-
Modelers Alliance has updated the forum software on our website. We have migrated all post, content and user accounts but we could not migrate the passwords.
This requires that you manually reset your password.
Please click here, http://modelersalliance.org/forums/login to go to logon page and use the "Forgot your Password" option.
You are using an out of date browser. It may not display this or other websites correctly.
You should upgrade or use an alternative browser.
You should upgrade or use an alternative browser.
Dragon StuG III Ausf F Update Trees 12/19/21
- Thread starter Iron Mike
- Start date
Iron Mike
Master At Arms And Resident Curmudgeon
Well, it's been awhile since I posted any progress on this StuG. I've been pecking away at it between projects and may have completion in sight.
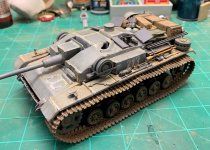
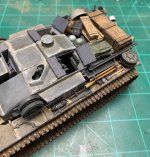

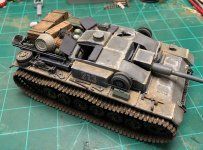
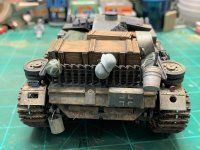
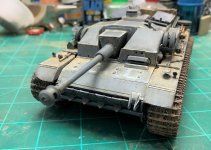
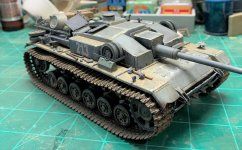
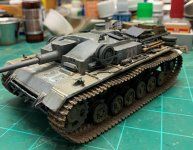
The stowage came from lots of sources, I have a couple figures yet to do and a base, so maybe I'm not as close as I thought. Anyway, I thought I'd share what I've been up to.
Thanks for coming by!


The stowage came from lots of sources, I have a couple figures yet to do and a base, so maybe I'm not as close as I thought. Anyway, I thought I'd share what I've been up to.
Thanks for coming by!

Looking great Mike!
Making me want to get back on the diorama. Just so much going on lately.
Keep at it!


Bob
Making me want to get back on the diorama. Just so much going on lately.
Keep at it!


Bob
That's where granny's washtub went!! 
Looks great, all that extra stowage really makes it look like a well worn veteran.
Looks great, all that extra stowage really makes it look like a well worn veteran.

Brokeneagle
Master at Arms
Wow, great build Mike! Absolutely love it, the stowage really sets this one off against the grey, as does the wide brown tracks. 

Well, it's been awhile since I posted any progress on this StuG. I've been pecking away at it between projects and may have completion in sight.
View attachment 139886View attachment 139887View attachment 139888View attachment 139889View attachment 139890View attachment 139891View attachment 139892View attachment 139893
The stowage came from lots of sources, I have a couple figures yet to do and a base, so maybe I'm not as close as I thought. Anyway, I thought I'd share what I've been up to.
Thanks for coming by!

OUTSTANDING!

Iron Mike
Master At Arms And Resident Curmudgeon
So the summer heat is still upon us and my poor wife was sick as a dog last weekend, so I decided to try building a Russian farmhouse. Borrowing heavily from the internet, I glued up a block of rigid foam insulation to the appropriate size using Titebond II PVA carpenter's glue.


That's a very high tech foam clamp.
I let that sit overnight, because the PVA doesn't dry quickly between the insulation pieces. In the meantime, I started making architectural components from basswood plywood. I used a scale convertor to help with the math.
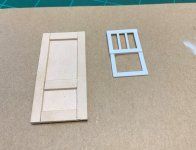
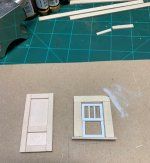
Using graph paper, I sketched the profile of the housed and laid the door and window on to check the proportions.
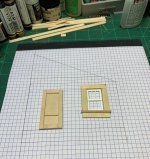

Sunday morning rolled around and I broke out the Proxxon foam cutter and whacked the foam to shape.
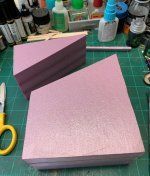
Yes, the hot wire cuts PVA glue too.
This is where I kinda got ahead of myself, but didn't realize it until much later in the day. D'oh! I started embossing the stone foundation, using a pencil and drawing random rock shapes.
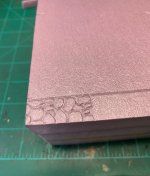

Once I got all the way around the two sides, I crumpled a ball of foil and pressed it into the rocks, creating texture. It's all up to you how much texture you want to add and it's pretty rewarding in short order.

I cut a stack of lumber from 1 and 2 mm basswood and started adding the siding and door frame. These were lightly sanded and cut to lengths, then attached with more PVA. I should note, the door and window were assembled with CA. I did this because PVA tends to cause the wood to warp. You have to use PVA to attach directly to the foam, because CA will melt the foam.

My friend Greg says all the Russian dwellings he found on the net were all crooked, so that's a good thing because mine isn't perfect by a long way.
 The soffit was some junk mail cardstock. I realized about this point that I forgot to cut the other angle to the building, so it would sit at an angle on the base. I have a plan to "fix"it, but the scene won't be exactly as I had planned. I quit for the weekend to ponder it.
Fast forward to this afternoon, I had a little time to hit the bench and watch the Iowa Hawkeyes dismantle Indiana. I started on the roof, using .020 Evergreen sheet stock and some Evergreen battens.
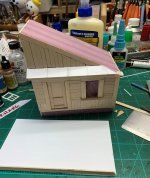
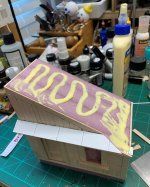

I didn't like the window, thought it looked too American, so I changed the muntins to a two wide pattern and thought that was more fitting. I cut out the foam behind the window and will install it after painting the structure.


For a first attempt, I'm satisfied. There's definitely a learning and planning curve to this, but it's mine rather than someone else's work that I just paint. I have some tweaks to do since there's always stuff you see on the monitor that you don't see on the bench.
Thanks for coming by, keep coming back and see how this turns out.


That's a very high tech foam clamp.

I let that sit overnight, because the PVA doesn't dry quickly between the insulation pieces. In the meantime, I started making architectural components from basswood plywood. I used a scale convertor to help with the math.


Using graph paper, I sketched the profile of the housed and laid the door and window on to check the proportions.


Sunday morning rolled around and I broke out the Proxxon foam cutter and whacked the foam to shape.


Yes, the hot wire cuts PVA glue too.
This is where I kinda got ahead of myself, but didn't realize it until much later in the day. D'oh! I started embossing the stone foundation, using a pencil and drawing random rock shapes.


Once I got all the way around the two sides, I crumpled a ball of foil and pressed it into the rocks, creating texture. It's all up to you how much texture you want to add and it's pretty rewarding in short order.

I cut a stack of lumber from 1 and 2 mm basswood and started adding the siding and door frame. These were lightly sanded and cut to lengths, then attached with more PVA. I should note, the door and window were assembled with CA. I did this because PVA tends to cause the wood to warp. You have to use PVA to attach directly to the foam, because CA will melt the foam.
My friend Greg says all the Russian dwellings he found on the net were all crooked, so that's a good thing because mine isn't perfect by a long way.
Fast forward to this afternoon, I had a little time to hit the bench and watch the Iowa Hawkeyes dismantle Indiana. I started on the roof, using .020 Evergreen sheet stock and some Evergreen battens.


I didn't like the window, thought it looked too American, so I changed the muntins to a two wide pattern and thought that was more fitting. I cut out the foam behind the window and will install it after painting the structure.
For a first attempt, I'm satisfied. There's definitely a learning and planning curve to this, but it's mine rather than someone else's work that I just paint. I have some tweaks to do since there's always stuff you see on the monitor that you don't see on the bench.
Thanks for coming by, keep coming back and see how this turns out.

Last edited:
Skinny_Mike
Well-known member
Looking great Mike!


That's awesome! 

Iron Mike
Master At Arms And Resident Curmudgeon
Gosh, how did it get to be December already? Progress has been made, lots of trial and error. After a coat of the thick Plasticator to seal the wood and foam, I shot a liberal coat of black Stynylrez over the entire building.


I still say there's something wrong with this batch of Stynylrez, it just doesn't cover like my first bottle and this one has much more gloss to it.
Moving on, I made a blend of Tamiya Hull Red and Deck Tan for a base coat for the tin roof.

I lightened the mix for the next couple passes, creating contrast. not sure exactly where this is headed, but I found some ideas by googling rusted roofs.

The siding was painted with various shades of Model Color, thinned with water and applied with a brush.


After fiddling around with the layout, I decided to make the base smaller and to add an apple tree, so I made one from wire. I'll add volume and bark with some epoxy putty.


There's more to come, still pecking away. To those who took time to comment, I appreciate your support. Thanks for coming by.

I still say there's something wrong with this batch of Stynylrez, it just doesn't cover like my first bottle and this one has much more gloss to it.

Moving on, I made a blend of Tamiya Hull Red and Deck Tan for a base coat for the tin roof.
I lightened the mix for the next couple passes, creating contrast. not sure exactly where this is headed, but I found some ideas by googling rusted roofs.

The siding was painted with various shades of Model Color, thinned with water and applied with a brush.
After fiddling around with the layout, I decided to make the base smaller and to add an apple tree, so I made one from wire. I'll add volume and bark with some epoxy putty.
There's more to come, still pecking away. To those who took time to comment, I appreciate your support. Thanks for coming by.

Similar threads
- Replies
- 59
- Views
- 7K
- Replies
- 126
- Views
- 20K


