
-
Modelers Alliance has updated the forum software on our website. We have migrated all post, content and user accounts but we could not migrate the passwords.
This requires that you manually reset your password.
Please click here, http://modelersalliance.org/forums/login to go to logon page and use the "Forgot your Password" option.
You are using an out of date browser. It may not display this or other websites correctly.
You should upgrade or use an alternative browser.
You should upgrade or use an alternative browser.
Maddog Manufacturing Open for 2022!
- Thread starter Duke Maddog
- Start date
Duke Maddog
Well-known member
Thank you Frank! I hope to have more soon, stay tuned.
Duke Maddog
Well-known member
Welcome to another week of progress by the Duke.
This week I finally got to airbrush! Wow, it felt great to make significant progress for once! Maddog Manufacturing has been in full production mode. All aboard the trams for the latest tour!
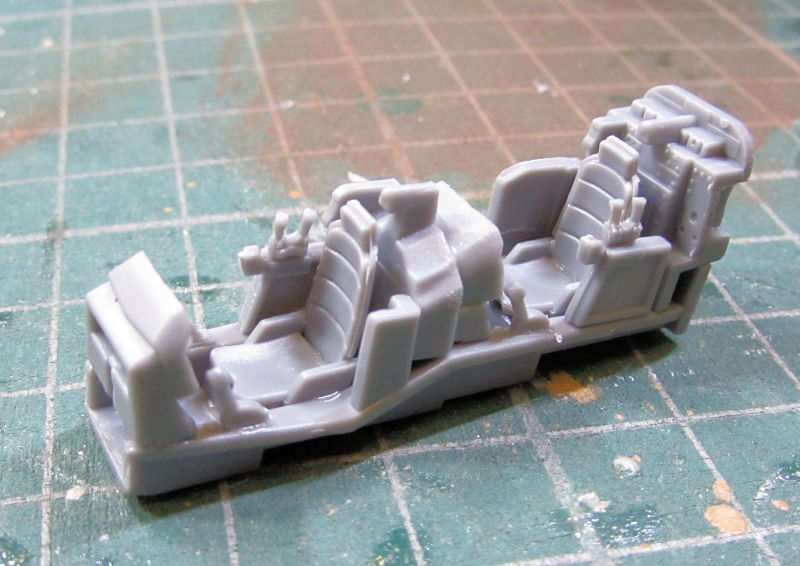
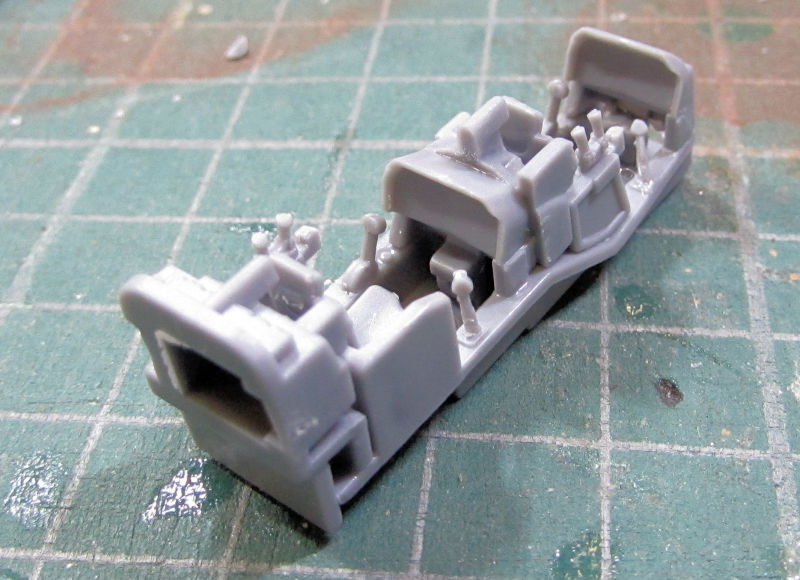
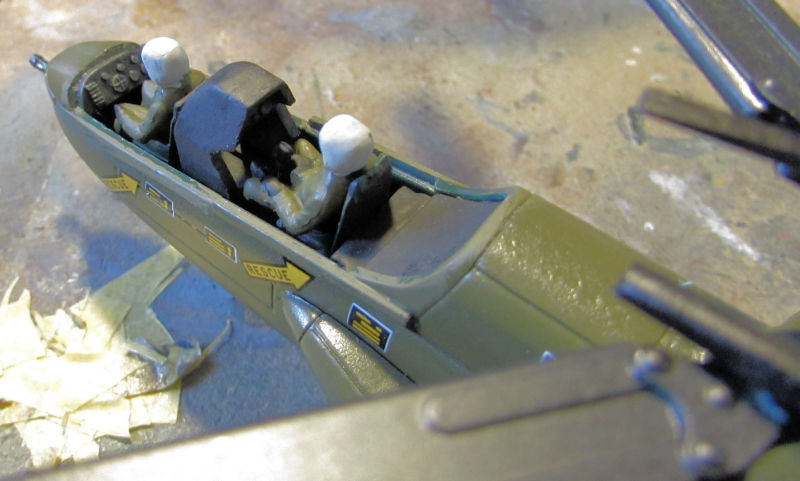
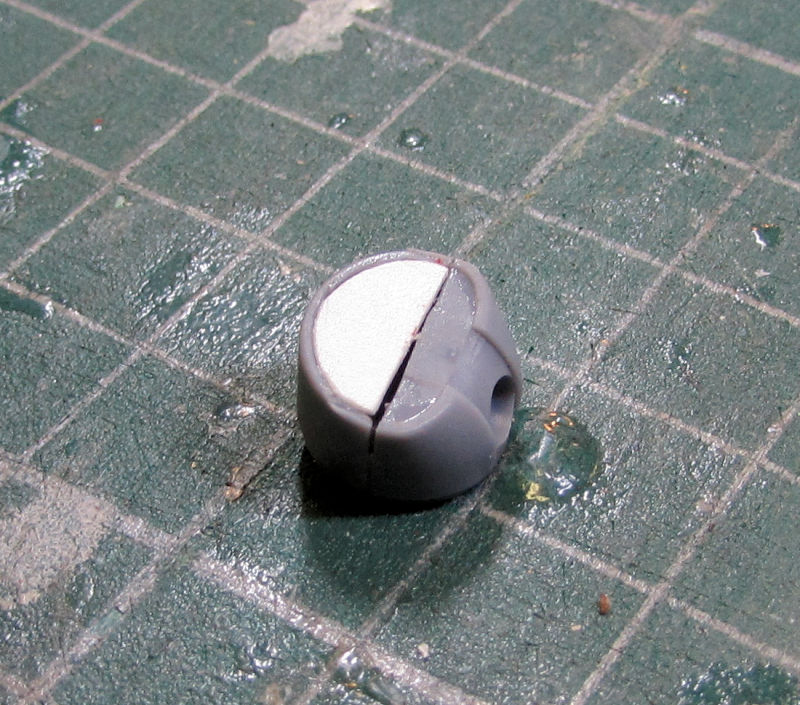
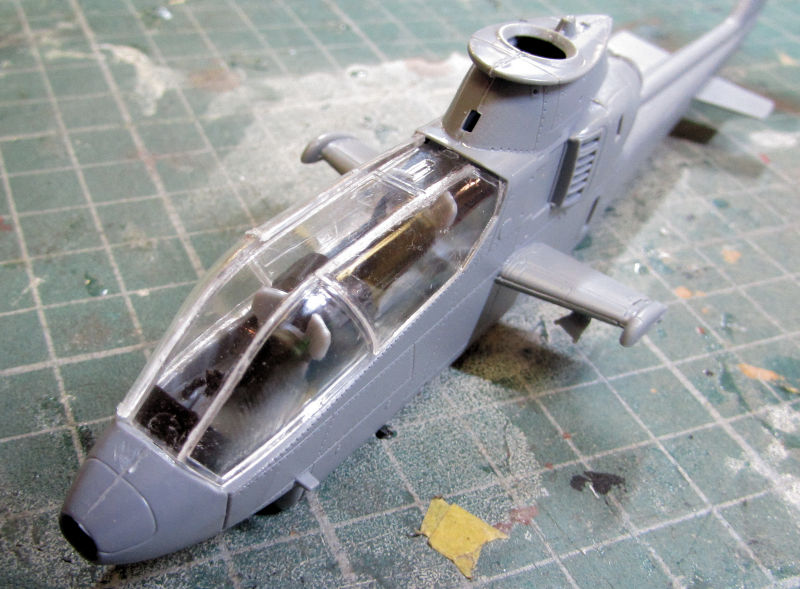
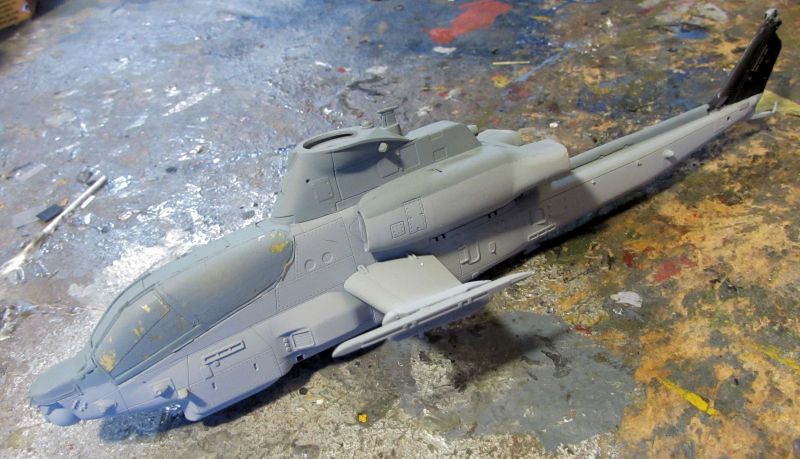
We'll start in the Hangar again where a little bit has been happening. I did start a new helicopter, this is one I've been wanting for quite some time.
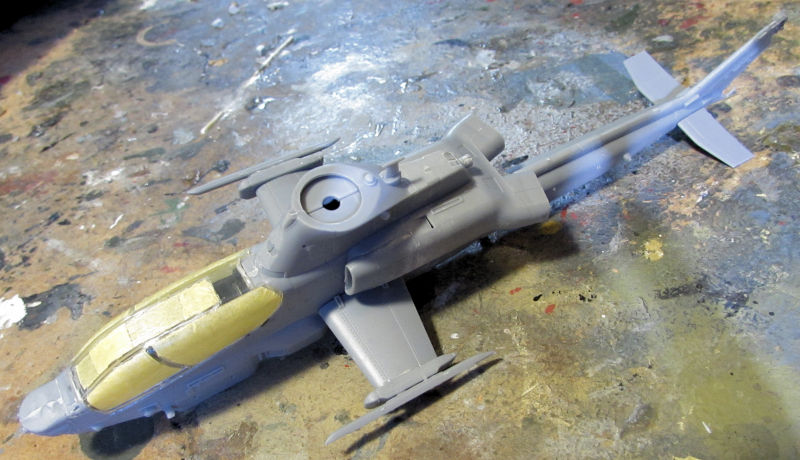
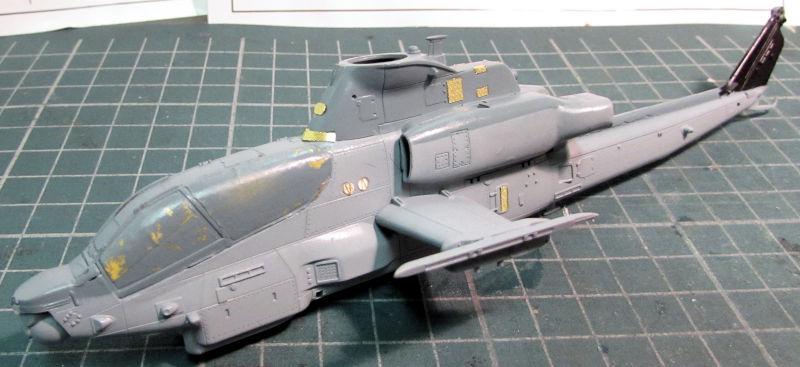
This is the cockpit I started for the AH-1Z Cobra, all ready for paint:
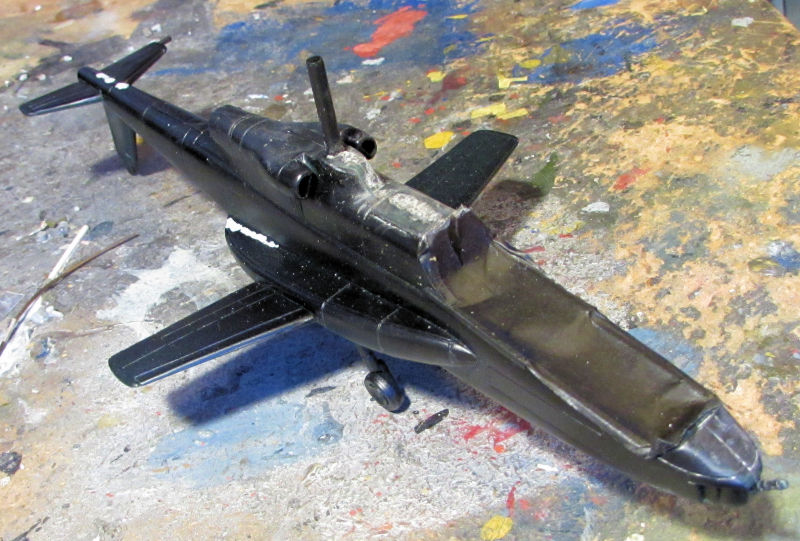
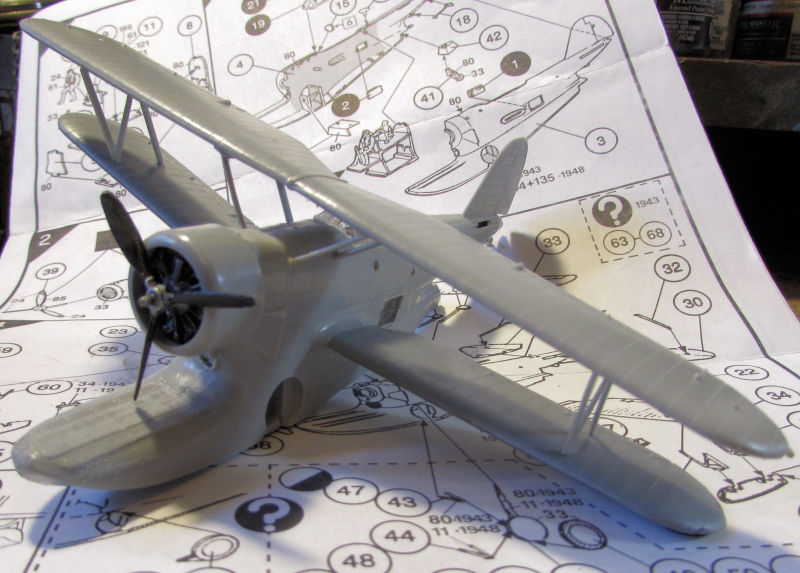
The next thing I did was to touch up the paint on the bottom of the Japanese U-125. First I masked off and sprayed the specific damage with my Sotar 20/20:
Later the mask came off. This looks so much better now so I can move forward once again:
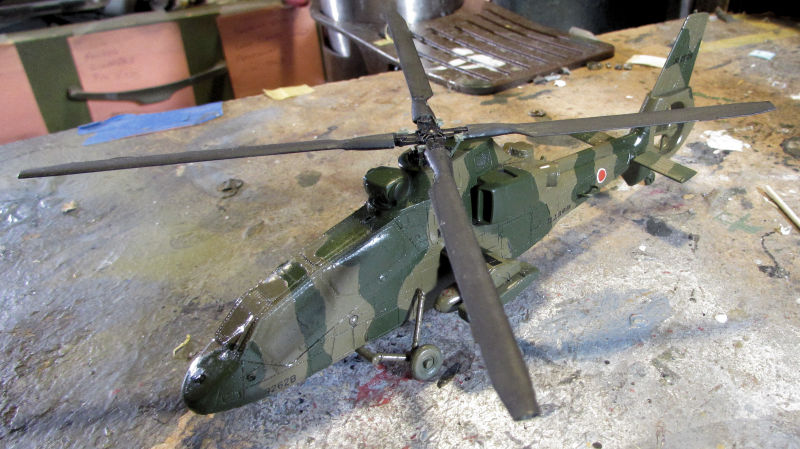
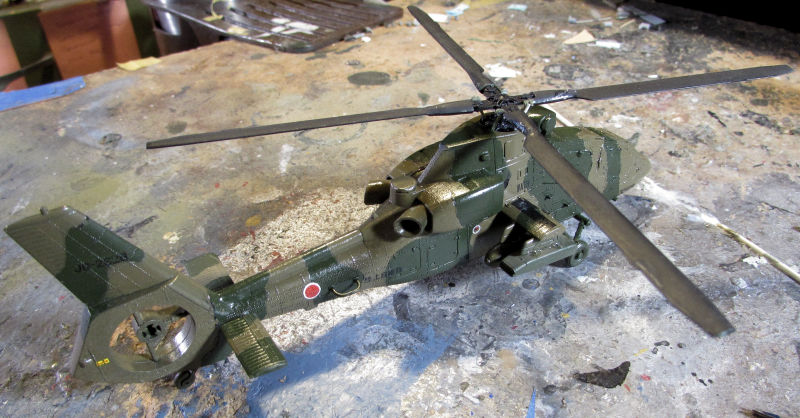
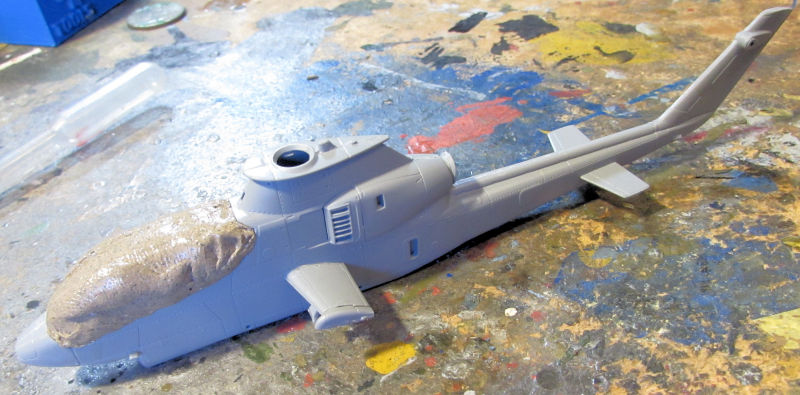
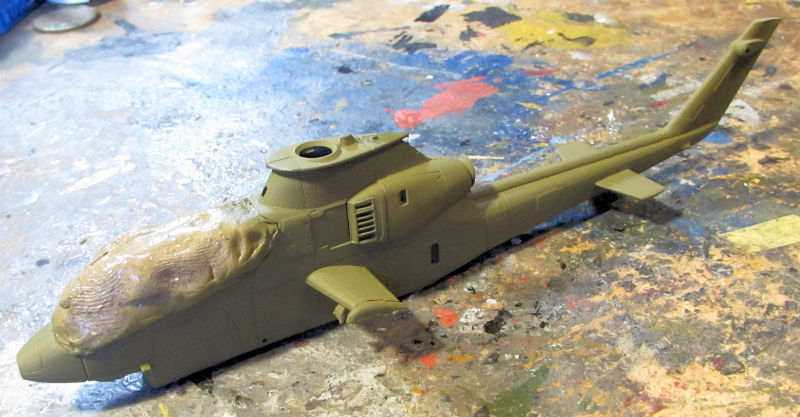
Speaking of masking and spraying, I started by adding the Silly Putty to my Japanese OH-1 helicopter; now that the base coat is on:
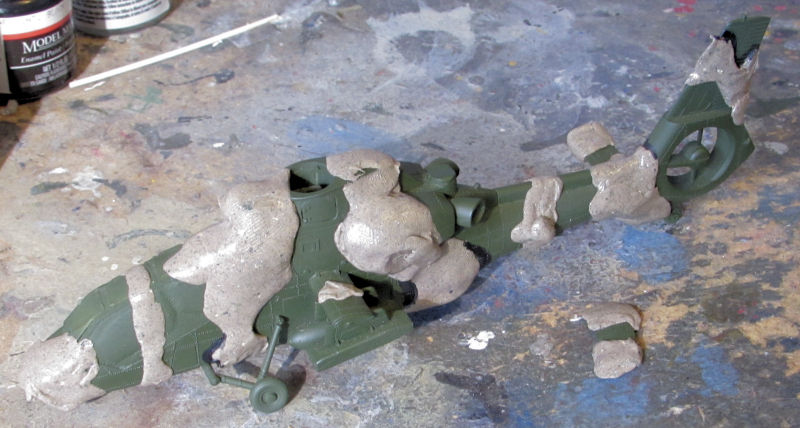
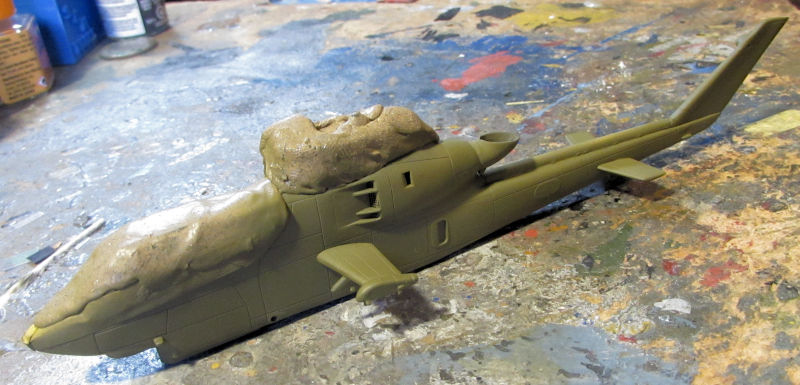
You'll notice that I broke off one of the horizontal stabilizers as I expected. Oh well, I still got it masked for spraying. I then shot the second color on this helicopter:
Again, another part broken from handling. That thing is small; no place to really hold it when shooting paint.
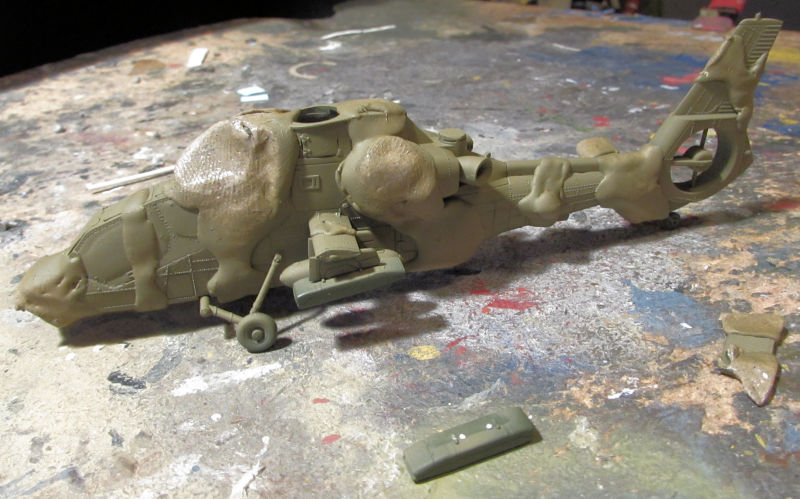
Finally the masking came off. I can now clearcoat this and start the decals:
Finally, the third helicopter I'm building; the AH-56 Cheyenne, got some small progress done too. I painted the cockpit and pilots for the time I can add them to this model:
I then went to shoot paint on the helicopter itself, but realized I had a lot of seam work to take care of first, so no more pics of this for now.
That's all that's happened in the Hangar, now on to see what's coming down the slipways in the Shipyards.
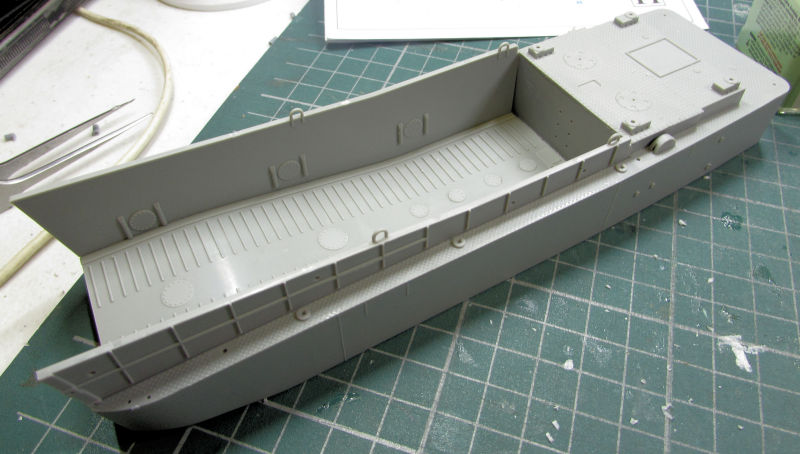
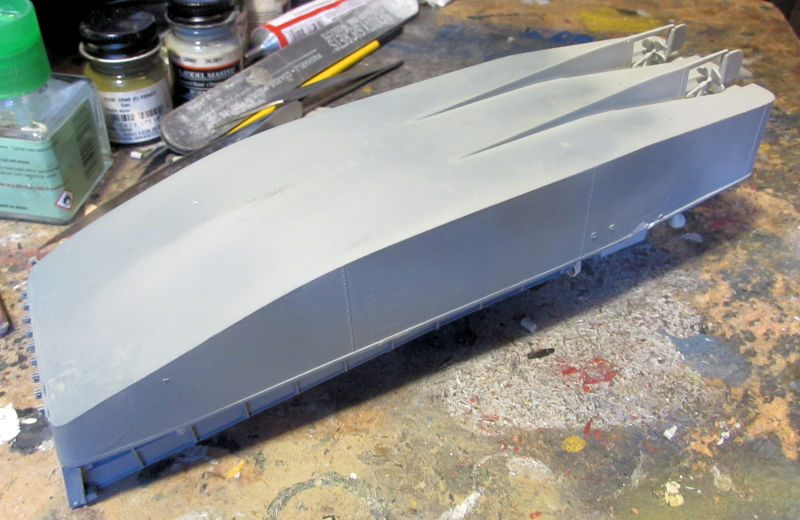
Now, you may be thinking that you've seen this before, but this is a new LCM-3 that came with the Dragon LCM and Sherman combo kit.
I started with the basic construction:
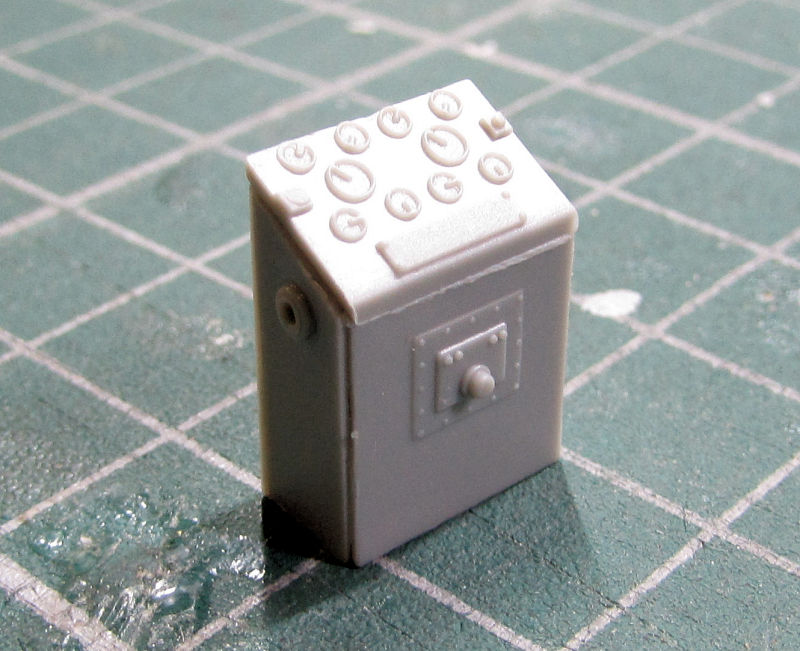
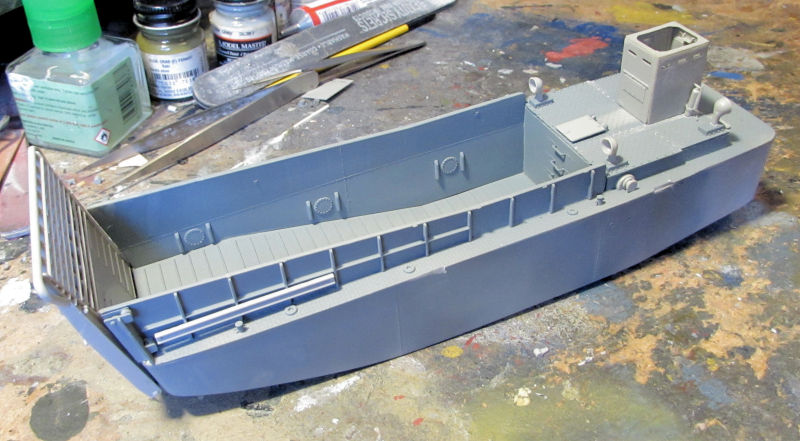
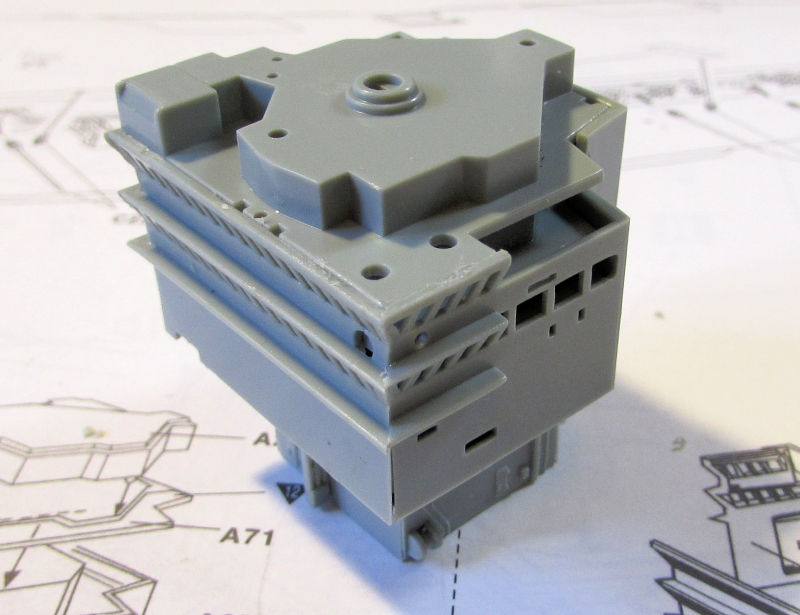
Here's the fiddly little control box used by the driver:
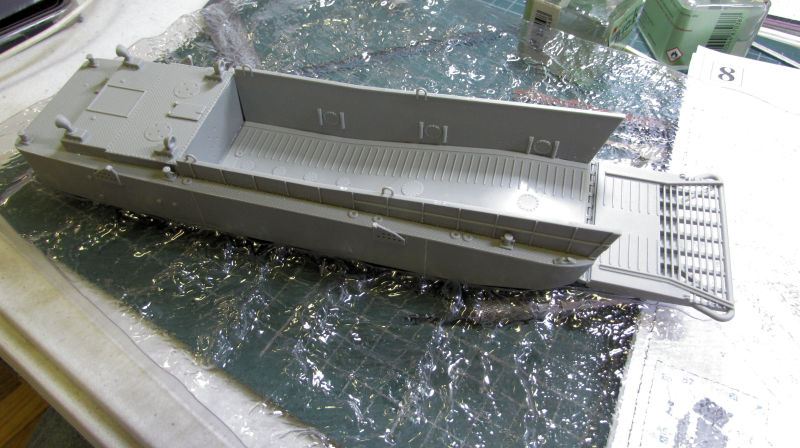
The main difference between this one and the other LCM-3 I started some time back (besides the manufacturer), is this one does not have any propellers or rudder underneath. In fact, it has an even shallower hull. This is why Dragon included a clear base piece to place this on so it can be displayed deploying the Sherman in a mini dio:
I plan on pulling out the other LCM to see if I can finish it in tandem with this one.
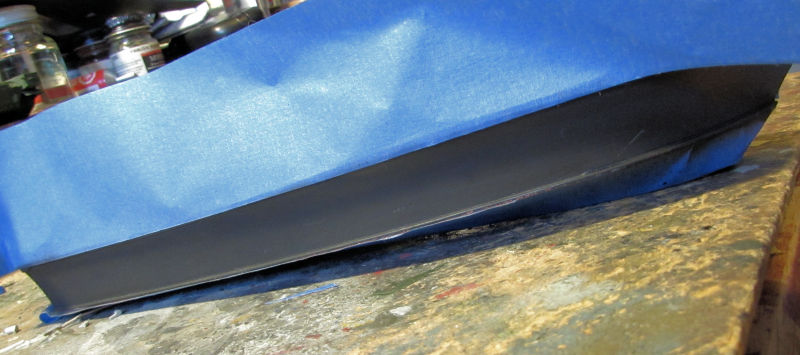
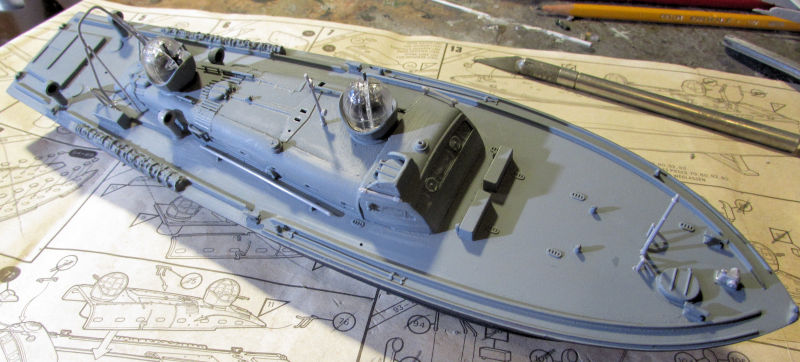
After this, I pulled out an old Shelf Queen, the old RAF Rescue Launch from Airfix, circa 1970's. I almost feel like I started it back then too! This has actually been on the Shelf of Doom for five to seven years; it's time to get it finished. I'd shot the sides of the hull way back when, and then recently masked off the sides. I then shot the hull red on the bottom and after that dried, I shot the grey over the whole upper deck and superstructure:
Later I pulled the masking off to see how this looks:
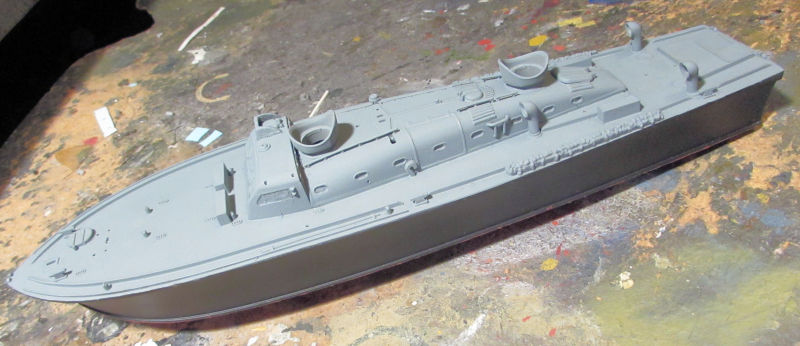
Looks good on this side. When I turned it around to check on the other side I found that the tape had pulled a bit of the black off the sides. Looks like I also left a bit of tape on it. Easy fix with my Sotar 20/20 and tweezers for the tape.
In this pic, you can also barely see the red bottom hull:
Sweet! Now to get the touch up done and the demarcation lines cleaned up and I can see what else I can do with this.
Moving on, I continued work on this SMS Emden commission build. First off, I removed the masking on the hull to see how well the boot stripe looks. Not bad on this side:
Needed improvement on this side:
I took some time to fix that hull stripe to make it look more consistent, then I painted all the upper grey parts grey as indicated on the paint scheme. I also did a bit more touch-ups on the other colors too:
You'll also notice that all the main gun turrets are back on this. Before, when I painted the deck, three of them got stuck and wouldn't rotate. When I tried to loosen them, they snapped right off. After painting the grey, I went to work fixing these turrets so they could be added back on and rotate like they did before. First I drilled some holes in the bottom of the turrets and cemented in a length of styrene rod right where the broken ones used to be:
After drilling out the holes in the deck I just slipped these right in. After all that was done, I decided to paint the masts, boats, davits and searchlights and all other extra parts that need to go on:

Now I should be able to get this finished fairly quickly. I'm hoping I can deliver this to him at the next Hobby Day. I gotta clear that slip for another naval project I want to get to.
Now that we're done at the Shipyards, lets move on to the Motor Pool where quite a bit has been done...
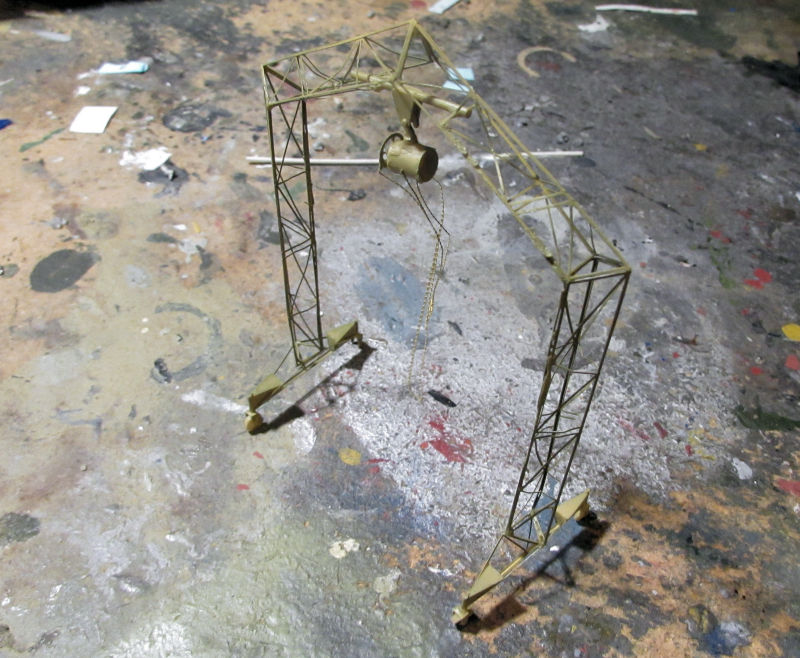
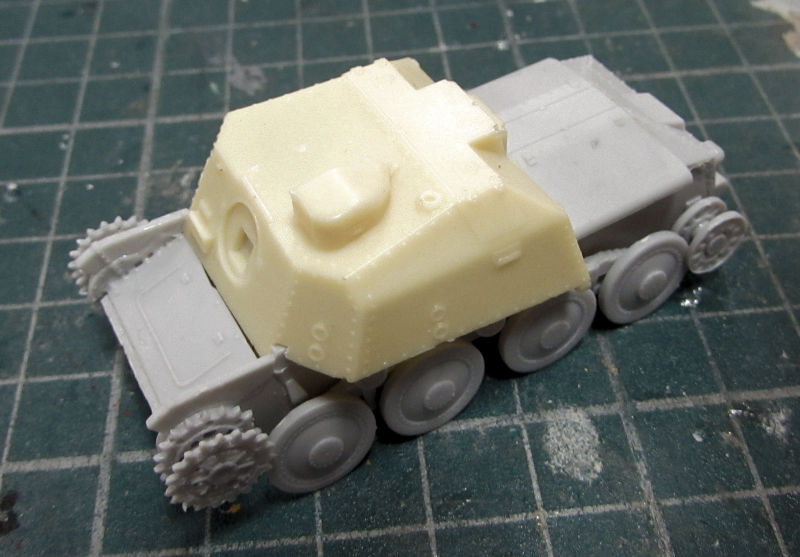
The first thing we'll look at is the gantry crane. I shot some panzer dunklegelb over the whole thing, hopefully covering all that brass. Not sure if I did. I still need to find that tiny wheel that broke off and get it replaced:
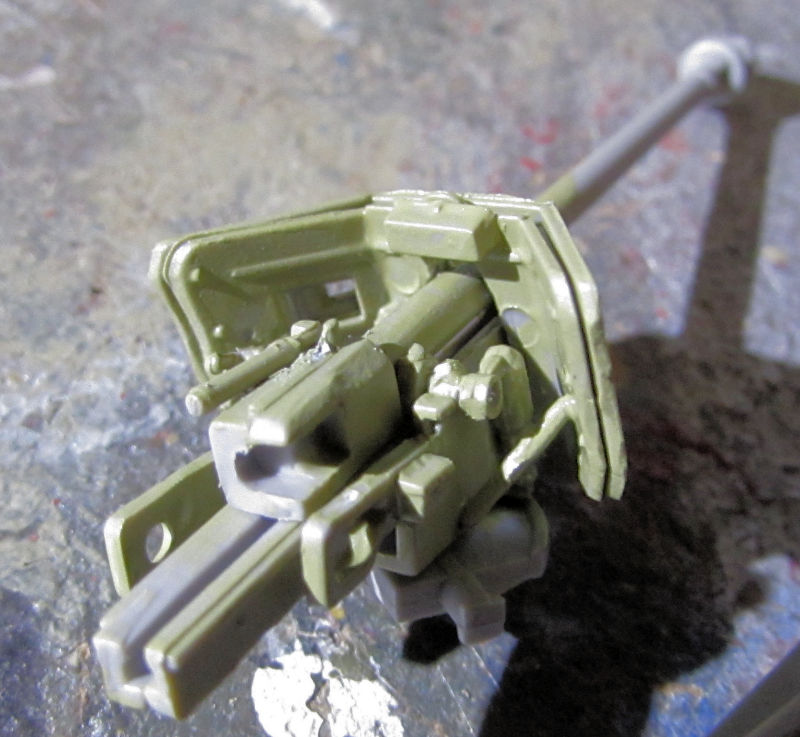
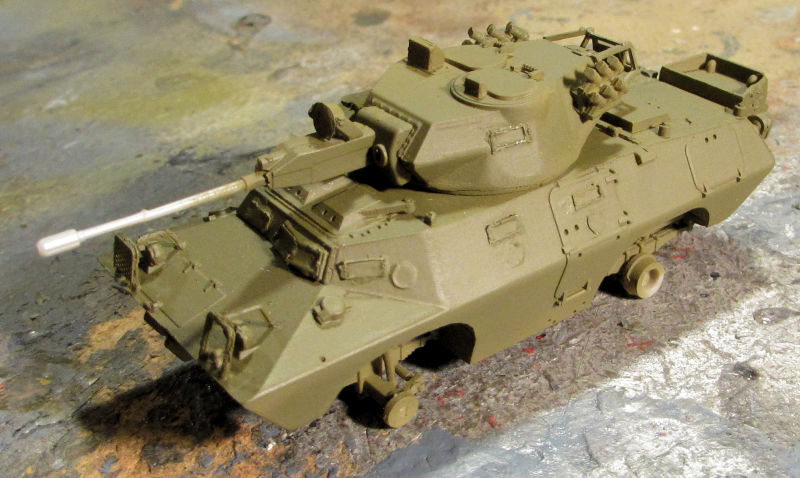
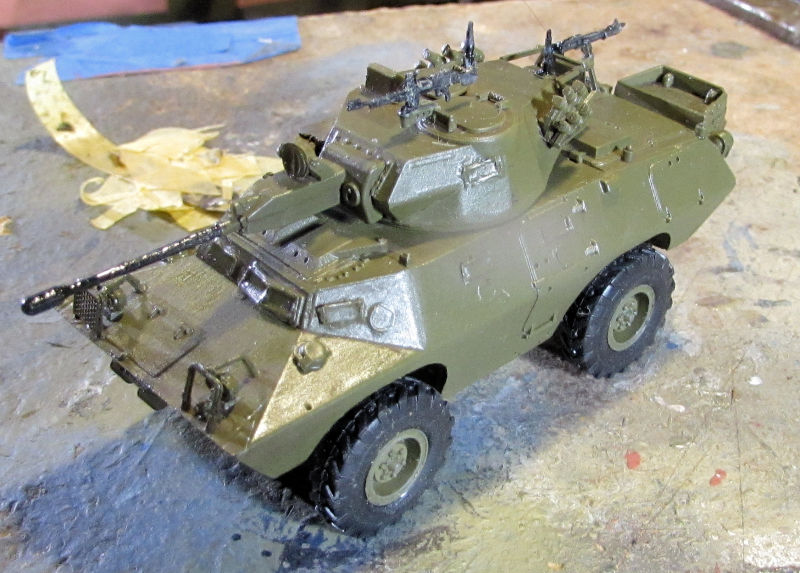
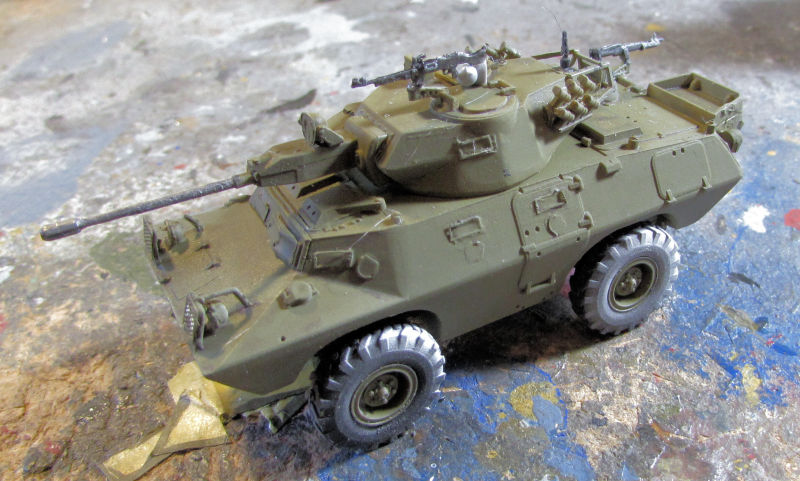
While I had the panzer dunklegelb out, I painted the interior of my Sd Kfz 234 Pakwagen and then did the details:
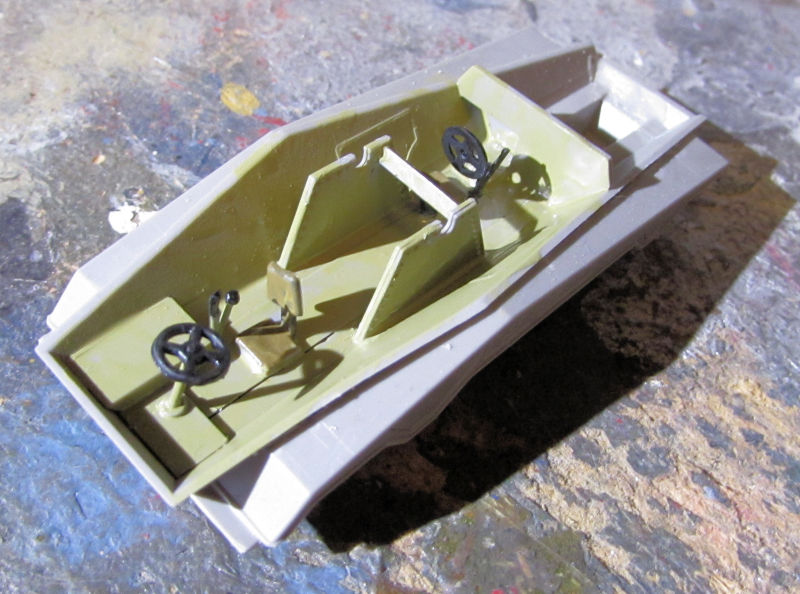
I also painted the inside of the gun shield and the back part of the gun:
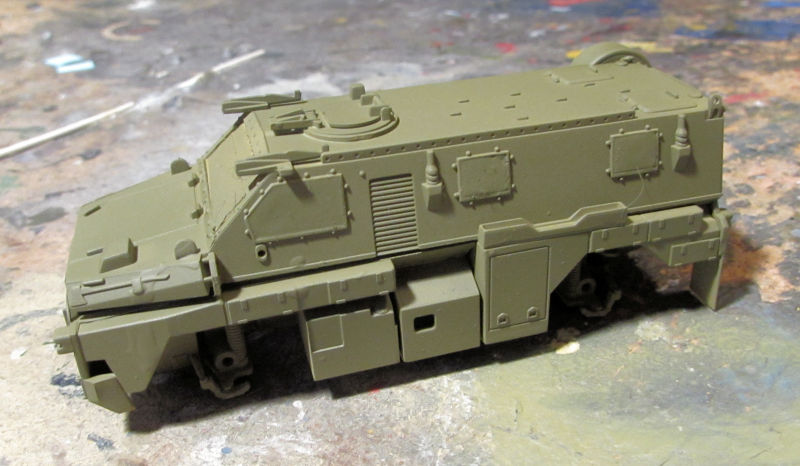
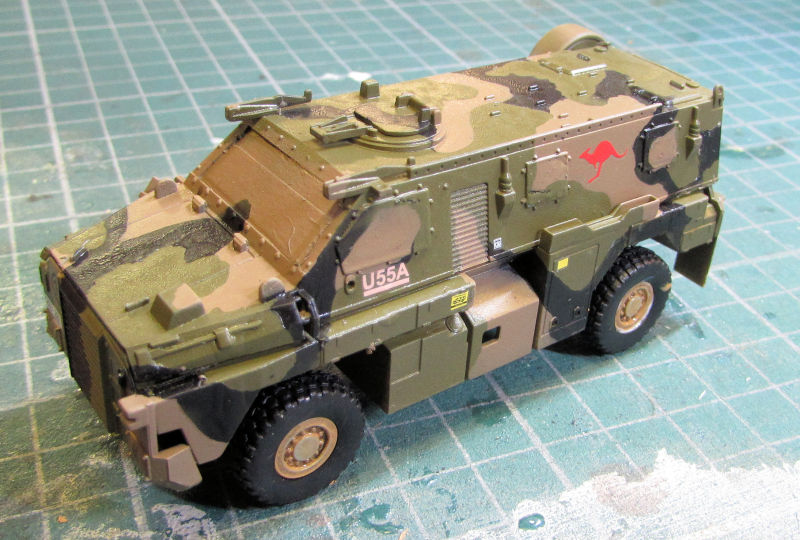
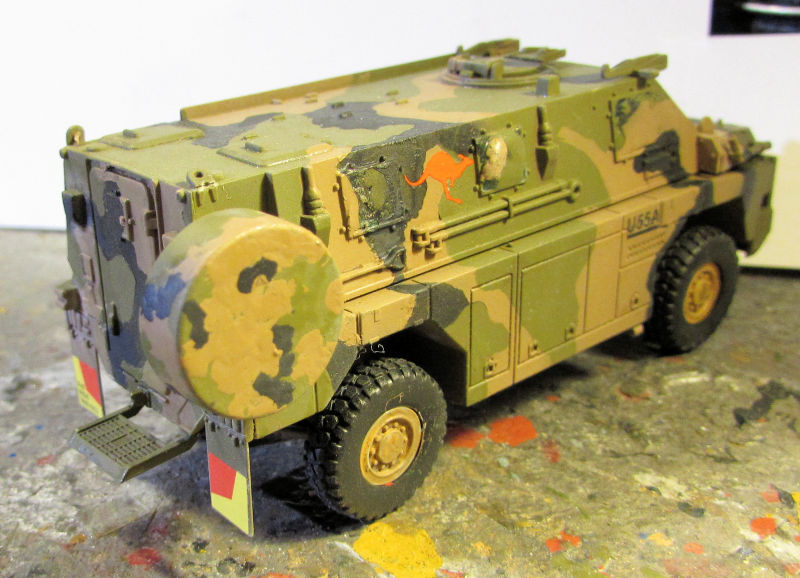
I'm gonna do a bit more detailing there before I go on. While I was shooting paint, I shot the Australian Bushmaster with a coat of Olive Drab:
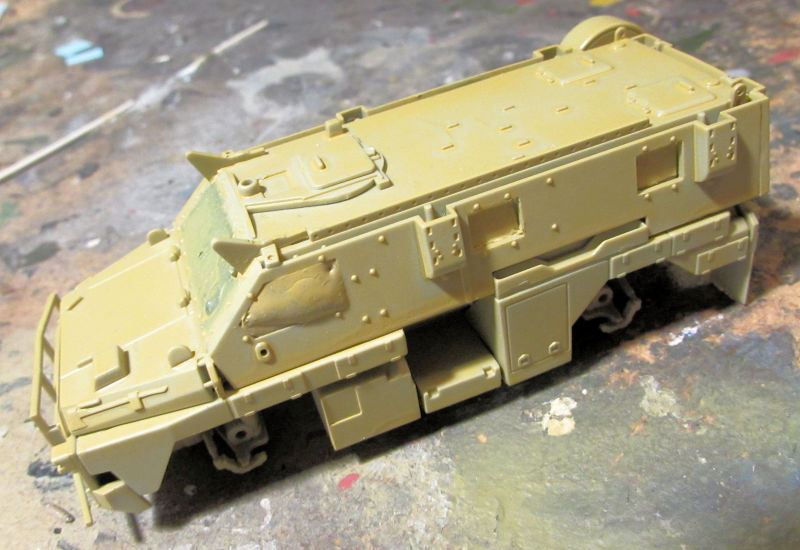
While that was drying, I shot British Gulf War Sand over the British Bushmaster. I thinned it a bit to much so this will need another coat:
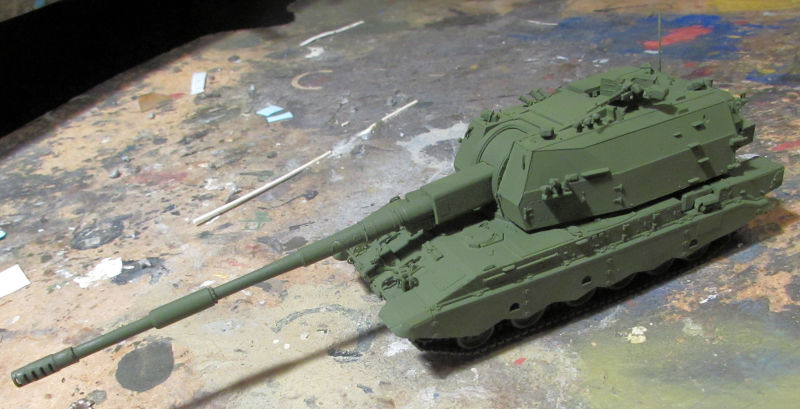
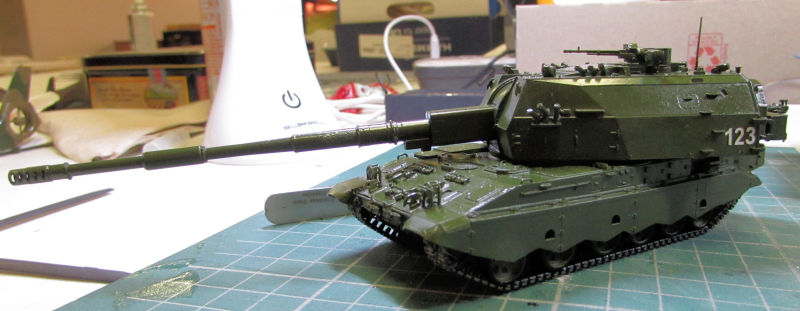
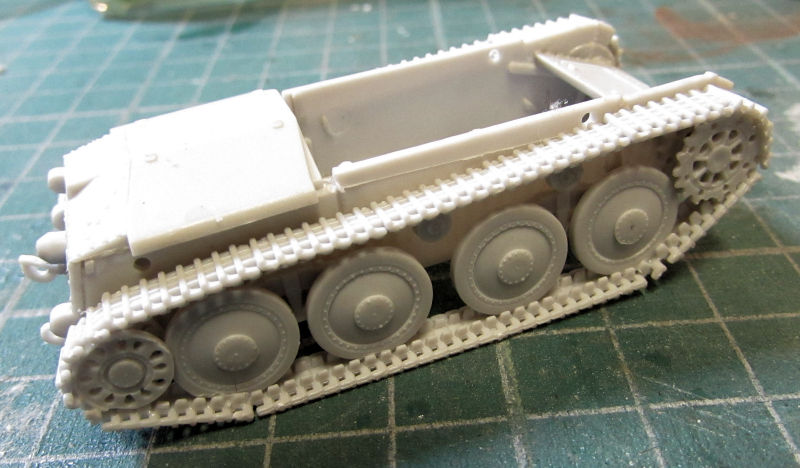
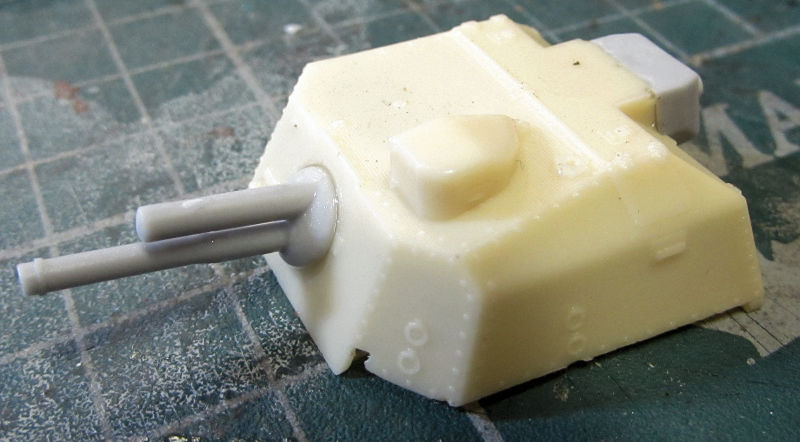
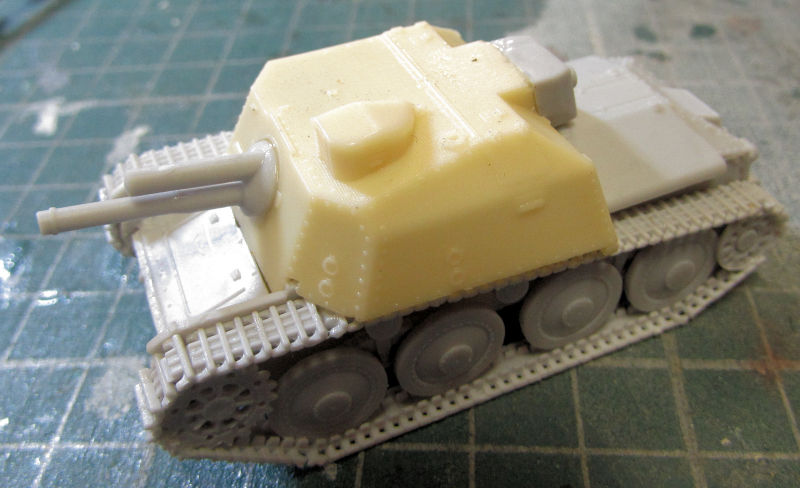
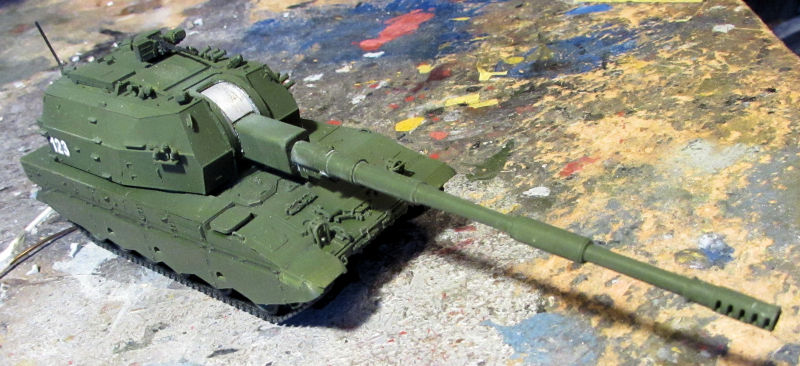
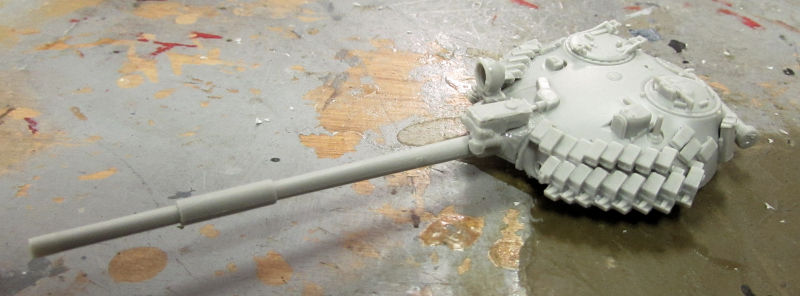
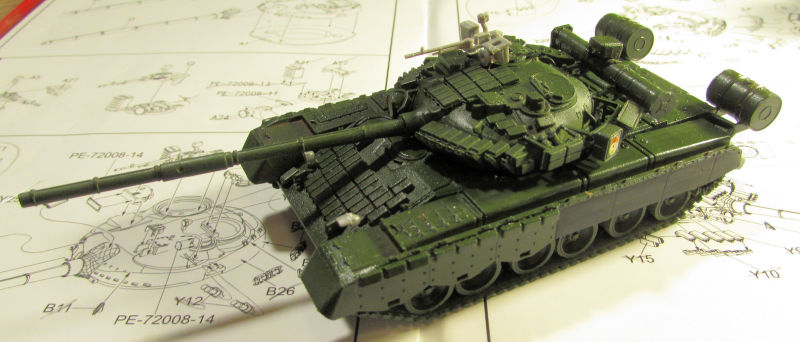
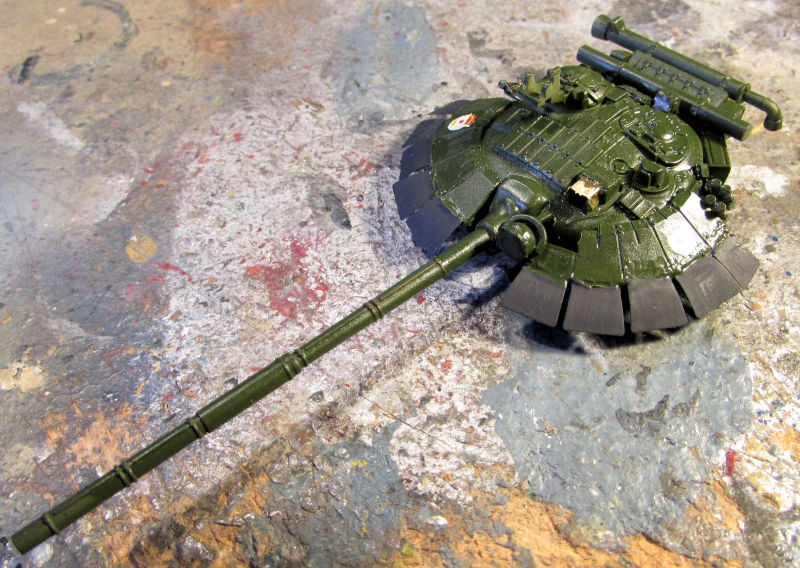
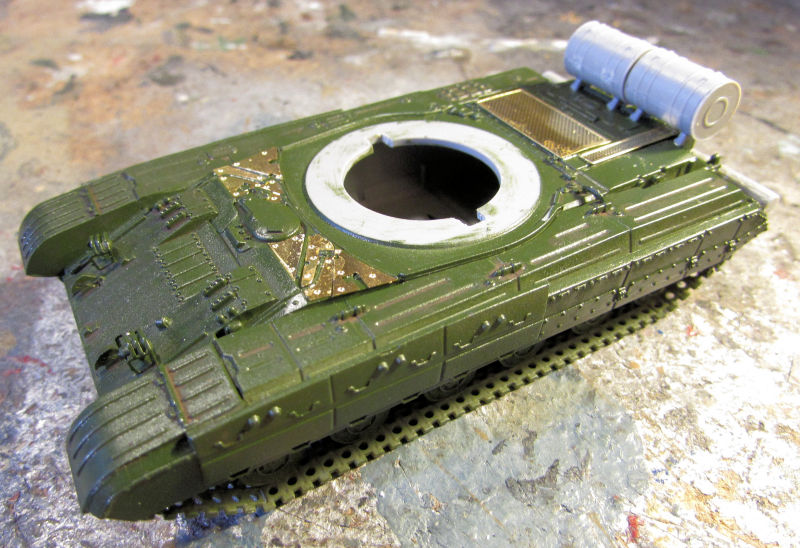
The final thing I did was to shoot the green basecoat on the Russian 2S35 Koalitzia so that I can clear coat it and add the decals:
And that concludes our tour of Maddog Manufacturing for now. Thank you all for joining me on this trip; comments are always welcome.
This week I finally got to airbrush! Wow, it felt great to make significant progress for once! Maddog Manufacturing has been in full production mode. All aboard the trams for the latest tour!
We'll start in the Hangar again where a little bit has been happening. I did start a new helicopter, this is one I've been wanting for quite some time.
This is the cockpit I started for the AH-1Z Cobra, all ready for paint:
The next thing I did was to touch up the paint on the bottom of the Japanese U-125. First I masked off and sprayed the specific damage with my Sotar 20/20:
Later the mask came off. This looks so much better now so I can move forward once again:
Speaking of masking and spraying, I started by adding the Silly Putty to my Japanese OH-1 helicopter; now that the base coat is on:
You'll notice that I broke off one of the horizontal stabilizers as I expected. Oh well, I still got it masked for spraying. I then shot the second color on this helicopter:
Again, another part broken from handling. That thing is small; no place to really hold it when shooting paint.
Finally the masking came off. I can now clearcoat this and start the decals:
Finally, the third helicopter I'm building; the AH-56 Cheyenne, got some small progress done too. I painted the cockpit and pilots for the time I can add them to this model:
I then went to shoot paint on the helicopter itself, but realized I had a lot of seam work to take care of first, so no more pics of this for now.
That's all that's happened in the Hangar, now on to see what's coming down the slipways in the Shipyards.
Now, you may be thinking that you've seen this before, but this is a new LCM-3 that came with the Dragon LCM and Sherman combo kit.
I started with the basic construction:
Here's the fiddly little control box used by the driver:
The main difference between this one and the other LCM-3 I started some time back (besides the manufacturer), is this one does not have any propellers or rudder underneath. In fact, it has an even shallower hull. This is why Dragon included a clear base piece to place this on so it can be displayed deploying the Sherman in a mini dio:
I plan on pulling out the other LCM to see if I can finish it in tandem with this one.
After this, I pulled out an old Shelf Queen, the old RAF Rescue Launch from Airfix, circa 1970's. I almost feel like I started it back then too! This has actually been on the Shelf of Doom for five to seven years; it's time to get it finished. I'd shot the sides of the hull way back when, and then recently masked off the sides. I then shot the hull red on the bottom and after that dried, I shot the grey over the whole upper deck and superstructure:
Later I pulled the masking off to see how this looks:
Looks good on this side. When I turned it around to check on the other side I found that the tape had pulled a bit of the black off the sides. Looks like I also left a bit of tape on it. Easy fix with my Sotar 20/20 and tweezers for the tape.
In this pic, you can also barely see the red bottom hull:
Sweet! Now to get the touch up done and the demarcation lines cleaned up and I can see what else I can do with this.
Moving on, I continued work on this SMS Emden commission build. First off, I removed the masking on the hull to see how well the boot stripe looks. Not bad on this side:
Needed improvement on this side:
I took some time to fix that hull stripe to make it look more consistent, then I painted all the upper grey parts grey as indicated on the paint scheme. I also did a bit more touch-ups on the other colors too:
You'll also notice that all the main gun turrets are back on this. Before, when I painted the deck, three of them got stuck and wouldn't rotate. When I tried to loosen them, they snapped right off. After painting the grey, I went to work fixing these turrets so they could be added back on and rotate like they did before. First I drilled some holes in the bottom of the turrets and cemented in a length of styrene rod right where the broken ones used to be:
After drilling out the holes in the deck I just slipped these right in. After all that was done, I decided to paint the masts, boats, davits and searchlights and all other extra parts that need to go on:
Now I should be able to get this finished fairly quickly. I'm hoping I can deliver this to him at the next Hobby Day. I gotta clear that slip for another naval project I want to get to.
Now that we're done at the Shipyards, lets move on to the Motor Pool where quite a bit has been done...
The first thing we'll look at is the gantry crane. I shot some panzer dunklegelb over the whole thing, hopefully covering all that brass. Not sure if I did. I still need to find that tiny wheel that broke off and get it replaced:
While I had the panzer dunklegelb out, I painted the interior of my Sd Kfz 234 Pakwagen and then did the details:
I also painted the inside of the gun shield and the back part of the gun:
I'm gonna do a bit more detailing there before I go on. While I was shooting paint, I shot the Australian Bushmaster with a coat of Olive Drab:
While that was drying, I shot British Gulf War Sand over the British Bushmaster. I thinned it a bit to much so this will need another coat:
The final thing I did was to shoot the green basecoat on the Russian 2S35 Koalitzia so that I can clear coat it and add the decals:
And that concludes our tour of Maddog Manufacturing for now. Thank you all for joining me on this trip; comments are always welcome.
Duke Maddog
Well-known member
With all the extra time I had at Hobby Day weekend this past weekend, there's a lot to show in this next tour! Come on in and board the trams to see the latest progress.
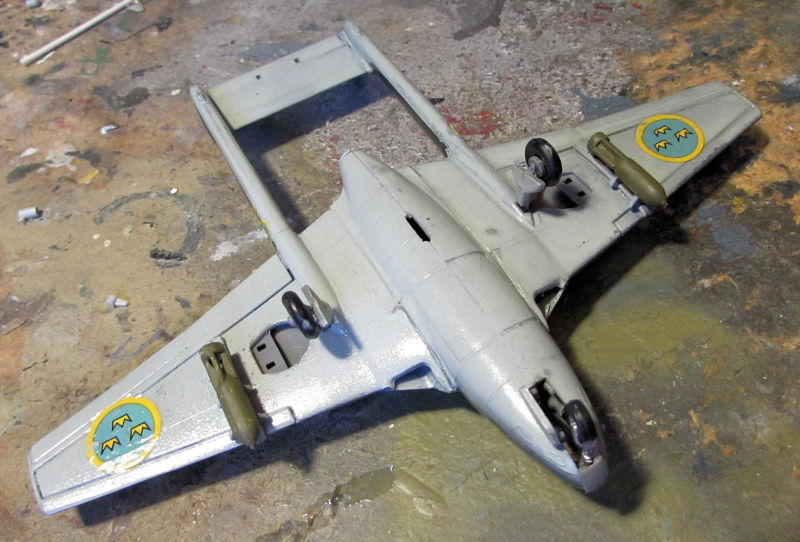
Starting again in the hanger, we did get the landing gear and gear doors on the Vampire. We also got the bombs painted up:
The next pic of this will be in the Finished boards...
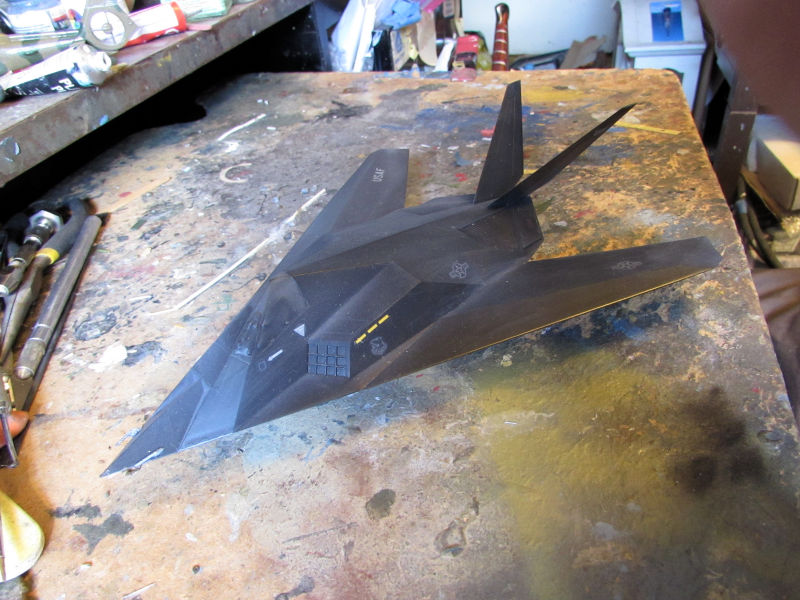
We also got the decals on the F-117 stealth fighter:
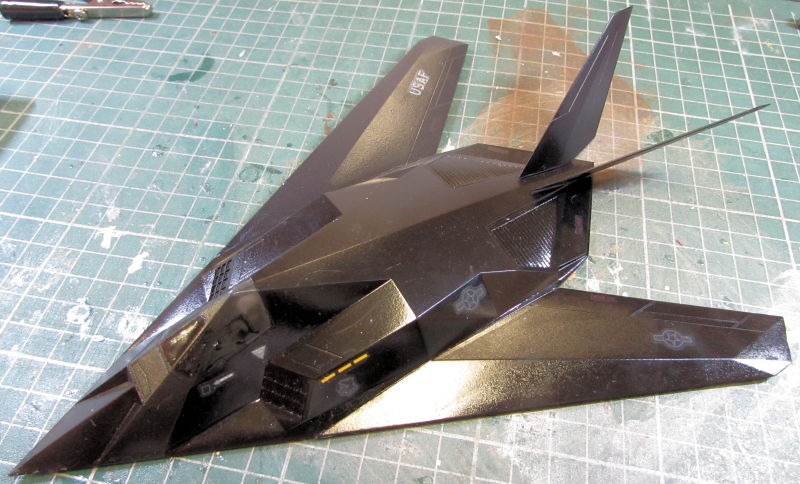
Now I'm not sure if the decals have silvered or if that is that milky stuff that Monogram decals always seems to have. I'm going to wait till this dries and see what a dull coat will do before I deal with that.
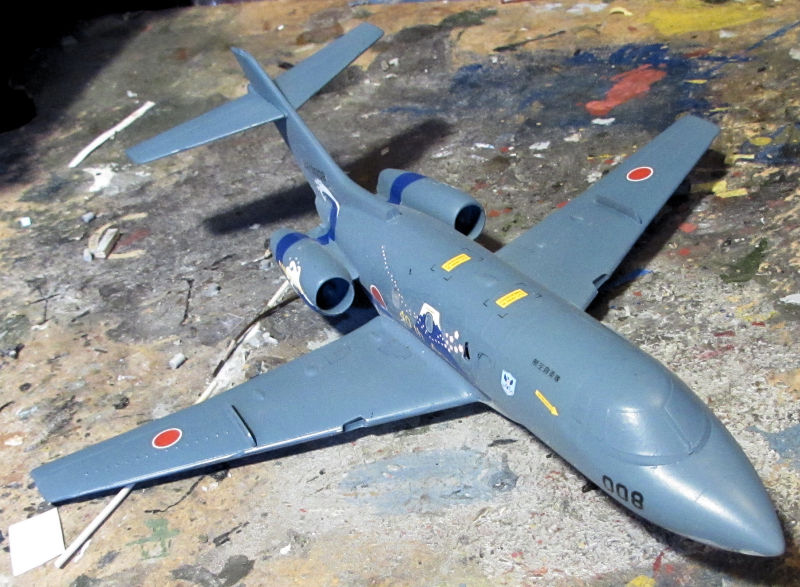
Finally, we also put decals the Japanese U-125. What an ordeal that was! These large decals were so thin and delicate they folded under if you looked at them wrong. Then they tore as you tried to fix them! We somehow managed to get 99% of this large decal on one side:
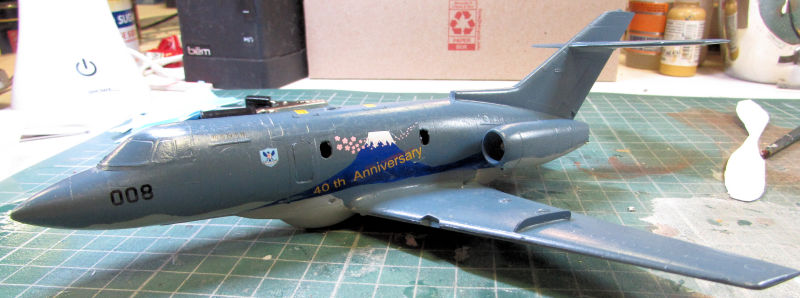
We stopped right there and pulled out my liquid decal film to coat the rest of the decals. After sufficient drying time, we finally got them on the plane. Wow, what a great improvement on the ease of application! We still cut the large side decal into two pieces to make sure we got it on right:
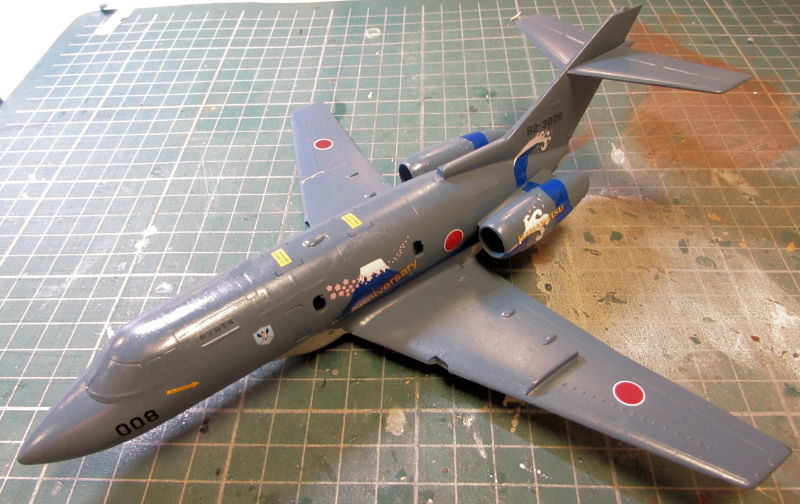
Yes, that wrinkling is from the Solvaset we applied to the engine nacelle decals since they did not conform at all to the curves of those nacelles. Later we added some more and they smoothed out much better. She is turning into quite the pretty plane!
That was the quick tour of the Hanger, now on to the Shipyards...
We got more work done on the Trumpeter LCM, adding the propellers and rudders underneath:
Next we added all the detail parts left off before. The ramp in front is just dry fit; the hinge system Trumpeter uses is useless, unlike the Dragon system. We will decide how to position that once it gets rigged with the rope included in the kit:
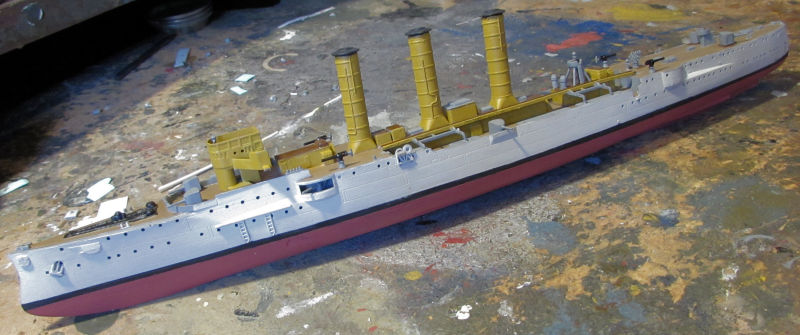
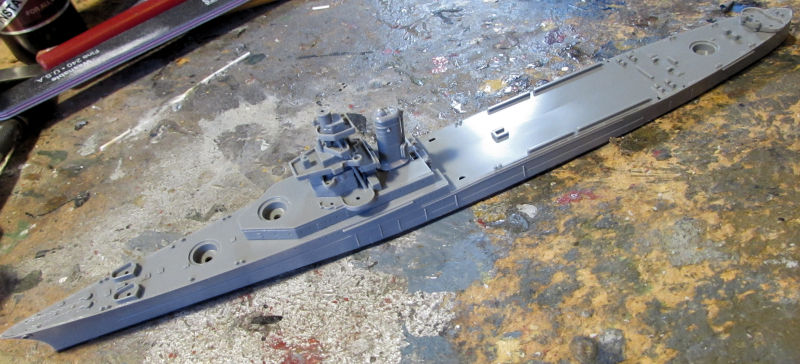
In the last slip here, we got the deck painted on HMS Kelly:
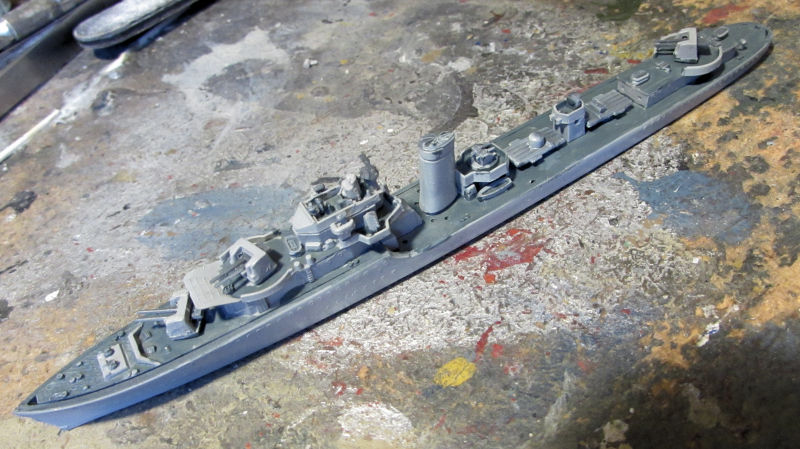
She'll be ready for more detail work now.
That completes the quick tour of the Shipyards; now on to the Motor Pool...
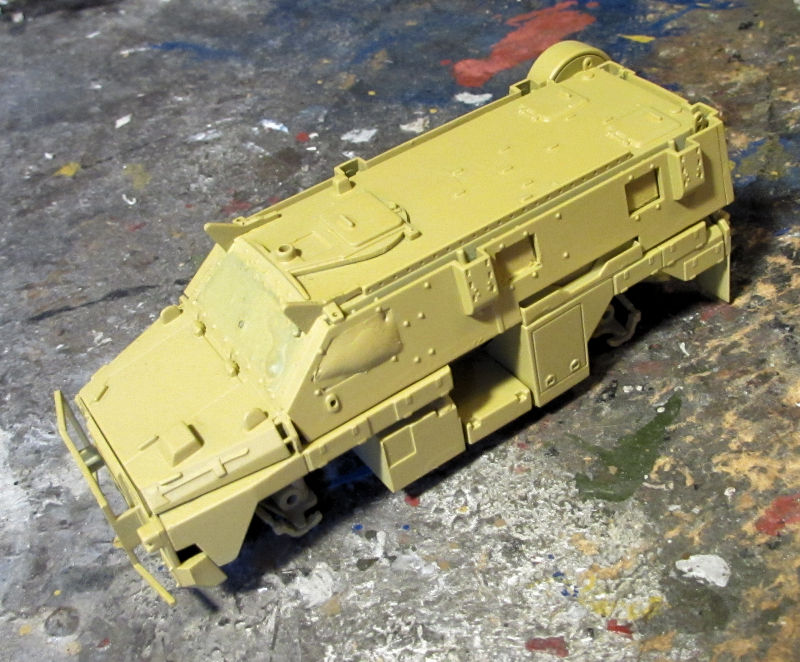
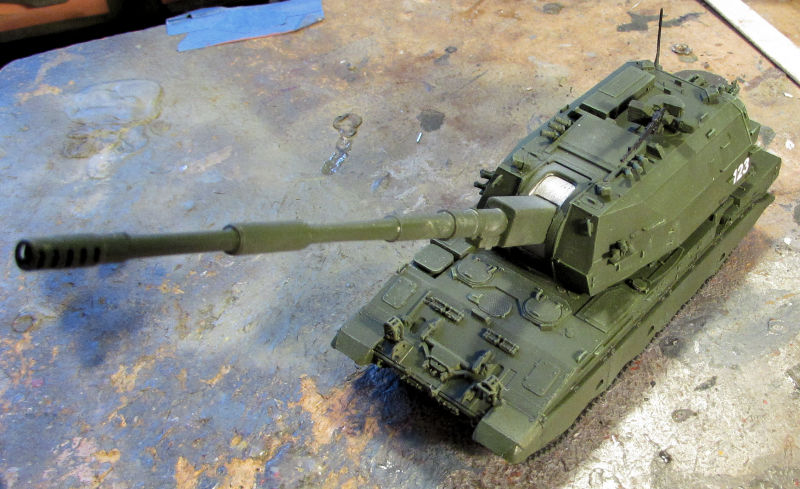
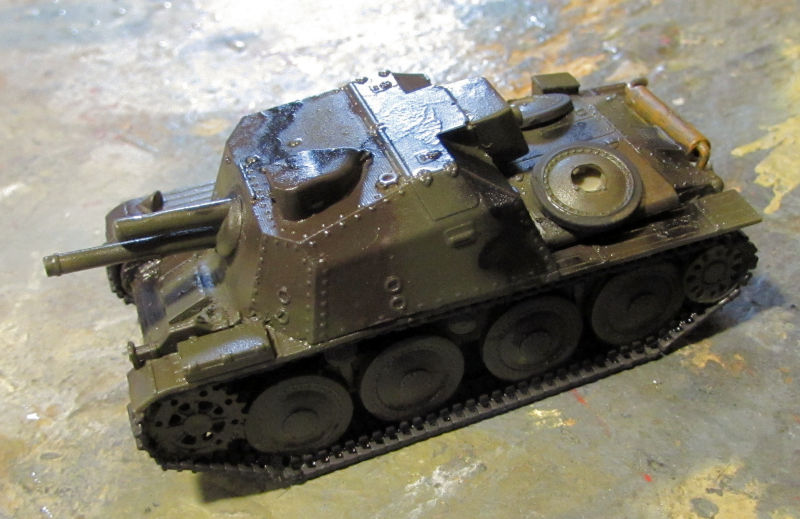
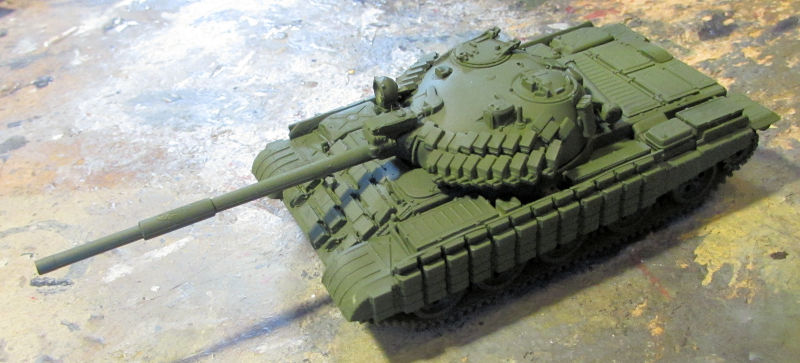
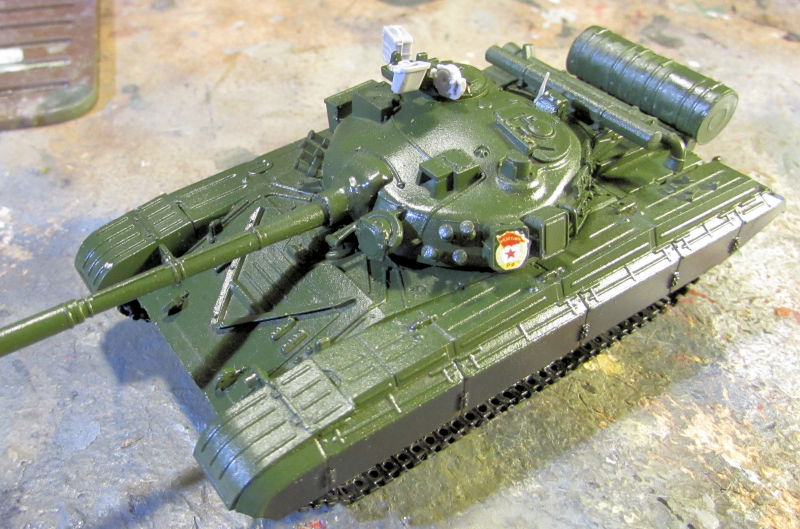
Here in the Motor Pool, we added the decals to the Russian 2S35. It was quite easy since it only had numbers on the sides of the turret:
Later we might decide to dress that up a bit with more markings just to give it some more color. Artistic license and all....
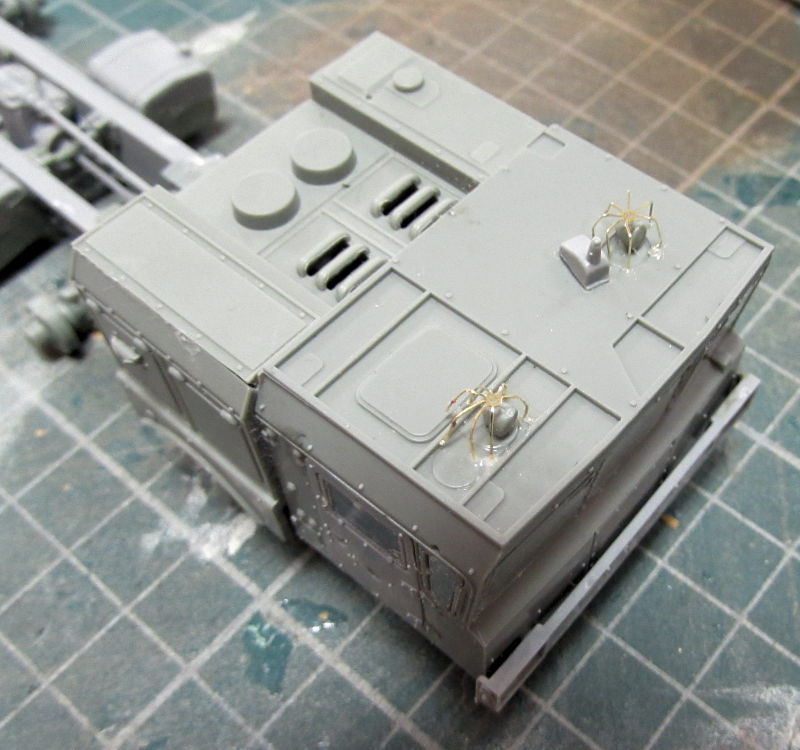
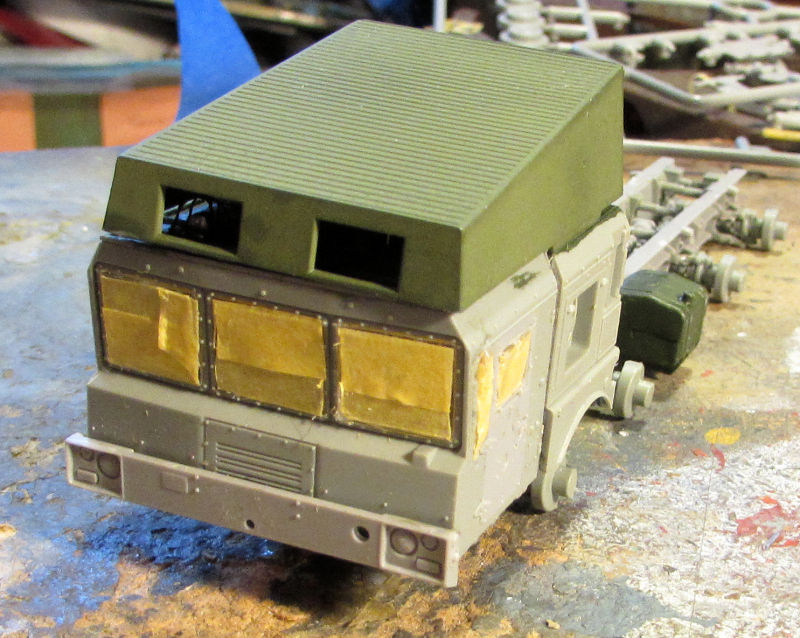
Since we were on Russian subjects, I consulted the instruction sheets for the Russian CLUB anti-ship missile defense system. There's a cover that goes over the cab, with openings on the front for some lights on the top of the cab to shine through. So we got busy and added the lights and the photo-etch cages that protect these lights. Why they still have those protective cages with that cover on, I don't know but since the instructions said they are supposed to go on, we added them:
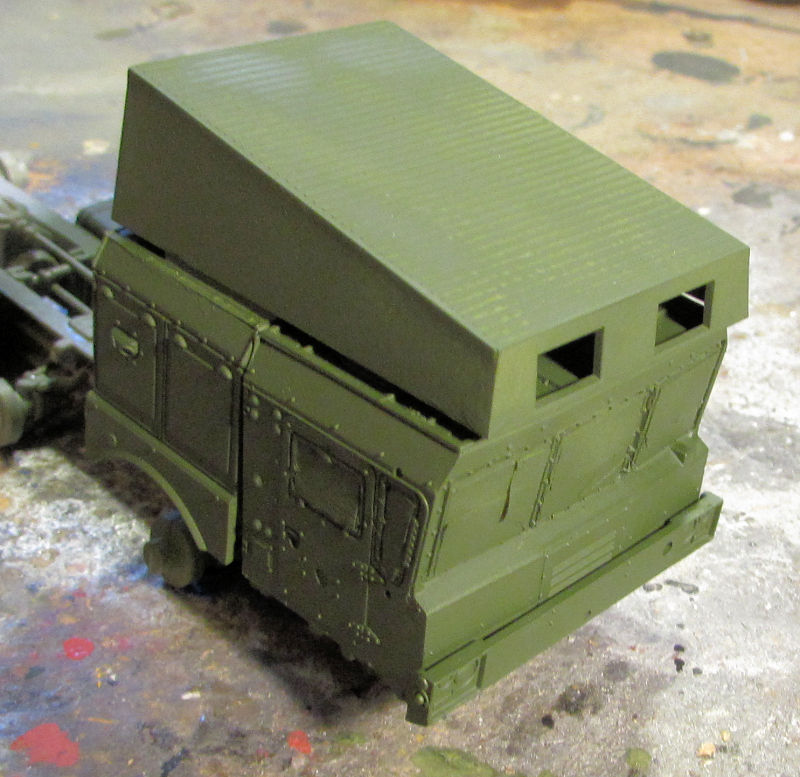
Later we painted the cab top in the same Russian green as the exterior and then installed the cover on top:
It does look pretty funky up there now, but once the launch bay is added to the back, this will look better. Time to mask these windows to prepare for paint.
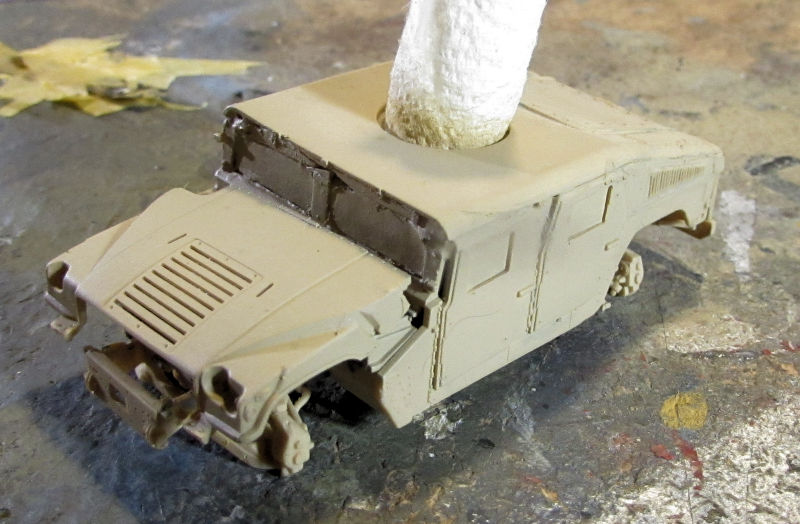
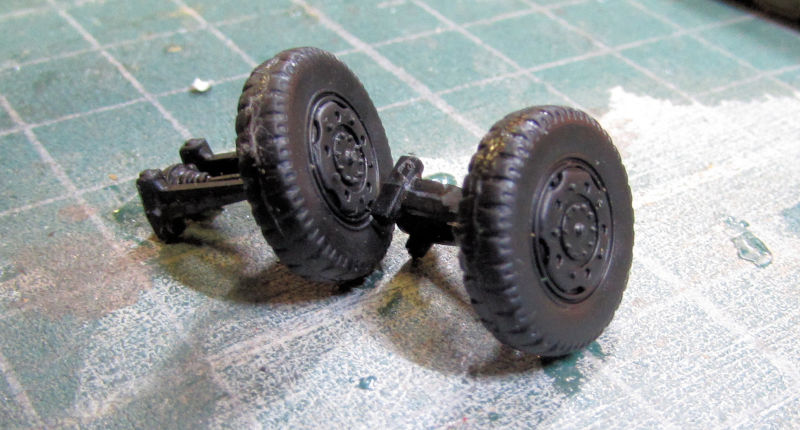
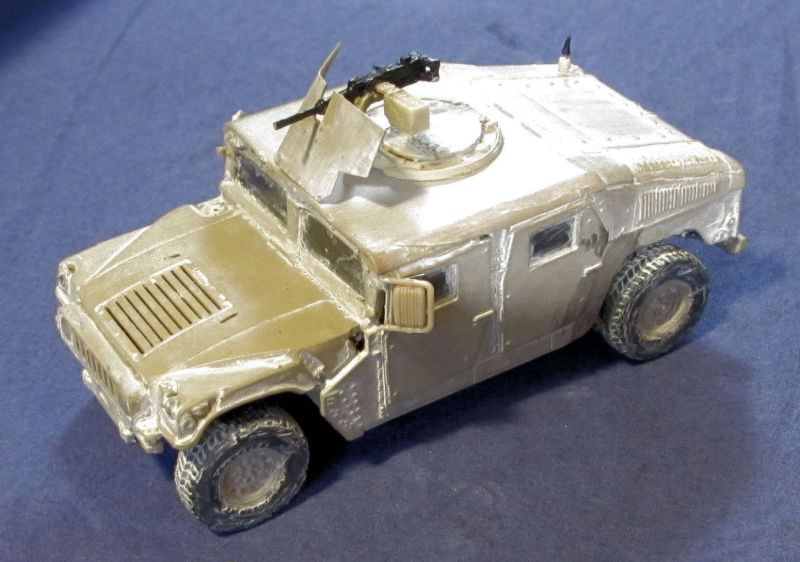
Next I pulled out a shelf queen that I'd put aside some time ago because of the way the wheels had to be assembled. It is the armored HUMVEE and it was time to get this thing moving so we went to work. These are the parts to each tire. Note that the hubs were already glued together:
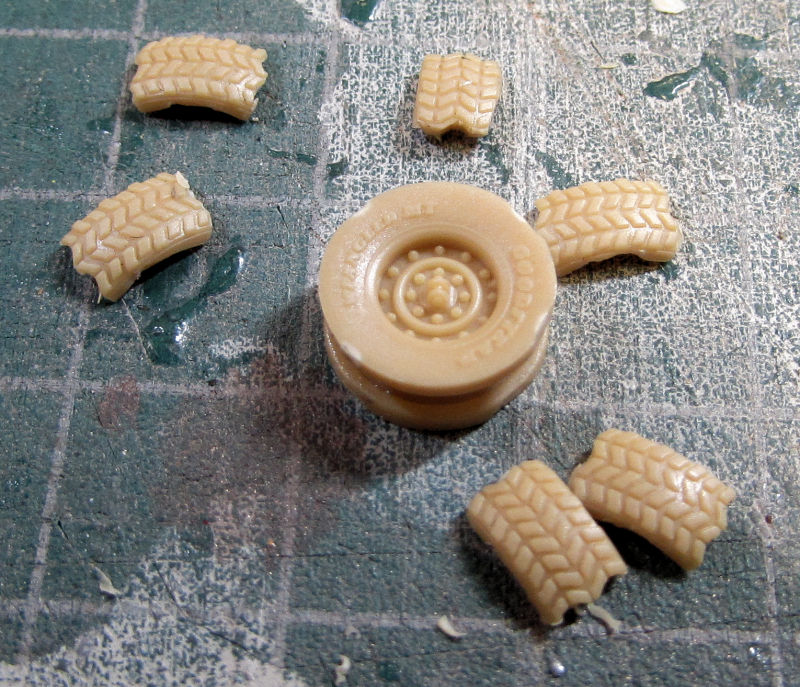
Yes, those are six tread pieces that are supposed to go on the hubs. This is what the wheels look like fully assembled:
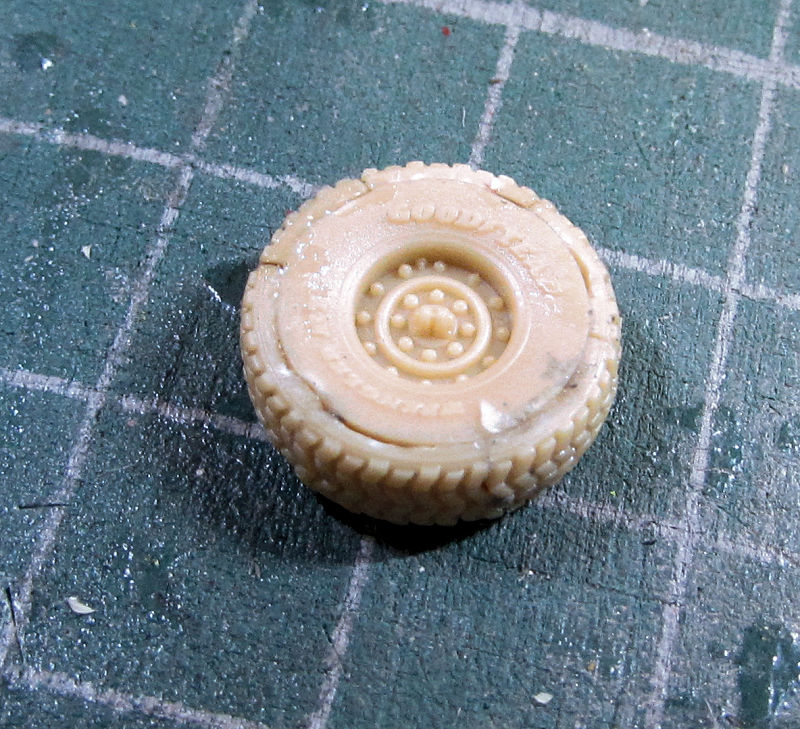
I'm not sure what to do about all those seams and gaps. What a ridiculous way to build wheels, especially since the tread pieces had so much flash you didn't know where the flash ended and the tread started! I might just forget any attempt to fix them just so I can move on...
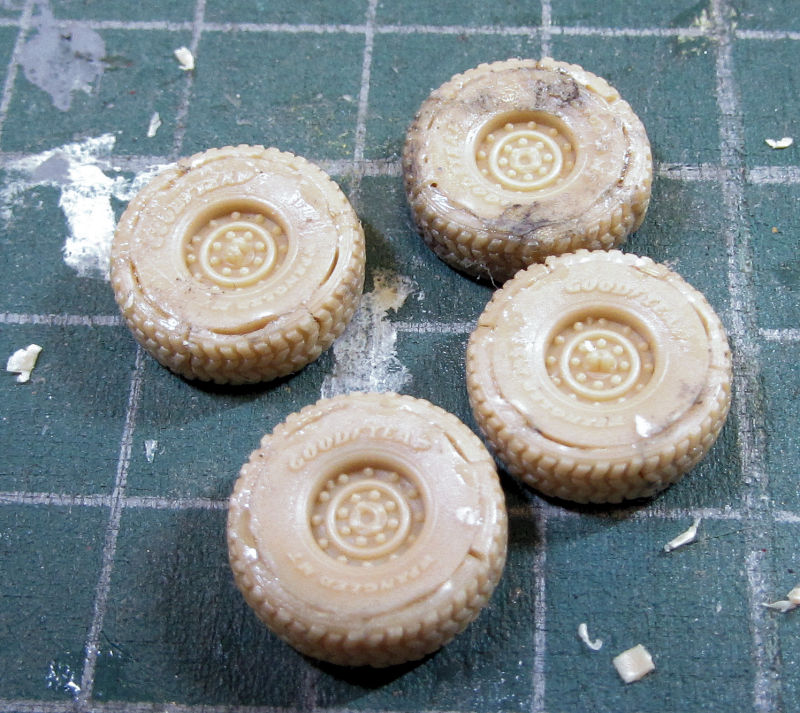
We finally got all four wheels done. I can send this to the paint booth now....
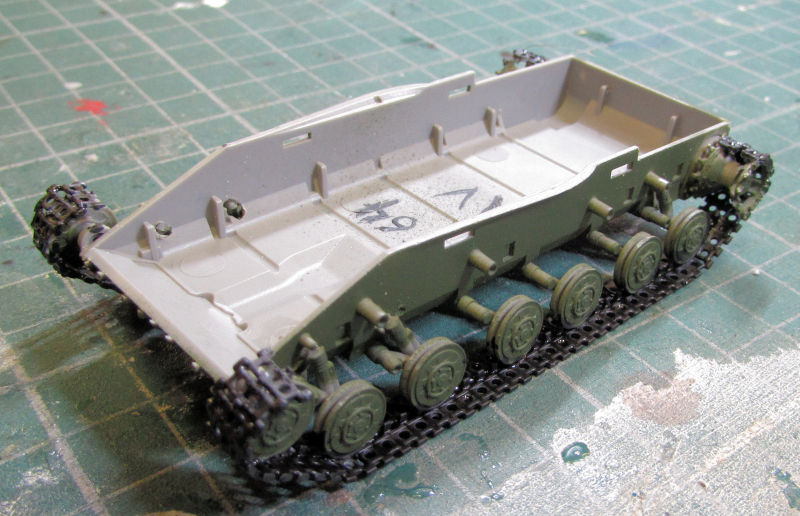
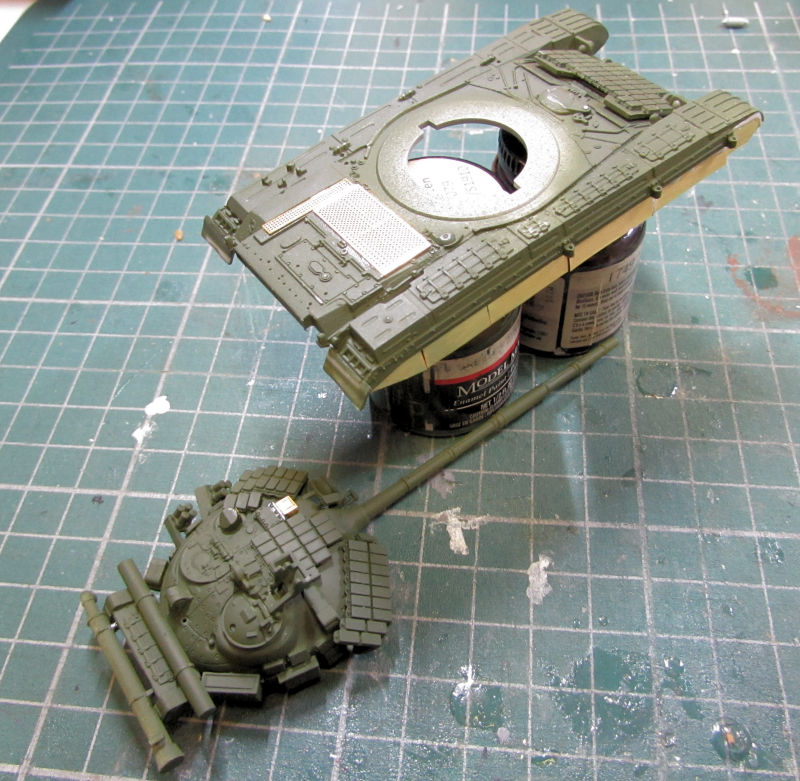
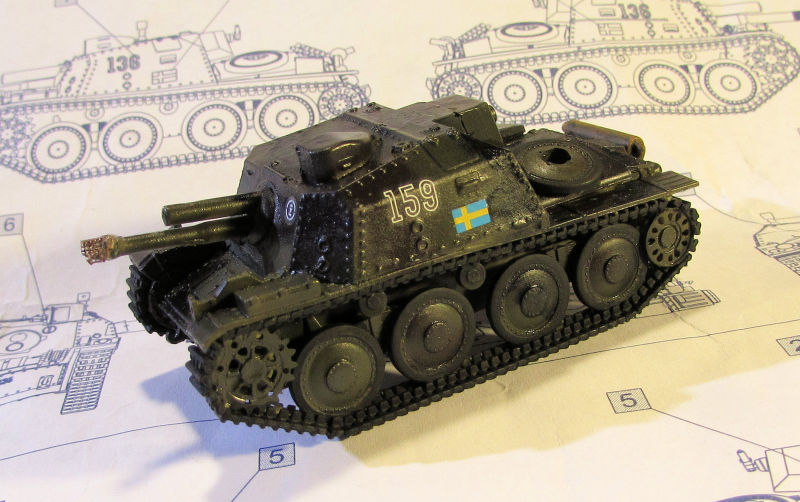
Earlier we had started a WWII Swedish assault gun, building the lower hull first. I forgot to take pics of it before we added the wheels and sprockets to it. We then added the engine deck on top along with the front glacis plate:
This kit came with a resin fighting compartment that houses the gun and all. Here it is dry fit on the hull to see how it fits. It is hollow and needed a slight bit of persuasion:
I'm not sure whether we should install the fenders before gluing that down, or try to fit the fenders after. If I decide to add the fenders first, we'll need to add the tracks to the running gear first. I'll have to think on this....
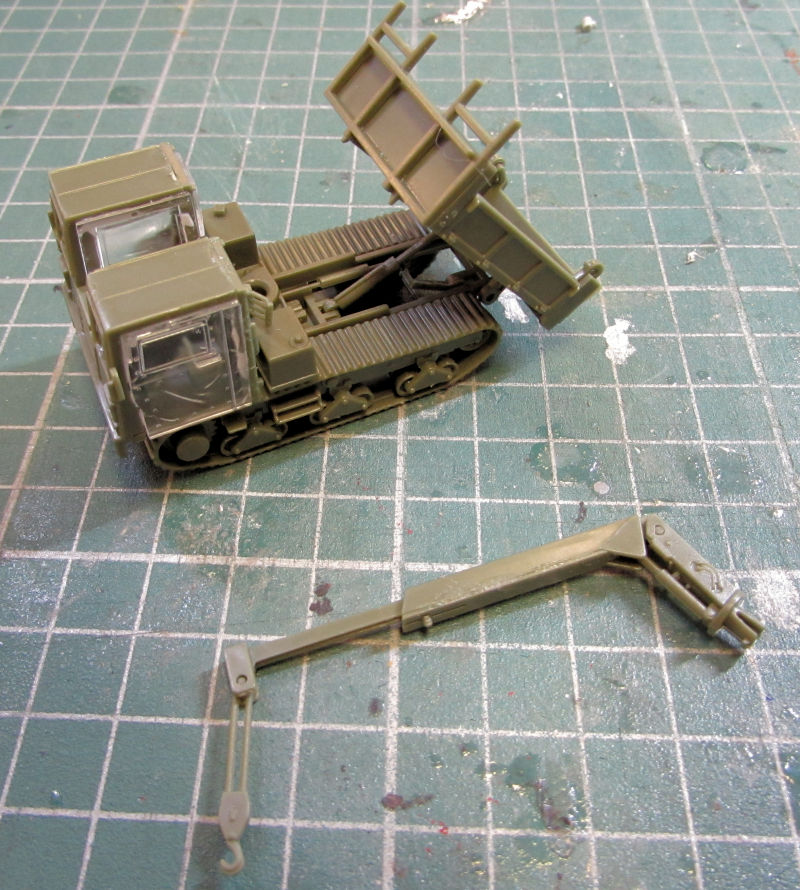
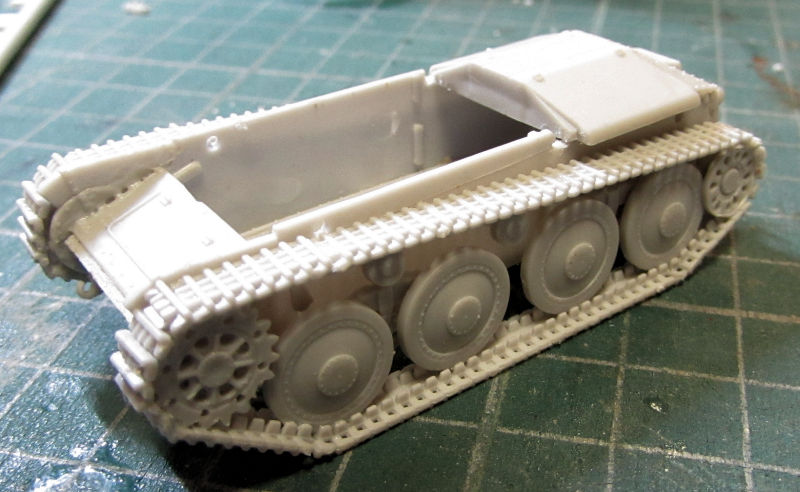
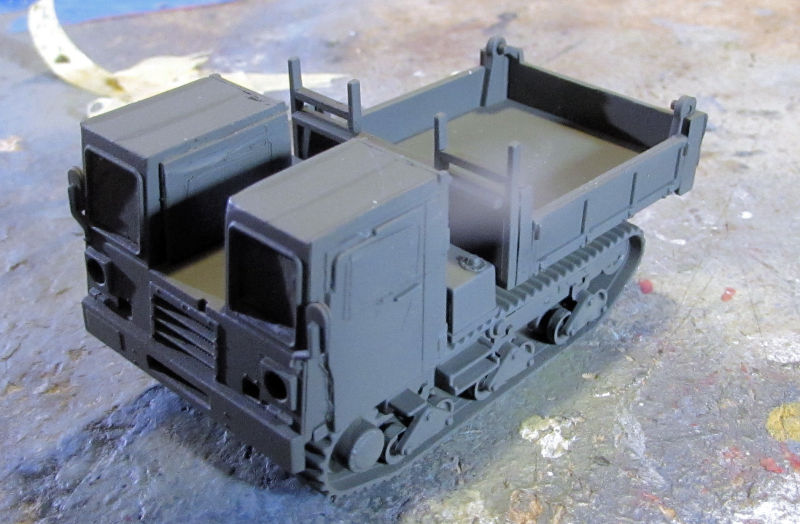
After al that, I wanted something simple and fun to work on. I pulled out this Japanese Material Handler to do for my 12-hour build challenge that my So Cal AMPS club is doing. After three and a half hours we had this:
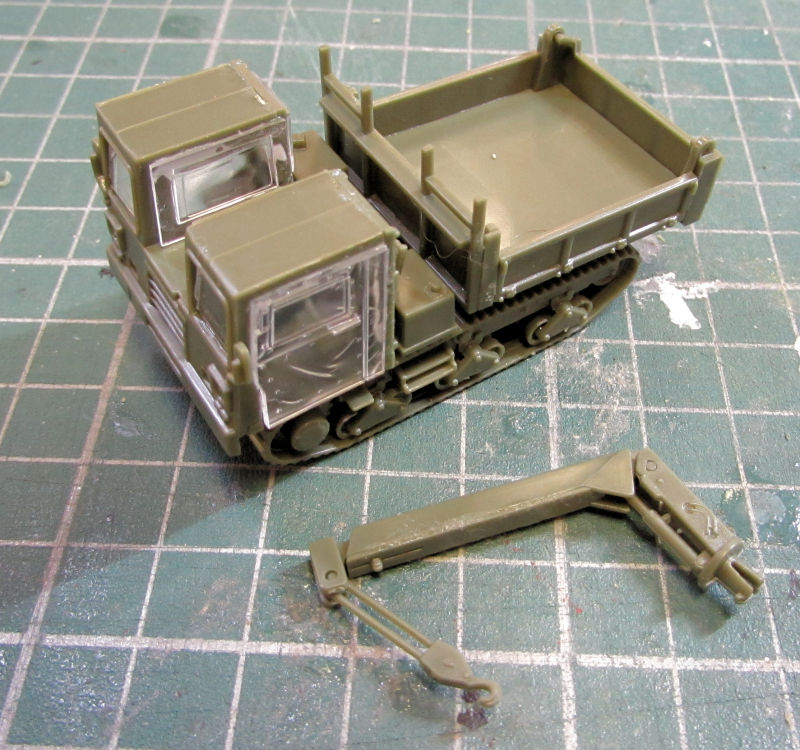
This thing is so cool! It is a funky looking beastie but it even does all this:
That was all we got done this weekend in the Motor Pool.
And that completes our tour of Maddog Manufacturing, I hope you enjoyed it. Thanks for coming along, comments are welcome.
Starting again in the hanger, we did get the landing gear and gear doors on the Vampire. We also got the bombs painted up:
The next pic of this will be in the Finished boards...
We also got the decals on the F-117 stealth fighter:
Now I'm not sure if the decals have silvered or if that is that milky stuff that Monogram decals always seems to have. I'm going to wait till this dries and see what a dull coat will do before I deal with that.
Finally, we also put decals the Japanese U-125. What an ordeal that was! These large decals were so thin and delicate they folded under if you looked at them wrong. Then they tore as you tried to fix them! We somehow managed to get 99% of this large decal on one side:
We stopped right there and pulled out my liquid decal film to coat the rest of the decals. After sufficient drying time, we finally got them on the plane. Wow, what a great improvement on the ease of application! We still cut the large side decal into two pieces to make sure we got it on right:
Yes, that wrinkling is from the Solvaset we applied to the engine nacelle decals since they did not conform at all to the curves of those nacelles. Later we added some more and they smoothed out much better. She is turning into quite the pretty plane!
That was the quick tour of the Hanger, now on to the Shipyards...
We got more work done on the Trumpeter LCM, adding the propellers and rudders underneath:
Next we added all the detail parts left off before. The ramp in front is just dry fit; the hinge system Trumpeter uses is useless, unlike the Dragon system. We will decide how to position that once it gets rigged with the rope included in the kit:
In the last slip here, we got the deck painted on HMS Kelly:
She'll be ready for more detail work now.
That completes the quick tour of the Shipyards; now on to the Motor Pool...
Here in the Motor Pool, we added the decals to the Russian 2S35. It was quite easy since it only had numbers on the sides of the turret:
Later we might decide to dress that up a bit with more markings just to give it some more color. Artistic license and all....
Since we were on Russian subjects, I consulted the instruction sheets for the Russian CLUB anti-ship missile defense system. There's a cover that goes over the cab, with openings on the front for some lights on the top of the cab to shine through. So we got busy and added the lights and the photo-etch cages that protect these lights. Why they still have those protective cages with that cover on, I don't know but since the instructions said they are supposed to go on, we added them:
Later we painted the cab top in the same Russian green as the exterior and then installed the cover on top:
It does look pretty funky up there now, but once the launch bay is added to the back, this will look better. Time to mask these windows to prepare for paint.
Next I pulled out a shelf queen that I'd put aside some time ago because of the way the wheels had to be assembled. It is the armored HUMVEE and it was time to get this thing moving so we went to work. These are the parts to each tire. Note that the hubs were already glued together:
Yes, those are six tread pieces that are supposed to go on the hubs. This is what the wheels look like fully assembled:
I'm not sure what to do about all those seams and gaps. What a ridiculous way to build wheels, especially since the tread pieces had so much flash you didn't know where the flash ended and the tread started! I might just forget any attempt to fix them just so I can move on...
We finally got all four wheels done. I can send this to the paint booth now....
Earlier we had started a WWII Swedish assault gun, building the lower hull first. I forgot to take pics of it before we added the wheels and sprockets to it. We then added the engine deck on top along with the front glacis plate:
This kit came with a resin fighting compartment that houses the gun and all. Here it is dry fit on the hull to see how it fits. It is hollow and needed a slight bit of persuasion:
I'm not sure whether we should install the fenders before gluing that down, or try to fit the fenders after. If I decide to add the fenders first, we'll need to add the tracks to the running gear first. I'll have to think on this....
After al that, I wanted something simple and fun to work on. I pulled out this Japanese Material Handler to do for my 12-hour build challenge that my So Cal AMPS club is doing. After three and a half hours we had this:
This thing is so cool! It is a funky looking beastie but it even does all this:
That was all we got done this weekend in the Motor Pool.
And that completes our tour of Maddog Manufacturing, I hope you enjoyed it. Thanks for coming along, comments are welcome.
Those wheels look like work. Good luck!
Duke Maddog
Well-known member
Thank you Mo! Sometimes I wonder myself; then I look in boxes and it all starts falling together. I do like that U-125 as well; what a beautiful scheme!
Thank you Bob! Yeah, those wheels are a bit of a challenge. It's part of the reason this became a shelf queen.
Thank you Bob! Yeah, those wheels are a bit of a challenge. It's part of the reason this became a shelf queen.
It's part of the reason this became a shelf queen.

I got a few myself.
Duke Maddog
Well-known member
Yeah, me too! Gotta see what I can do to move more of them forward.
Duke Maddog
Well-known member
Once again, we kept busy and moved a lot of things forward this week. So much so that I scheduled another tour of the facilities earlier than expected!
All aboard the trams everyone and remember to keep your hands and feet inside at all times. This will be a good long tour.
As always, we'll start in the Hangar.
Here you can see that the F-117 got a dull coat on it:
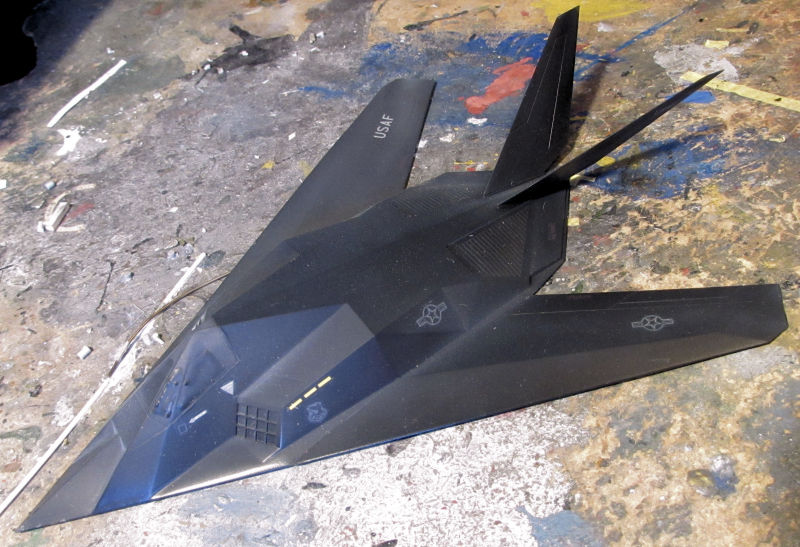
I was going to keep it glossy, but then I realized that a dull coat would absorb more radar waves than a glossy coat. After that, we installed the landing gear, gear doors and bomb bay doors, as well as one Maverick:
Not a good angle for viewing all that so here's a better angle:

Finally I was ready to get this thing finished. Then I ran into a big issue....
I HATE THIS MASKING AGENT!!
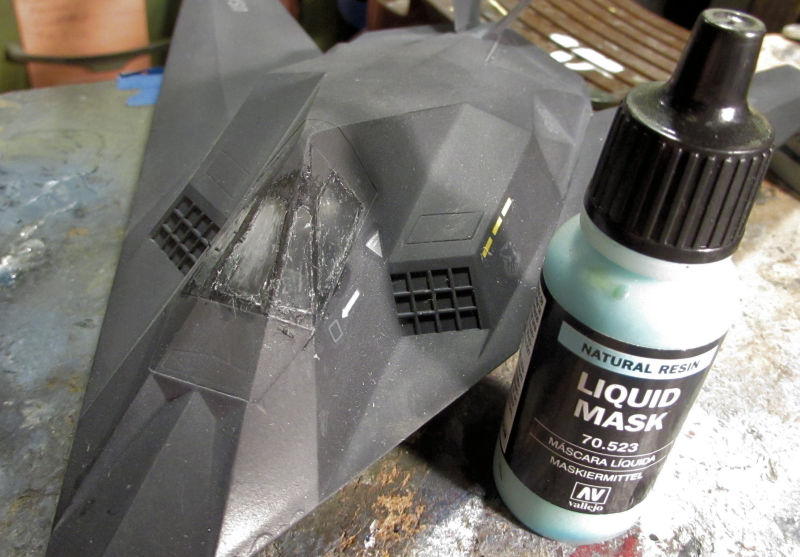
When we tried to remove it from the canopy, it would not come off! It seemed to peel by layers, each of which seemed to be more sticky than the previous one. I took a wooden coffee stir and cut a chiseled end and used that to try and scrape all this stuff off. Even then, it stuck to the model! What a cluster! After I got all that off that I could, I took a cotton bud/Q-tip/whatever you want to call it; dipped it in alcohol and scrubbed the whole canopy, finally removing the last of the mask residue. I then brushed on some Pledge Future to clear the windows again and later re-painted a dull coat along the area around the canopy to bring it back into consistency with the rest of the plane. I can see in these pics we still have some touch up to do. Despite that, my USAF took delivery of this plane anyway.
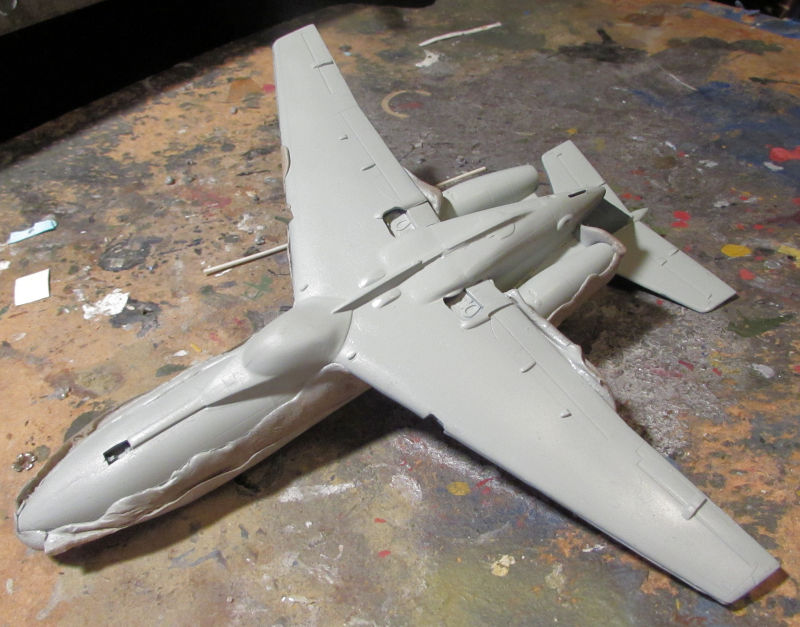
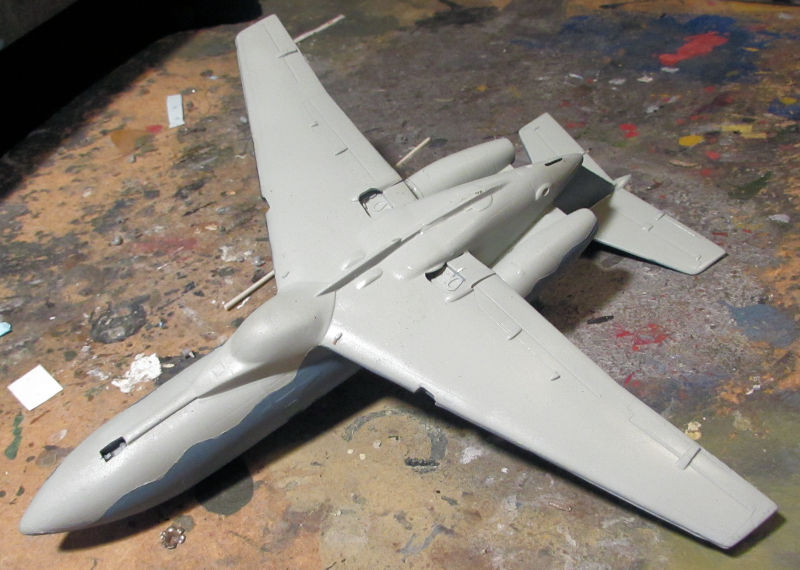
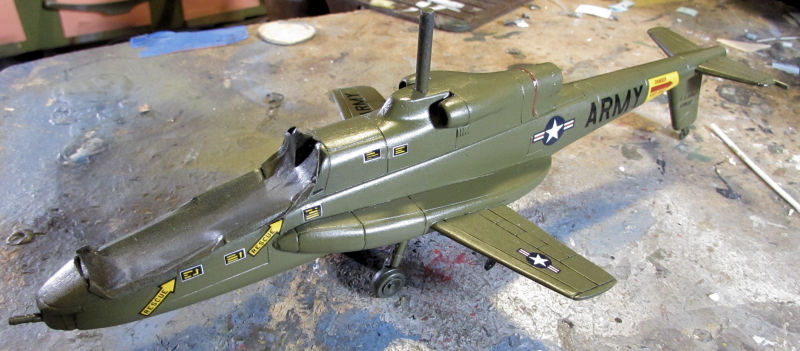
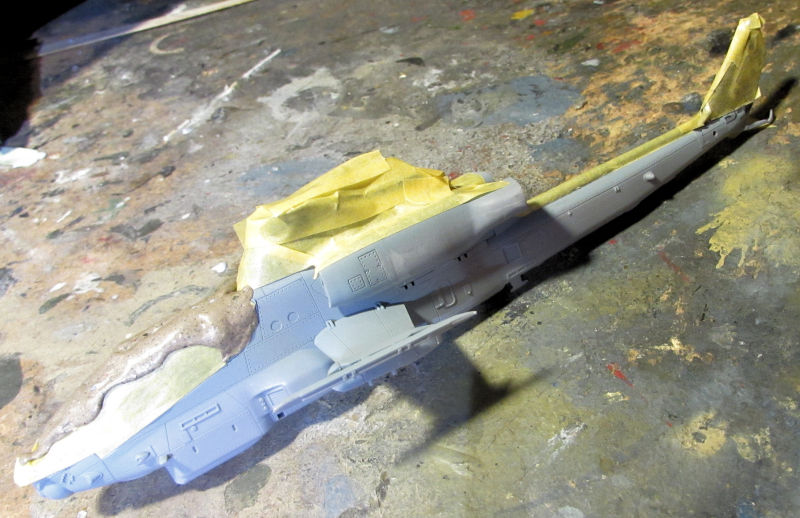
Because of the tightness in the facility, I made an effort to get some more space by trying to organize things a bit. That's when I really got tired of this C-17-wannabe horse and the box it rode in on, cluttering up my hangar space! So, we set things aside and started on this by first glueing the wings in place:

This was a very poor fit. After nearly an hour of working it, this was the final result that I had to live with:
There's gonna be a lot of sanding and filling and repainting to do there...
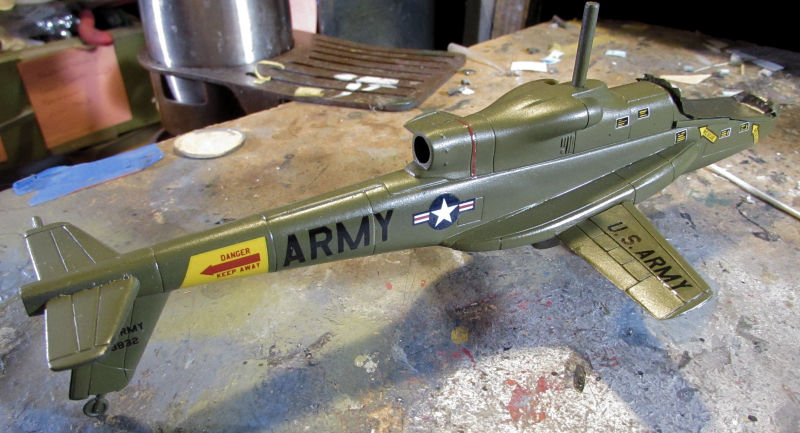
When the wings were finally dry enough, we stepped back to find that every stinking wheel had broken off the landing gear struts:
We are going to get the decals on and the window masks off and possibly even the dull coat shot on this thing before I get to work fixing those wheels. Enough of that, time to work on something easy...
I chose the AH-56 Cheyenne to work on since that seemed to be the easiest so far. It was. We had applied some filler in the gaps I'd found and sanded down the steps:
After another coat of black primer, I saw it was looking great:

Certainly far better than the A-400...
Off she went to the spray booth to get her coat of Olive Drab:

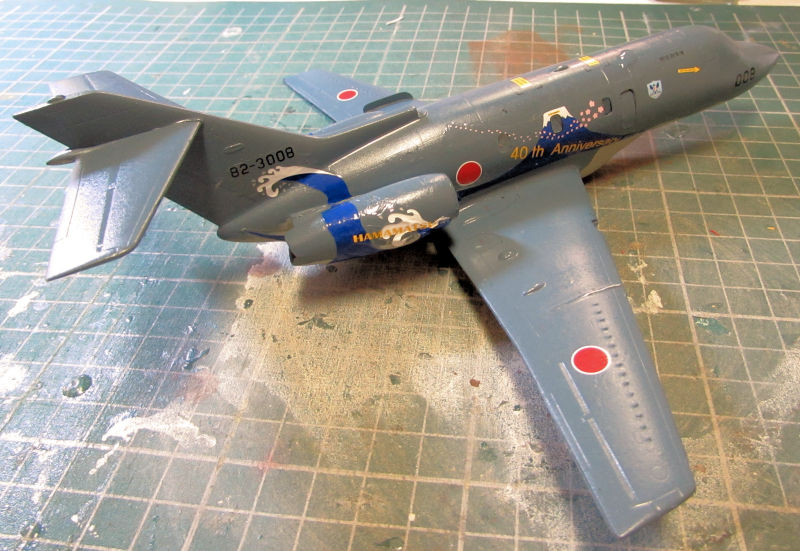
Next we shot a dull coat on the Japanese U-125 since we had it out for the Stealth fighter already:
This bird then got her landing gear on as well. Sword does not give you very great attachment points to fasten these struts securely and firmly:

Here's a better shot of her stubby legs. They are holding her up quite nicely:
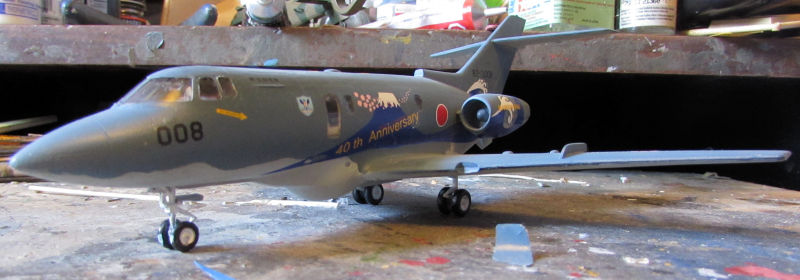
But I'm getting a bit ahead of myself. All this time some of the main cabin windows had opened up while we were trying to mask them way back before paint was first shot. We just left them alone all this time.....until now. That's when we pushed them all the way in and used Micro Scale Window glue to make new windows. Those are the white ovals on the sides of the fuselage:
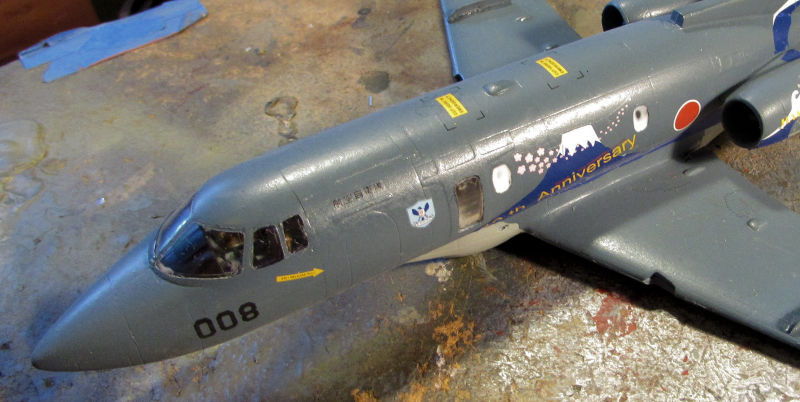
Finally we got the last of the landing gear bay doors and other detail parts on this bird, finishing all the assembly. After some touch up painting, she was delivered to my Japanese Air Force.
That completes the tour of the Hangar, now on to the Shipyards...
We've been keeping busy on the various naval projects going on here and are planning on laying the keel to a couple more projects soon. Meanwhile, this is what was done in the slipways this past week.
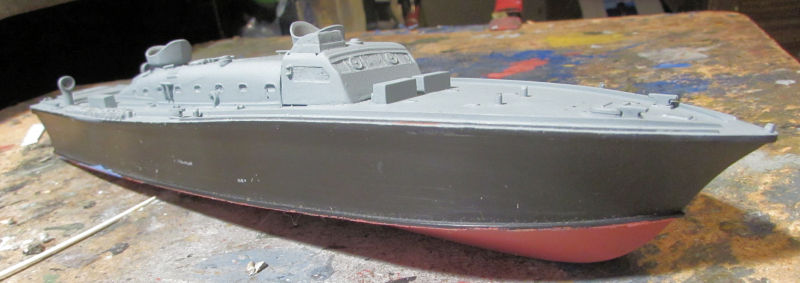
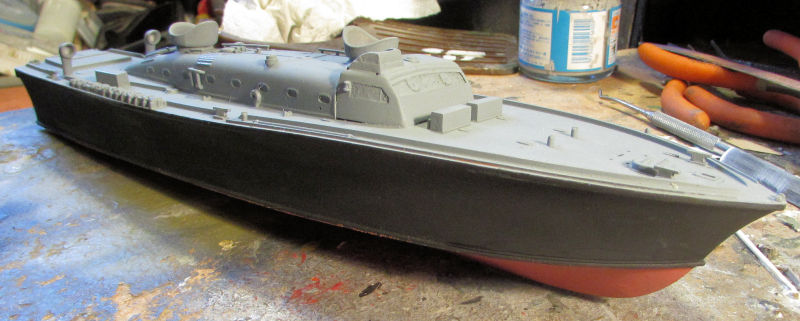
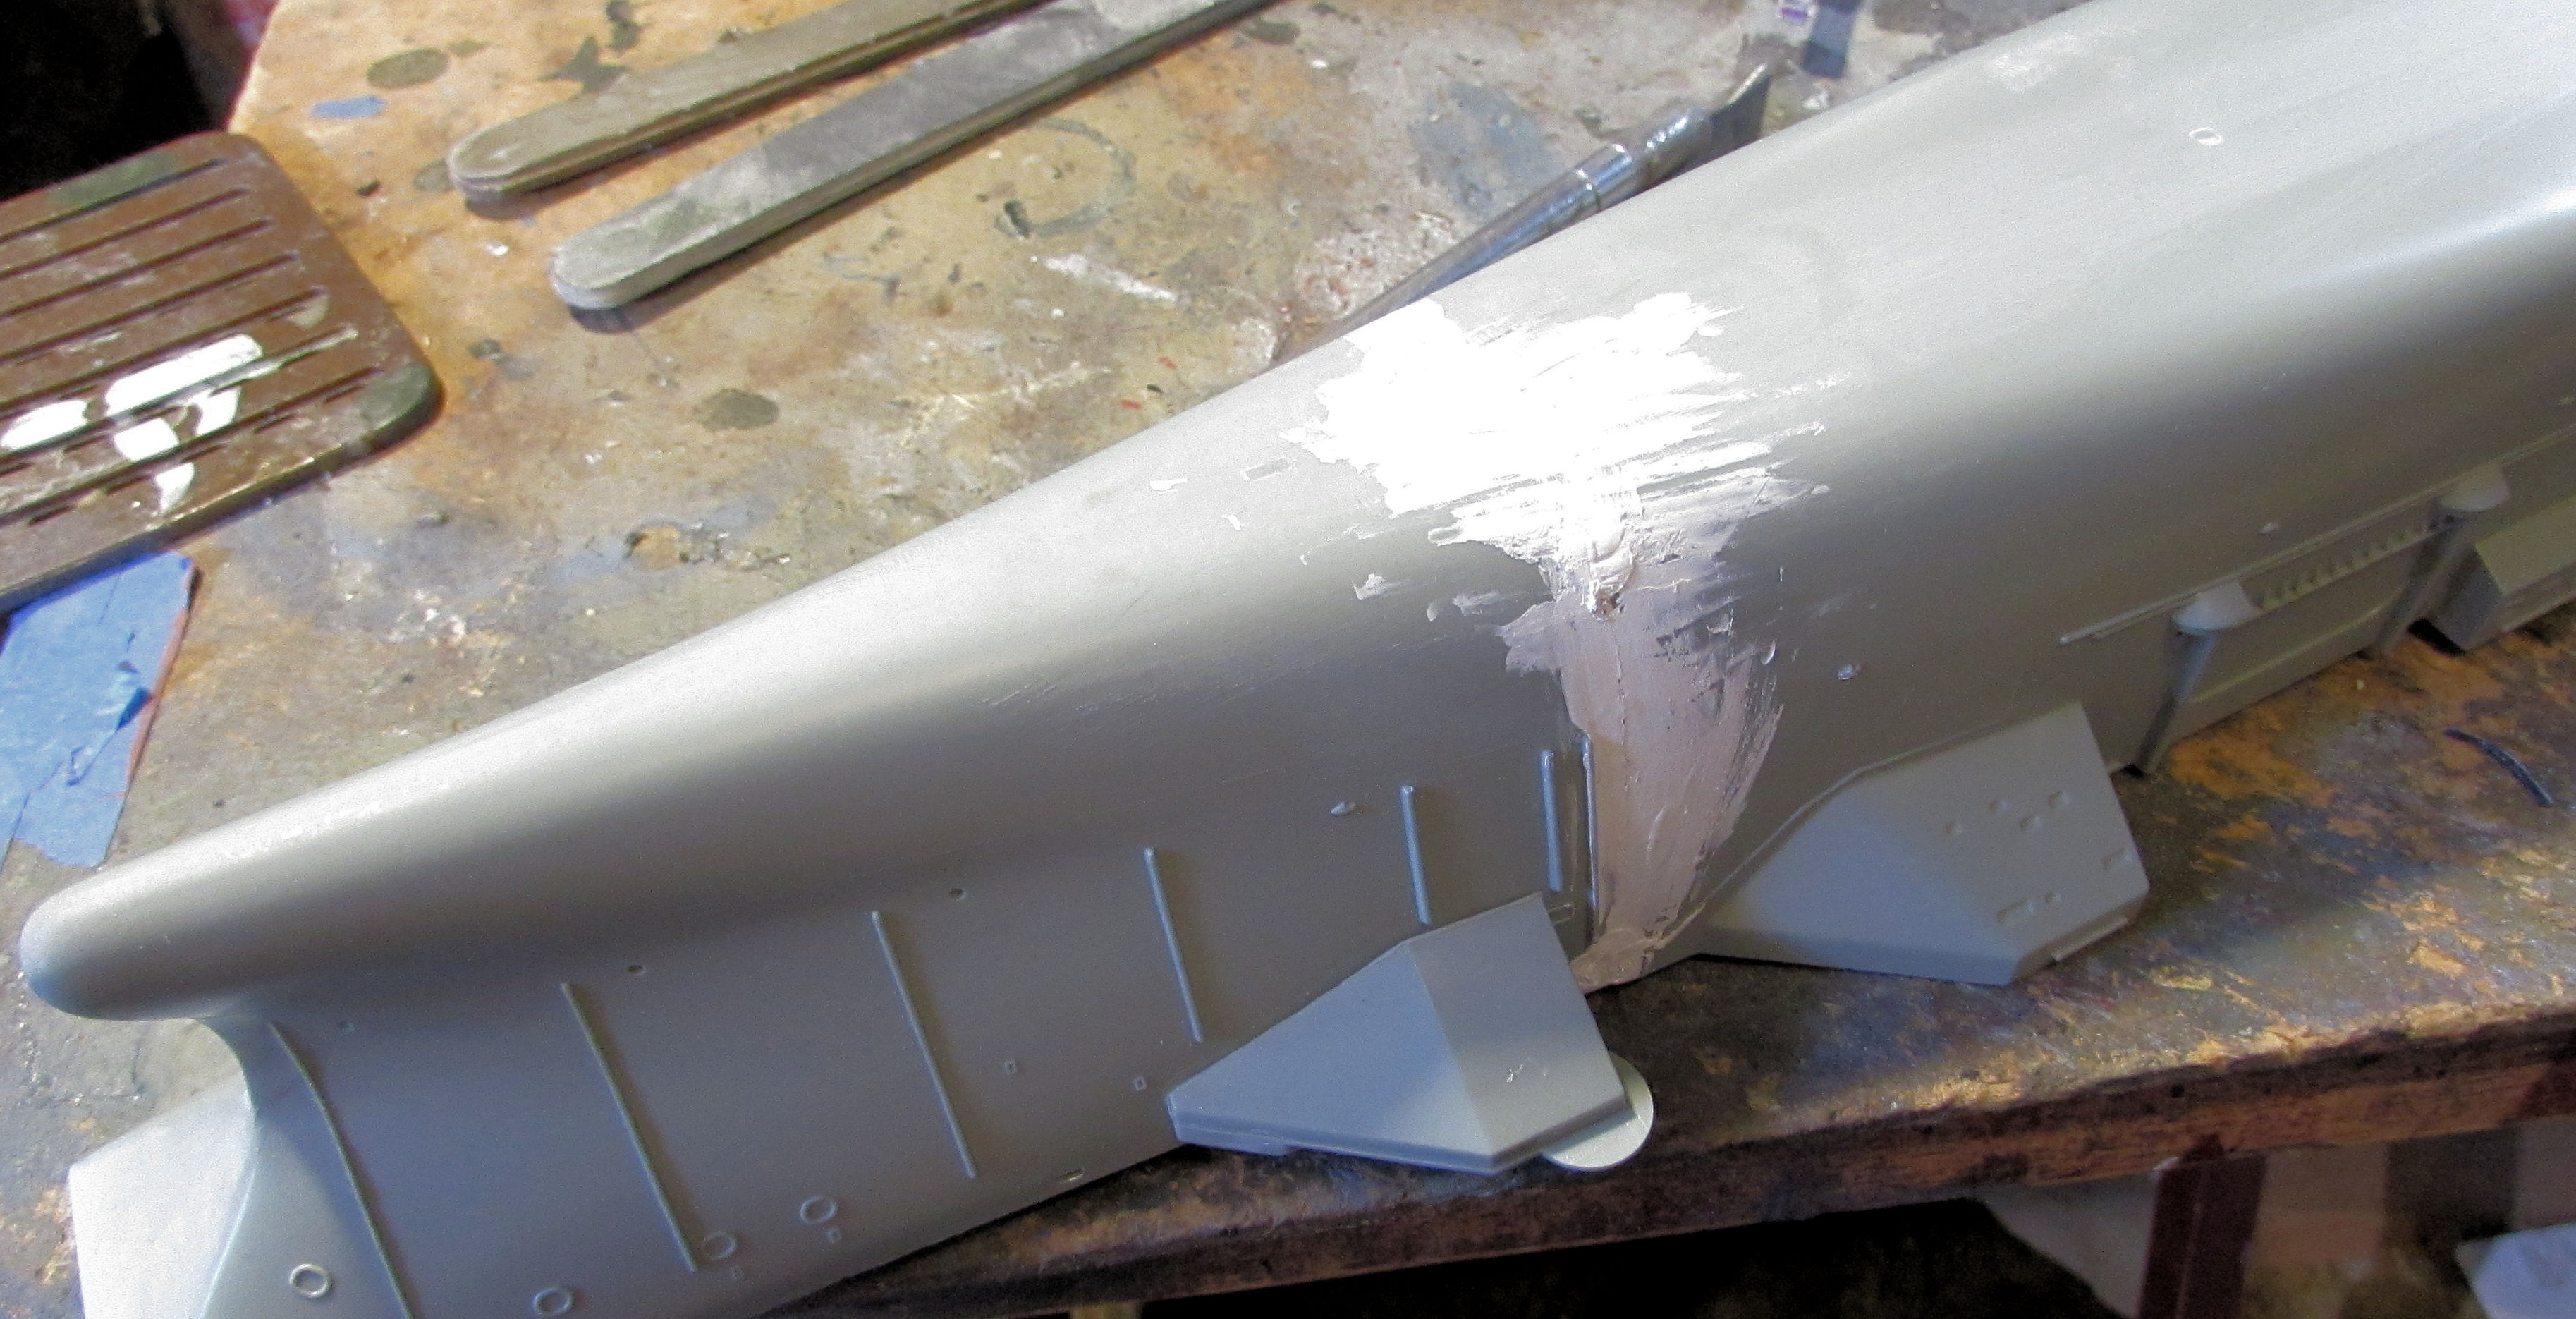
First of all, some of the paint on the side of the RAF Rescue Launch was pulled away earlier and so we masked it off and shot another coat of black on the side to fix it:
Once that was dry, she was looking good. We can now move forward on her soon:
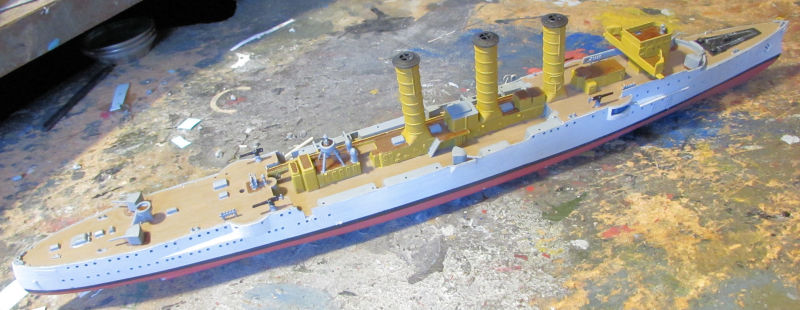
Meanwhile in the next slipway, the final parts were installed on HMS Kelly, except for the ship's boats:
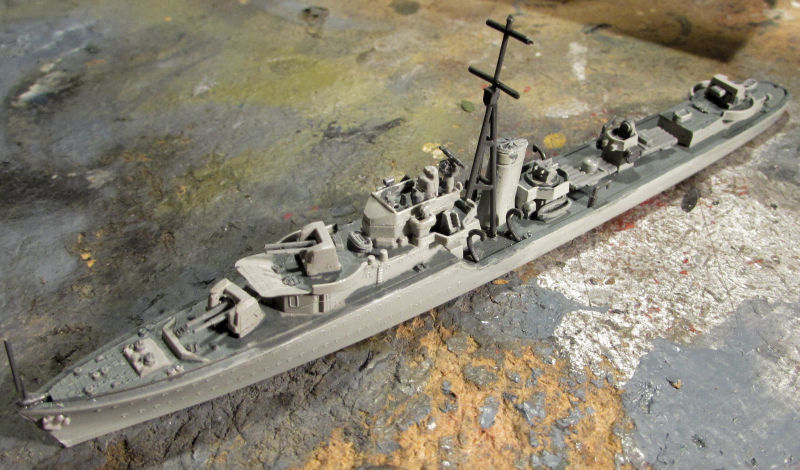
After some touch up painting and the addition of her boats, we were able to launch her and send her out on her shakedown cruise before being delivered to my British Navy.
That was a short trip through the Shipyards, and so we move on to the Motor Pool...
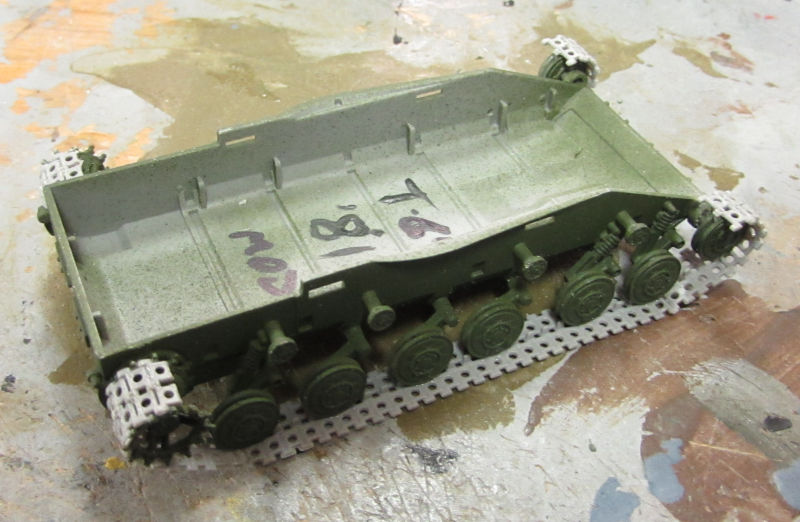
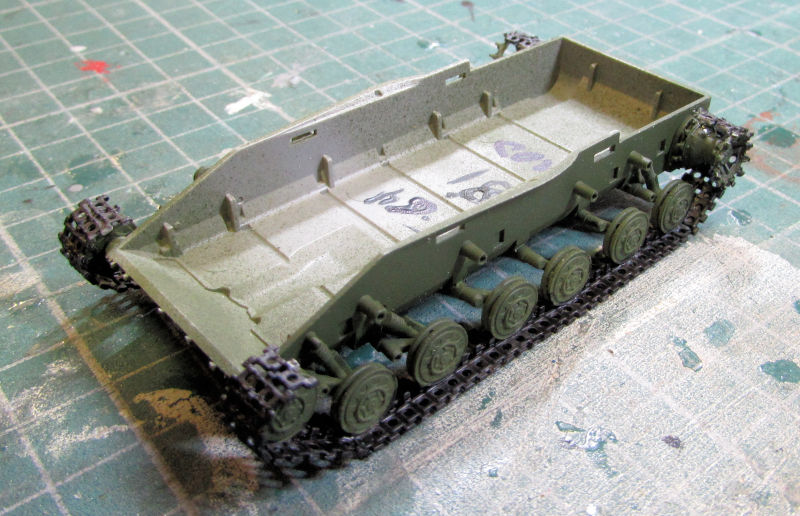
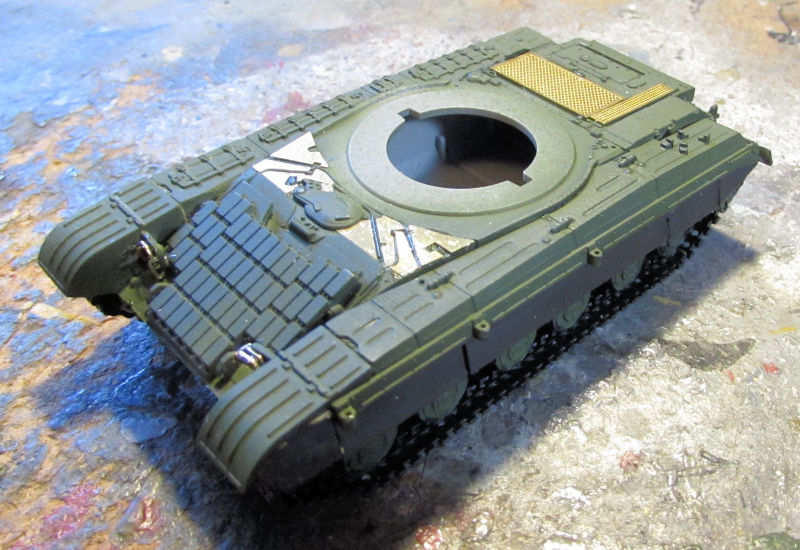
Here in the Motor Pool, things went fairly smoothly as well. We had gotten quite far on the Swedish Assault Gun so I wanted to get it further along as close to the paint stage as possible. We got the tracks installed first since they needed to be on before the fenders and casemate:
The individual track pieces on this model are only about a millimeter and a quarter long. Very tiny!
While they were drying, we got the main gun and rear stowage box installed on the casemate:
The kit includes a photo-etch piece for the perforated muzzle break on the end.. I'll have that done later once the P/E is annealed. A test fitting of the casemate on the hull shows some gaps that will need to be dealt with:
Time to let that set for a bit and show you our next projects. These next two got another coat of paint on them. First the British Bushmaster that needed a more solid coat of paint:
Then this Canadian Cadillac Gage was giving me the stinkeye for forgetting it for so long and so we pulled that over to the spray booth and shot the remaining OD from the Cheyenne project:
Finally, I got some more progress on my Russian models. First, I got the dull coat on the beastie:
Later we tried some combinations of paint and Future/Pledge to make this main gun a little less loose so the gun would remain in any angle I wanted to pose it in. We had some success:
Later on we finished weathering the beastie on the lower hull and tracks. I didn't want to over weather this as I figured they would be mostly traveling on roads or being covered up and carried by tank transporters. Once that was done, my Russian Army took delivery of this gun.
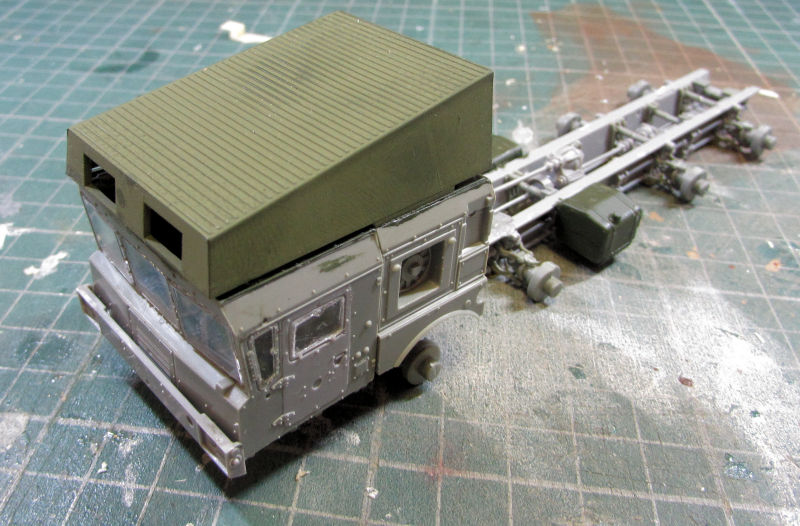
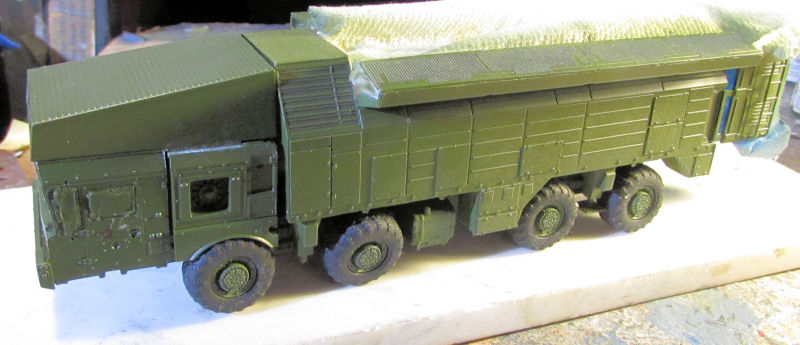
This last one was giving me a bit of trouble. We pulled out the CLUB M and started masking the windows to get the cab ready for paint. Unfortunately, the side windows decided to come unglued on one side and push in. Now the cab was fully sealed so fixing them was a real issue. Finally since we couldn't get the cab off and opened up, we cut some holes in the rear cab wall so I could stick something in and push them shut once glue was re-applied to the open sides:
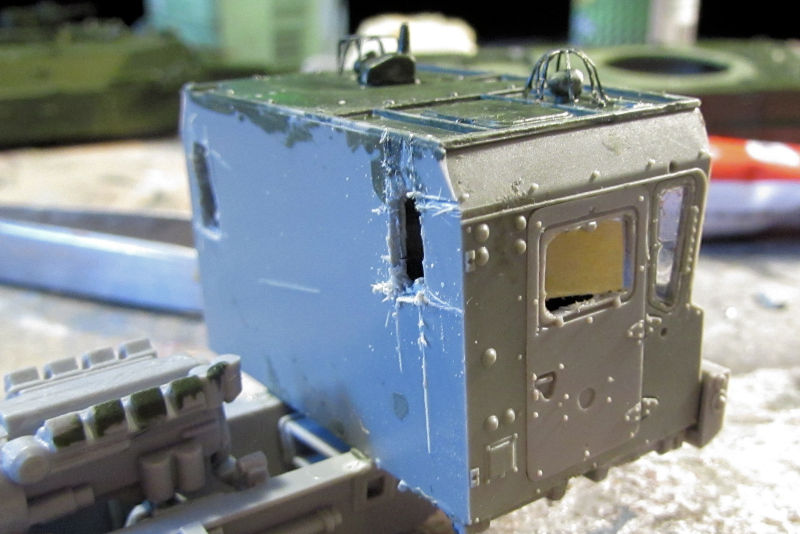
Since that was going to be hidden from view by the engine housing, I didn't care. We re-glued the windows and when they were dry, we finished masking them successfully this time. Then the top weather cover was added to the roof of the cab after I'd already had the inside top painted. It looks crooked in this pic but we got it straightened up:
Paint was then shot and came out smooth:
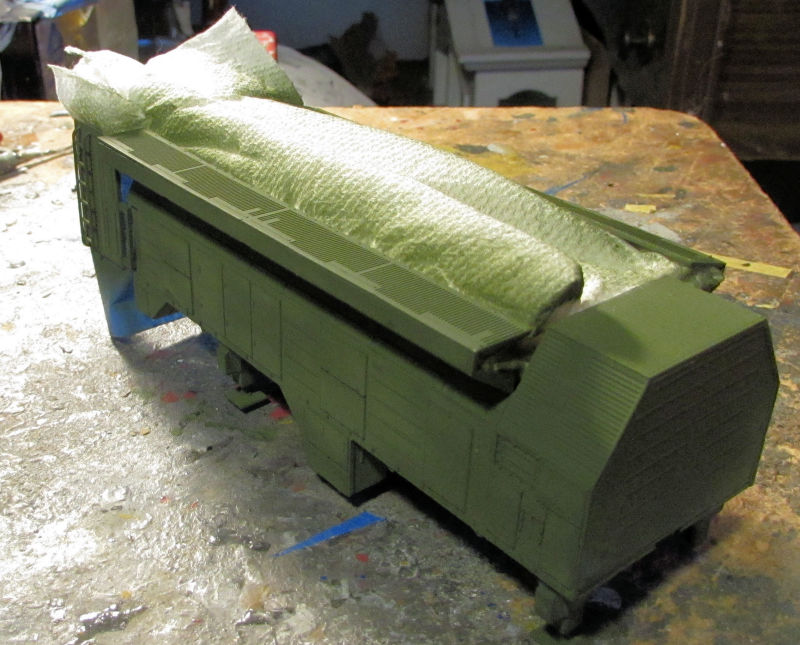
Since I had the launch cabin that houses the launch tubes already masked and I had the base paint out, we finished shooting paint on the outer launch cabin:
Finally, the last bit of work on this was the dry-fitting of the whole thing together:
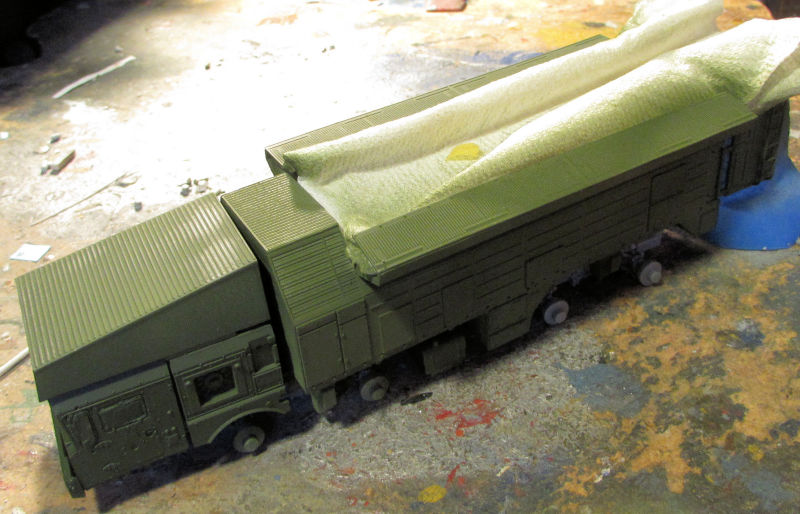
She's a big one!
I hope to start getting Silly Putty applied to this and the Australian Bushmaster so the camouflage colors can be shot. Hopefully this coming week.
Thank you all for joining me on this latest tour! Comments are always welcome.
All aboard the trams everyone and remember to keep your hands and feet inside at all times. This will be a good long tour.
As always, we'll start in the Hangar.
Here you can see that the F-117 got a dull coat on it:
I was going to keep it glossy, but then I realized that a dull coat would absorb more radar waves than a glossy coat. After that, we installed the landing gear, gear doors and bomb bay doors, as well as one Maverick:
Not a good angle for viewing all that so here's a better angle:
Finally I was ready to get this thing finished. Then I ran into a big issue....
I HATE THIS MASKING AGENT!!
When we tried to remove it from the canopy, it would not come off! It seemed to peel by layers, each of which seemed to be more sticky than the previous one. I took a wooden coffee stir and cut a chiseled end and used that to try and scrape all this stuff off. Even then, it stuck to the model! What a cluster! After I got all that off that I could, I took a cotton bud/Q-tip/whatever you want to call it; dipped it in alcohol and scrubbed the whole canopy, finally removing the last of the mask residue. I then brushed on some Pledge Future to clear the windows again and later re-painted a dull coat along the area around the canopy to bring it back into consistency with the rest of the plane. I can see in these pics we still have some touch up to do. Despite that, my USAF took delivery of this plane anyway.
Because of the tightness in the facility, I made an effort to get some more space by trying to organize things a bit. That's when I really got tired of this C-17-wannabe horse and the box it rode in on, cluttering up my hangar space! So, we set things aside and started on this by first glueing the wings in place:
This was a very poor fit. After nearly an hour of working it, this was the final result that I had to live with:
There's gonna be a lot of sanding and filling and repainting to do there...
When the wings were finally dry enough, we stepped back to find that every stinking wheel had broken off the landing gear struts:
We are going to get the decals on and the window masks off and possibly even the dull coat shot on this thing before I get to work fixing those wheels. Enough of that, time to work on something easy...
I chose the AH-56 Cheyenne to work on since that seemed to be the easiest so far. It was. We had applied some filler in the gaps I'd found and sanded down the steps:
After another coat of black primer, I saw it was looking great:
Certainly far better than the A-400...
Off she went to the spray booth to get her coat of Olive Drab:
Next we shot a dull coat on the Japanese U-125 since we had it out for the Stealth fighter already:
This bird then got her landing gear on as well. Sword does not give you very great attachment points to fasten these struts securely and firmly:
Here's a better shot of her stubby legs. They are holding her up quite nicely:
But I'm getting a bit ahead of myself. All this time some of the main cabin windows had opened up while we were trying to mask them way back before paint was first shot. We just left them alone all this time.....until now. That's when we pushed them all the way in and used Micro Scale Window glue to make new windows. Those are the white ovals on the sides of the fuselage:
Finally we got the last of the landing gear bay doors and other detail parts on this bird, finishing all the assembly. After some touch up painting, she was delivered to my Japanese Air Force.
That completes the tour of the Hangar, now on to the Shipyards...
We've been keeping busy on the various naval projects going on here and are planning on laying the keel to a couple more projects soon. Meanwhile, this is what was done in the slipways this past week.
First of all, some of the paint on the side of the RAF Rescue Launch was pulled away earlier and so we masked it off and shot another coat of black on the side to fix it:
Once that was dry, she was looking good. We can now move forward on her soon:
Meanwhile in the next slipway, the final parts were installed on HMS Kelly, except for the ship's boats:
After some touch up painting and the addition of her boats, we were able to launch her and send her out on her shakedown cruise before being delivered to my British Navy.
That was a short trip through the Shipyards, and so we move on to the Motor Pool...
Here in the Motor Pool, things went fairly smoothly as well. We had gotten quite far on the Swedish Assault Gun so I wanted to get it further along as close to the paint stage as possible. We got the tracks installed first since they needed to be on before the fenders and casemate:
The individual track pieces on this model are only about a millimeter and a quarter long. Very tiny!
While they were drying, we got the main gun and rear stowage box installed on the casemate:
The kit includes a photo-etch piece for the perforated muzzle break on the end.. I'll have that done later once the P/E is annealed. A test fitting of the casemate on the hull shows some gaps that will need to be dealt with:
Time to let that set for a bit and show you our next projects. These next two got another coat of paint on them. First the British Bushmaster that needed a more solid coat of paint:
Then this Canadian Cadillac Gage was giving me the stinkeye for forgetting it for so long and so we pulled that over to the spray booth and shot the remaining OD from the Cheyenne project:
Finally, I got some more progress on my Russian models. First, I got the dull coat on the beastie:
Later we tried some combinations of paint and Future/Pledge to make this main gun a little less loose so the gun would remain in any angle I wanted to pose it in. We had some success:
Later on we finished weathering the beastie on the lower hull and tracks. I didn't want to over weather this as I figured they would be mostly traveling on roads or being covered up and carried by tank transporters. Once that was done, my Russian Army took delivery of this gun.
This last one was giving me a bit of trouble. We pulled out the CLUB M and started masking the windows to get the cab ready for paint. Unfortunately, the side windows decided to come unglued on one side and push in. Now the cab was fully sealed so fixing them was a real issue. Finally since we couldn't get the cab off and opened up, we cut some holes in the rear cab wall so I could stick something in and push them shut once glue was re-applied to the open sides:
Since that was going to be hidden from view by the engine housing, I didn't care. We re-glued the windows and when they were dry, we finished masking them successfully this time. Then the top weather cover was added to the roof of the cab after I'd already had the inside top painted. It looks crooked in this pic but we got it straightened up:
Paint was then shot and came out smooth:
Since I had the launch cabin that houses the launch tubes already masked and I had the base paint out, we finished shooting paint on the outer launch cabin:
Finally, the last bit of work on this was the dry-fitting of the whole thing together:
She's a big one!
I hope to start getting Silly Putty applied to this and the Australian Bushmaster so the camouflage colors can be shot. Hopefully this coming week.
Thank you all for joining me on this latest tour! Comments are always welcome.
Duke Maddog
Well-known member
Wow, the manufacturing plant has been humming along quite a bit! It feels great to have all this time to keep things going.
It's time for another tour, the trams are waiting! All aboard!
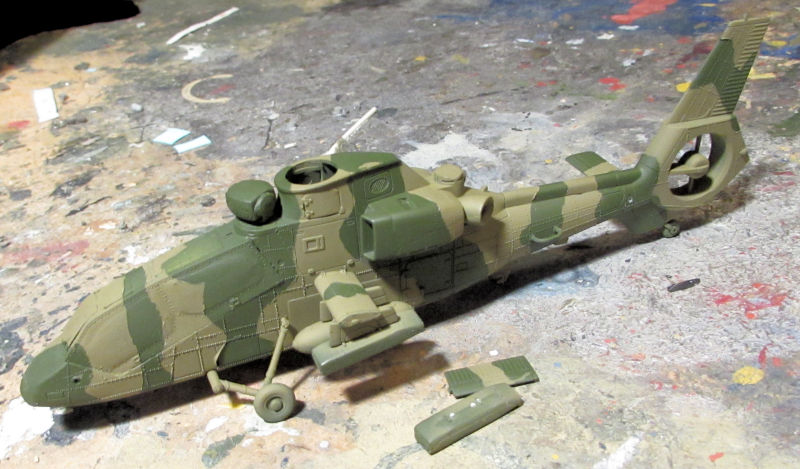
Starting in the Hangar again, you'll see that the Japanese OH-1 has finally got her markings on. This kit has been fighting me more than expected, but we're starting to see the light at the end of the tunnel:
Not much more to do on that one. Since decals were being applied, the AH-56 Cheyenne got markings as well:
Just for fun we added the main rotors to get a preview of what this one should look like when it's done:
Next up it was time to paint the canopy so the whole thing was masked off with tape and a black base was painted on first since the paint is always so transparent on first pass:
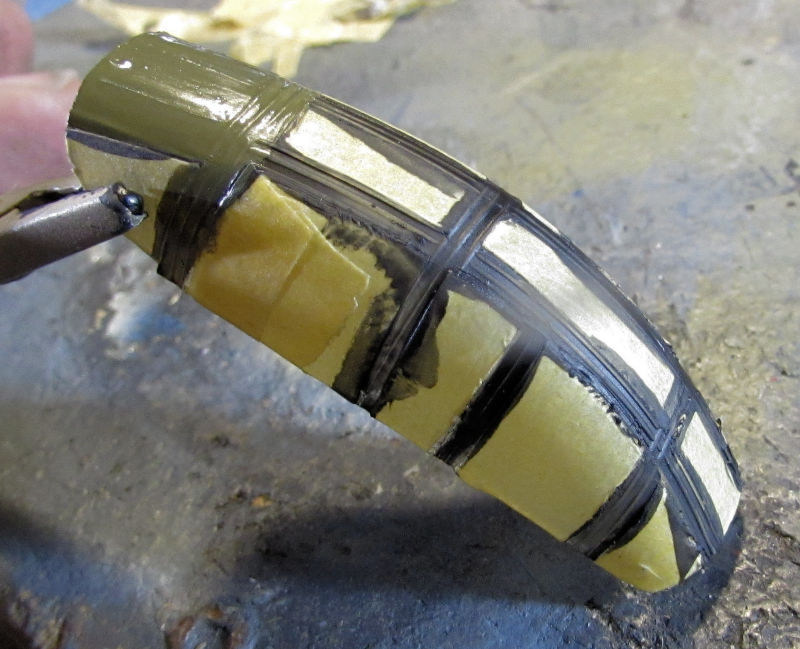
Here it is all painted up:
I know the color looks dark here in this pic, but it is the same OD color.
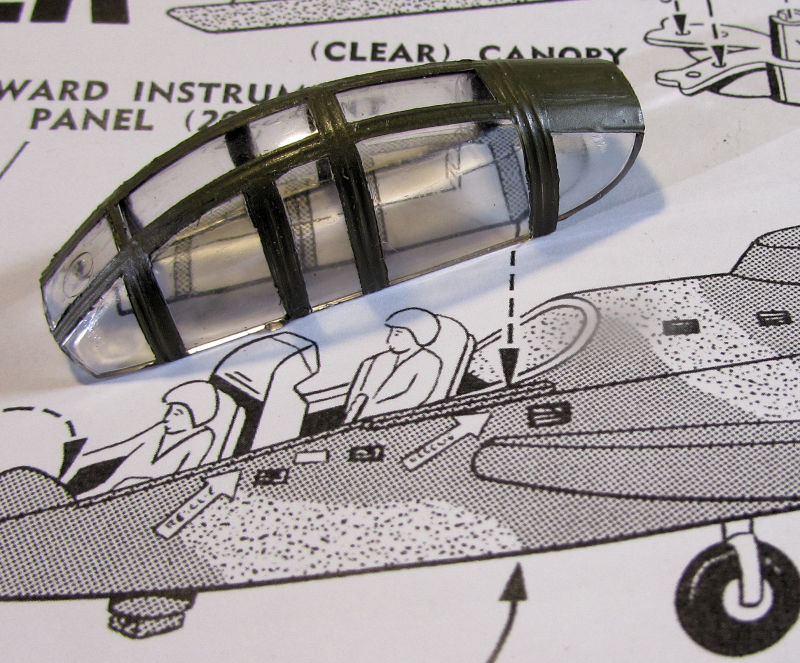
Another dry fit to see how well this canopy fits:
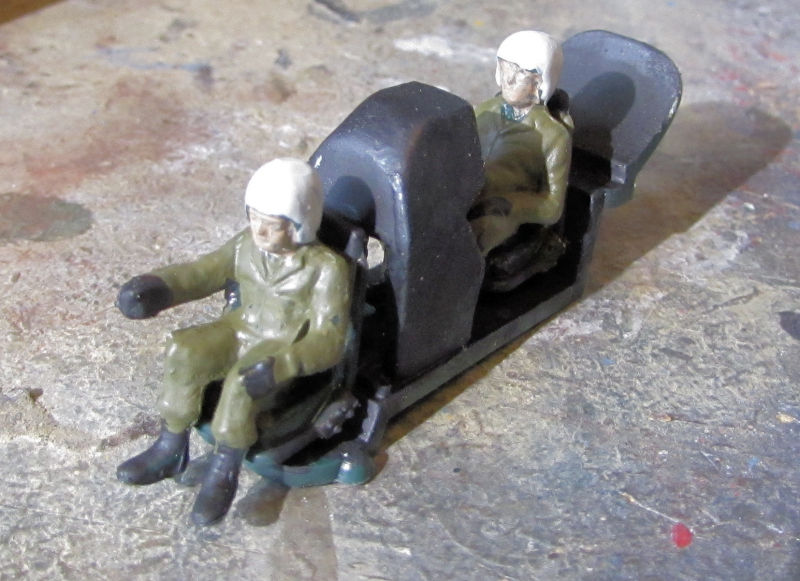
Amazingly perfect fit for such an old mold! I love it! There was an ejector pin mark on the front of this canopy so we needed to sand that away and then polish the clear part to bring it back to standard. I didn't shoot pics of that, but we did install the cockpit permanently, after painting the front instrument panel. Here's a shot of the cockpit and instrument panel:
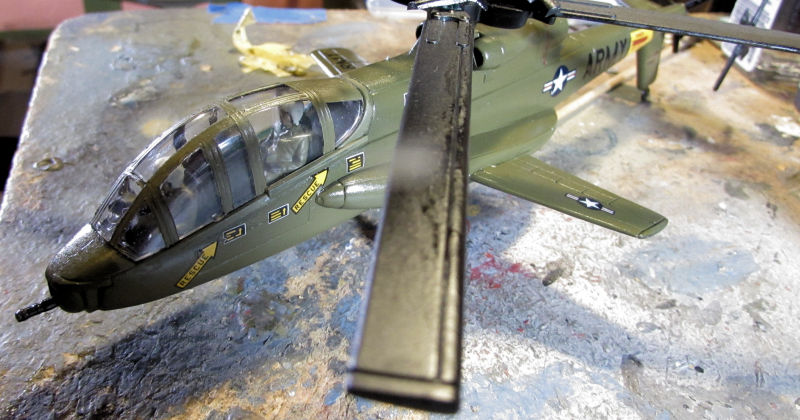
Afterward we put on the two tail rotors:
Finally the canopy was cemented into place. All that's left is a bit of touch up painting and this bird is done:
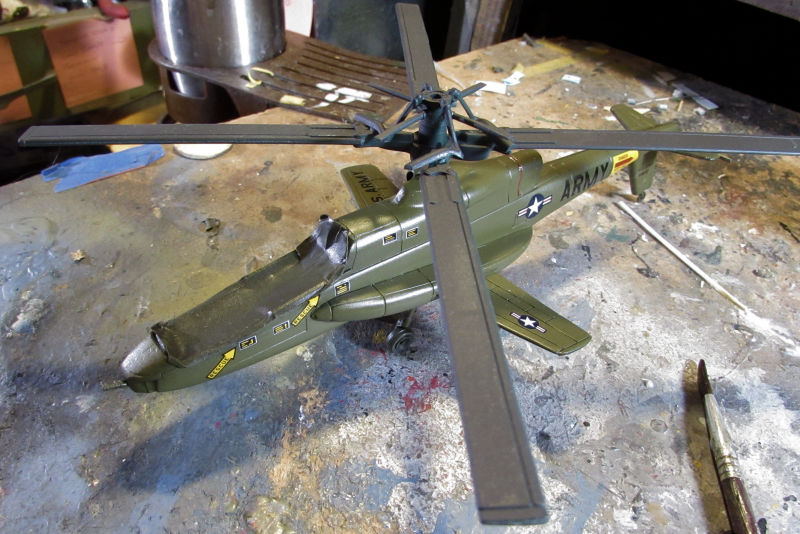
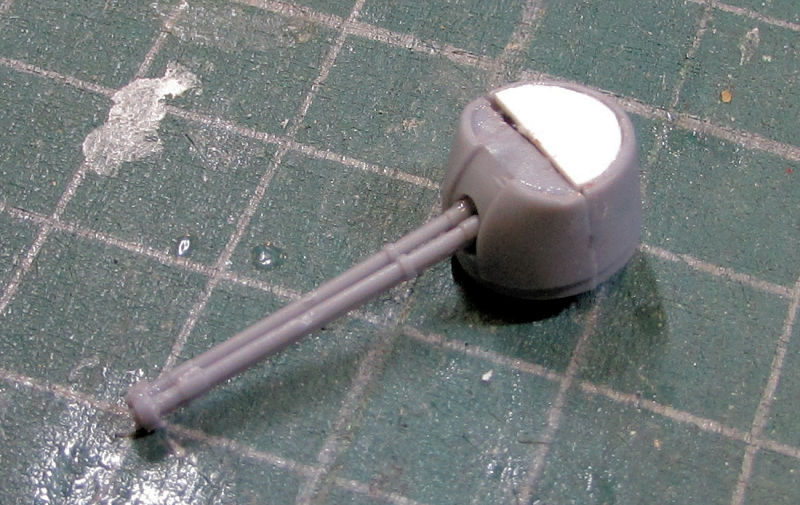
Our next project is this AH-1Z that had the cockpit painted so it was finally enclosed inside the fuselage:
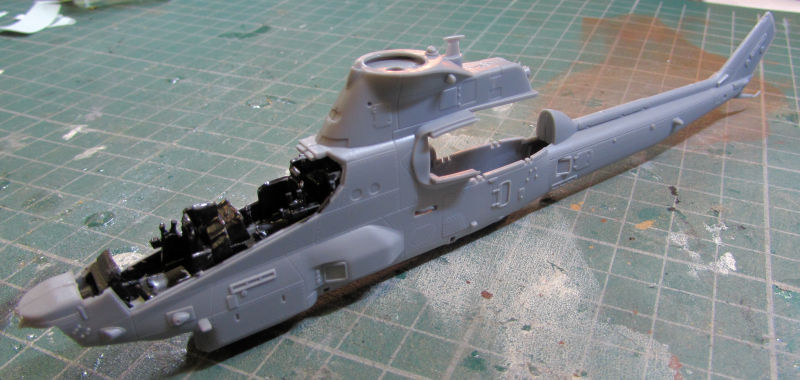
We then started construction on the nose gun turret. Once the two halves were put together; we found that the bottom was open ended:
You're looking at the bottom of that turret. We searched everywhere on the instruction sheet and sprues and found no trace of a part that is supposed to go there. So, out came the strip styrene. A bottom plate was fashioned and glued in place:
I may put another larger plate on on top of that....
Once that was done, we assembled the gun... all four parts of it:
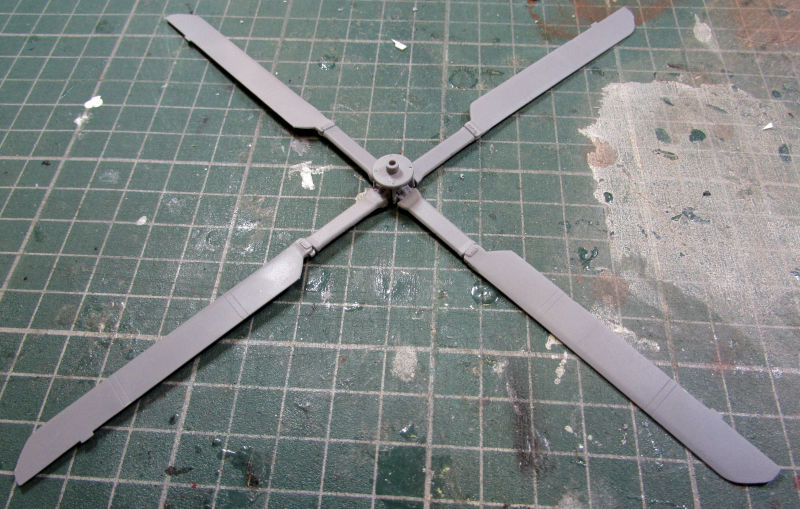
Main rotors were than assembled:
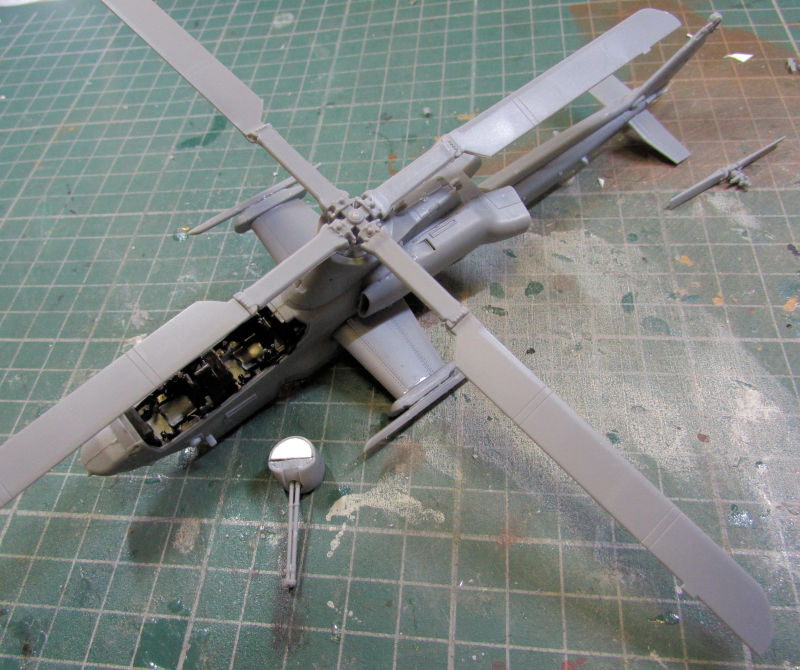
Engines, horizontal stabilizers, and stub wings were installed after that. I also added the small piece that holds the tail rotor on top of the tail. Here's the whole thing all ready for paint:
That completes the Hangar portion of the tour. A brief detour through the shipyards shows that the RAF Rescue launch got some additional detail parts:
Followed by the installation of her screws and rudders:
Now on to the Motor Pool.
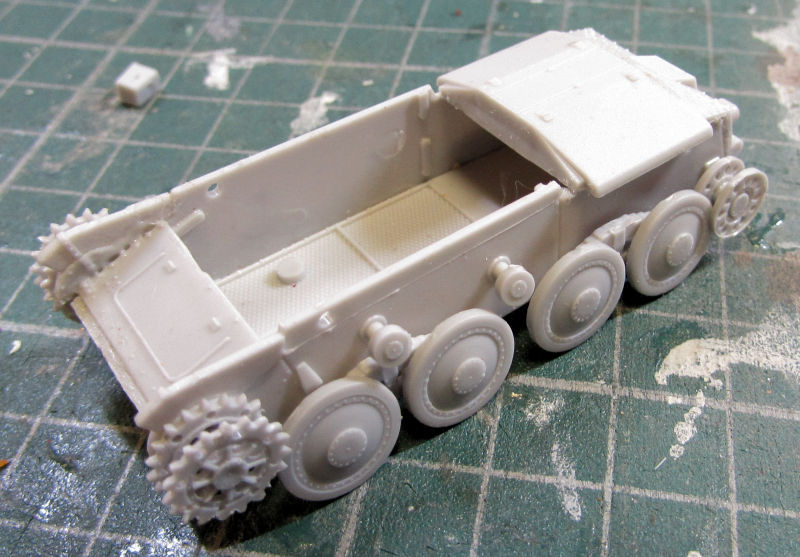
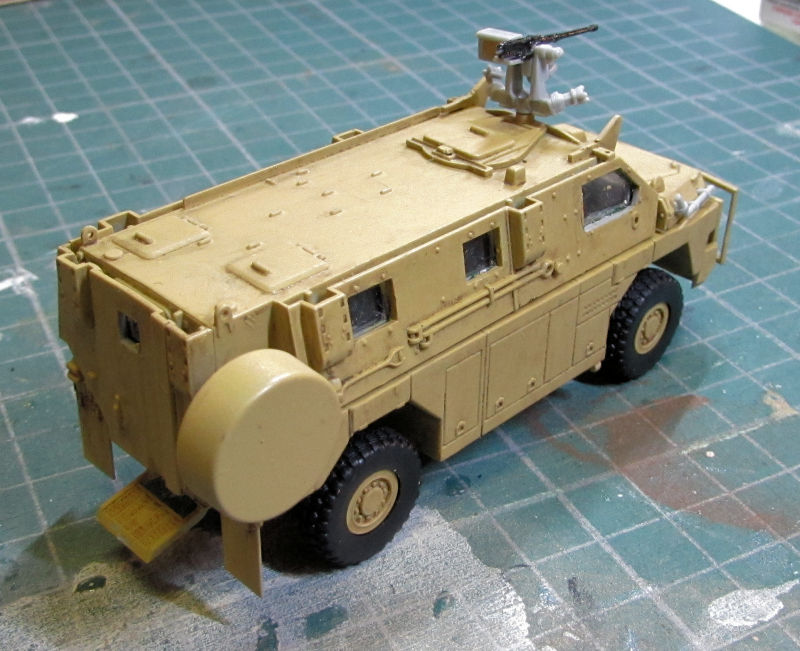
A few things got painted with a base coat first. One was the troublesome HUMVEE that finally got a coat of US Desert Sand:
The Swedish Assault gun also got a base coat of green drab:
...which was left over after basecoating this little gem:
While those were drying we tried to assemble the wheels on the SdKfz 234 Pakwagen. After doing these two; I had enough. I'll do the other six later:
After that, I decided to move forward on this Shelf Queen, which had been languishing for some time because first the decals went missing, then when they were found the instruction sheet went missing, then the decals disappeared again when the instruction sheet was found again. Finally after this happening four times, I was able to keep both and so we got the decals on this German Type SSYMS 80 flatcar:
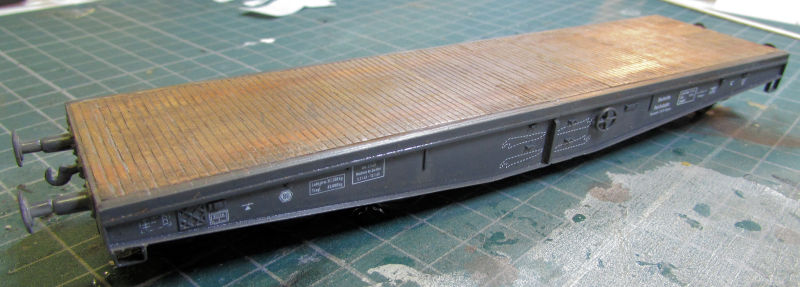
Some more detailing on that and it will be done.
Next we had gloss coated the Cadillac Gage to add decals, but found that these had no markings. So this got a wash, followed by the addition of the machine guns on top:
Then the dull coat went on:
I found it quite interesting that the Testor's Dullcote frosted the wheels on this. First time that ever happened to me. The little piece of sprue is holding that turret machine gun up while it dries. I may even dig through my decal stash to add some decals to this, even though it went without markings.
When the Cadillac Gage got the gloss coat, we also shot a gloss coat on the SAS Bushmaster, thinking that decals were provided for this as well. There were some but the instructions stated that this didn't really need them. We checked out where they would go and found that they go on rather difficult areas to apply them to so I decided to leave all off but one. More on that later. First, here's the Bushmaster after a brown wash over the gloss coat:
I had not cemented the upper hull to the lower one on this because I still needed the interior painted. We pulled off the top and painted the interior; basic as it is. We had also installed the wheels and tires:
Some of that interior might be seen through the rather large windows so I felt that was needed. Following that, We shot a dull coat on this; removed the masks and assembled the machine gun assembly on top. A few last detail parts were installed too. Here it is with the machine gun assembly dry fit to the top:

Oh and that one decal I used, you'll see it in the finished post.
Now that concludes our latest tour of Maddog Manufacturing. I hope you enjoyed it. Thank you all for stopping in, comments are always welcome.
It's time for another tour, the trams are waiting! All aboard!
Starting in the Hangar again, you'll see that the Japanese OH-1 has finally got her markings on. This kit has been fighting me more than expected, but we're starting to see the light at the end of the tunnel:
Not much more to do on that one. Since decals were being applied, the AH-56 Cheyenne got markings as well:
Just for fun we added the main rotors to get a preview of what this one should look like when it's done:
Next up it was time to paint the canopy so the whole thing was masked off with tape and a black base was painted on first since the paint is always so transparent on first pass:
Here it is all painted up:
I know the color looks dark here in this pic, but it is the same OD color.
Another dry fit to see how well this canopy fits:
Amazingly perfect fit for such an old mold! I love it! There was an ejector pin mark on the front of this canopy so we needed to sand that away and then polish the clear part to bring it back to standard. I didn't shoot pics of that, but we did install the cockpit permanently, after painting the front instrument panel. Here's a shot of the cockpit and instrument panel:
Afterward we put on the two tail rotors:
Finally the canopy was cemented into place. All that's left is a bit of touch up painting and this bird is done:
Our next project is this AH-1Z that had the cockpit painted so it was finally enclosed inside the fuselage:
We then started construction on the nose gun turret. Once the two halves were put together; we found that the bottom was open ended:
You're looking at the bottom of that turret. We searched everywhere on the instruction sheet and sprues and found no trace of a part that is supposed to go there. So, out came the strip styrene. A bottom plate was fashioned and glued in place:
I may put another larger plate on on top of that....
Once that was done, we assembled the gun... all four parts of it:
Main rotors were than assembled:
Engines, horizontal stabilizers, and stub wings were installed after that. I also added the small piece that holds the tail rotor on top of the tail. Here's the whole thing all ready for paint:
That completes the Hangar portion of the tour. A brief detour through the shipyards shows that the RAF Rescue launch got some additional detail parts:
Followed by the installation of her screws and rudders:
Now on to the Motor Pool.
A few things got painted with a base coat first. One was the troublesome HUMVEE that finally got a coat of US Desert Sand:
The Swedish Assault gun also got a base coat of green drab:
...which was left over after basecoating this little gem:
While those were drying we tried to assemble the wheels on the SdKfz 234 Pakwagen. After doing these two; I had enough. I'll do the other six later:
After that, I decided to move forward on this Shelf Queen, which had been languishing for some time because first the decals went missing, then when they were found the instruction sheet went missing, then the decals disappeared again when the instruction sheet was found again. Finally after this happening four times, I was able to keep both and so we got the decals on this German Type SSYMS 80 flatcar:
Some more detailing on that and it will be done.
Next we had gloss coated the Cadillac Gage to add decals, but found that these had no markings. So this got a wash, followed by the addition of the machine guns on top:
Then the dull coat went on:
I found it quite interesting that the Testor's Dullcote frosted the wheels on this. First time that ever happened to me. The little piece of sprue is holding that turret machine gun up while it dries. I may even dig through my decal stash to add some decals to this, even though it went without markings.
When the Cadillac Gage got the gloss coat, we also shot a gloss coat on the SAS Bushmaster, thinking that decals were provided for this as well. There were some but the instructions stated that this didn't really need them. We checked out where they would go and found that they go on rather difficult areas to apply them to so I decided to leave all off but one. More on that later. First, here's the Bushmaster after a brown wash over the gloss coat:
I had not cemented the upper hull to the lower one on this because I still needed the interior painted. We pulled off the top and painted the interior; basic as it is. We had also installed the wheels and tires:
Some of that interior might be seen through the rather large windows so I felt that was needed. Following that, We shot a dull coat on this; removed the masks and assembled the machine gun assembly on top. A few last detail parts were installed too. Here it is with the machine gun assembly dry fit to the top:
Oh and that one decal I used, you'll see it in the finished post.
Now that concludes our latest tour of Maddog Manufacturing. I hope you enjoyed it. Thank you all for stopping in, comments are always welcome.
Duke Maddog
Well-known member
Wow, for some reason I feel like the last tour or two never got published here. I need to check and see what's going on...
Yep! I was right! Two tours did not get posted here.

Okay, I won't go through the whole thing, but I'll show a recap of what happened in the previous two tours.
In the Hangar. we got all this progress done:
A lot of work went into the Duck, bringing it to this stage:
The AH-1 Zulu got the canopy on and masked:
The two AH-G's also made some progress; I won't recap them here, you can see them in the Campaign Headquarters under Charlie.
The next one is the Russian Ka-29 Helix that has been fighting me the whole time. After tearing it open three times before to fix something inside, we finally got it here:
And during some down time, the crew built these two items to help with future aircraft builds:
Moving on to the Shipyards, we laid the keel for the USS Indianapolis:
And also laid the keel for the USS Enterprise, post SLEP:
You can see a lot of work is needed on this one; so we got s head start on the island too:
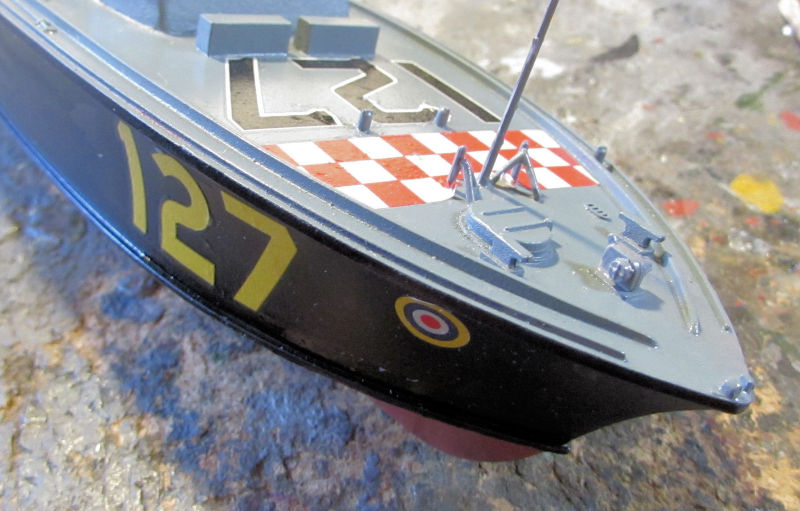
In addition to that, we also got the markings on the RAF Rescue Launch:
Now we move on to the Motor Pool...
Progress was made on the three Russian tanks, bringing them almost to the paint stage:
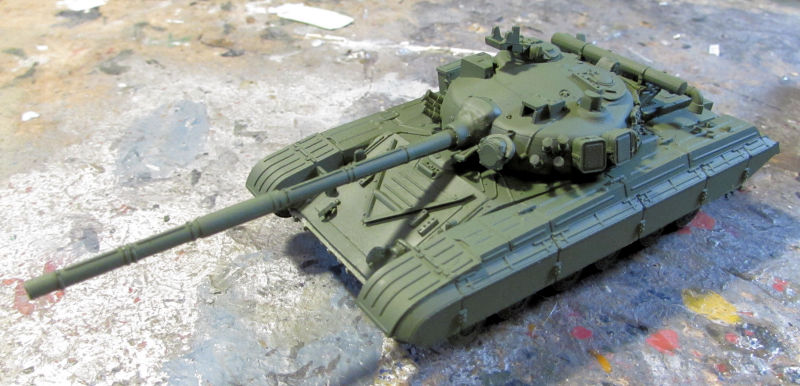
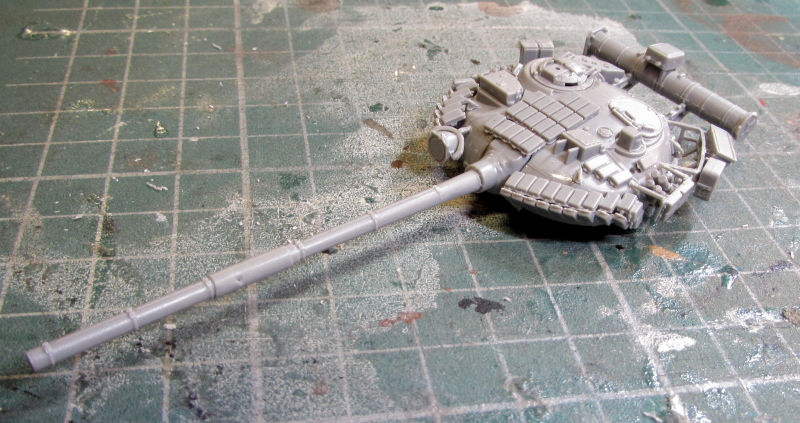
In addition to that, we also started a T-62 tank with ERA:

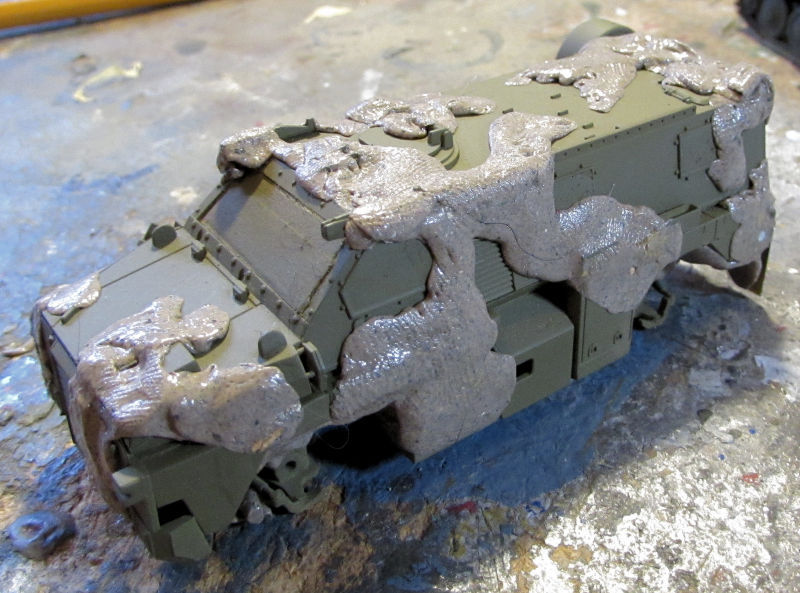
The Australian Bushmaster was masked with Silly Putty for the second camouflage color:
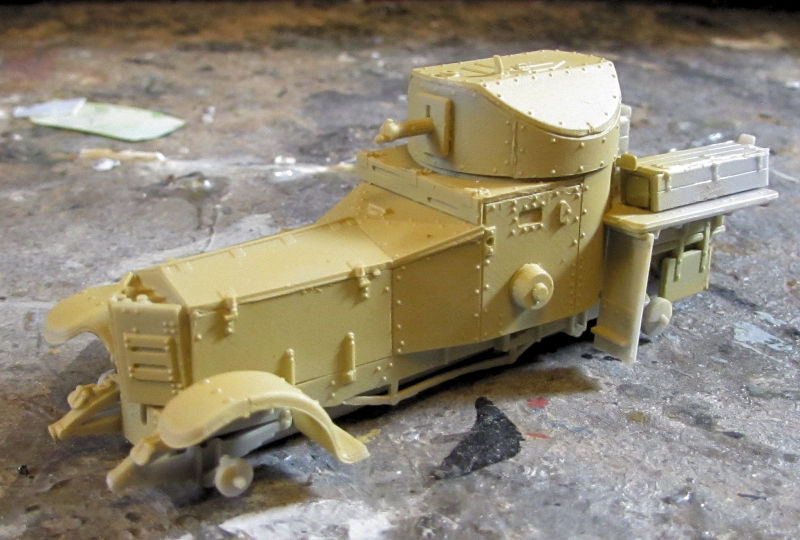
And we also got started on a new armored car: the Rolls Royce Pattern 20:

The last one we started was a Japanese Material Handler which was built in twelve hours... not straight, but three four-hour sessions:
You may or may not remember that one, but it is now completed along with these two that rolled out of the Motor Pool for delivery to their respective Armies. I'm sure you've seen them in their respective posts:

And now you are fully up to date on the latest work at Maddog Manufacturing. Now to go prepare for the next tour, which hopefully will be published this time!
Yep! I was right! Two tours did not get posted here.
Okay, I won't go through the whole thing, but I'll show a recap of what happened in the previous two tours.
In the Hangar. we got all this progress done:
A lot of work went into the Duck, bringing it to this stage:
The AH-1 Zulu got the canopy on and masked:
The two AH-G's also made some progress; I won't recap them here, you can see them in the Campaign Headquarters under Charlie.
The next one is the Russian Ka-29 Helix that has been fighting me the whole time. After tearing it open three times before to fix something inside, we finally got it here:
And during some down time, the crew built these two items to help with future aircraft builds:
Moving on to the Shipyards, we laid the keel for the USS Indianapolis:
And also laid the keel for the USS Enterprise, post SLEP:
You can see a lot of work is needed on this one; so we got s head start on the island too:
In addition to that, we also got the markings on the RAF Rescue Launch:
Now we move on to the Motor Pool...
Progress was made on the three Russian tanks, bringing them almost to the paint stage:
In addition to that, we also started a T-62 tank with ERA:
The Australian Bushmaster was masked with Silly Putty for the second camouflage color:
And we also got started on a new armored car: the Rolls Royce Pattern 20:
The last one we started was a Japanese Material Handler which was built in twelve hours... not straight, but three four-hour sessions:
You may or may not remember that one, but it is now completed along with these two that rolled out of the Motor Pool for delivery to their respective Armies. I'm sure you've seen them in their respective posts:
And now you are fully up to date on the latest work at Maddog Manufacturing. Now to go prepare for the next tour, which hopefully will be published this time!
Duke Maddog
Well-known member
Okay, now we are ready for the next tour of the plant. The trams have been cleaned and maintained and are now ready for boarding. This will be a bit of a short tour this time as the crew in the Shipyards took some time off.
All aboard!
Here in the Hangar we got the first color shot on the top of the Zulu Cobra:

It is a bit hard to see, but I assure you it is there. After that dried, we masked off the top color to prepare for the next color:
The Marine Harrier also got the first color shot on the top:
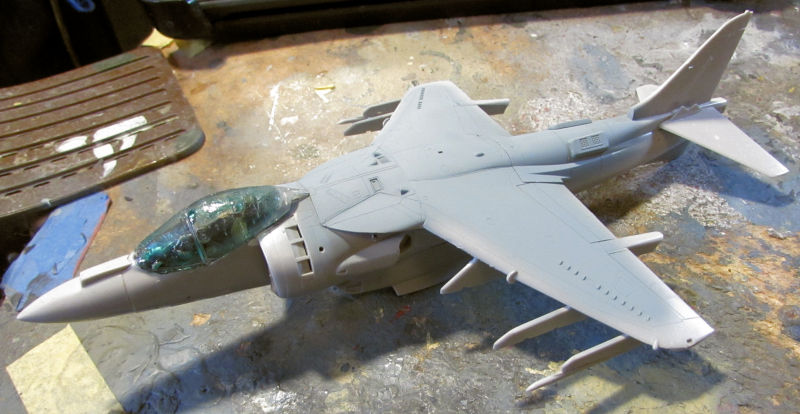
This one will have three colors on it, so when it dried we also masked off the top for the second grey:
That was all that got done in the Hangar; yeah, it has been a slim week time wise. Here in the Motor Pool, we were able to get even more done, mostly because we were able to fire up the spray booth.
First was the Australian Bushmaster which got the second color:
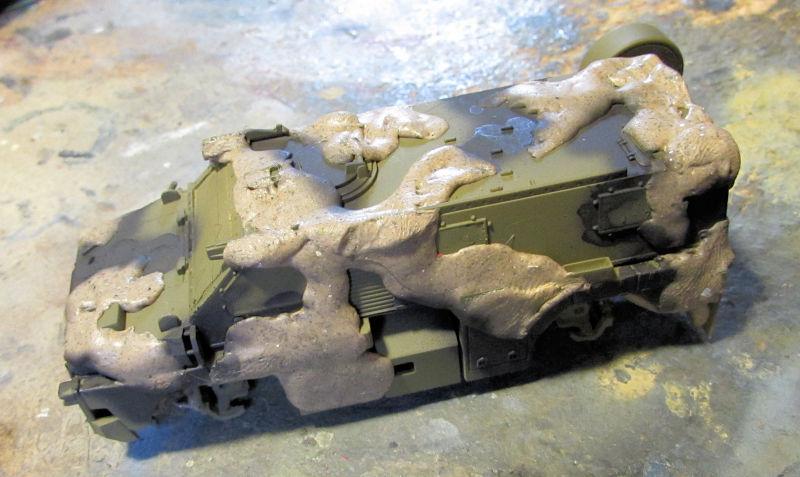
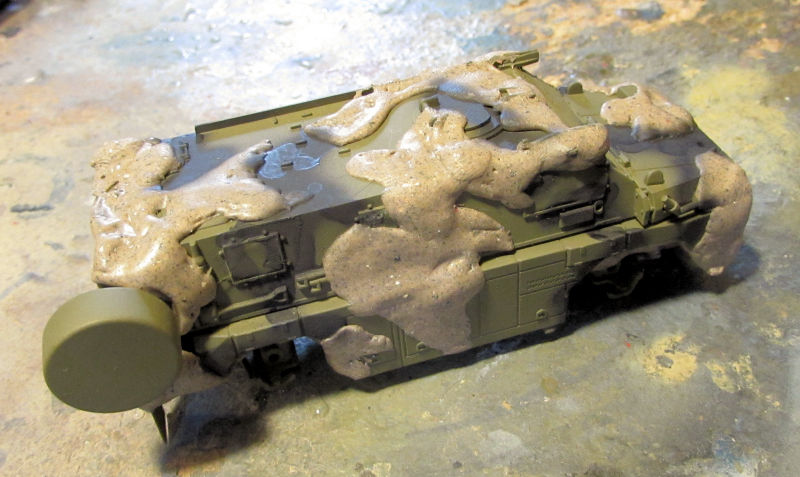
Once that dried, we got that one covered for the third color:
That should be done with painting fairly soon...
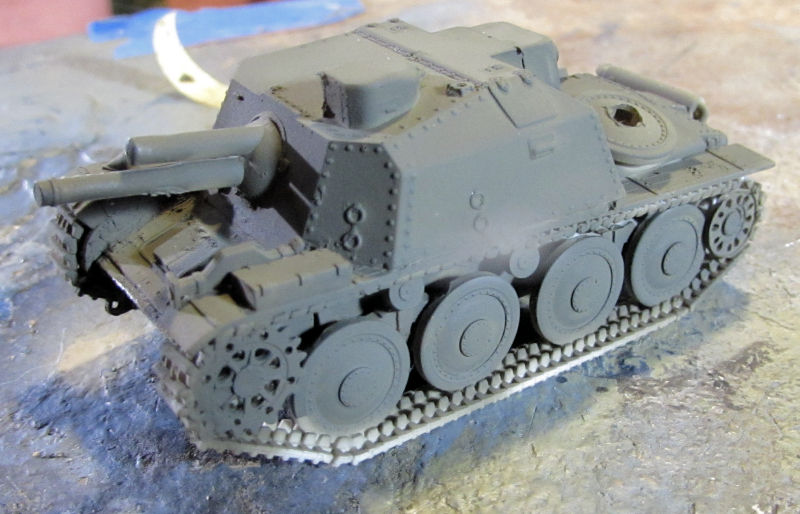
We also shot some paint on the Swedish Assault Gun. However, due to the fact that there was no paint schematic included in the instructions; we had to freehand this and guess where the colors went based on the few views seen on the box. First came the green basecoat:

Followed by the second color, brown:
... and then the third color, black. I used a lightened black for this one:
Once all that was dry, we glossed it for the decals:
Only to find that the decals (and photo-etch gun muzzle among others) have gone on walkabout. When I track them down, this little thing will be finished!
Next we also shot some color on the Rolls Royce. This one was done in a British desert tan because I like the big roundel on the top of the turret on this scheme:
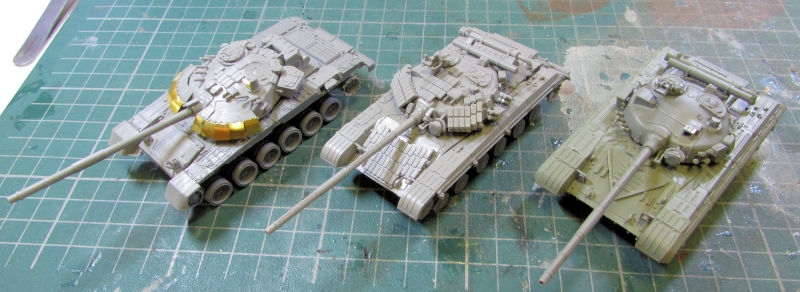
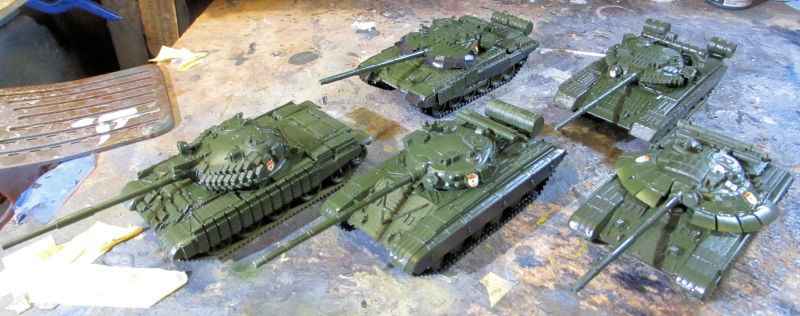
After that, the three Russian tanks got their green basecoat:
The T-64 Mod 1981:
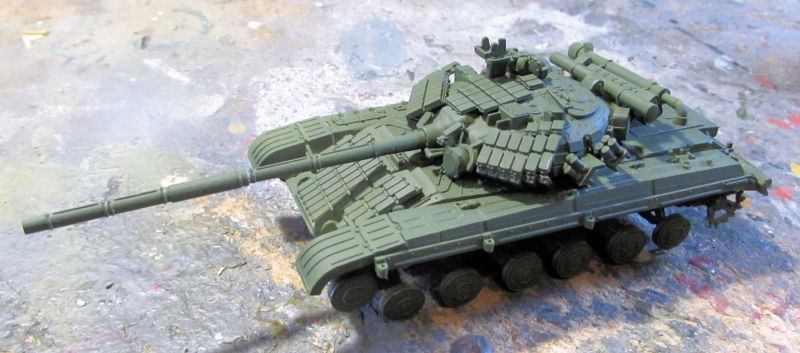
The T-64AV:
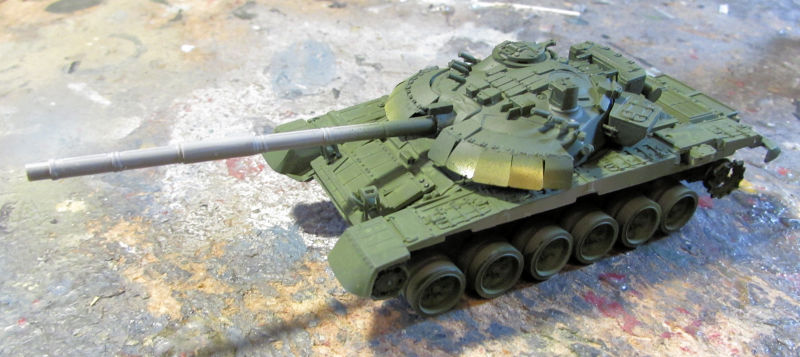
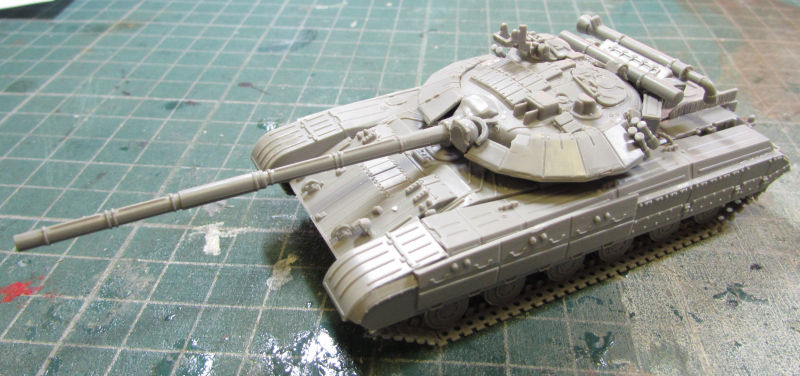
...and the T-72 Rogatka:
And now that completes this short tour of Maddog Manufacturing. Thank you all for coming in, comments are welcome.
All aboard!
Here in the Hangar we got the first color shot on the top of the Zulu Cobra:
It is a bit hard to see, but I assure you it is there. After that dried, we masked off the top color to prepare for the next color:
The Marine Harrier also got the first color shot on the top:
This one will have three colors on it, so when it dried we also masked off the top for the second grey:
That was all that got done in the Hangar; yeah, it has been a slim week time wise. Here in the Motor Pool, we were able to get even more done, mostly because we were able to fire up the spray booth.
First was the Australian Bushmaster which got the second color:
Once that dried, we got that one covered for the third color:
That should be done with painting fairly soon...
We also shot some paint on the Swedish Assault Gun. However, due to the fact that there was no paint schematic included in the instructions; we had to freehand this and guess where the colors went based on the few views seen on the box. First came the green basecoat:
Followed by the second color, brown:
... and then the third color, black. I used a lightened black for this one:
Once all that was dry, we glossed it for the decals:
Only to find that the decals (and photo-etch gun muzzle among others) have gone on walkabout. When I track them down, this little thing will be finished!
Next we also shot some color on the Rolls Royce. This one was done in a British desert tan because I like the big roundel on the top of the turret on this scheme:
After that, the three Russian tanks got their green basecoat:
The T-64 Mod 1981:
The T-64AV:
...and the T-72 Rogatka:
And now that completes this short tour of Maddog Manufacturing. Thank you all for coming in, comments are welcome.
Duke Maddog
Well-known member
Once again it is time for another tour of the plant. This will be a long one, but quick as there is not going to be too much narration here. So without further ado, lets board the trams!
Starting in the Hangar again, we managed to get some paint down on my three Cobras. Before painting, we managed to put together the five-part canopy on the AH-1G Early:
That was then masked off like the -Late Cobra so we could shoot paint on both at the same time:
Then it was shot with a base coat of OD Green:
Since I shot that one, and the -Late was already masked and ready to go, it also got a base coat of OD Green:
We might just clear coat these and add the decals right away before adding all the breakable parts on these. Meanwhile, the masking came off the AH-1 Zulu and on close inspection, we realized on the left side, the upper color did not come down far enough on the engine nacelle to match the right side. So the left side was re-masked and sprayed again, setting this issue right:
That completes the Hangar part of the tour, time to visit the Motor Pool...
This again, will be quite fast. So much of the work is repetitive on multiple models but since all are different; I'm showing all the work.
To start, the Australian Bushmaster was given a coat of gloss, and then the decals were applied:
Later it was dullcoated for mask removal, weathering and final detail parts:
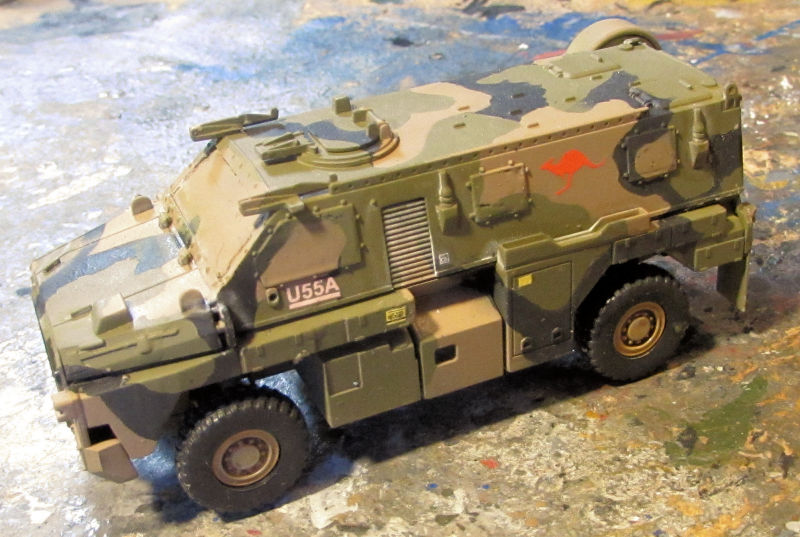
The next time this will be seen is when my Australian Army takes delivery of the finished vehicle.
Now on to the next bunch.....
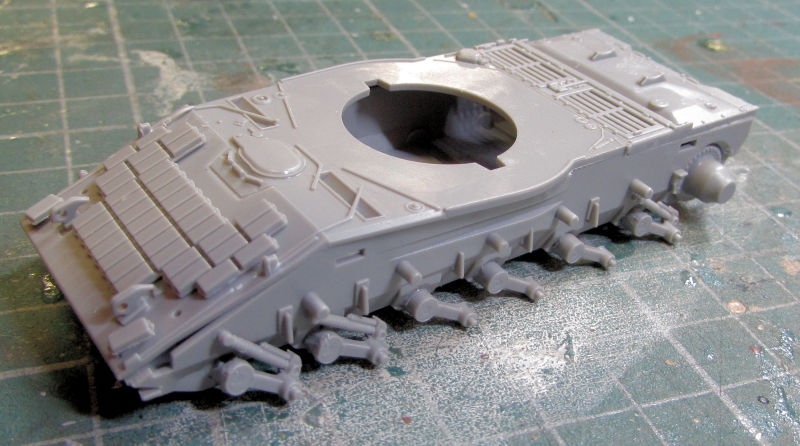
I'll start with this first one that I had purchased for my birthday. It is the Trumpeter T-62 with ERA. The upper hull was worked on first, getting all the stowage boxes and other parts installed:

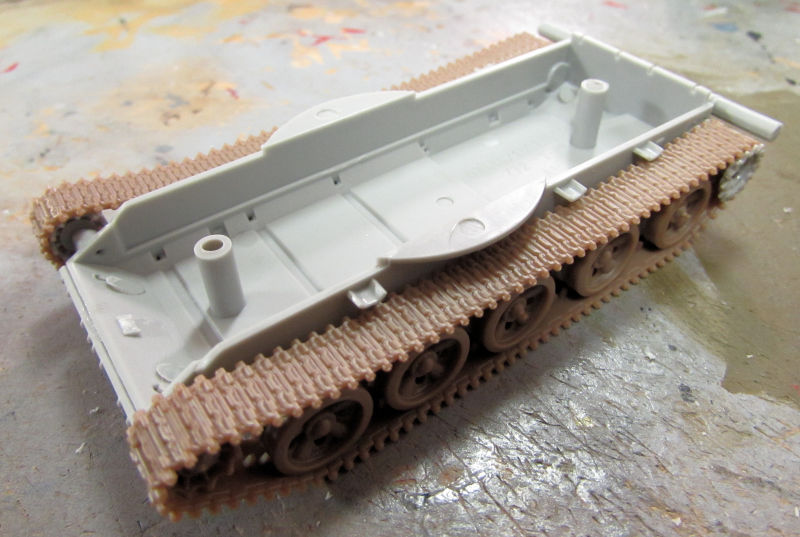
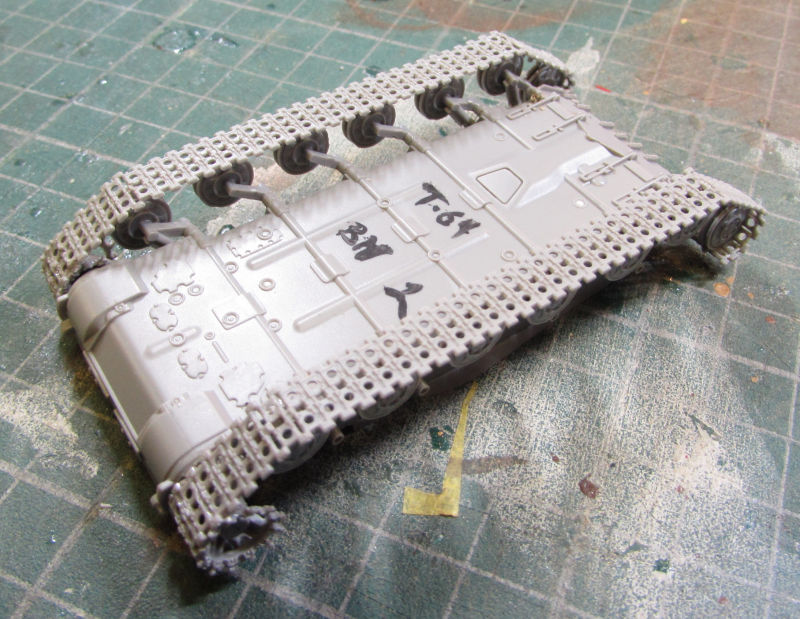
Next was the lower hull. This was easy as the whole outside wheels and tracks were all one piece:
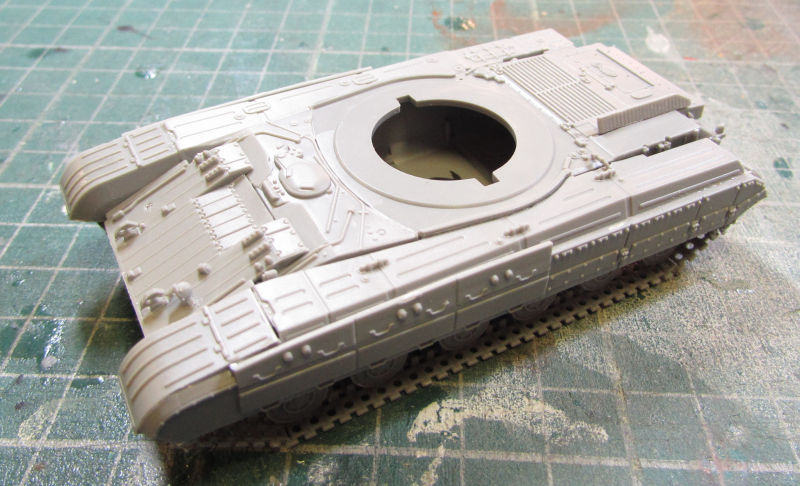
Upper and lower hulls assembled:

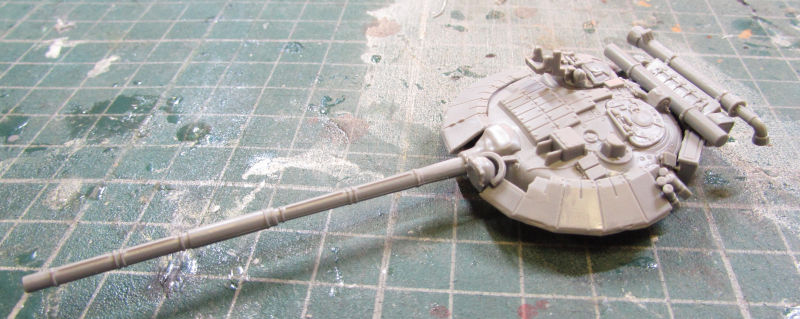
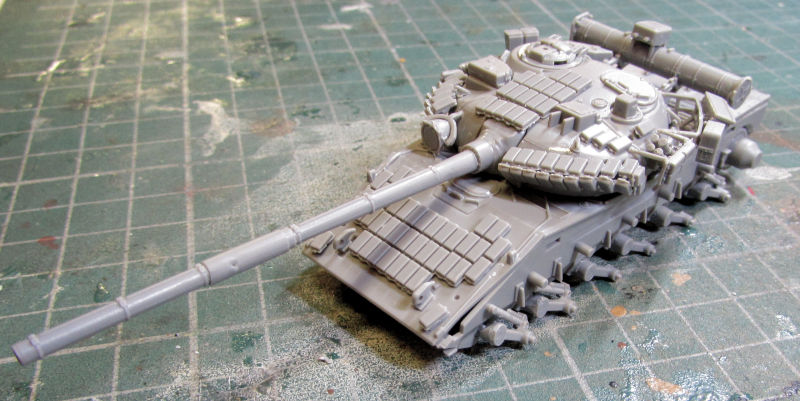
After that was the turret:
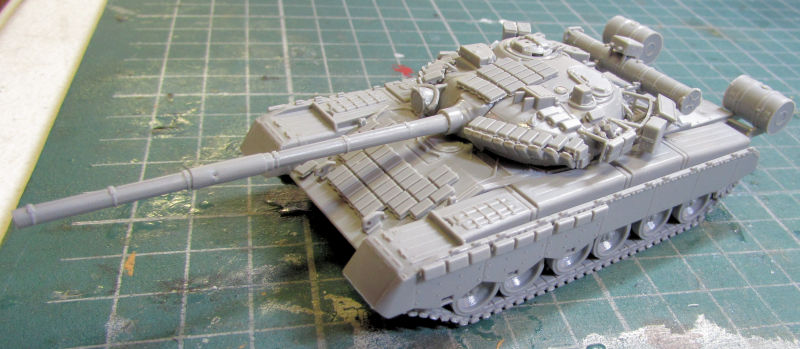
Finally the whole thing was painted up:
Moving on from there, we worked on the T-64 Mod 1981. Tracks were installed, then painted with a base coat of flat black:
Everything put together and clearcoated for decals:

The next T-64 is the AV version. Again, tracks installed and painted black:

Then before we could put the hulls together, we had to add some photo-etch skirts to the upper hull fenders. These were attached with Gator;s Grip Glue as is all the photo-etch that we added to the rest of the models. Some photo-etch was also added to the engine deck and the turret on this one:
Additional photo-etch was needed on the front of the upper hull:
Then this version calls for hanging skirts of ERA to the side of the tank.....using photo-etch hooks. I'd done this once before and swore "never again!". But here I am, doing it again:
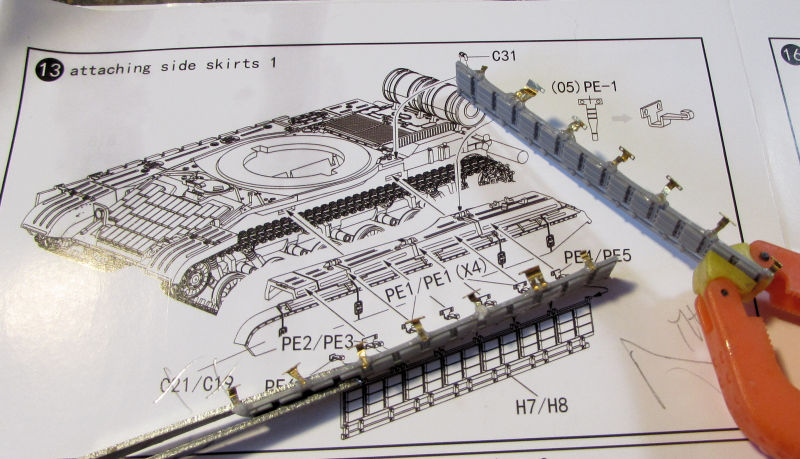
You can see in the upper right of the diagram how these little tiny bits needed to be folded. At least two broke from unavoidable excessive folding. After that ordeal, I wanted to see that this was all worth it so here is the glamour shot before those skirts go on:
Moving on, we worked some more on the T-64 BM-2, starting again with the tracks:
Upper hull was worked on as well with side skirts added and then fastened down to the lower hull:
Turret was then started. Yes it is going to get the same type of flaps that are on the T-72:
The glamour shot of this one as well:
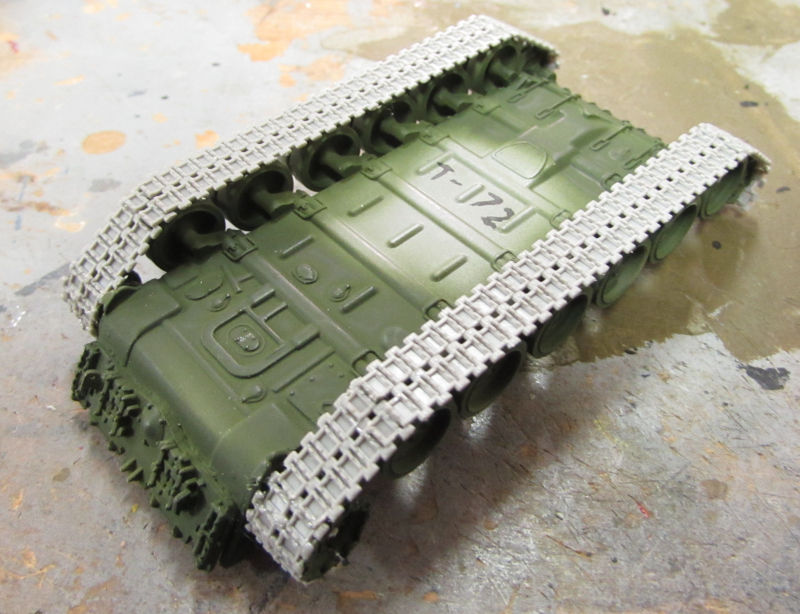
Speaking of the T-72, this one also got the tracks installed and painted:
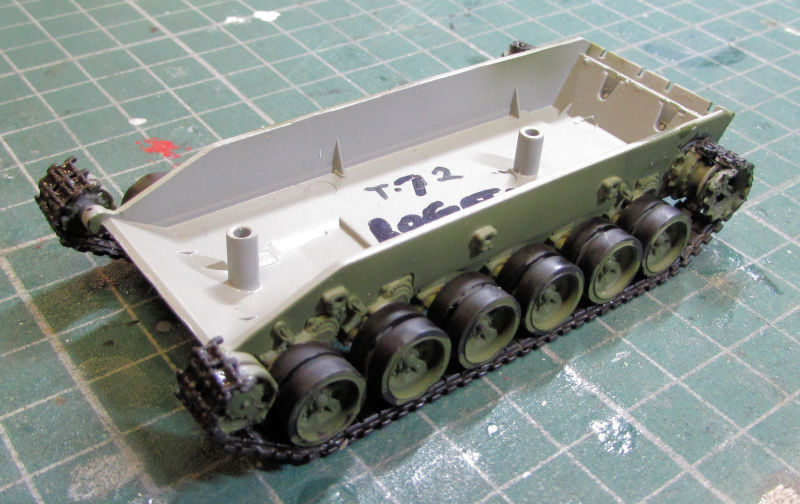
Basecoat painted, and then the flaps because I wanted to see them black. Fuel tanks also added to the back:


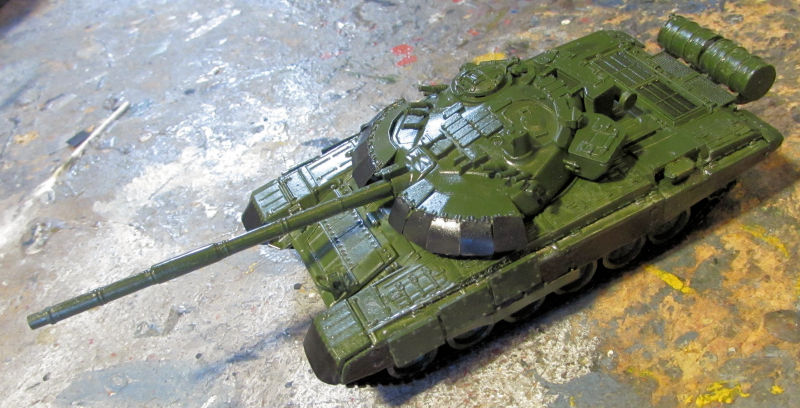
Clearcoated for decals:
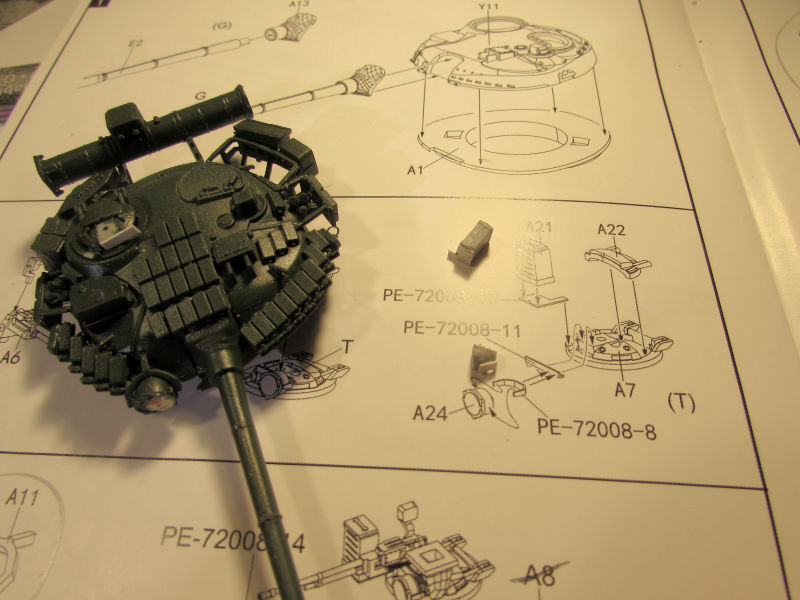
Finally the last (so far) of these Russian tanks, the T-80BV. This tank was the load for my MAZ 534 tank transporter that I set aside to build 'someday'. Someday came and the turret; as with all Modelcollect Russian tank kits, was started first:
This turret was a difficult build in that the instructions did not say how to install everything on the very back of this turret. I had to refer to pics for that, trying to match what I saw with the parts available.
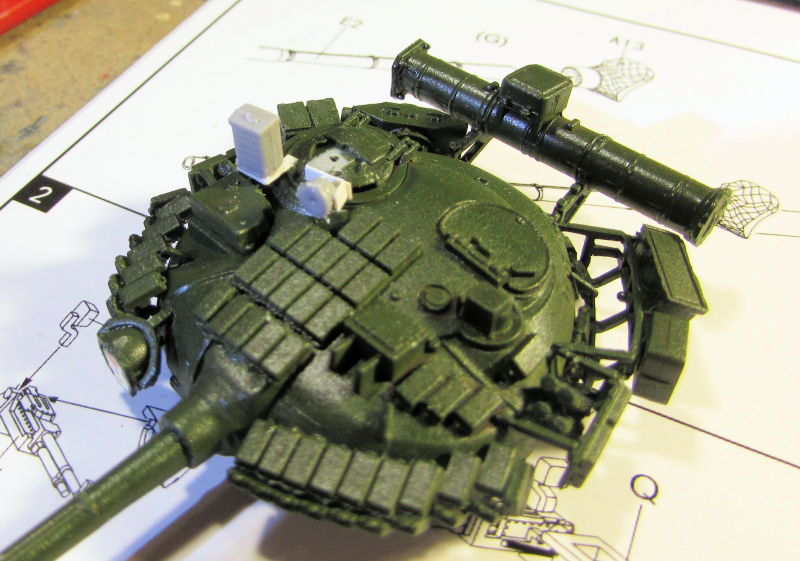
Next the upper and lower hulls were fastened together and the suspension was installed:
Dry fitting the turret showed an excellent fit with nothing snagging the hull:
Final glamour shot after the fenders and several other detail parts were added:
This was the total work I did on these tanks during Hobby Day:
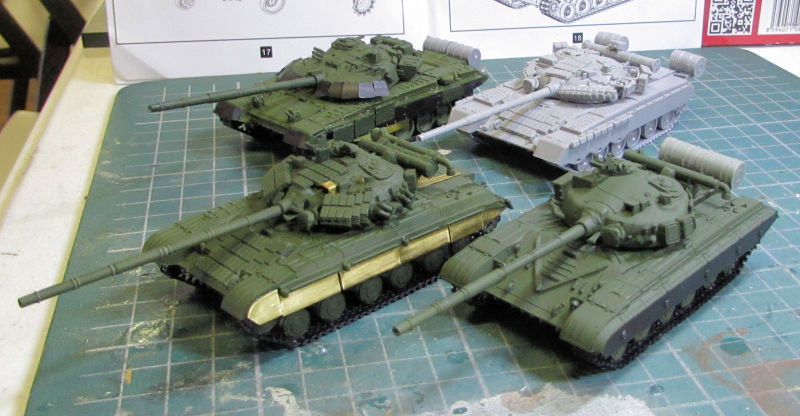
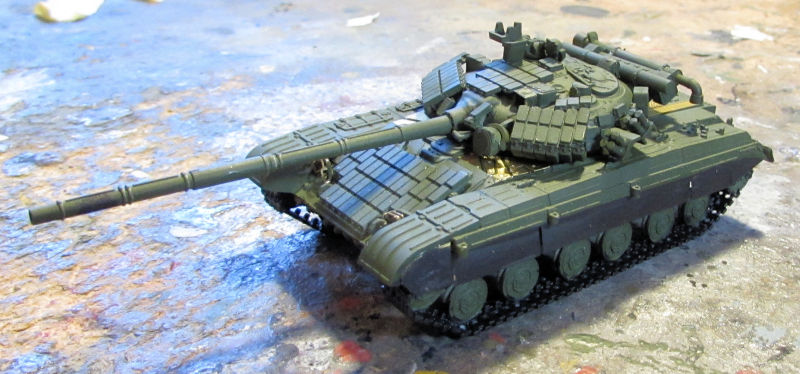
Once I got home, I was able to paint, clearcoat and decal these and one other. Here they all are after their decals went on:
Front left to right: T-62, T-64 Mod 1981, T-64BM2,
Back let to right: T-72 Rogatka, T-80BV
And that completes this latest tour of Maddog Manufacturing. Time to work on something different now, at least for a couple days. Then I can come back and finish these Russian Tanks.
Thanks for taking the tour, comments are welcome.
Starting in the Hangar again, we managed to get some paint down on my three Cobras. Before painting, we managed to put together the five-part canopy on the AH-1G Early:
That was then masked off like the -Late Cobra so we could shoot paint on both at the same time:
Then it was shot with a base coat of OD Green:
Since I shot that one, and the -Late was already masked and ready to go, it also got a base coat of OD Green:
We might just clear coat these and add the decals right away before adding all the breakable parts on these. Meanwhile, the masking came off the AH-1 Zulu and on close inspection, we realized on the left side, the upper color did not come down far enough on the engine nacelle to match the right side. So the left side was re-masked and sprayed again, setting this issue right:
That completes the Hangar part of the tour, time to visit the Motor Pool...
This again, will be quite fast. So much of the work is repetitive on multiple models but since all are different; I'm showing all the work.
To start, the Australian Bushmaster was given a coat of gloss, and then the decals were applied:
Later it was dullcoated for mask removal, weathering and final detail parts:
The next time this will be seen is when my Australian Army takes delivery of the finished vehicle.
Now on to the next bunch.....
I'll start with this first one that I had purchased for my birthday. It is the Trumpeter T-62 with ERA. The upper hull was worked on first, getting all the stowage boxes and other parts installed:
Next was the lower hull. This was easy as the whole outside wheels and tracks were all one piece:
Upper and lower hulls assembled:
After that was the turret:
Finally the whole thing was painted up:
Moving on from there, we worked on the T-64 Mod 1981. Tracks were installed, then painted with a base coat of flat black:
Everything put together and clearcoated for decals:
The next T-64 is the AV version. Again, tracks installed and painted black:
Then before we could put the hulls together, we had to add some photo-etch skirts to the upper hull fenders. These were attached with Gator;s Grip Glue as is all the photo-etch that we added to the rest of the models. Some photo-etch was also added to the engine deck and the turret on this one:
Additional photo-etch was needed on the front of the upper hull:
Then this version calls for hanging skirts of ERA to the side of the tank.....using photo-etch hooks. I'd done this once before and swore "never again!". But here I am, doing it again:
You can see in the upper right of the diagram how these little tiny bits needed to be folded. At least two broke from unavoidable excessive folding. After that ordeal, I wanted to see that this was all worth it so here is the glamour shot before those skirts go on:
Moving on, we worked some more on the T-64 BM-2, starting again with the tracks:
Upper hull was worked on as well with side skirts added and then fastened down to the lower hull:
Turret was then started. Yes it is going to get the same type of flaps that are on the T-72:
The glamour shot of this one as well:
Speaking of the T-72, this one also got the tracks installed and painted:
Basecoat painted, and then the flaps because I wanted to see them black. Fuel tanks also added to the back:
Clearcoated for decals:
Finally the last (so far) of these Russian tanks, the T-80BV. This tank was the load for my MAZ 534 tank transporter that I set aside to build 'someday'. Someday came and the turret; as with all Modelcollect Russian tank kits, was started first:
This turret was a difficult build in that the instructions did not say how to install everything on the very back of this turret. I had to refer to pics for that, trying to match what I saw with the parts available.
Next the upper and lower hulls were fastened together and the suspension was installed:
Dry fitting the turret showed an excellent fit with nothing snagging the hull:
Final glamour shot after the fenders and several other detail parts were added:
This was the total work I did on these tanks during Hobby Day:
Once I got home, I was able to paint, clearcoat and decal these and one other. Here they all are after their decals went on:
Front left to right: T-62, T-64 Mod 1981, T-64BM2,
Back let to right: T-72 Rogatka, T-80BV
And that completes this latest tour of Maddog Manufacturing. Time to work on something different now, at least for a couple days. Then I can come back and finish these Russian Tanks.
Thanks for taking the tour, comments are welcome.
Duke Maddog
Well-known member
Well, here it is almost a week later and we have a lot to show in this latest tour. The trams are coming around now, so when they are ready, feel free to climb aboard for another Maddog Manufacturing tour.
We did get back to the Russian tanks as mentioned above, but more on that later. Our tour starts in the Hangar.
There's not much progress at all to show here. We had intended to apply decals to all the Cobras, but two of the decal sheets needed liquid decal film so they were coated and set aside to dry. Then we got ready to do the decals for the Zulu Cobra; but then I saw the photo etch fret inside with all the screens for this model. So, we added all the screens to this and set it aside to dry. It'll need paint again:
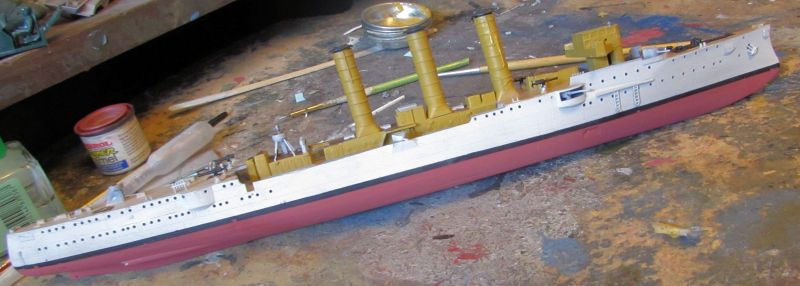
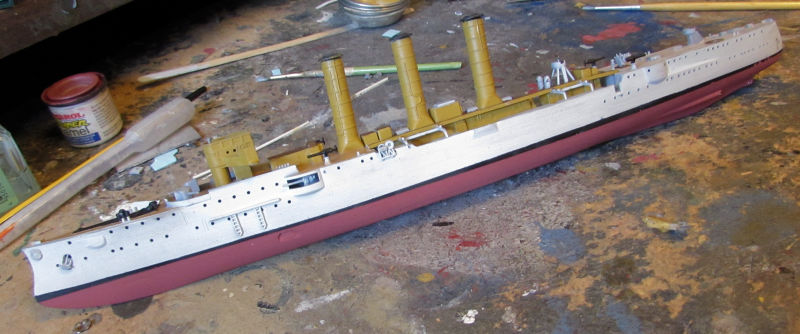
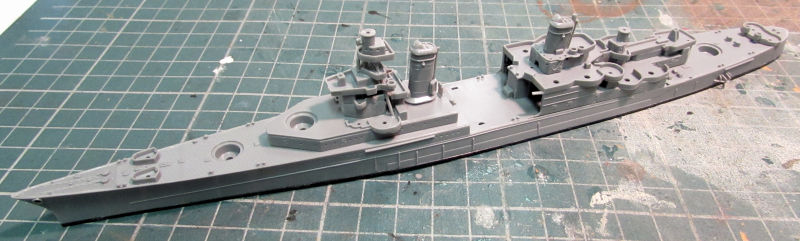
Moving on to the Shipyards, we've got a good bit more to show. While some work was done on the Enterprise, not enough was done to show any measurable progress. On the next slip over, the Indianapolis got all her superstructure built up:
Since we've been working on all these ships; I figured it was time to return to the USS Sacramento which had been languishing for months a couple slips over. After checking it out, we went to work adding on all these greeblies onto the upper deck of the superstructure. This was quite the challenge as the instructions were as clear as mud as to where they went. Hopefully, they are all in the proper places:
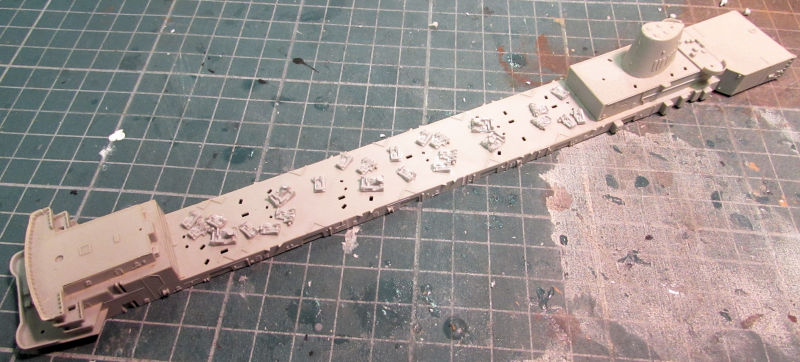
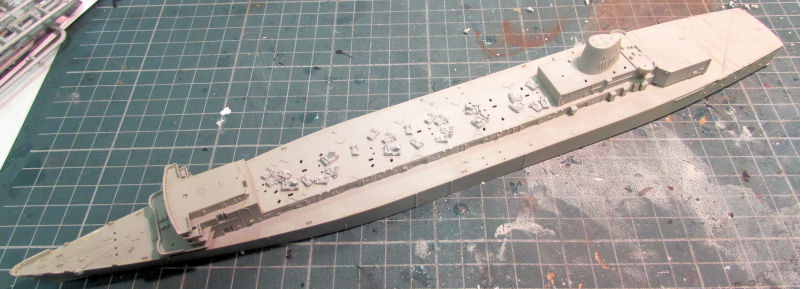
That's only half of them too. We still have a good bit to go. Here is a shot of the superstructure dry fit to the hull:
I'm still trying to figure out when to paint this before finishing all the rest of the detail parts. I think that's why she was left alone for so long.
Finally, we dropped the keep on another ship; this time one I'd never built before. This is the hull and decks of the Italian battleship Vittorio Venetto:
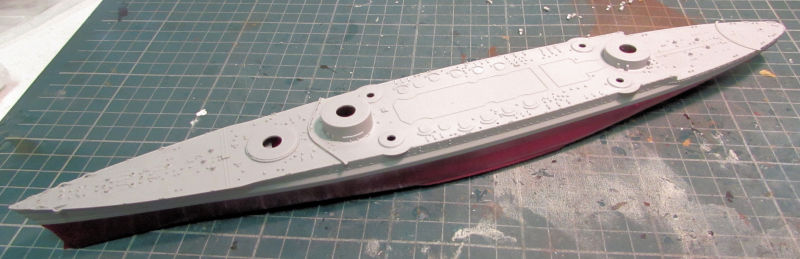
I've always loved Italian battleships; the Italians sure built them pretty back in WWII. It's about time I added one to the navy. I also have the Roma somewhere that I need to find and build along with the Venetto.
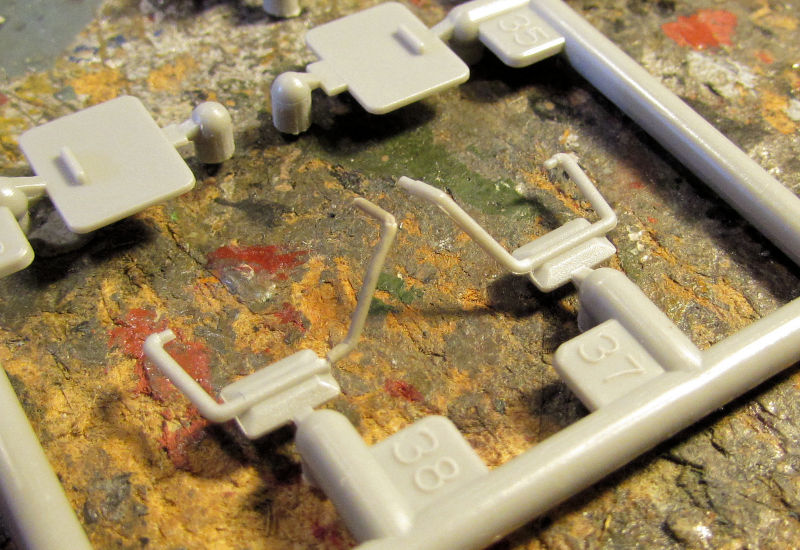
Moving on now to the Motor Pool, there's considerably more to see as was mentioned at the beginning of this tour. I was so close to finishing so many models that we marathoned these to see how far we could get. First off, I found the decals and photo etch for the Swedish M-34 Assault gun so we went to work on that straight away. The most important part was the gun muzzle. We first annealed the photo etch before removing the muzzle part to roll. Here it is partially rolled on the instruction sheet showing what needs to be done:
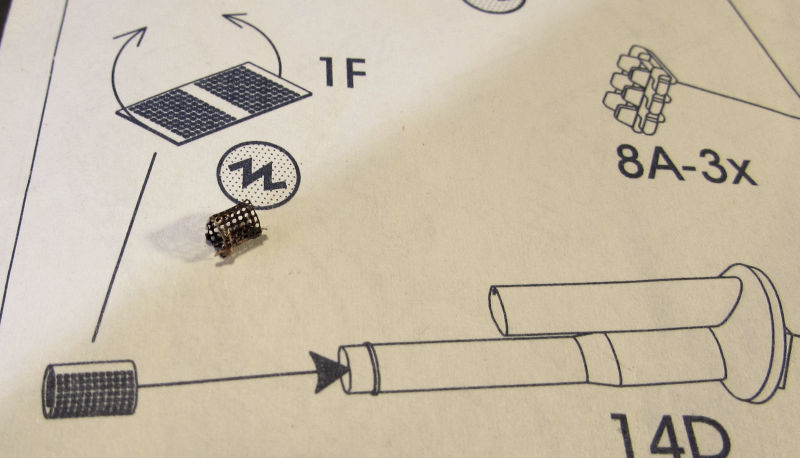
Yes, it's tiny; probably only 2mm long if that. I started with cementing the partially rolled muzzle brake onto the end of the gun:

Later we finished rolling it and cemented the remainder of the part down:
It may look like there's a gap at the bottom but that was a a part that folded under that I needed to unfold. You can also see in the pic that the decals had been applied.
Next, I had to fix one of the broken arms of the Australian Bushmaster since; like the SAS one, it broke off and disappeared. So, a bit of stretched sprue bent just so and Bob's your uncle:
As that was drying, we took a shot at painting the spare tire cover with a representation of the hex-patterned camouflage. Why Dragon didn't include that I'll never know since they did include a dusty windshield decal for the SAS one. It ain't perfect, but close enough from three feet away:
Moving on from there we have a lot to show of the progress made on all my Russian tanks and truck.
Let's start with the truck...
This is the CLUB M coastal defense missile system truck that I've had sitting for a bit. Here you can see the decals have been applied (very hard to see but they are there) and the wheels have been added:
They were tough; the wheels would not stay lined up and the rubber part kept slipping off the hubs. What a pain!
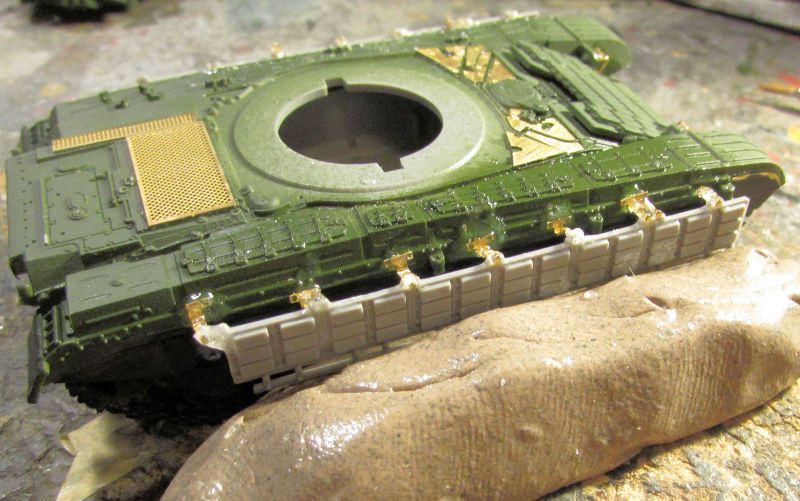
Next up are all the tanks, starting with the most difficult one: the T-64AV. First we added all the photo-etch plate to the forward deck and the screens to the engine deck:

Here's where we checked it to see that nothing interfered with the turret turning. It's good:

Next was the part I'd said "never again", but here I am: adding the side skirts to this thing by attaching it to the P/E brackets, just like on my T-64 BV I'd built some years before. Yes, I checked it to be sure I wasn't building two of the same tank. I don't know what the differences are but the instructions say this is an -AV while the one I built before was a -BV. I'd compare the two, but the T-64 BV is still packed in the tub.
Anyway, enough idle chatter, the first thing that was needed was something to hold the skirt at the proper height. After checking a bunch of clamps, clips, props and all I finally hit on the idea of using the Silly Putty. We pulled a good amount off, rolled it a bit and then added the skirt. We then placed the tank next to it, adjusted the brackets as best we could without breaking them (one did break but was fixed) and then we added the glue:
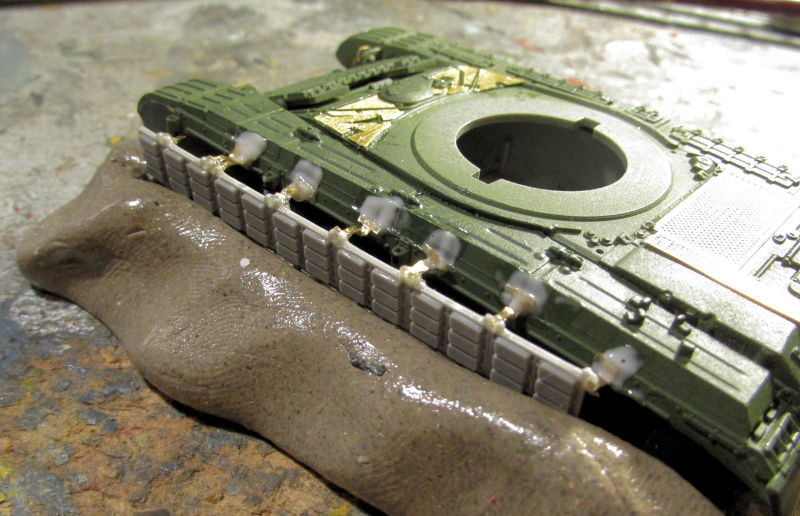
Once it was dry, we repeated the process on the other side:
This was shot after the first skirt was dry to see how successful we were. It shows that the process worked:

I had enough of that so we moved on...
The next tough one was the T-80 which, because it was part of the tank transporter set, did not have the photo etch that it was supposed to have. Maybe I put it away after finishing the truck half of the kit; that seems to be the most logical result. Anyway, to save time, I pulled out some sheet styrene and cut the flat pieces out that would replace the missing photo etch:
It's kind of hard to see in that pic, but I replaced the shelf holding the ammo can and the plate and bracket for the small light next to the machine gun. Here they are in place:
And the glamour shot of the whole thing put together:
The T-72 Rogatka had some photo etch and the fuel drums added:
Later it was painted and cleared for decals:

The T-64 Mod 1981 was cleared for decals:
The decals were applied and the machine gun gun accessories were added:
The T-64 BM-2 had decals added and the photo etch added to the turret as well as the hull:
Well, that was a lot. We worked on these assembling them in an assembly line manner to try and bring them over the finish line at about the same time.
That concludes our tour of the latest work achieved at Maddog Manufacturing. Thank you all for taking the tour and always remember comment are welcome.
We did get back to the Russian tanks as mentioned above, but more on that later. Our tour starts in the Hangar.
There's not much progress at all to show here. We had intended to apply decals to all the Cobras, but two of the decal sheets needed liquid decal film so they were coated and set aside to dry. Then we got ready to do the decals for the Zulu Cobra; but then I saw the photo etch fret inside with all the screens for this model. So, we added all the screens to this and set it aside to dry. It'll need paint again:
Moving on to the Shipyards, we've got a good bit more to show. While some work was done on the Enterprise, not enough was done to show any measurable progress. On the next slip over, the Indianapolis got all her superstructure built up:
Since we've been working on all these ships; I figured it was time to return to the USS Sacramento which had been languishing for months a couple slips over. After checking it out, we went to work adding on all these greeblies onto the upper deck of the superstructure. This was quite the challenge as the instructions were as clear as mud as to where they went. Hopefully, they are all in the proper places:
That's only half of them too. We still have a good bit to go. Here is a shot of the superstructure dry fit to the hull:
I'm still trying to figure out when to paint this before finishing all the rest of the detail parts. I think that's why she was left alone for so long.
Finally, we dropped the keep on another ship; this time one I'd never built before. This is the hull and decks of the Italian battleship Vittorio Venetto:
I've always loved Italian battleships; the Italians sure built them pretty back in WWII. It's about time I added one to the navy. I also have the Roma somewhere that I need to find and build along with the Venetto.
Moving on now to the Motor Pool, there's considerably more to see as was mentioned at the beginning of this tour. I was so close to finishing so many models that we marathoned these to see how far we could get. First off, I found the decals and photo etch for the Swedish M-34 Assault gun so we went to work on that straight away. The most important part was the gun muzzle. We first annealed the photo etch before removing the muzzle part to roll. Here it is partially rolled on the instruction sheet showing what needs to be done:
Yes, it's tiny; probably only 2mm long if that. I started with cementing the partially rolled muzzle brake onto the end of the gun:
Later we finished rolling it and cemented the remainder of the part down:
It may look like there's a gap at the bottom but that was a a part that folded under that I needed to unfold. You can also see in the pic that the decals had been applied.
Next, I had to fix one of the broken arms of the Australian Bushmaster since; like the SAS one, it broke off and disappeared. So, a bit of stretched sprue bent just so and Bob's your uncle:
As that was drying, we took a shot at painting the spare tire cover with a representation of the hex-patterned camouflage. Why Dragon didn't include that I'll never know since they did include a dusty windshield decal for the SAS one. It ain't perfect, but close enough from three feet away:
Moving on from there we have a lot to show of the progress made on all my Russian tanks and truck.
Let's start with the truck...
This is the CLUB M coastal defense missile system truck that I've had sitting for a bit. Here you can see the decals have been applied (very hard to see but they are there) and the wheels have been added:
They were tough; the wheels would not stay lined up and the rubber part kept slipping off the hubs. What a pain!
Next up are all the tanks, starting with the most difficult one: the T-64AV. First we added all the photo-etch plate to the forward deck and the screens to the engine deck:
Here's where we checked it to see that nothing interfered with the turret turning. It's good:
Next was the part I'd said "never again", but here I am: adding the side skirts to this thing by attaching it to the P/E brackets, just like on my T-64 BV I'd built some years before. Yes, I checked it to be sure I wasn't building two of the same tank. I don't know what the differences are but the instructions say this is an -AV while the one I built before was a -BV. I'd compare the two, but the T-64 BV is still packed in the tub.
Anyway, enough idle chatter, the first thing that was needed was something to hold the skirt at the proper height. After checking a bunch of clamps, clips, props and all I finally hit on the idea of using the Silly Putty. We pulled a good amount off, rolled it a bit and then added the skirt. We then placed the tank next to it, adjusted the brackets as best we could without breaking them (one did break but was fixed) and then we added the glue:
Once it was dry, we repeated the process on the other side:
This was shot after the first skirt was dry to see how successful we were. It shows that the process worked:
I had enough of that so we moved on...
The next tough one was the T-80 which, because it was part of the tank transporter set, did not have the photo etch that it was supposed to have. Maybe I put it away after finishing the truck half of the kit; that seems to be the most logical result. Anyway, to save time, I pulled out some sheet styrene and cut the flat pieces out that would replace the missing photo etch:
It's kind of hard to see in that pic, but I replaced the shelf holding the ammo can and the plate and bracket for the small light next to the machine gun. Here they are in place:
And the glamour shot of the whole thing put together:
The T-72 Rogatka had some photo etch and the fuel drums added:
Later it was painted and cleared for decals:
The T-64 Mod 1981 was cleared for decals:
The decals were applied and the machine gun gun accessories were added:
The T-64 BM-2 had decals added and the photo etch added to the turret as well as the hull:
Well, that was a lot. We worked on these assembling them in an assembly line manner to try and bring them over the finish line at about the same time.
That concludes our tour of the latest work achieved at Maddog Manufacturing. Thank you all for taking the tour and always remember comment are welcome.
Brokeneagle
Master at Arms
 wow!
wow!Duke Maddog
Well-known member
Thank youI I felt it was time to restart the shipyards, they had been idle for far too long.
Thank you Ian!
Thank you Ian!
Duke Maddog
Well-known member
Thank you Frank! Hoping to get more done soon.
Similar threads
- Replies
- 23
- Views
- 2K
- Replies
- 41
- Views
- 8K
- Replies
- 1
- Views
- 506
- Replies
- 15
- Views
- 1K