• Modelers Alliance has updated the forum software on our website. We have migrated all post, content and user accounts but we could not migrate the passwords.
    This requires that you manually reset your password.
    Please click here, http://modelersalliance.org/forums/login to go to logon page and use the "Forgot your Password" option.

Revell Tornado Gr.4

Greg Kimsey

Well-known member
I began putting this together a few days ago. I realized almost immediately that this model is way above my paygrade. I am attempting it, but cannot guarantee any outcome! Just putting the stupid ejection seat together has almost kicked my butt, holding these TINY parts. I haven't photographed yet because, honestly, I wasn't sure I was going to admit to you guys that I was doing it just in case of epic fail. None the less, I changed my mind and you shall be witness! I expect this to take an eternity because of the snails pace I am going to set LOL. Enjoy!
IMG-20220920-WA0000[1].jpeg
 
Starting with the ejection seat. It had moulded searbelts, but looking at references they looked inaccurate. Here is my referance...
64a194c5a3a4f5adad8866b031d752c3.jpg


I have made the green padding of the harness from aluminium embissing metal sheet and tried my best to understand its orientation.

20220925_140316.jpg

That is the seat with the padding in place.
The seat was missing a bar near the top so I made one with wire
20220925_141000.jpg


I am making the belts from flat lead wire. I painted them raw sienna.
20220925_140223.jpg


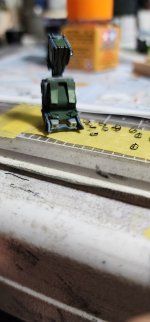
The buckles took forever
20220925_132652.jpg


Now it is time to see if I can make a passable harness! Here we go...
 

Attachments

  • 20220925_140316.jpg
    20220925_140316.jpg
    847.4 KB · Views: 27
My effing nerves are shot but I got them done. I needed 12 buckkes but bet I made nearly 30 because the would go flying out of the tweezers, never to be seen again. I showed the seat to my wife Gail. She said, "Wait a minute, You have 14 hours plus of work and all you have finished are the seats!?" I have 14 hours plus, on just in the seats LOL. Anyway, here they are...
20220925_165725.jpg


Not perfect by any stretch but they will have to do!
 
I went that route on 2 pairs of F-4 seats. Yeah I could've bought new resins ones if I really wanted too...but I actually really enjoyed building up and detailing the seats.
 
I went that route on 2 pairs of F-4 seats. Yeah I could've bought new resins ones if I really wanted too...but I actually really enjoyed building up and detailing the seats.
I actually did enjoy this as well, despite the flurry of nuclear F-bombs that kept being dropped LOL.
 
Well, here we are. I need sone lessons on decals. I suck at them so bad. I wish I had a do-over on them. Here is the cockpit finished, mostly
20220926_082604.jpg


20220926_082622.jpg

20220926_082713.jpg


If you don't look really really close it reads pretty good. Magnified it looks like poop. The decals are all completely wrinkled all to hell. I use the TamiyaMark Fit solution first, slide the decal off, pat it dry with a paper towel, and finish with softener. 10 minutes later they turn to garbage. It doesnt matter if I let the Mark Fit dry completely or put the decal on while it is wet. This is why I usually hand paint my interiors. I may still do that and just remove these and paint with a brush. Actually, I am pretty sure that is goi g to happen LOL.
 
That office looks great, it will be just fine once you have it under glass of the canopy, I see just the right amount of dirt and grime, well done! :vgood:
 
Here is what I do when applying decals. I put down a gloss coat first. Dip decal in cold water. After applying the decal where I want it, I take a q tip and roll it to one direction to push and water under the decal out. I want it to be firmly down on the surface. Sometimes when I get the decal where I want it I will rub it pretty aggressive with a q tip to really force it to the surface.

Now on the setting solution. I have the tamiya stuff and really don't care for it. My go to is micro sol by microscale. It's in the bottle with red letters. I put this on AFTER I have the decal where I want it. This stuff is not as hot as some I've used. So multiple applications may have to be done.

After the decal has dried I then seal the decal in with a gloss coat and finish with what ever finish coat I want..

I would stress just use water to free the decal from the sheet.

Nice looking cockpit. Really like the seats.
 
Well, I couldnt stand it. I removed the decals and hand painted everything. I used .4mm styrene round rod, .01x .02 styrene strips and cut tiny switches and dials. I have some colored acetate sheets in blue, green, yellow, and orange (was out of red) to makecolored buttons and monitor screens. I pai ted the screens silver, then transparent yellow, then put green acetate on top. It looks pretty good now. I realize I need some micro tweezers to pick up styrene rod cut into .3mm lengths. Anyway, see if it is better...
20220927_174229.jpg

20220927_174220.jpg


There are three more monitors that sit on top if the rear cockpit instrument panel thet I have not finished yet.
 
High Greg. I dont know how many times i have done some work, thought that looks good, then taken some pictures and thought........I cant let that go....... You have to remember that people dont have macro lenses for eyes :) That said i 100% agree with the way you have gone with the second attempt and my guess is it was more fun and more rewarding to do as well ? I spend more on Albion metals strips and evergreen styrene strips than i do on the models themselves especially on cars/ bikes in larger scales.. :) Keep up the good work.
 
High Greg. I dont know how many times i have done some work, thought that looks good, then taken some pictures and thought........I cant let that go....... You have to remember that people dont have macro lenses for eyes :) That said i 100% agree with the way you have gone with the second attempt and my guess is it was more fun and more rewarding to do as well ? I spend more on Albion metals strips and evergreen styrene strips than i do on the models themselves especially on cars/ bikes in larger scales.. :) Keep up the good work.
You know, it was so much fun doing this, and yes, it was far more rewarding!!
 
Lots of progress has happened, but it may not look like it. I ended up with 22 hours in the cockpit LOL. But it looks very cool.
20221001_215205.jpg

20221001_215219.jpg


20221001_215239.jpg


20221001_233910.jpg


20221001_234033.jpg


I am trying the black sharpie and slurry trick for the seams. We will find out tomorrow how I did. So far the fit of this kit is the best I heve ever experienced.
 
Back
Top