• Modelers Alliance has updated the forum software on our website. We have migrated all post, content and user accounts but we could not migrate the passwords.
    This requires that you manually reset your password.
    Please click here, http://modelersalliance.org/forums/login to go to logon page and use the "Forgot your Password" option.

De Havilland DH88 Comet

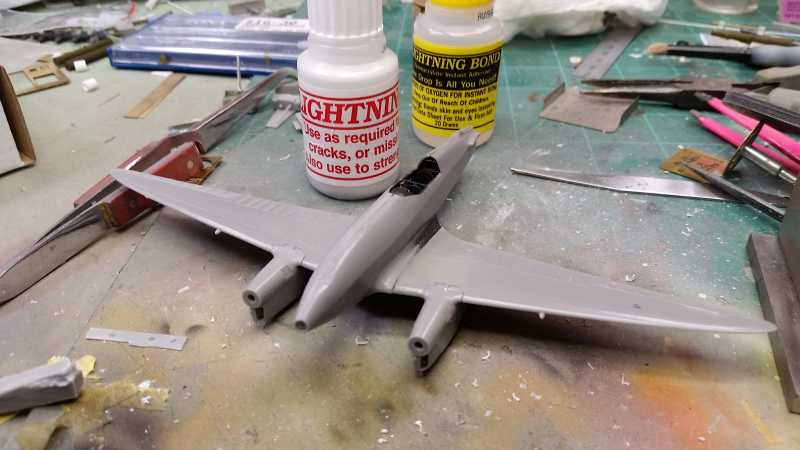
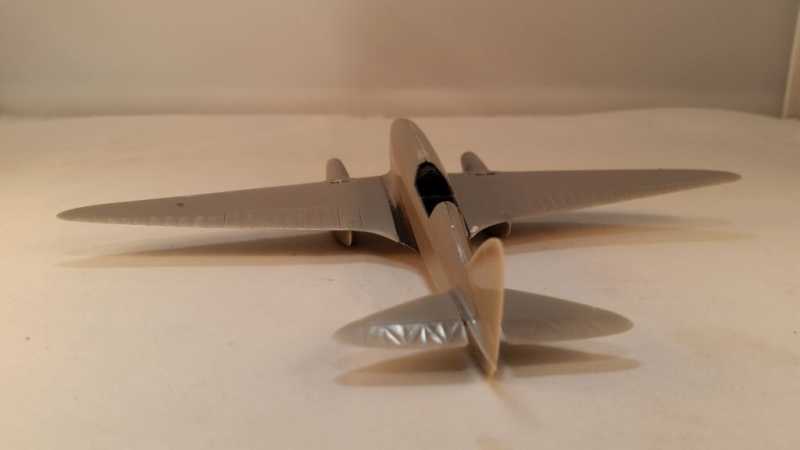
Oh here's my problem.


ha19b57f.jpg

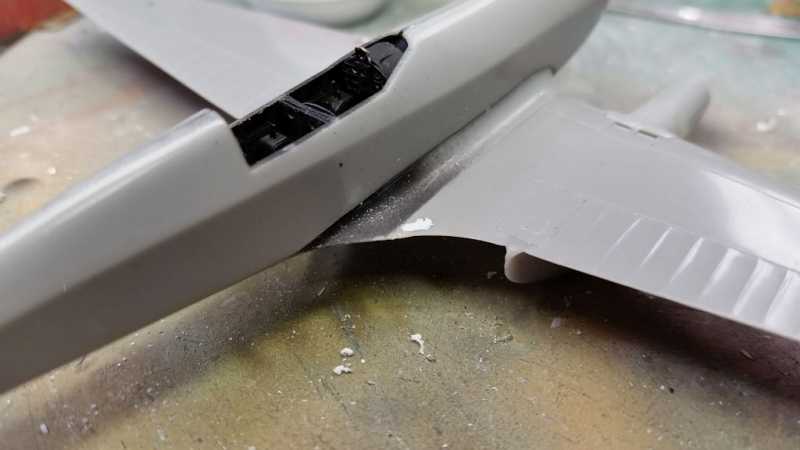
Notice the point of the trailing edge as it blends into the wing root? Piece broke off somewhere along the way, not sure where.
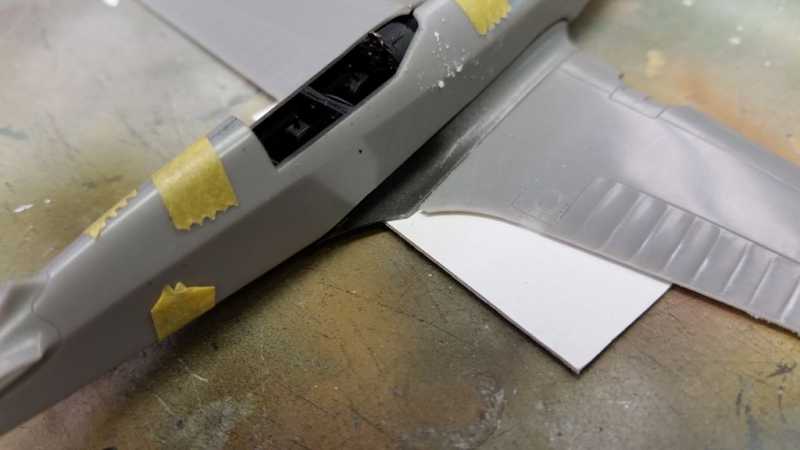
So..how would you guys take care of this?
 
Once it is all glued together I would take a piece of tape and put it on the bottom side then a couple of drops of resin and make a small puddle on the top of the tape.

Once it is set up, remove the tape and file it sand it to shape. If you took a little care the buildup wouldn't be that thick, just enough to fill it. The resin would bond solidly to the resin parts. As an alternate maybe some epoxy.

Looks like it is coming along nicely Bob. You don't want to see the 2 resin beasts that are heading my way from ebay.

One is because I liked the subject and size, the other is because I want to build a tribute model to a friend that I lost touch with and have since learned he had passed away. An honest to God Navy PBY pilot during WW2.

Looking forward to seeing how you work this out Bob! :popcorn

Hobby Lobby has resin in their model section (at least the local ones have it).
 
Thanks Paul, didn't about going ahead and putting it in place. Think gonna try it with Mike's glue with his filler stuff.
 
Great subject MP
The thing that really stands out with the DH when you see it is the finish, hardly any panel lines and all flush rivets. Parked up next to many other aircraft of the time it was way ahead of everything else in terms of finess.


this was it a couple of years ago when i stopped in at Old warden.
 
Thanks Paddy, she is a sleek bird aint' she?

You'll like this model because there are no panel lines along the fuselage. Looks to me that only the metal/wood joints are represented.


h297c33a.jpg

Wings and motors on. Note that the motors are a bit different than what you see in Paddy's photo, the motors were changed at some point to a more reliable version of the race engines.


h47e14b2.jpg

How's that, still a bit rough but it's filled in nicely.

:good:

So, is this Mr Mike. Repair or resin ? B)
 
Dr Mike to you sir...:smack

That's right Chris. Sorry, should have taken some pictures. I took some Tamiya tape as Paul suggested and put it on the bottom of the wing root. Then I poured out filler substance, remember he said it is proprietary stuff, like really fine glass or something. The tape helped it stay put. Then a drop of Mr...Dr Mikes. It was like a big wart at first but sanded it down and shaped it turned out alright.

Sorry. Lazy typing on my Ipad . Thanks for info (y) Scotch tape also works with superglue but I have only tried it on plastic.

Cheers, Christian B)
 
I think this stuff is going to work on anything. I had tried some Tamiya putty but it just crumbled, guess it doesn't support itself.
 
Geez I fell a sleep for a couple of days and missed all the fun! Making some good headway on this one Bob! Nice fix on the wing trailing edge!
 
Tail feathers on. :pilot

h51d3cca.jpg


got the props to do, think I'll leave the landing gear off till after painting.


h35ba6a5.jpg


h4cc85b3.jpg

Glad the light caught the rib detail in the elevator, shows how nice these castings are. The area between the ribs are nearly transparent. You can almost see though them. Amazing. :notworthy

Biggest question now is canopy open or closed.
 
Thanks, Warren the kit is very nice, really diggin' it. There is a lot of sand and test fit going on but once you have it fitted well there's not much else to do other than glue it up.
 
Back
Top