• Modelers Alliance has updated the forum software on our website. We have migrated all post, content and user accounts but we could not migrate the passwords.
    This requires that you manually reset your password.
    Please click here, http://modelersalliance.org/forums/login to go to logon page and use the "Forgot your Password" option.

Sherman ETO

iambrb

Well-known member
Howdy! So I have been slowly acquiring bits and pieces for some months now, and am going to start a 'joint' build. That is, I thought it would be neat to build a Pair of Sherman kits, one representing the European Theater (ETO), and also one representing the Pacific Theater (PTO).

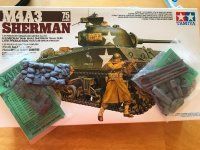
So the kit for this particular build is the old TAMIYA M4A3. I have added to sets of resin from the excellent maker VALUE GEAR this is the '2-fo-1 set of Sandbag armor for the glacias and log armor with some gear and bits from the "Easy 8" set. Although this was obviously intended for the Easy8 variant, this log armor was used on other tanks in theater. I also had an aluminum aftermarket barrel for this in the parts bin, so I may gor with that as well,. we will see

I may or may not do this guy in Winter camo as well, haven't decided on it s yet. At any rate, here is the initial pic of it.
 

Attachments

  • ZZ1.jpg
    ZZ1.jpg
    155.6 KB · Views: 33
Last edited:
Though this is a 105 Shaman the winter camo, this one is really Kool. Note only the sides and front of the lower hull are in white and only the front half of the turret is white. Just saying ... :coolio2:

1607799269290.png
 
Wow Super Kewl!

I'm not sure if i wanna do that for this build, or for an upcoming build on an M10 TD. This is the pic I found that I particularly like:
3I0U0Ra.jpg

and not sure if the armor and sandbags would basically cover up all the winter camo, but thanks so much for that pi - that is why I enjoy posting here so much!

So got some good Jazz going:
9yuRjBc.jpg


And got to work. The instructions on the Zvezda had you build up the turret first, so I jumped to there and build it up. As with most Tamiya stff, it all but fell together. here are a few pics of the comparison in texture between the old Tamiya and the new Zvezda:

oHodDGc.jpg

They both are about the same, really. In fitting the turret, there was one REALLY bad gap at the rear:
FvQoSO0.jpg

So I used some of the Tamiya Extra-thin/stinky-stuff and kept melting some thins stock in there
ikOMjbh.jpg

Followed by some judicious sanding
SWLNlDS.jpg

the rear of that had a very noticeable 'step' in there too, so you can see I got the sanding equipment out, but overall, it really worked well.
A few nice hours spent on the turret, adding the afore-mentioned barrel, and the turret was looking quite nice!
Aed7SBF.jpg
 
Last edited:
Is that first picture really winter camo or is it frost. The way its on forward faces looks like frost to me, especially where they have cleared it away from the number on the side.
 
Is that first picture really winter camo or is it frost. The way its on forward faces looks like frost to me, especially where they have cleared it away from the number on the side.

It's really Winter Camo...I promise! That's what makes that a unique subject. Below is a Sherman with frost on it...but that would be kool to do as a winter camo too.

Sherman024.JPG

:victory:
 
I always wanted to try and do a frost effect using a clear flat base, you know the stuff you can add to gloss and flatten it out?
 
Have to say i am not convinced the reason its not frosty at the back is engine heat on the top surface and the back of the turret but what do i know :)
 
Whelp here we have the latest. Like all Tamiya kits, this sweet baby just falls together. Also like most of Tamiya's older kits this is one of those that lacks some detail. This was really evident on the suspension, though it looks OK from the side here, the New Zvezda really has it beat. you also wind up with that FAT seam on top, so I had to correct using sheet styrene (Plastic card, to you blokes across the pond) as with the Zvezda:
FjFtBBr.jpg

However, the Tamiya has a bomb-proof means of attaching the suspension, and it was easy-peasy to get the stuff on there nice and level:
THiF97E.jpg

Another aspect of this tis is that the Tamiya has those conspicuous 'plates' missing underneath, as shown here, so I will have to 'plate' over that as well.
mNmHFfM.jpg

Come to find out I had no thick styrene so I used a bit of white paper card, and got it filled in:
kji2AMp.jpg

DgaCzBD.jpg

Really digging the way this is looking! As I was using Value gear's Sandbag armor up front, I decided to just attach the back, and the turre, while not permanent, I think looks nice turned like that,
4DSPhsw.jpg

fAgVhPf.jpg


AND NOW FOR A QUESTION:

I want to build this up using the Value Gear Log armor as shown, but I think this earlier M4A3 didn't have running boards, so when log armor was used in Theater, how was it attached? Do I need some additional rigging or something? Anyone know?
skm5Myt.jpg
 
Looks like the sand bags are pushed forward some. Clean up whatever is up front and get it flush.
Like we discussed on the txt messages, they would have welded on hooks to tie the ropes on. Speaking of ropes, check the rope on the top log, looks like it's broke. Don't think they would be very useful broke like that.
 
When I did Fury,I attached some grab handles on the deck and tied the rope to them.
Google some pics of Fury,you can see the detail
 
Whelp as with the PTO Sherman, I was on the front porch, getting paint on a model, and wow did it turn out great! All paint is Tamiya. I tried to do a little modulation on the Olive Drab. there isn't anything on the front slope 'cause the plan is to have sandbag armor there, and log armor on the sides. This was my first attempt with 'freehand' airbrush camo/no stencil/no tape. Good bit of work getting it there, but am quite pleased with the result!
e1ZUhFh.jpg

IhWt2rw.jpg

UsdgfqG.jpg

zorTHas.jpg
 
Back
Top