• Modelers Alliance has updated the forum software on our website. We have migrated all post, content and user accounts but we could not migrate the passwords.
    This requires that you manually reset your password.
    Please click here, http://modelersalliance.org/forums/login to go to logon page and use the "Forgot your Password" option.

Revell FW-190- A8 "Sturmbock" 1/32

That's a definite possibility Bob. If i had my time again i wouldn't bother with the Eduard parts, i would detail the Revell engine. If you were to replace the push rod tubes with something a little more to scale, add you own ignition harness which you have to do anyway with the Eduard engine anyway you would be 90% towards an very acceptable engine without any of the fit problems.
Ultimately the whole point of me highlighting the pitfalls of the parts and my own limitations is to give everyone the heads up before they start so they can plan. :)

Right now i am trying to make a usable cockpit...................be prepared for moans , groans and irritating grumbles from me :)
 
So...where were we ?

Are yes, the F190 with the F16 cockpit :)

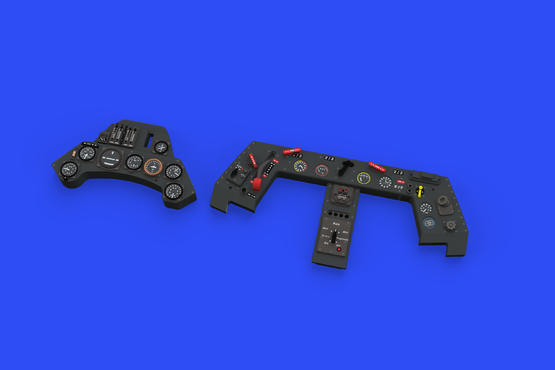
this is the Eduard PE
Pro's: its the right colour
Cons: maybe if they hadn't highlighted ever rivet in white and stuck more to the original design it might have worked better.


_DSC9584.JPG


Next i tried the Kits World 3D printed decals.
I had a load of problems with these.
Firstly there are no instructions so if you have never fitted 3d Decals before you are on your own. I assumed they worked like normal wet slide decals....but they dont :) Show these water and they instantly and i mean instantly within a second detach from their backing sheet. Go to fit and they are the wrong size, about 2mm too long on the side consuls and about 1mm to wide for the front panel. I cut them to fit, positioned them dabbed them with a towel and left them for a couple of hours. Picked up the cockpit section and they simply fluttered down to the bench, no sign of adhesion at all. I obviously did something wrong and i will look into it and let you know.
I then re applied them using Mig ultra glue. They didnt like that at all and if you look at the picture below they tried to lift at every opportunity on the sides and the lower centre panel

_DSC9591.JPG

apart from that they are hardly RLM dark gray :)

Running out of options and the kit parts now getting decidedly knackered i made my own very simple side panels based on photos from Google.

_DSC9611.JPG


Now these look very simplistic but are actually way closer to the real thing and i think if i had carried on this theme with the front
panel it would have worked well

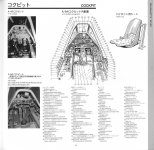
You can see here how simplistic some versions were ?
5b55c42554fc.jpg


The upshot is when building these things, if detail is your thing then dont assume the after market is correct or even better . On the real aircraft the side panel on the pilots left is barely half the width of the panel on the right, the pilot is not sitting in the middle as far as i can make out. In fairness to eduard and kits world they have to make their parts match the kit so its a Revel Problem as they make the side panels the same width. Its probably just me asking to much from a very cheap for the size and parts count, model thats more than a few year old.

Hope this interests someone and i am not boring you all to death 😂👍
 
Thanks but i think in conclusion you could do anything and not be far off.

Here is one with just a switch box and a window winder.

6ddb542062753fbd23a309e23c7d7177.jpg


Notice how far back down the cowling the top instrument panel sits above then see below here ?

Fw190A3_cockpit.jpg


This panel is fully forward with the gun sight mostly behind the panel.


_DSC9616.JPG


these are my kit parts with the panel right at the back of the cowling and well behind the gunsight

32804745976_1923969019_b.jpg


Another with the panel to the front which makes more sense as , would you be able to even see it at the back of the cowling.

I think this interests me but i get the sense others......not so much 😂 As is usual in these cases what ever you do it would be very hard to be proved wrong.............or right :)
 
Could it be a factor that if an aircraft as restored, they just didn't have all the necessary components and just put in a flat panel?

I know seeing a few similar aircraft, no 2 seemed to be exactly the same
 
I am sure its a big factor because that last panel has Digital clocks at the top
I am also sure that modern rules require all sorts of modern id and transponders etc which will have been added
 
I wonder how well Johnson's clear would work to fix the Kitsworld I/P decals, After all the surgery! I use our Future (in the USA) to attach tiny P/E parts to my Masters. It could work on bigger models. :bm:
 
I wonder how well Johnson's clear would work to fix the Kitsworld I/P decals, After all the surgery! I use our Future (in the USA) to attach tiny P/E parts to my Masters. It could work on bigger models. :bm:
Gator grip worked well for me on those others. (forgot the name)
 
I have done a couple of the Quinta Studios sets and they "FIT" the panels they are supposed to go on "PERFECTLY"! They also lift from the backing fairly easy, but you do have to get the backing good and wet, then they do the usual gooey decal slide. What I read someplace in order to attach them, I coat the panel with Future and lay the decal on top. Position and dab it down for a short while and it then sticks and stays.
For the most part the colors are pretty good and are more solid with minimal streaking and fine detail.
The only drawback is on the vertical sides of whatever on the resin, is that the printing doesn't cover the 90 degree sides and thus needs a little paint touch up.
 
Thanks Saul
I think what i am seeing here is a confusion of original , restored, simply wrong and different marks as well as poor translation from original layout to PE.
For example the circuit braker panel cover in diagrams is a simple cover with what looks like 14 small engraved Bakelite name plates. In 1/1 scale these would be pretty much a flat panel in grey with cream lettering. but in PE 1/32 with they become what looks like 14 switches or knobs because they are high contrast white against the panel and way over size because of the poor resolution they have with the printing. This makes the panels way over busy
Of course none of this matters in reality but its just something thats pricked my interest. :)
To me its a problem that wide spread across model making where artistic effect are praised and encouraged above reality. Much like panel lines that would be near invisible in most scales yet are highlighted and added and actively encouraged at every opportunity by a small section of modellers who try and set these things as a std. I was reading a dissenting article on panel lines the other day and this whole craze was started by a magazine some time back and was adopted by a few influential modelers like Bret Green and Tom Cleaver etc and before you know it, its the must have detail in every build :)
I think my problem with this is my interest in photography because as soon as you start taking photos of these artistic effect and they are enlarged to anything greater than the eye would normally see ., they start to look very silly :)
 
here is my final attempt
I have remade the front panel now to match my new side panels. dont forget there is still the std flying/blind flying panel to add to this.
Its a much simplified panel, more in keeping in my opinion, with the original
With practice and learning new techniques i think i could do better but this is a first attempt :) and i am happy i am on the right track.

_DSC9622.JPG
 
Eduard can do it

this is their pre painted, ready to fit, resin instrument panels.
to cap it all these are cheaper than their PE set at £6.00 GBP and look to be pretty much
correct..

1722967576529.png


Eduard can do it

this is their pre painted, ready to fit, resin instrument panels.
to cap it all these are cheaper than their PE set at £6.00 GBP and look to be pretty much
correct..

View attachment 172657


Those look the business
 
Back
Top