-
Modelers Alliance has updated the forum software on our website. We have migrated all post, content and user accounts but we could not migrate the passwords.
This requires that you manually reset your password.
Please click here, http://modelersalliance.org/forums/login to go to logon page and use the "Forgot your Password" option.
You are using an out of date browser. It may not display this or other websites correctly.
You should upgrade or use an alternative browser.
You should upgrade or use an alternative browser.
Revell FW-190- A8 "Sturmbock" 1/32
- Thread starter paddy
- Start date
Heavens Eagle
Well-known member
Yes they are quite expensive, so I wonder if they ever really sell anything to North America directly. I suspect that most sales are to Sprue Brothers.They do! Impressive!
I find Eduard's shipping costs crazy. That would probably be $30-40 to ship to NA
paddy
Well-known member
Just had a look at Eduards site.
An Eduard 109 1/32 is £30 GBP
Post is £21 GBP to England
Total £51 GBP
From hannants its £37 shipping £5.70 total £43.00 so a saving of 20%
In fairness this is why manufacturers have agents in different countries.
I sell Dellorto and brembo parts at much cheaper prices than Brembo and Dellorto would sell them to you from Italy including shipping.
Last edited:
paddy
Well-known member
Build #2 is progressing well as its OTB so not having fit problems. Wing to fuselage fit is a lot better and this time i remembered to fit the Archer fabric detail before fitting control surfaces.
You have to sand the surface detail from the kit parts first and i didnt do this before fitting on build one so passed on this that time

I would like to have followed in James footsteps and built a specific aircraft this time but i only have one option of the 2 kit decal options left and i dont like it so not sure what to do at the moment, i dont really fancy spending another load of cash on decals but it might come to that.
You have to sand the surface detail from the kit parts first and i didnt do this before fitting on build one so passed on this that time
I would like to have followed in James footsteps and built a specific aircraft this time but i only have one option of the 2 kit decal options left and i dont like it so not sure what to do at the moment, i dont really fancy spending another load of cash on decals but it might come to that.
How about what it would look like coming off the assembly line?
paddy
Well-known member
Not got a clue what that would look like ? would it be bare metal ? or silver and silver dope ? They obviously didnt have a std camo like brit fighters. I have basic insignia decals and the placards, just nothing specific other than the Revell kit stuff like this

Just didnt want to do this same camo again, i suppose i could use these decals and a variation of the camo.
Just didnt want to do this same camo again, i suppose i could use these decals and a variation of the camo.
Beats me, I'm the big picture guy. 
jknaus
Administrator
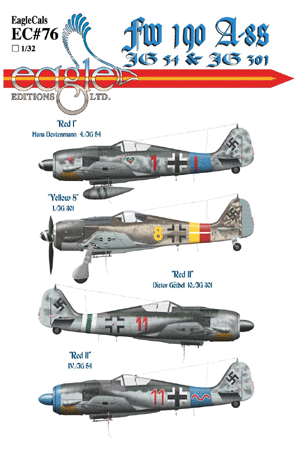
Here's a nice set if you want something colourful. Its one I will get.


 www.eagle-editions.com
James

EagleCals #76-32 Fw 190 A-8s - Eagle Editions Ltd.
EagleCals #76 Fw 190 A-8s in 32nd scale
Greg Kimsey
Well-known member
I love learning from you! You are meticulous. That's why I always let you work out the bugs before I try to build... 

Heavens Eagle
Well-known member
A Fw-190 on the assembly line would probably look something like this Do-335

paddy
Well-known member
I fitted the kit engine last night and thought i would post a picture because anyone else wanting to build this can see and compare with the Eduard build earlier in the thread. I haven't spent the time detailing this lump as it will never be seen but TBH the engine and gun platform is very good and has the huge bonus of everything fitting well OTB.
The only real reason for fitting is to give me something to hang the prop on but if i didnt already have the first eduard engine build , opened up and on display i would be more than happy to leave this one open.
So much so that my planned BF-109 build will have a detailed kit engine, not after market

#
on a different subject my archer decals dried ...........and fell off you can see they ar set and now brittle and come off in one piece, its not like they just lifted on a corner or anything.

I re applied them using micro sol as a glue and then gave them a coat of clear ASAP and that seems to have held them long enough to get a the paint on Not having a lot of luck with after market at the moment..
Next test will be if the engine covers now build up round the engine with no gaps etc, it an odd build because there is no reference points to attache them too.
The only real reason for fitting is to give me something to hang the prop on but if i didnt already have the first eduard engine build , opened up and on display i would be more than happy to leave this one open.
So much so that my planned BF-109 build will have a detailed kit engine, not after market
#
on a different subject my archer decals dried ...........and fell off
I re applied them using micro sol as a glue and then gave them a coat of clear ASAP and that seems to have held them long enough to get a the paint on
Next test will be if the engine covers now build up round the engine with no gaps etc, it an odd build because there is no reference points to attache them too.
Paddy, I don't recall any of these resin "decals" having much adhesion. I'd use Future, Alclad Aqua or some other thin medium to glue them in place.
I did that one 109 a while back with all those resin details, damn I can't remember the name. I think they suggested installing with a clear coat.
I did that one 109 a while back with all those resin details, damn I can't remember the name. I think they suggested installing with a clear coat.
Last edited:
Heavens Eagle
Well-known member
When I place the Quinta decals, I paint a wet layer of Future (yeah, I still have most of a bottle) on the panel and then place the resin decal. I then usually have to blot, align, and press a little, but they settle right down, and have had zero trouble after that.
paddy
Well-known member
So here is the dilemma i alluded to earlier

These cowling parts have to fit together to form a perfect circle if they are to fit the front ring. The problems are
There is no fixed starting point/ datum point to build from
the engine dia is too big to wrap the covers round.
You cant build the covers on to the front ring and slide them over the engine. they will not fit
First thing to do is check/google others builds and this part is described as "a can of worms" to "its not going to happen" ....
You could with careful snipping cut the tops off each rocker box as i had to do with the eduard engine. in a couple of places and I wasnt even fitting the panels, just trying to get the front ring on.
The engine needs much better mounts. to hold it in an exact position relative to the fuselage for the panels to have any chance of being closed up, i would guess a couple of degrees out on the mounts will be enough to have the engine sitting at any angle other than the intended. Mine looks ok to the eye but its obviously not. bear in mind on assembly you cant even see the bottom engine mounts, you have to guess the engine has engaged with them.
Its a shame Revell didnt supply a small frame to mount the panels for people who didnt want to include the engine.
I think my best option is to junk the engine and build my own mount to take the prop and its fan. but i will sleep on it
The real value of this second build is its throwing up most of the problems i encountered with the first using the Eduard parts so for me its quite interesting..
These cowling parts have to fit together to form a perfect circle if they are to fit the front ring. The problems are
There is no fixed starting point/ datum point to build from
the engine dia is too big to wrap the covers round.
You cant build the covers on to the front ring and slide them over the engine. they will not fit
First thing to do is check/google others builds
You could with careful snipping cut the tops off each rocker box as i had to do with the eduard engine. in a couple of places and I wasnt even fitting the panels, just trying to get the front ring on.
The engine needs much better mounts. to hold it in an exact position relative to the fuselage for the panels to have any chance of being closed up, i would guess a couple of degrees out on the mounts will be enough to have the engine sitting at any angle other than the intended. Mine looks ok to the eye but its obviously not.
Its a shame Revell didnt supply a small frame to mount the panels for people who didnt want to include the engine.
I think my best option is to junk the engine and build my own mount to take the prop and its fan. but i will sleep on it
The real value of this second build is its throwing up most of the problems i encountered with the first using the Eduard parts so for me its quite interesting..
Is the engine oversized or the panels not scale thickness?
Similar threads
- Replies
- 8
- Views
- 2K


