• Modelers Alliance has updated the forum software on our website. We have migrated all post, content and user accounts but we could not migrate the passwords.
    This requires that you manually reset your password.
    Please click here, http://modelersalliance.org/forums/login to go to logon page and use the "Forgot your Password" option.

Maddog Manufacturing Open in 2021

And now for Part II

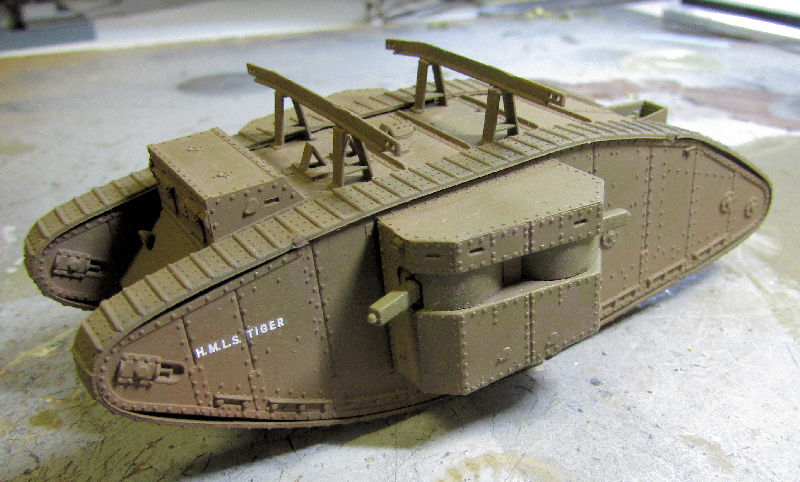
As we resume this tour, we'll check in on the WWI female tank. This one got the decals on it and some dusting. It's not done yet, despite looking so close. I expect this will be in the completed models section soon:

full


Now we move on to the Israeli Nagmasho't. Ace has you bend four tiny pieces of P/E into ammunition box holders for the four machine guns on this. I'm so thrilled I had my Hold-n-Fold:

full


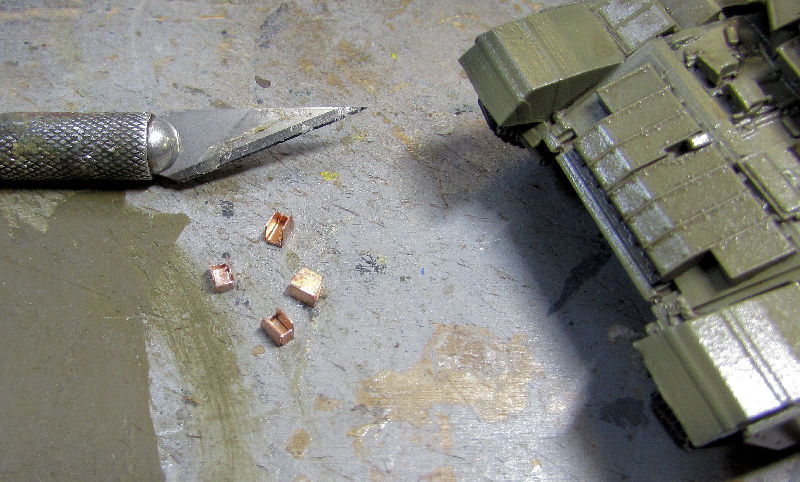
You can see the Exacto Blade in the pic for size reference. Man, I'm glad that got done! I glued each corner joint with Gator's Grip Glue.

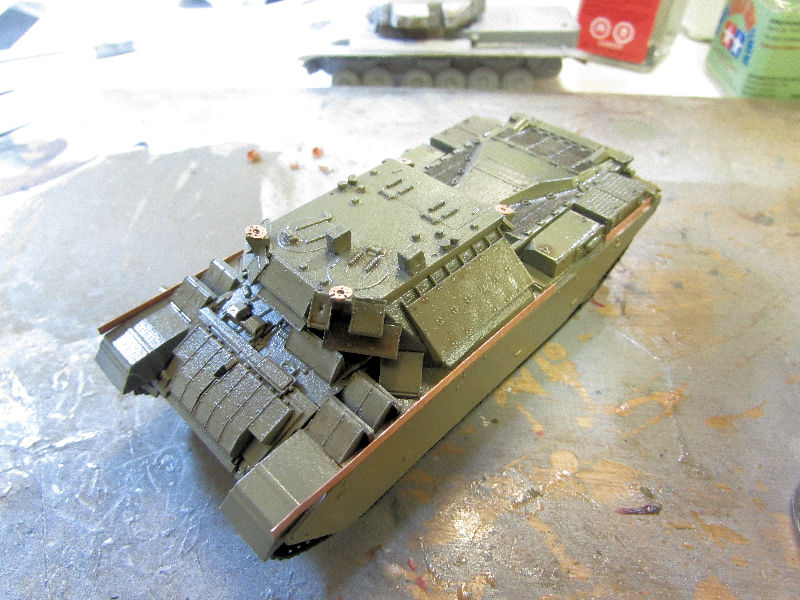
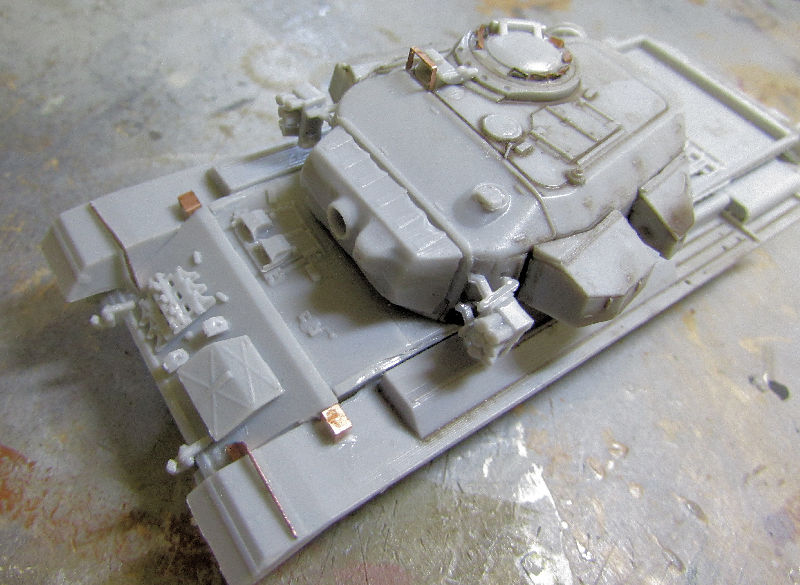
Since I was doing photo etch on this, I added the final parts to the model:

full


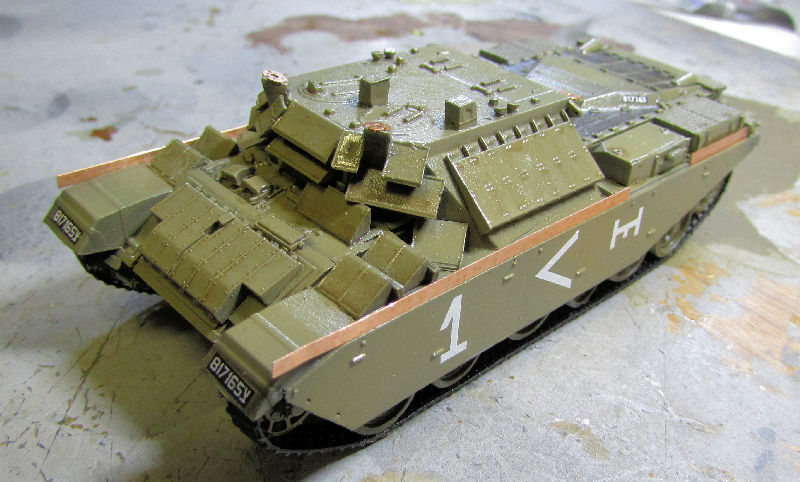
Once they were dry, I added the decals:

full


While the photo etch was drying on the Nagmasho't, I continued to work on the Sho't Meteor tank.

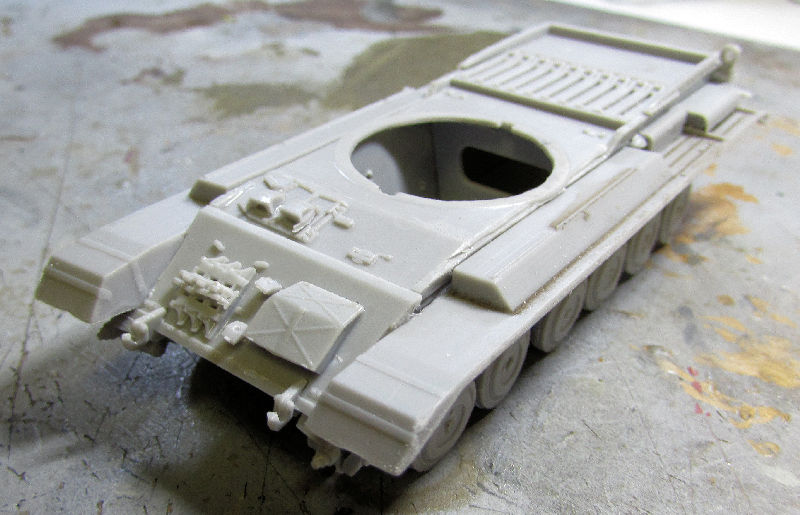
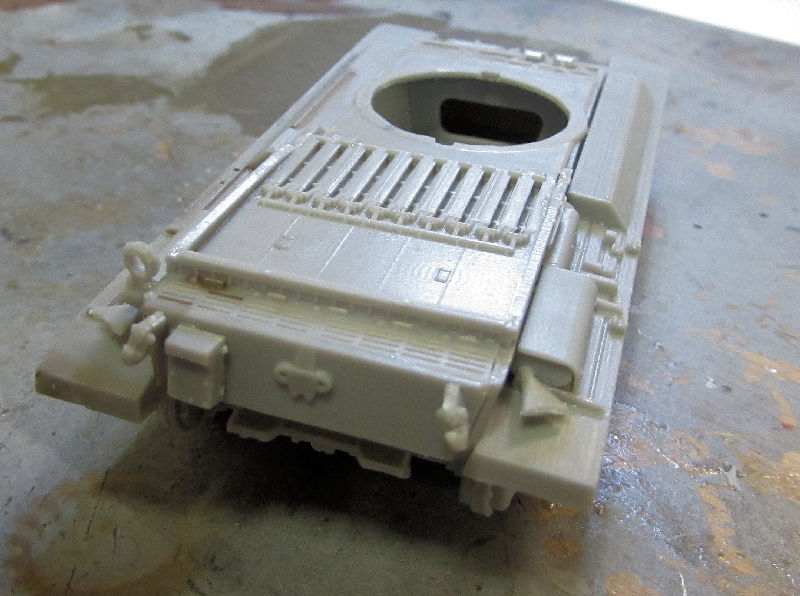
First I completed the details on the hull:

full


full


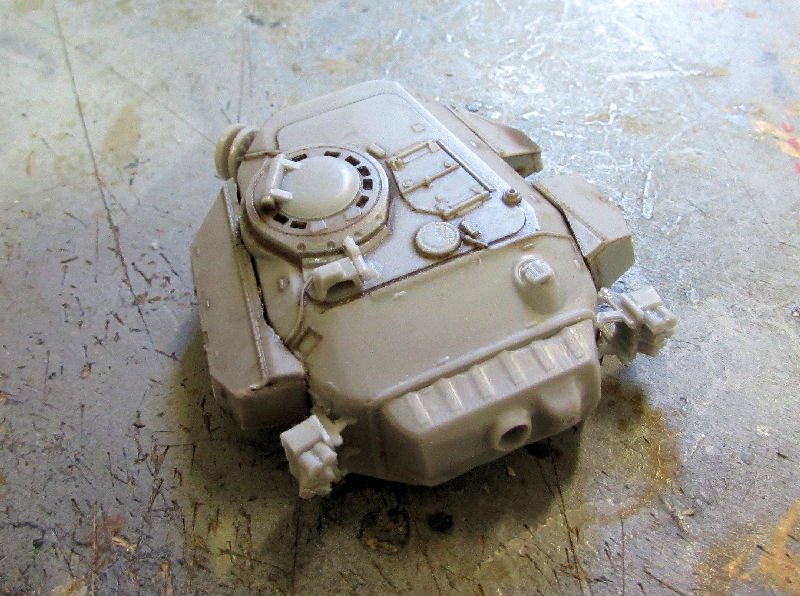
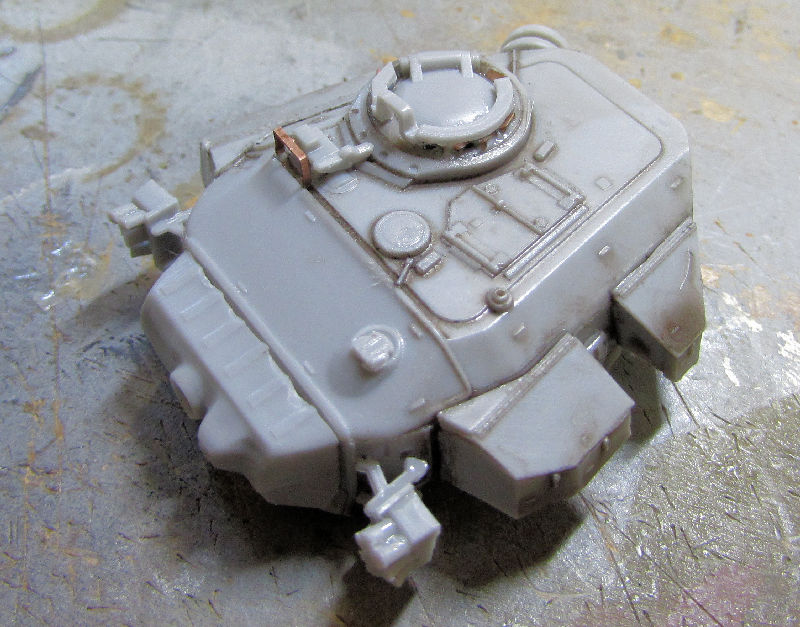
Next I started adding the details to the turret to bring it closer to finishing:

full


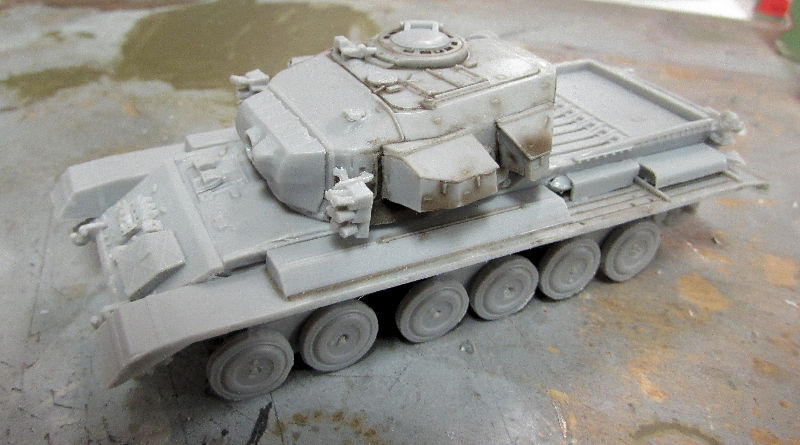
Here they both are mocked up with all the details I added:

full


Next came all the photo etch. First I did the turret; I needed to bend all the vision block shields and add them to the turret. Later I added the remaining parts to the turret and hull:

full


Later I added the hatch ring to the commanders hatch over the top of all those vision blocks:

full


Now this is so much closer to being finished. I should be able to paint this within the week.

Finally, I got tired of the M-41 taking up space. I pulled it out and added the fenders, the photo etch braces and the fender boxes to this:

full


Next I did final bits to the turret. This is getting closer to paint, but I still have so much more to do with it. I did add the idler wheels and the rear halves of the roadwheels to the suspension but didn't take any pics. Too much frustration with the roadwheels not lining up at all. Maybe you'll see that in the next tour.

That completes the latest tour of Maddog Manufacturing, I hope you enjoyed it. Thanks all for looking in, comments are welcome.
 
Hello everyone! Another small update for this week. With all the excessive heat happening out here, I figured it was time to stay indoors and work on some projects. I normally would wait but I'm pretty stoked at my progress this past few days. So, without further ado, feel free to board the trams for another short tour.

I'll start with the armor this time.

Remember those tiny ammo box holders I folded? Well, I filled them with the ammo boxes:

full


Later I got them attached to the machine guns:

full


Later on, when I pulled these down to touch up the paint and get ready to install them on the Nagmasho't; one ammo box disappeared into the Oblivion:

full


You can see the missing one on the left most gun. After two and a half hours of searching without even klnowing where to search, I found nothing so I resorted to a more simple solution. I removed one box from one of the other guns:

full


This time, second from right. Now I have two loaded and two unloaded guns. At least they are even. So now I installed the guns after weathering the model. I put the loaded guns in front, and the unloaded ones in the back:

full


If I ever find the missing box or a suitable rep[lacement, I'll put both back on. Now all there is to do is touch up the paint and fix the huge thumb print on the forward skirt!

While that was drying, I also painted my Centurion Sho't Meteor in my usual way: first coat of Green Drab followed by the Israeli Armor Sand. This time I tried a little more modulation:

full


After that I clearcoated that with my gloss for decals. That's when I noticed a few extra missing parts which I then added to the turret. I then gave this a black wash in the rear grilles and a brown wash overall as well:

full


And now going to aircraft...


Here is the unveiling of my An-124 during and after I painted the stripes on this. You recall I had taped and painted it already with the first thin stripe. Now I have removed that tape:

full


full


Next I taped up the sides to prepare for the larger upper stripe:

full


full


More paint was shot, again using my Sotar 20/20 as I get a lot less overspray out of that. Regardless, I still added a third strip of tape to top and bottom to be sure:

full


full


I went over that a lot to be sure I had a smooth even coat. by the way, I was using Humbrol gloss blue. It's not the correct shade, but it is the closest I could get to the decals on the sheet.

Finally, the unveiling! The bends are not lined up as well as I'd hoped and there are some touchups that will be needed, but now this bird is finally ready for additional decals:

full


full


Okay, that's all for now. Maybe I'll be able to post after this weekend again. I might even have a few more finished models.

I hope you enjoyed the short tour again.

Thanks all for looking in, comments are welcome.
 
Here is a small update showing my latest efforts to bring a couple more items over the finish line before July.

First off, I rigged the Diamond T wrecker with regular thread since I know that won't melt under glue! Now to find a couple hooks to add to the ends so I can finish this:

full


Next: There IS a God! With His help, I found the impossibly small ammo box that went missing from my Nagmasho't kit! So, I pulled out the one I removed and installed them both. Finally this is truly done:

full


Moving on, I had a few more steps to do on my Sho't Meteor. First was the turret. The version I wanted to do required a plate be added to both sides of the turret. There was a template on the instruction sheet, but how to make a plate from that? Then it hit me: clear plastic! I found a sheet of thick clear plastic and cut out two plates to match the template. I cemented them on the turret using Gator's Grip Glue:

full


Later they got painted, glossed and decaled:

full


Next I had to add the wheels and tracks to this. That went fairly fast, although the adjustments to line these up took longer than the installation:

full


Yes, it says "Meteor" on the bottom. I had planned on building the Sho't Kal Alef alongside this so I wrote that to keep from confusing which hull was for which tank. Turns out I didn't need to. Best plans and all that....

I then glued the two halves of the tracks together using black tire glue:

full


When they were dry, I tried installing them and naturally, I broke the idler wheel when trying to thread it through under the fender:

full


The other side went on fine though... of course:

full


Later when the idler dried in place, I was finally able to finish the tracks on the other side:

full


Finally, here she is all dressed up in her skirt and shoes:

full


Later I finished this up completely. You can see it in the finished armor forums.

Thanks all for looking in, comments are welcome.
 
Thanks Rob! Which one? I've had them both done for awhile now. In fact, both of them were in San Diego at the show. I wish we had met up so I could've shown them to you.
 
Welcome back to the plant everyone!

Thanks to Hobby Day I got a great amount of work done so this will be a long tour of the manufacturing plant with an intermission in between.

All aboard as we head over to the hanger first.

I was determined to make some more progress on my A-400 because I'm getting tired of that thing cluttering up my workbench. I shot some grey over the fuselage to see how well the nose and all looks; and then hit it with a glosscoat for decals:

full


I'm pretty pleased with the way the nose turned out.

Next I shot the wings with the grey and gloss to even this up:

full


After that, I had the urge to mock this up. I dry-fit the tail and wings to this to see how big and bulky it is:

full


Thinking about how I'm going to proceed on this plane, I'm planning on removing the tail and decaling it. Then I'll cement the wings in place. When they dry, I'll fix and/or sand the seams around the wing-fuselage joint and then re-paint it with the grey and gloss. After that I'll add the decals; seal them and then add the tail to finish this Big Bird up.

As for the other Big Bird (Antonov) I'm still re-touching the paint on it. Hopefully I'll be able to make progress on it soon.

After that, I wanted to start something simple and nostalgic. That's when I found the bagged Frog kit of the Swedish Vampire. Perfect!

I started with the "cockpit":

full


Yes, I will be painting that guy.

Later I cemented him into one half of the fuselage to see where and how much weight to add to the nose:

full


The white is the Gator Grip Glue I used on the flattened bullet fishing weights.

After that, I cemented the fuselage together, added the wings, booms and tail; used Vallejo acrylic putty to fill the seams and sanded the joints:

full


Just need to paint the pilot, mask and add the canopy and I'll be able to paint this little bird.

Next I went looking for something different to build. What can be more different than a helicopter? I found my little Japanese OH-1 Observation helicopter AKA "Ninja" and started on the cockpit:

full


And that's as far as I got on that because I need to paint that interior. Then I pulled out my Christmas present from my sister: the Russian Kamov Ka-29 helicopter. Started the cockpit on that too:

full


Next I did the main cabin interior, seen here behind the cockpit:

full


In order to make sure the upright bulkheads lined up properly, I added these sub-assemblies to one of the fuselage halves to allow them to dry in the proper position:

full


That rear bulkhead was adjusted after that pic was taken...

Later I painted the whole interior:

full


Kinda bland; only two colors, black and blue!

As the paint dried, I assembled the main rotor hub:

full


That looks a lot more complicated than it is.

That is all I have on my aircraft so we'll continue on to my vehicle manufacturing.

I painted the interior of the searchlight on my 1/35th scale Patton tank:

full


Later I'll be mounting that to the turret behind it and then add the final parts to finish it off.

Since I had cleared the desk of almost every small scale armor model in progress; it was time to start some more. Since I had built a Centurion; I decided that I should just go ahead and build al the rest of the ACE Centurions I had in the stash.

First Centurion up was the British Centurion Mk.5 that will be done up as a Berlin Brigade tank. I started by assembling the lower hull:

full


I continued by adding the roadwheels and suspension bogies:

full


Later I added all the upper hull plates and assembled the turret:

full


The next Centurion I started was the Australian Centurion Mk.5/1 Long Range. I assembled the lower hull with bogies and wheels; and then did the rear external add-on fuel tank. That is the little box behind the lower hull:

full


The final Centurion variant was a one-off test vehicle the British built to counter the JS Stalin class of tanks. It is labeled the FV-4005. The lower hull was assembled just like the other two:

full


Then I built the big boxy turret:

full


This thing carries a 7.2inch howitzer on it; that is why they needed such a turret.

I placed the turret on the lower hull even though I hadn't added the top plates to it. And yes, it does come with a recoil spade:

full


There it is; the British KV-2!

And now it's time for the intermission. Please debark in an orderly fashion and enjoy the snack bar and gift shop. The tour will continue shortly.
 
And now if you'd like to board the trams again, we'll continue with this tour of vehicle production.


Moving on, it was time to start something else. I'd been wanting to start the Italian Centauro B1T, so that one came out next. I built the lower hull:

full


Then the upper hull was assembled:

full


Then I went to build the turret for this, but remembered the difficult time I had with the hull/turret fit on my original Centauro. So, I test fit the lower turret plate to the hull and found I needed to remove that raised ring on the upper hull:

full


Then I had to widen the hole a bit, as well as thin the edges:

full


There! Now it fits AND turns smoothly:

full


Okay, now I could assemble the basic turret:

full


Then I looked at the main gun and found that the usual ACE issue of sink marks on the barrels was exhibited here so I filled that with Mr. Surfacer again:

full


At least that one was not quite as bad as the previous gun on the Centurion Sho't...

After that I started another wheeled vehicle, this time a V-150 with a 20mm gun. I'm going to do this one as the Cadillac Gage Canadian car. I assembled the lower hull first:

full


Then I built the diminutive turret:

full


That was as far as I got with that. There is an interior that goes in there that I'll be adding later, even though it won't be seen once the model is built.


I'll know it's in there!

After all those rough ACE kits; it was time to start something a lot more simple and easy to build. I pulled out my recently-acquired Japanese Type 96 APCs and started the Type A one first.

These kits are the Tamiya of Braille Scale!

These models allow you to have steerable wheels in the front. They give you the parts to not only make the wheels turn, but to turn consecutively using this type of system:

full


That gets covered by the bottom plate that also holds the main wheel hubs in place.

They also give a somewhat rudimentary interior:

full


The rear hatch also opens and closes:

full


full


Then I built the upper hull, adding the hatches and other parts. The mini turret on top is just dry-fit now. Check out the fit; that top is just sitting on top of the vehicle:

full


I then built the Type B APC, doing all the same things as I did with the Type A version. This one has a machine gun (Ma Deuce) instead of a 40mm grenade launcher like the Type A. I also left the main driver's hatch off because I'll be showing it open. Later you'll see the difference on that:

full


The Type B model comes with troops from the Rapid Reaction Force that these Type B vehicles are assigned to. It even has a 120mm mortar with it. I had to assemble them all:

full


After I took that pic, I noticed a second sprue with the parts for three more soldiers so I built them afterward.


And that completes this latest tour of Maddog Manufacturing. I hope you enjoyed it.

As always, comments are welcome; thanks for coming in.
 
LOL! Mark you are now truly getting into some of my kind of crazy territory with the figures.

Keep up the good work!
Mech Thumb up.jpg
 
Thank you Paul! Yeah, it's been awhile, but I have built and/or painted figures before; all in 1/72 scale. I think I have over 1830 painted. I can opnly hope that I can do half as good as you in that regard!
 
I learned to paint 25mm figures back in my 20's for D&D gaming. Many times the figures looked too good to use in the game. It has been a very long time since I painted any of the tiny folk.
 
LOL! I know what you mean. I also learned very early to paint mine. It has indeed been quite some time since I painted any small figures, aside from a couple of pilots...
 
Well it has been awhile, mostly because I actually picked up a couple jobs. However, this means I will have a pretty substantial update here today.

It will definitely run two pages again....


Let's start with my aircraft. All aboard the tram to the hanger, and remember to keep your hands and feet inside at all times.

To start with, I had a smudge in the paint on my Antonov that would not go away. Upon closer inspection, it seems that somehow all the white had been sanded away. So, I masked off the whole thing except for the bunged area to shoot some white:

full


A couple coats later and after drying, I have a now very white patch! Not sure what to do about this:

full


I went ahead and shot a gloss over this so that I could seal it in, seal the decals more, and moved ahead on this. No such luck. I waited three days to shoot a clear on this, and once it hit that blue stripe, it all crackled again:

full


You can see the white was fine, but the Humbrol blue cracked like shattered glass. Once more into the breech....


I masked off the strip where it cracked and sanded the cracking smooth again:

full


Sorry for the bad pic there; but this was ready for re-painting that section of blue. Already done as of this update. This time I'll be trying Future again, now that I have a new bottle.

Moving on to something easier, I painted the pilot of the Vampire and then glued on the canopy:

full


After that dried, I used my Vallejo masking agent to cover the clear portion of that canopy for painting:

full


Moving on, I started two new aircraft. While I was building my armor, I was chatting with a friend and we were talking models. The F-27 Friendship was mentioned and since I was already planning to build it, I was motivated to start it today. Here is the interior of this plane all assembled:

full


Just for fun, I dry fit that into one side of the fuselage:

full


Nice! Later I glued the wing and tail halves together (not to each other though) so that I wouldn't have to worry about that later:

full


That was good enough for now because we also started talking about the ancient Matchbox Noorduyn Norseman which I also happened to have in the stash. So, out it came and the most basic interior was completed:

full


Here's what that one looks like inside one side of the fuselage:

full


I then cemented the float halves together to ease construction later:

full


There's where I stopped more or less. I wanted to focus on my armor now since I have so many under production. So, next stop for this tour is my motor pool portion of this factory....

My first one I did was the Canadian Cadillac Gage, which needed the interior, basic as it is:

full


Not even sure why I did that, it won't be seen once this is closed up. Oh well, it was fun!

Next up was the Russian CLUB M Coastal defense missile system. I'm doing this four hours at a time for our SoCal AMPS 20 hour build. Before I finished up the chassis, including the photo etch. This time, I started on the cab with the interior first:

full


The outer cab was then done, first the interior dashboards:

full


...followed by the windows:

full


After that I started the generator cab, getting it assembled:

full


Then I started on the launch tube cabin, first assembling and then mounting the launch tubes inside:

full


Here's the whole set of sub-assemblies sitting on the chassis:

full


This is the other side which shows how this will look:

full


I need to paint that interior before I add anything more. And yes, this will be shown open because I figured out how to make the launch tubes elevate....


Now for a short rest break on this tour. Feel free to stop into the gift shop and snack bar.
 
Okay all aboard the trams again for the next leg of this tour. On this one, we'll be showcasing the assembly of my three Centurion variants.

First up is my Australian Centurion Mk.5 LR. I had already built the basic lower hull, so this time I moved on to the turret:

full


This has a turret basket on the back so I built that. Later I'll be adding photo etch to it:

full


Then the top part in front of the commander's hatch disappeared so I scratched out a new one and installed it on the turret:

full


It looks close enough to the original kit part so at least I'm happy with that:

full


Next I decided on a new approach to adding the tracks to these beasties. First I added the inner wheels and sprockets:

full


Then I cemented the run of tracks to the bottom of the roadwheels, making sure the guide teeth were up against each one. Yes, I used the glue shown in the pic. It works!

full


After this dried, I wrapped it around the sprockets and connected them at the top of the run; cementing them to each wheel and sprocket:

full


Once that was done, all I needed to do was add in the outer wheels and sprockets and Bob's your Uncle!

full


I did the same with the other two Centurion variants and it worked out exceptionally well. Here you can see the progression from first gluing on the left to finished on the right:

full


After that, I completed all the plastic assembly for the tank. Next up is the addition of all the photo etch:

full


I then worked on completing the hull and most of the turret on the British Mk.5:

full


Later I also assembled the hull and turret for the British FV4005; or as I like to call it, the British KVII! The first thing I did, since the turrets were sticking on the previous two Centurions; was to fix and test the turret ring panel before installing it on the hull:

full


Should've done that with the other two Centurions...

Got the hull all assembled and stuck the turret on it:

full


Later I completed this all the way up to photo etch:

full


I also brought the British Mk.5 up to the same level. Here are all three sitting together ready for photo etch:

full


And that completes the latest tour of Maddog Manufacturing, I hope you enjoyed it.

Thanks all for looking in, comments are welcome.
 
if you have used Humbrol Enamel for that blue stripe and then use a laquer clear this most prob. won't react - if that is the case I would recommend a Acryl clear

ah and rest of the company outcome is looking great, so you had successful motivated your employees :)
 
Thank you Bob and Martin! I do plan on shooting this with Future now since it should not react with anything else. Man,, I need to finish this plane!

Martin, thanks for the compliments on everything else!
 
Back
Top