• Modelers Alliance has updated the forum software on our website. We have migrated all post, content and user accounts but we could not migrate the passwords.
    This requires that you manually reset your password.
    Please click here, http://modelersalliance.org/forums/login to go to logon page and use the "Forgot your Password" option.

Maddog Manufacturing Open in 2021

Duke Maddog

Well-known member
Hey everyone! Happy New Year and welcome to the new Grand Opening of Maddog Manufacturing for 2021. Most of which I'm going to show right off is work I did just before heading out on vacation back in December. Since it didn't get posted then, I'll be showing it here.

So, all aboard the tram and remember to keep hands and feet inside at all times. Enjoy the tour!

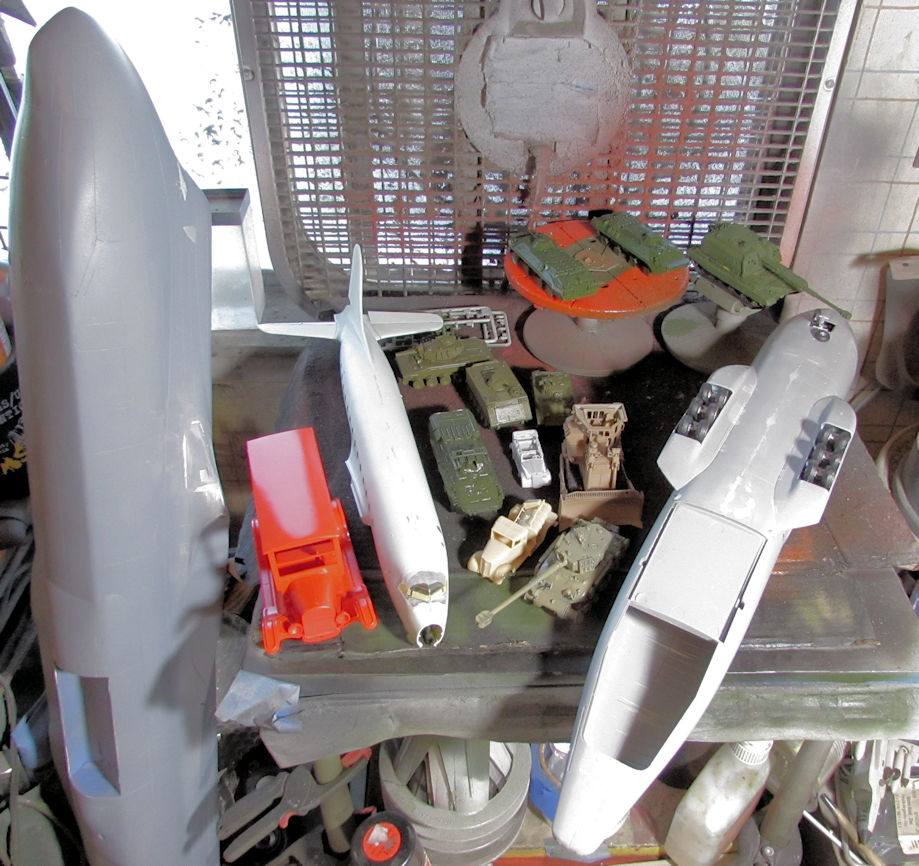
To start with, these are my most active projects currently going on right now:

full


A lot of the work you see here has already been chronicled, but just before I left, I did some airbrushing of base coats.

First I'll show you the work I did on the C-54.

I worked on sanding and shaping the cockpit canopy to get it ready for paint:

full


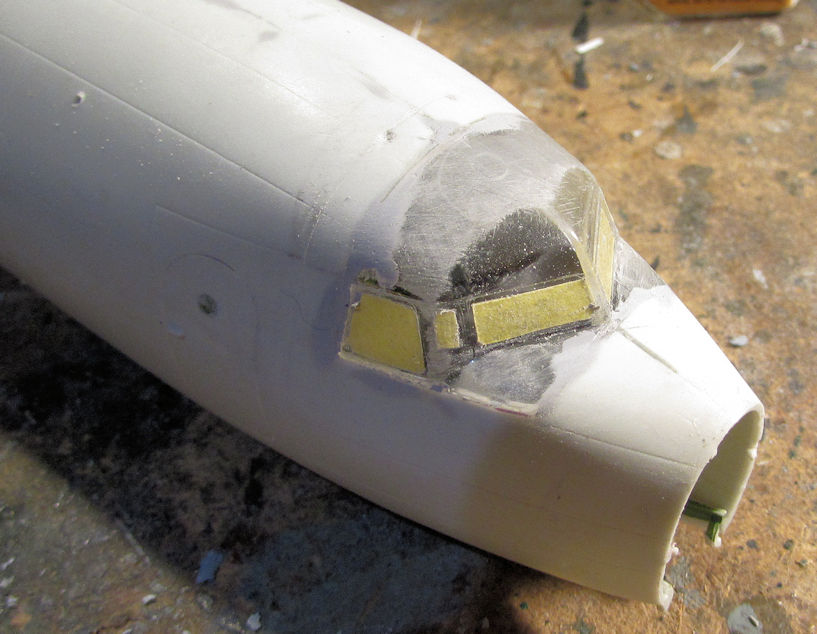
I think it's ready, but I'll have to prime it first to be sure.

Then I built all the engines and dry-fit them to the wing nacelles to see how they look:

full


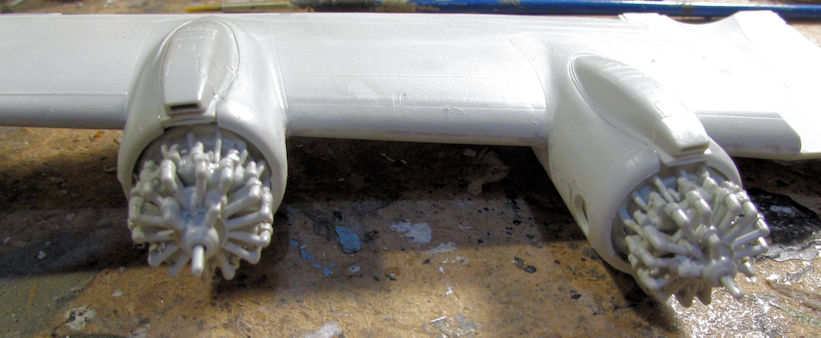
They look great in place, but I had a sneaky suspicion about something so I slipped a cowl on one of them to see how well it fit. It didn't:

full


That is way too far from the nacelle so the engines are gonna take a little finagling before they get painted and closed in behind the cowls.


Moving on, here are the pics of that base coating work on my armor and the 1929 Coke Delivery Van...

First off, I had the Olive Drab out so I shot the OD basecoat on these models:

M-5 Stuart:

full


M-551 Sheridan:

full


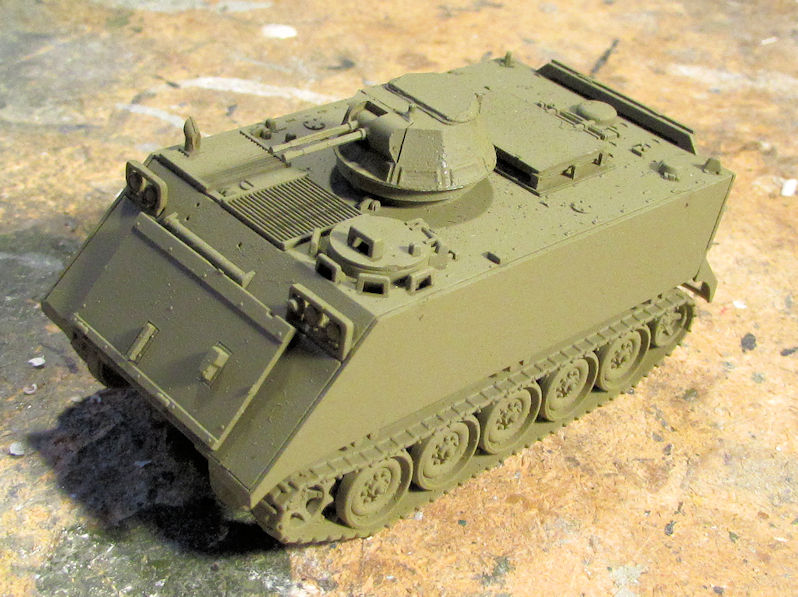
M-113 APC with Turret:

full


Next I pulled out the Dark Green and shot it over these:

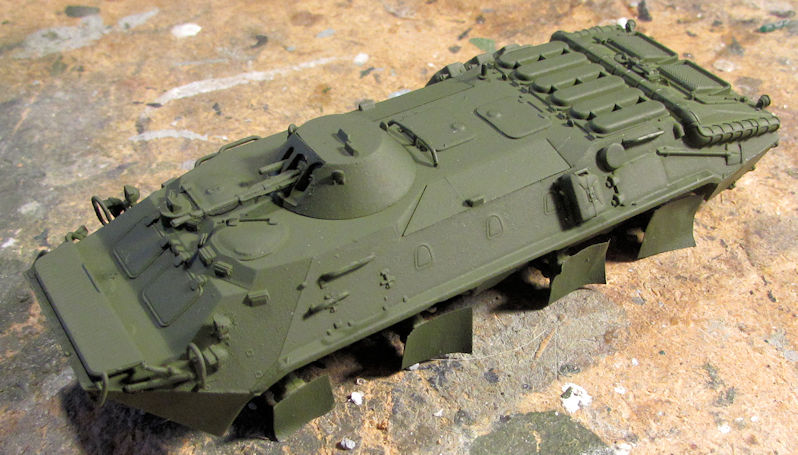
Russian BTR-70 Early:

full


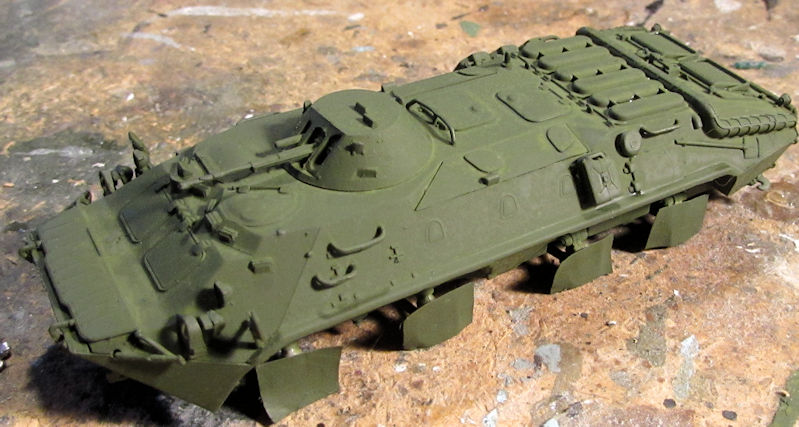
Russian BTR-70 Late:

full


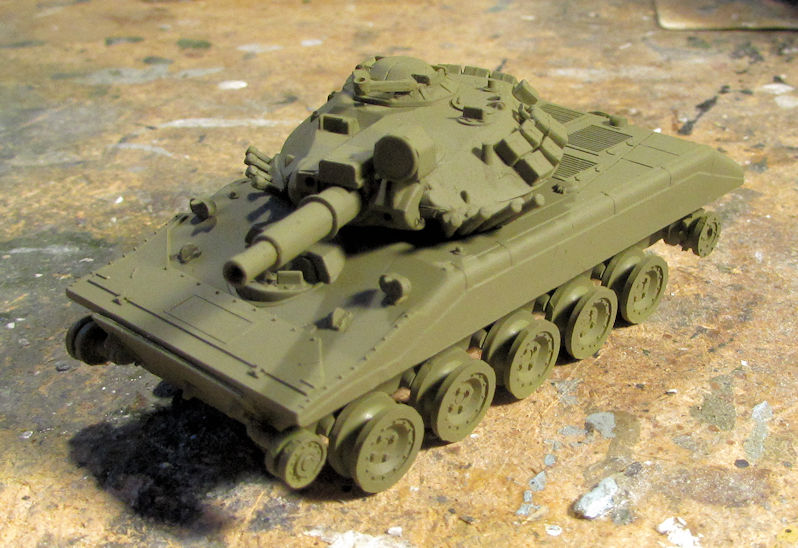
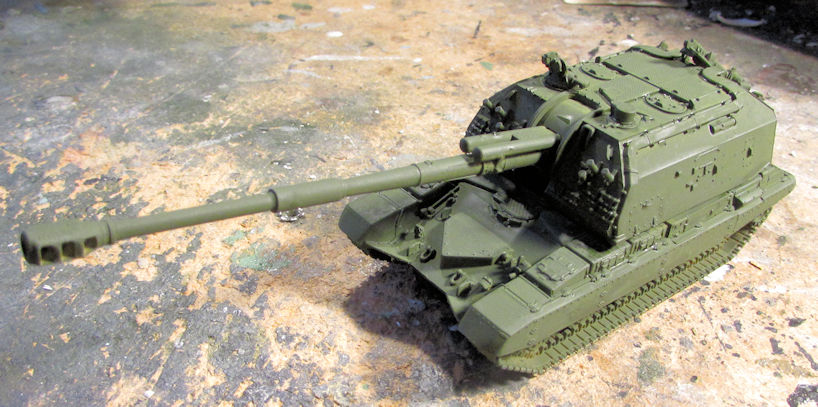
...and my Russian 2S19 Artillery Vehicle that I'd assembled in 15 minutes some time before:

full


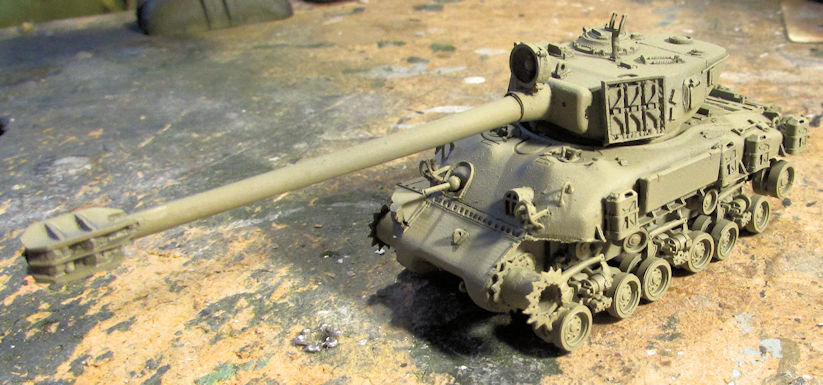
Later I pulled out the Green Drab and base coated the M-51 Isherman:

full


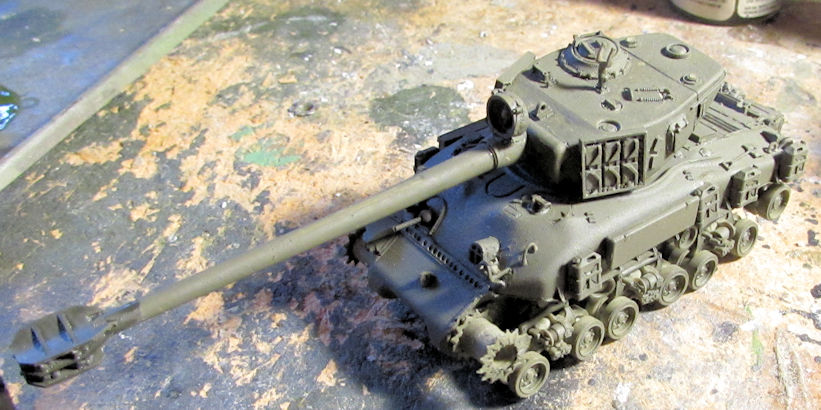
After that dried, I shot a coat of Israeli Armor Sand over this, trying hard to do it light enough for the Green Drab to show through in places:

full


I then changed things up and loaded some red in the brush and shot my 1929 Coke Delivery Van. It was still wet in this pic:

full


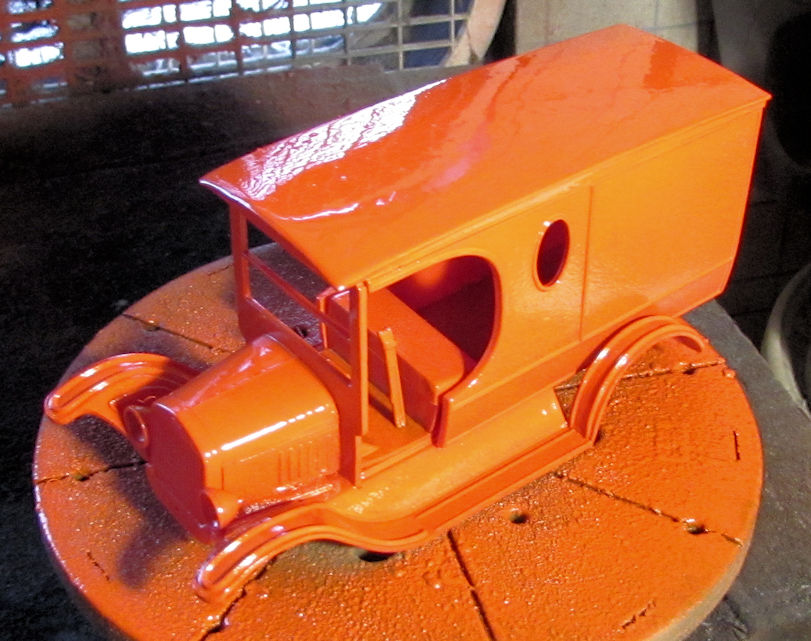
Personally I'm not that thrilled with that red, I feel it's too light. I want a darker red on this so I'll be looking for another color to shoot on this.

After that, I shot the dark tan over the D-9 Dozer:

full


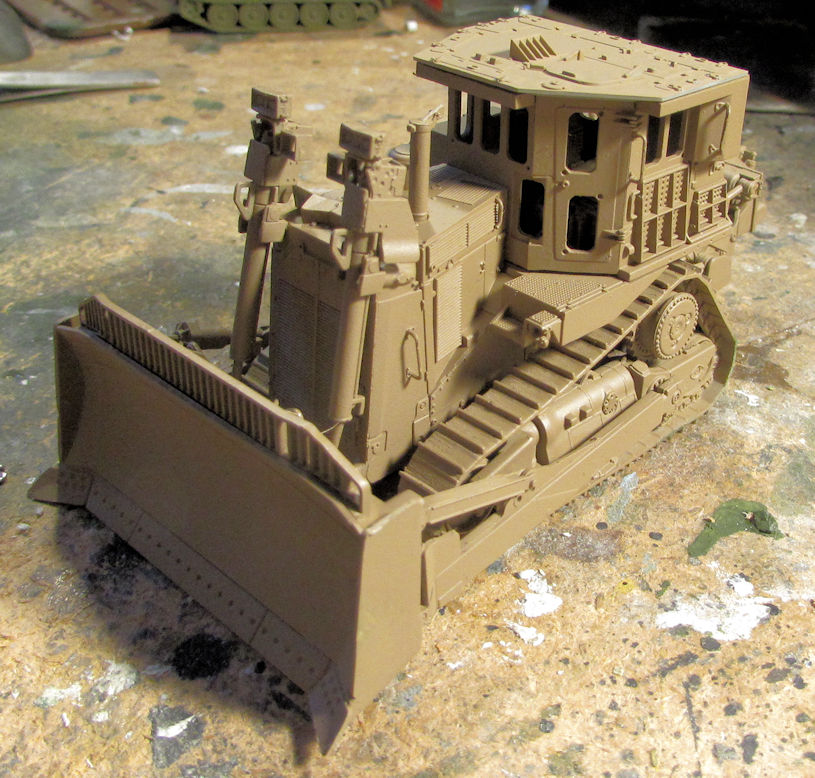
I'll be doing a dark brown wash over that to make it pop and then after paint the interior, I'll add the windows to this. Then after I weather it, I think it will be done as I don't remember any markings for it.

The day before I left, I shot gloss coats over all the above vehicles to prepare them for decals when I came home.

Finally when I got home, I decided to tackle the BTR-3K that has the digital camouflage decals included. Alexey had a nice sheet of digital patterns but I feel there could have been more as I didn't have enough for the upper deck in back. Maybe it doesn't need it up there, but I added what I had left after applying them to the sides, front and rear. There was no diagram in the instructions showing where and how to apply them so I winged it. I think it looks pretty good, despite my poor application:

full


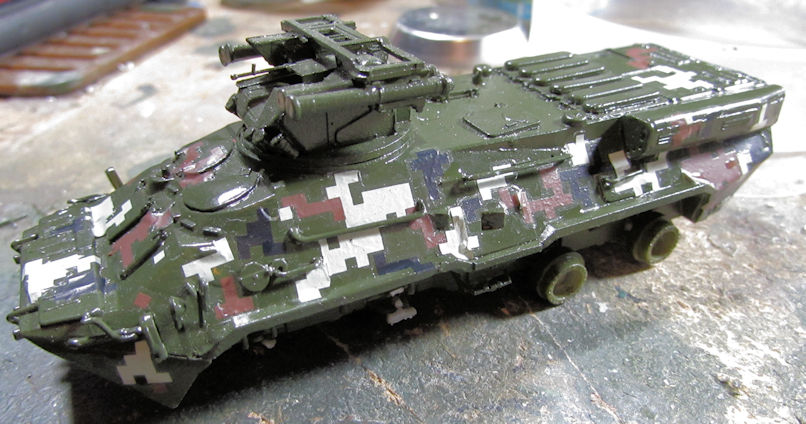
And no, I won't paint the remainder on the top. I don't want to deal with masking with multiple strips of tape over multiple layers, even on that small area. It's just going to be dullcoated and weathered after adding any other markings that might go on this. I also decided that after dealing with these, I was going to wait for another day to decal the rest.

Okay. that's what I have to show for the start of 2021. Hopefully I can maintain this momentum throughout the year.

Thank you for joining the Grand Opening Tour! I appreciate all comments.
 
Last edited:
Thank you Bob! I'm sorry I missed your reply before. I guess I missed the notification in my E-mail.


Well I got more to show from this past week. I was waiting for my airbrushes to be finished with their repairs, so while I did that, I managed to move forward on these models. Let's start with my aircraft.

After seeing how badly the cowls fit over the engines on my C-54, I sanded the edges of each one and tried again. Success! They fit now:

full


Now to build the other two engines and see if I can do more on this plane.

Meanwhile, I had a lot of sanding to do on my An-124 around the cockpit area and the shoulders in front of the wings:

full


While I was sanding them, I also sanded and adjusted the wings so that when I finally glue them, they will seal perfectly and be flush where they are supposed to be:

full


Later, all these subassemblies went out and got shot with another three or four coats of primer and another clearcoat:

full


Hopefully I can start moving forward on this monster now.

Now, since I have so many pics showing the work I did on my armor, I'll start another post after this one with that progress since I can get no more than 20 pics per post.
 
Continued from above...

Okay, here is the work I did on my armor. Let's start with my 1/35th scale Patton. I decided to finish painting my tracks for this tank while waiting for my airbrushes:

full


Now, once I get them back, I can finish detailing and modulating this big tank.

Okay, enough of the big stuff, here's my progress on my small scale armor.

We'll start with the smallest one. I shot a gloss coat over the little Stuart so I could add the decals. Naturally, the decals disappeared so I dug through my decal stash to find some that would fit. This is totally fictitious, but at least it has markings:

full


Yes, the decals silvered, I took care of that. I also took care of the silvered decals on three other models as well.

After this dried and the Solvaset finished, I shot a dullcoat on this little tank. Then I decided to experiment with some weathering powders to see how well I could use them. I applied some on the hull and running gear:

full


I wasn't thrilled with this. However, I did kind of go a bit heavy since the follow-on dullcoat tends to make a lot of it disappear as you can see here:

full


Yeah, I'll be redoing this with paint when my airbrushes come back.

Moving along, I also did the gloss and decals on the turreted M-113. I liked the Snoopy decals so on they went:

full


Later this got dullcoated and powdered like the Stuart:

full


After the second dullcoat it looked better, but I'm still not thrilled:

full


The final tank I tried this one was the M-551 Sheridan. I shot the gloss and then added the decals:

full


Next came the powders:

full


...and finally the last dullcoat:

full


Well, that experiment on several vehicles was not a roaring success in my eyes, so maybe I'll shelve that idea until I can see what works better. Meanwhile, I continued on my three BTR's. First are the two BTR-70's that got a gloss and decals:

full


Next I decided to try and weather the wheels a bit before installing them. I painted the treads with a dirt-colored paint first. You can see six of eight done that way now:

full


Next I tried wiping the top color off, but the paint came completely off, despite whatever light touch I tried. So, I re-painted it and later semi-dry brushed a black color over the paint to get the effect I was looking for. It's kind of hard to see but I went ahead and added the wheels to these vehicles:

full


One thing I liked about these kits: the wheels were so tight, all I did was snap them on!

Later they got a dullcoat in preparation for weathering:

full


On the BTR-3K, however; after applying all the decals I had some repairs to make:

full


Once that was done, I dullcoated this little vehicle:

full


Then I added the wheels to this. All she needs now is weathering and it's done:

full


Finally, I gloss coated the M-51 and then decaled it using the old Star decals that I'd gotten for IDF vehicles. I had forgotten they were printed on a solid decal film so I didn't trim close to the decal images until after they were on the model. That being said the chevrons still shattered so they didn't go on. These ones did:

full


Later I dullcoated this and gave it a dark brown wash and afterward dry-brushed it with a light sand color:

full


All it needs is tracks and weathering and that little beastie is done!

Wow, I got a bit more done than expected this week. I can only hope that next week is as productive. If so, you'll be seeing almost all these armor vehicles in the finished Forums!

Until then, thank you for looking in, comments are always welcome.
 
Last edited:
Wow neat stuff! I am always a fan of Russkie stuff, that digital camo is neat! Also the IDF stuff is close to my heart always. really neat!
 
Thank you Bruce! I have at least seven more Russian tanks to build, and I have three Israeli Centurions on order. I think I'll have a lot for you to enjoy soon.
 
Okay, here's the latest I got done this past week; most of it done on the Hobby Day weekend. I'll start with the aircraft that got messed up.

Some time back, I realized I needed a lot more weight in the nose of the A-400. A LOT. So, since the rear end was still open, I decided to add it and then tilt the plane forward. Naturally when I maneuvered the fuselage for additional sanding or fitting of parts, the weights were not fastened down so they rattled around and sometimes fell out of the still open rear end. So, I took an empty paper towel; tube and slipped it down through the rear opening and then shot some spray 77 adhesive through the tube to coat the weights and then set it aside propped up on it's nose to let the stuff dry.

Good news: It worked. The weights don't move anymore.

The Bad news: some of the adhesive flowed down to the nose and apparently was 'hot' enough to do this before drying:

full


So, until I figure out how to sculpt a nose for this, or find something to graft on; this bird is grounded on the Shelf of Doom for a while.

Meanwhile, I moved on and got some progress done on the 1/35th scale M48 Patton tank I'm doing for my local AMPS club Group Build for the Vegas Nationals. First, I painted the tracks that were dry and ready to paint:

full


I then shot some additional modulation on this:

full


...which I covered with another thin coat of OD green again. It doesn't show up well in these pics, but there is definite modulation here:

full


Moving on, I started another new kit. This one is the ACE kit of the AT-1 Snapper Anti-tank vehicle. It was started for a "Goodbye 2020 Group Build" that was started on another Forums. Here is my early progress...

First I completed the suspension underneath:

full


Then I did the top part:

full


I have some brackets for the spare missiles to go in and then I'll have to paint that interior. Once I put the top on, that will be impossible to paint.

Later, I assembled all the Snapper missiles but didn't shoot pics of them.

Now I have about 17 more pics to post which will put me over the 20 pic limit so this will be continued below in Part II
 
Okay, here's Part II continued from above...

Before I get into what I did; I have to show this. Do you remember me leaving off the round cylinder off the HEMMTT tank transporter tractor because it got lost? I was doing some cleaning and finally found it! Here it is installed on the model:

full


Later I painted it to match the model; but I was so excited that I finally found this that I had to shoot it after it was glued on, just in case it fell off and disappeared again.

Moving on to my other in-progress models....

The first thing I did, since this model is so close to the finish line; was to clearcoat the Russian MSTA self propelled gun. Interestingly enough it was such a quick build that I didn't get shots of it under construction! Anyway, here it is in it's basecoat and clear coat:

full


Later I added the decals to this:

full


Now all that's left is final parts, detail painting, dullcoat and weathering.

Next up is the US Army M109A6 that got most of the fiddly parts that wouldn't break much during handling before I shoot paint. I added the hatches, headlights and other detail parts:

full


Next, it was time to move forward on the Takom 2-n-1 kits of British vehicles. I started with the FV-432 APC, adding the hatches, headlights and other detail parts that weren't delicate:

full


Afterward, I decided to try the tank track jig they included in the kit. It looks like this:

full


The drive sprocket and idler wheels go on the end posts and the top run of track is glued on to connect them:

full


On the other side were some huge ejector pin marks that were so close to those posts that one got cut while I was removing the EP. It had to be glued back into place and so I was only able to do one side.

Once the upper run of track was done, then I added the individual track links on the idler and drive sprockets, followed by the end runs to the bottom run of track:

full


Later that is to be removed from the jig and glued onto the model, then the bottom track run is glued on to complete the tracks. The Chieftains all have the same jig for their tracks. Overall a pretty good system; but I'm hoping the larger track links on the Chieftains are easier to do than these small, fiddly things!

Speaking of Chieftains, I moved ahead on them, finishing off the turrets and adding all the detail parts to the upper and lower hulls; starting with the Chieftain Mk.5:

full


Later I added the baskets to this tank, but I still have some P/E mesh parts to insert inside them before I paint. You'll also notice that the smoke dischargers are missing from the front of the turret. That's because Takom only molded one in the Chieftain Mk.5 kit, the other one was never molded. I know because comparing the sprues to those of the Mk.10 and Mk.11, the sprues that are supposed to hold the second one were shorter and had no broken connection points, indicating that the plastic never quite got into that part of the mold. I'll need to source some extras from the spares box; M1 Abrams dischargers look closest to these used on the Chieftains.They may not be accurate, but they'll be on there!

Speaking of the Mk.10, I also finished the turret and added the detail parts to the turret and hull:

full


Late I added the baskets to this too:

full


On the Mk.11, it was the same; finished building the turret and then adding all the non breakable detail parts to the turret and hull:

full


That one got baskets as well when I built them and added them with the other Chieftains:

full


And yes, the reason I waited to do the baskets is that I had to assemble each one from four to five pieces...each! AND I still have to add P/E mesh to them all!

Anyway, here are the three Chieftains ready for track assembly and then paint:

full


And that completes my latest update on my progress. Thanks all for looking in, comments are always welcome.
 
You just keep adding to the collection there Mark. I am seeing some improvement in your skills on painting the armor. That 1/35th scale build is looking quite good!
 
Thanks Rob! Yeah, that fan is my vent for my "spraybooth". I usually clean it off after so many uses.

Thanks Paul! I'm hoping to get that Patton done soon.
 
This has been one of those one-step-forward/two-steps-back kinda weeks. That is why I've only done this much.

I'll start with the 1/35th scale M-48 Patton I'm doing for the SoCal AMPS Group Build. This actually went pretty well; probably the only thing that went well this week. To start with, I added all the extra detail parts to the upper hull that I'd left off before. Things like headlight, lifting hooks and gas caps for instance:

full


Of course, this didn't all go so pristine; when I went to add the vision blocks to the driver's hatch, I found that one was either missing or never molded. There's supposed to be three as seen on the instruction sheet to the left. You can see I only have two. I never handled this sprue before so I have no idea where the third one went:

full


So now, I will only put on the center one and see what I can do about the other two. Until then, I'm moving forward on this.

I did have all the clear parts for the turret, so I added them all along with the rest of the detail parts:

full


full


I then started on the big searchlight:

full


full


I'm gonna paint the interior before adding more and closing it up with the clear panel it comes with.

That's as far as I got with that so far. Later, I started another little model for a Group Build on Missing Lynx Braille Scale Forums. This is my M-32 started. I did the lower hull first:

full


After that, I didn't want to deal with the running gear so I skipped ahead and started the mine rolling assembly. What a battle this turned out to be! After an hour and a half of fighting this thing, I finally got the following result:

full


Later I built the turret and some of the parts for the lower hull. This is a mock up of all I'd done on this so far:

full


I'd had enough of that so I moved on, hoping to make some progress on some of my aircraft. More on them in the next post since I exceeded my 20-pic limit. Stay tuned for part II
 
Here is part two, showing the disappointing progress on my aircraft...

The A-400 was bothering me so I started the sprue framework on the nose suggested by one other friend:

full


Of course, that caused a front wheel to come off:

full


So I tried to glue it back on. It wouldn't glue on straight! So, I drilled out the stem, destroying it in the process of course, Then I added a piece of wire to the broken wheel:

full


The axles ain't straight, but the wheel is even with the unbroken one, so this is DONE!

full


While doing that, I found a couple other areas where the spray 77 made the plastic soft and caused it to sink/ Mr. Surfacer 500 liberally applied filled those areas to be sanded after it dries sufficiently:

full


Okay, that was enough of that since it was really torquing me off. I decided to try and do something on my An-124. First, I taped off the underside, nose and tail where it is supposed to remain grey:

full


I then took it outside to shoot the white topside:

full


full


Looks good doesn't it? Yeah, I thought so too until I looked closer before glossing it.

What you don't see in those pics are several smudges, patches of lint, extreme rough spots, and imperfections in the white paint, certainly not smooth or clean enough to shoot a gloss clear on it. That pic was shot three days ago. Since then, I've been sanding, washing, respraying, wiping, sanding re-spraying at least another nine times or more. Still ain't right.

In between all that, I also taped off the tips of the wings and horizontal tail surfaces and painted them red:

full


After that, it was time to paint the metallic parts of the engines. I masked off the front of both wings with the Tamiya flexible tape and on one of them, I brush painted an aluminum color on the edges and interior of the front of the engine:

full


Kinda hard to see in that pic, but I did it. I then painted the tail cones a dark metallic color and drybrushed with a steel:

full


Not too thrilled with that drybrush, so I'll be redoing those rear cones. I also saw a lot of issues with the grey paint on the wings again. Gonna have to re-mask and re-shoot these grey and gloss coat again. Meanwhile, I pulled down the other wing and started to paint it too:

full


Naturally, as always, one engine had to break off again! I can never move ahead on this:

full


Yes, that was JBWeld! It has since been glued back on. That is gonna have to be re-shot in grey again too. Enough of all these hassles!

By this time I was thoroughly fed up! I looked through my stash for some thing simple, easy and not needing paint so I could lose myself in just building. I found a kit I'd started some time ago: my Space 1999 Mk.IX Hawk. I had done some simple sub assemblies so I thought it was time to start putting it all together. I started by adding the engine cones to the main engine:

full


Later I assembled the rest of the model, losing myself in the build just like I wanted:

full


Here it is mocked up with the main engine:

full


I gotta paint that main engine housing orange before I can glue it to the rest of the model.


That seemed like a great place to end this disappointing week of model building. I hope you enjoyed this latest tour.

Thanks all for riding along, comments are welcome.
 
Okay cool! I'll have to check on how that looks so I can do it. I'll close the two and have the front one open.

Thanks Bob!
 
Well, here is a small update on some of the work I've done after recovering from that difficult week. Things seem to have gotten a bit better now. This is also all the work I got done yesterday and today.

To start with, I assembled all the wheels for my 1/35th scale Patton that I am doing for the SoCal AMPS Group Build:

full


Next I painted all the bare pieces that I'd installed earlier:

full


Moving on, I decided that that tracks for the FV-432 needed to be finished, so I did the other side on the track jig. I then test fit the first run I did on the one side:

full


That was very fiddly and poorly done so I decided I better just do a complete track install. After some effort and adjustments, I got everything on:

full


full


All that's left is to add all the photo-etch parts and then this can be painted.

Since I was doing tracks, I moved on and did the tracks for the Chieftains, starting with the Mk.V. I assembled the first run of tracks on the one side of the jig:

full


These larger ones were much easier to do. I like these jigs too because you can do the track runs on both sides which helps insure the tracks are all going the proper direction:

full


I hope to paint a basecoat at least on my Chieftains before I install these tracks.

I started the tracks on the other two jigs I had for the Mk.10 and Mk.11 Chieftains but didn't shoot any pics of them. After all they look like the above pics. However, because I was doing wheels and tracks, I pulled down my M-109A6 and added the roadwheels and tracks to that:

full


full


Afterward I added a few more bits and bobs to the turret of this vehicle. Here it is sitting on the hull with all the new tracks on it:

full


A few more bits and bobs, some baskets on the back of the turret and some photo-etch and this will be ready for paint as well...

After that, my two Roden WWI buses came in and so I eagerly got started on one of them. I chose to do the civilian bus first. Of course the first thing to do was the suspension and chassis... such as it is:

full


I then assembled the main body/lower passenger cabin:

full


That is when I found out why there was so little on the suspension because it all gets added to the bottom of the main body:

full


Afterward I finished the drivers seat and hood of this bus:

full


While that was set aside and drying, I assembled the upper passenger deck:

full


Here it is all mocked up to see what it will look like:

full


I like it! I'm leaving the upper deck off until I can get the interior of the lower part painted first. Then everything will be brought together.

And that is my progress for the past day and a half. Thanks all for looking in! Comments are always welcome.
 
Back
Top