
-
Modelers Alliance has updated the forum software on our website. We have migrated all post, content and user accounts but we could not migrate the passwords.
This requires that you manually reset your password.
Please click here, http://modelersalliance.org/forums/login to go to logon page and use the "Forgot your Password" option.
You are using an out of date browser. It may not display this or other websites correctly.
You should upgrade or use an alternative browser.
You should upgrade or use an alternative browser.
Maddog Manufacturing Open for 2024!
- Thread starter Duke Maddog
- Start date
Duke Maddog
Well-known member
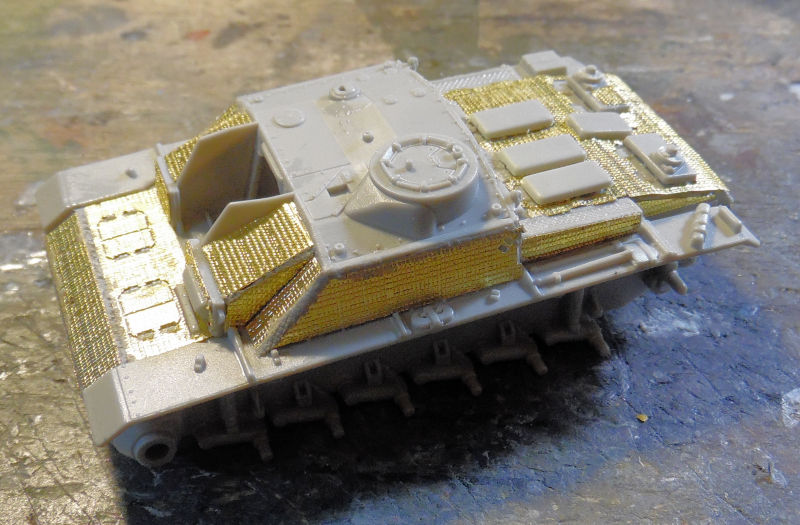
That is close. Mine will have even more, as it sports side skirts that drop lower than those in the pic. It's a serious challenge, and I will be slowly working on it.
Duke Maddog
Well-known member
Now after all the effort to putting all my ground vehicles on parade for inspection, it's time to start a new tour. This one will mostly be in the Hangar and Shipyards as we've been focusing on projects in those departments. Now that we've reached that milestone, it's time to get some long time projects off the workbench and on to the shelf. So, without further ado, let's all board the trams and see what's happening at Maddog Manufacturing.
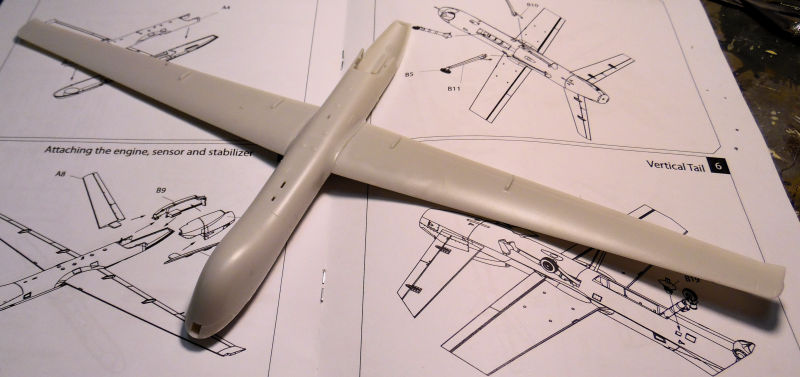
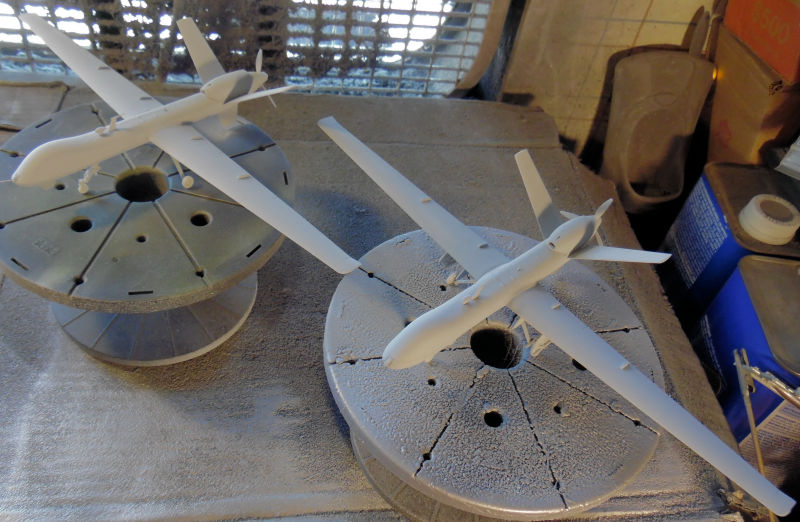
Starting in the Hangar, we have these projects going, most of which are quite large and been sitting idle for awhile. First, let's visit this first bay where we have a 1/72 scale MQ-9 Predator under construction:
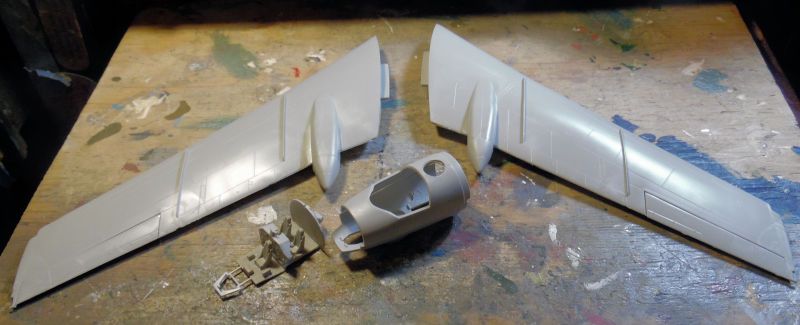
Basic assembly of the body and wings happened first. They didn't say in the instruction sheet that weight was needed in the nose, so that was carefully added later:
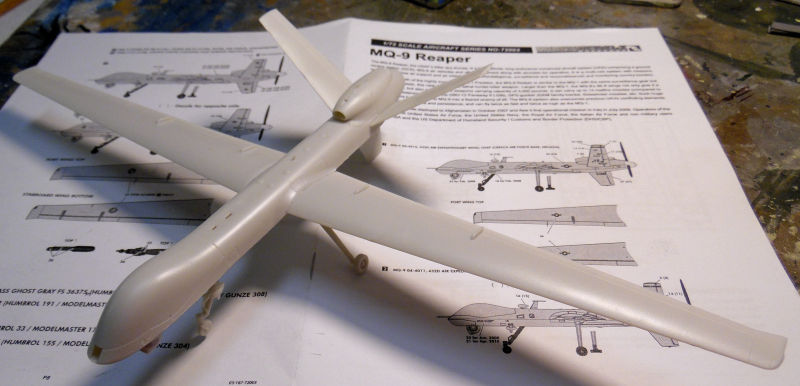
Later the engine and landing gear were added, that's where the weight issue was discovered:
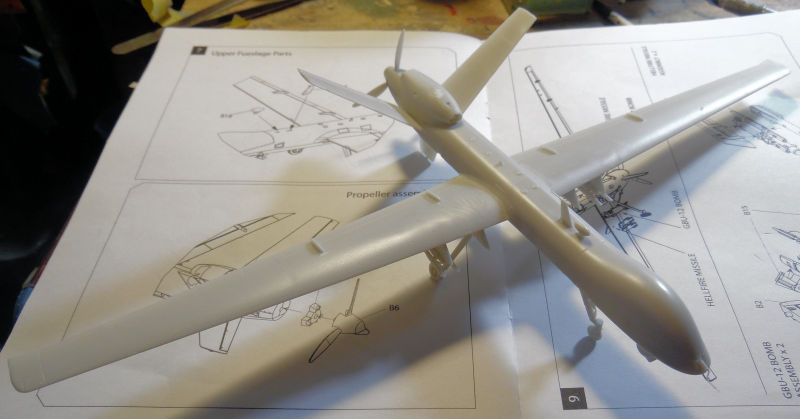
Weight was carefully added and then all the final detail parts were added, this bird is ready for paint:
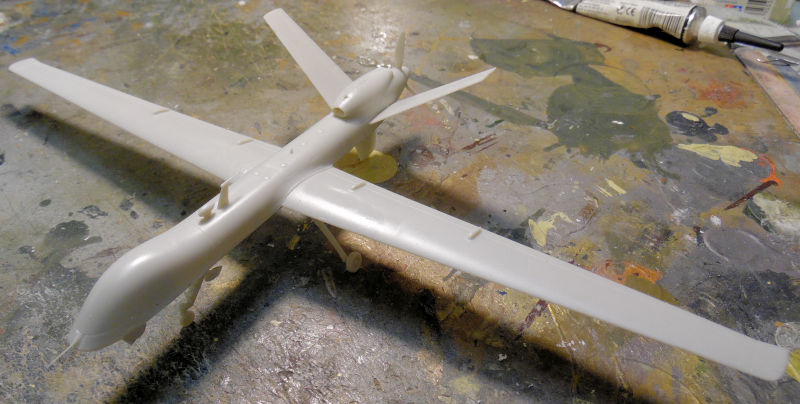
Next it it, we also have another MQ-9 Predator. Two came in the kit with options for two other versions. I chose to build this for my RAF, and now this one is almost ready for paint as well:
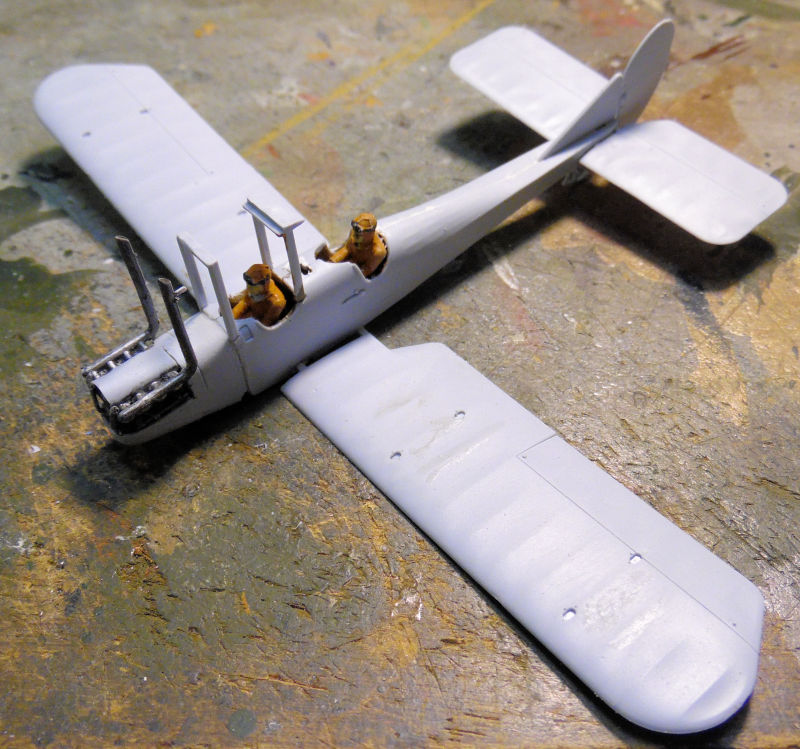
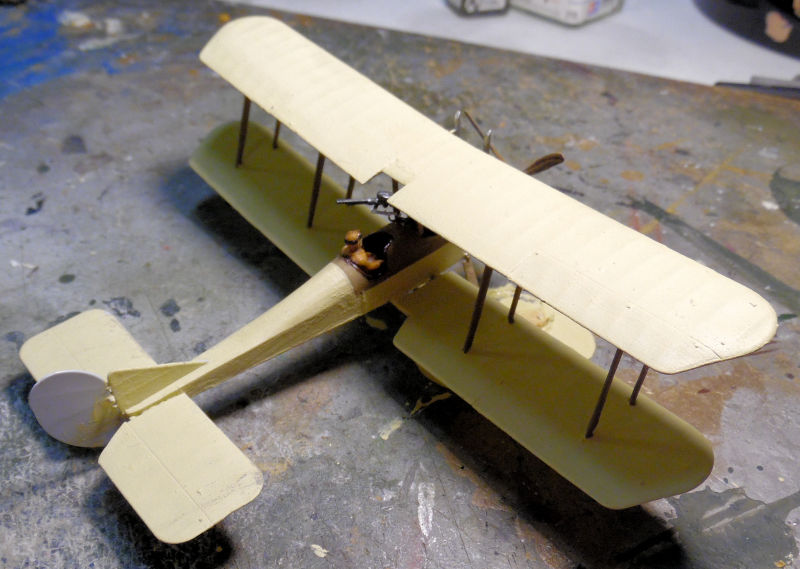
Moving on to the next bay, we go back in time with this Airfix 1/72 scale Dogfight Doubles set. It was a gift for me from a friend and avid WWI aficionado. The first plane from it is this British Se-2C scout plane that went together fast:

Later the engine was assembled and installed in place:
The beauty of this kit is that Airfix included these strut alignment jigs so the struts line up perfectly so we thought we'd try them out:
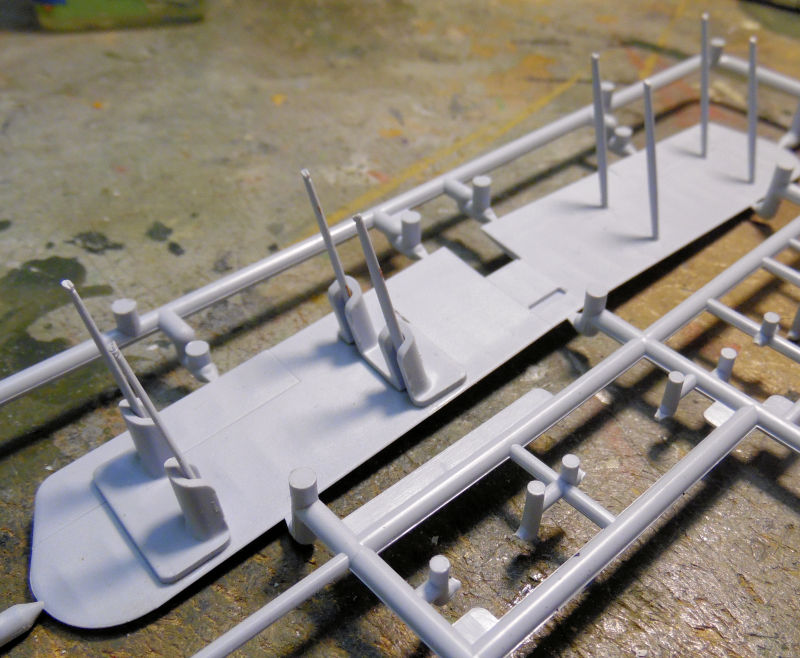
The jigs worked, simplifying the top wing mounting:
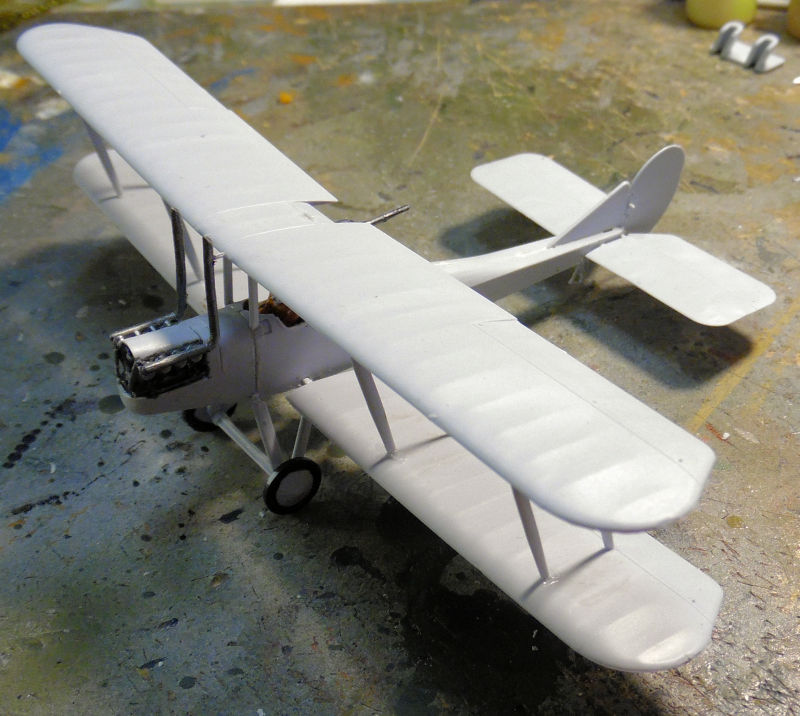
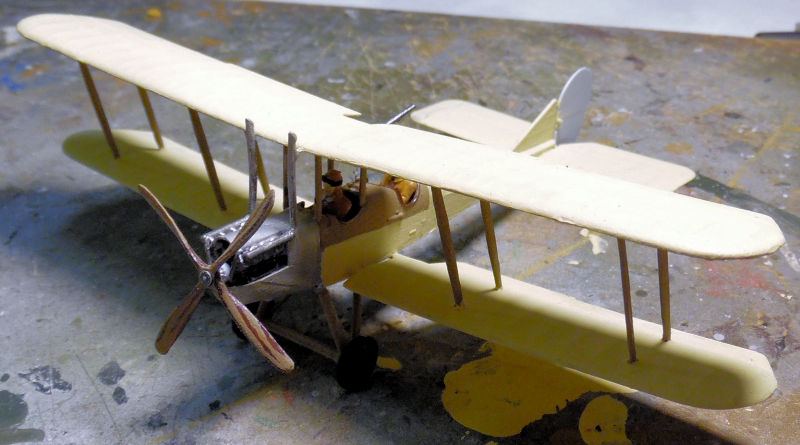
Later we got all the painting done on this.
While that was drying, we started on the other half of the Dogfight Double set, the German Eindecker E.II. Basic fuselage assembly was fast:
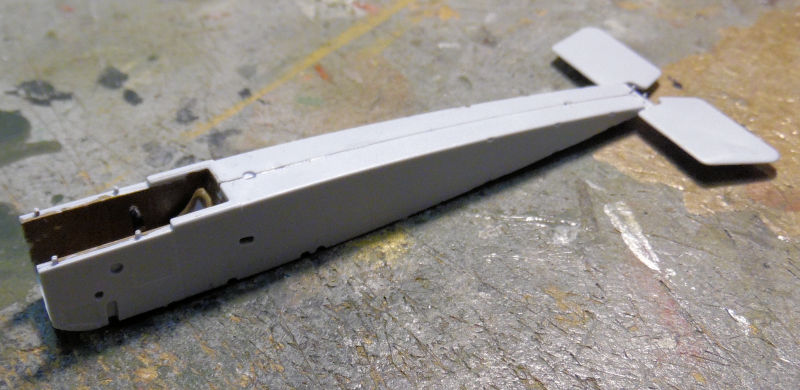
The rest of the plane fell together perfectly so we starting painting it as well:
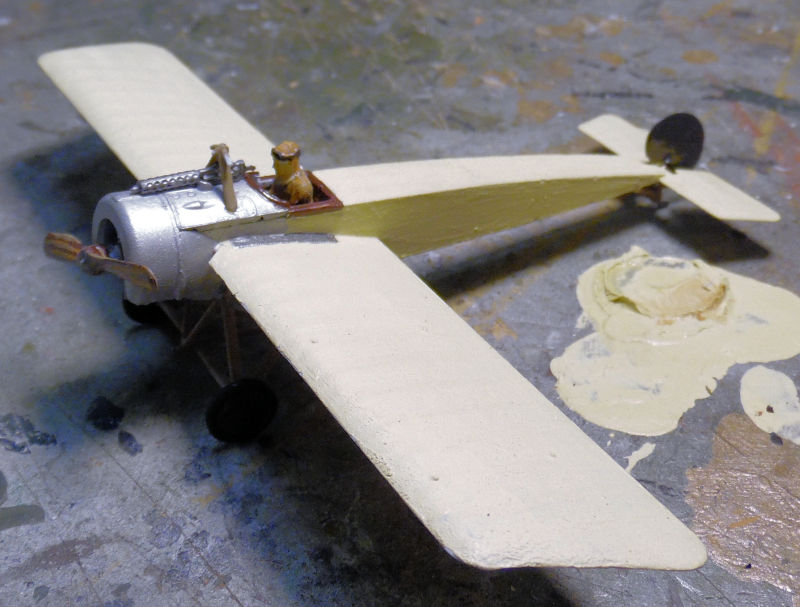
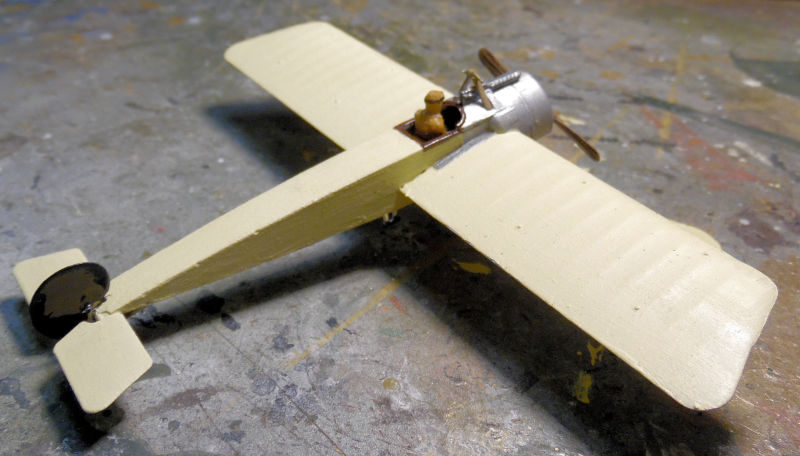
And now both of them are ready for final decals and rigging.
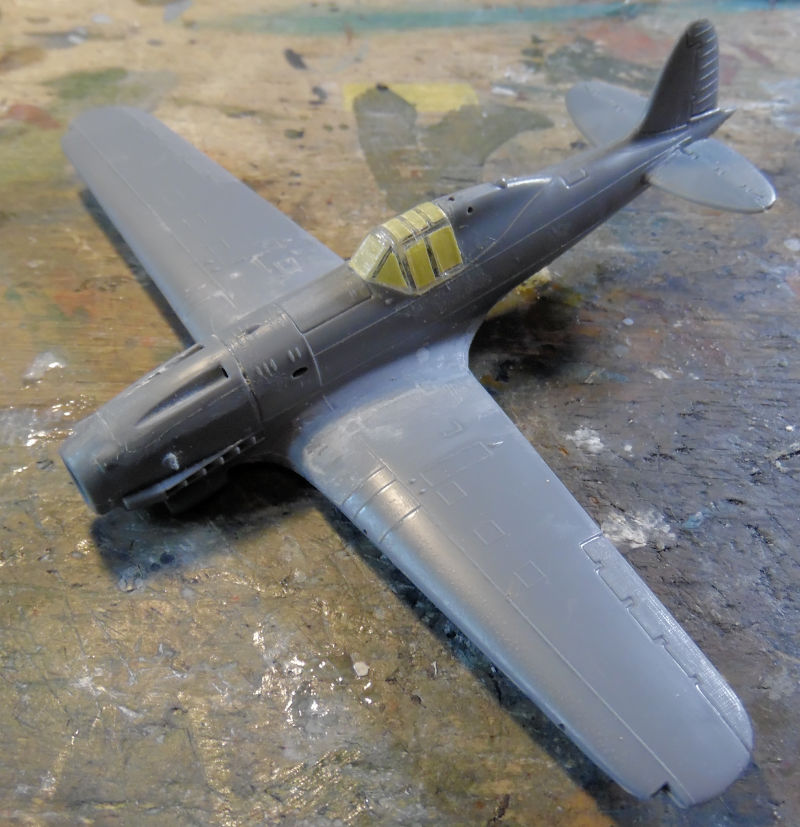
Moving on to the next bay, we have a 1/72 scale Super Model Italian Macchi C-205 that was sitting in a very broken up box. It was time to get that one done. Basic fuselage and wing assembly was quick as there weren't too many parts. What parts there were certainly had some pretty serious fit issues. The propeller is in a cowl that glues into the opening of the nose so the propeller will continue to turn. It'll be one of the last things I glue into place:
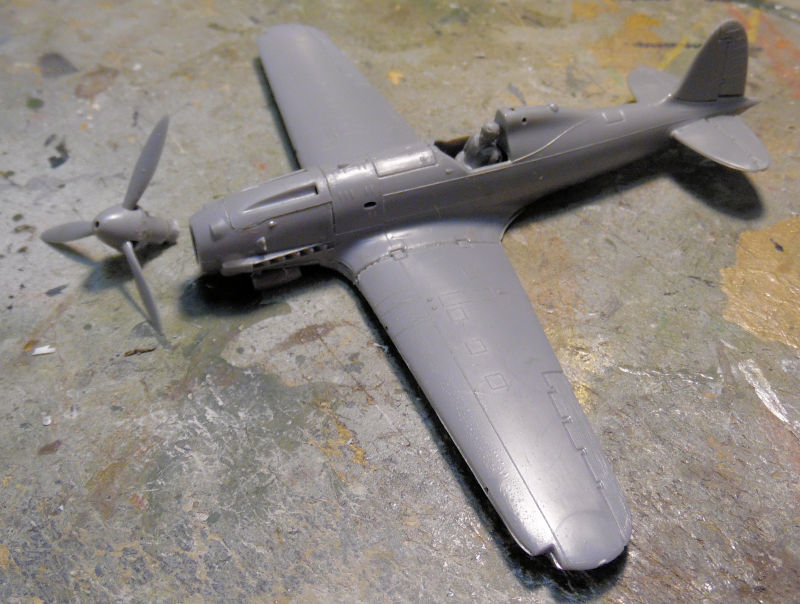
As you can see a lot of filling was needed for the gaps around the wing roots, under the plane and around select panels. You can also see how confident the pilot was in the abilities of his plane; he bailed out before it is done. Again, propeller assembly is dry fit into place:
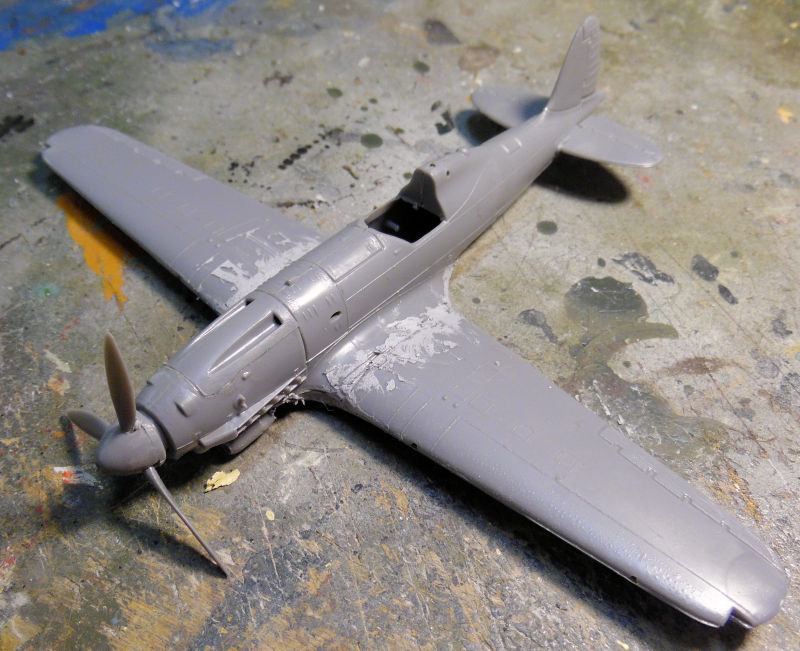
Some judicious sanding and shaping and this is starting to look much better. The pilot is still MIA so we closed up the canopy and started preparing this for paint:

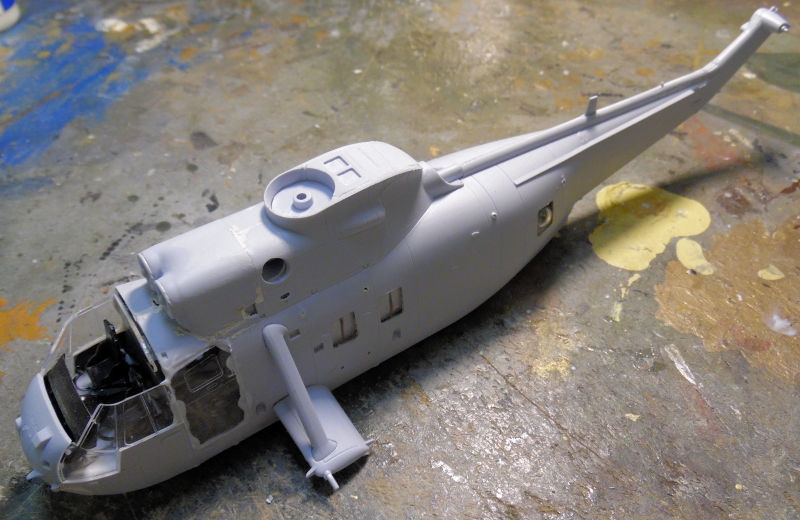
In the next bay, we finally got the fuselage halves together for the British Westland Sea King. It went together pretty well with only a little bit of persuasion:
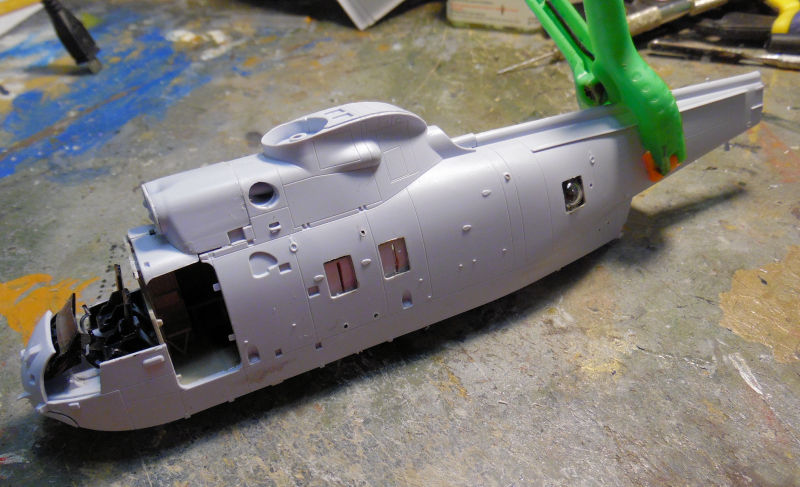
There were some seam issues that got addressed and then the main landing gear sponsons got installed along with portions of the glass:
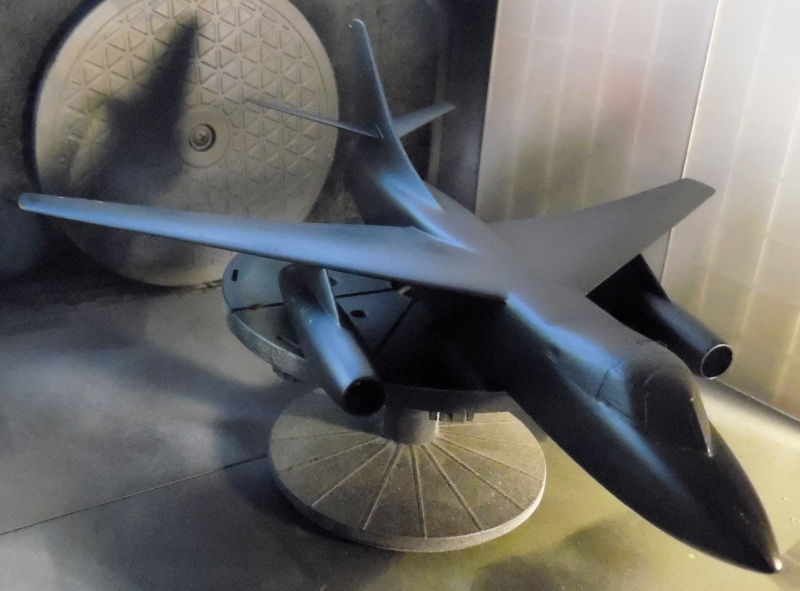
Now on to some of the Big Stuff. The B-66 Destroyer had been sanded smooth after the second coat of primer wrinkled up. Now a third coat was shot on it. Overall it looked fine, but there are a few small blemishes that will need attention again before a metal coat goes on this:
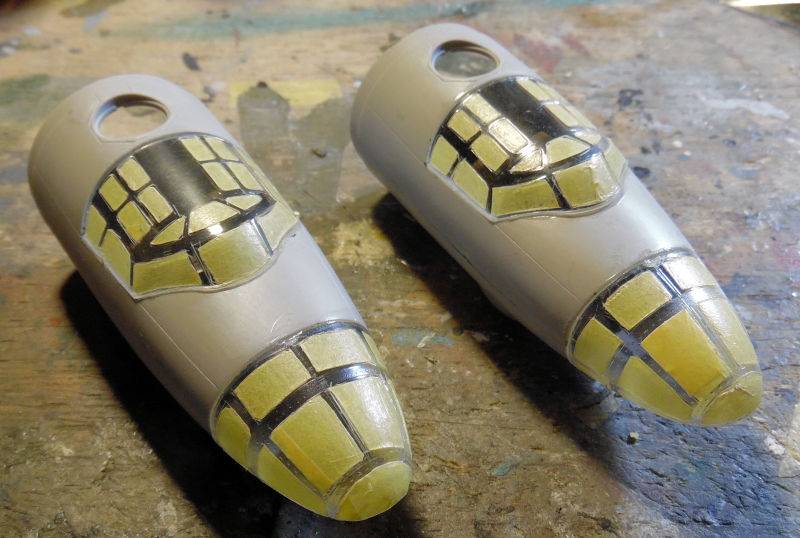
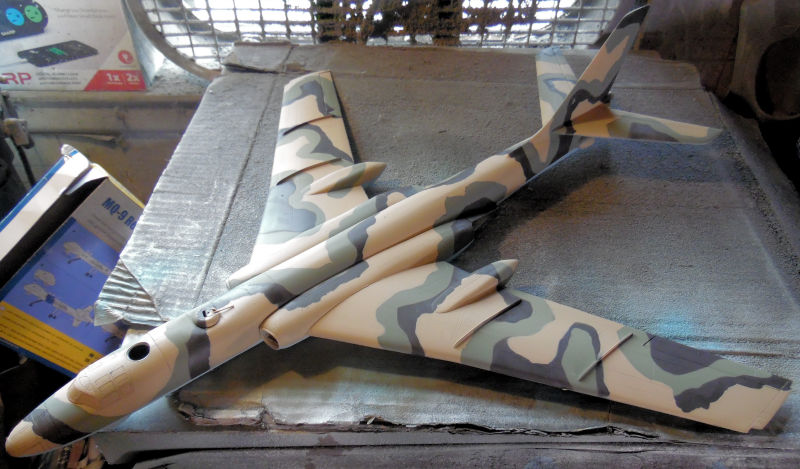
In the next bay is the Egyptian Tu-16 Badger, one of two we're building, here is a reminder:
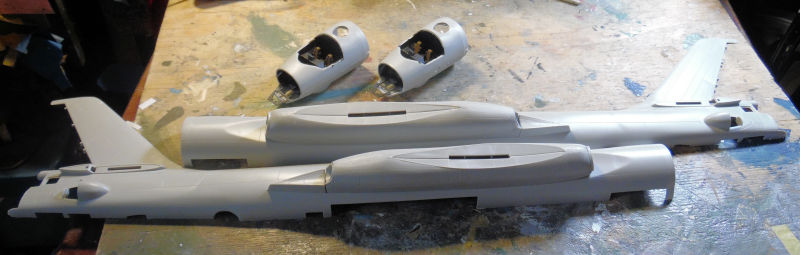
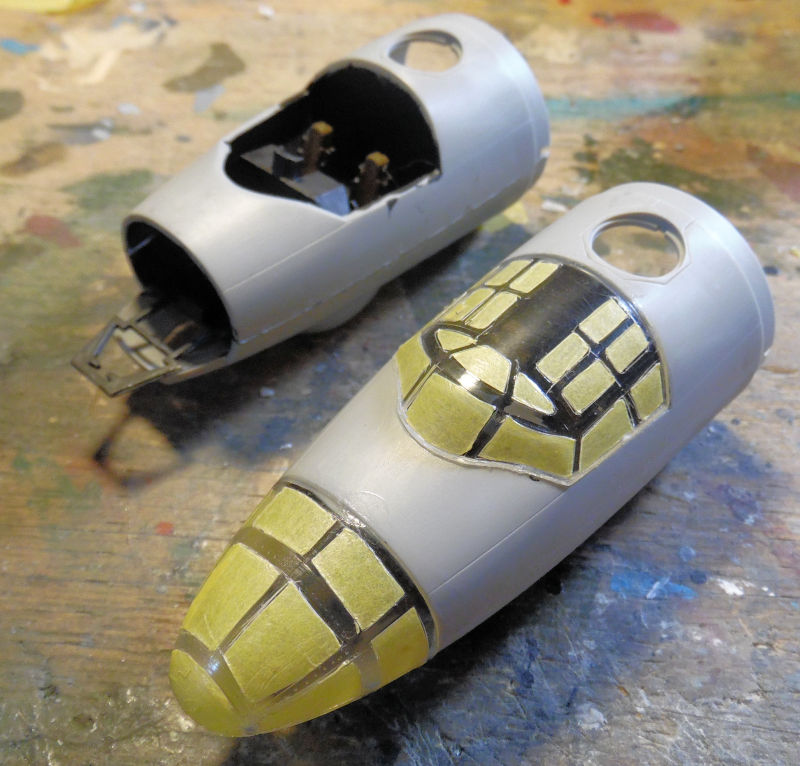
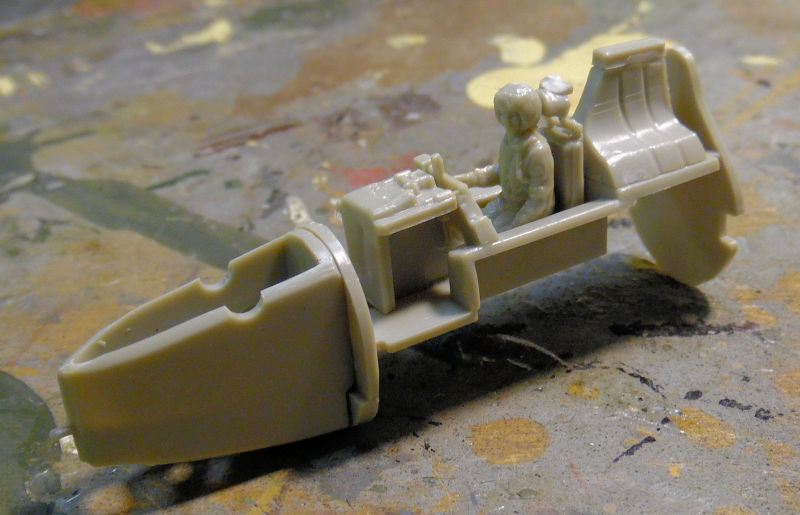
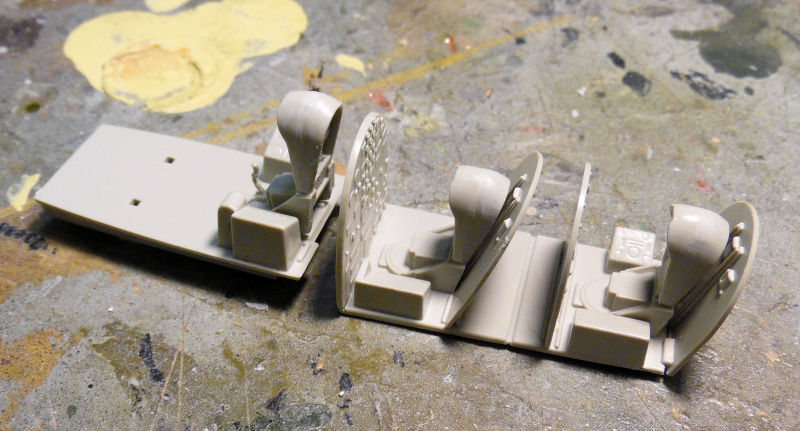
The cockpits were painted, the cockpit modules were assembled and the engines were mounted on the fuselage halves of the Egyptian plane. You can see both cockpit modules here too:
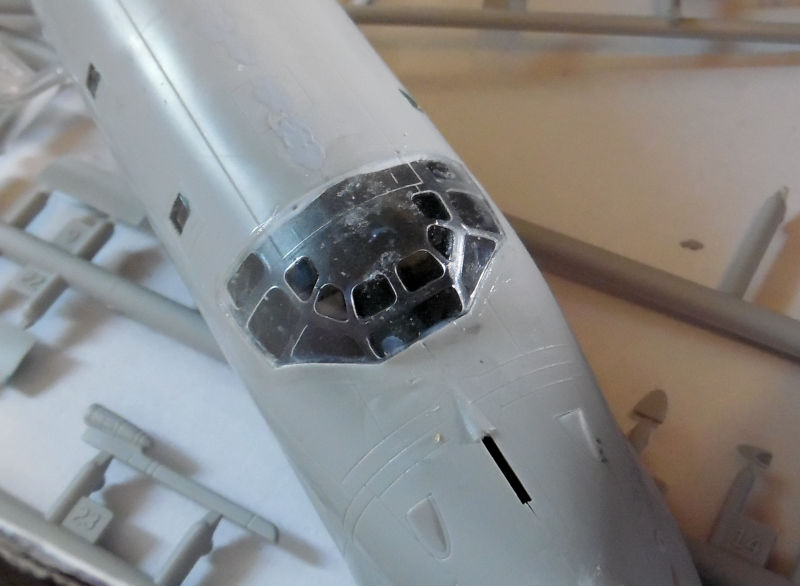
We got one set of glass cockpit and nose masked and ready for paint:
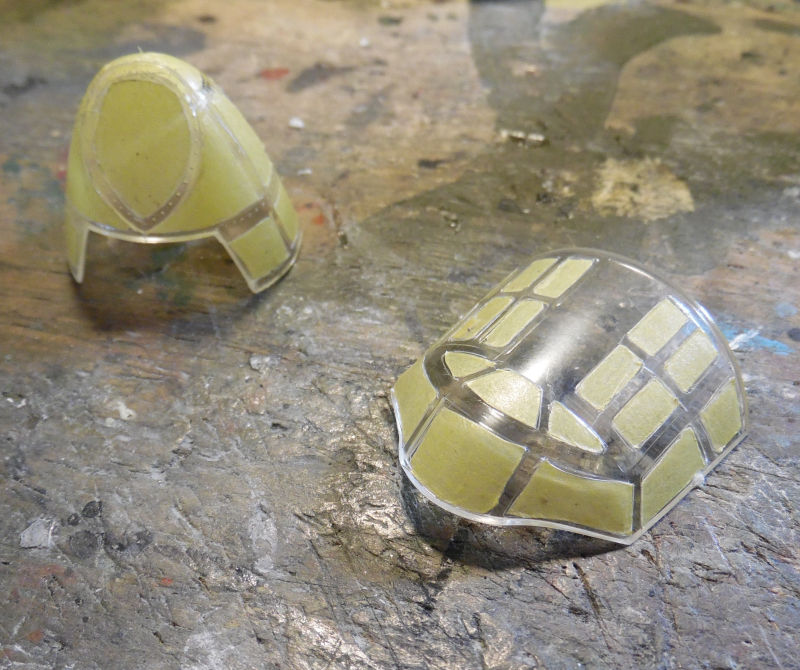
To make things easier, we installed those parts to one of the cockpit modules; the fit is amazing:
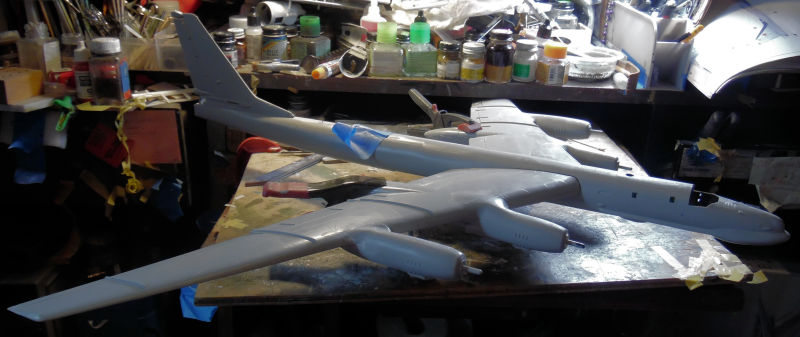
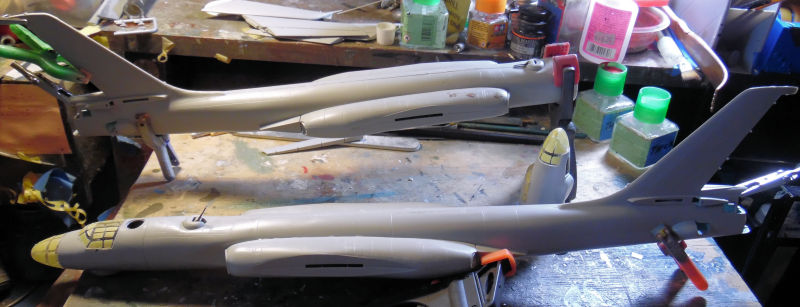
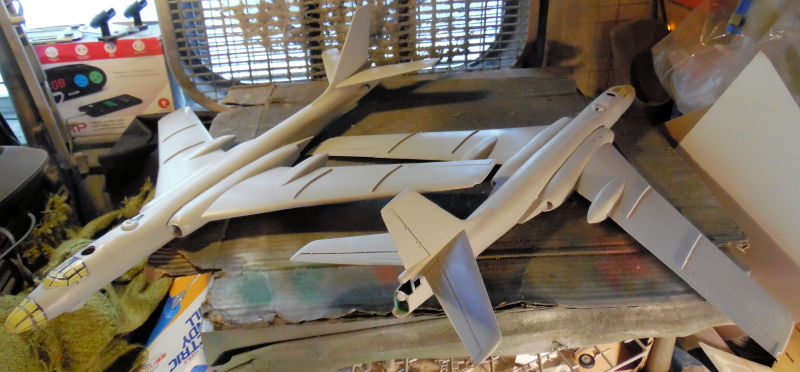
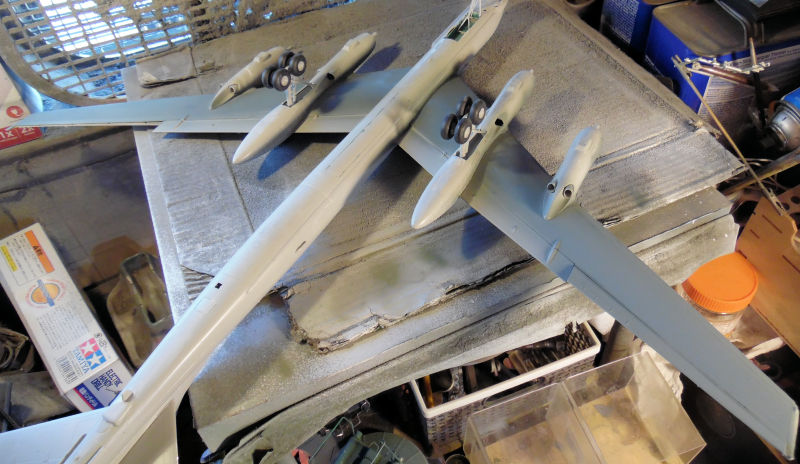
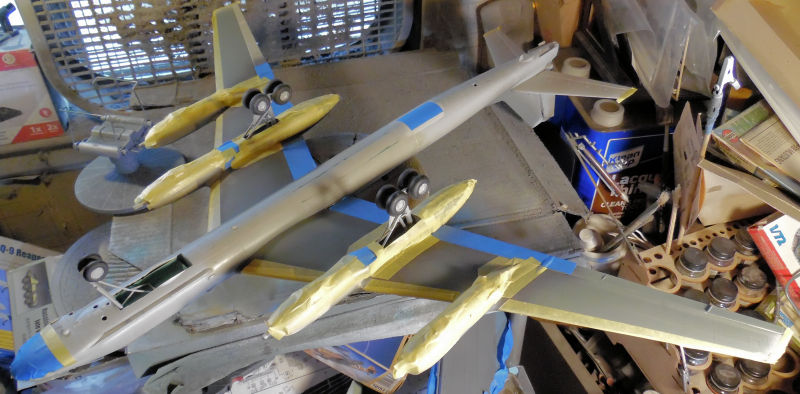
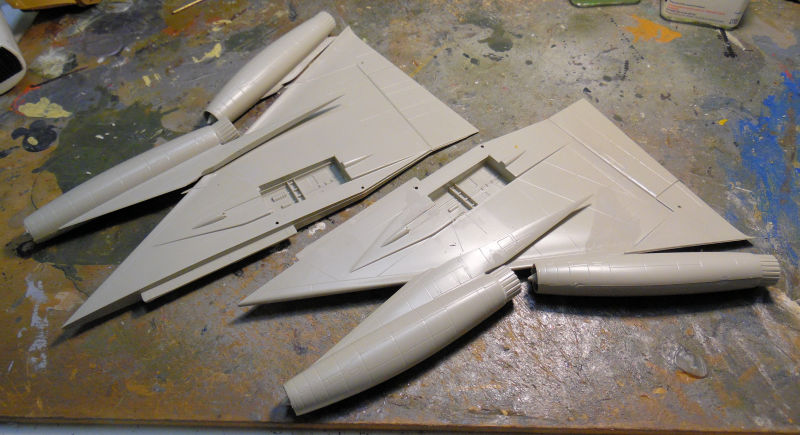
Now we'll try to catch up on the Iraqi Badger so this is where this stands. Meanwhile in the next bay we installed the inside engine and landing gear nacelle to each wing of the Tu-142 Bear:

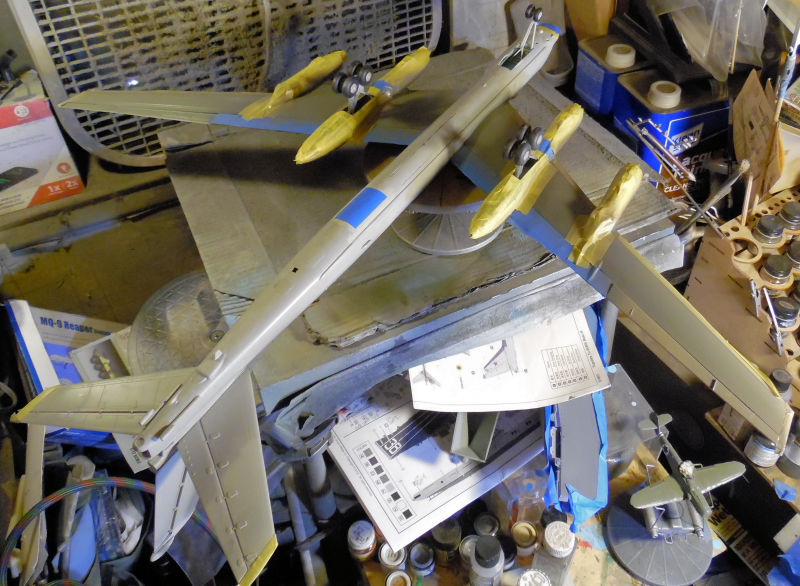
I decided we should dry fit this together to see what we're dealing with. Remember this is sitting on a standard TV tray:
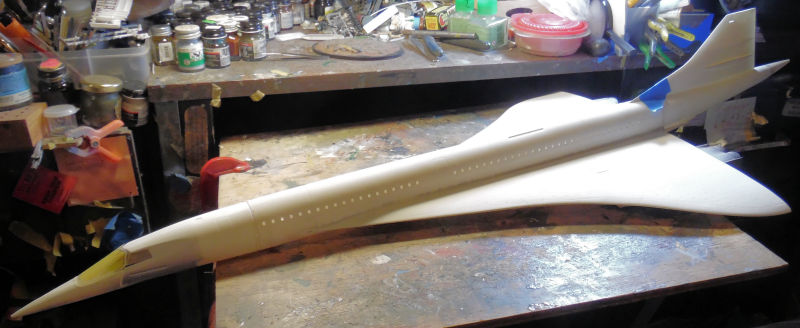
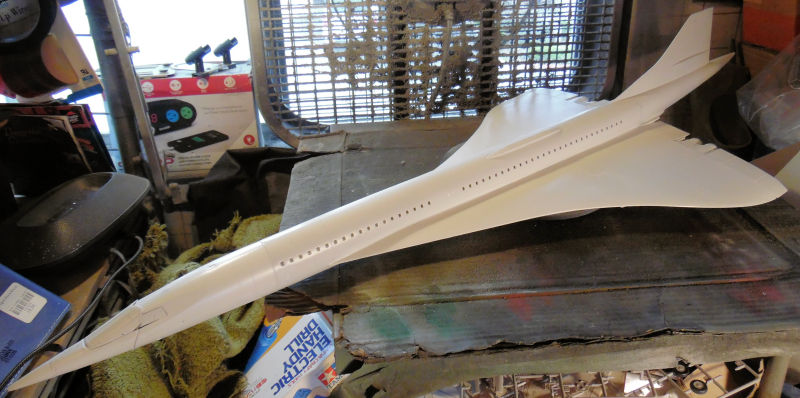
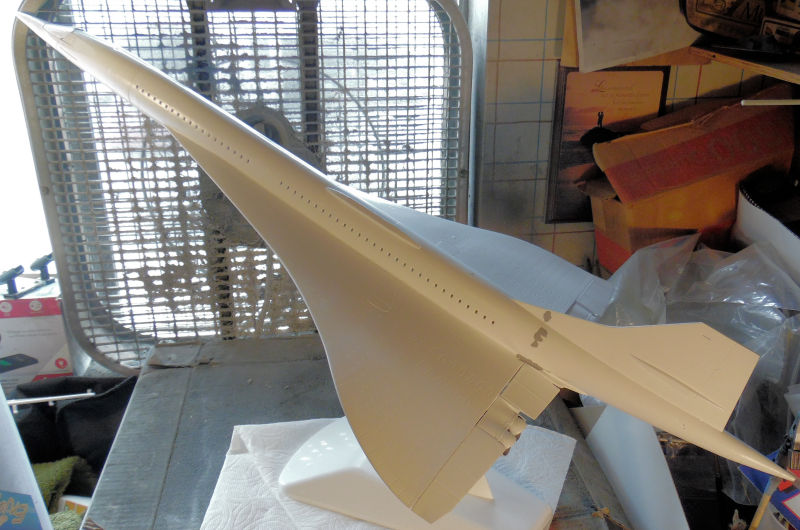
Finally in this last bay, we have the British Airways Concorde, here it is with the cockpit module dry fit to the rest of it. This is alkso sitting on the same TV Tray:
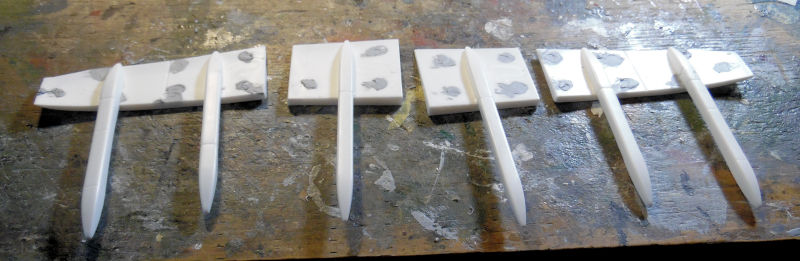
Work was done on the flaps for this, all these ejector pin marks needed filling which we started after adding the actuator casing to them:
The tail feathers were attached after that:
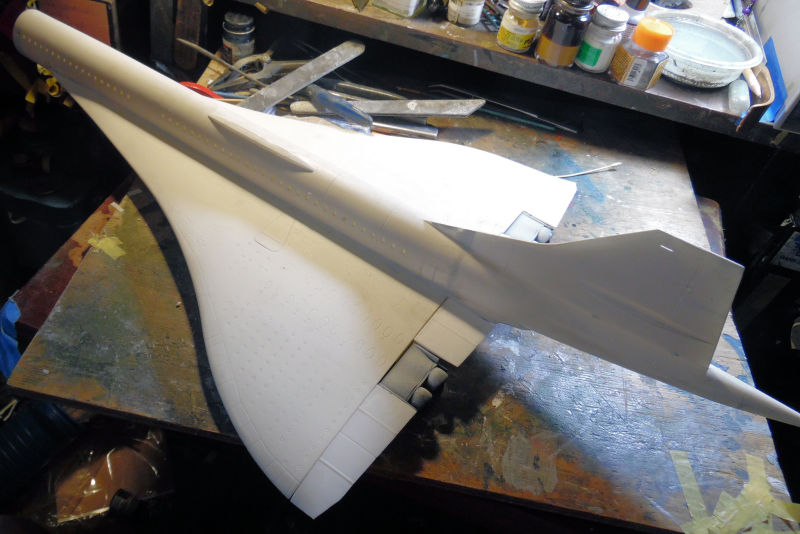
Here's another shot showing how big this is again:

Later we got half of it inside the spray booth for another couple coats of white primer:
Yep, more paint will be needed for that.
That concludes the Hangar portion of this tour, now on to the Shipyards....
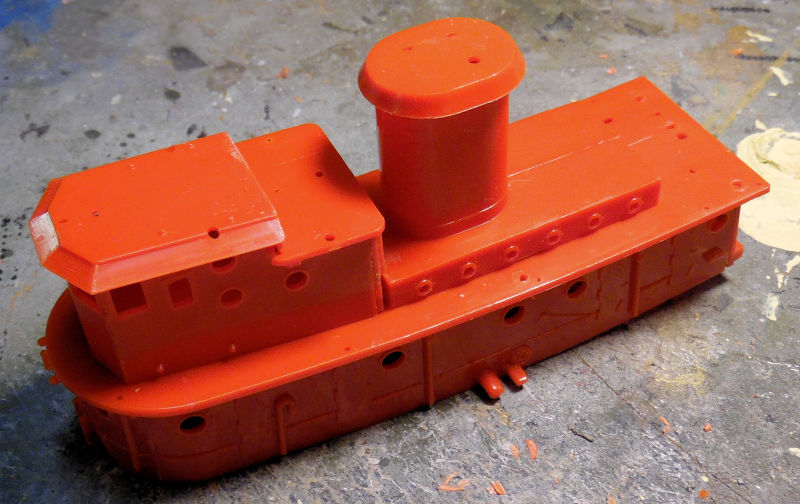
Here is the Shipyards, things have been slowly picking up. We even started this project here in this first slipway. This is the Revell 1/106 scale tugboat that I'd been gifted so it was time to lay the keel. Mind you the instructions are missing so everything done in this slipway is done sans instructions. Here's where this boat was after the the first few steps:
Yep, badly warped main railings. Glue was applied on the rear portions and then after it dried, we glued the remaining parts in with a bit of persuasion. That allowed us to get this far:
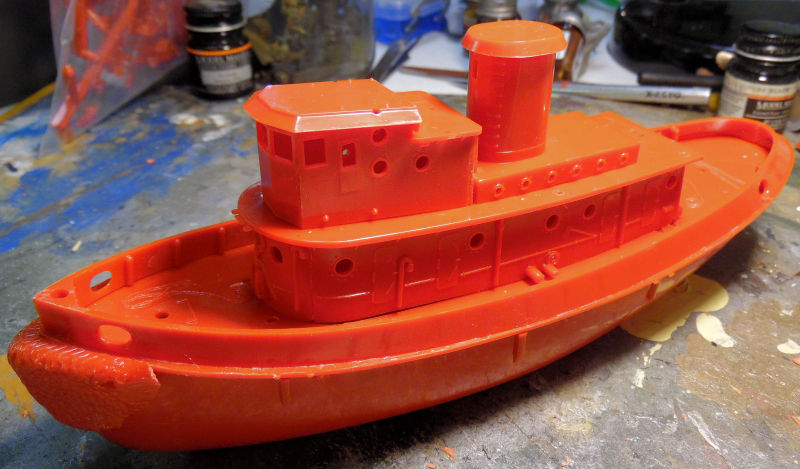
While that was all drying, we started on the main superstructure, again all sans instructions. It went together quite well:
A test fit shows how well this is gonna look:
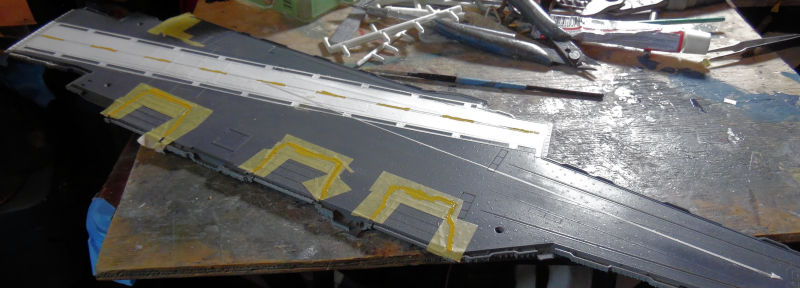
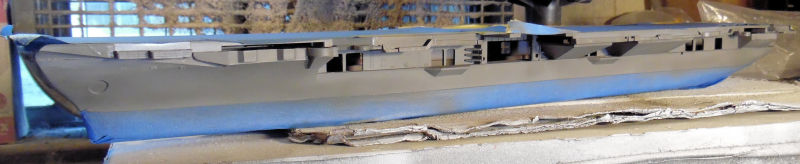
That was about an hour's work. More projects were taking a lot longer. One of them that didn't was the main deck of the USS Enterprise; white paint was finally shot after the last of the masking was added:
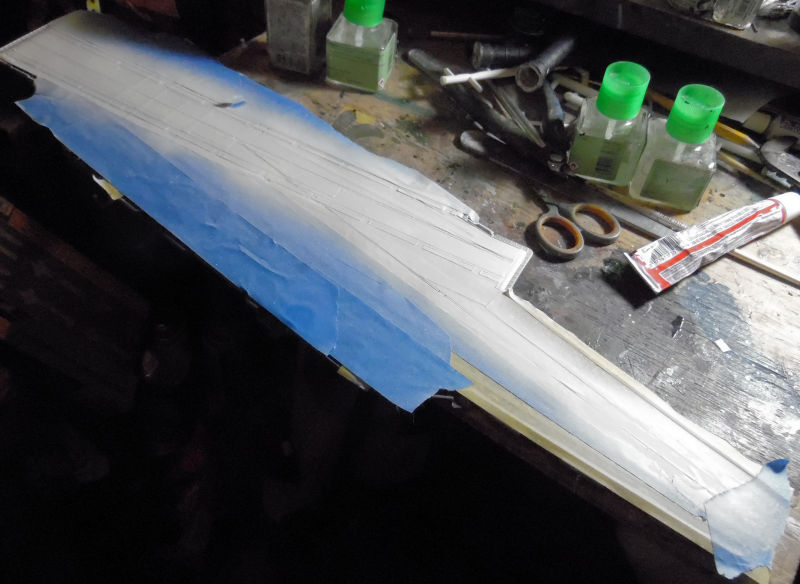
Later we'll paint the yellow portions and then see how much cleanup I'll need to do before moving on.
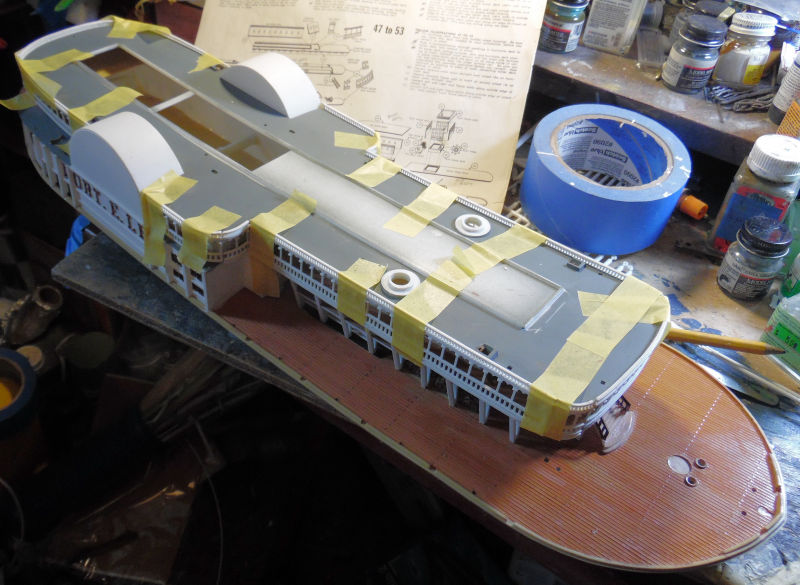
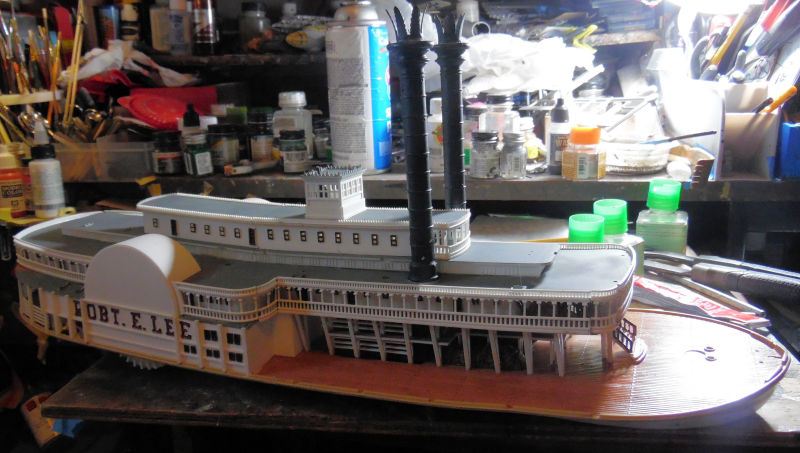
Finally in this last slipway, the Robert E. Lee was slowly being built up. The outer railings were added to the two lower decks; Pyro did it right making them one piece that spans both decks. Even so, due to issues from earlier deck and bulkhead misalignment and some slight warpage these still took a lot persuasion:
Some of those issues, I am not sure how I'll address them.
Still, more progress was made building up the Texas skylights, Texas deck house, pilot house and other minor details. We had also re-sanded and re-shot the main stacks so I decided to dry fit them here for this picture. The Lee is starting to look like a steamboat:
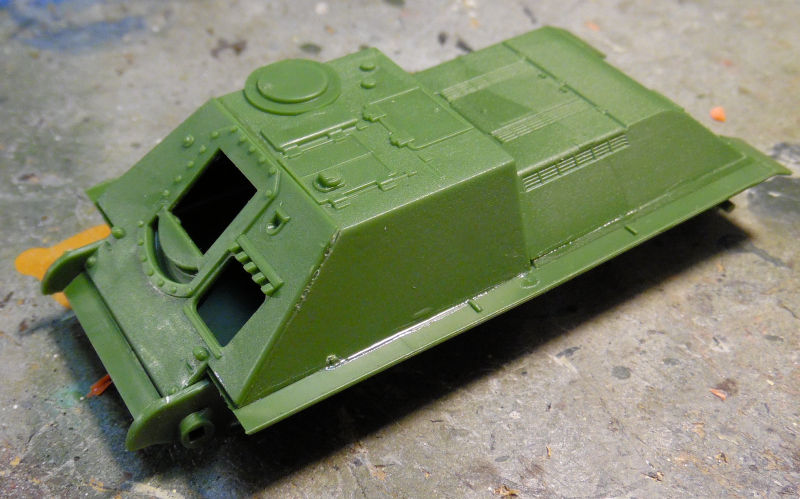
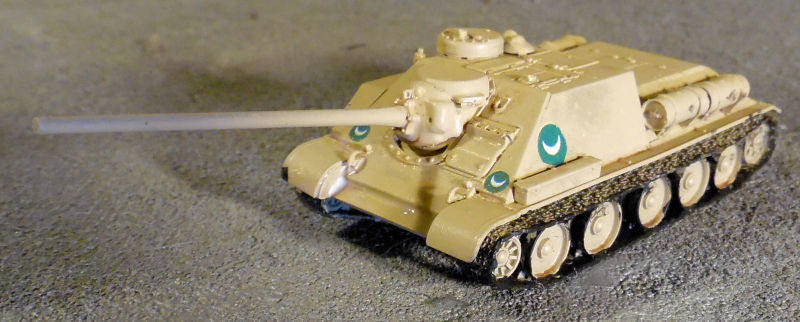
Finally, as we drive by the Motor Pool on the way back to the main lobby, you can catch a glimpse of one of the newer projects to expand the land forces again; we started an Egyptian Su-100 for my Egyptian Army:
Work will commence on that and others after the crew gets a good rest from vehicles.
Thank you again for coming on this latest tour; comments are always welcome!
Starting in the Hangar, we have these projects going, most of which are quite large and been sitting idle for awhile. First, let's visit this first bay where we have a 1/72 scale MQ-9 Predator under construction:
Basic assembly of the body and wings happened first. They didn't say in the instruction sheet that weight was needed in the nose, so that was carefully added later:
Later the engine and landing gear were added, that's where the weight issue was discovered:
Weight was carefully added and then all the final detail parts were added, this bird is ready for paint:
Next it it, we also have another MQ-9 Predator. Two came in the kit with options for two other versions. I chose to build this for my RAF, and now this one is almost ready for paint as well:
Moving on to the next bay, we go back in time with this Airfix 1/72 scale Dogfight Doubles set. It was a gift for me from a friend and avid WWI aficionado. The first plane from it is this British Se-2C scout plane that went together fast:
Later the engine was assembled and installed in place:
The beauty of this kit is that Airfix included these strut alignment jigs so the struts line up perfectly so we thought we'd try them out:
The jigs worked, simplifying the top wing mounting:
Later we got all the painting done on this.
While that was drying, we started on the other half of the Dogfight Double set, the German Eindecker E.II. Basic fuselage assembly was fast:
The rest of the plane fell together perfectly so we starting painting it as well:
And now both of them are ready for final decals and rigging.
Moving on to the next bay, we have a 1/72 scale Super Model Italian Macchi C-205 that was sitting in a very broken up box. It was time to get that one done. Basic fuselage and wing assembly was quick as there weren't too many parts. What parts there were certainly had some pretty serious fit issues. The propeller is in a cowl that glues into the opening of the nose so the propeller will continue to turn. It'll be one of the last things I glue into place:
As you can see a lot of filling was needed for the gaps around the wing roots, under the plane and around select panels. You can also see how confident the pilot was in the abilities of his plane; he bailed out before it is done. Again, propeller assembly is dry fit into place:
Some judicious sanding and shaping and this is starting to look much better. The pilot is still MIA so we closed up the canopy and started preparing this for paint:
In the next bay, we finally got the fuselage halves together for the British Westland Sea King. It went together pretty well with only a little bit of persuasion:
There were some seam issues that got addressed and then the main landing gear sponsons got installed along with portions of the glass:
Now on to some of the Big Stuff. The B-66 Destroyer had been sanded smooth after the second coat of primer wrinkled up. Now a third coat was shot on it. Overall it looked fine, but there are a few small blemishes that will need attention again before a metal coat goes on this:
In the next bay is the Egyptian Tu-16 Badger, one of two we're building, here is a reminder:
The cockpits were painted, the cockpit modules were assembled and the engines were mounted on the fuselage halves of the Egyptian plane. You can see both cockpit modules here too:
We got one set of glass cockpit and nose masked and ready for paint:
To make things easier, we installed those parts to one of the cockpit modules; the fit is amazing:
Now we'll try to catch up on the Iraqi Badger so this is where this stands. Meanwhile in the next bay we installed the inside engine and landing gear nacelle to each wing of the Tu-142 Bear:
I decided we should dry fit this together to see what we're dealing with. Remember this is sitting on a standard TV tray:
Finally in this last bay, we have the British Airways Concorde, here it is with the cockpit module dry fit to the rest of it. This is alkso sitting on the same TV Tray:
Work was done on the flaps for this, all these ejector pin marks needed filling which we started after adding the actuator casing to them:
The tail feathers were attached after that:
Here's another shot showing how big this is again:
Later we got half of it inside the spray booth for another couple coats of white primer:
Yep, more paint will be needed for that.
That concludes the Hangar portion of this tour, now on to the Shipyards....
Here is the Shipyards, things have been slowly picking up. We even started this project here in this first slipway. This is the Revell 1/106 scale tugboat that I'd been gifted so it was time to lay the keel. Mind you the instructions are missing so everything done in this slipway is done sans instructions. Here's where this boat was after the the first few steps:
Yep, badly warped main railings. Glue was applied on the rear portions and then after it dried, we glued the remaining parts in with a bit of persuasion. That allowed us to get this far:
While that was all drying, we started on the main superstructure, again all sans instructions. It went together quite well:
A test fit shows how well this is gonna look:
That was about an hour's work. More projects were taking a lot longer. One of them that didn't was the main deck of the USS Enterprise; white paint was finally shot after the last of the masking was added:
Later we'll paint the yellow portions and then see how much cleanup I'll need to do before moving on.
Finally in this last slipway, the Robert E. Lee was slowly being built up. The outer railings were added to the two lower decks; Pyro did it right making them one piece that spans both decks. Even so, due to issues from earlier deck and bulkhead misalignment and some slight warpage these still took a lot persuasion:
Some of those issues, I am not sure how I'll address them.
Still, more progress was made building up the Texas skylights, Texas deck house, pilot house and other minor details. We had also re-sanded and re-shot the main stacks so I decided to dry fit them here for this picture. The Lee is starting to look like a steamboat:
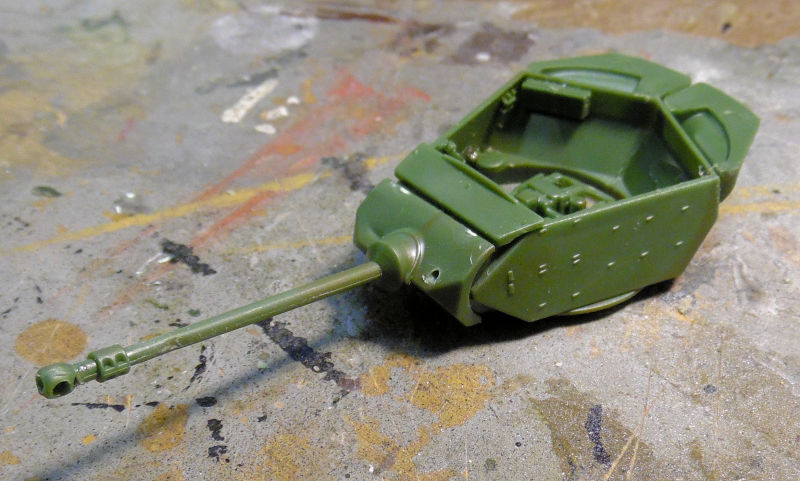
Finally, as we drive by the Motor Pool on the way back to the main lobby, you can catch a glimpse of one of the newer projects to expand the land forces again; we started an Egyptian Su-100 for my Egyptian Army:
Work will commence on that and others after the crew gets a good rest from vehicles.
Thank you again for coming on this latest tour; comments are always welcome!
Last edited:
Duke Maddog
Well-known member
Well, it's been nearly a month since the last tour, so we are due. As there has been quite a bit of progress during that time, this will be another two-part tour due to the extensive amount of things to show.
So, all aboard the trams for the latest tour!
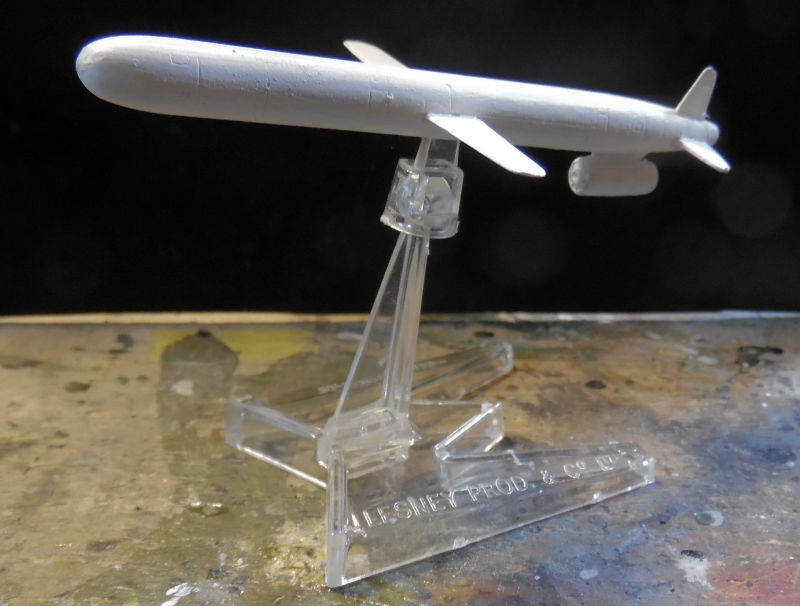
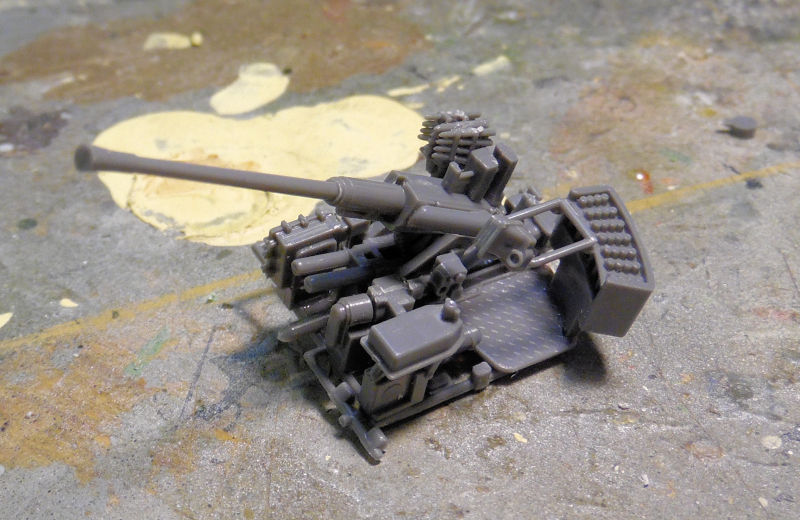
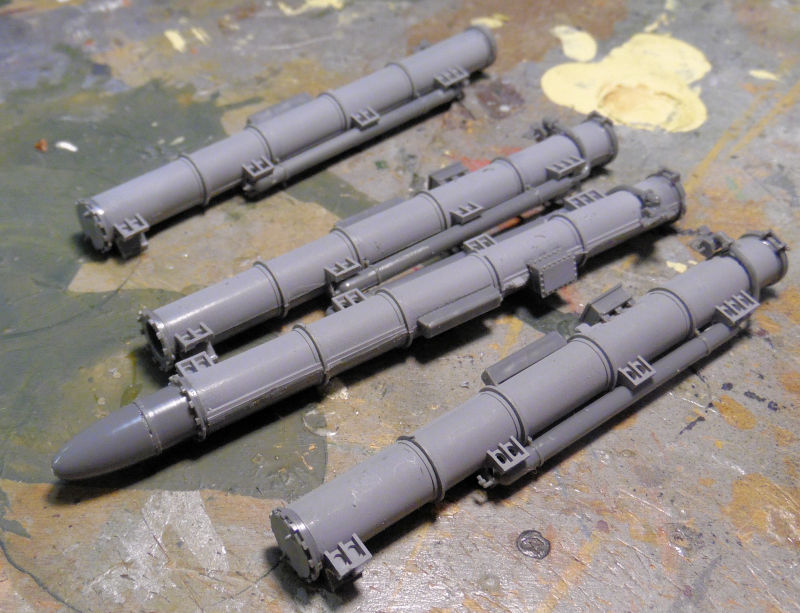
The Hangar is the first stop as always and here is where the majority of the progress has been. Starting in this first bay, we have some Russian ordinance. This was a short run kit that I got in the Distressed Kit Auction some time back. These finally got some paint on them and since the stand to the flying one went on walkabout, we modified one to hold it:

Not too shabby...
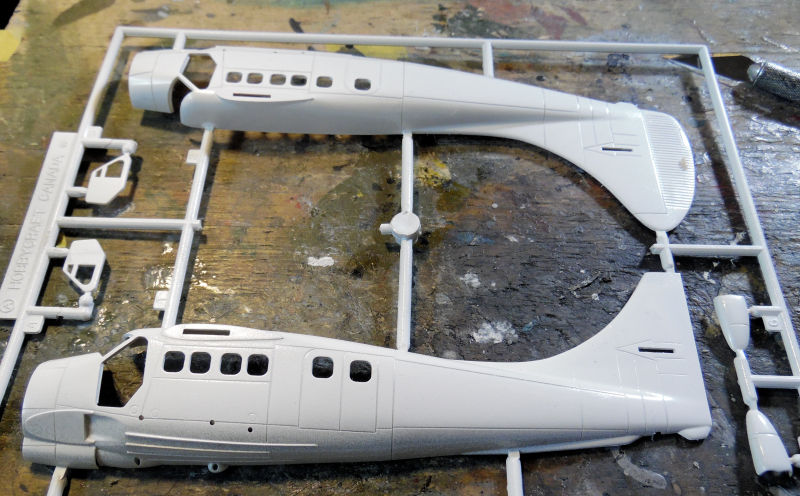
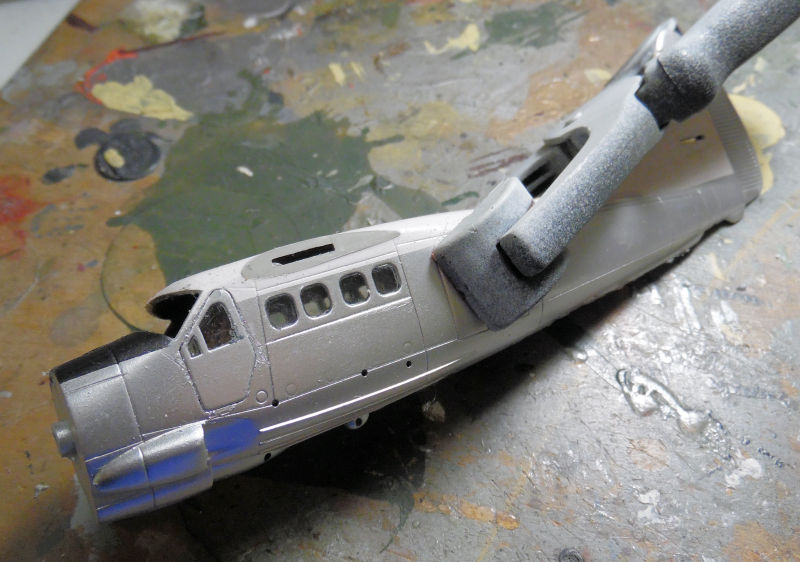
In the next bay is a project that got started because of all the white we were spraying on the Concorde. so, while I had the white out, we shot a white on the fuselage of this Canadian Otter to get a jump on it:
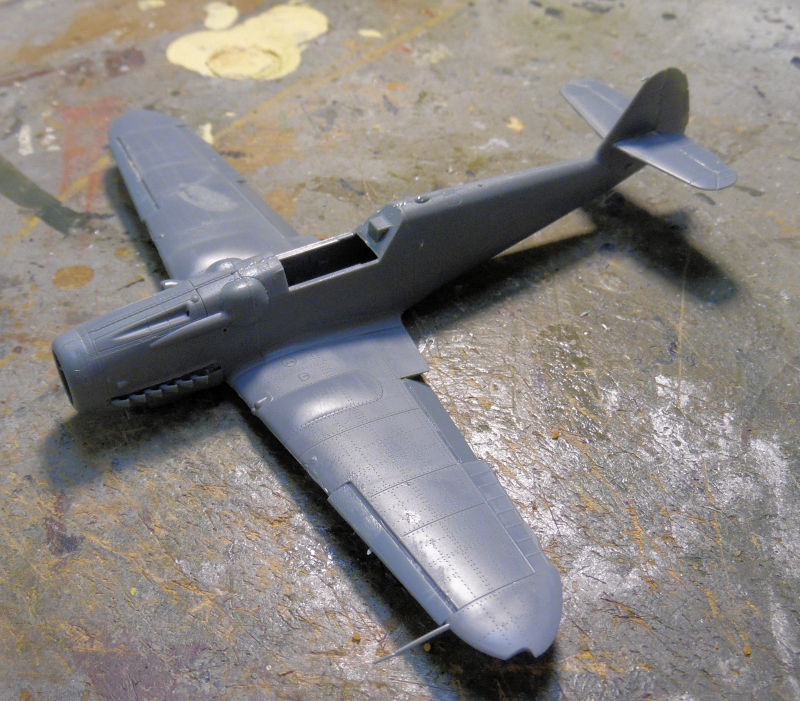
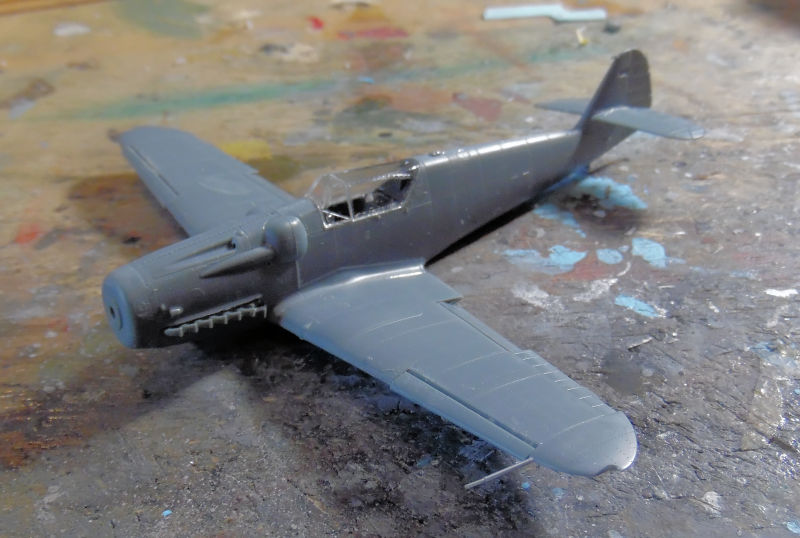
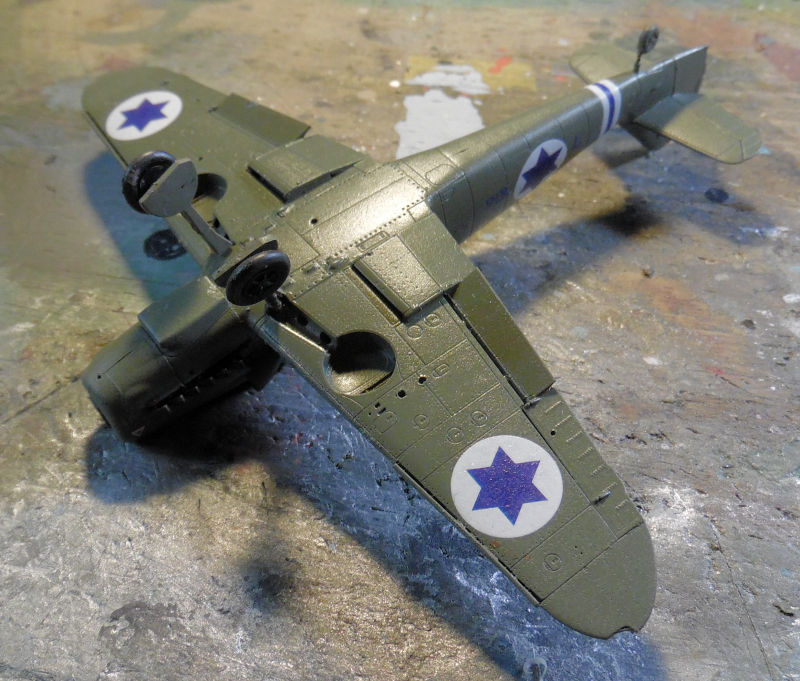
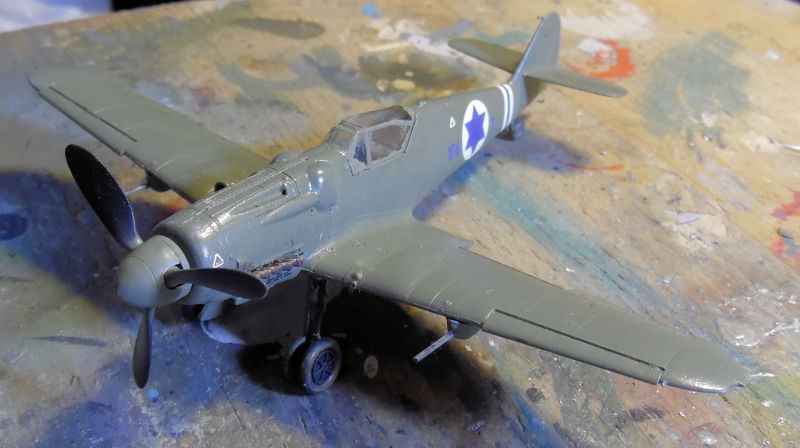
Now on to the next bay, we have another started project; something that had been crying out for me to start. This is the Eduard Profipak Israeli S-199. The cockpit sans instrument panel was started first:
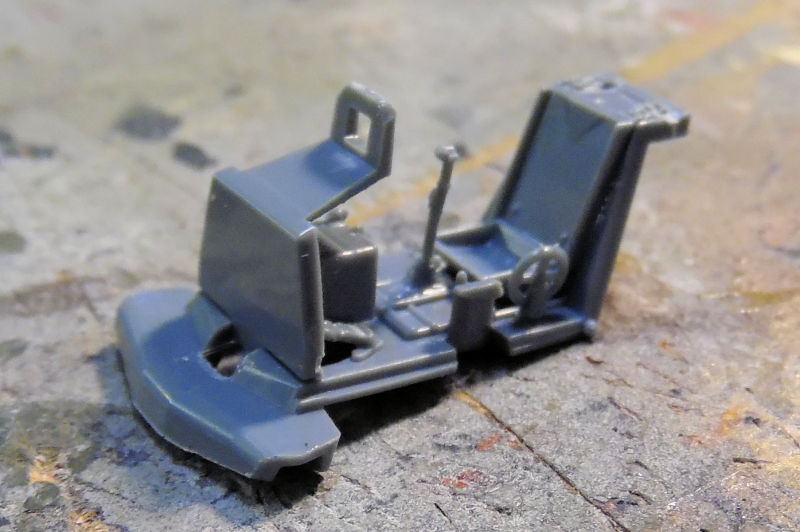
After that the basic fuselage was assembled:
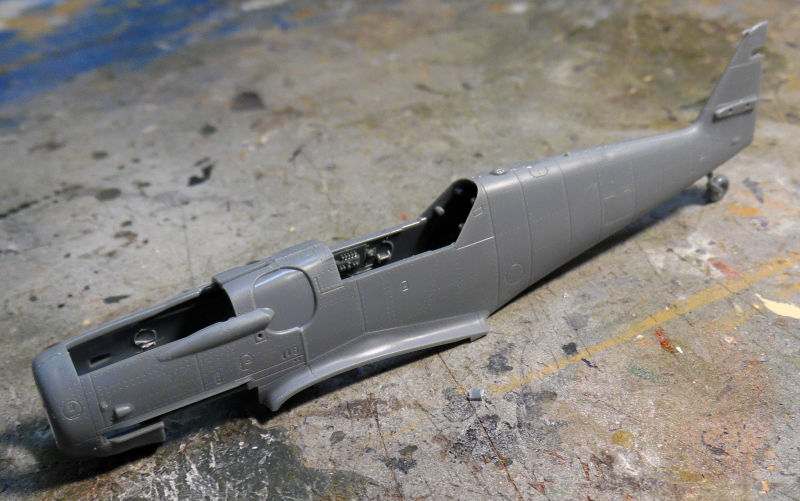
Then we completed the rest of the fuselage and slipped the cockpit sub-assembly inside to dry fit so we could see how it fit:
Looking pretty good so far. Next we worked more on the Italian Macchi C.205. The canopy went on after some more sanding had taken place:
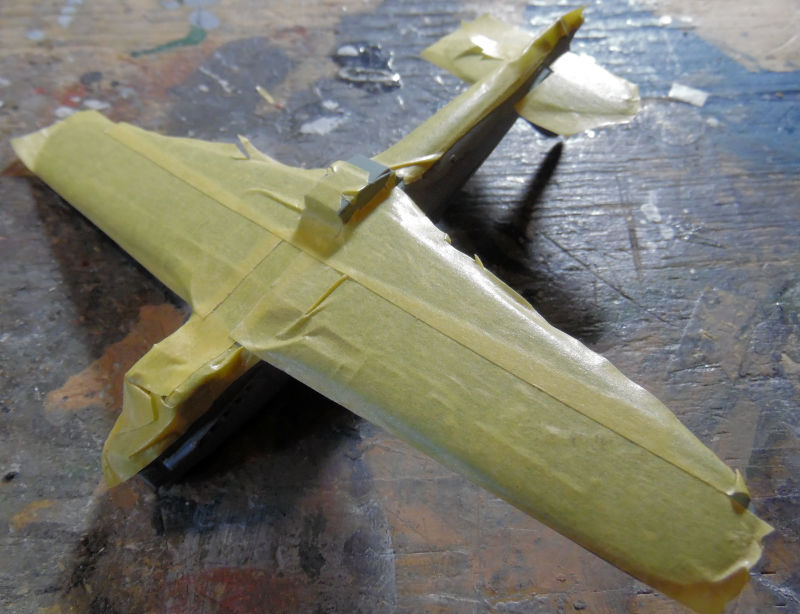
The the canopy was masked; it was easier to do it while installed on the aircraft:
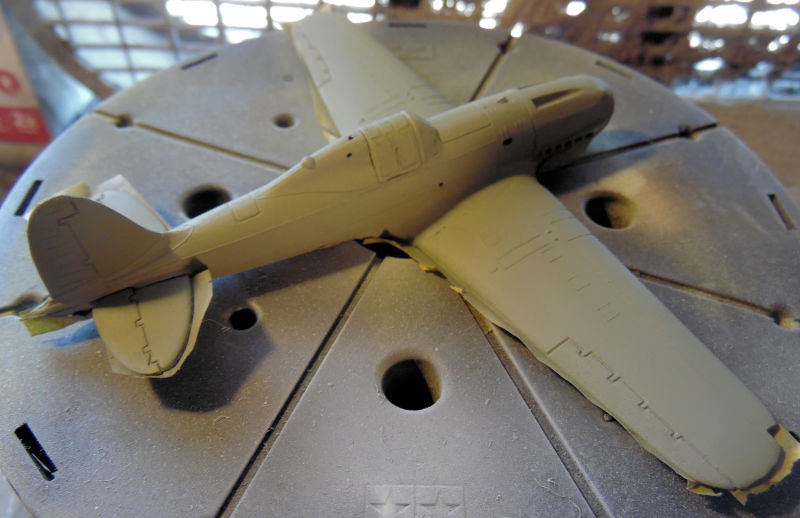
Next stop was the paint station, where this got the undercoat. Once it was dry, we masked it off for the upper coat:
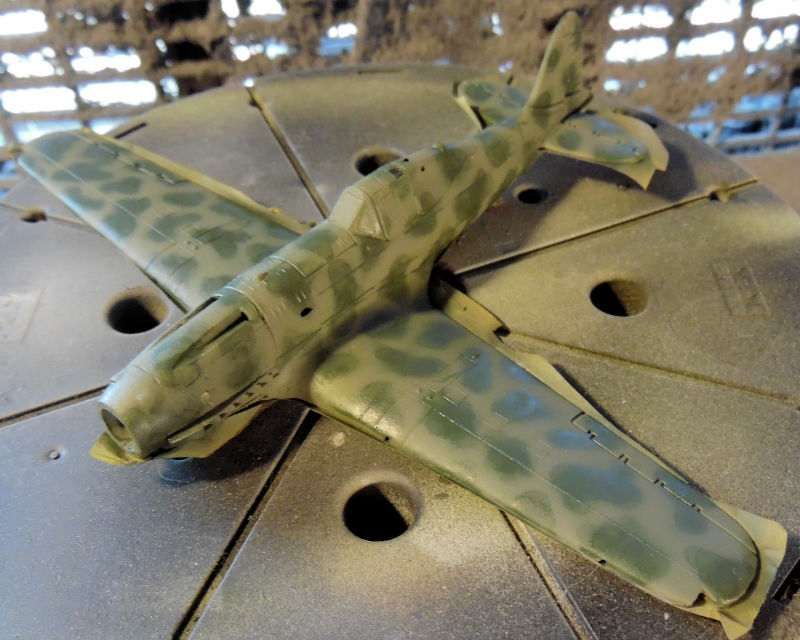
The upper coat went on after that:
Followed later by the darker green splotches since we still had that color in the color cup after spraying the T-34:
Moving along, we got some more progress done on the two Reapers (that I mislabeled as "Predators") shooting a base coat of Light Ghost Grey over them both:
Once that was dry, a gloss coat was sprayed and we got the decals down on the British Reaper:
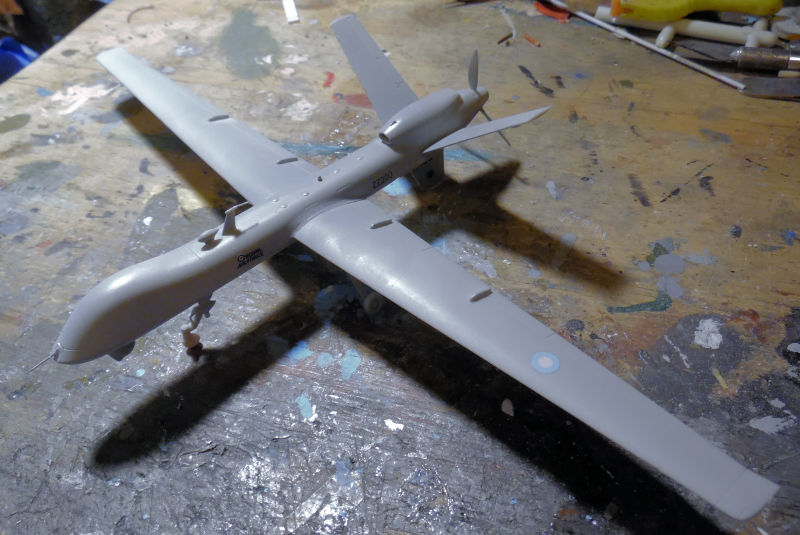
I'm waiting for word from my nephew to see if he knows a particular drone he's flown the most so I can model it.
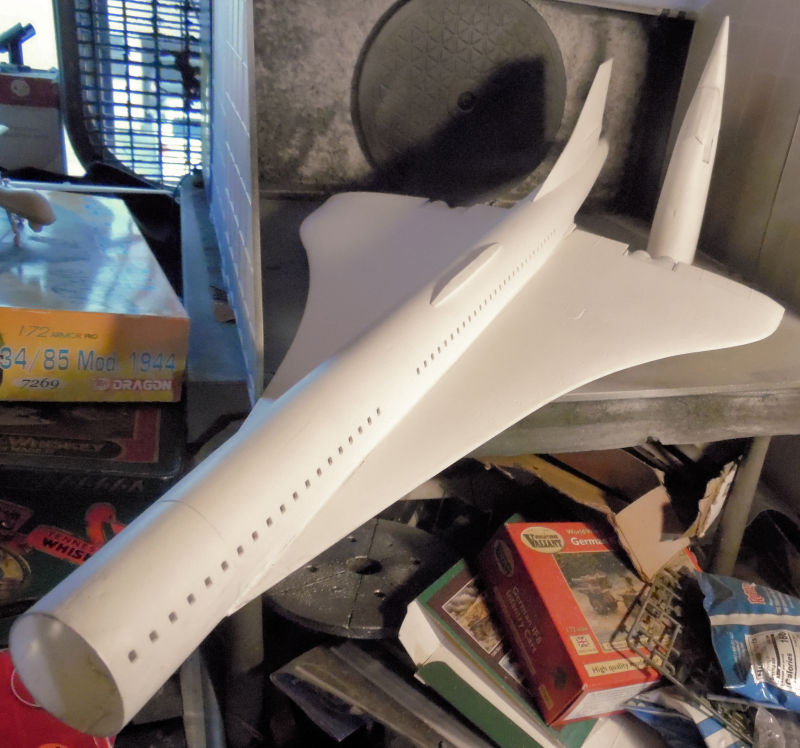
Now for the larger stuff. In this bay we have another attempt at shooting a gloss coat on the Concorde:
I was not satisfied with the joint between the tail and the main fuselage. However, to facilitate things we did what I should have done long before: we built the stand that came in the kit:
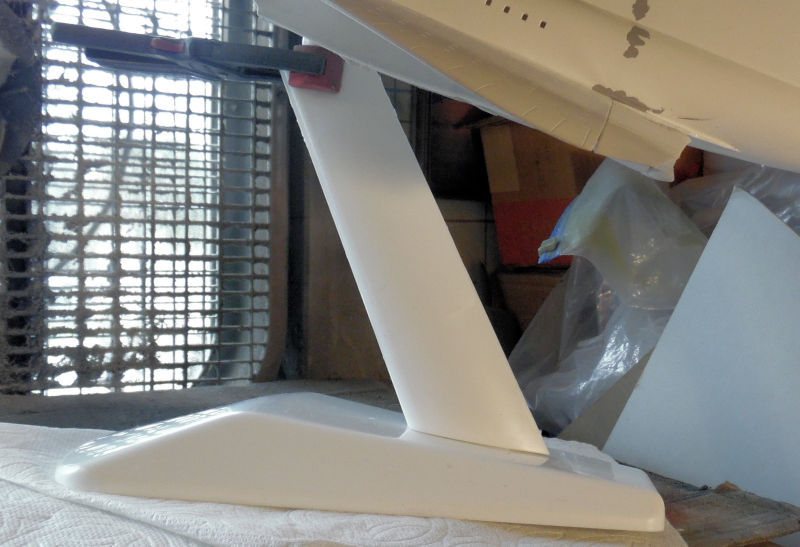
Now this is much easier to maneuver without having to touch it and dirty up the white! It also made it easier to add the additional Mr. Surfacer to try and smooth out the troublesome joint again:
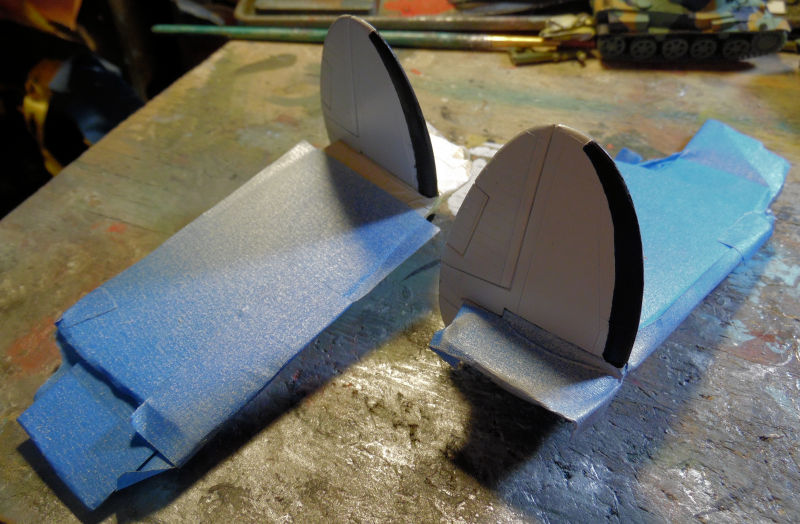
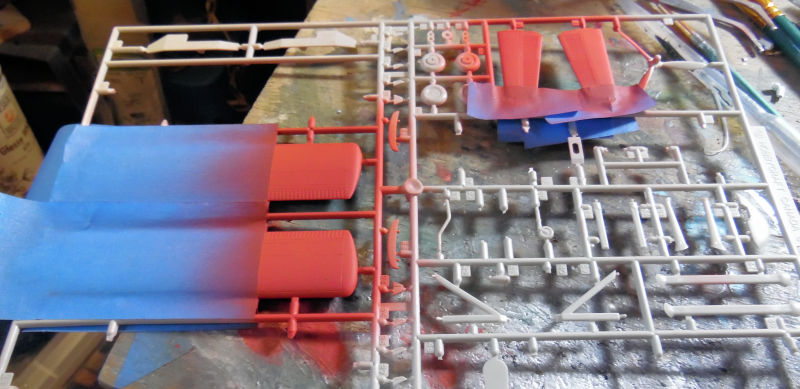
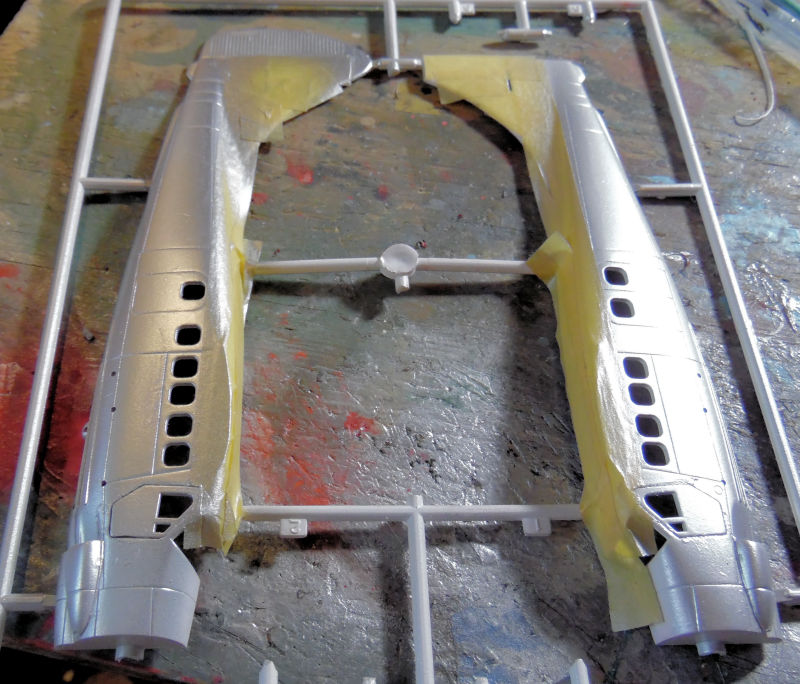
Moving on while that dried, we have in this next bay both of the T-16 Badgers under construction. Both cockpit modules had the clear parts masked off to prepare for paint:
The engines were added to the main fuselages of both planes and the main fuselage halves were cemented together. You can see one of them had already got the cockpit module attached:
Afterward, the other cockpit module was attached and the wings were installed on both planes:
Later their first color went on. I'm not exactly happy with this shade and I may re-shoot another one....or not:
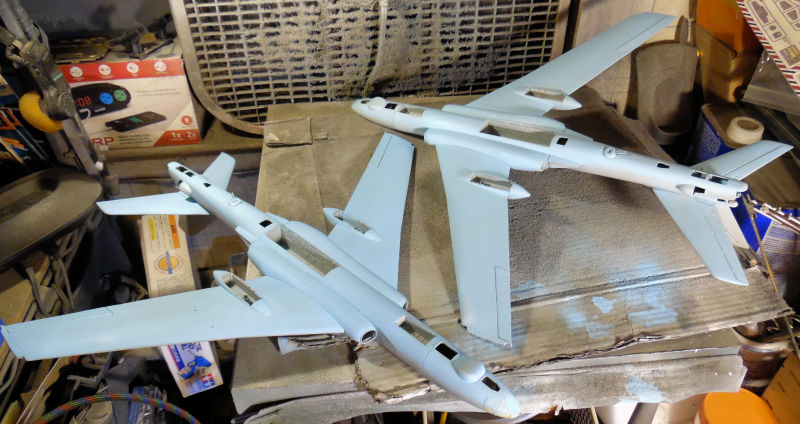
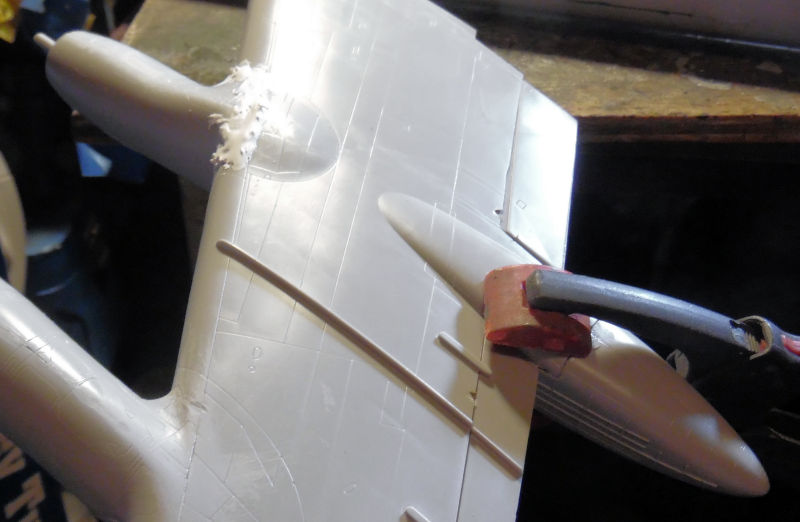
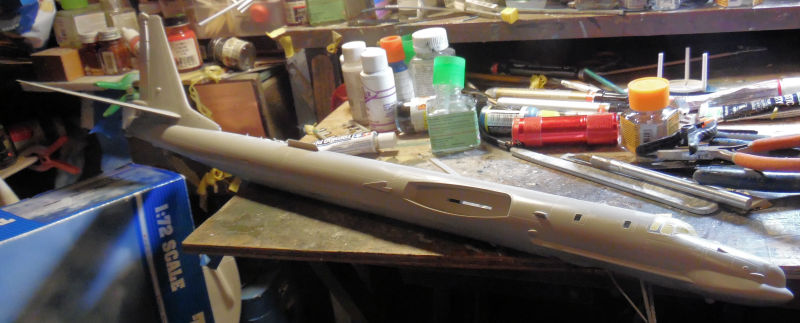
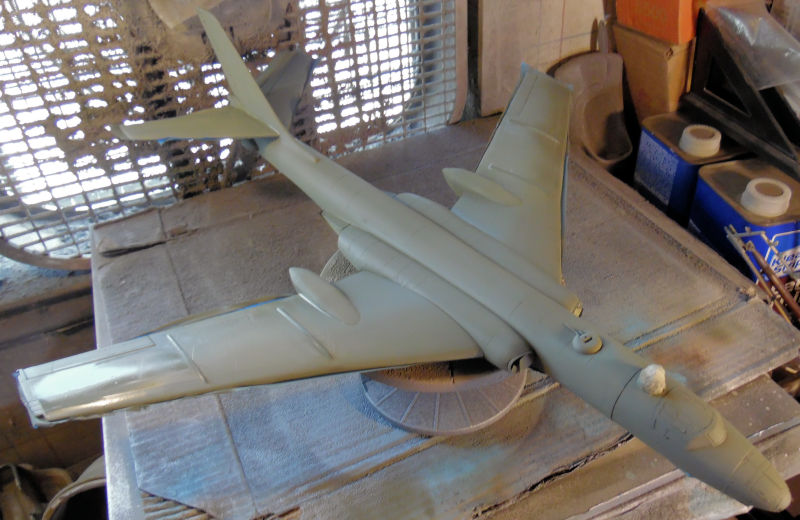
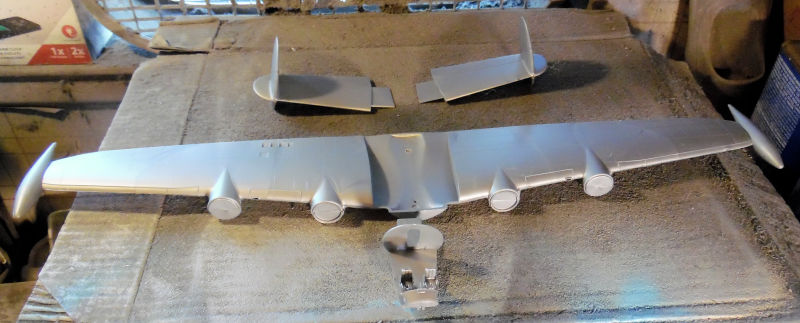
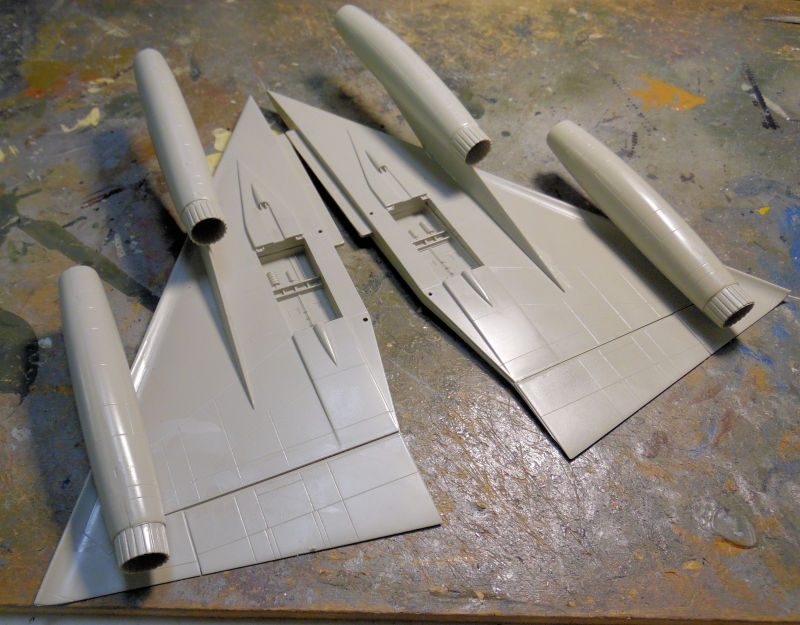
Now for the next big model, we go to this next bay where the Tu-95H (also mislabeled as the "Tu-142) is being built. I wasn't happy with the way the inside nacelle on one wing was sitting; there were too many large gaps along the nacelle and wing. The only thing to do was to remove it and re-set it correctly so that that the gaps are gone:
Once re-set there was still a bit of putty needed at the top joint where the nacelle meets the wing:
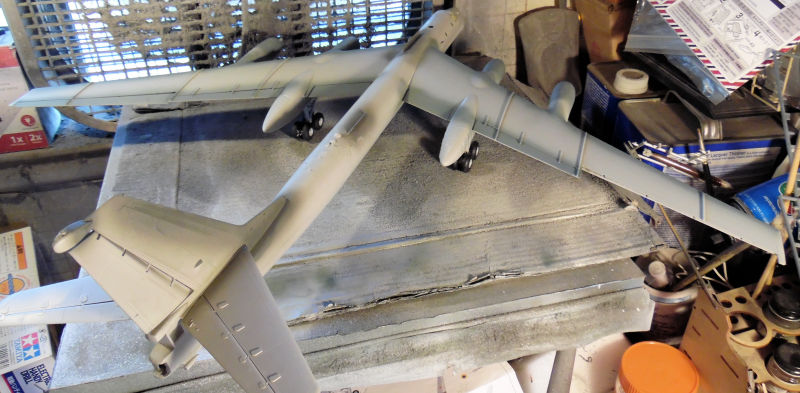
Naturally doing all that caused the main landing gear to break, so this was fixed to dry along with everything else:
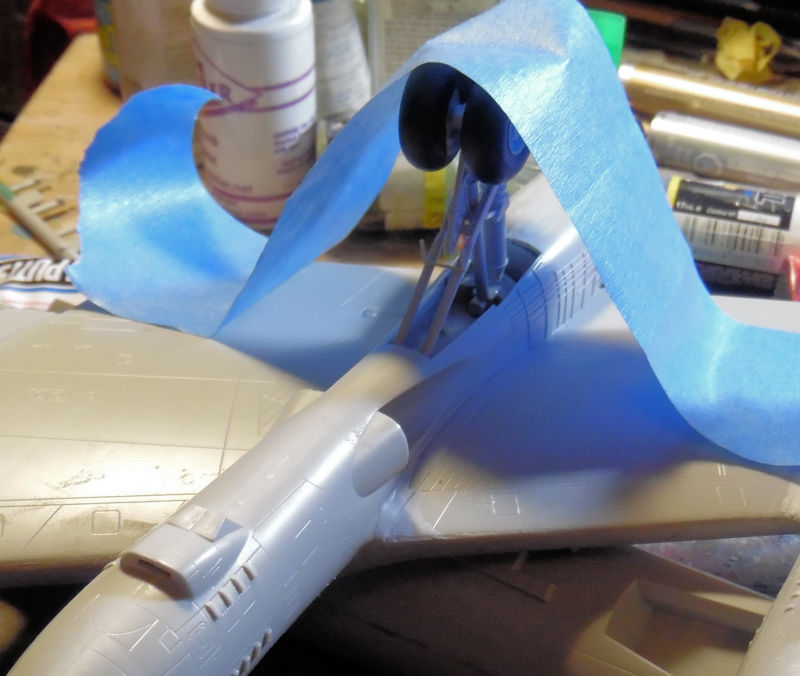
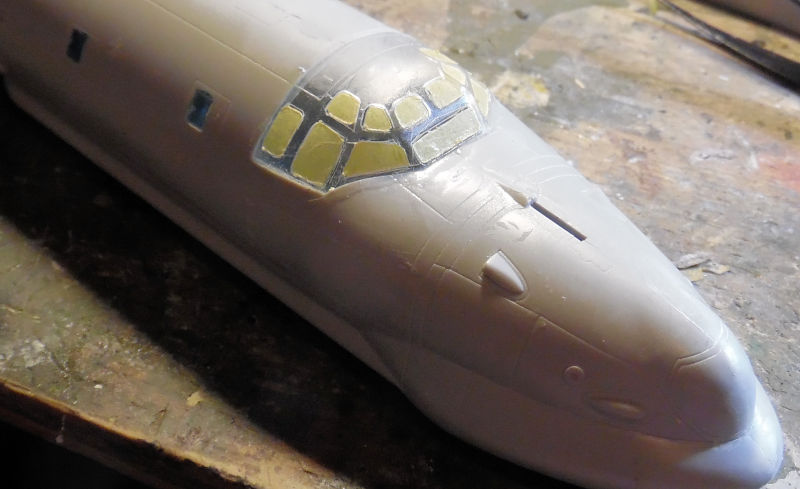
While that was drying we moved on to the front fuselage section where the canopy was installed:
This was then masked when it was dry:
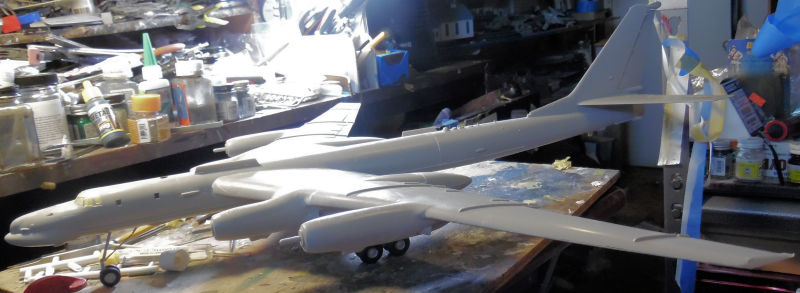
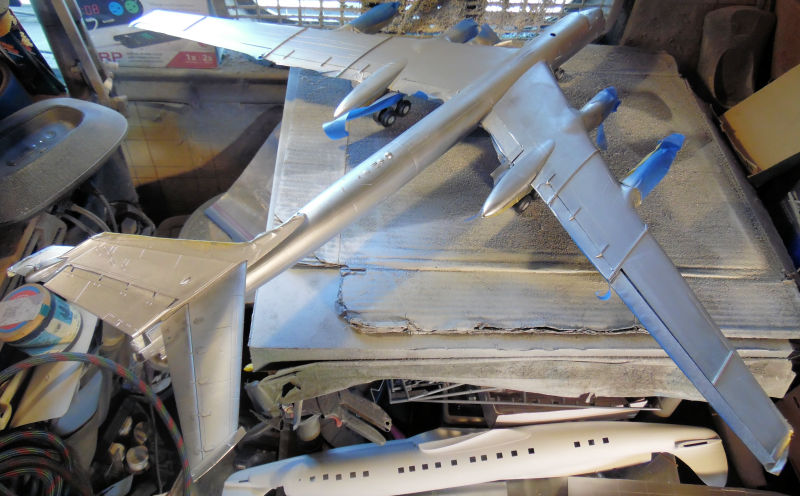
After that, the rear fuselage and the front fuselage were joined together. Now you can get some idea of how big this thing is as it is sitting on a standard tray table:
Naturally you'll be able to see how incredibly messy my bench is, but hey, it can't be helped....
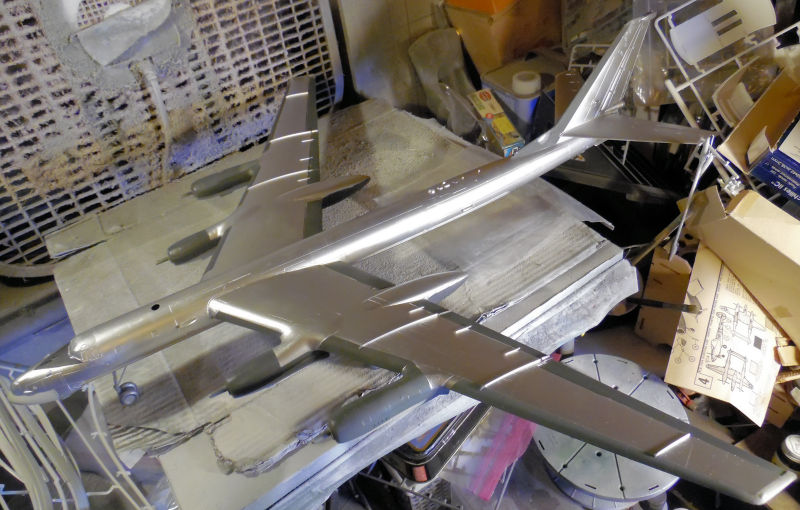
Moving on, we then installed the wings:
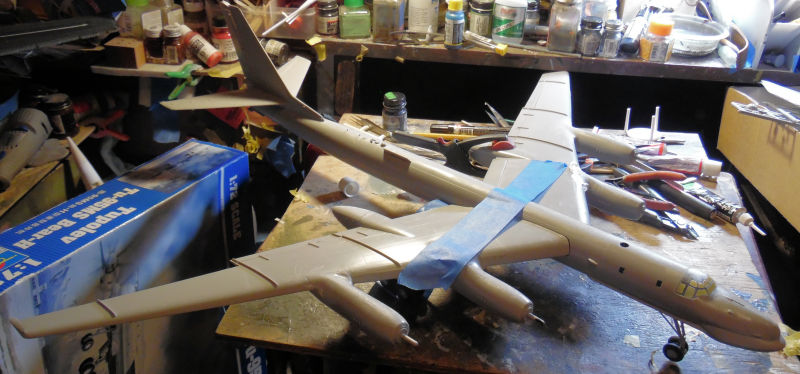
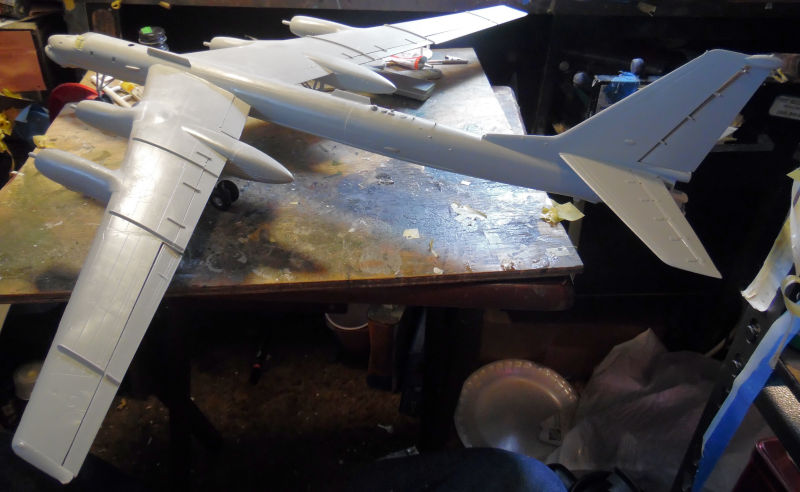
I had to pull the entire tray table out to fit that thing! Here's another view of this thing on the tray table:
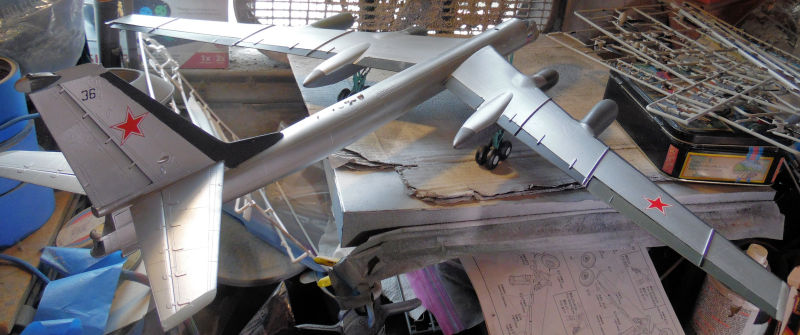
Later on, this Big Bird got it's first color:
That will all be masked when it's time to put the main bare metal silver coat on. First, we still need to add some of the lighter greys on certain areas first.
Now this tour has been quite extensive already so we shall continue the tour in the Shipyards and the Motor Pool in the next post.
So, all aboard the trams for the latest tour!
The Hangar is the first stop as always and here is where the majority of the progress has been. Starting in this first bay, we have some Russian ordinance. This was a short run kit that I got in the Distressed Kit Auction some time back. These finally got some paint on them and since the stand to the flying one went on walkabout, we modified one to hold it:
Not too shabby...
In the next bay is a project that got started because of all the white we were spraying on the Concorde. so, while I had the white out, we shot a white on the fuselage of this Canadian Otter to get a jump on it:
Now on to the next bay, we have another started project; something that had been crying out for me to start. This is the Eduard Profipak Israeli S-199. The cockpit sans instrument panel was started first:
After that the basic fuselage was assembled:
Then we completed the rest of the fuselage and slipped the cockpit sub-assembly inside to dry fit so we could see how it fit:
Looking pretty good so far. Next we worked more on the Italian Macchi C.205. The canopy went on after some more sanding had taken place:
The the canopy was masked; it was easier to do it while installed on the aircraft:
Next stop was the paint station, where this got the undercoat. Once it was dry, we masked it off for the upper coat:
The upper coat went on after that:
Followed later by the darker green splotches since we still had that color in the color cup after spraying the T-34:
Moving along, we got some more progress done on the two Reapers (that I mislabeled as "Predators") shooting a base coat of Light Ghost Grey over them both:
Once that was dry, a gloss coat was sprayed and we got the decals down on the British Reaper:
I'm waiting for word from my nephew to see if he knows a particular drone he's flown the most so I can model it.
Now for the larger stuff. In this bay we have another attempt at shooting a gloss coat on the Concorde:
I was not satisfied with the joint between the tail and the main fuselage. However, to facilitate things we did what I should have done long before: we built the stand that came in the kit:
Now this is much easier to maneuver without having to touch it and dirty up the white! It also made it easier to add the additional Mr. Surfacer to try and smooth out the troublesome joint again:
Moving on while that dried, we have in this next bay both of the T-16 Badgers under construction. Both cockpit modules had the clear parts masked off to prepare for paint:
The engines were added to the main fuselages of both planes and the main fuselage halves were cemented together. You can see one of them had already got the cockpit module attached:
Afterward, the other cockpit module was attached and the wings were installed on both planes:
Later their first color went on. I'm not exactly happy with this shade and I may re-shoot another one....or not:
Now for the next big model, we go to this next bay where the Tu-95H (also mislabeled as the "Tu-142) is being built. I wasn't happy with the way the inside nacelle on one wing was sitting; there were too many large gaps along the nacelle and wing. The only thing to do was to remove it and re-set it correctly so that that the gaps are gone:
Once re-set there was still a bit of putty needed at the top joint where the nacelle meets the wing:
Naturally doing all that caused the main landing gear to break, so this was fixed to dry along with everything else:
While that was drying we moved on to the front fuselage section where the canopy was installed:
This was then masked when it was dry:
After that, the rear fuselage and the front fuselage were joined together. Now you can get some idea of how big this thing is as it is sitting on a standard tray table:
Naturally you'll be able to see how incredibly messy my bench is, but hey, it can't be helped....
Moving on, we then installed the wings:
I had to pull the entire tray table out to fit that thing! Here's another view of this thing on the tray table:
Later on, this Big Bird got it's first color:
That will all be masked when it's time to put the main bare metal silver coat on. First, we still need to add some of the lighter greys on certain areas first.
Now this tour has been quite extensive already so we shall continue the tour in the Shipyards and the Motor Pool in the next post.
Duke Maddog
Well-known member
And now to continue our tour of the Shipyards next.
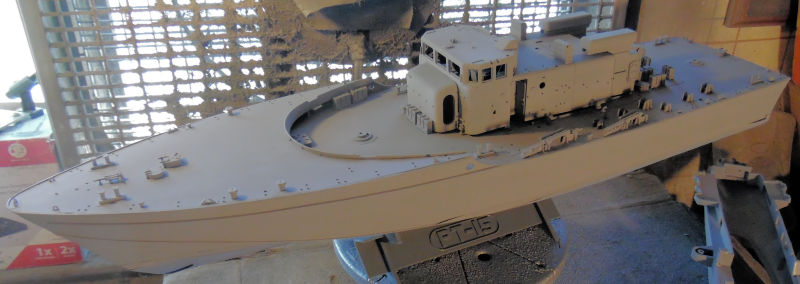
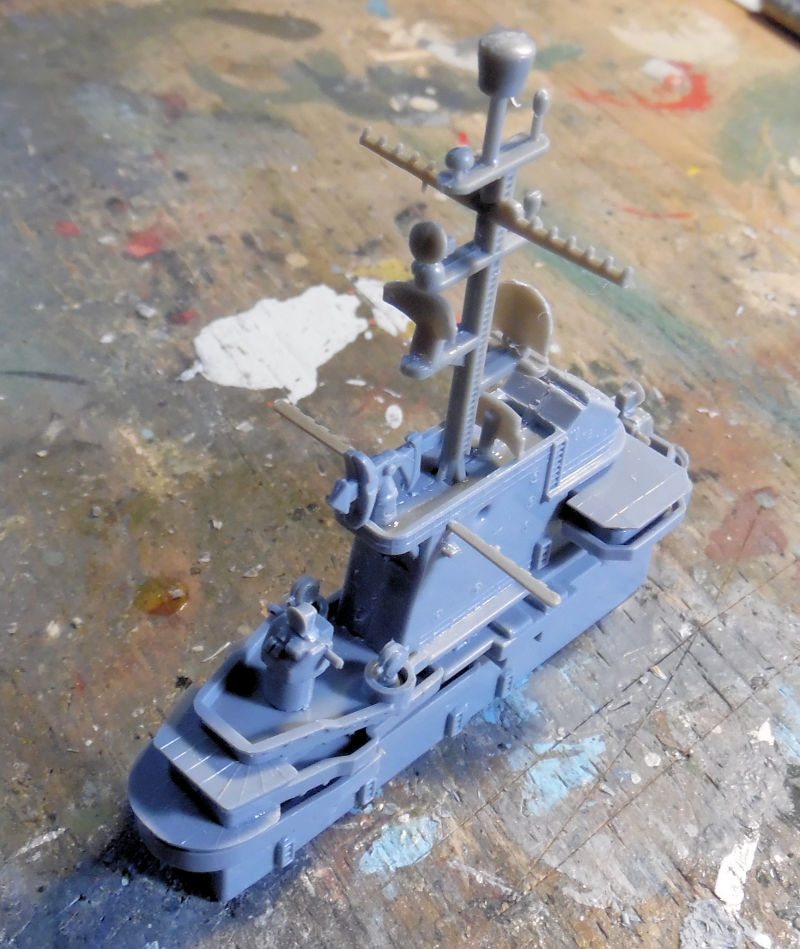
In the first slipway here we have the Japanese PT-15 that finally got the base coat of grey on it:
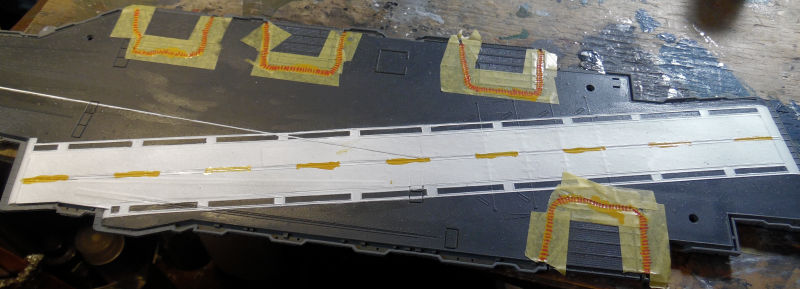
In the next slipway, we continued work on the deck of the USS Enterprise. Some masking was pulled off, but the the yellow stripes were painted on the deck:
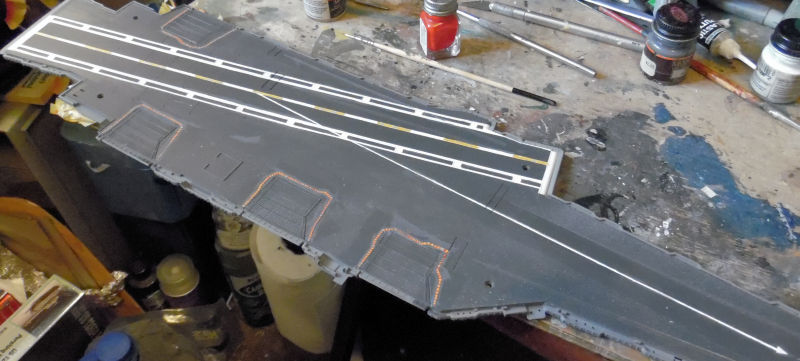
Later, the remaining elevator stripes were masked off, the yellow painted on it and then we added the red stripes on these same elevator stripes:
After some touchup, this deck is done:
Finally, in this last slipway, we worked on getting the railings on the Robert E. Lee looking more even and refined. Additional parts were added and the seams on the upper cabin and deck were filled as well:

That completes our tour so far of the Shipyards and so we move on to the Motor Pool.
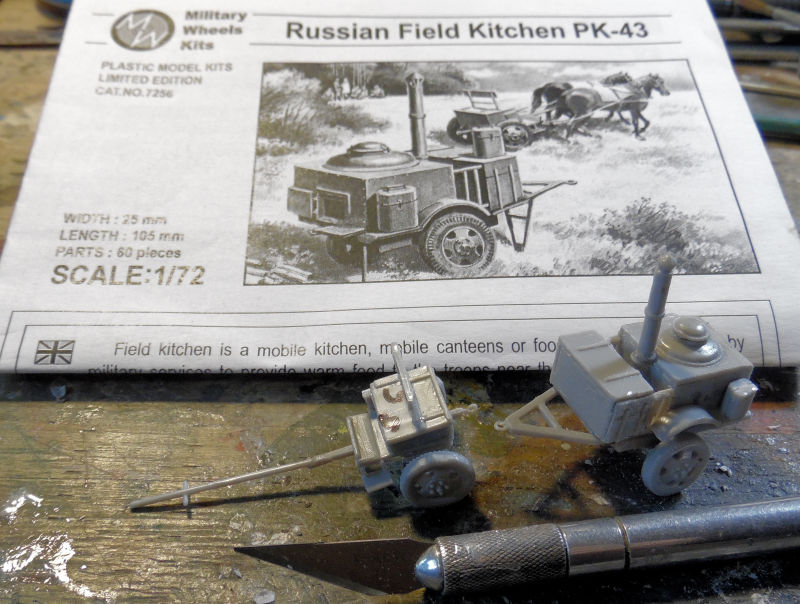
Production has been picking up, starting with a small shelf queen project that I wanted on the display shelf. This is the Military Wheels 1/72 scale Russian Field Kitchen. We had started it some time ago, found the box again and decided it was time to get it finished. First off the kitchen and limber were completed:
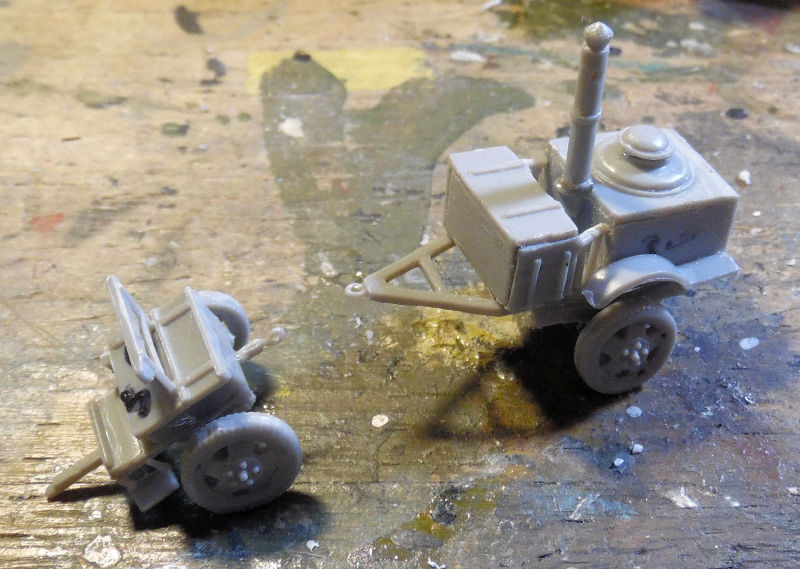
Here's an idea of how small this is too:
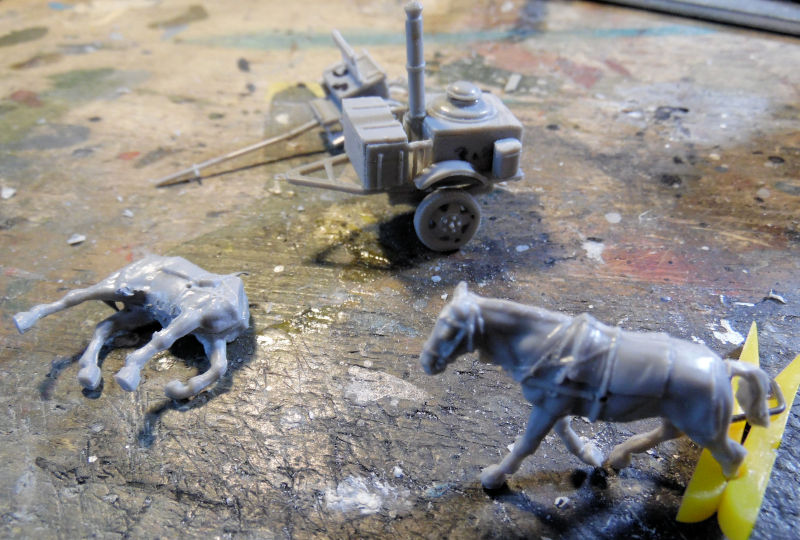
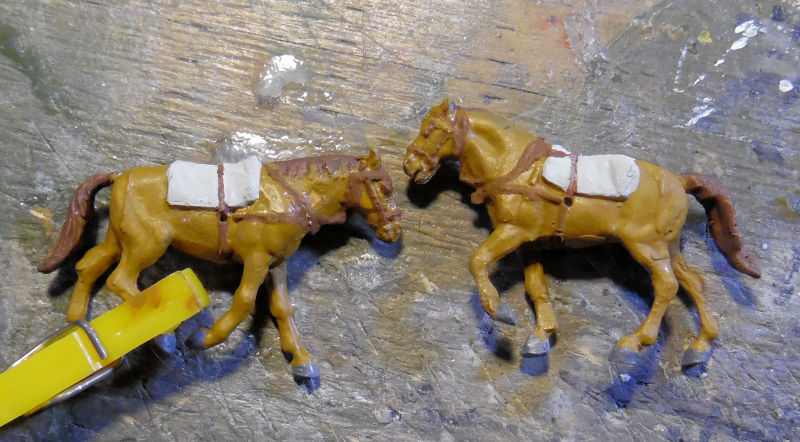
The horses were in four parts. Seriously. Two body halves, the head and the tail. They seemed pretty desperate to add some kind of 'detail' to this model! It didn't help that the parts were all so badly molded that massive sanding, carving and other adjustments needed to be made:
Finally we got them painted:
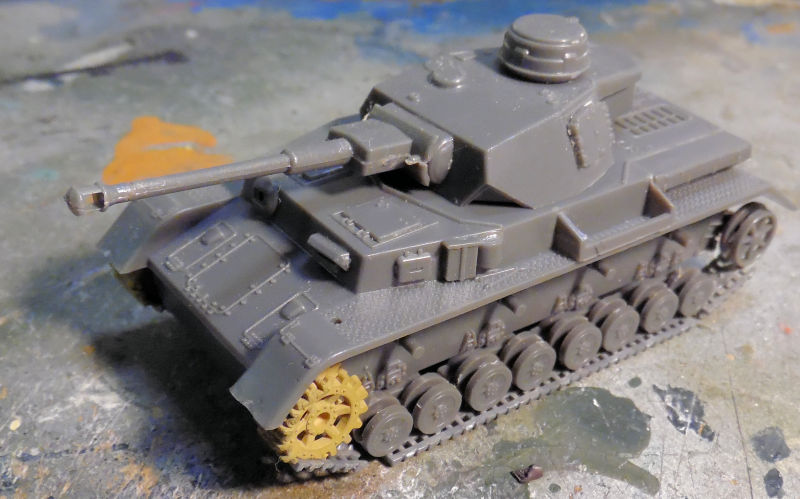
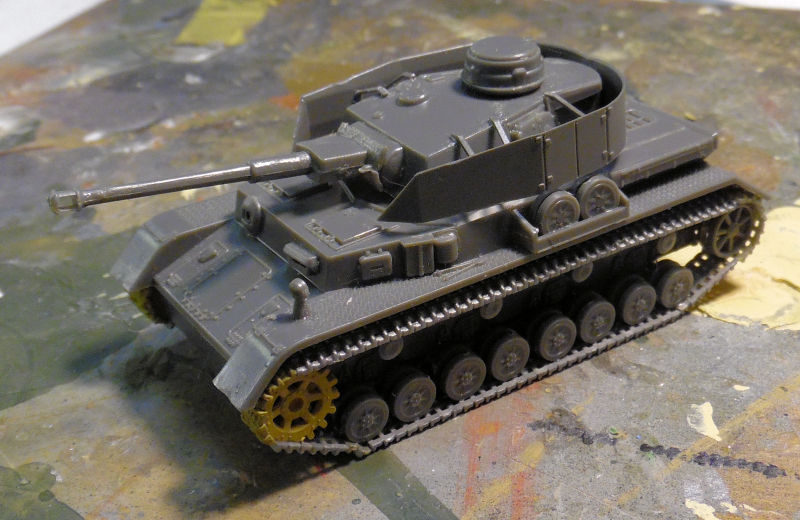
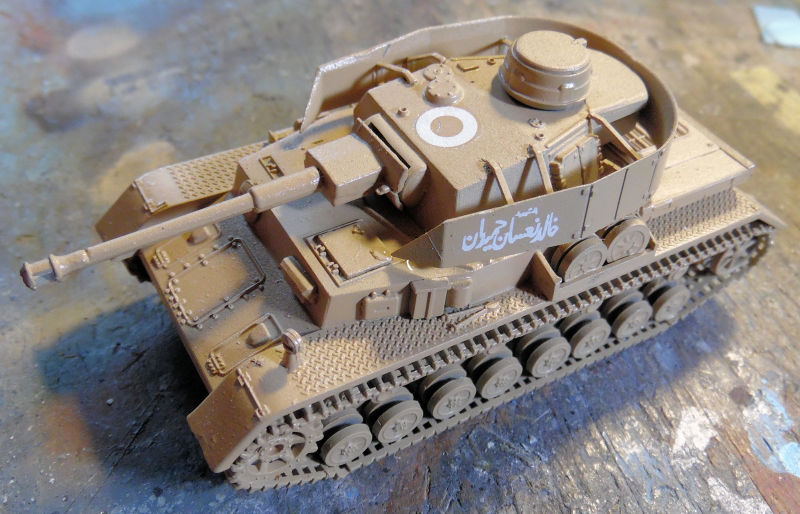
Moving along to the next bay, the Syrian PzIV got a partial run of tracks from the spares box. More will go on this when additional track pieces are found:
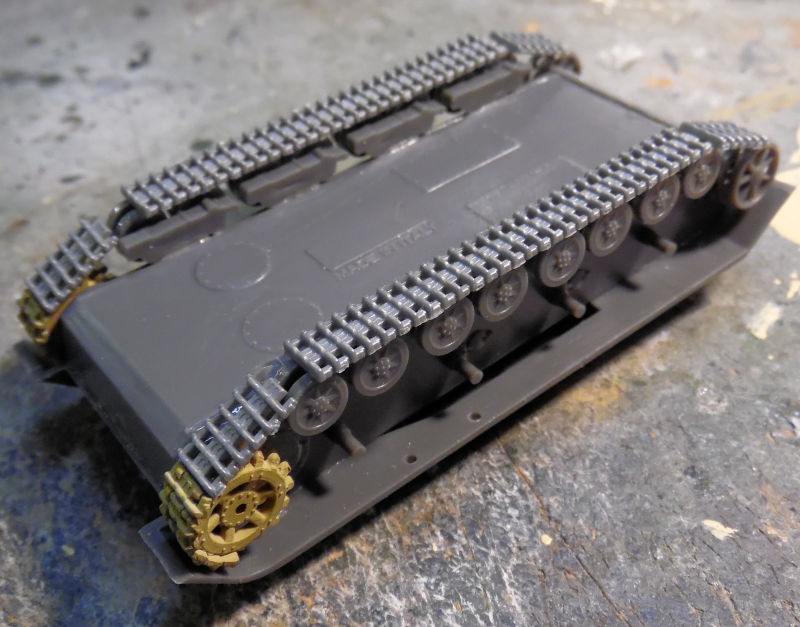
Overall it's looking pretty good:
Next are two Distressed Kit Auction winnings. These were mostly assembled by someone else before they gave up and donated them to our club for our Auction. First is this Dragon StuG III ausf H that they had added photo etch zimmerit to:
This is going to be a Syrian StuG, and yes, there are pictures of several of these in Syrian service still sporting their Zimm. We started on the tracks for this for now:
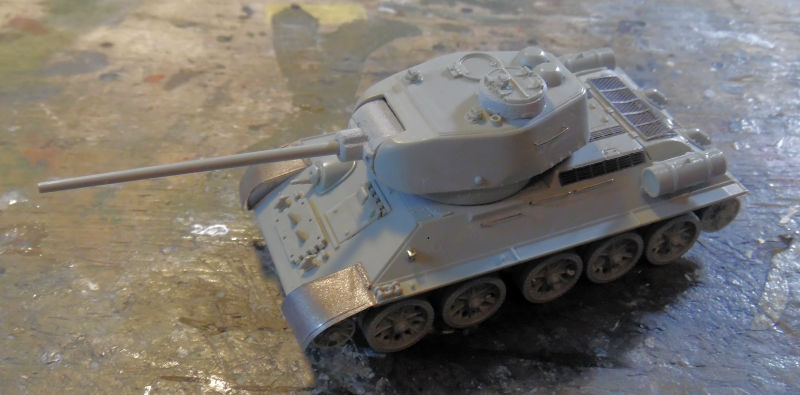
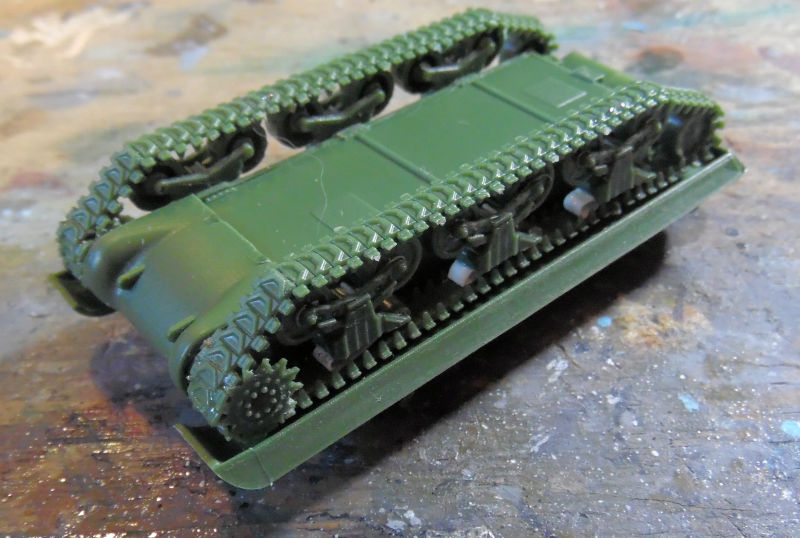
Our last Syrian tank is this Trumpeter T-34/85 that they had given up on because one of the idler wheels disappeared. I conjured up a replacement pair and added them to this tank:
Next the tracks went on:

Someone else added those metal fenders, saving me the trouble....
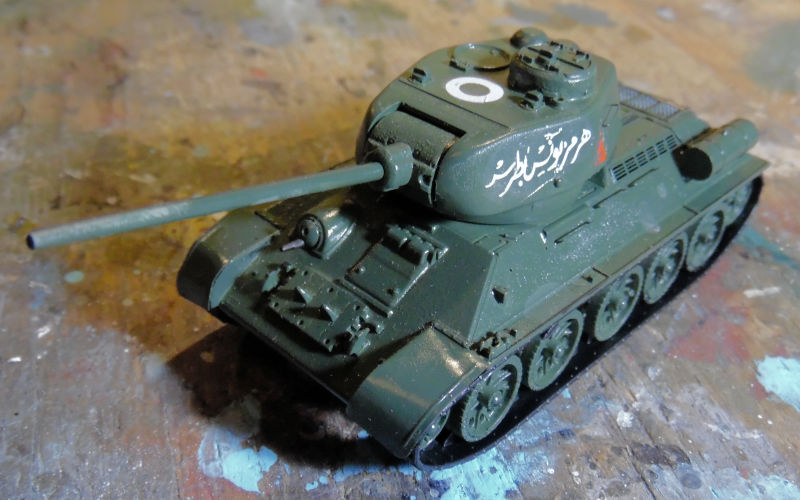
And then this got basecoated with the dark green:

Then the decals went on. These are Braille Strike decals and went on well. I just forgot to trim them very close so some judicious cutting with a very sharp Exacto knife got them the right size. You can also see in my clumsiness, I messed up the red triangle on this side. Nothing a little paint can't fix:
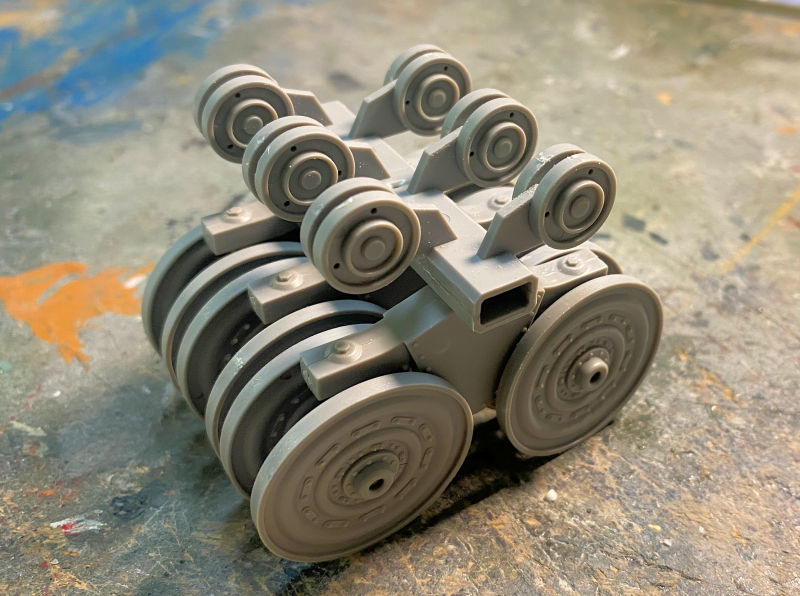
Lastly, I've been talking about starting my P.1000 Ratte to make into a carrying case for my small scale vehicle contest entries. Well, one Hobby Day Monday I made good on that statement. No, it never existed, or was ever used. Yes, this is in 1/72 scale. No, I don't think I will count it as one of the collection....mostly because it is pure fantasy that never got built or used. But I am building it.
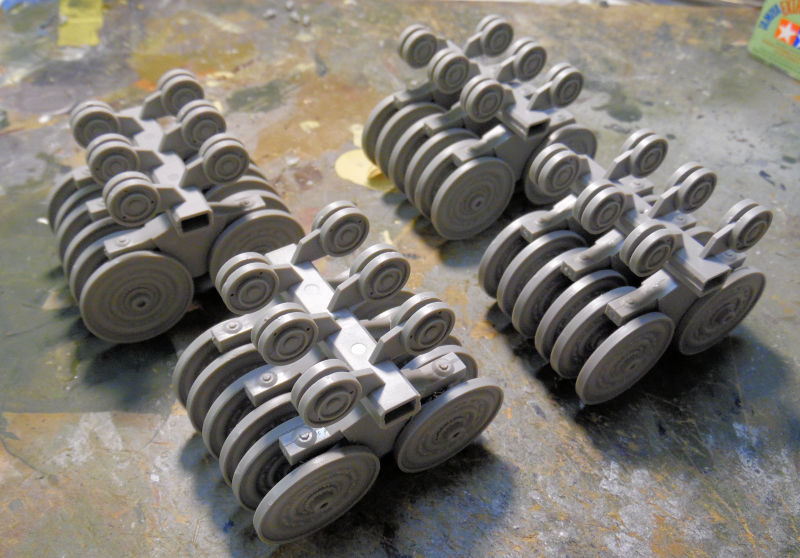
Here are all of the components and/or sub assemblies for the main track bogies. The drive sprockets are already finished:
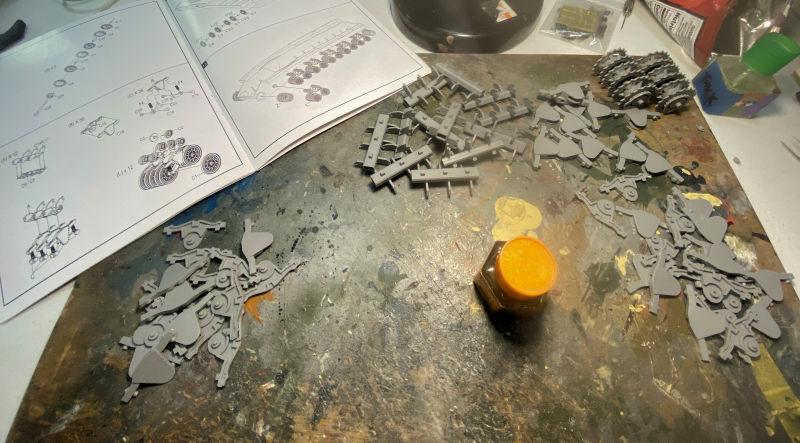
We had to make 32 of these rocker arms... or was it 36?

This kit gives you springs so that the bogies articulate:

Here's a close up of the drive sprockets:
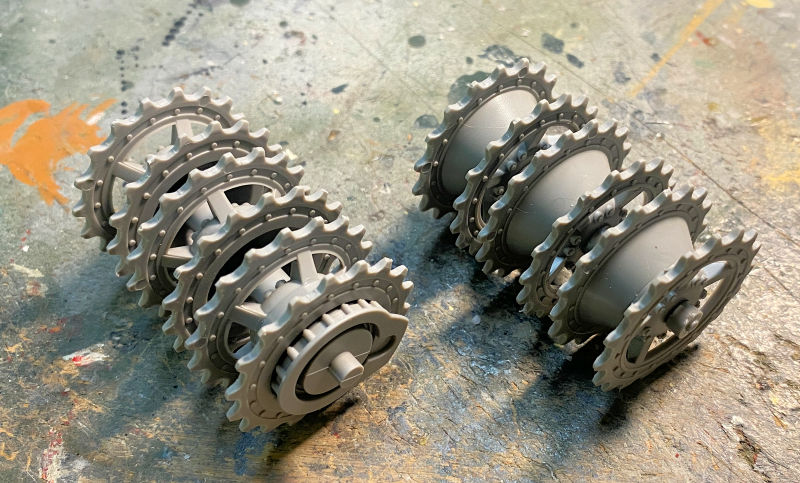
And finally, here is ONE bogie consisting of 44 parts in that one assembly.... I need to make eleven more:
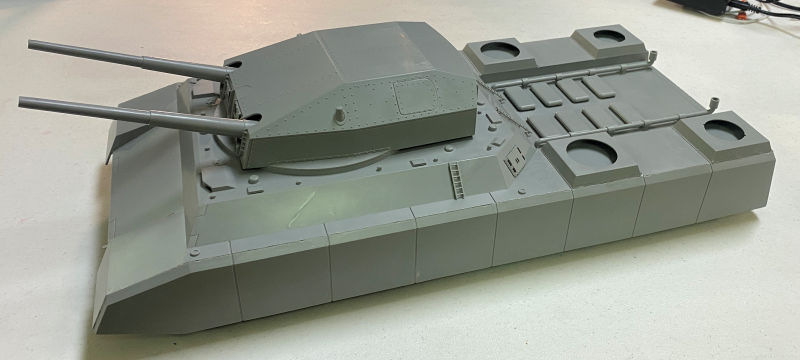
While that was drying, we finished up the majority of the main hull and turret:
Now in this back lot, given how much lumber we use, we are building a new Lumber Mill:
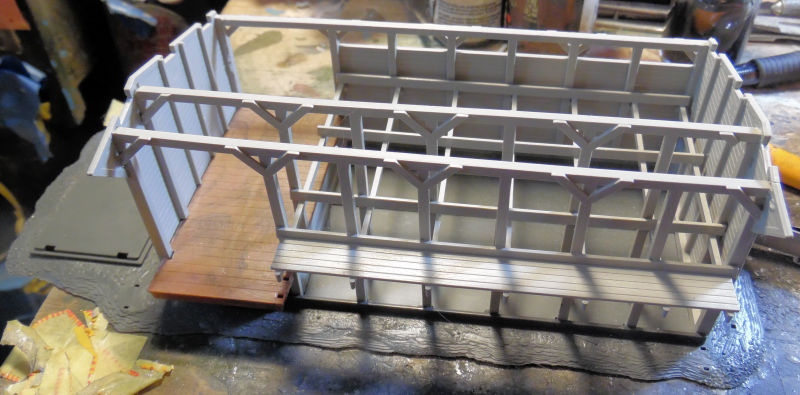
This is also a tribute of sorts for my paternal grandfather who was not permitted to serve in WWII: he owned one of these and because it was a vital industry back then, the government made sure he stayed on and supplied them throughout the war.
And that completes this tour of Maddog Manufacturing for this time. Thank you all for looking in and as always, comments are welcome.
In the first slipway here we have the Japanese PT-15 that finally got the base coat of grey on it:
In the next slipway, we continued work on the deck of the USS Enterprise. Some masking was pulled off, but the the yellow stripes were painted on the deck:
Later, the remaining elevator stripes were masked off, the yellow painted on it and then we added the red stripes on these same elevator stripes:
After some touchup, this deck is done:
Finally, in this last slipway, we worked on getting the railings on the Robert E. Lee looking more even and refined. Additional parts were added and the seams on the upper cabin and deck were filled as well:
That completes our tour so far of the Shipyards and so we move on to the Motor Pool.
Production has been picking up, starting with a small shelf queen project that I wanted on the display shelf. This is the Military Wheels 1/72 scale Russian Field Kitchen. We had started it some time ago, found the box again and decided it was time to get it finished. First off the kitchen and limber were completed:
Here's an idea of how small this is too:
The horses were in four parts. Seriously. Two body halves, the head and the tail. They seemed pretty desperate to add some kind of 'detail' to this model! It didn't help that the parts were all so badly molded that massive sanding, carving and other adjustments needed to be made:
Finally we got them painted:
Moving along to the next bay, the Syrian PzIV got a partial run of tracks from the spares box. More will go on this when additional track pieces are found:
Overall it's looking pretty good:
Next are two Distressed Kit Auction winnings. These were mostly assembled by someone else before they gave up and donated them to our club for our Auction. First is this Dragon StuG III ausf H that they had added photo etch zimmerit to:
This is going to be a Syrian StuG, and yes, there are pictures of several of these in Syrian service still sporting their Zimm. We started on the tracks for this for now:
Our last Syrian tank is this Trumpeter T-34/85 that they had given up on because one of the idler wheels disappeared. I conjured up a replacement pair and added them to this tank:
Next the tracks went on:
Someone else added those metal fenders, saving me the trouble....
And then this got basecoated with the dark green:
Then the decals went on. These are Braille Strike decals and went on well. I just forgot to trim them very close so some judicious cutting with a very sharp Exacto knife got them the right size. You can also see in my clumsiness, I messed up the red triangle on this side. Nothing a little paint can't fix:
Lastly, I've been talking about starting my P.1000 Ratte to make into a carrying case for my small scale vehicle contest entries. Well, one Hobby Day Monday I made good on that statement. No, it never existed, or was ever used. Yes, this is in 1/72 scale. No, I don't think I will count it as one of the collection....mostly because it is pure fantasy that never got built or used. But I am building it.
Here are all of the components and/or sub assemblies for the main track bogies. The drive sprockets are already finished:
We had to make 32 of these rocker arms... or was it 36?
This kit gives you springs so that the bogies articulate:
Here's a close up of the drive sprockets:
And finally, here is ONE bogie consisting of 44 parts in that one assembly.... I need to make eleven more:
While that was drying, we finished up the majority of the main hull and turret:
Now in this back lot, given how much lumber we use, we are building a new Lumber Mill:
This is also a tribute of sorts for my paternal grandfather who was not permitted to serve in WWII: he owned one of these and because it was a vital industry back then, the government made sure he stayed on and supplied them throughout the war.
And that completes this tour of Maddog Manufacturing for this time. Thank you all for looking in and as always, comments are welcome.
Brokeneagle
Master at Arms
Hey Duke, you've really stepped it up in 2024 haven't you and [to me anyway] your skills have moved to the next level.
Some great builds going on here.
Some great builds going on here.
Heavens Eagle
Well-known member
Looking good Mark! How big is that last plane you are building (the 4 engine Russian) Just curious. I am sure the P.1000 is also huge.
Duke Maddog
Well-known member
Thank you Ian! Yes, I've tried to step it up this year; I do need to get these big projects done, as well as some others with smashed boxes. Thank you for the compliment on my skills! I don't feel like I've improved much, but it's nice that you noticed!
Thank you Paul! The last plane is a Tu-95 Bear and it's quite large. Not quite as big as the B-52, but close. I can try to get measurements later. And yes, the P.1000 model is big enough to carry four modern main battle tank models inside.
Thank you Paul! The last plane is a Tu-95 Bear and it's quite large. Not quite as big as the B-52, but close. I can try to get measurements later. And yes, the P.1000 model is big enough to carry four modern main battle tank models inside.
Duke Maddog
Well-known member
It's been a pretty good couple weeks and so we have enough for a new tour. This one will be a bit shorter but there is still lots to see. So, make your way to the trams and all aboard!
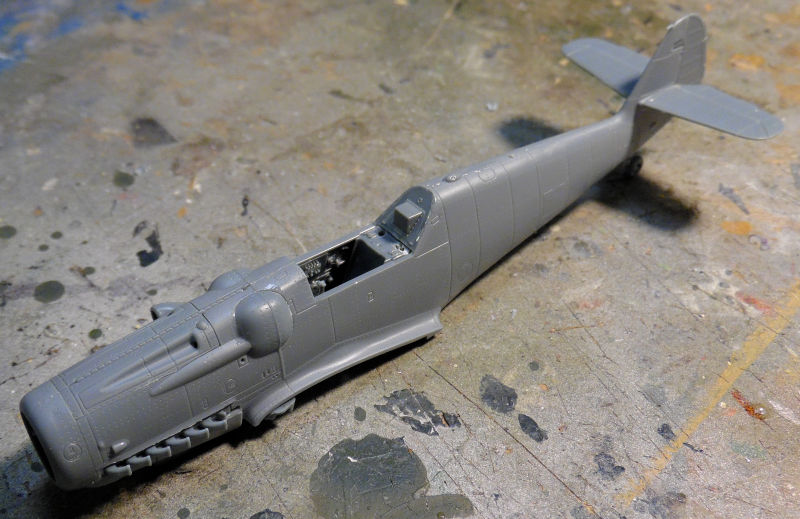
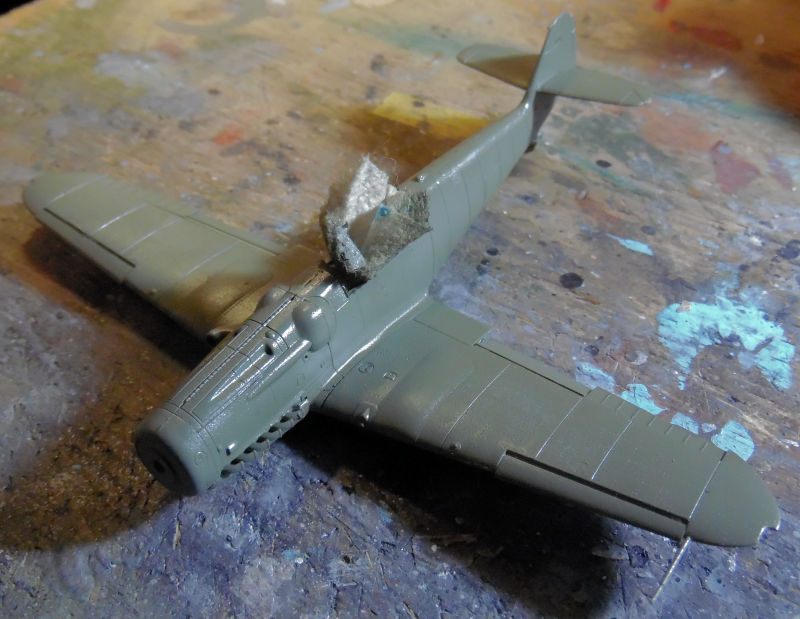
In our first stop in the Hangar, we have a number of projects moving forward, including another troublesome model like the Concorde, but that is further in. First we have progress on this Israeli S-199. We completed the wing assembly which consisted of ten parts and dry ft that sub-assembly to the fuselage:
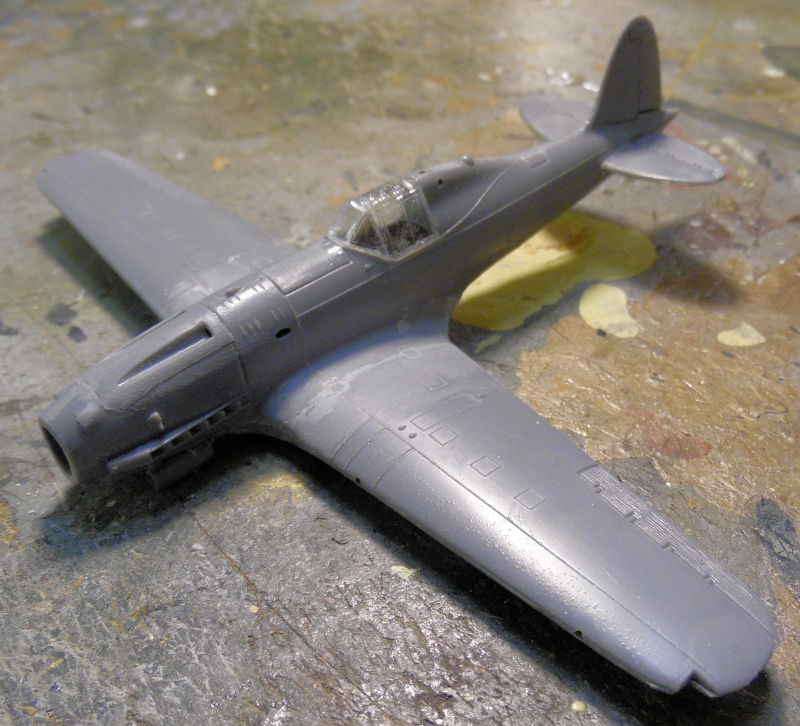
Since it fit so well, we added the cockpit from underneath; after adding the instrument panel first, and then cemented everything in place. The canopy was added here too:
Since masking the canopy was so difficult, even on the plane, it was removed and paper towel was used to mask the interior so that the base color could be applied. It was then glossed for decals after the paint had dried:
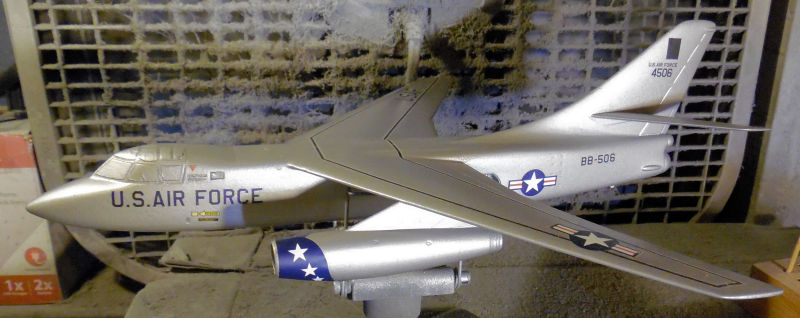
Finally here in the last bay we have the troublesome B-66 Destroyer. After multiple spraying, sanding, stripping, spraying etc. I finally decided to just move on. The silver coat was good enough so it was polished and decals were applied:
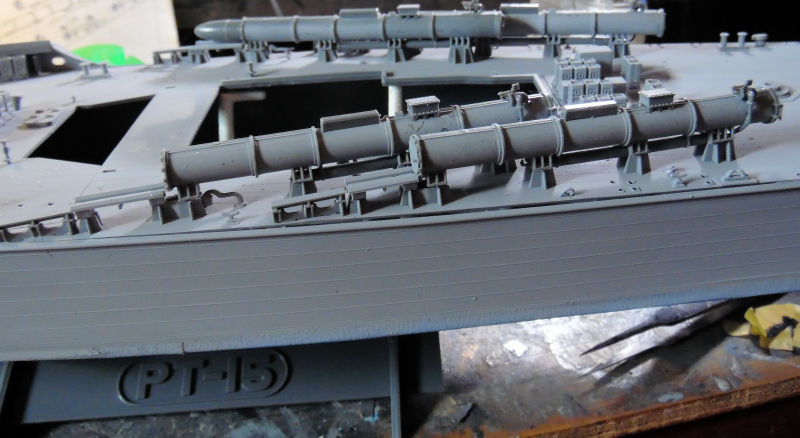
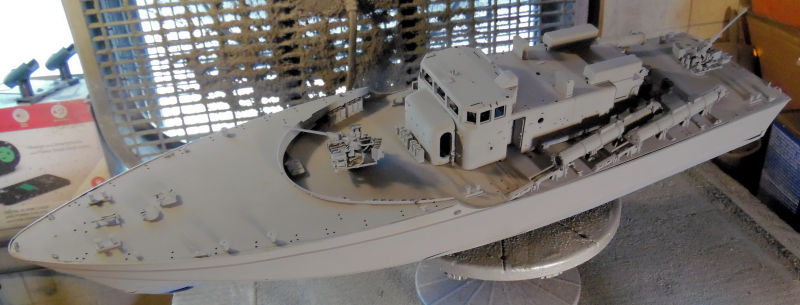
That is it for this short tour of the Hangar, now on to the Shipyards where small progress was done in our workshops building the weapons for the PT-15 MTB. Here is the second of the 20mm guns for this boat; the first had been built before:
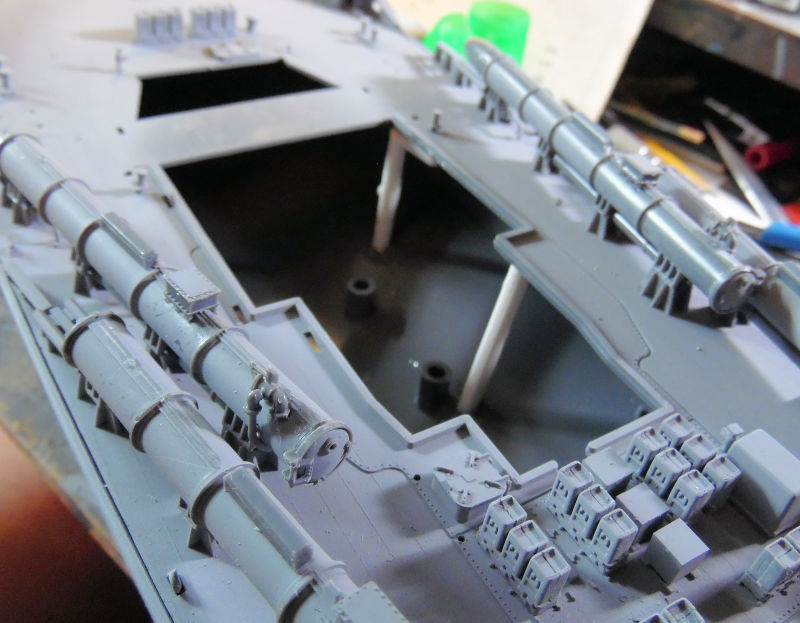
We also completed the torpedo tubes (mostly); one part went missing. I intend to build these with one set of tubes closed and the other set of tubes open and ready to fire:
That is all we have here for now. On to the Motor Pool where we've been working on a number of projects that need to be finished.
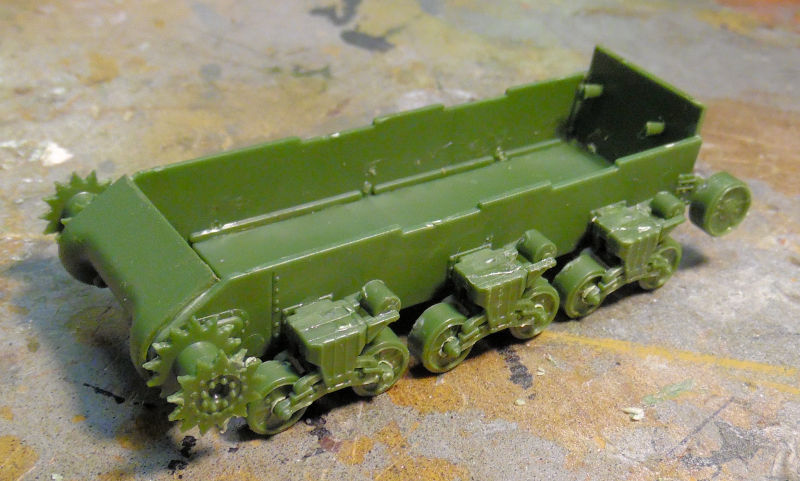
In this first bay of the Motor Pool, we have the British Achilles tank destroyer. This will be the first one of these I ever built. It's a UM kit so another tough fight here. First the running gear was installed:
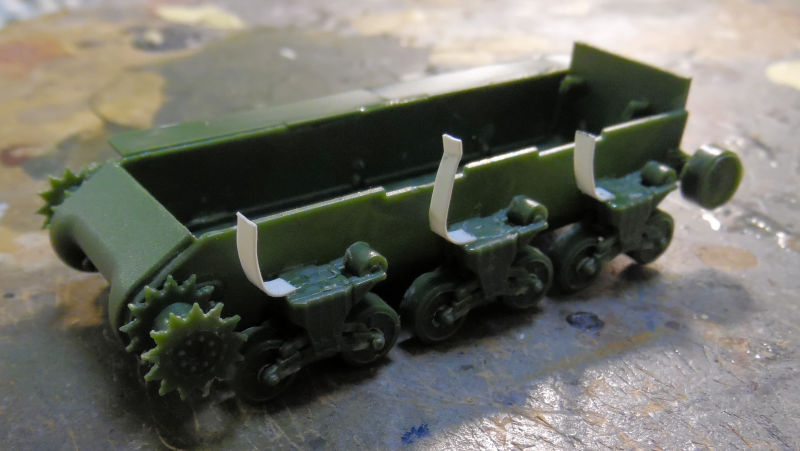
The kit included photo etch strips to bend into shape and cemented to the top of these bogies. Naturally, as with all UM kits of Shermans and Sherman variants, these photo etch parts go AWOL no matter how hard I try to keep them from disappearing! So this time I wasn't waiting to find them; I have too many UM Shermans sitting incomplete because I'm waiting to find these parts! I figured I'd try plastic styrene strip. It was more difficult that I expected but I forged ahead, starting with getting a basic bend done and then cementing them to the bogies:
When these were dry, they were bent over and the other ends cemented down. Once they held, I added the upper run of track to push them down:
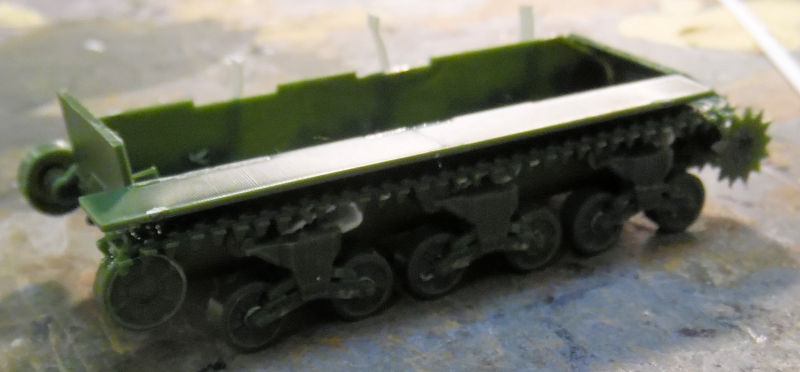
You can see they look very misshapen, not at all like they were supposed to be. But they are ON, and with enough paint and weathering, they will be darn near impossible to see. Hey it was an experiment that partially succeeded, I don't know if I'll try it again, but the opening there is possible. While that sat and simmered, the turret was completed with all but the ready ammunition:
By then, the tracks were dry enough so I completed the track runs for both sides:
All that is really needed now is the oversized bolts to be added to the turret and upper hull and this is ready for paint:

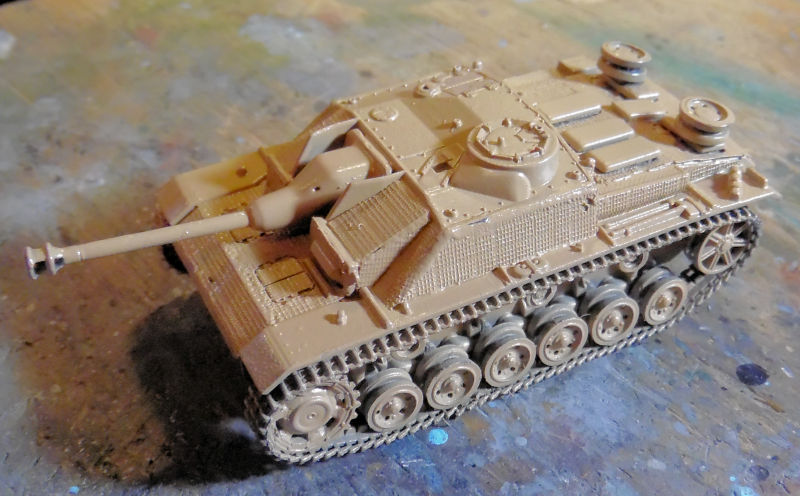
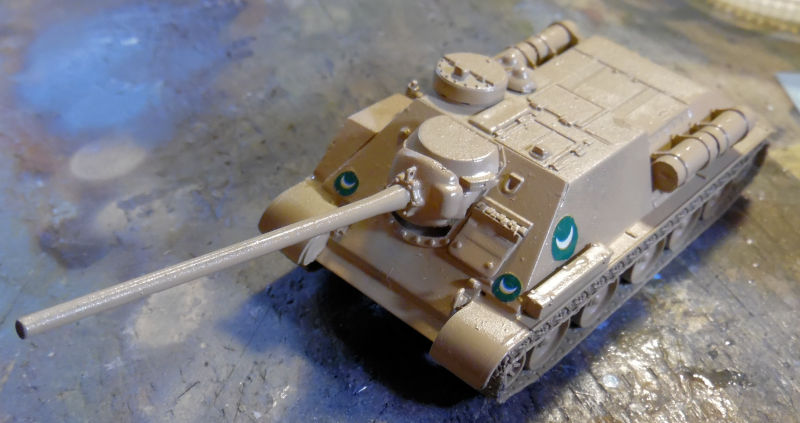
In the next bay we have the Egyptian Su-100 assault gun. This kit provided resin parts to replicate a vehicle used by the Egyptians, so they were added to this. The full run of tracks were added as well:
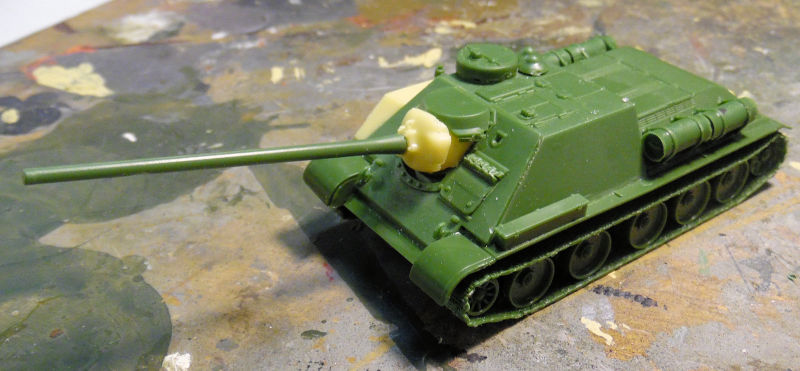
It's amazing; this model is from the same company as the Shermans and yet it goes together so much better than any of their Sherman kits! Anyway, this was got it's tan base coat and later a gloss coat to ready it for decals:

Following this is the Syrian StuG III completed and ready for paint after I added the track runs to this:
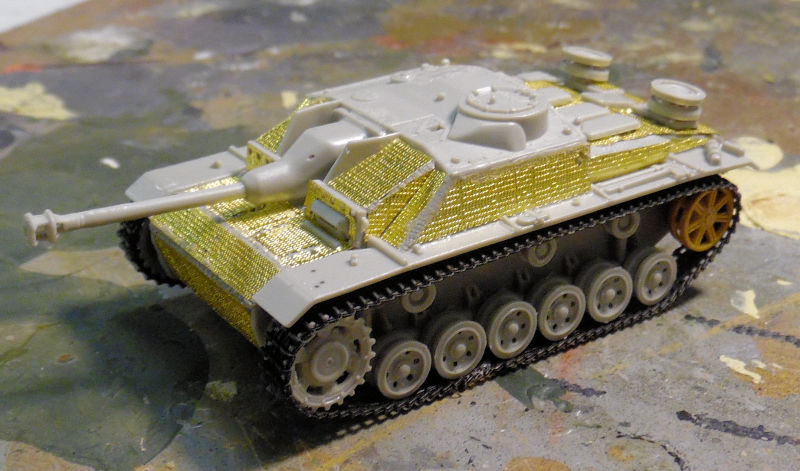
Because of all that photo etch, this was primed with a black primer to hopefully seal all that Zimm so the brass color doesn't shine through and that the base paint holds:
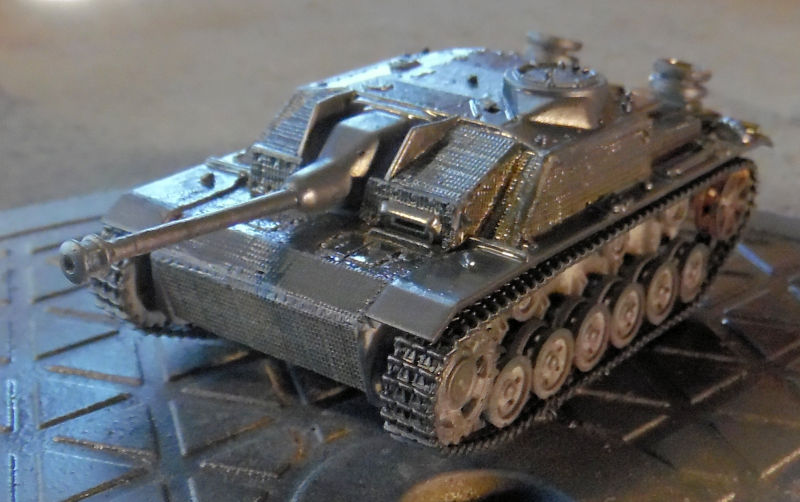
Sinister looking vehicle right? Where's that Haunted Tank?!!
Base paint went on well and looks great so far I think. Then the gloss was applied for the decals:
Now I wish I knew how to build the spacial monut they made for the Italian SAFAT machine gun that they mounted on this. All the pics are too far away, fuzzy or both to get a clear view, and any search attempts to find it went every which way but where I wanted it to go.
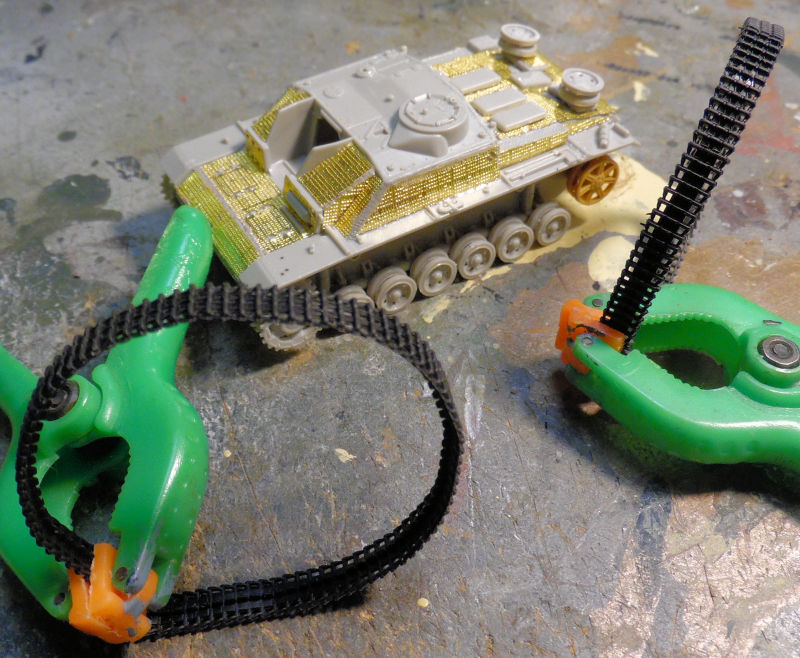
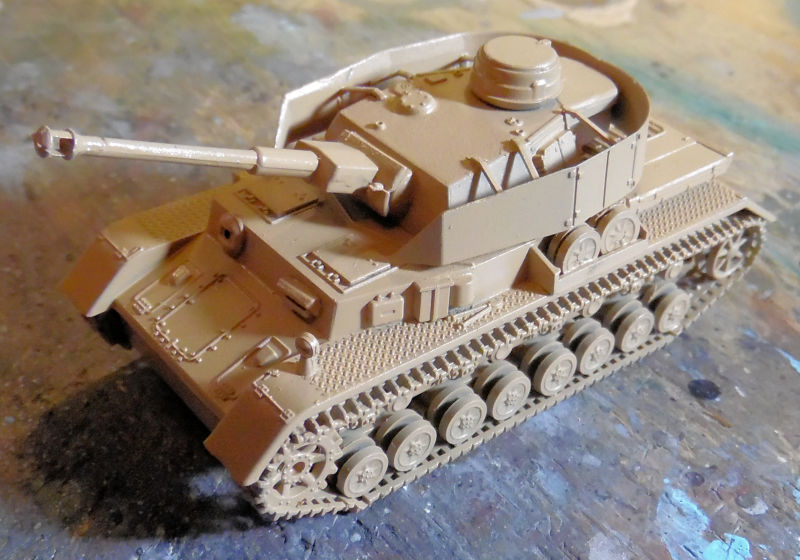
That leads us to the last Syrian tank, the PzIV in the next bay. As you can see, about half of the tracks had been installed while I went looking for the same type to complete these track runs:

I wanted to replace those Godawful vynil tracks that came in this kit. Searching for the same type of track that was already on it resulted in enough to finish these track runs. The turret shurtzen went on as well:
Finally a base of tan was appplied and later the gloss for decals:
Last but not least, the Ratte had been creeping along as Rattes do, I now have four of 16 bogies completed:
And that completes our short tour for today. Thank you all for looking in, comments are welcome!
In our first stop in the Hangar, we have a number of projects moving forward, including another troublesome model like the Concorde, but that is further in. First we have progress on this Israeli S-199. We completed the wing assembly which consisted of ten parts and dry ft that sub-assembly to the fuselage:
Since it fit so well, we added the cockpit from underneath; after adding the instrument panel first, and then cemented everything in place. The canopy was added here too:
Since masking the canopy was so difficult, even on the plane, it was removed and paper towel was used to mask the interior so that the base color could be applied. It was then glossed for decals after the paint had dried:
Finally here in the last bay we have the troublesome B-66 Destroyer. After multiple spraying, sanding, stripping, spraying etc. I finally decided to just move on. The silver coat was good enough so it was polished and decals were applied:
That is it for this short tour of the Hangar, now on to the Shipyards where small progress was done in our workshops building the weapons for the PT-15 MTB. Here is the second of the 20mm guns for this boat; the first had been built before:
We also completed the torpedo tubes (mostly); one part went missing. I intend to build these with one set of tubes closed and the other set of tubes open and ready to fire:
That is all we have here for now. On to the Motor Pool where we've been working on a number of projects that need to be finished.
In this first bay of the Motor Pool, we have the British Achilles tank destroyer. This will be the first one of these I ever built. It's a UM kit so another tough fight here. First the running gear was installed:
The kit included photo etch strips to bend into shape and cemented to the top of these bogies. Naturally, as with all UM kits of Shermans and Sherman variants, these photo etch parts go AWOL no matter how hard I try to keep them from disappearing! So this time I wasn't waiting to find them; I have too many UM Shermans sitting incomplete because I'm waiting to find these parts! I figured I'd try plastic styrene strip. It was more difficult that I expected but I forged ahead, starting with getting a basic bend done and then cementing them to the bogies:
When these were dry, they were bent over and the other ends cemented down. Once they held, I added the upper run of track to push them down:
You can see they look very misshapen, not at all like they were supposed to be. But they are ON, and with enough paint and weathering, they will be darn near impossible to see. Hey it was an experiment that partially succeeded, I don't know if I'll try it again, but the opening there is possible. While that sat and simmered, the turret was completed with all but the ready ammunition:
By then, the tracks were dry enough so I completed the track runs for both sides:
All that is really needed now is the oversized bolts to be added to the turret and upper hull and this is ready for paint:
In the next bay we have the Egyptian Su-100 assault gun. This kit provided resin parts to replicate a vehicle used by the Egyptians, so they were added to this. The full run of tracks were added as well:
It's amazing; this model is from the same company as the Shermans and yet it goes together so much better than any of their Sherman kits! Anyway, this was got it's tan base coat and later a gloss coat to ready it for decals:
Following this is the Syrian StuG III completed and ready for paint after I added the track runs to this:
Because of all that photo etch, this was primed with a black primer to hopefully seal all that Zimm so the brass color doesn't shine through and that the base paint holds:
Sinister looking vehicle right? Where's that Haunted Tank?!!
Base paint went on well and looks great so far I think. Then the gloss was applied for the decals:
Now I wish I knew how to build the spacial monut they made for the Italian SAFAT machine gun that they mounted on this. All the pics are too far away, fuzzy or both to get a clear view, and any search attempts to find it went every which way but where I wanted it to go.
That leads us to the last Syrian tank, the PzIV in the next bay. As you can see, about half of the tracks had been installed while I went looking for the same type to complete these track runs:
I wanted to replace those Godawful vynil tracks that came in this kit. Searching for the same type of track that was already on it resulted in enough to finish these track runs. The turret shurtzen went on as well:
Finally a base of tan was appplied and later the gloss for decals:
Last but not least, the Ratte had been creeping along as Rattes do, I now have four of 16 bogies completed:
And that completes our short tour for today. Thank you all for looking in, comments are welcome!
Duke Maddog
Well-known member
Another couple weeks of work on the Hobby Room and at Hobby Days, and there's loads to show. It's time for another tour so all aboard the trams and remember to keep hands and feet inside at all times.
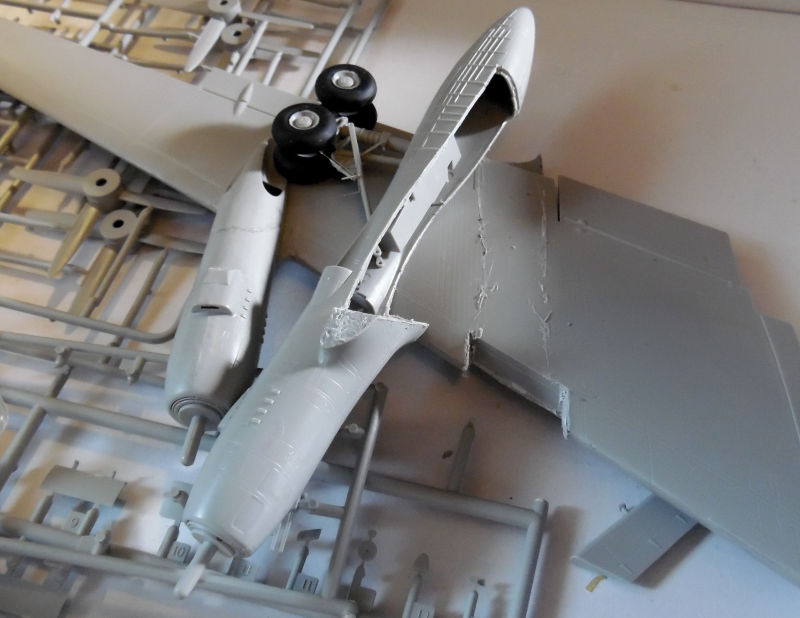
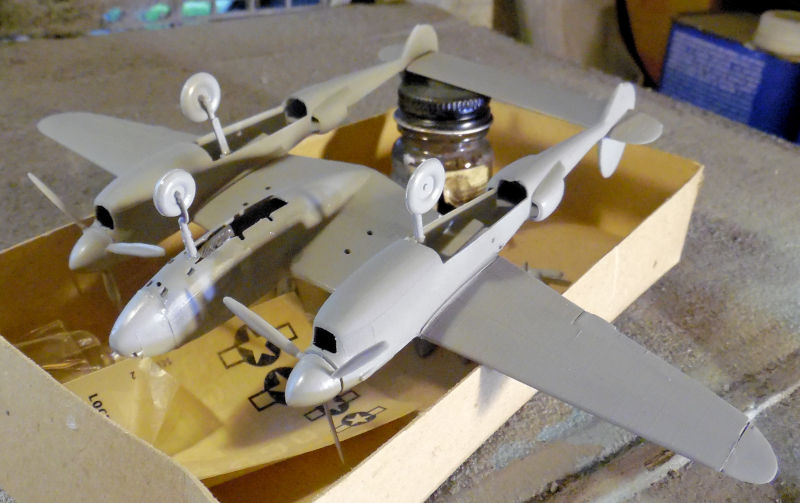
Our first stop again is the Hangar. Our first bay shows the work done on the P-38 gifted to me by a friend and fellow IPMS member. Basic assembly was fast for such an old kit:
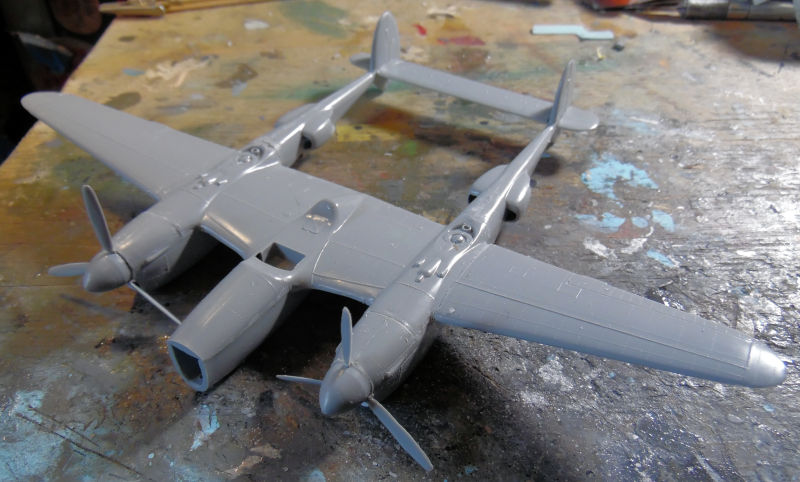
It was found to be a tail sitter so we added weight to the nose, hit it with Gator's Grip Glue and left it to dry:
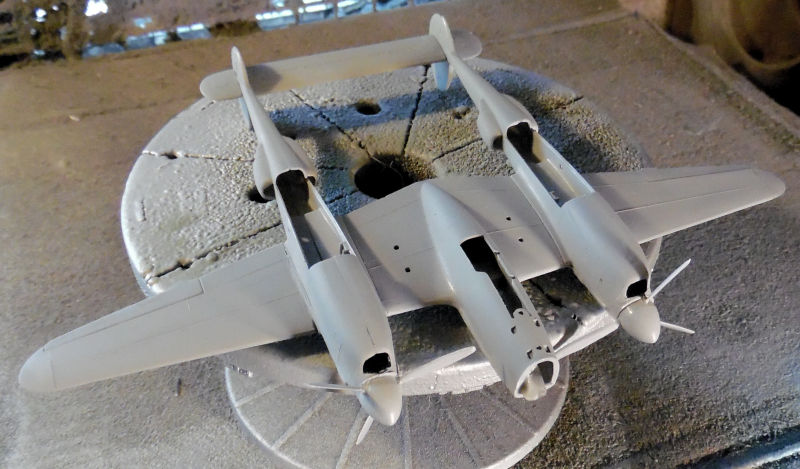
The landing gear was then added and when dry, tested. More weight was needed inside:
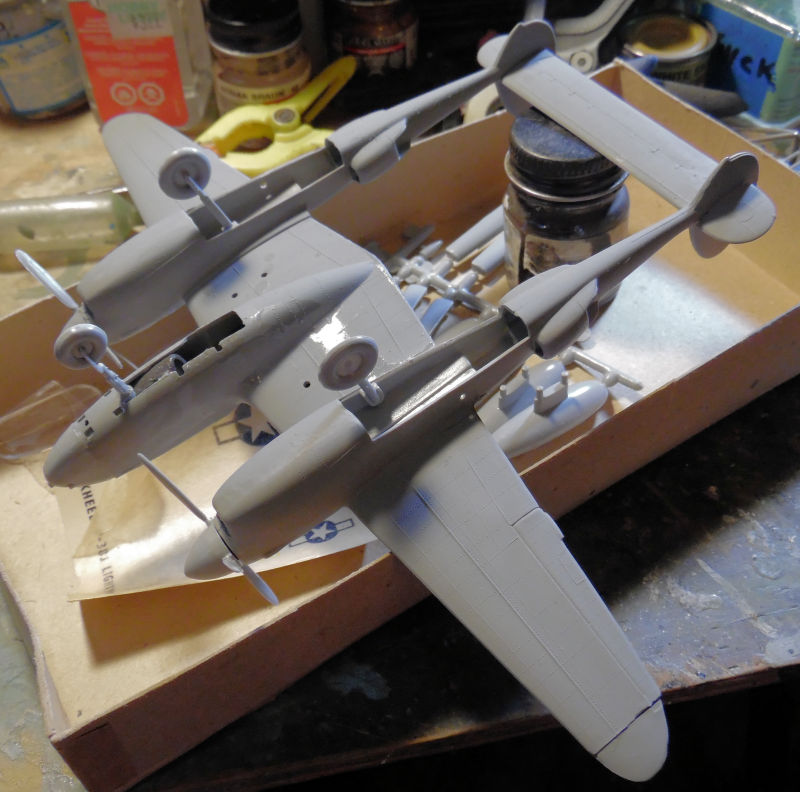
The shiny you see is from the accelerator used to speed the CA glue. After that dried, we shot a neutral grey on the bottom since we were also using that color in the Shipyards:
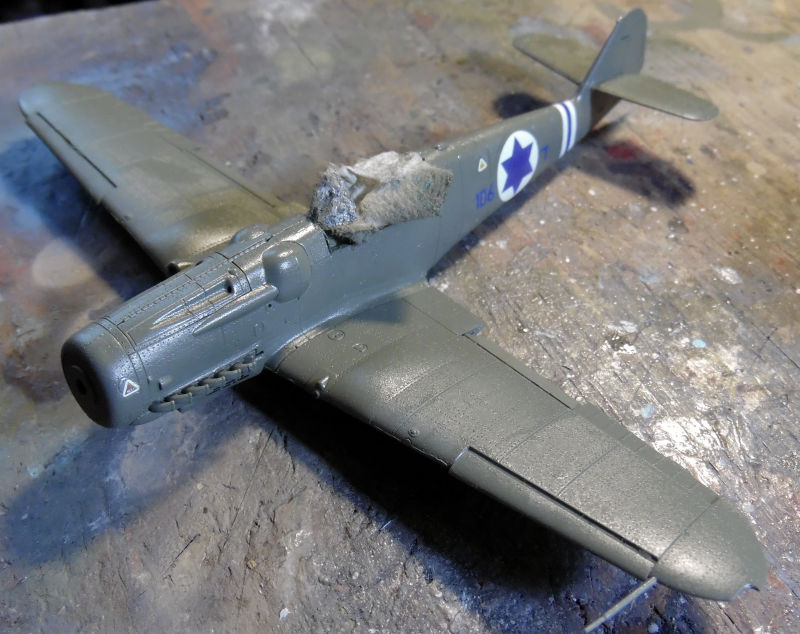
Time to let that cure for a bit and so moving on to the next bay, we have decals applied to the Israeli S-199. I chose the least colorful version because it was the only one of these birds to score two air-to-air kills in the 1956 War:
In the next two bays, we have the two Tu-16 Badgers. All the hatches were installed and the bottom color re-sprayed:
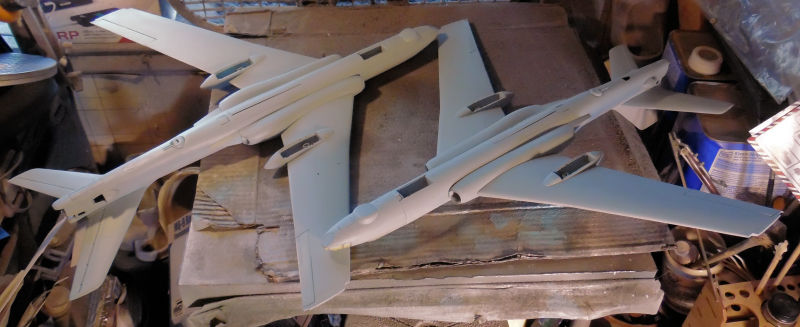
This was later masked off and the base color for the two were sprayed. First the Iraqi Badger:
Followed by the Egyptian Badger:
We went back to the Iraqi Badger and free handed the blotches with the airbrush:

While that was drying, we went back to the Egyptian Badger and started on the more complicated pattern. First, out came the Silly Putty and rolls were laid down to cover the base coat I wanted to remain. The second colkor was then sprayed on:
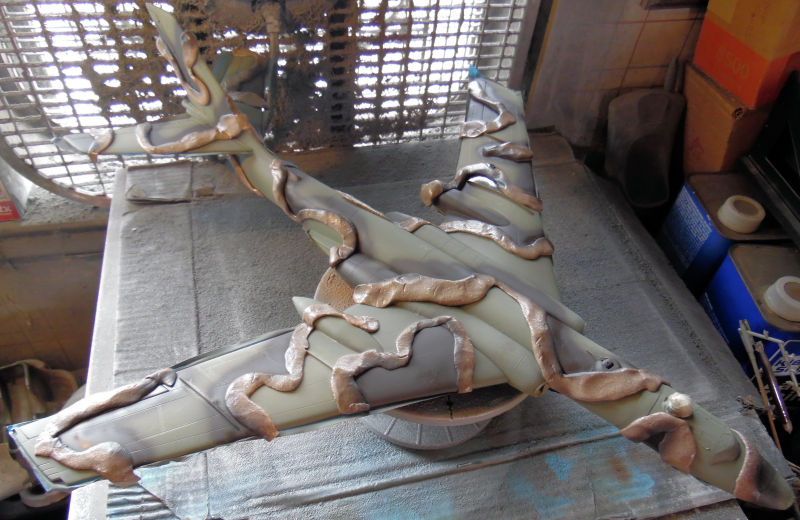
That color was then covered up with the Silly Putty:
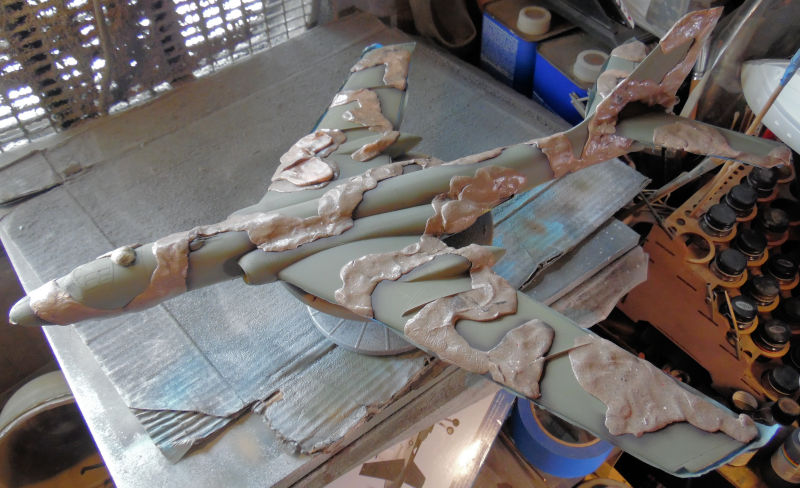
....and the third color was sprayed on:
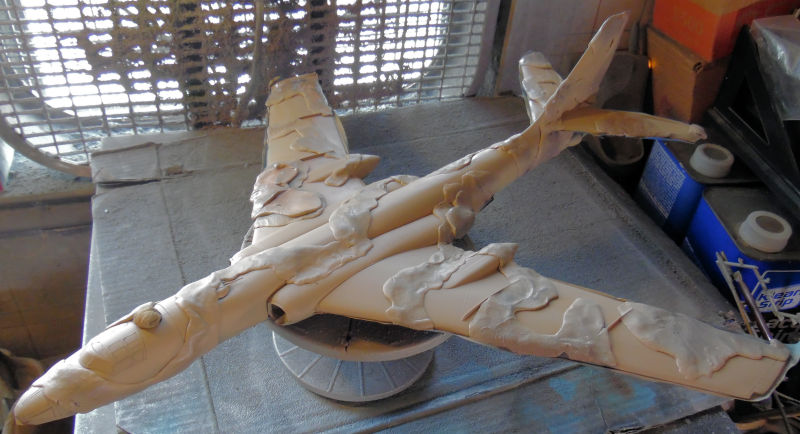
When all that was dry, the Silly Putty was removed and this is the result:
Both these Badger birds are ready for gloss coat and decals now.
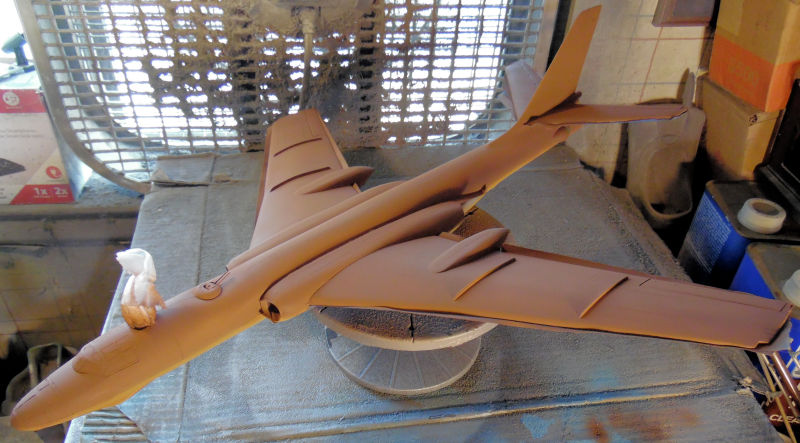
The Bear also got some needed attention in the next bay. The bottom of the wings needed a "burnt iron" color applied to it and then a dark Sea Grey over everything not "burnt". So, we shot a dark metallic color on select areas and then masked them off to spray the sea grey. The lighter greys on the nose radome and select panels was also painted and then masked when dry. Then the Sea Grey was sprayed:
Now that all that is done, additional masking will be done so the final silver/alminum coat can be sprayed. Hopefully that will be soon.
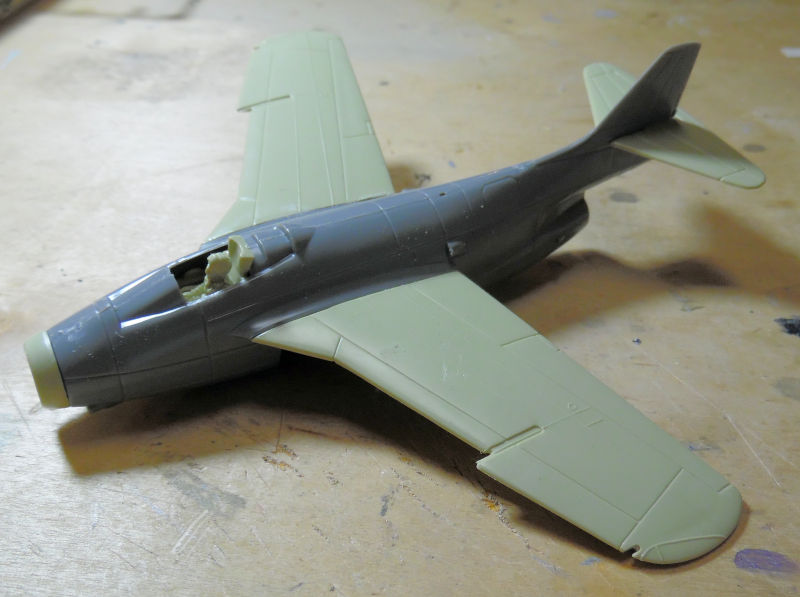
In this next bay is the start of a new aircraft model. It's an old Airfix 1/72 scale F-84F with Greek and Italian markings. This wil be an Italian bird for my Italian Air Force. The cockpit was done, just needs paint:
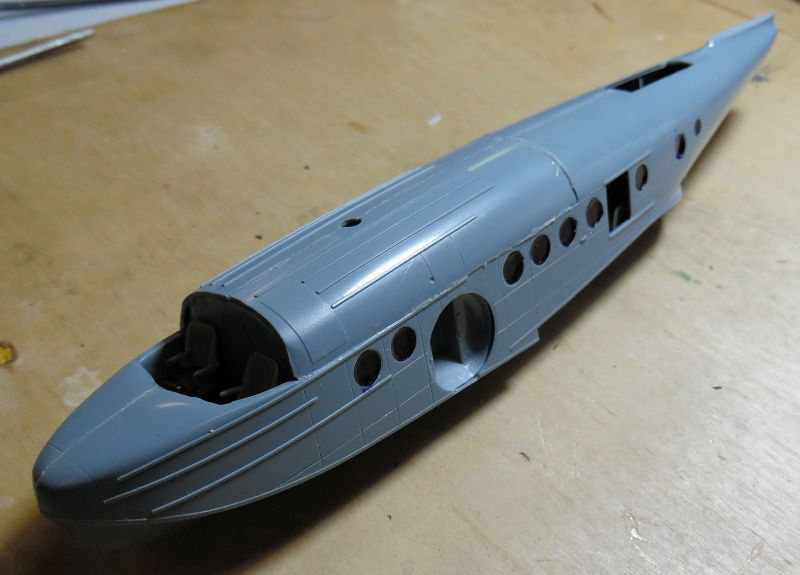
This final bay in the Hangar is another large model that I've been wanting to build for awhile, the Super G Constellation from Trans World Airlines. The cockit, wings and tail were all assembled:
That completes the Hangar portion of our tour, now on to the Shipyards....
Here in the Shipyards, we have a good bit of progress to show. In this first slipway, the Japanese PT-15 got the torpedo tubes installed finally:
While installing them, we realized that the deck was flexing too much and the superstructure/cabins would not stay snapped in place. Some reinforcement was then needed so thick styrene sprue posts were cut to fit and glued into place to allow the deck to be more solid:

Later the two cannons were added, the cabin again is just dry fit:
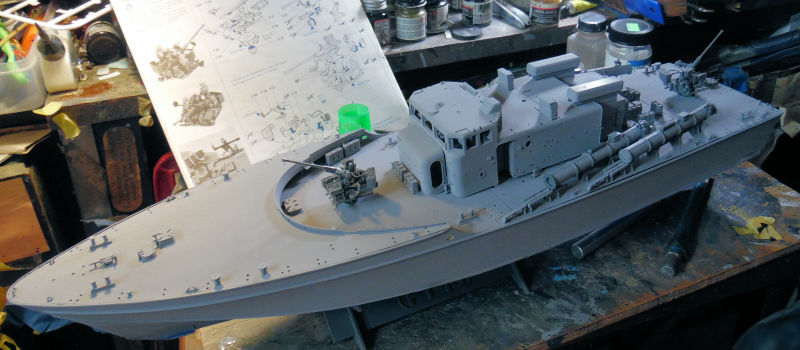
Since a lot of the torpedo tubes and the guns were not painted, more grey paint was shot on this boat:
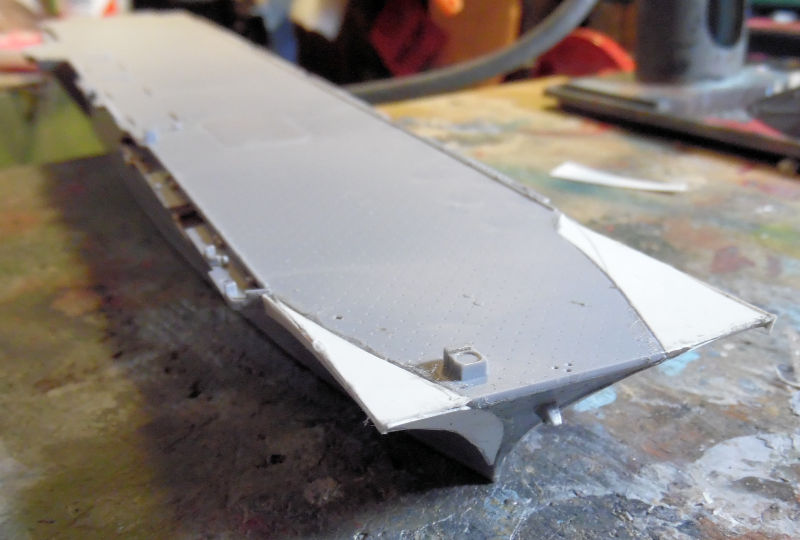
Moving on to the next slipway, the Shangi-La got the first part of the deck painted:
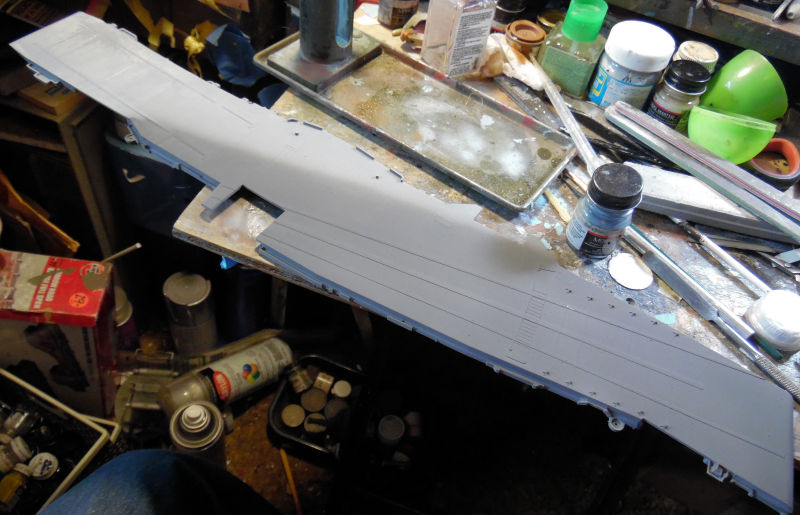
This was then masked off to spray the blue-grey color next:
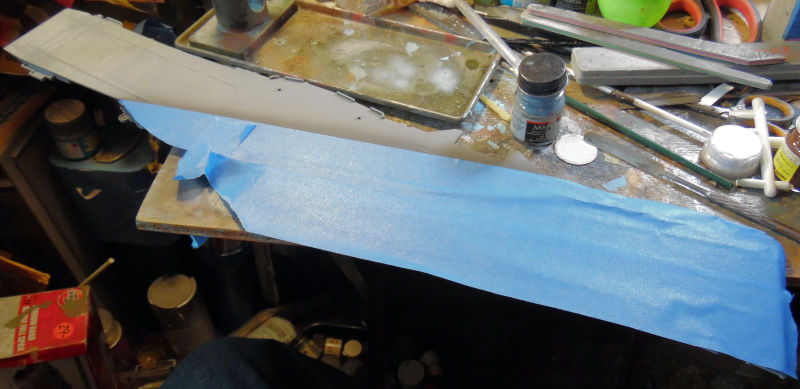
The next color was shot and left to dry:

Finally all masking was removed:
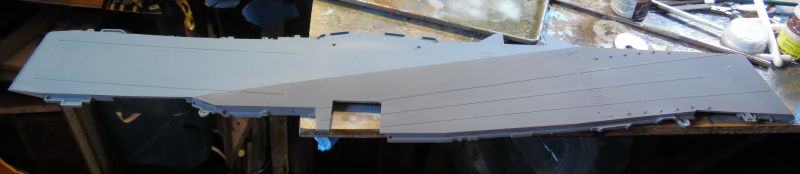
This deck was ready to be installed on the hull. Naturally it took a bit of persuasion:

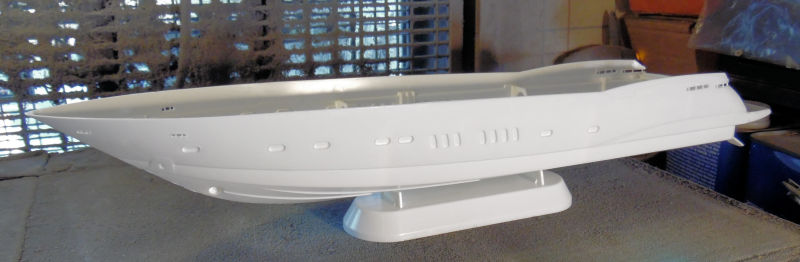
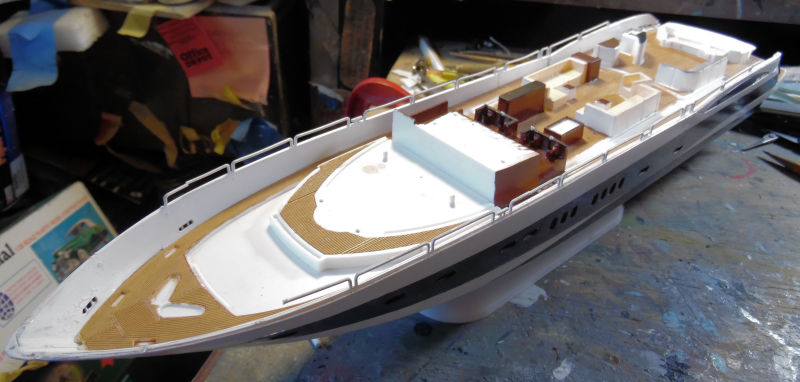
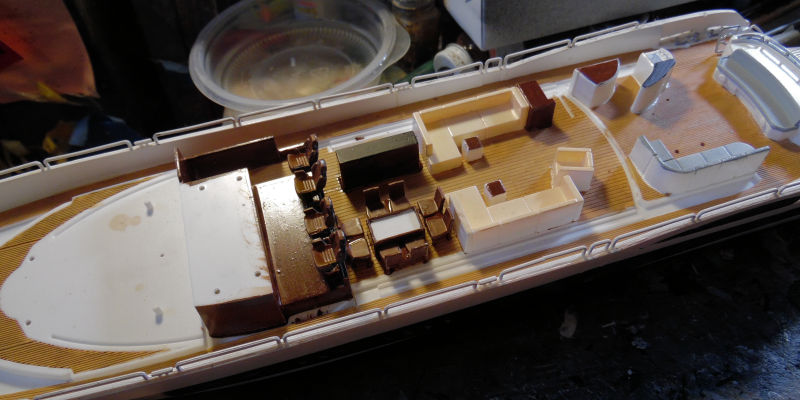
That isn't all! We opened another slipway and laid the keel for this next model. It's the Revell 1/72 scale Sunseeker Predator 108 luxury cabin cruiser:
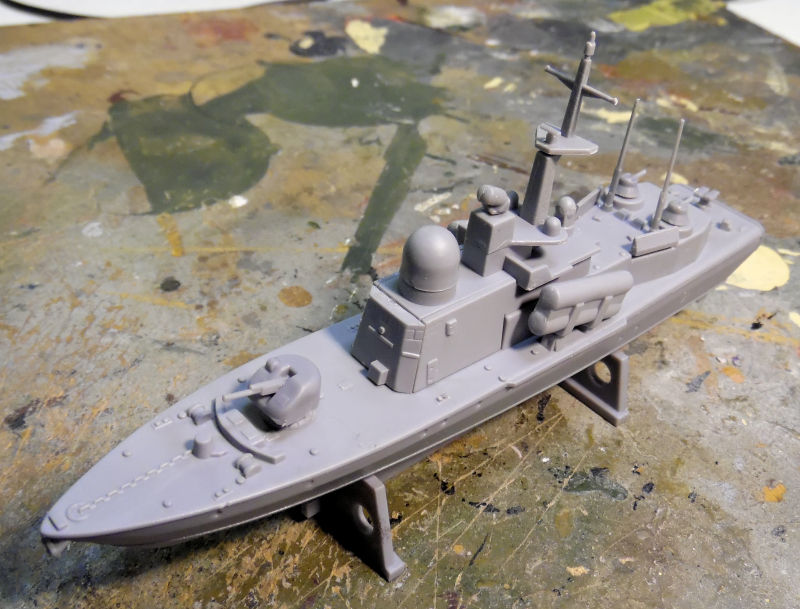
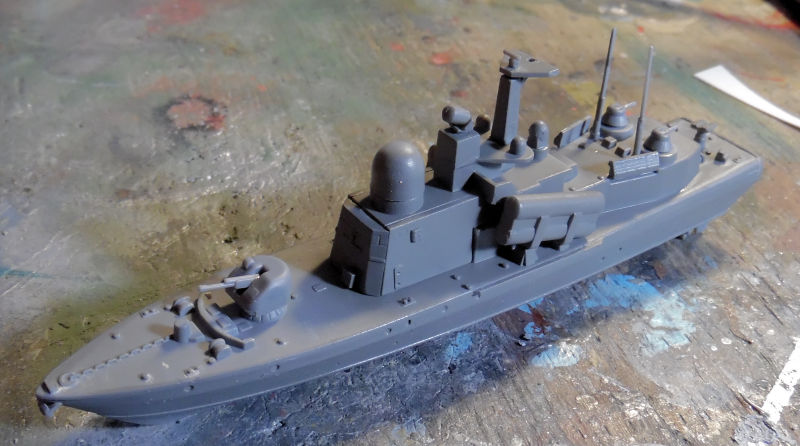
And the final slipway was opened to lay the keel for the Mirage 1/400 scale German Tarantul-class missile boat "Hiddensee":

This was quick and easy to build so it got to the paint stage very fast:
And that completes this section of our Shipyards tour, now on to the Motor Pool....
The Motor Pool tour today has a good bit to show as well. In this first bay, we had to improvise with the British Achilles since the photo-etch set disappeared. With the help of a Dragon Sherman kit, and some strip styrene, we got this vehicle ready for paint:
The next bay shows the Egyptian Su-100 with it's base coat of paint:

Decals were applied next:
Additional detail painting was done after that:
That one is about ready to be finished off.
The next bay we have to see is this one with the Syrian Panzer IV. Decals had gone on this one as well:
This and the Egyptian Su-100 got washes but they didn't show up well in these photos. After the decals and wash had dried, here is my attempt to scratch build a mount for the 12.7mm machine gun:

Later on, I found a 12.7 mm gun in my parts box and on it went:
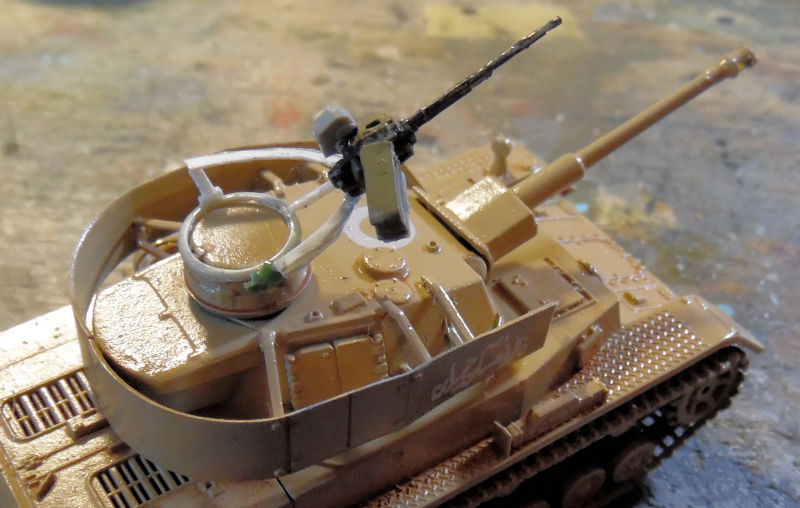
I have to admit that just looks so cool!
In the next bay, decals went on the Syrian StuG III:

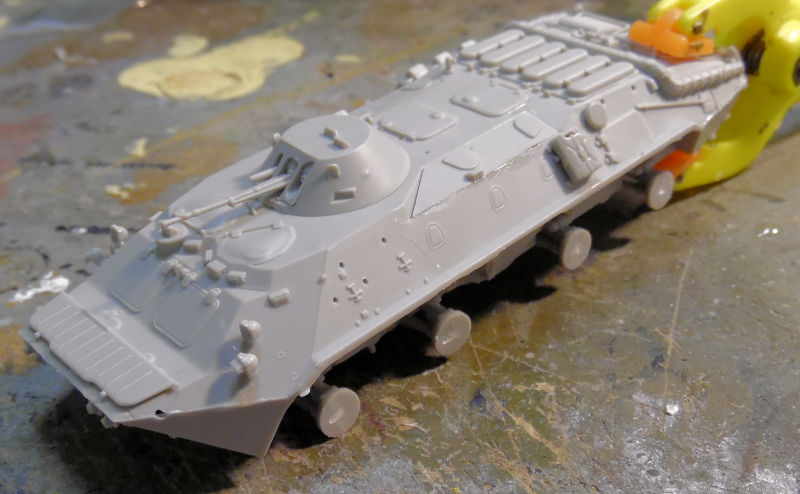
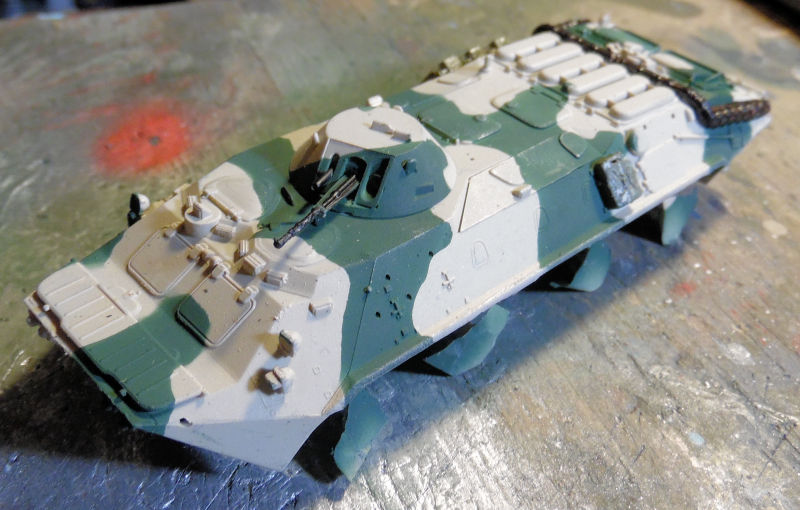
In this next bay, we started this Trumpeter 1/72 scale BTR-70, which will be made into a Syrian BTR. Assembly for this went fast:
That completes our portion of the tour in the Motor Pool.
However, here in our miscellaneous assembly yard out back, we started a 1/24 scale Lindbergh 1910 Model T Ford. I've always wanted one of these and everyone should have a model of the first mass produced car ever:

And that completes the whole tour, thank you all for looking in, comments are welcome.
Our first stop again is the Hangar. Our first bay shows the work done on the P-38 gifted to me by a friend and fellow IPMS member. Basic assembly was fast for such an old kit:
It was found to be a tail sitter so we added weight to the nose, hit it with Gator's Grip Glue and left it to dry:
The landing gear was then added and when dry, tested. More weight was needed inside:
The shiny you see is from the accelerator used to speed the CA glue. After that dried, we shot a neutral grey on the bottom since we were also using that color in the Shipyards:
Time to let that cure for a bit and so moving on to the next bay, we have decals applied to the Israeli S-199. I chose the least colorful version because it was the only one of these birds to score two air-to-air kills in the 1956 War:
In the next two bays, we have the two Tu-16 Badgers. All the hatches were installed and the bottom color re-sprayed:
This was later masked off and the base color for the two were sprayed. First the Iraqi Badger:
Followed by the Egyptian Badger:
We went back to the Iraqi Badger and free handed the blotches with the airbrush:
While that was drying, we went back to the Egyptian Badger and started on the more complicated pattern. First, out came the Silly Putty and rolls were laid down to cover the base coat I wanted to remain. The second colkor was then sprayed on:
That color was then covered up with the Silly Putty:
....and the third color was sprayed on:
When all that was dry, the Silly Putty was removed and this is the result:
Both these Badger birds are ready for gloss coat and decals now.
The Bear also got some needed attention in the next bay. The bottom of the wings needed a "burnt iron" color applied to it and then a dark Sea Grey over everything not "burnt". So, we shot a dark metallic color on select areas and then masked them off to spray the sea grey. The lighter greys on the nose radome and select panels was also painted and then masked when dry. Then the Sea Grey was sprayed:
Now that all that is done, additional masking will be done so the final silver/alminum coat can be sprayed. Hopefully that will be soon.
In this next bay is the start of a new aircraft model. It's an old Airfix 1/72 scale F-84F with Greek and Italian markings. This wil be an Italian bird for my Italian Air Force. The cockpit was done, just needs paint:
This final bay in the Hangar is another large model that I've been wanting to build for awhile, the Super G Constellation from Trans World Airlines. The cockit, wings and tail were all assembled:
That completes the Hangar portion of our tour, now on to the Shipyards....
Here in the Shipyards, we have a good bit of progress to show. In this first slipway, the Japanese PT-15 got the torpedo tubes installed finally:
While installing them, we realized that the deck was flexing too much and the superstructure/cabins would not stay snapped in place. Some reinforcement was then needed so thick styrene sprue posts were cut to fit and glued into place to allow the deck to be more solid:
Later the two cannons were added, the cabin again is just dry fit:
Since a lot of the torpedo tubes and the guns were not painted, more grey paint was shot on this boat:
Moving on to the next slipway, the Shangi-La got the first part of the deck painted:
This was then masked off to spray the blue-grey color next:
The next color was shot and left to dry:
Finally all masking was removed:
This deck was ready to be installed on the hull. Naturally it took a bit of persuasion:
That isn't all! We opened another slipway and laid the keel for this next model. It's the Revell 1/72 scale Sunseeker Predator 108 luxury cabin cruiser:
And the final slipway was opened to lay the keel for the Mirage 1/400 scale German Tarantul-class missile boat "Hiddensee":
This was quick and easy to build so it got to the paint stage very fast:
And that completes this section of our Shipyards tour, now on to the Motor Pool....
The Motor Pool tour today has a good bit to show as well. In this first bay, we had to improvise with the British Achilles since the photo-etch set disappeared. With the help of a Dragon Sherman kit, and some strip styrene, we got this vehicle ready for paint:
The next bay shows the Egyptian Su-100 with it's base coat of paint:
Decals were applied next:
Additional detail painting was done after that:
That one is about ready to be finished off.
The next bay we have to see is this one with the Syrian Panzer IV. Decals had gone on this one as well:
This and the Egyptian Su-100 got washes but they didn't show up well in these photos. After the decals and wash had dried, here is my attempt to scratch build a mount for the 12.7mm machine gun:
Later on, I found a 12.7 mm gun in my parts box and on it went:
I have to admit that just looks so cool!
In the next bay, decals went on the Syrian StuG III:
In this next bay, we started this Trumpeter 1/72 scale BTR-70, which will be made into a Syrian BTR. Assembly for this went fast:
That completes our portion of the tour in the Motor Pool.
However, here in our miscellaneous assembly yard out back, we started a 1/24 scale Lindbergh 1910 Model T Ford. I've always wanted one of these and everyone should have a model of the first mass produced car ever:
And that completes the whole tour, thank you all for looking in, comments are welcome.
I made my T bucket into a pickup truck of course. 
Duke Maddog
Well-known member
That is a good idea. Maybe if I get another one of these kits, I'll try that too. Can't beat a great pickup!
Duke Maddog
Well-known member
Wow, it's been almost a whole month since the last tour. It's time to bring out the trams and start loading up for the next tour. Quite a bit of work had been done so this might have to be broken up into two posts. So, all aboard fro the first part of this tour starting in the Hangar....
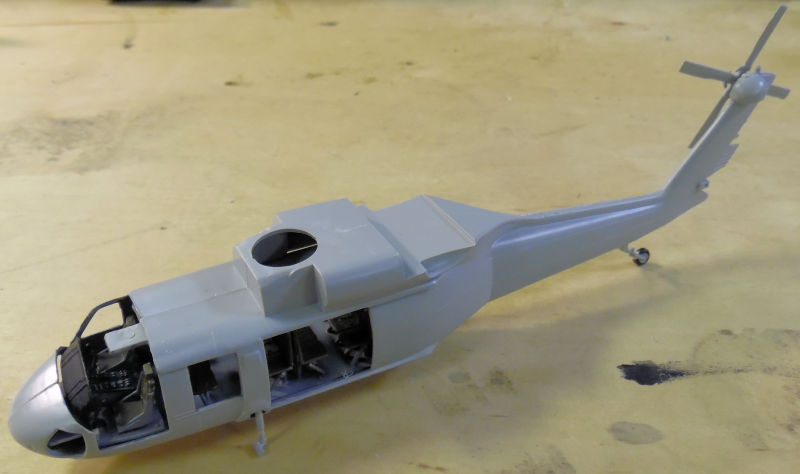
Here in this first bay we have the start of one of a few new projects. This is the cockpit for the Italeri 1/72 scale Australian UH-60 Blackhawk helicopter:
Later the rest of the cabin interior was added:
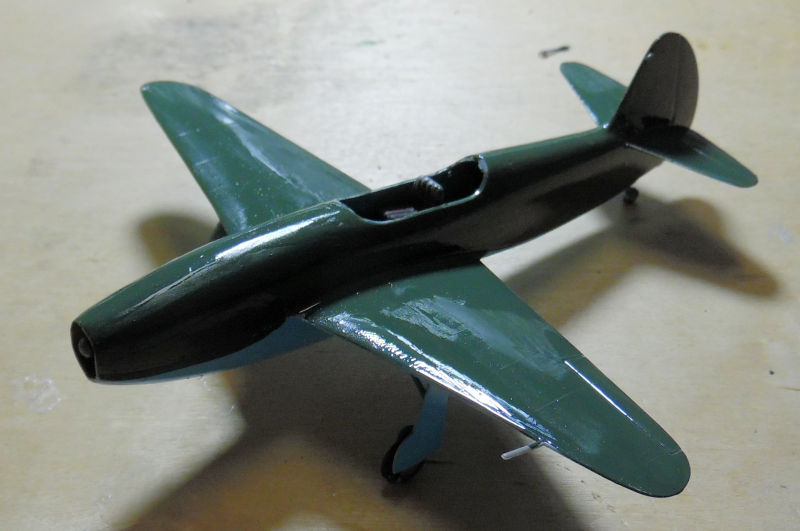
In the next bay over, another stated project that went so fast, it was already assembled till now! That is part of the reason I wanted this started; in trying to get rid of extra boxes, I'm looking for the fastest models to finish. This one fit the bill well. There were some gaps and seams that needed to be addressed so Tamiya putty was applied to this 172 scale Matchbox Yak 15:
These were sanded and smoothed out, and this is just about ready for paint:
'
The next bay has another of the larger aircraft I've been wanting to build. This is the ancient Italeri kit of the 1/72 scale B-58 Hustler. Cockpit and interior were built first:
While that was drying, we assembled the wings and engines:
When they had dried sufficiently, the engines were added to the wings:
In this next bay, we got the tail sections of the Constellation painted up:
That was all on that. More needs to be done on other things before we can move further on this model. Moving to the bay we have the Israeli S-199 that we lost a sprue for. So, out came a spare landing gear set from another Me-109 to be installed instead:
Later the sprue was found, but the landing gear had already dried and been painted. They were not replaced. However, this version of the S-199 did have the underwing cannons, so we were able to install those from the found sprue:
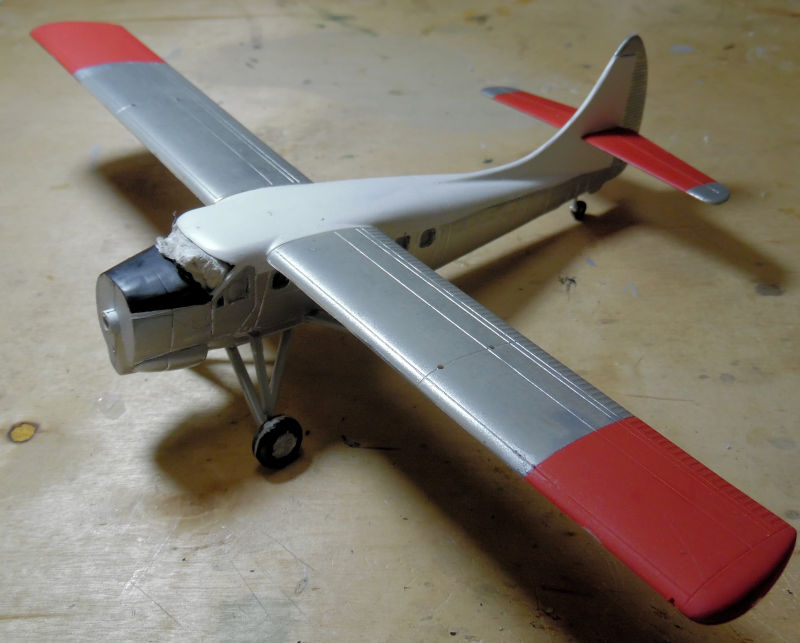
In this next bay we have the Canadian Otter getting the red paint on the wings and tail surfaces:
The white on the fuselage was masked off and the silver was sprayed on:
After all that dried, the two fuselage halves got the interior and windows added inside and then were cemented together:
That's all for that one now. In this last bay, we sprayed the final silver coat on the Bear:
Later all the masking came off and some serious touch up was needed:
Once everything was completely dried, we added the decals:
Finally the last things that needed to be done besides the fiddly end pieces were the propellers. After some time, we got them all painted and assembled:
That completes our tour of the Hangar, now on to the Shipyards......
Here in the Shipyards, in this first slipway, we went back to an old shelf queen and shot a coat of grey over this landing craft:
While that was drying, we moved on to the next slipway to lay the keel for this British Hunt-class destroyer from Mirage in 1/700 scale:
This one assembled quite quickly, but now we have to deal with all this photo-etch that comes with it:
That can wait. We move on to the next slipway to see the German Tarantul class missile boat is now ready for paint:
In this next slipway, we have a kit that was given to me almost fully assembled of the newest Japanese helicopter carrying cruiser the Kaga. I recently read that she had been modified with a new bow to accommodate the F-35s they are getting from the US. So, based on photos I saw, I decided to try and add those mods to this one to see if I can make it as it appears today. So, into drydock it was towed and the following was done so far on the bow:
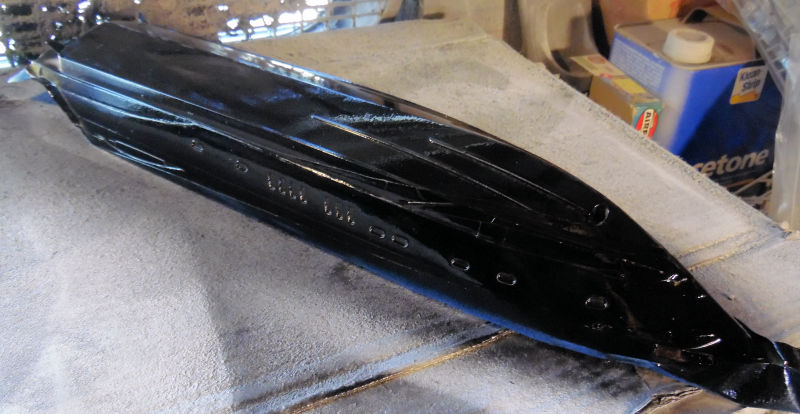
The sides still need to be done, but the basic shape is there. Now while I figure out how to finish that mod, we can move on to the next slipway here to see the Sunseeker Predator 108 masked off to get the next black color on the sides of the hull:
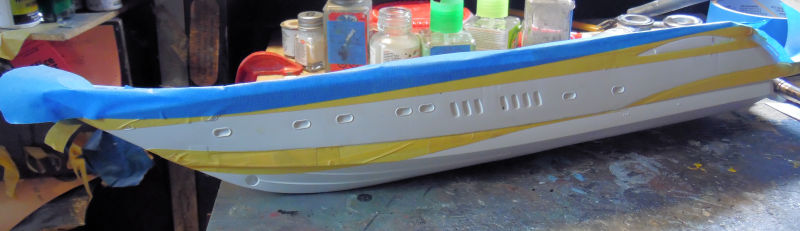
That was tough and confusing, but I think we got it right. I hope so because the black was then shot over it:
More to come on that soon... I hope.
In this slipway, the USS Enterprise got masked off and the lower hull shot with red:
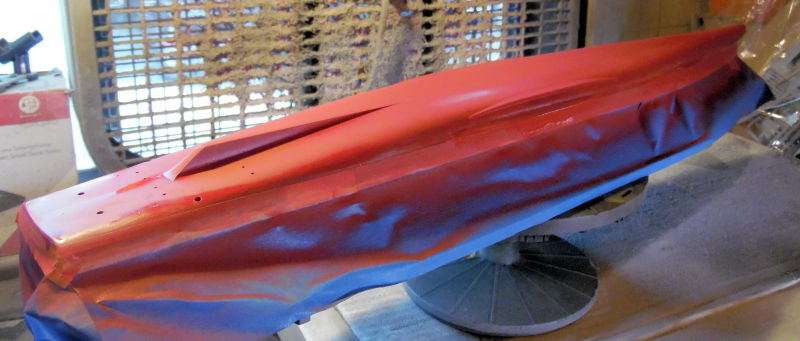
Once that dried, the masking came off and this was ready to move on. Now to find the island that got lost so I can finish this:
In this last slipway, the USS Shangri-La got the lower hull masked and sprayed as well:

Because of the big hole, there was a lot of extra overspray that got in under the tape, so when this dried, we taped up the lower hull and re-shot the upper hull:
While that dried, the island for the Shangri-La was assembled.....
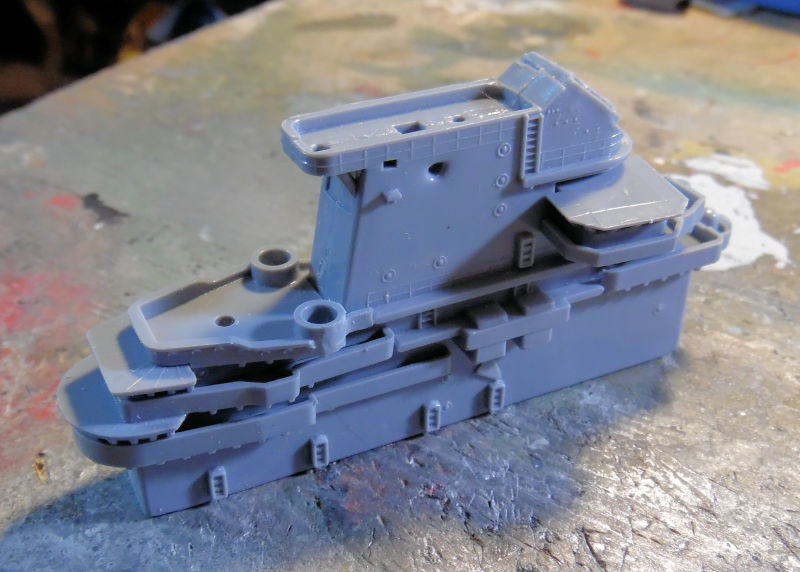
.... then painted and finished off:
That's all we got done on this. More to come soon....
Now to continue our tour of the Motor Pool in the next post.
Here in this first bay we have the start of one of a few new projects. This is the cockpit for the Italeri 1/72 scale Australian UH-60 Blackhawk helicopter:
Later the rest of the cabin interior was added:
In the next bay over, another stated project that went so fast, it was already assembled till now! That is part of the reason I wanted this started; in trying to get rid of extra boxes, I'm looking for the fastest models to finish. This one fit the bill well. There were some gaps and seams that needed to be addressed so Tamiya putty was applied to this 172 scale Matchbox Yak 15:
These were sanded and smoothed out, and this is just about ready for paint:
'
The next bay has another of the larger aircraft I've been wanting to build. This is the ancient Italeri kit of the 1/72 scale B-58 Hustler. Cockpit and interior were built first:
While that was drying, we assembled the wings and engines:
When they had dried sufficiently, the engines were added to the wings:
In this next bay, we got the tail sections of the Constellation painted up:
That was all on that. More needs to be done on other things before we can move further on this model. Moving to the bay we have the Israeli S-199 that we lost a sprue for. So, out came a spare landing gear set from another Me-109 to be installed instead:
Later the sprue was found, but the landing gear had already dried and been painted. They were not replaced. However, this version of the S-199 did have the underwing cannons, so we were able to install those from the found sprue:
In this next bay we have the Canadian Otter getting the red paint on the wings and tail surfaces:
The white on the fuselage was masked off and the silver was sprayed on:
After all that dried, the two fuselage halves got the interior and windows added inside and then were cemented together:
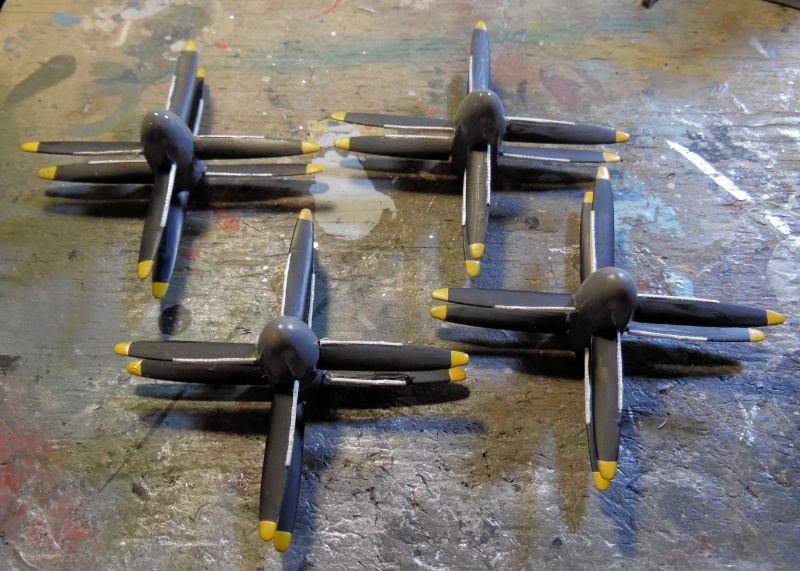
That's all for that one now. In this last bay, we sprayed the final silver coat on the Bear:
Later all the masking came off and some serious touch up was needed:
Once everything was completely dried, we added the decals:
Finally the last things that needed to be done besides the fiddly end pieces were the propellers. After some time, we got them all painted and assembled:
That completes our tour of the Hangar, now on to the Shipyards......
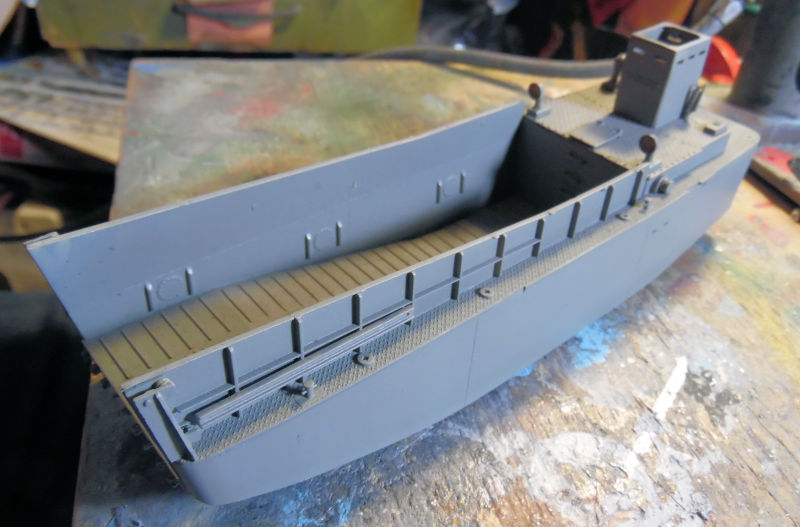
Here in the Shipyards, in this first slipway, we went back to an old shelf queen and shot a coat of grey over this landing craft:
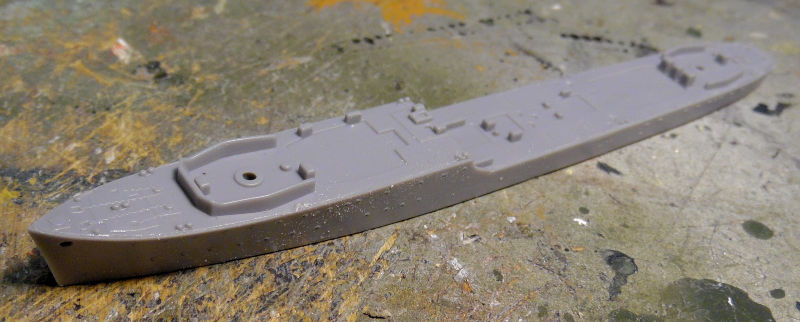
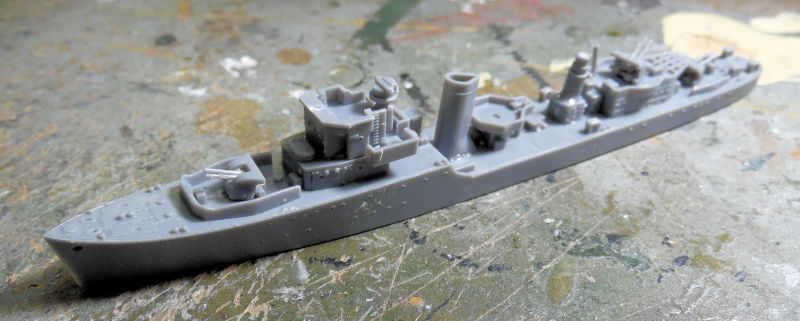
While that was drying, we moved on to the next slipway to lay the keel for this British Hunt-class destroyer from Mirage in 1/700 scale:
This one assembled quite quickly, but now we have to deal with all this photo-etch that comes with it:
That can wait. We move on to the next slipway to see the German Tarantul class missile boat is now ready for paint:
In this next slipway, we have a kit that was given to me almost fully assembled of the newest Japanese helicopter carrying cruiser the Kaga. I recently read that she had been modified with a new bow to accommodate the F-35s they are getting from the US. So, based on photos I saw, I decided to try and add those mods to this one to see if I can make it as it appears today. So, into drydock it was towed and the following was done so far on the bow:
The sides still need to be done, but the basic shape is there. Now while I figure out how to finish that mod, we can move on to the next slipway here to see the Sunseeker Predator 108 masked off to get the next black color on the sides of the hull:
That was tough and confusing, but I think we got it right. I hope so because the black was then shot over it:
More to come on that soon... I hope.
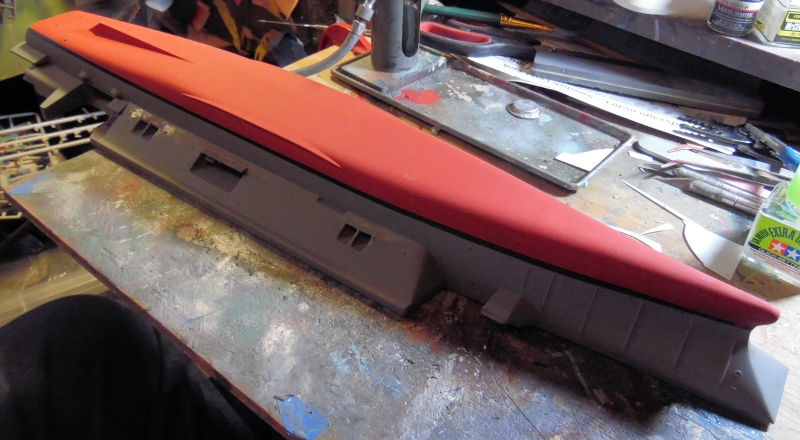
In this slipway, the USS Enterprise got masked off and the lower hull shot with red:
Once that dried, the masking came off and this was ready to move on. Now to find the island that got lost so I can finish this:
In this last slipway, the USS Shangri-La got the lower hull masked and sprayed as well:
Because of the big hole, there was a lot of extra overspray that got in under the tape, so when this dried, we taped up the lower hull and re-shot the upper hull:
While that dried, the island for the Shangri-La was assembled.....
.... then painted and finished off:
That's all we got done on this. More to come soon....
Now to continue our tour of the Motor Pool in the next post.
Duke Maddog
Well-known member
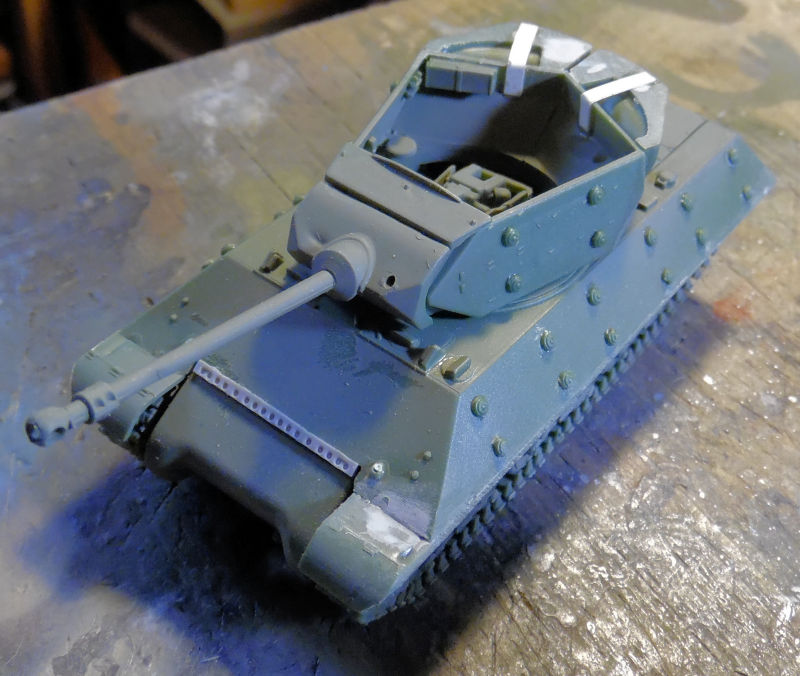
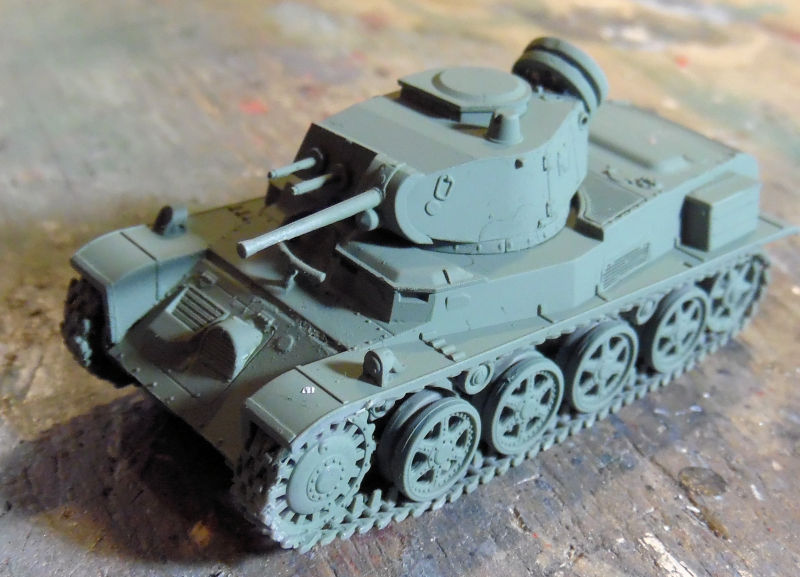
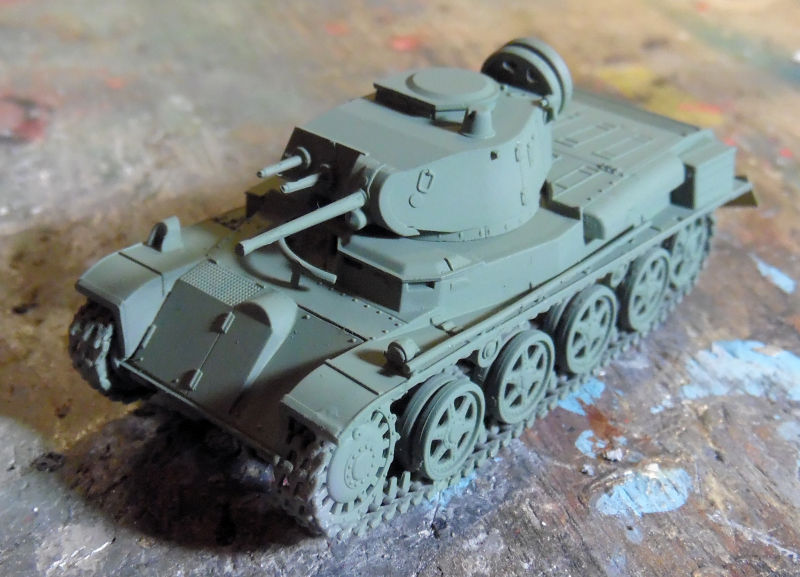
Now here in the Motor Pool, we have a good amount of work that got done. We'll start in this first bay where we got four Swedish Light tanks under construction. One of the things that slowed me down on this was the tracks; I wasn't eager to tackle these tiny things but once I got started, I found they were not so bad at all! In fact they were quite fun to do:
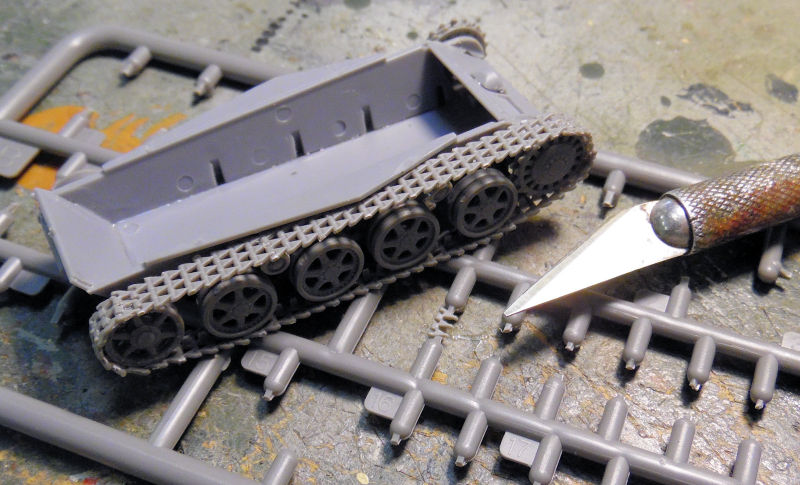
The Exacto blade is there for size reference. Remember I had to do that both sides four times!
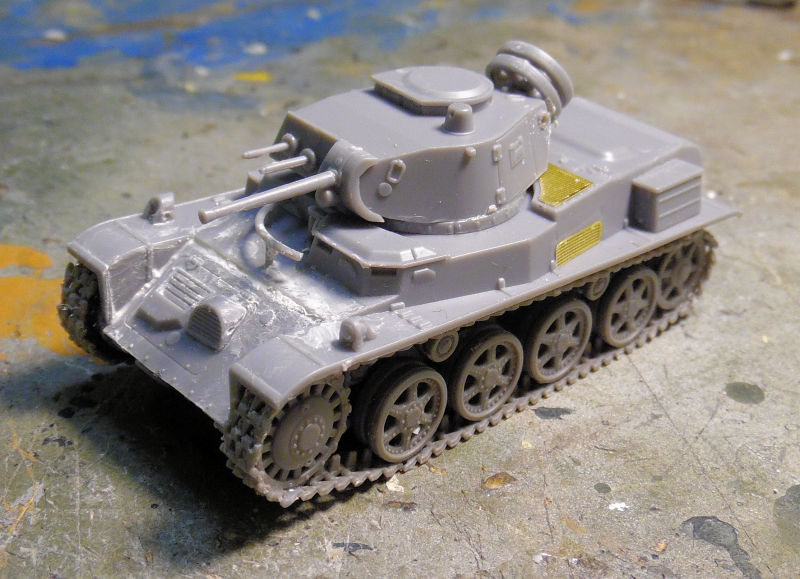
Finally, all got assembled, yet this tank needed some extra filler since the hull front did not close up:
I didn't show all the tanks with their tracks, but here they are in this sequence of painting pics. I tried to keep them in order of M-38 to M-40L but they might be out of sequence...
Base coat of green went on first:
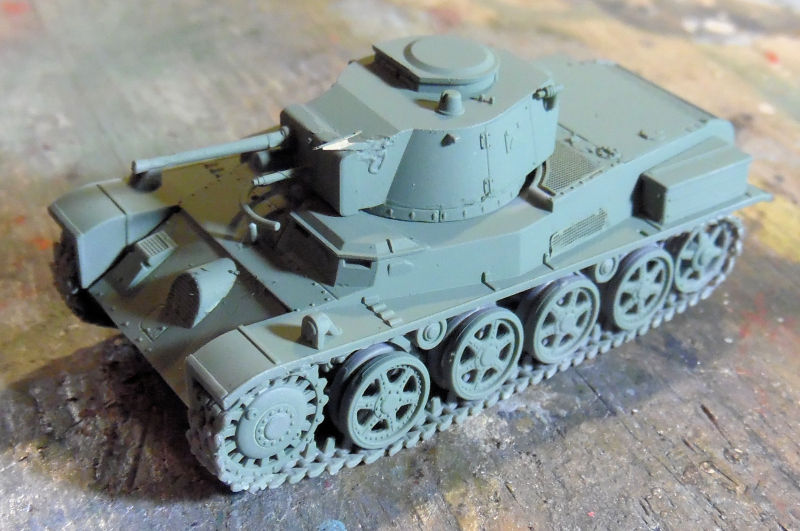
These were then camouflaged next:
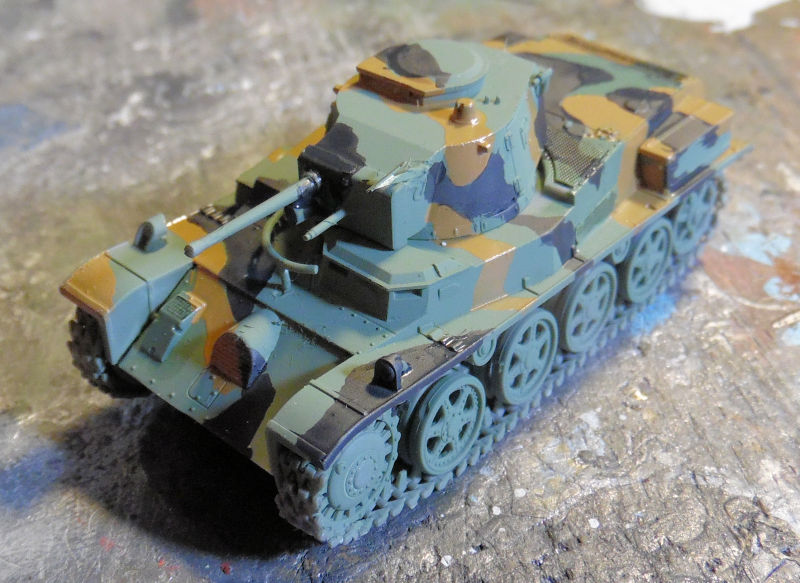
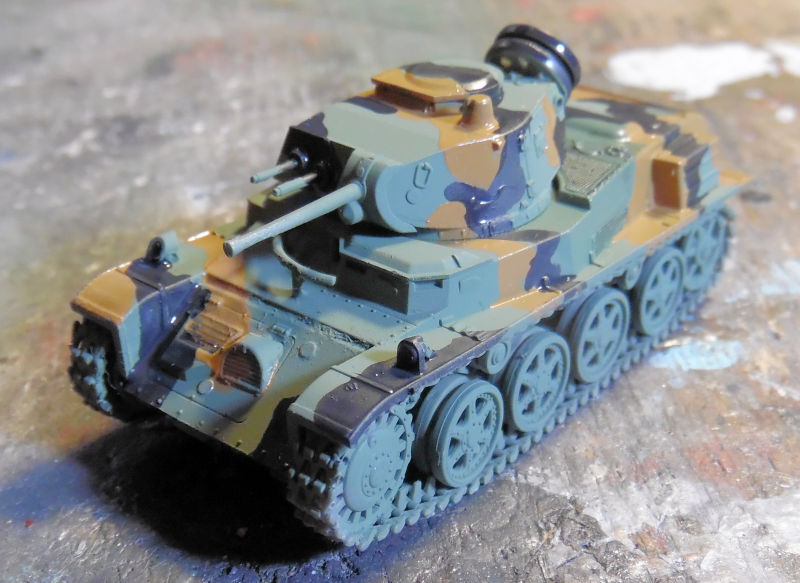
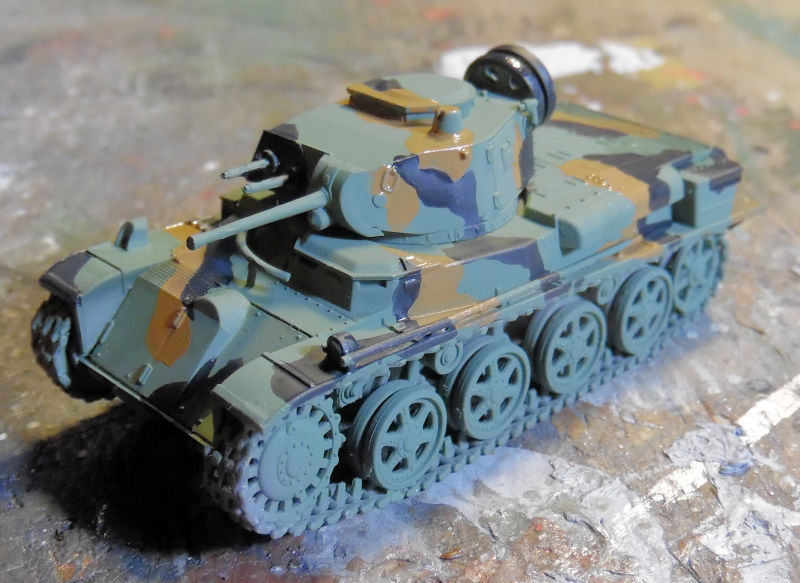
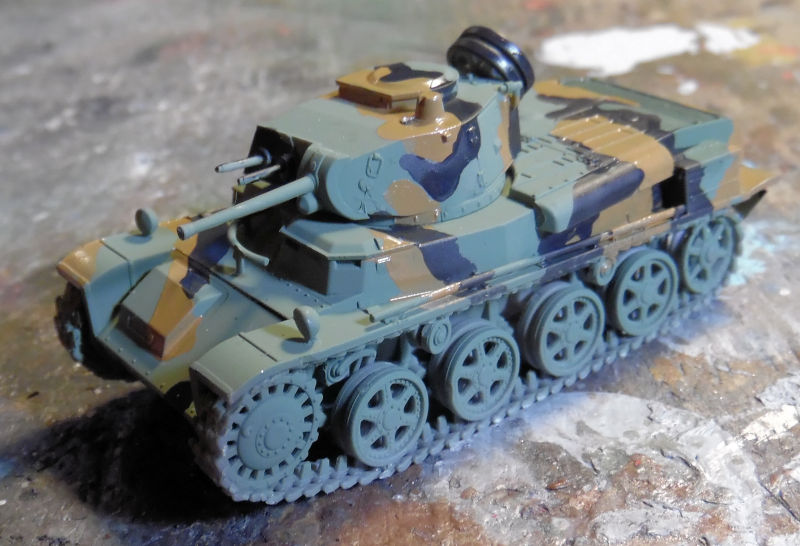
Then the decals went on:
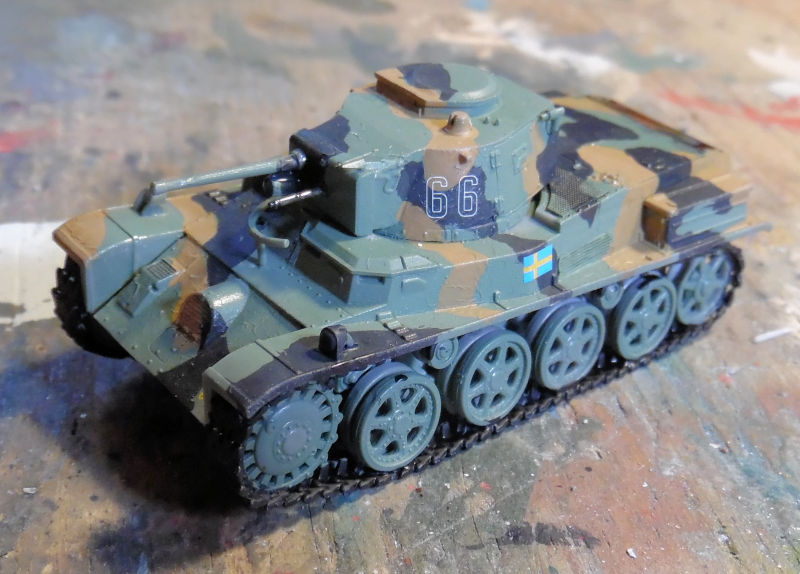
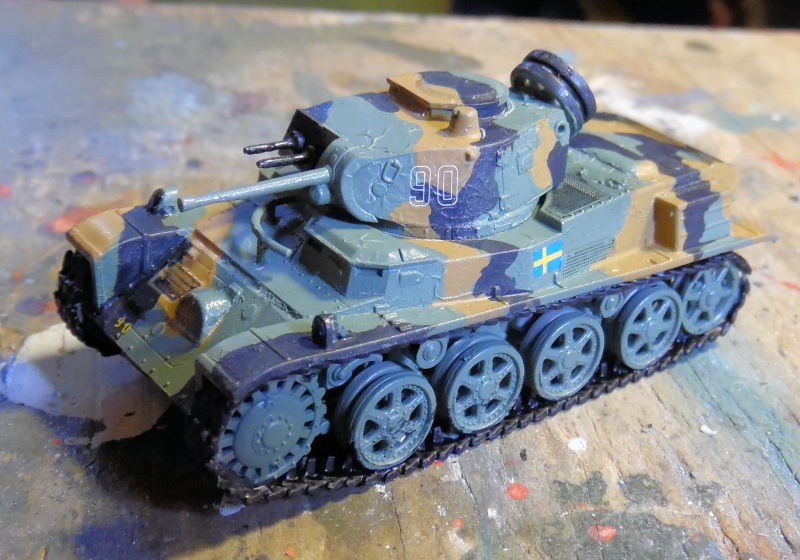
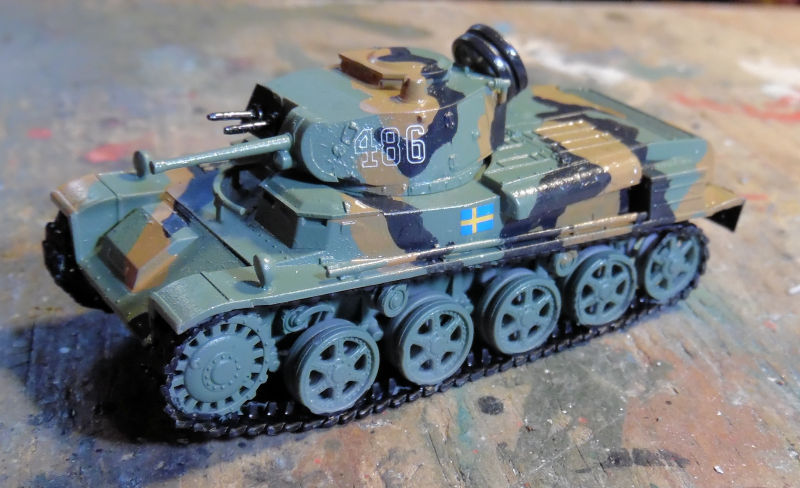
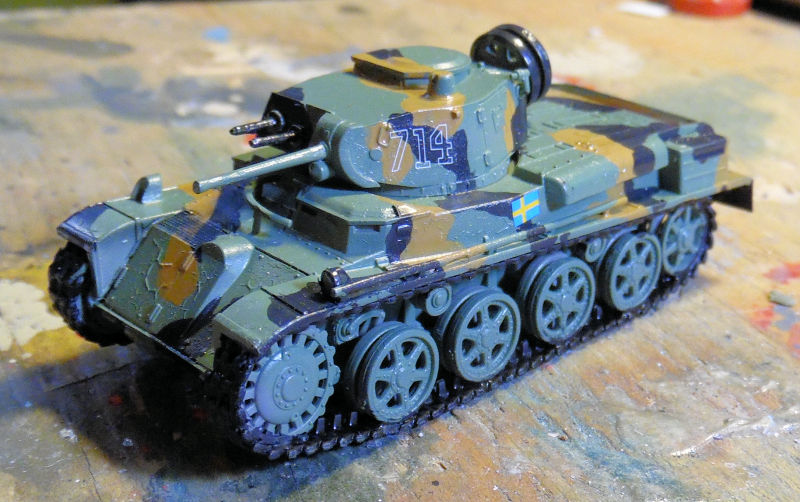
And that's how it's done assembly line style!
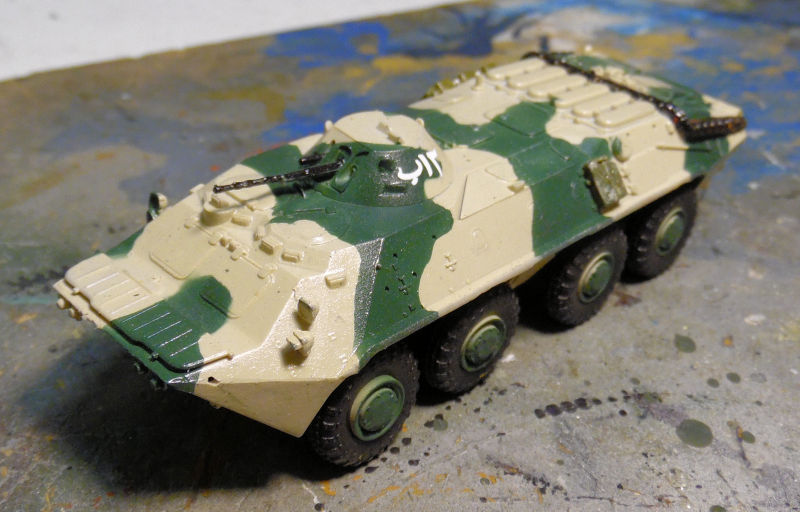
Moving on into this next bay we have the BTR-70 Late that I didn't know what army to build it for. Then I looked it up and decided to make it Syrian. So, base coat of sand color went on first:

Then the Silly Putty was applied to mask the sand color:
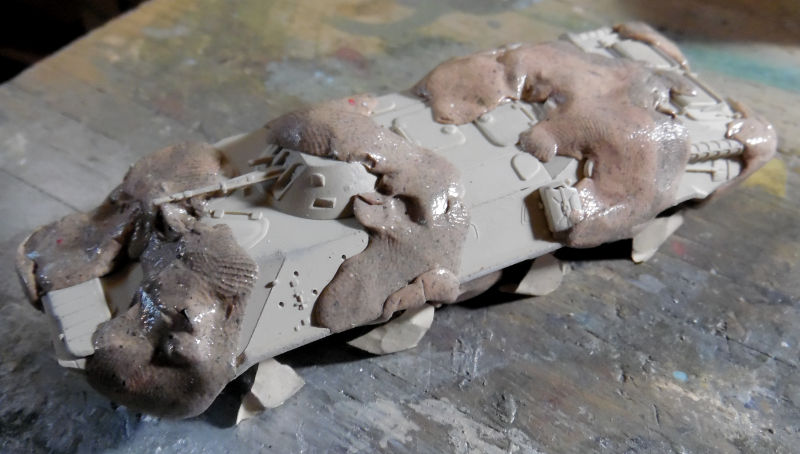
Next we shot the green on this:
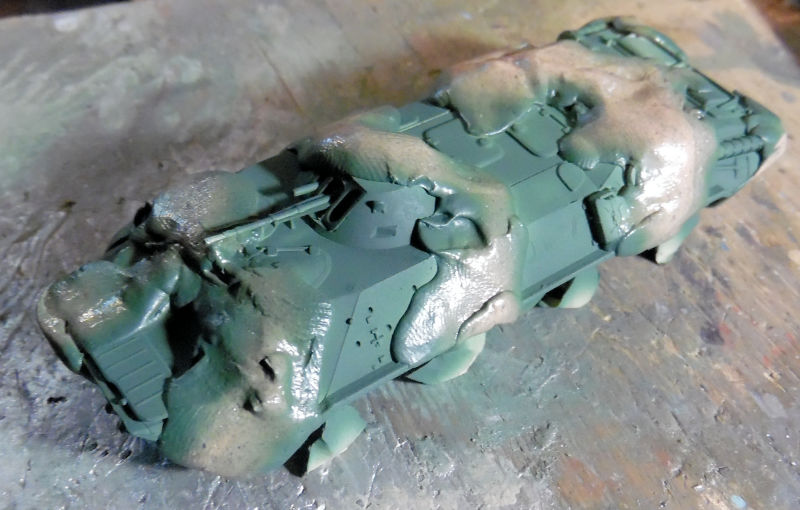
After all that, I love peeling the Silly Putty off and seeing the final result:
We had even painted some of the other details too. Then a clearcoat and decals went on:
In this last bay, we started up a German Land Wasser Schlepper since it was a very fast and easy kit to do. First the lower hull was done, except for the propellers:

Twenty minutes later, we have this almost fully assembled vehicle:
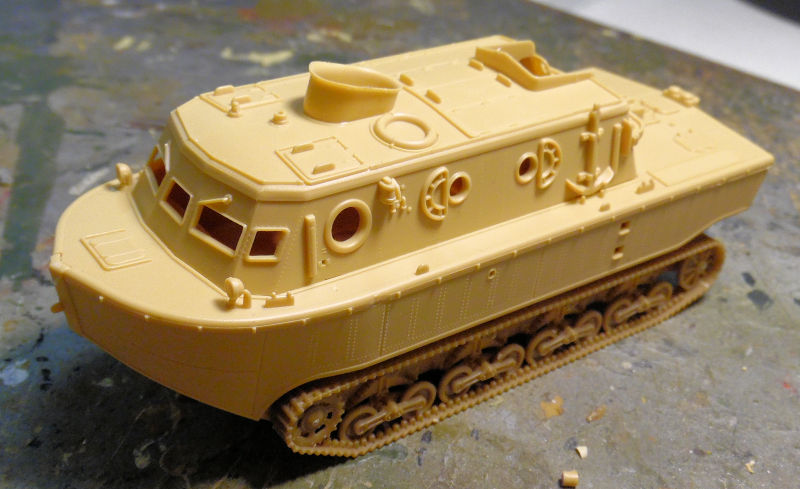
The cab is removable for painting. This should be finished very soon.
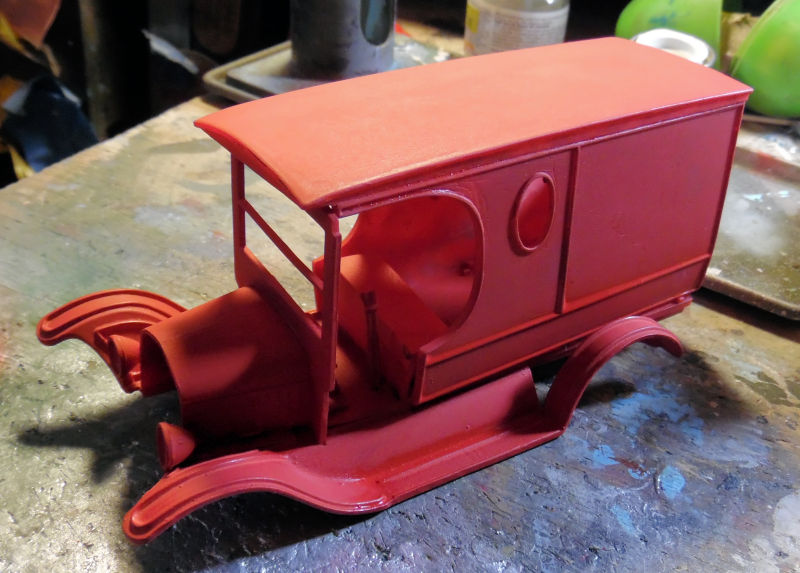
Finally in our back work area, we re-visited another shelf queen that needed another coat of red after extensive cleanup. This is the 1/24 scale 1929 Coca Cola delivery van:
And that concludes our tour of Maddog Manufacturing for the day, or is it month now? Thank you all for looking in, and coming on this tour. Comments are always welcome.
The Exacto blade is there for size reference. Remember I had to do that both sides four times!
Finally, all got assembled, yet this tank needed some extra filler since the hull front did not close up:
I didn't show all the tanks with their tracks, but here they are in this sequence of painting pics. I tried to keep them in order of M-38 to M-40L but they might be out of sequence...
Base coat of green went on first:
These were then camouflaged next:
Then the decals went on:
And that's how it's done assembly line style!
Moving on into this next bay we have the BTR-70 Late that I didn't know what army to build it for. Then I looked it up and decided to make it Syrian. So, base coat of sand color went on first:
Then the Silly Putty was applied to mask the sand color:
Next we shot the green on this:
After all that, I love peeling the Silly Putty off and seeing the final result:
We had even painted some of the other details too. Then a clearcoat and decals went on:
In this last bay, we started up a German Land Wasser Schlepper since it was a very fast and easy kit to do. First the lower hull was done, except for the propellers:
Twenty minutes later, we have this almost fully assembled vehicle:
The cab is removable for painting. This should be finished very soon.
Finally in our back work area, we re-visited another shelf queen that needed another coat of red after extensive cleanup. This is the 1/24 scale 1929 Coca Cola delivery van:
And that concludes our tour of Maddog Manufacturing for the day, or is it month now? Thank you all for looking in, and coming on this tour. Comments are always welcome.
Duke Maddog
Well-known member
With a number of jobs coming up, my forum time will be extremely limited, so I figured it was time for another short tour of Maddog Manufacturing. All aboard the trams for this next tour!
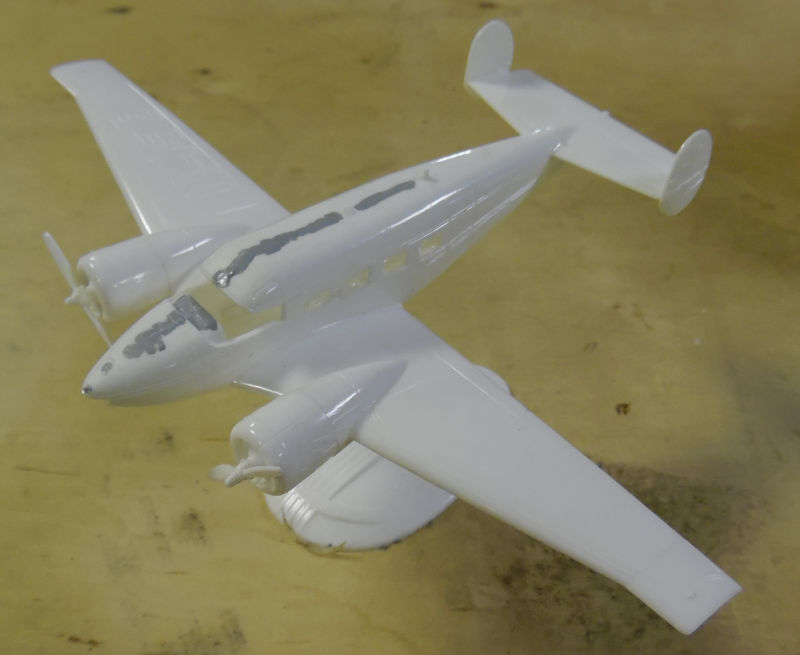
Here in the Hangar, We have a number of things going on. After the huge planes were sent out for delivery to their respective air forces, I felt it was time to just work on a few smaller and easier kits. That brought me to these simple "Planes on a Stick". These are very old and have no interior to speak of, nor any landing gear; they were ideal for a simple start. Not to mention that they were both slightly started when I got them.
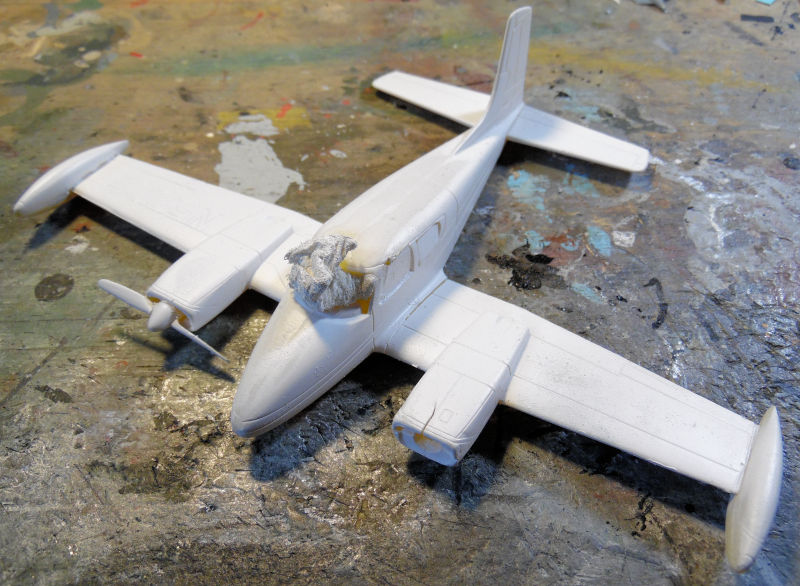
First is the Beechcraft Super 18. Assembly went fast, and some seams needed addressing:
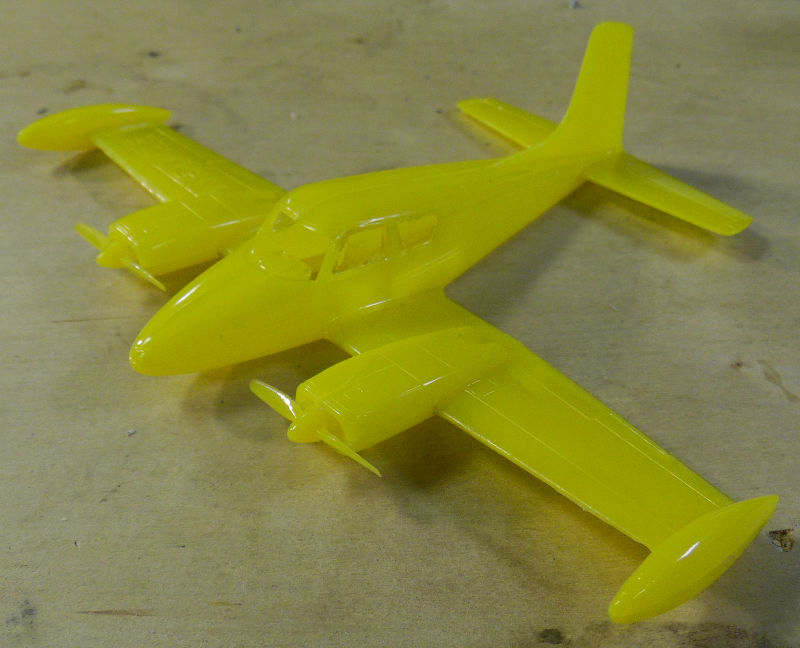
Next was the Cessna 310; another fast and easy kit with no interior or landing gear. Thjis was a bit tougher due to the horrid yellow plastic it was molded in. It almost glowed!
In the next bay, we also started the Cessna 172 but only got the interior done:
For something different, we continued to work on this Australian UH60 Blackhawk, first painting the interior:
A quick test fit showed where attention was needed:

Once that was done, the fuselage was closed up:
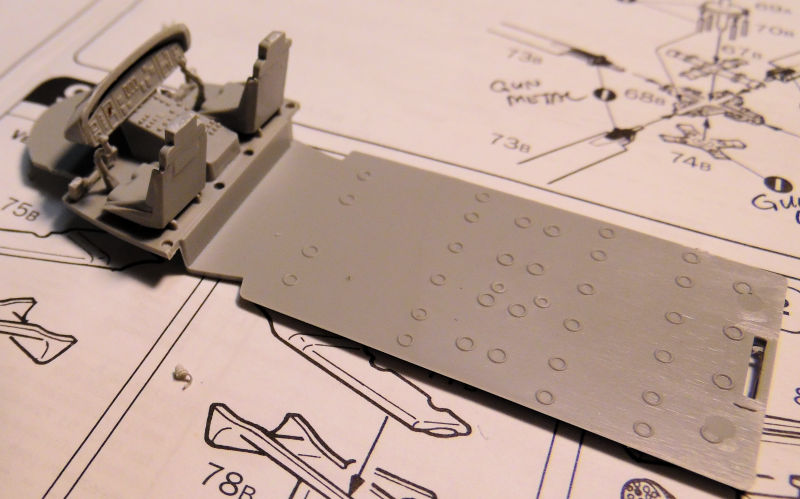
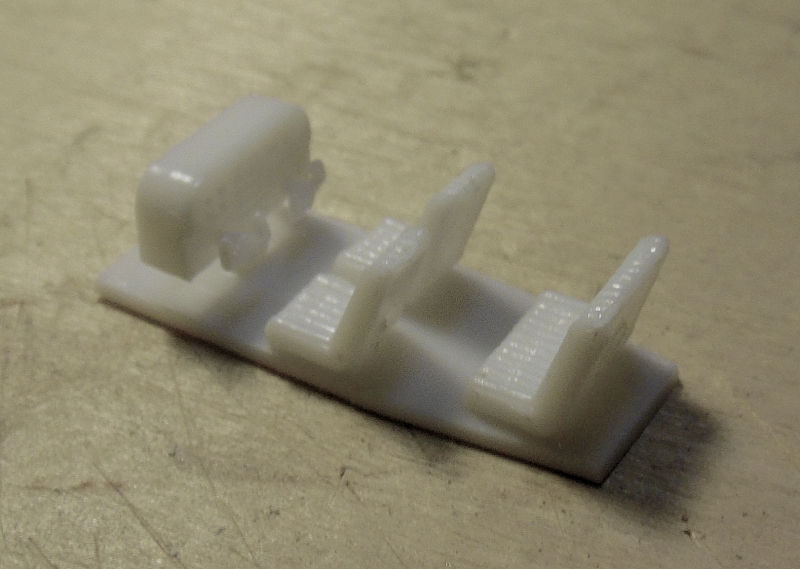
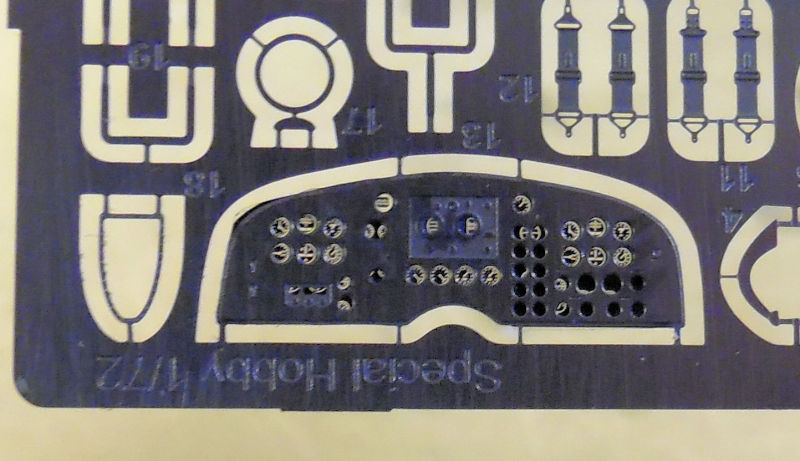
Finally we opened this next bay again because the JRS-1 was calling, so we got started on the cockpit. This kit gave a photo-etch instrument panel and a film that goes behind it for the dials. It looks fantastic, but after this photo, it will never be seen again:
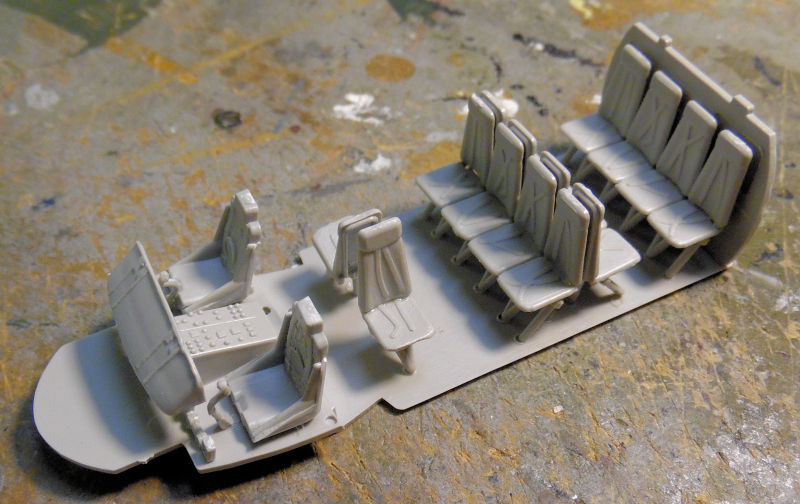
The kit also came with resin seats for the interior and naturally, I cut myself yet again trying to remove these from the pour blocks. You can see the faint red line on my finger, after I got the blood to stop flowing:
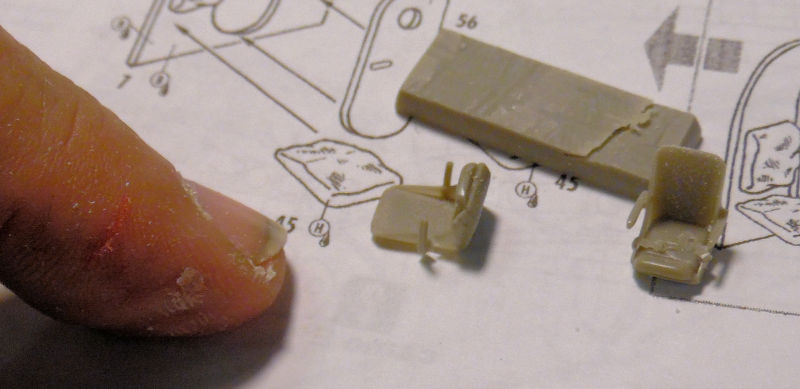
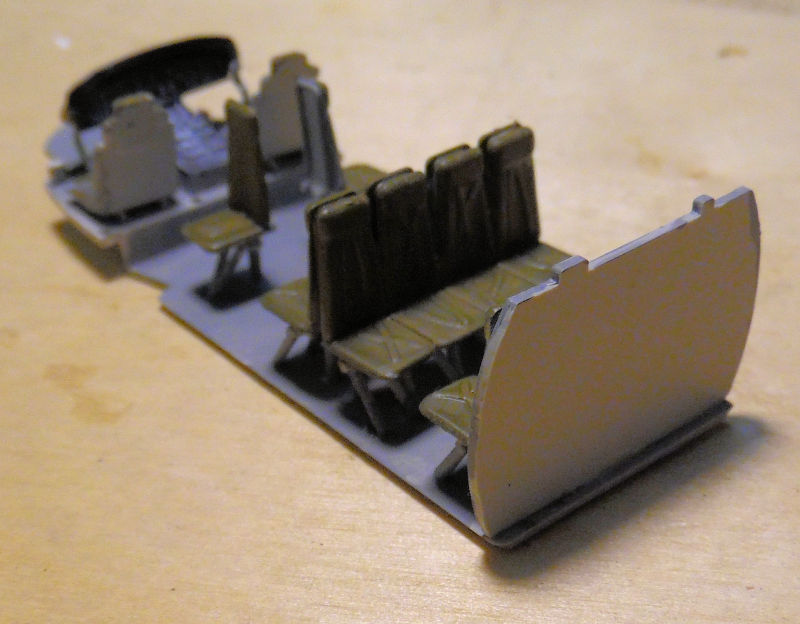
More sawing later and the rest of the seats in the main cabin were installed:

Finally, in this last bay, we got the interior of the B-58 Hustler painted up and installed inside one side of the fuselage. This later got closed up:
That concludes the Hangar portion of our tour. Not enough was done in the shipyards to justify touring them, so on to the Motor Pool:
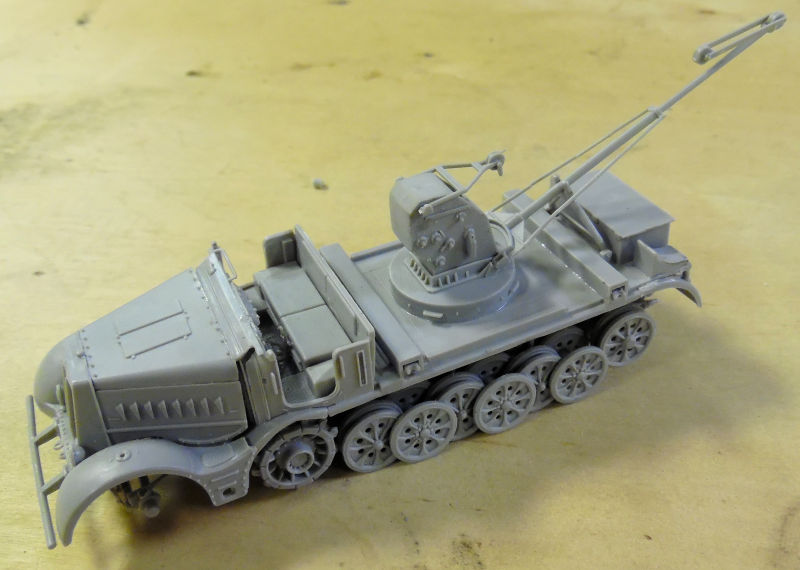
Here in the Motor Pool, we finished up the construction of the German SdKfz-9 with the crane and now it is ready for paint:
In the next bay, we spent a lot of time on this next project. It has always been a dream to complete the T26-E4 Super Pershing with all the hydraulics and additional armor. So, I found the kit and some white styrene tubes and strips and went to work.
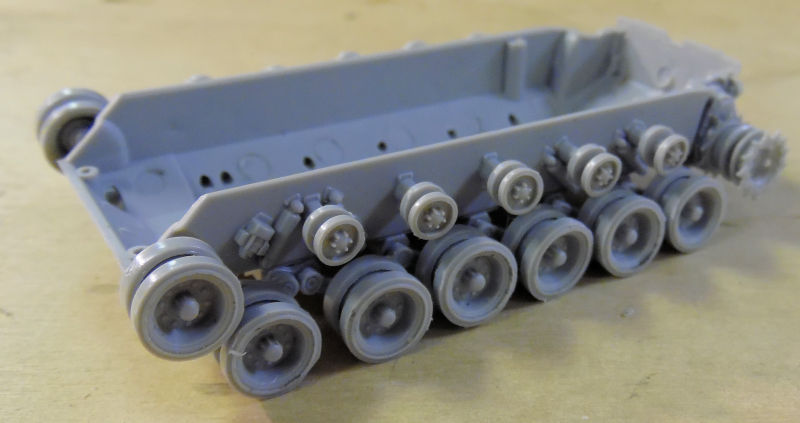
First, the lower hull and suspension was built:

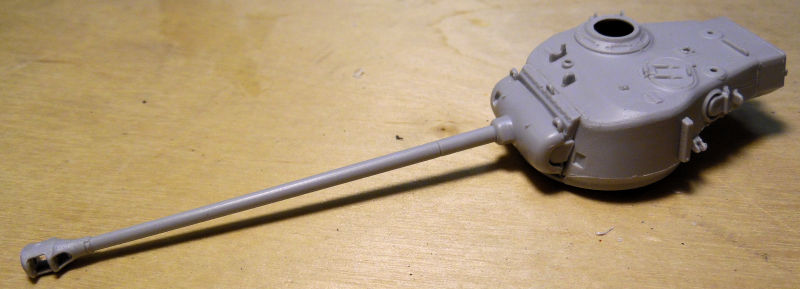
Then we built the basic turret:
All the wheels and sprockets were then added and allowed to dry:
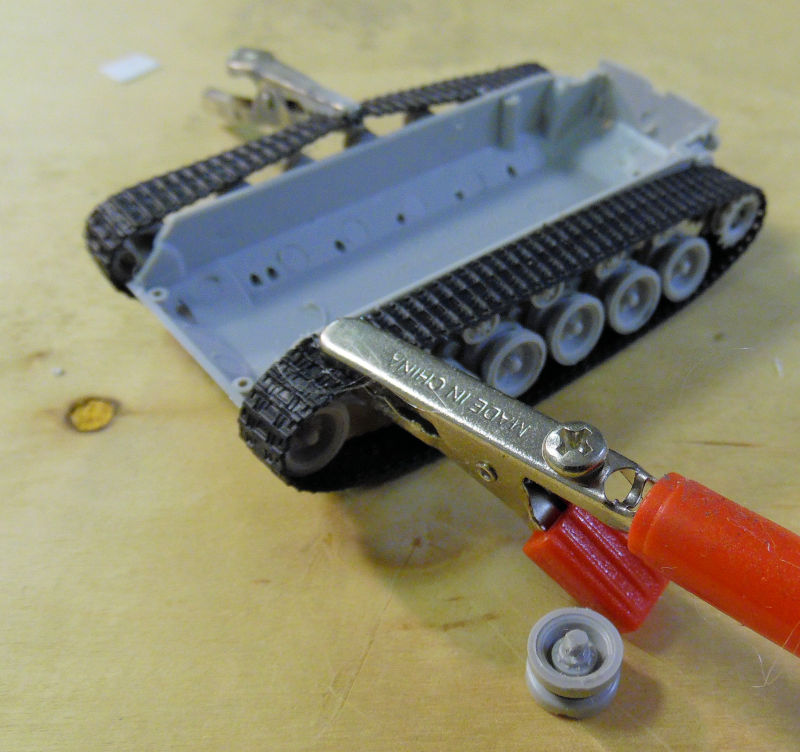
Next were the tracks and naturally one of the roadwheels had to be a pain and not cooperate:
While all that was drying, we returned to the turret to work on all the added equipment that was installed on this tank. First, the added mantlet armor and 'ears' were cut out and built; I had to layer some of these since I had no thicker sheets or strips of styrene:
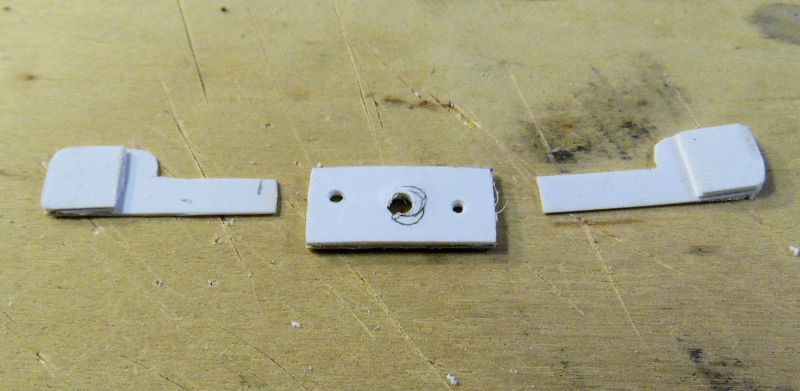
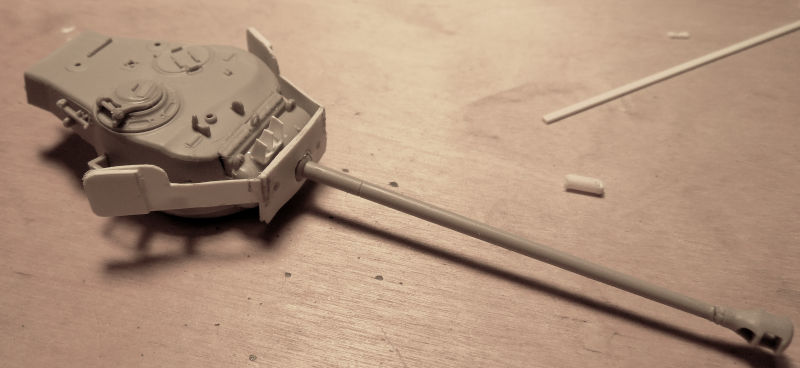
Next these were added to the front of the turret. I had to cut off and replace the muzzle brake in order to install the main plate because it was too big to fit through that center hole:

Later we started the mounts on the mantlet for the hydraulics:
I didn't have exact measurements here so al this was done by eye; flying by the seat of my pants. I had some photos that helped a little as I was building these, but eventually, I came up with this for the hydraulics:
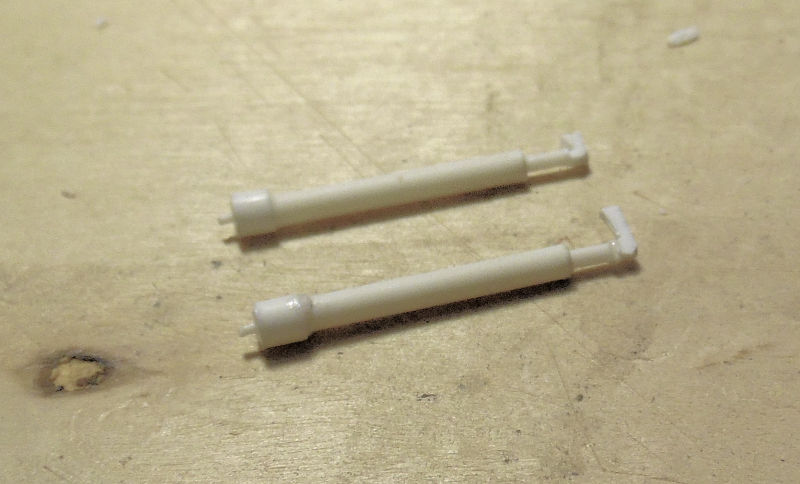
Sometime later I got them installed and the cover added. It is all quite crude, but it is done. I will be trying to refine this a bit later:
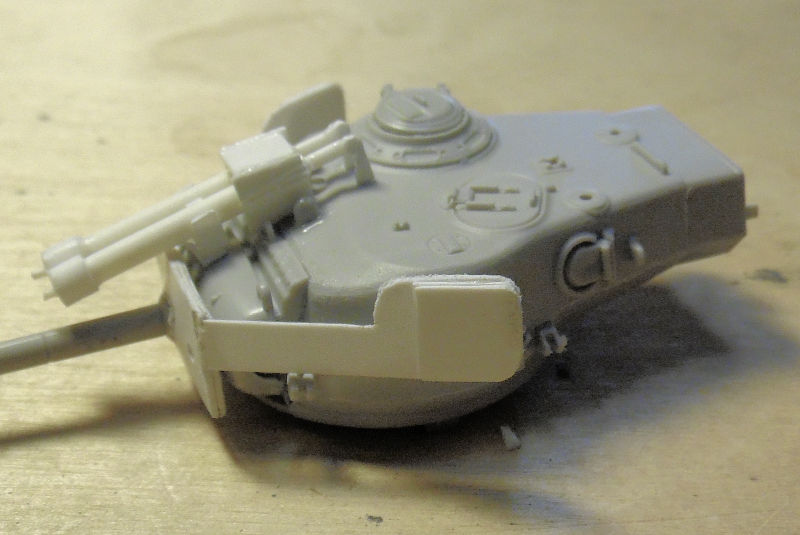
The last mod to the turret is the counterweight at the back that I built up:

Now except for refinements, this turret is done. Once I get the tracks and roadwheels to cooperate, I'll close up the hull and then start on the spaced armor on the front and other mods on the fuselage.
That concludes our short tour of the facilities for today. Thank you all for looking in comments are welcome. That being said, it might be quite a few days, or even a week or more to reply, due to the upcoming tight schedule I will be starting.
Thanks again to all.
Here in the Hangar, We have a number of things going on. After the huge planes were sent out for delivery to their respective air forces, I felt it was time to just work on a few smaller and easier kits. That brought me to these simple "Planes on a Stick". These are very old and have no interior to speak of, nor any landing gear; they were ideal for a simple start. Not to mention that they were both slightly started when I got them.
First is the Beechcraft Super 18. Assembly went fast, and some seams needed addressing:
Next was the Cessna 310; another fast and easy kit with no interior or landing gear. Thjis was a bit tougher due to the horrid yellow plastic it was molded in. It almost glowed!
In the next bay, we also started the Cessna 172 but only got the interior done:
For something different, we continued to work on this Australian UH60 Blackhawk, first painting the interior:
A quick test fit showed where attention was needed:
Once that was done, the fuselage was closed up:
Finally we opened this next bay again because the JRS-1 was calling, so we got started on the cockpit. This kit gave a photo-etch instrument panel and a film that goes behind it for the dials. It looks fantastic, but after this photo, it will never be seen again:
The kit also came with resin seats for the interior and naturally, I cut myself yet again trying to remove these from the pour blocks. You can see the faint red line on my finger, after I got the blood to stop flowing:
More sawing later and the rest of the seats in the main cabin were installed:
Finally, in this last bay, we got the interior of the B-58 Hustler painted up and installed inside one side of the fuselage. This later got closed up:
That concludes the Hangar portion of our tour. Not enough was done in the shipyards to justify touring them, so on to the Motor Pool:
Here in the Motor Pool, we finished up the construction of the German SdKfz-9 with the crane and now it is ready for paint:
In the next bay, we spent a lot of time on this next project. It has always been a dream to complete the T26-E4 Super Pershing with all the hydraulics and additional armor. So, I found the kit and some white styrene tubes and strips and went to work.
First, the lower hull and suspension was built:
Then we built the basic turret:
All the wheels and sprockets were then added and allowed to dry:
Next were the tracks and naturally one of the roadwheels had to be a pain and not cooperate:
While all that was drying, we returned to the turret to work on all the added equipment that was installed on this tank. First, the added mantlet armor and 'ears' were cut out and built; I had to layer some of these since I had no thicker sheets or strips of styrene:
Next these were added to the front of the turret. I had to cut off and replace the muzzle brake in order to install the main plate because it was too big to fit through that center hole:
Later we started the mounts on the mantlet for the hydraulics:
I didn't have exact measurements here so al this was done by eye; flying by the seat of my pants. I had some photos that helped a little as I was building these, but eventually, I came up with this for the hydraulics:
Sometime later I got them installed and the cover added. It is all quite crude, but it is done. I will be trying to refine this a bit later:
The last mod to the turret is the counterweight at the back that I built up:
Now except for refinements, this turret is done. Once I get the tracks and roadwheels to cooperate, I'll close up the hull and then start on the spaced armor on the front and other mods on the fuselage.
That concludes our short tour of the facilities for today. Thank you all for looking in comments are welcome. That being said, it might be quite a few days, or even a week or more to reply, due to the upcoming tight schedule I will be starting.
Thanks again to all.
It's just a flesh wound. 
Duke Maddog
Well-known member
Indeed! Come back here so I can bite your kneecaps!
Duke Maddog
Well-known member
Happy fourth of July! It's time I finally started a new tour showing all the work we got done during the last half of June. So, all aboard the trams for the next tour of the facilities here and remember to keep hands and feet inside at all times.
Our first stop as always is the Hangar. Here we have a few things happening, mostly some paint being sprayed before my window screen was removed. In this first bay, the Beechcraft Super 18 and the Cessna 310 both got base coats of white:

Gonna be some touch up there before decals are attempted. In this next bay, my Russian Yak 15 got the top coat of green on it:
Later when that was dry, decals went on along with the canopy:
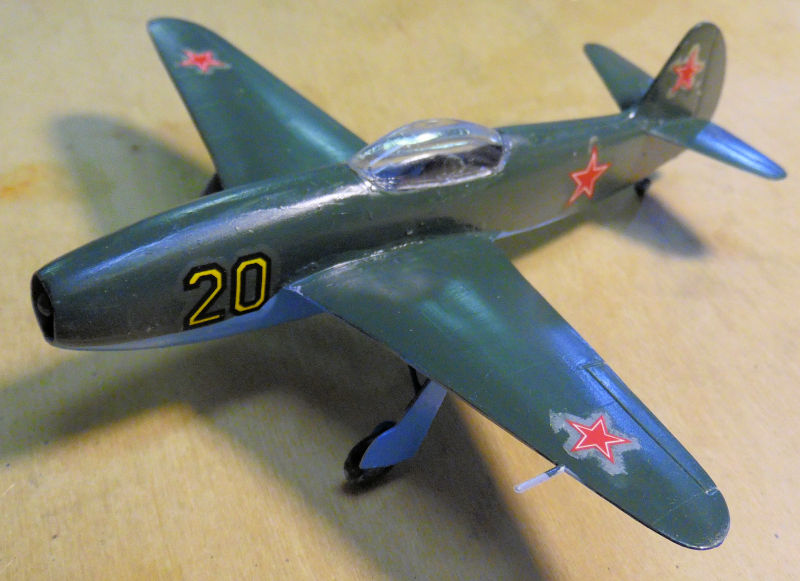
Yes the decals silvered pretty badly, we punctured them with a fine Exacto blade tip and slathered them with Solvaset, eliminating all that. However, the film covering these is matte so they still appear to be silvered. If I shoot this with a dull coat, it all should blend in. Meanwhile, the canopy frame was painted and the final detail parts were added::

In the next bay over, we have the Otter finally being assembled. The wings and tail went on and the landing gear was installed. Yes the one tail piece is drooping, that was fixed later:
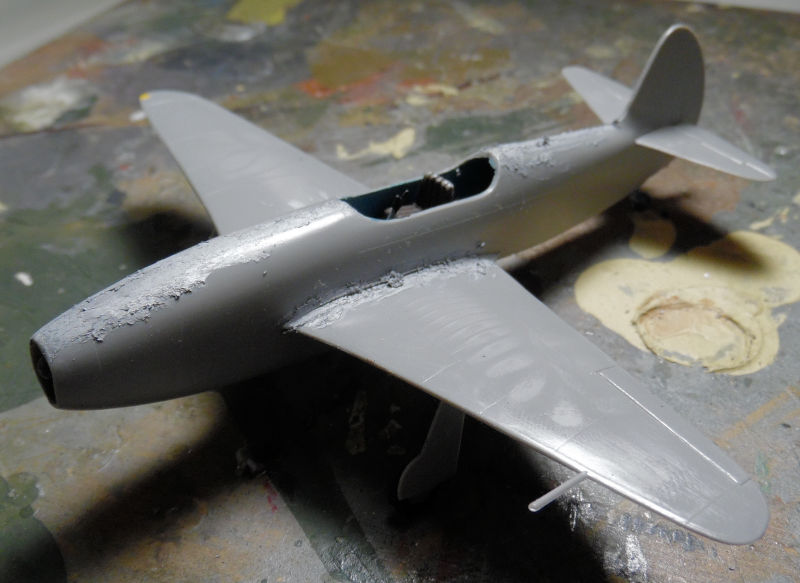
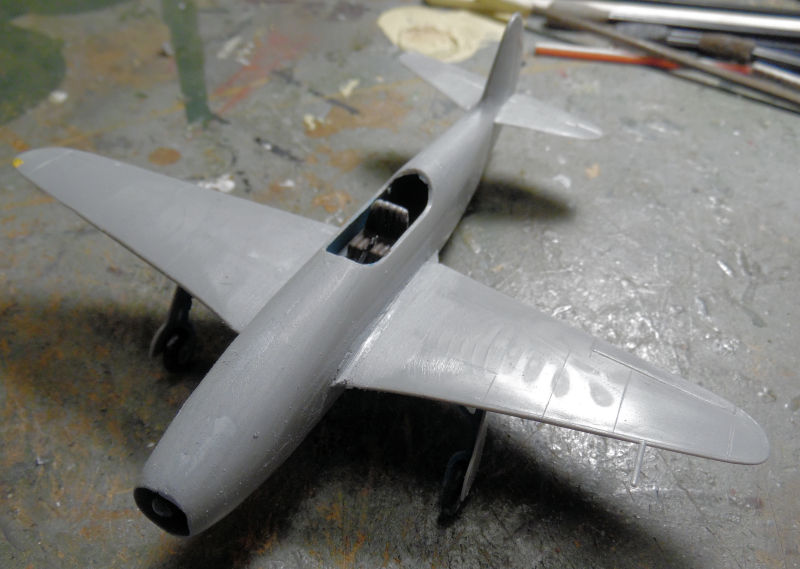
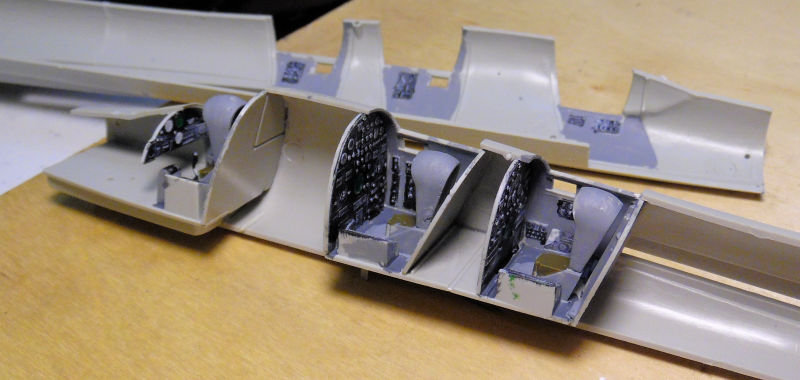
Moving on to the next bay, we got the fuselage of the JRS-1 all assembled as best we could. Later putty and sanding was done to smooth this out:
In this final bay, we started another Matchbox kit of the Swedish Tunnen jet fighter. This was also given to me later after the Distressed Kit Auction. This was fast and easy to build as well, we got this far before I finally took pics:
Gotta love this canyons for panel lines! That concludes the Hangar portion of our tour, now on to the Shipyards.....
Here in the shipyards we upped our production a bit to see if we could get some of these launched. We had also started a couple that looked fast and easy, more or less.
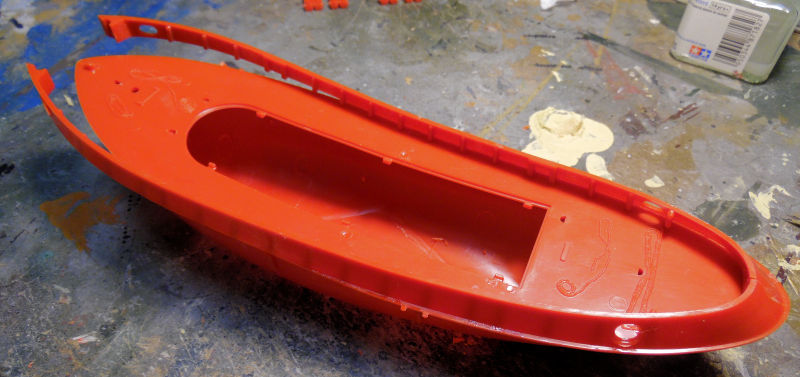
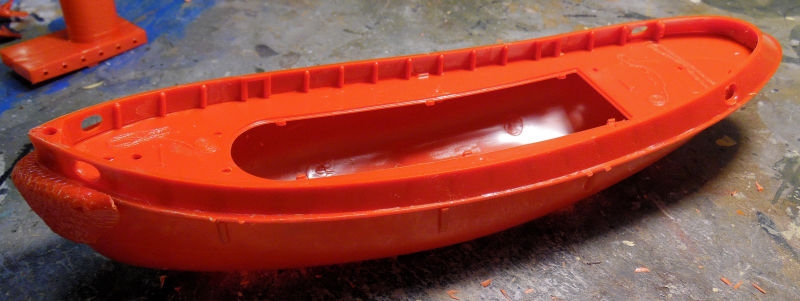
In this first slipway we have one of our 1/72 scale motor boats under construction. After fighting the paint on the hull for too long, it is finally at least acceptable so the main decks were finally glued in place:
Later most of the interior was installed before the sprue holding the remaining interior parts disappeared:
That is where that is for now. Moving to the next slipway, we have the little Hunt class destroyer escort finally getting the railings and other photo-etch parts before paint:
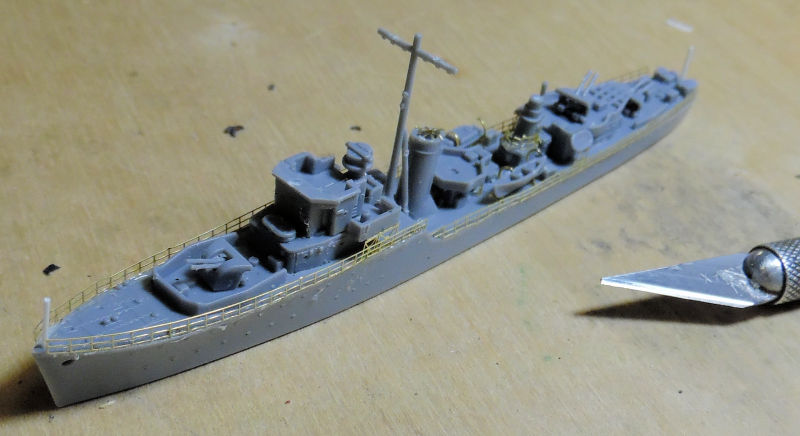
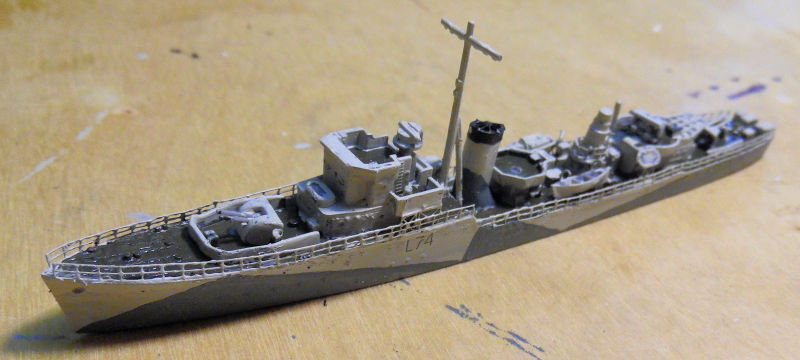
This thing is 1/700 scale so the Exacto blade is there to show the size of this little thing. Later it got paint and decals, making it HMS Middleton:
In this next slipway, the hull of the Nitta Maru got paint on it:
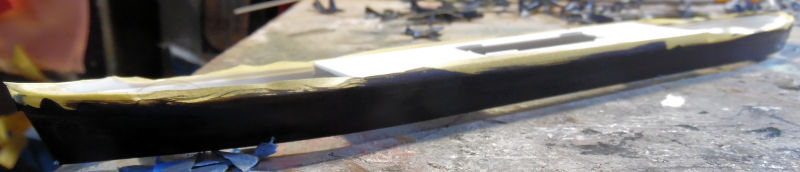
Once that was dry, the decks and superstructure went on, followed by the stack. Additional painting was done as well:
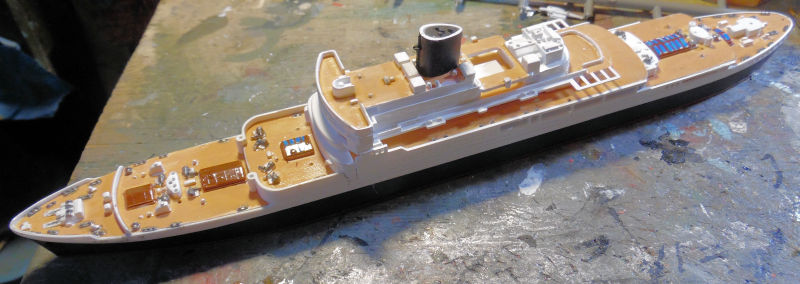
Later on, decals went on:
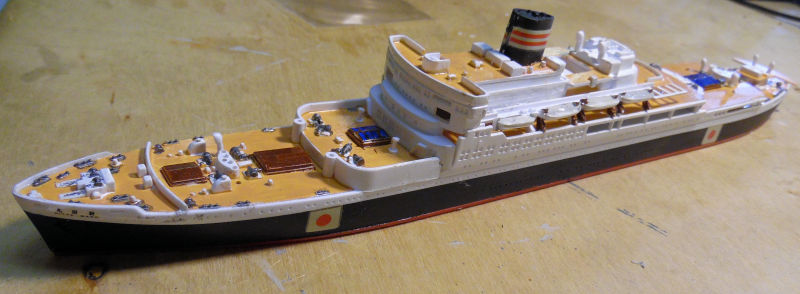
The decals had been hit with Solvaset and naturally I messed up while touching up details:
I left that to be fixed later and started with all the masts and cranes, getting this far before moving on to other things:
Moving on to the next slipway, the USS Shangri-La got all the final details added. except the deck edge antennae. The Island was also cemented in place:
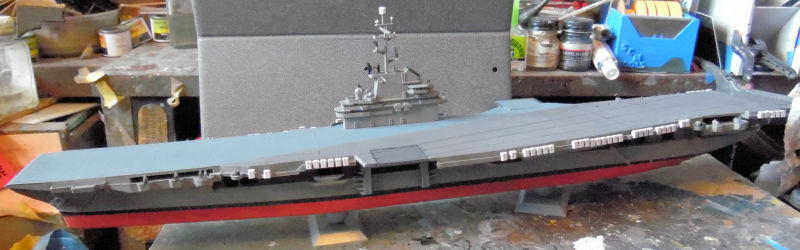
In doing the air wing and looking over the Regulus launch vehicles, I noticed that none were in firing position, so we took two and added a raised launch rail:
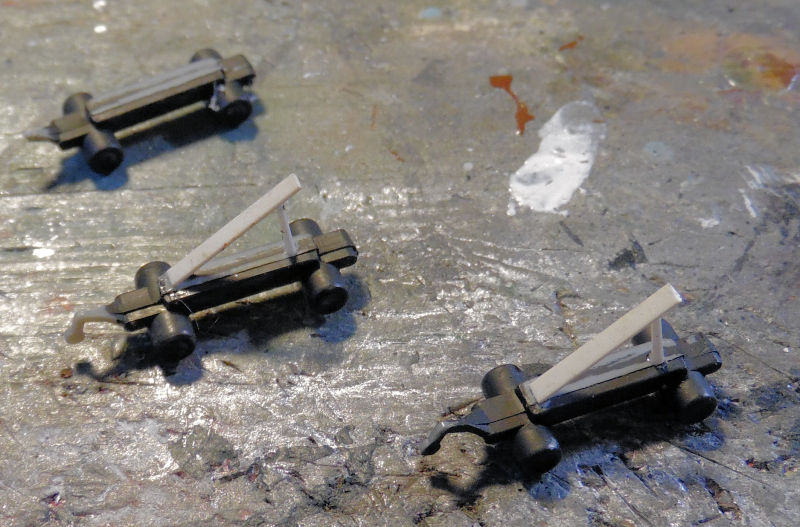
Afterward, we added all the decal markings to the deck. They didn't give enough of certain lengths so we improvised:
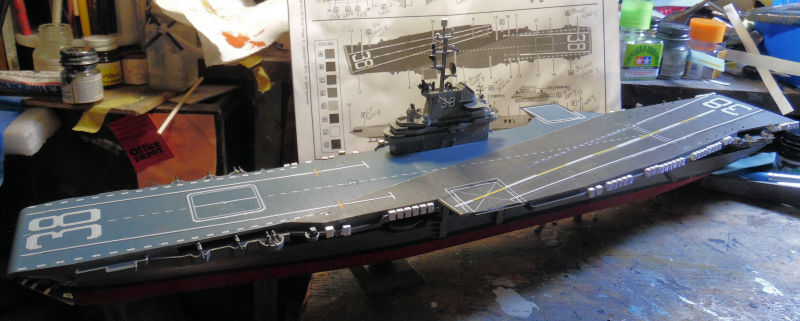
It may not be accurate but it works well enough for me:
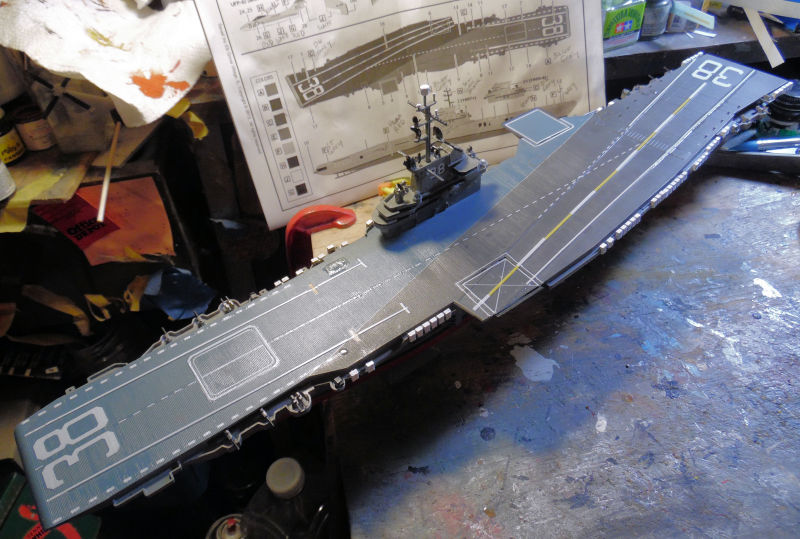
And that concludes our tour of the Shipyards, now on to the Motor Pool....
Here in the Motor Pool, a lot has been happening. In the first bay, the M10 Achilles got decals. They may not be accurate, but I couldn't find anything that matched what I had in my decal spares box, so I chose what looked best and ran with it:
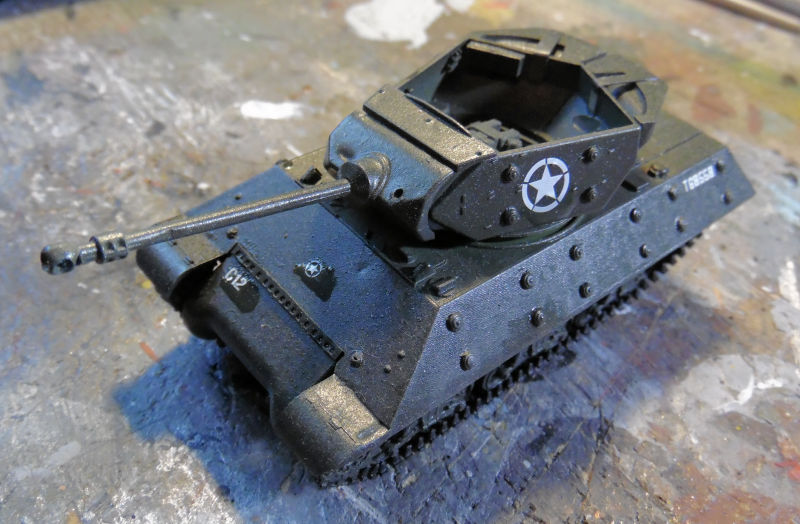
While on the subject of British vehicles; in this next bay we started on another British tank, the Challenger III. First was the lower hull:

The roadwheels and sprockets went on later:
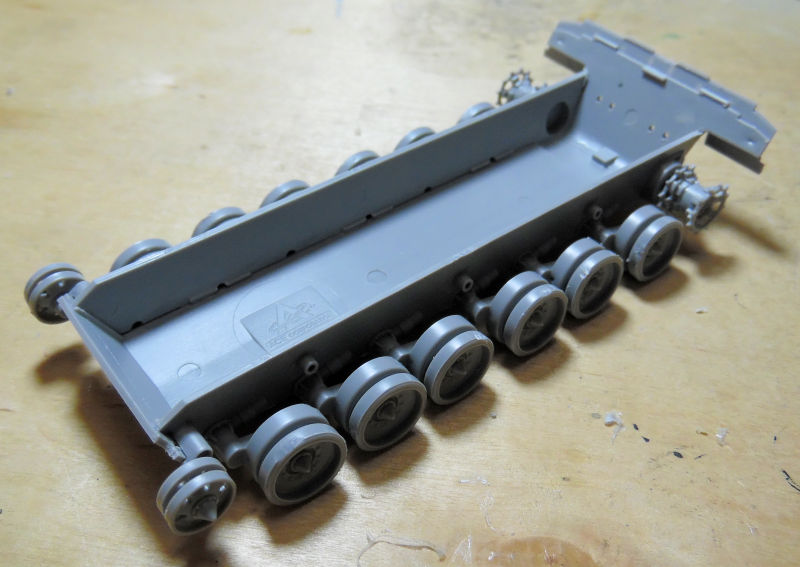
While waiting for them to dry, we built the turret. Only the basic assembly was started:
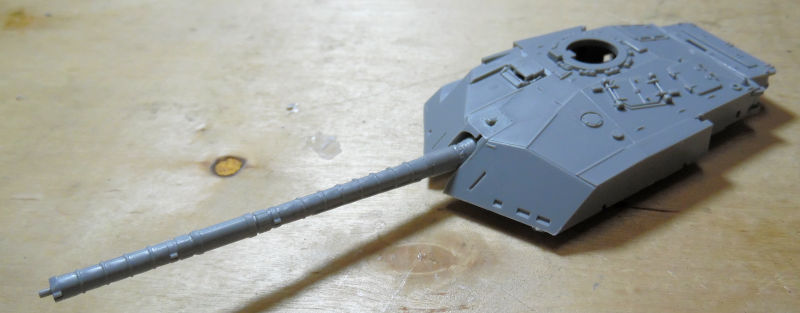
The upper hull was worked on next, not much to do there, but here it is dry-fit on the lower hull:
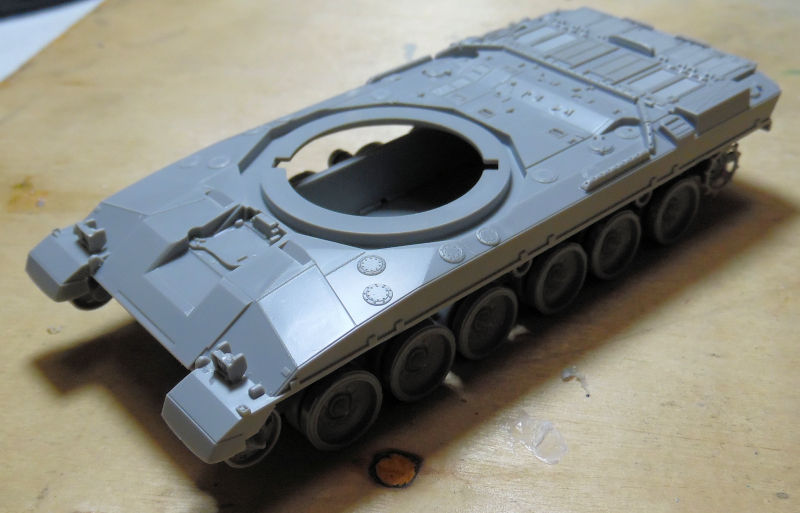
Then the turret was added to the dry-fit upper hull:
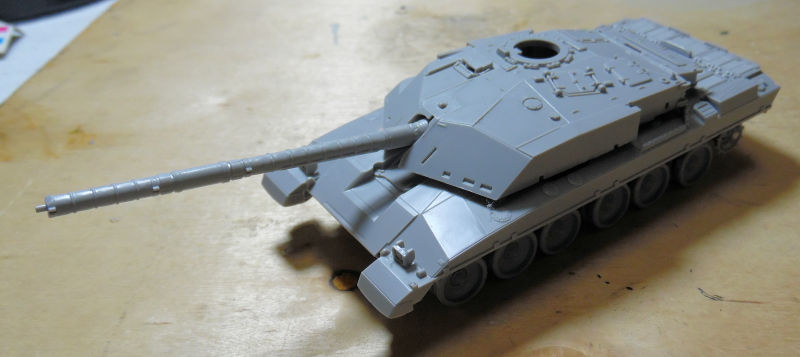
Moving on to the next bay, we are finally are able to move forward on a shelf queen that was stalled because the main gun trunnion assembly was lost. Well, it turned up:
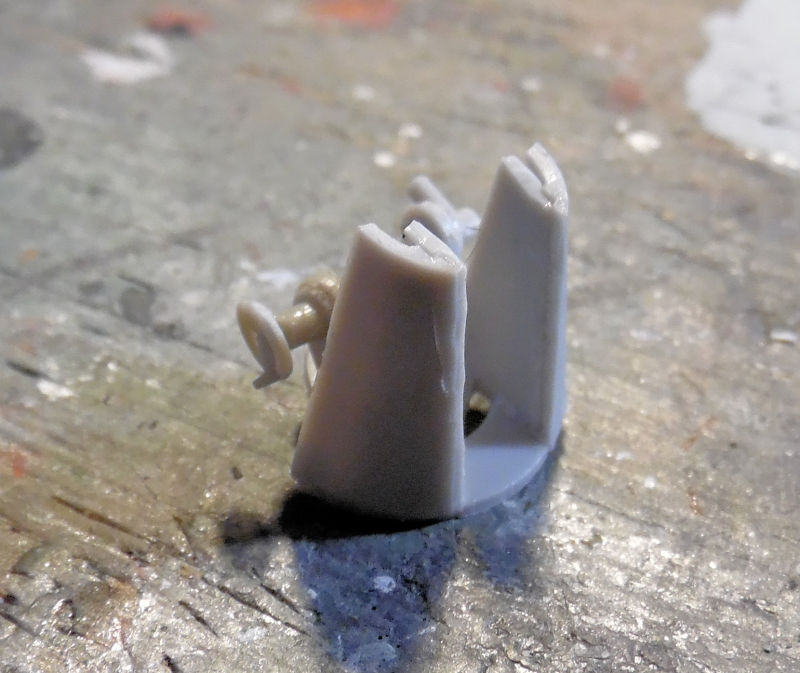
You can see from this dry fit in place, why this stalled:
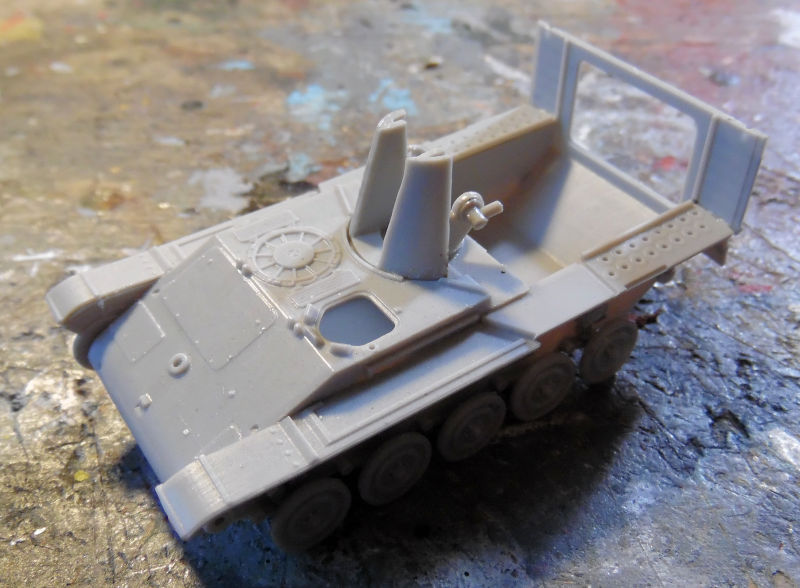
The gun was finally installed into place:

We then dry fit this in place so the front superstructure panels could be added:
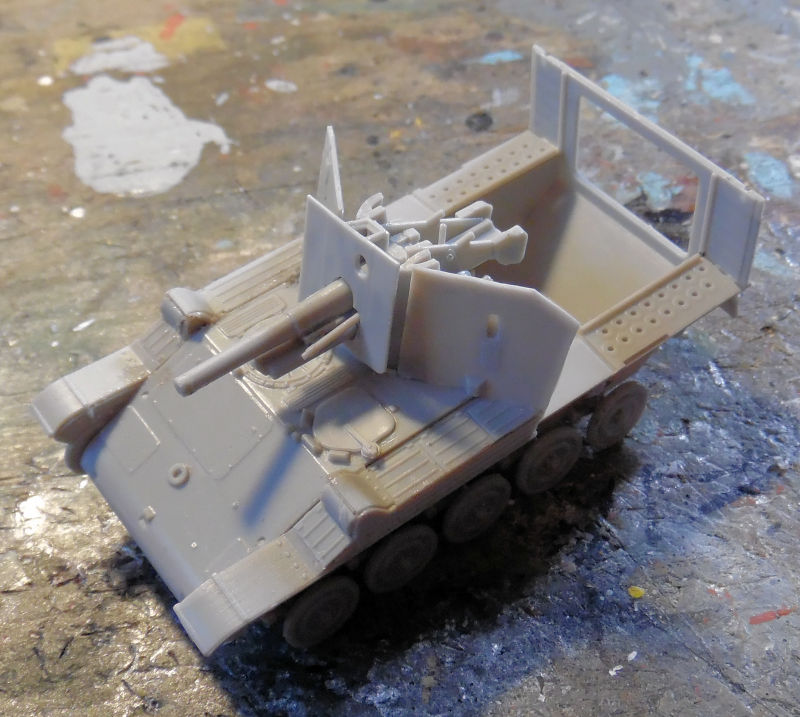
The shells were then added to the interior:
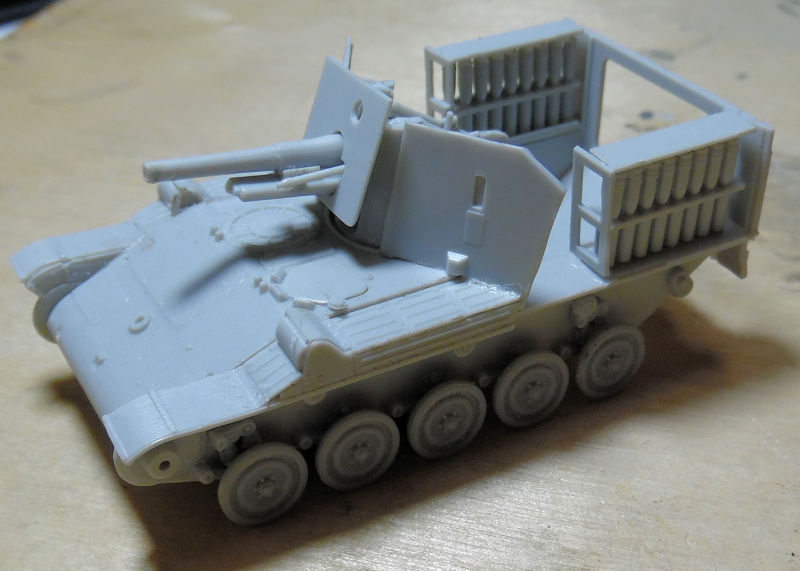
Things were moving along well until it was time to add the side walls. That's when we saw that the front panels were way off alignment, so off they came again:
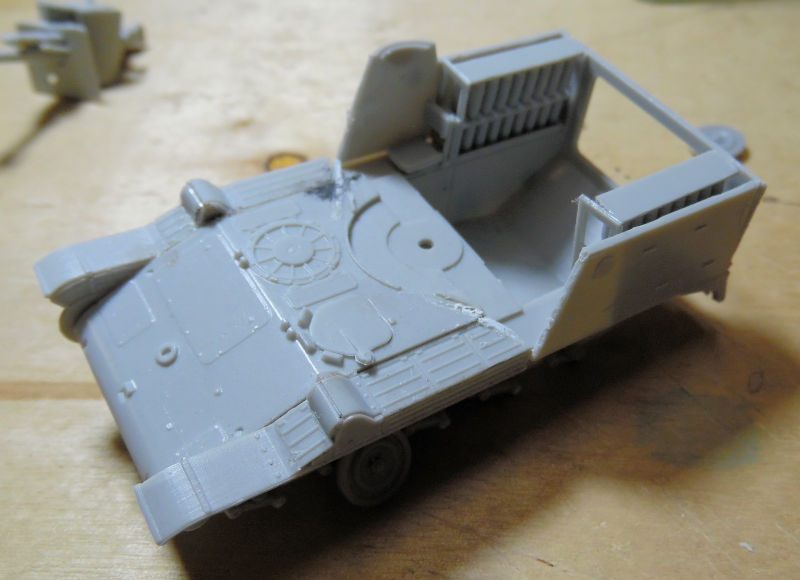
Naturally during this whole attempt to fix the upper superstructure, all these decided to break off and try to fly:
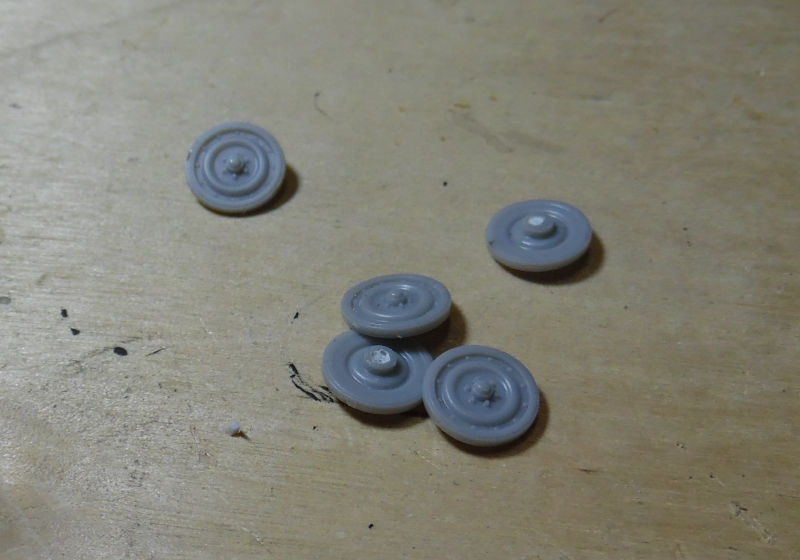
I'll leave them off until the upper structure is finally assembled properly and then these will go back on.
Moving on to this last bay, we have the T26-E4 which got the front spaced armor installed on the front. Don't worry, that fingerprint disappeared:
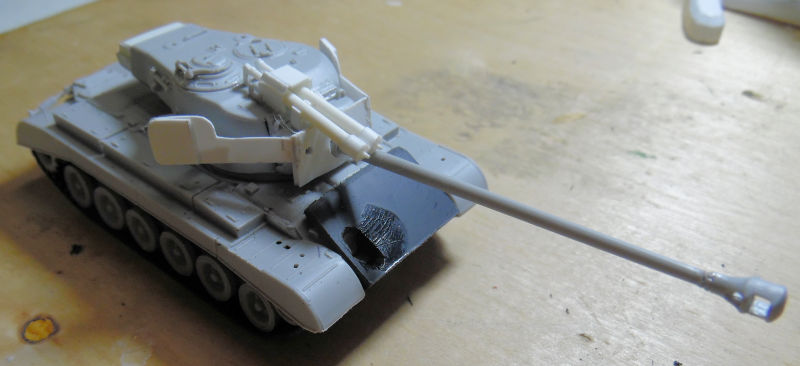
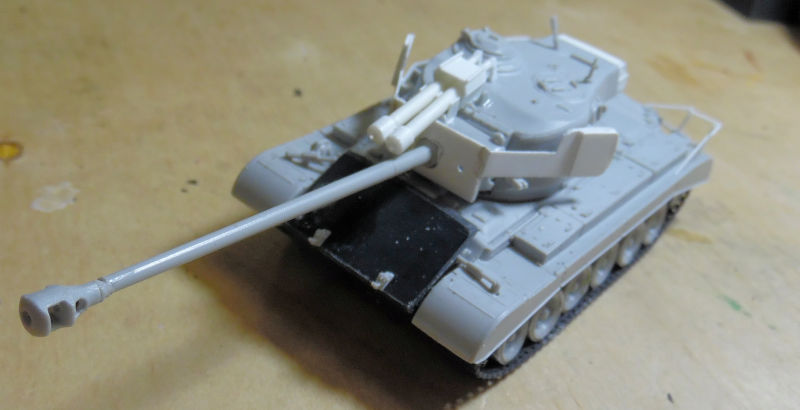
Later we added the stowage rails on the rear deck that were added to this tank:
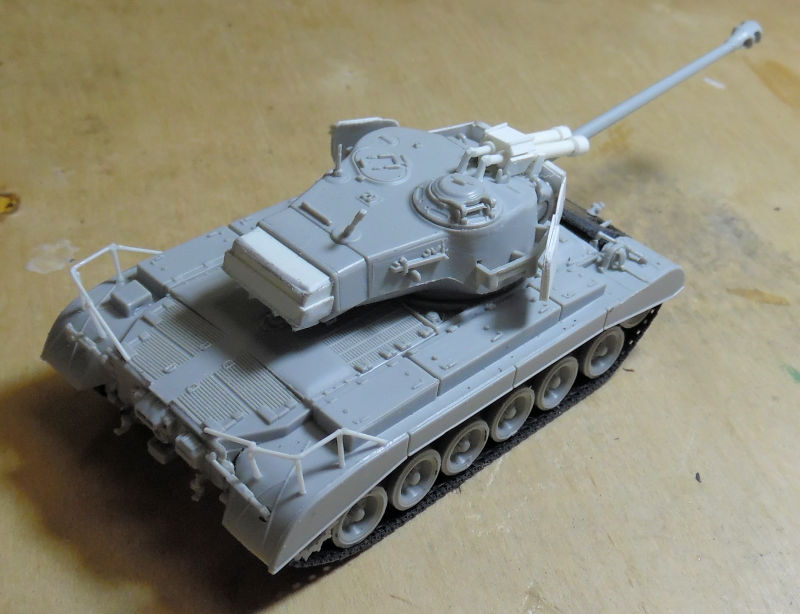
This was now ready for paint so a base of Olive Drab was sprayed:
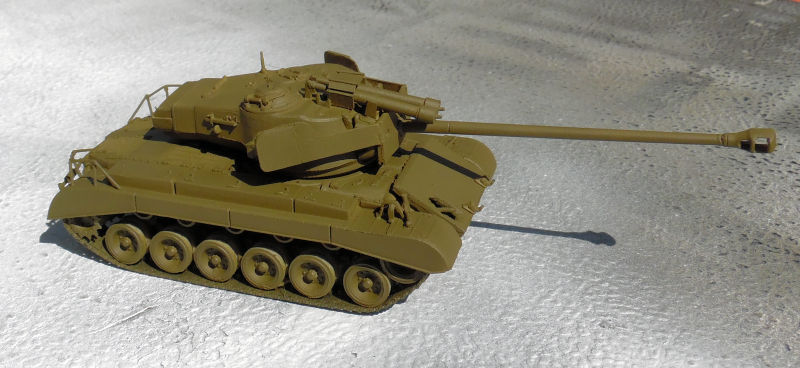
This was shot outside and I didn't adjust the color when editing this but this next shot shows this tank after we modulated the base coat with a lighter OD green:
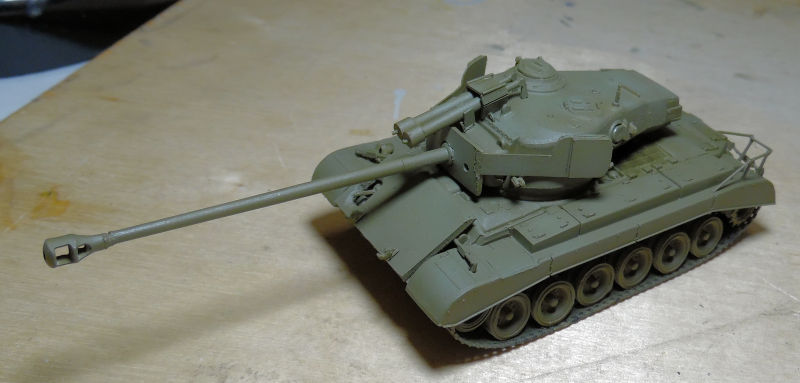
Finally we raided the decal spares box again and came up with some markings that most closely matched what I saw in ref pics. I also took some artistic license and added a star in the front so friendly forces wouldn't mistake that plate armor for the front of a Panther and I added the star in top of the turret for aircraft recognition. We also added the machine gun on top, the antenna, and repaired one of the stowage racks on the back:
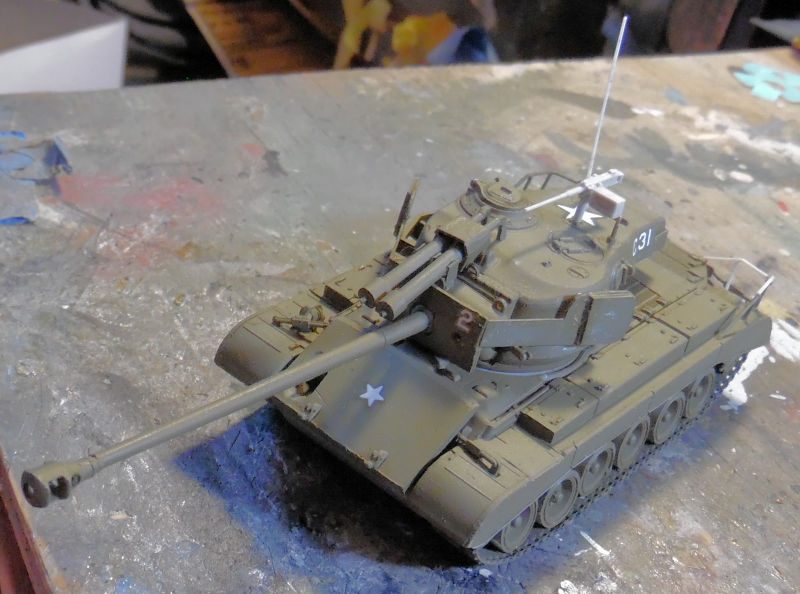
And that completes our tour for this week (month?) I hope you enjoyed it. Thank you all for stopping in; comments are always welcome!
Our first stop as always is the Hangar. Here we have a few things happening, mostly some paint being sprayed before my window screen was removed. In this first bay, the Beechcraft Super 18 and the Cessna 310 both got base coats of white:
Gonna be some touch up there before decals are attempted. In this next bay, my Russian Yak 15 got the top coat of green on it:
Later when that was dry, decals went on along with the canopy:
Yes the decals silvered pretty badly, we punctured them with a fine Exacto blade tip and slathered them with Solvaset, eliminating all that. However, the film covering these is matte so they still appear to be silvered. If I shoot this with a dull coat, it all should blend in. Meanwhile, the canopy frame was painted and the final detail parts were added::
In the next bay over, we have the Otter finally being assembled. The wings and tail went on and the landing gear was installed. Yes the one tail piece is drooping, that was fixed later:
Moving on to the next bay, we got the fuselage of the JRS-1 all assembled as best we could. Later putty and sanding was done to smooth this out:
In this final bay, we started another Matchbox kit of the Swedish Tunnen jet fighter. This was also given to me later after the Distressed Kit Auction. This was fast and easy to build as well, we got this far before I finally took pics:
Gotta love this canyons for panel lines! That concludes the Hangar portion of our tour, now on to the Shipyards.....
Here in the shipyards we upped our production a bit to see if we could get some of these launched. We had also started a couple that looked fast and easy, more or less.
In this first slipway we have one of our 1/72 scale motor boats under construction. After fighting the paint on the hull for too long, it is finally at least acceptable so the main decks were finally glued in place:
Later most of the interior was installed before the sprue holding the remaining interior parts disappeared:
That is where that is for now. Moving to the next slipway, we have the little Hunt class destroyer escort finally getting the railings and other photo-etch parts before paint:
This thing is 1/700 scale so the Exacto blade is there to show the size of this little thing. Later it got paint and decals, making it HMS Middleton:
In this next slipway, the hull of the Nitta Maru got paint on it:
Once that was dry, the decks and superstructure went on, followed by the stack. Additional painting was done as well:
Later on, decals went on:
The decals had been hit with Solvaset and naturally I messed up while touching up details:
I left that to be fixed later and started with all the masts and cranes, getting this far before moving on to other things:
Moving on to the next slipway, the USS Shangri-La got all the final details added. except the deck edge antennae. The Island was also cemented in place:
In doing the air wing and looking over the Regulus launch vehicles, I noticed that none were in firing position, so we took two and added a raised launch rail:
Afterward, we added all the decal markings to the deck. They didn't give enough of certain lengths so we improvised:
It may not be accurate but it works well enough for me:
And that concludes our tour of the Shipyards, now on to the Motor Pool....
Here in the Motor Pool, a lot has been happening. In the first bay, the M10 Achilles got decals. They may not be accurate, but I couldn't find anything that matched what I had in my decal spares box, so I chose what looked best and ran with it:
While on the subject of British vehicles; in this next bay we started on another British tank, the Challenger III. First was the lower hull:
The roadwheels and sprockets went on later:
While waiting for them to dry, we built the turret. Only the basic assembly was started:
The upper hull was worked on next, not much to do there, but here it is dry-fit on the lower hull:
Then the turret was added to the dry-fit upper hull:
Moving on to the next bay, we are finally are able to move forward on a shelf queen that was stalled because the main gun trunnion assembly was lost. Well, it turned up:
You can see from this dry fit in place, why this stalled:
The gun was finally installed into place:
We then dry fit this in place so the front superstructure panels could be added:
The shells were then added to the interior:
Things were moving along well until it was time to add the side walls. That's when we saw that the front panels were way off alignment, so off they came again:
Naturally during this whole attempt to fix the upper superstructure, all these decided to break off and try to fly:
I'll leave them off until the upper structure is finally assembled properly and then these will go back on.
Moving on to this last bay, we have the T26-E4 which got the front spaced armor installed on the front. Don't worry, that fingerprint disappeared:
Later we added the stowage rails on the rear deck that were added to this tank:
This was now ready for paint so a base of Olive Drab was sprayed:
This was shot outside and I didn't adjust the color when editing this but this next shot shows this tank after we modulated the base coat with a lighter OD green:
Finally we raided the decal spares box again and came up with some markings that most closely matched what I saw in ref pics. I also took some artistic license and added a star in the front so friendly forces wouldn't mistake that plate armor for the front of a Panther and I added the star in top of the turret for aircraft recognition. We also added the machine gun on top, the antenna, and repaired one of the stowage racks on the back:
And that completes our tour for this week (month?) I hope you enjoyed it. Thank you all for stopping in; comments are always welcome!
Duke Maddog
Well-known member
Time for another short tour of Maddog Manufacturing today! Anyone wishing to join this one, feel free to board the trams and remember to keep all arms and legs inside at all times.
Our first stop in the Hangar, has a couple projects going. In this first bay, we got the interior of the Cessna 172 painted up and the instrument panel detailed:
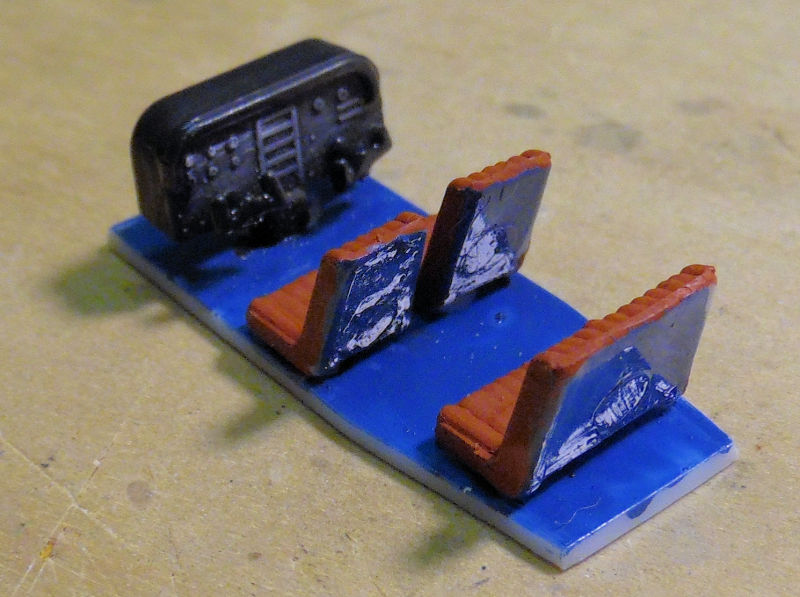
Later it was fitted inside the fuselage. You'll note I tried something different, masking the windows before installing them:
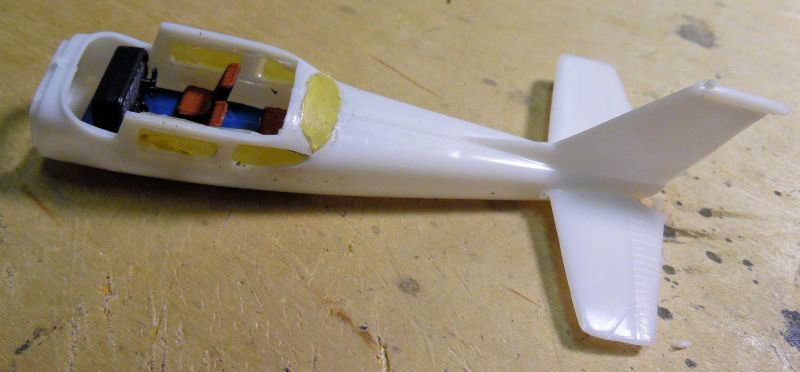
This will be painted and decaled later.
In the next bay, we got the pilot figure of the Swedish Tunnen painted, as well as some other cockpit detail:

Later, all was closed up, masked, and shot with silver basecoat. Decals went on next:
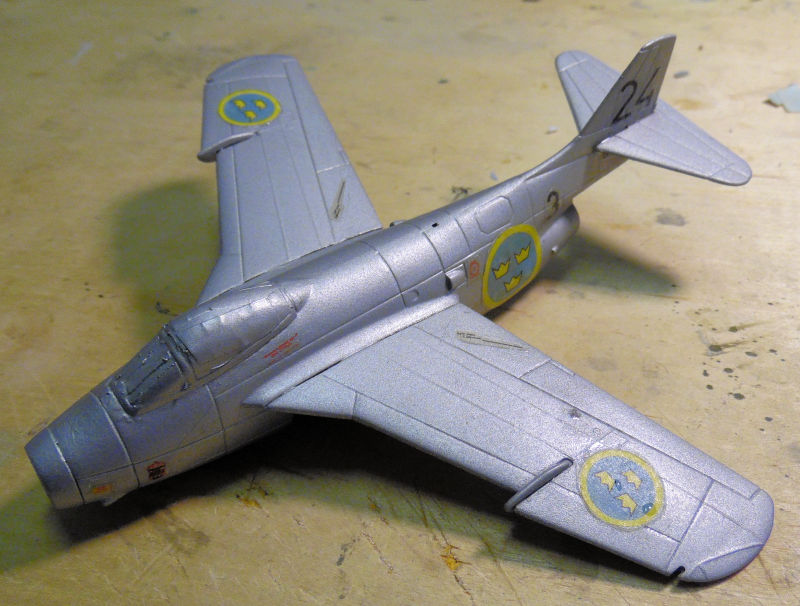
Yes, those are the original kit decals. They went on surprisingly well considering their age. However, some still required some 'persuasion' in the form of Tamiya Extra Thin cement.
In this final bay, we didn't get much done on the JRS-1, but the main canopy was masked and installed. A few more detailed parts to add and this will be ready for basecoat:
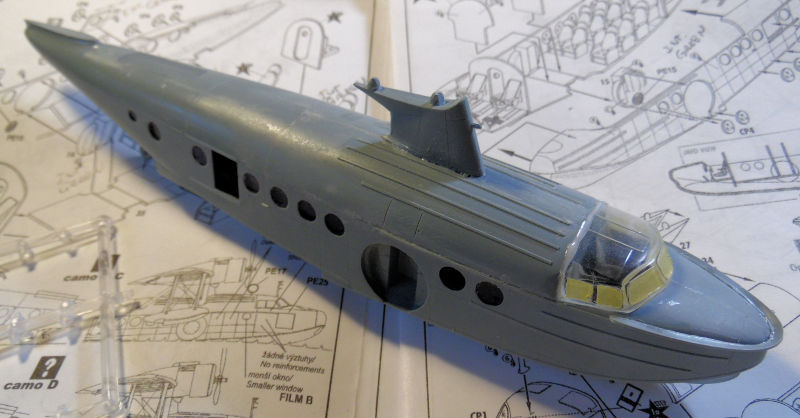
While that was drying, we decided to get the engines installed inside the cowlings:
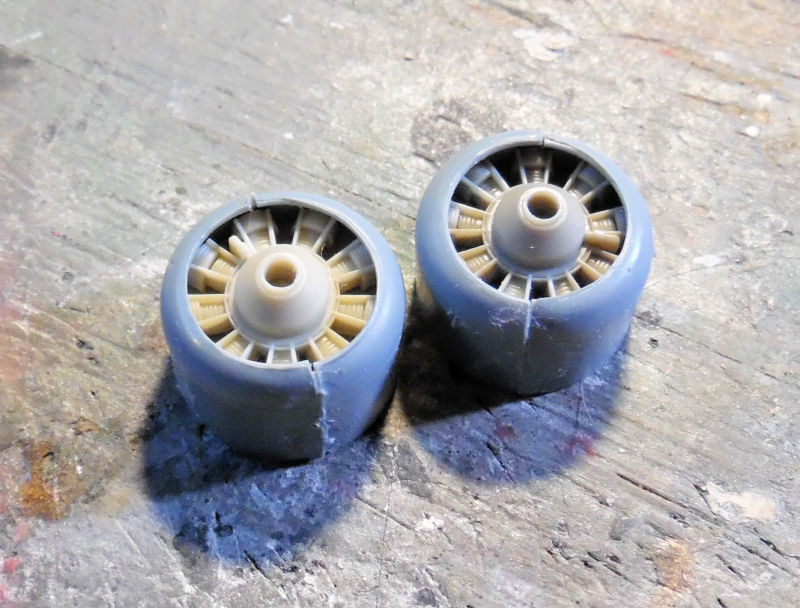
And that is our tour of the Hangar for now, on to the Shipyards.
Here in the first slipway, we are starting a new destroyer for a Group Build for anything that floats on another boards. This is what was chosen:
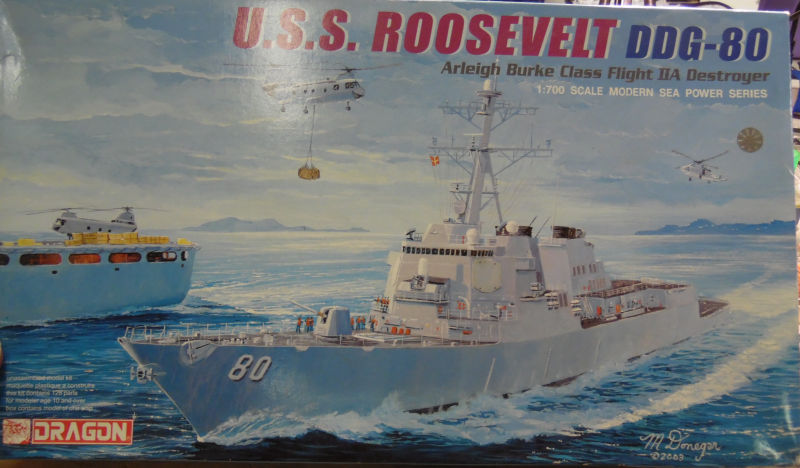
The keel was laid down and the bridge sections and forward superstructure were built up. The rear stack and structure are only dry fit at this time:
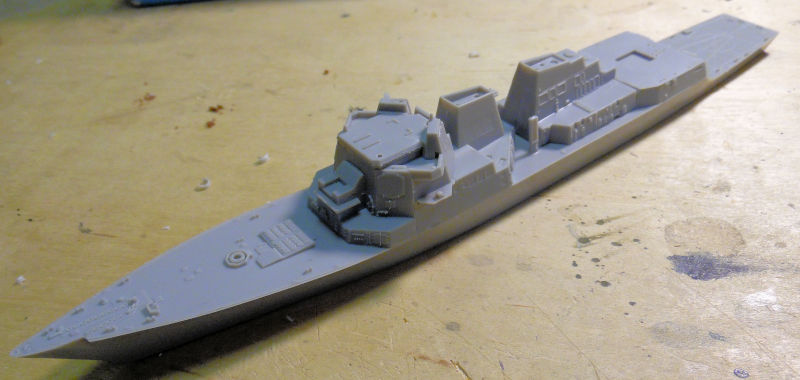
It doesn't show here but the rear superstructure is cemented down and additional detail parts were added. We're hoping to get paint on this soon:
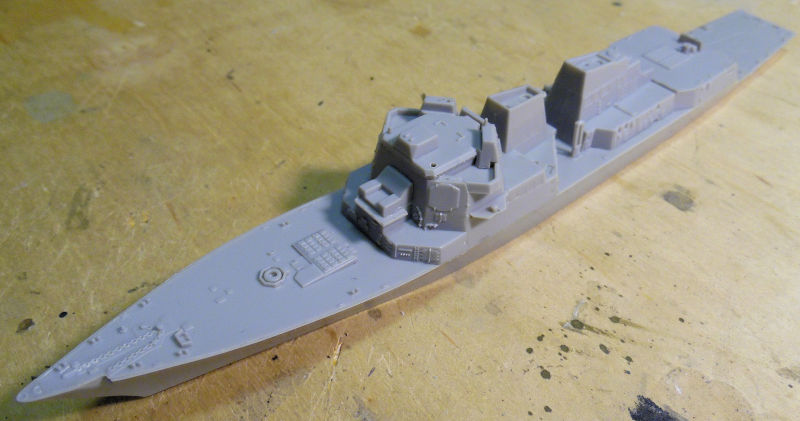
In the next bay, we have been trying to get this massive Japanese PT boat out of the slipways and out to her base so extra work has gone into this. First off, all the railings have finally been rigged:
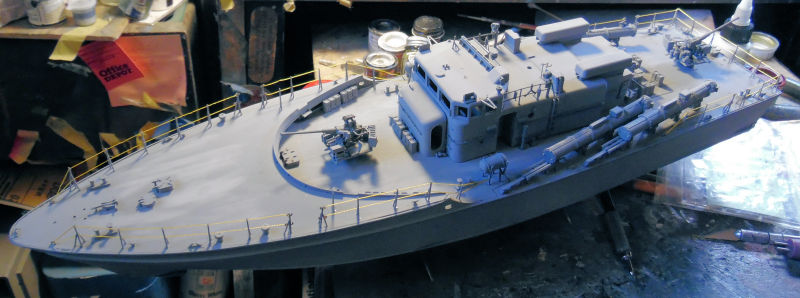
Later, all the extra additional parts were added to the superstructure. The main mast is only dry fit here for removal to prevent breakage later:
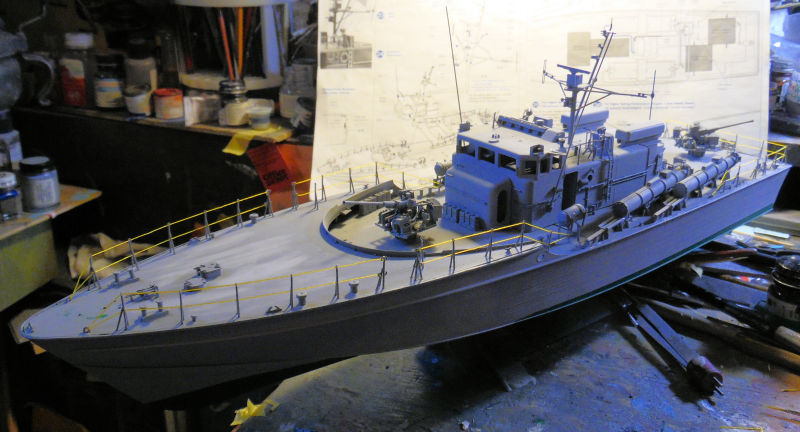
This is when I realized that the one side of the superstructure was missing parts that would normally block the view of the interior, so we scratched up some bulkheads for that side. It's a good thing I hadn't glued down the main superstructure:
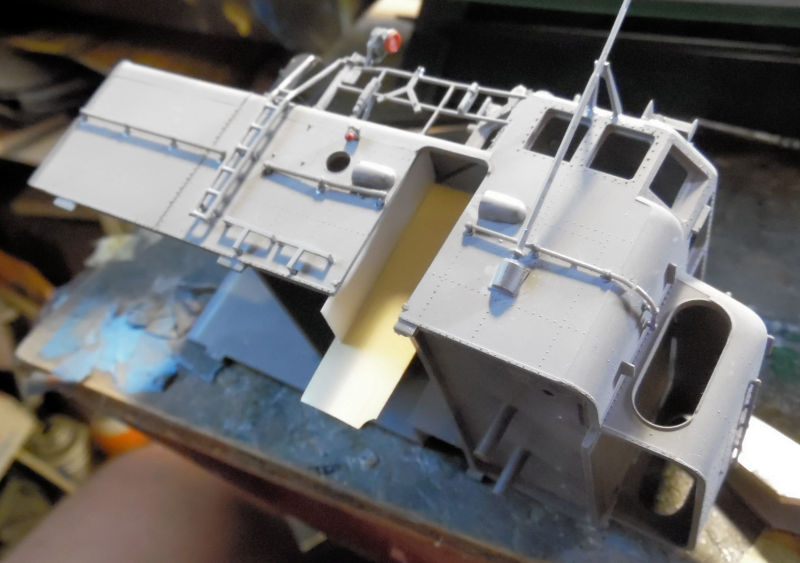
After that was trimmed and painted, windows were installed and some additional touch up painting was done:
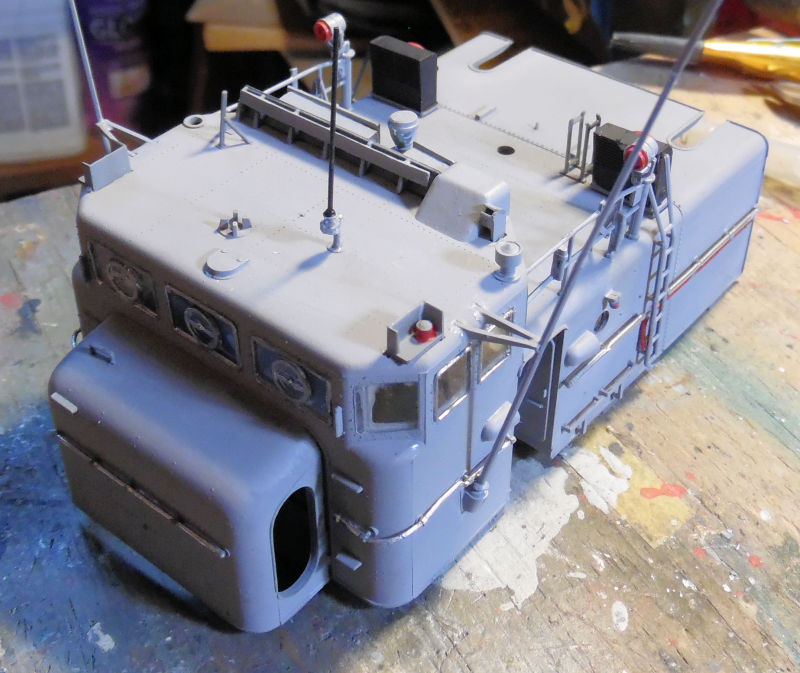

Superstructure was then re-installed in a dry fit and additional hull detailed were painted. There's still lots to do on this but it is getting closer to being done:
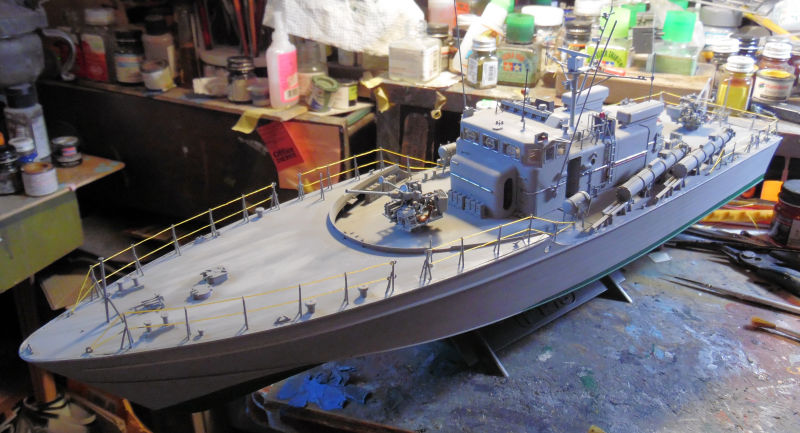
The frustrating thing about this is it gives me stickers, not decals and they are all on a single piece of glossy plastic. I'm not sure what to do about that at this time.
Anyway, that concludes the tour of the Shipyards; now on to the Motor Pool.
In the Motor Pool here, we have been trying to get things caught up on some projects, and started a couple more. In this first bay, we finally managed to get the superstructure of this French gun fully assembled. It took a bit of a fight, with us having to remove almost all of it and rebuilding it:
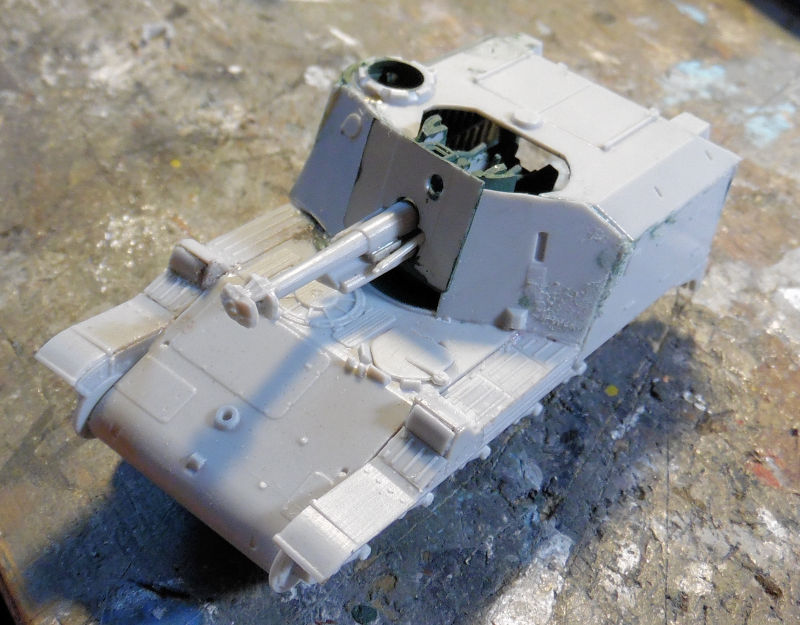
Later we installed all the broken wheels back on and then added the tracks when they were dry:
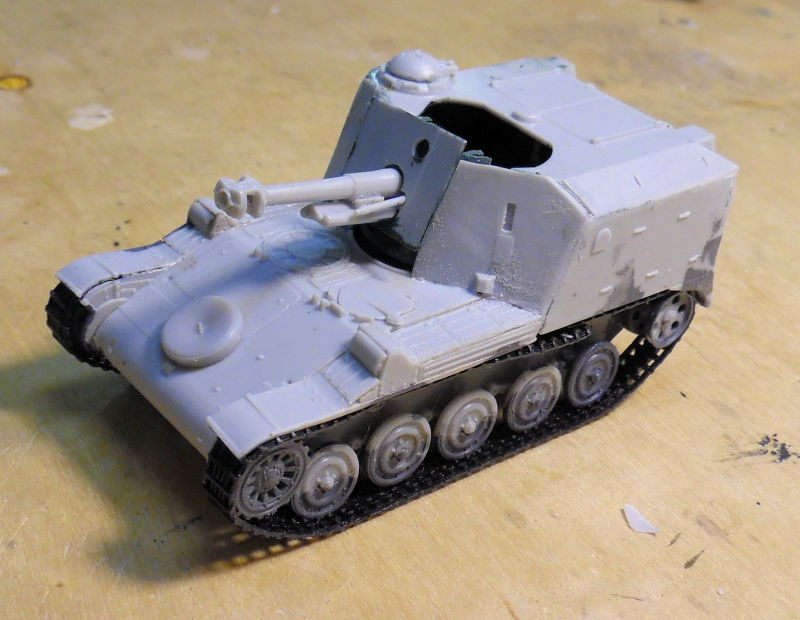
We may get this painted soon, along with about seven other projects.
In this next bay is another project I've been wanting to do for a good long time. It was about time to start on this US Marine M274 Mule with a recoilless rifle on it. Basic assembly was easy:
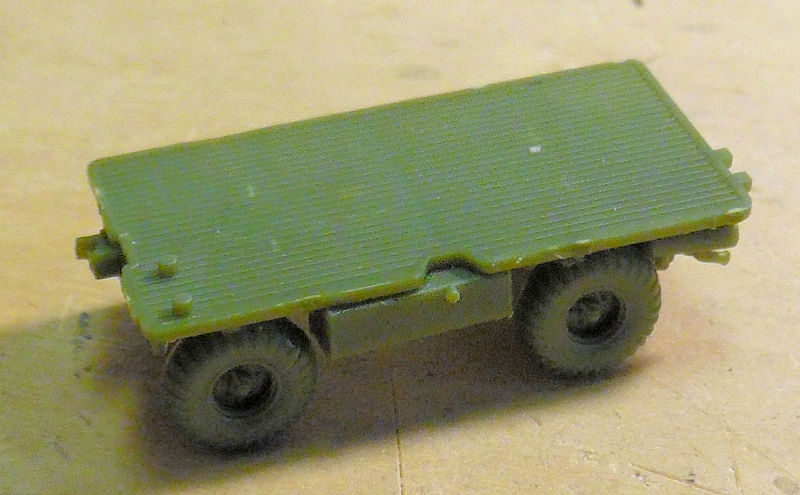
This model is barely an inch long. Later I'll post a pic of it with an Exacto blade so everyone can get an idea of how small this is.
Later on the detail parts were added and the photo-etch parts installed. After they were dry, we started on the photo-etch railing around the bed:
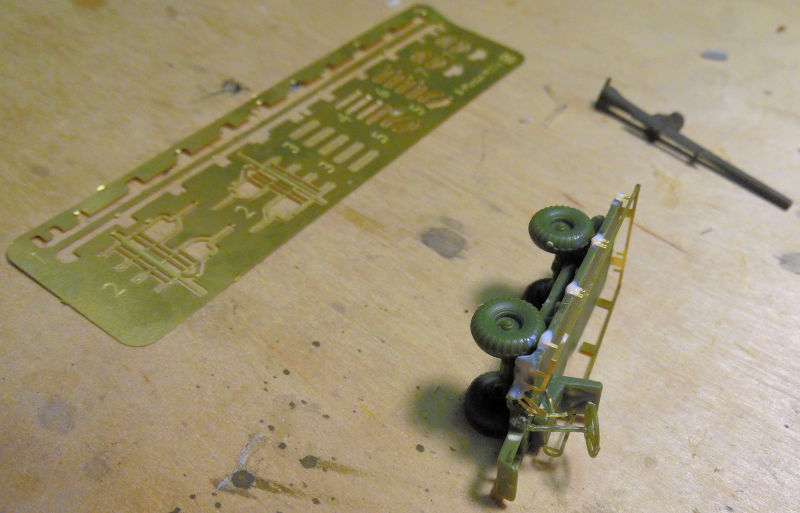
Eventually, the railing got installed all the way around:
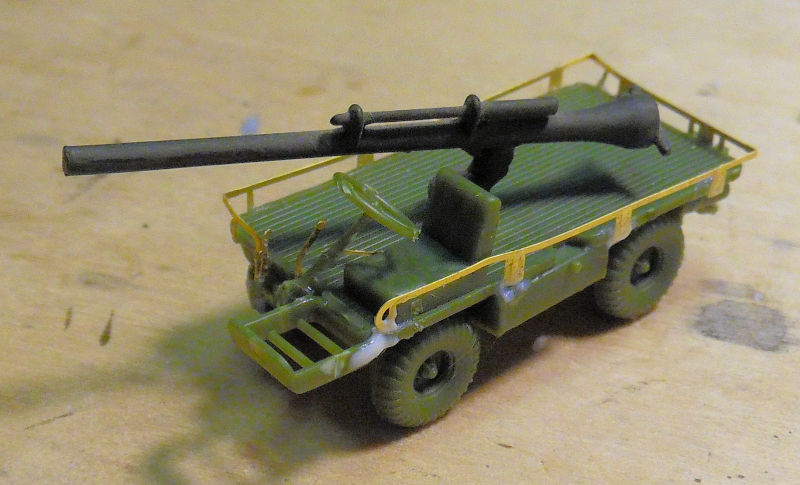
The recoilless rifle was only dry fit so off it came to be painted separately, while we painted the rest of the vehicle:
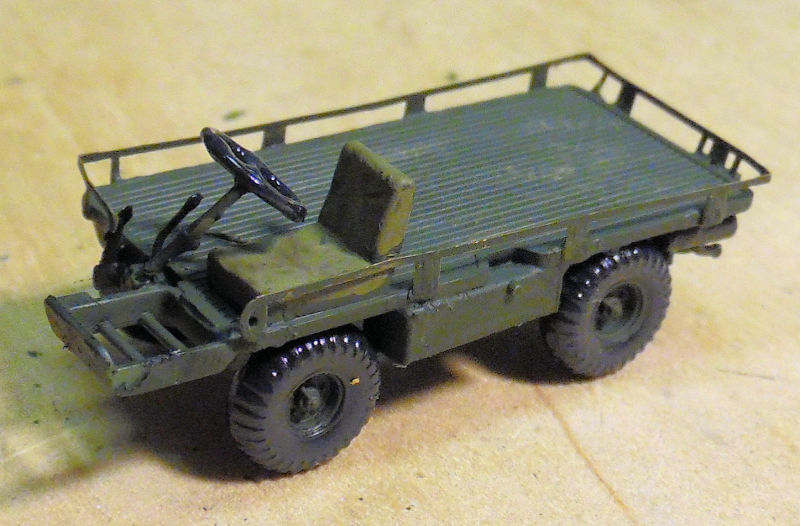
That one is about ready for completion. That being said, let's look into the next bay where we started a German flatcar again, only this one is sporting a 128mm anti-aircraft gun. The bogies were started first, we did one, then the other:
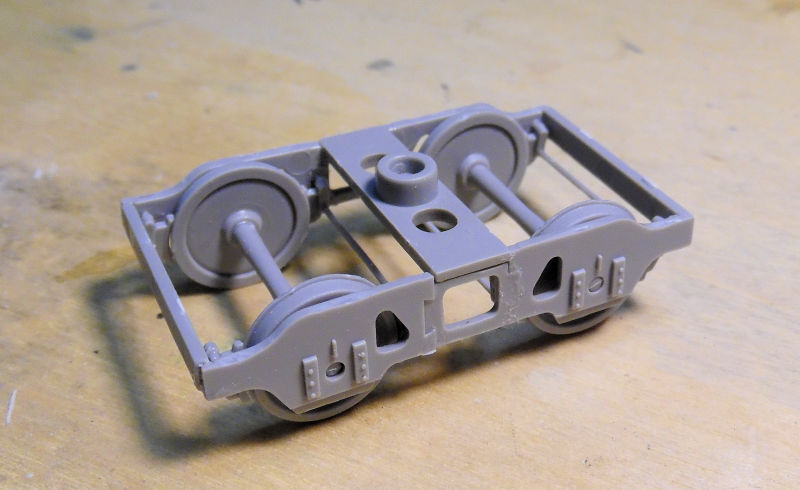
There are some extremely delicate pats in there that don't necessarily fit well in that so you can see why we delayed doing the second one for a bit:
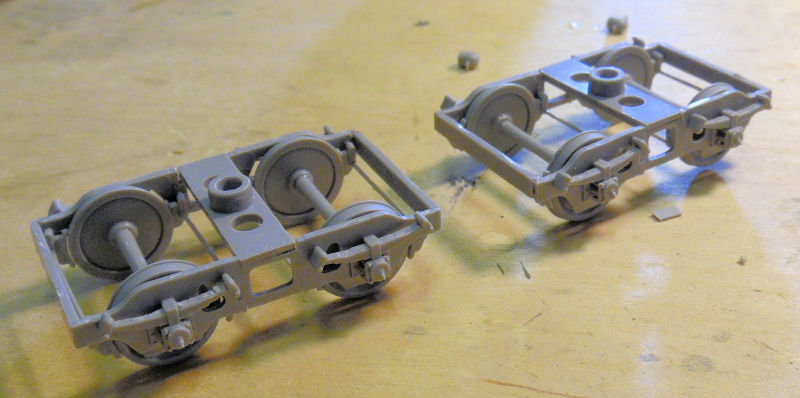
After that the basic flatcar was assembled:
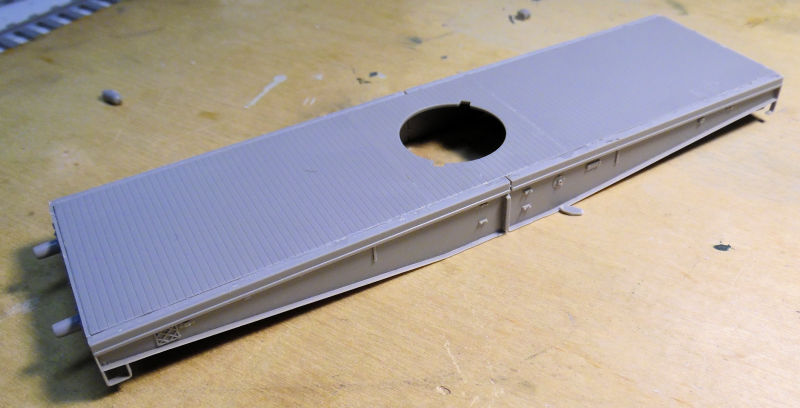
While that was all drying, we started on the gun, making the barrel first:
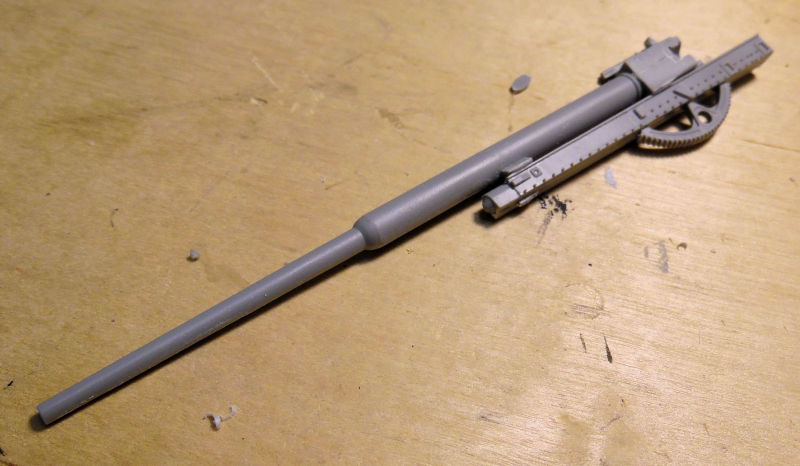
Several detail parts later and after the trunnions were built, this gun is starting to look like an AA gun:
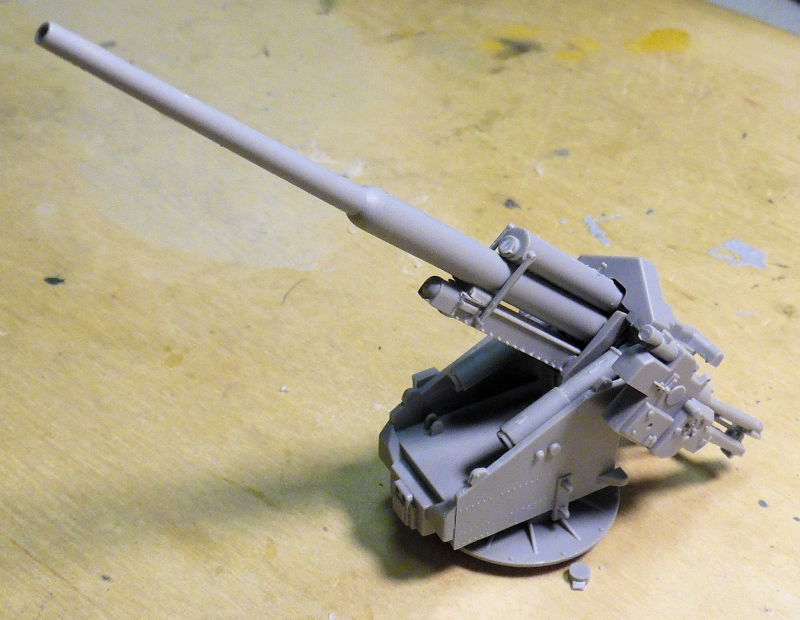
We then built the mounting box for this and dry-fit it on the flatcar:
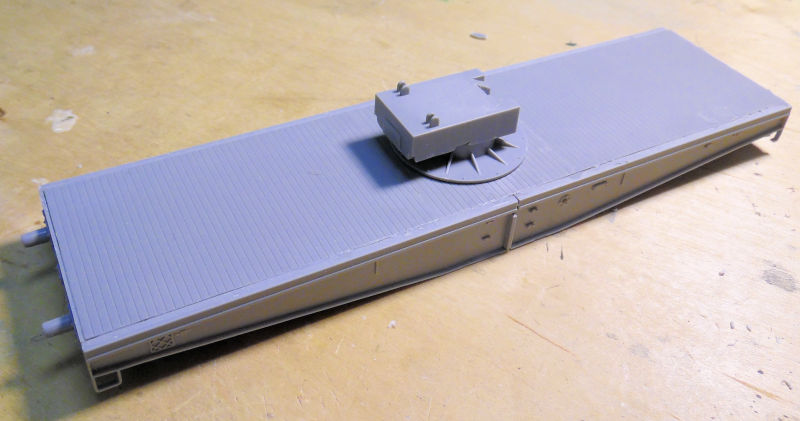
The gun mount was the added to the gun sub-assembly and now it's looking more like it should:
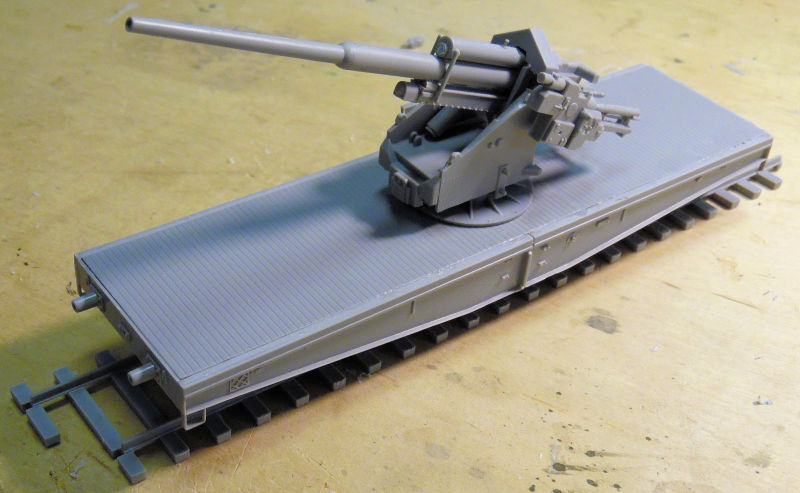
Again it's only dry fit so we were able to get some additional parts on it to complete the sub-assembly:
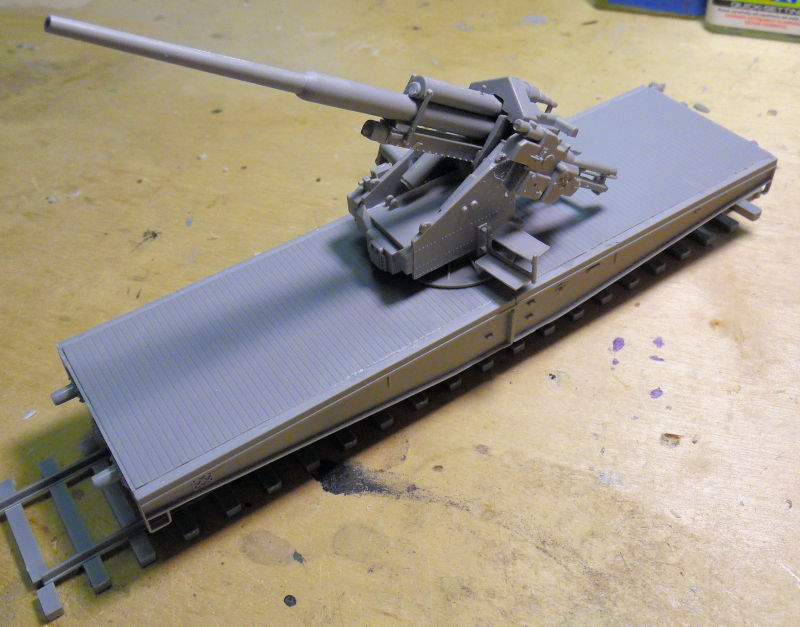
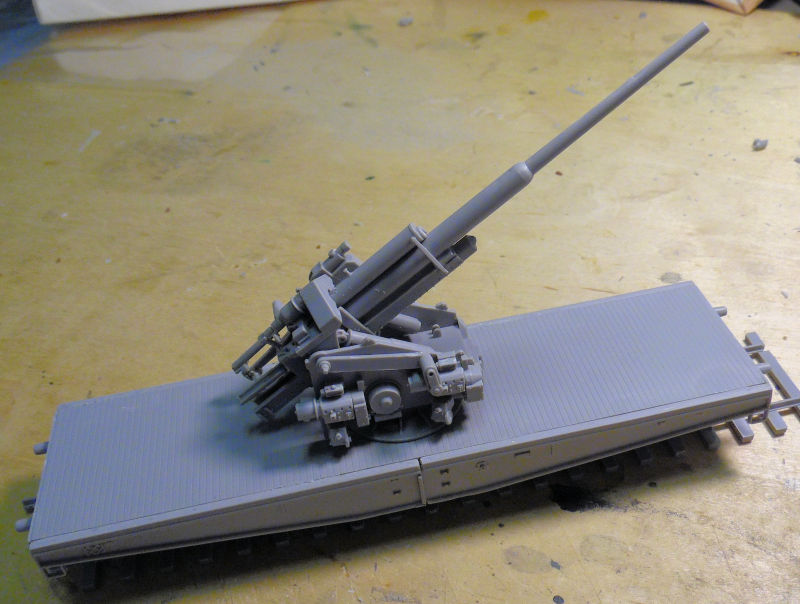
Finally, we got started on trying to replicate a wood colored base. I'm only partially pleased with the result; more experimentation will be needed:
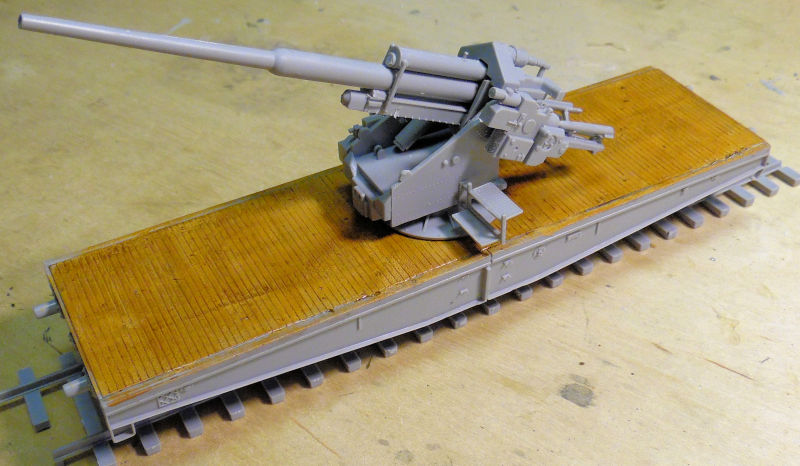
And that concludes our tour of Maddog Manufacturing once again. Thank you all for joining the tour; I hope you enjoyed it. Comments are always welcome.
Our first stop in the Hangar, has a couple projects going. In this first bay, we got the interior of the Cessna 172 painted up and the instrument panel detailed:
Later it was fitted inside the fuselage. You'll note I tried something different, masking the windows before installing them:
This will be painted and decaled later.
In the next bay, we got the pilot figure of the Swedish Tunnen painted, as well as some other cockpit detail:
Later, all was closed up, masked, and shot with silver basecoat. Decals went on next:
Yes, those are the original kit decals. They went on surprisingly well considering their age. However, some still required some 'persuasion' in the form of Tamiya Extra Thin cement.
In this final bay, we didn't get much done on the JRS-1, but the main canopy was masked and installed. A few more detailed parts to add and this will be ready for basecoat:
While that was drying, we decided to get the engines installed inside the cowlings:
And that is our tour of the Hangar for now, on to the Shipyards.
Here in the first slipway, we are starting a new destroyer for a Group Build for anything that floats on another boards. This is what was chosen:
The keel was laid down and the bridge sections and forward superstructure were built up. The rear stack and structure are only dry fit at this time:
It doesn't show here but the rear superstructure is cemented down and additional detail parts were added. We're hoping to get paint on this soon:
In the next bay, we have been trying to get this massive Japanese PT boat out of the slipways and out to her base so extra work has gone into this. First off, all the railings have finally been rigged:
Later, all the extra additional parts were added to the superstructure. The main mast is only dry fit here for removal to prevent breakage later:
This is when I realized that the one side of the superstructure was missing parts that would normally block the view of the interior, so we scratched up some bulkheads for that side. It's a good thing I hadn't glued down the main superstructure:
After that was trimmed and painted, windows were installed and some additional touch up painting was done:
Superstructure was then re-installed in a dry fit and additional hull detailed were painted. There's still lots to do on this but it is getting closer to being done:
The frustrating thing about this is it gives me stickers, not decals and they are all on a single piece of glossy plastic. I'm not sure what to do about that at this time.
Anyway, that concludes the tour of the Shipyards; now on to the Motor Pool.
In the Motor Pool here, we have been trying to get things caught up on some projects, and started a couple more. In this first bay, we finally managed to get the superstructure of this French gun fully assembled. It took a bit of a fight, with us having to remove almost all of it and rebuilding it:
Later we installed all the broken wheels back on and then added the tracks when they were dry:
We may get this painted soon, along with about seven other projects.
In this next bay is another project I've been wanting to do for a good long time. It was about time to start on this US Marine M274 Mule with a recoilless rifle on it. Basic assembly was easy:
This model is barely an inch long. Later I'll post a pic of it with an Exacto blade so everyone can get an idea of how small this is.
Later on the detail parts were added and the photo-etch parts installed. After they were dry, we started on the photo-etch railing around the bed:
Eventually, the railing got installed all the way around:
The recoilless rifle was only dry fit so off it came to be painted separately, while we painted the rest of the vehicle:
That one is about ready for completion. That being said, let's look into the next bay where we started a German flatcar again, only this one is sporting a 128mm anti-aircraft gun. The bogies were started first, we did one, then the other:
There are some extremely delicate pats in there that don't necessarily fit well in that so you can see why we delayed doing the second one for a bit:
After that the basic flatcar was assembled:
While that was all drying, we started on the gun, making the barrel first:
Several detail parts later and after the trunnions were built, this gun is starting to look like an AA gun:
We then built the mounting box for this and dry-fit it on the flatcar:
The gun mount was the added to the gun sub-assembly and now it's looking more like it should:
Again it's only dry fit so we were able to get some additional parts on it to complete the sub-assembly:
Finally, we got started on trying to replicate a wood colored base. I'm only partially pleased with the result; more experimentation will be needed:
And that concludes our tour of Maddog Manufacturing once again. Thank you all for joining the tour; I hope you enjoyed it. Comments are always welcome.
Duke Maddog
Well-known member
Wow, it's been over a month so now it's time for a quick tour of the facilities again. This has been a slow month due to some other obligations and a serious injury that I've mostly recovered from. Also, this will be the last tour until I return from my vacation to Florida on September 14th. I'm going to visit my family and celebrate my mother's 90th birthday with her.
So, without further ado, let's board the trams and see what the latest progress has been happening at Maddog Manufacturing.......
Starting in the Hangar, we have in this first bay the JRS-1. We got the wing masked and then painted yellow. After it dried, we applied the decals:
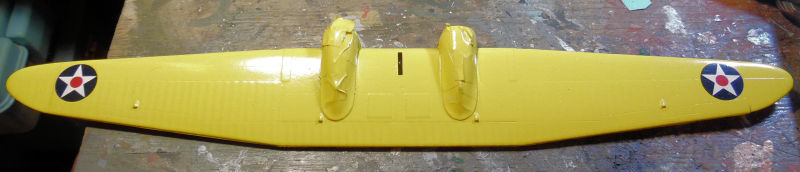
Later, the main wing was cemented to the fuselage which had also gotten the decals applied:
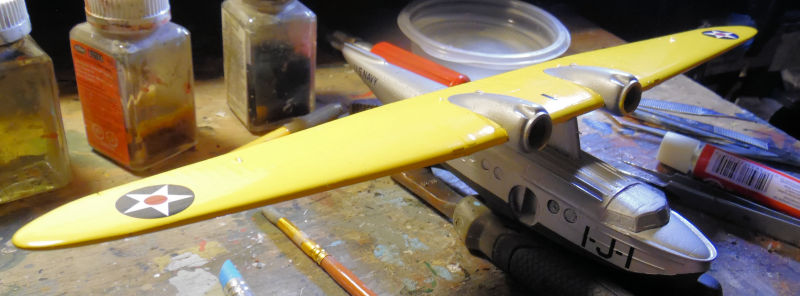
Afterward, the support struts and the outer pontoons were added to the wing. The pontoons will get support cables later:
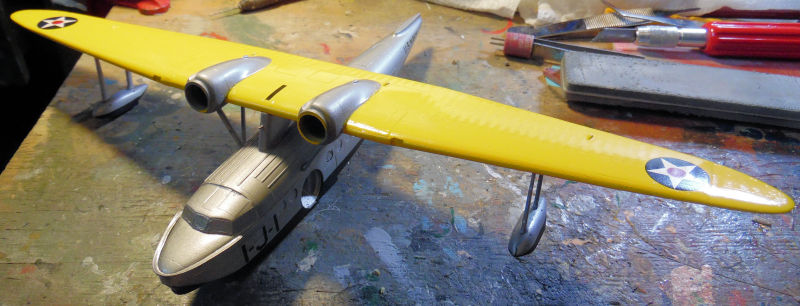
Still a lot to do with that but I still need the screen in my window before I can airbrush again. Until then, we shall move on to the next bay where
we started a 1/72 scale DC-9 in Hughes Airwest markings. This was a kit that I'd picked up at the San Diego Model Show. It had the parts for two almost complete kits inside and the yellow one had been started. Some parts were missing as you'll see soon. First, the wings and tail were all assembled and cemented to the already built fuselage:

Now we discovered what some of the missing pieces were. The previous builder had built the engines, but neglected to put in the end parts:
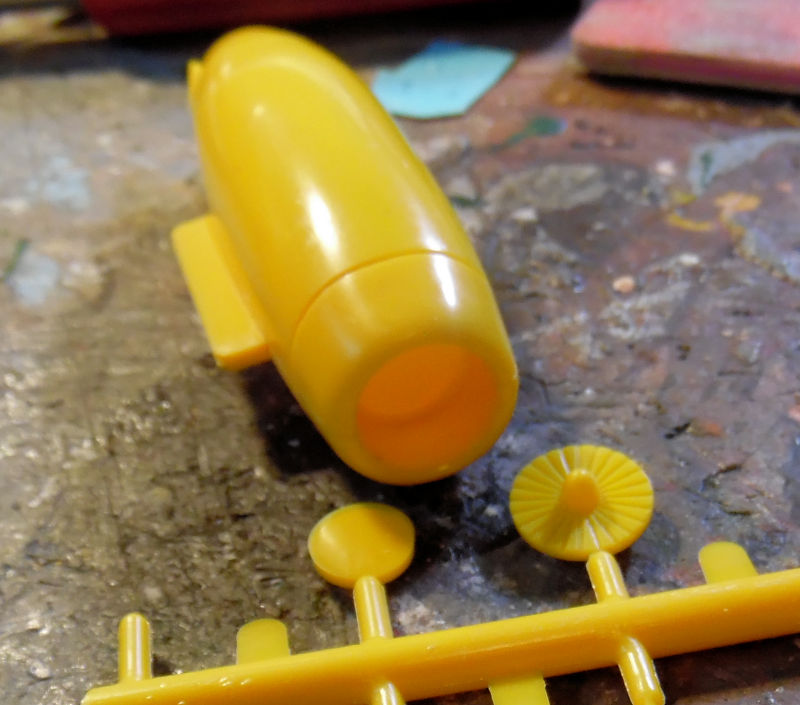
These went in okay, but the other set was missing so one engine has no end pieces. Not gonna worry about it. We installed the engines anyway:
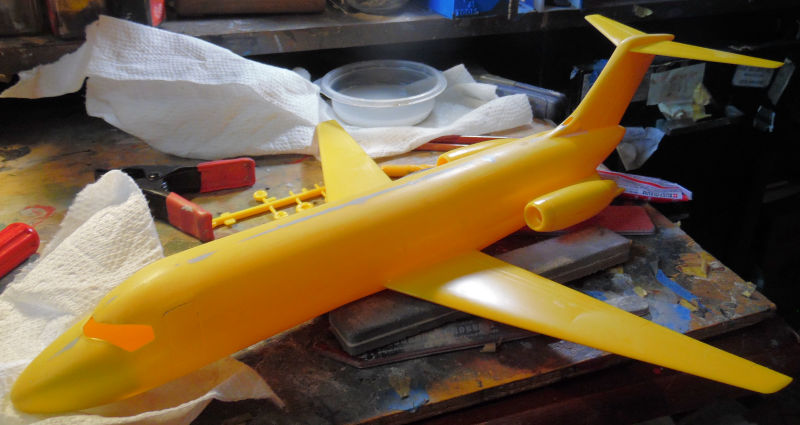
Later, we shot the metallic on the wings and tail:
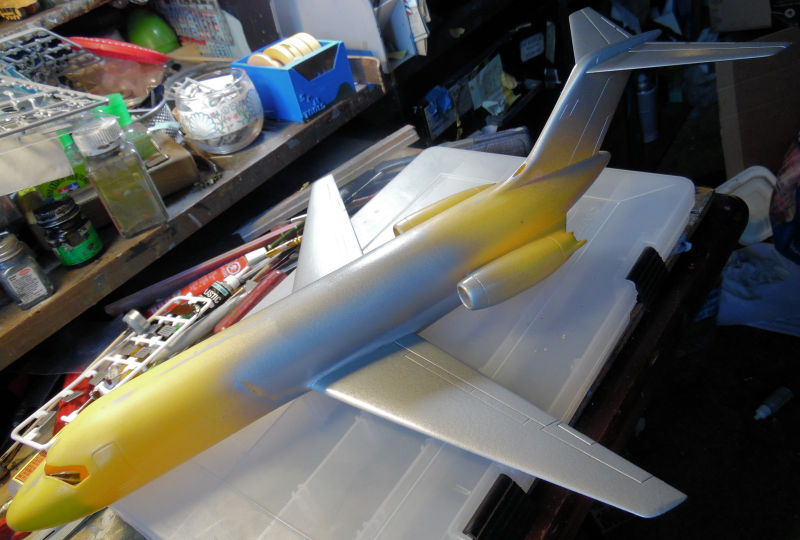
After that dried, we masked off the wings to try and shoot some yellow on this using a rattle can:
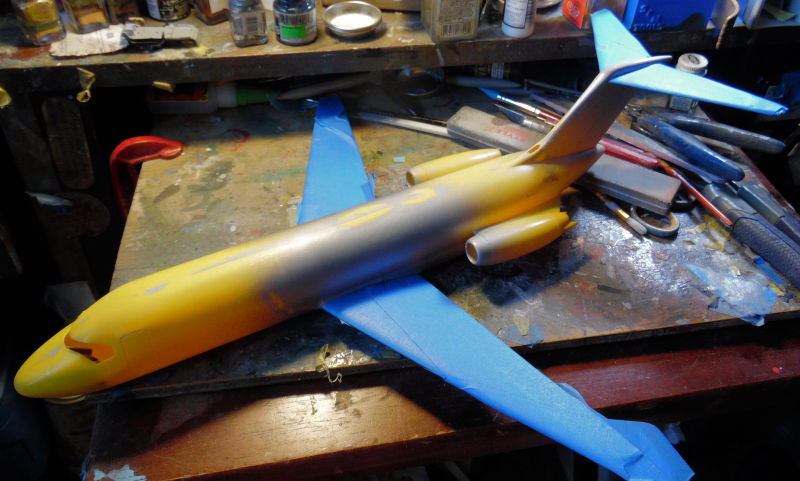
So far the yellow has been a dismal failure so no pics until I can get it right.....
Meanwhile, we looked at starting the second kit in the box, and found one more part that was missing: the main cockpit windscreen. So, using the original one as a template, we marked where the windscreen struts are supposed to go so we could fashion some new ones and use clear sheet to add the panes:
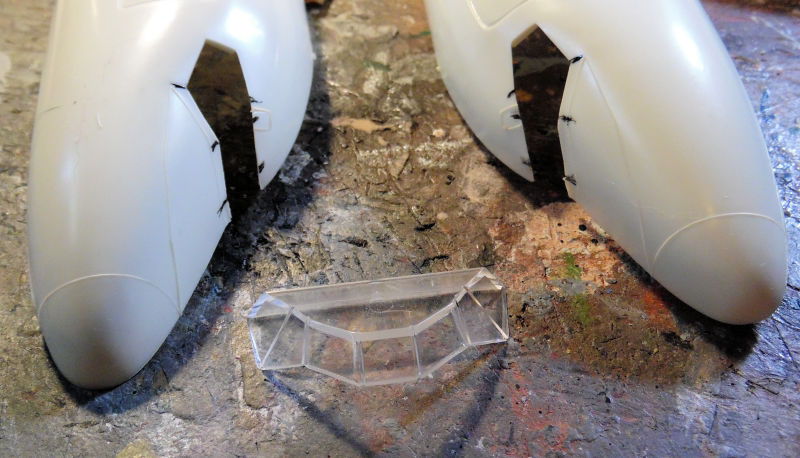
Later I found a third DC-9 kit that had both Hughes Airwest and TWA markings, so now I need to source another airline decal sheet for a 1/72 scale DC-9....
That's it for the Hangar for now, let's head out to the Shipyards to see what's going on..
Here in the Shipyards, we continued to work on the Sunseeker Predator 108. Lots of little parts being added to bigger parts and some decals being applied, but nothing worth shooting pics for. I did shoot one pic of the Predator interior now that it is done:

I also saw how the some of the tinted windows needed some black paint on some framework, so we masked off the parts and painted them black on the inside:
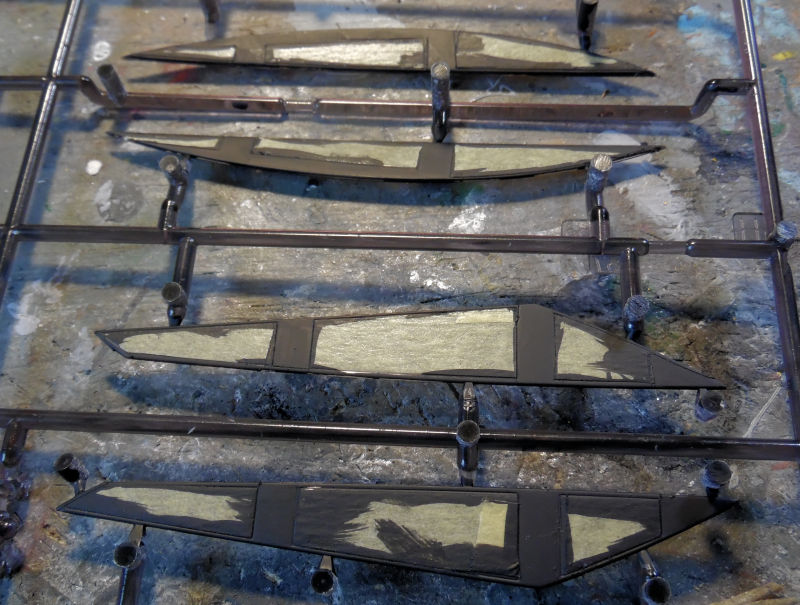
That way when they are installed the black will be gloss on the outside....
All there is left right now is to finish the instrument panel decals and then close this upper cabin up. Then we'll see what else needs to be done before this is finished.
In the next three slipways, we got to work on three Soviet Submarines from WWII. This was a kit that included all three boats:
Now one of these had been started and has been a shelf queen for at least two decades. It was the first one, the Type D. One thing I wanted to do was put these on their stands so they would stay in place while things dried. Unfortunately, they did not add an crossbar for the stand pieces so we improvised:
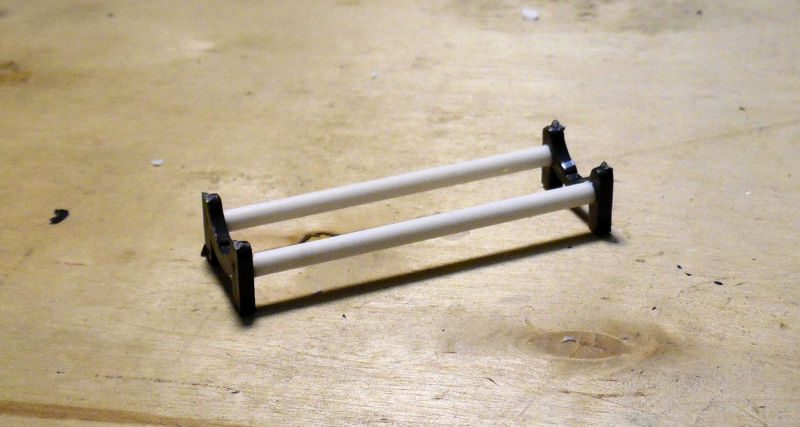
Later, all the missing pieces that I had not added in the past were installed on this hull and conning tower. Now this Type D is waiting for paint:
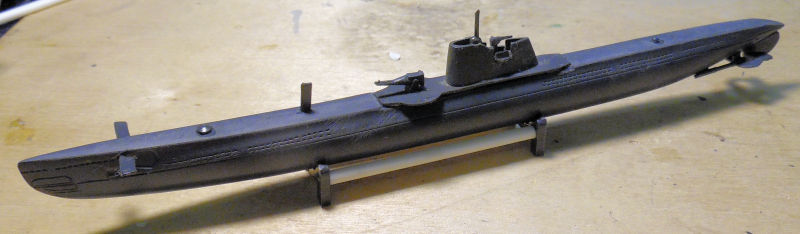
Next, a stand for the next one, a Type L:
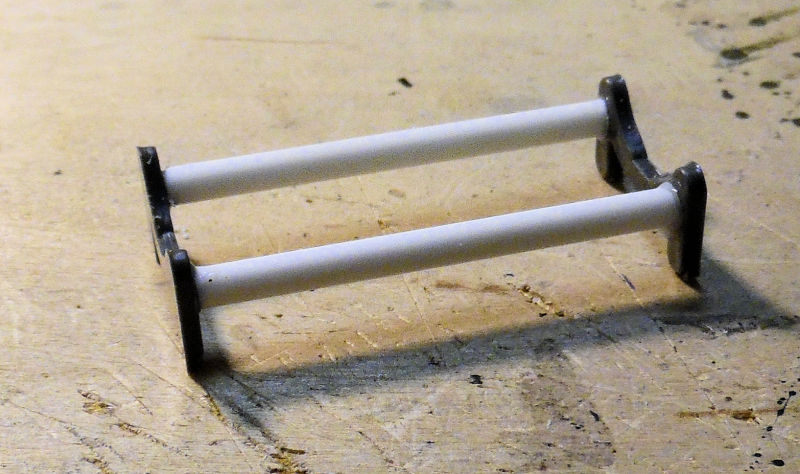
Yes it's shorter, I was running out of that size sprue. However, the hull and conning tower were built up and all the detail parts installed. This Type L is waiting for paint:
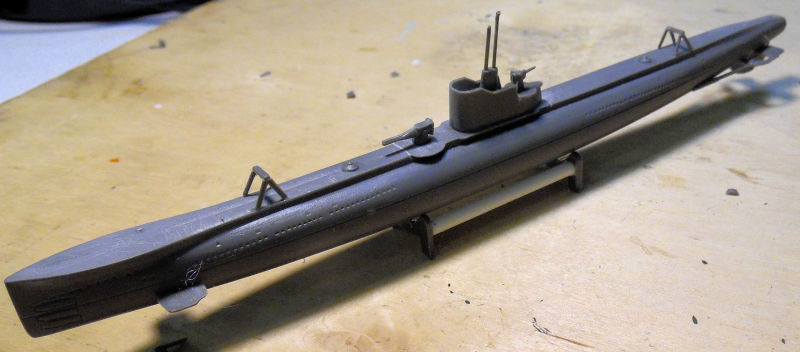
Finally we started on the last one, a Type S. Yes, I built a stand for it, but you don't need to see another stand for this one. The hull was put together first like before:
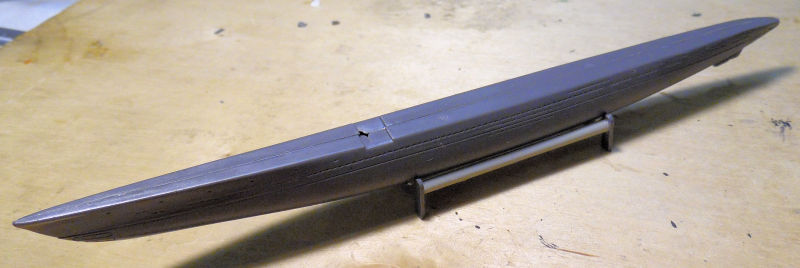
Before too long, the conning tower was built and all the other detail parts were added. This Type S boat is waiting for paint:

Just for fun, here's all three of them together:
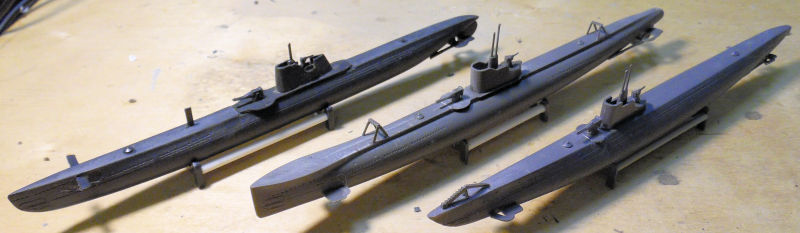
That completes the tour of the Shipyards for now, let's move on to the Motor Pool...
Here in the Motor Pool, there's a couple of started vehicles and more work on my monstrosity.
Let's start with the German Staff Car. This is a snap together kit, but I'm using glue here and there. The first thing we did was to shoot a metallic color over all the body panels and such:
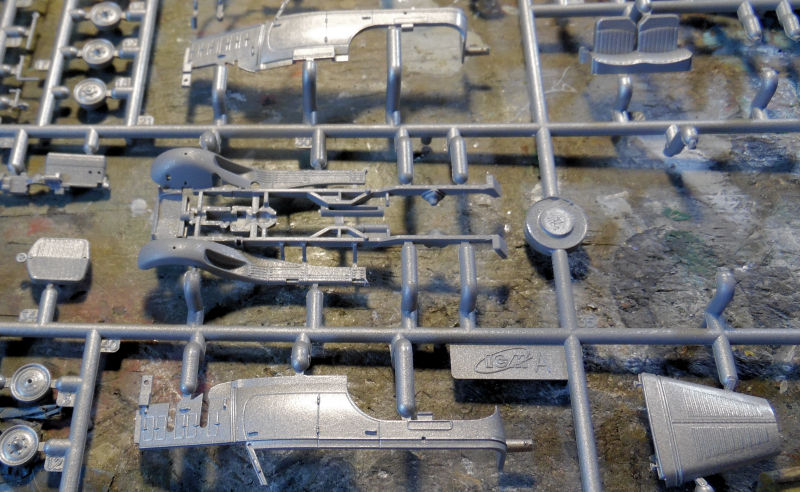
Later, details were painted when the metallic color had dried:
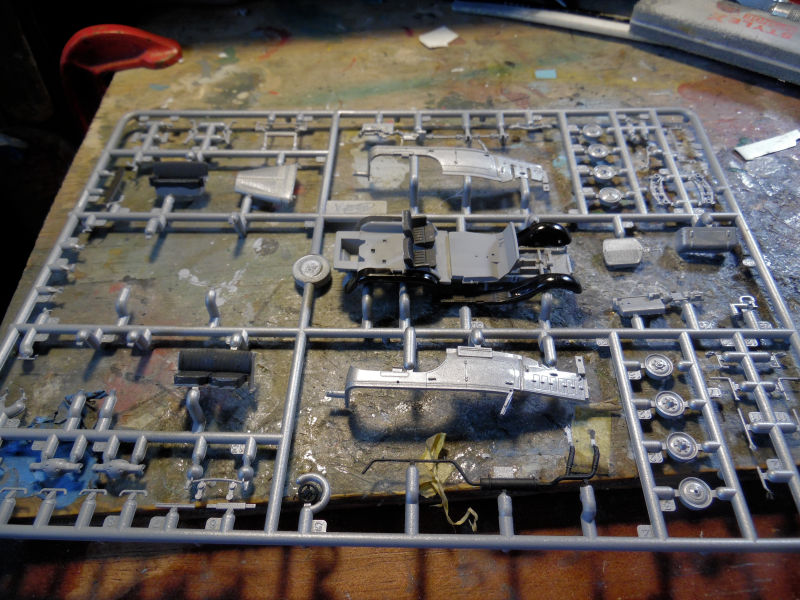
Finally, some assembly got done:
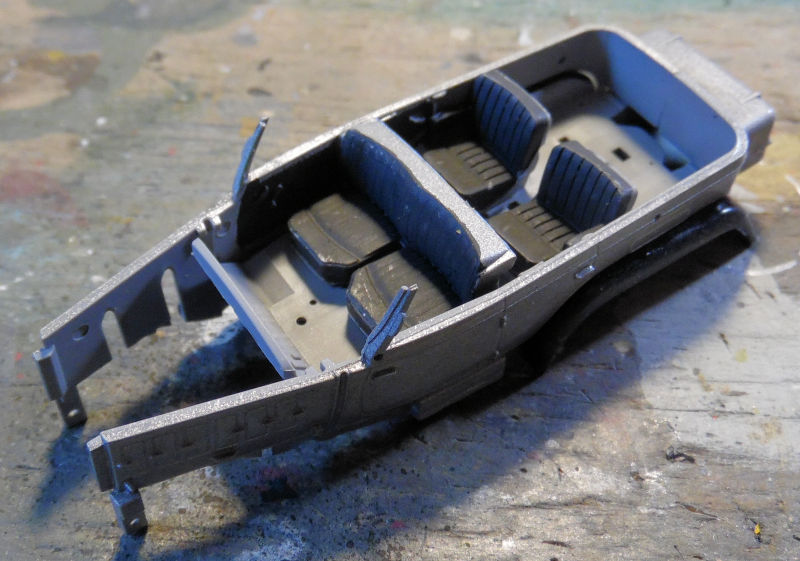
That's all for that one now, in the next bay we started a Chevy wrecker for a group build on another Forums. First was the tiny engine:
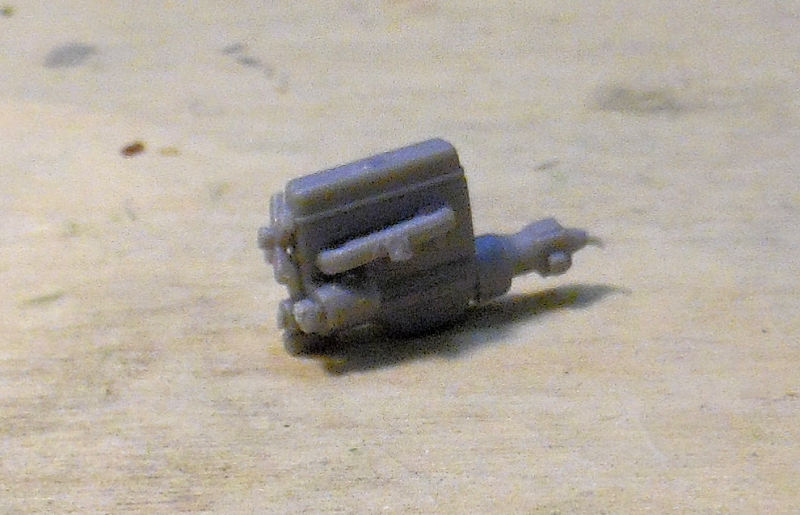
Next the cab which will go over that engine:
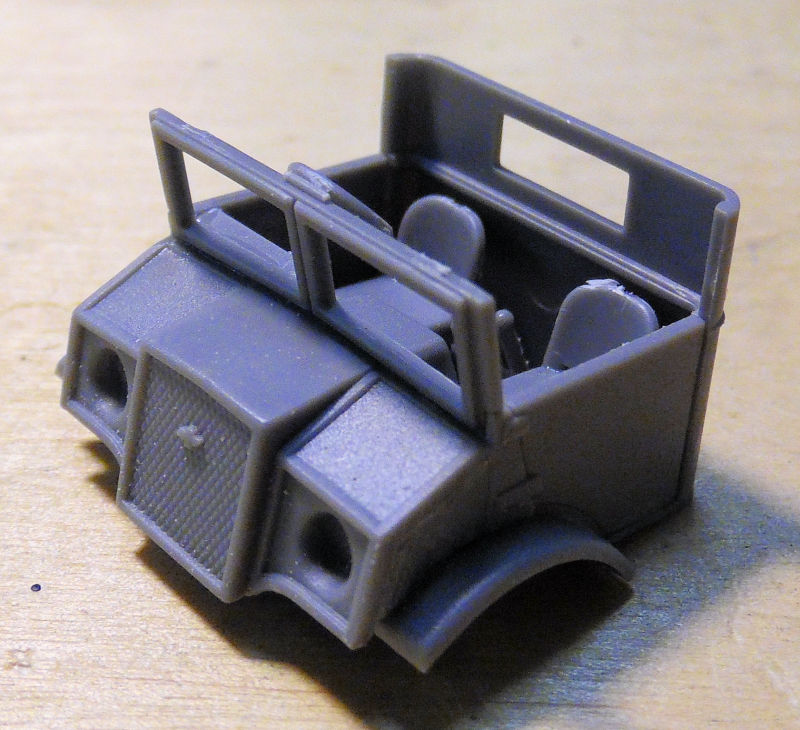
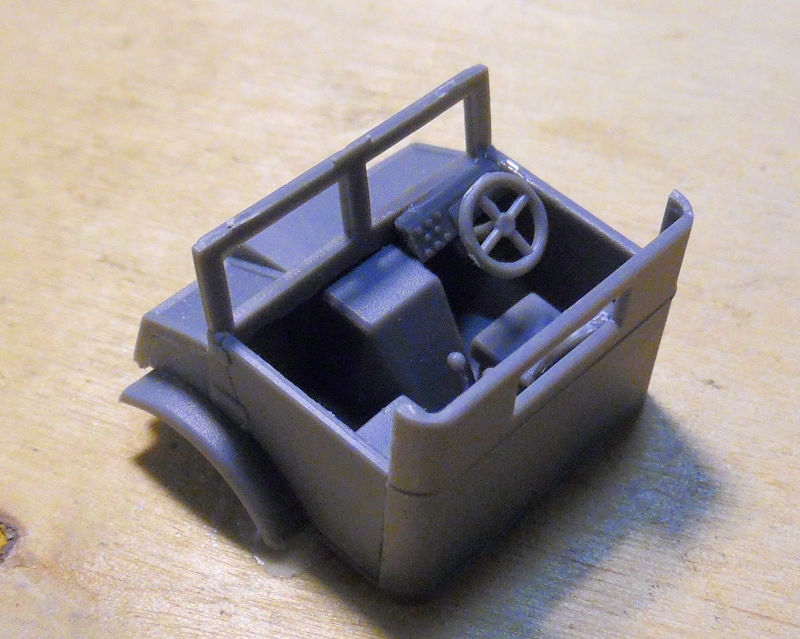
And that is where we stopped on that one.
In this final bay, we continued to build all the bogies for the P.1000 Ratte until they were all done. Afterward when everything was dry, we installed them all on the lower hull and then snapped the upper hull on them so they would dry in the proper position to lock into the connection points on the upper hull skirts. Here is what it looked like:
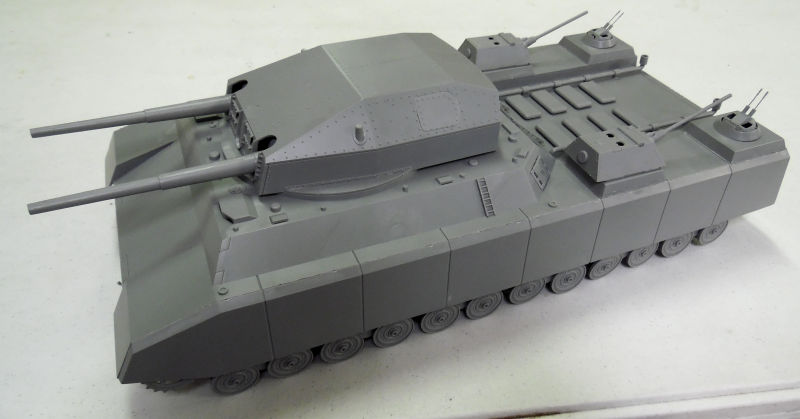
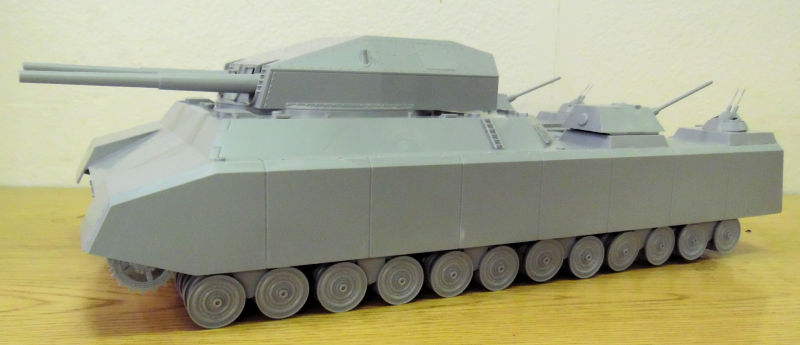
Now all I need to do is figure out the rear idler wheels and why they are fitting so loosely. Then maybe we can start installing the tracks if possible.
Still trying to figure out what camouflage pattern I want to put on this; the box art pattern is just too butt-ugly!!
Maybe an ambush pattern................
And that completes this tour of Maddog Manufacturing, I hope you enjoyed it. Thank you all for taking the tour and comments are always welcome.
So, without further ado, let's board the trams and see what the latest progress has been happening at Maddog Manufacturing.......
Starting in the Hangar, we have in this first bay the JRS-1. We got the wing masked and then painted yellow. After it dried, we applied the decals:
Later, the main wing was cemented to the fuselage which had also gotten the decals applied:
Afterward, the support struts and the outer pontoons were added to the wing. The pontoons will get support cables later:
Still a lot to do with that but I still need the screen in my window before I can airbrush again. Until then, we shall move on to the next bay where
we started a 1/72 scale DC-9 in Hughes Airwest markings. This was a kit that I'd picked up at the San Diego Model Show. It had the parts for two almost complete kits inside and the yellow one had been started. Some parts were missing as you'll see soon. First, the wings and tail were all assembled and cemented to the already built fuselage:
Now we discovered what some of the missing pieces were. The previous builder had built the engines, but neglected to put in the end parts:
These went in okay, but the other set was missing so one engine has no end pieces. Not gonna worry about it. We installed the engines anyway:
Later, we shot the metallic on the wings and tail:
After that dried, we masked off the wings to try and shoot some yellow on this using a rattle can:
So far the yellow has been a dismal failure so no pics until I can get it right.....
Meanwhile, we looked at starting the second kit in the box, and found one more part that was missing: the main cockpit windscreen. So, using the original one as a template, we marked where the windscreen struts are supposed to go so we could fashion some new ones and use clear sheet to add the panes:
Later I found a third DC-9 kit that had both Hughes Airwest and TWA markings, so now I need to source another airline decal sheet for a 1/72 scale DC-9....
That's it for the Hangar for now, let's head out to the Shipyards to see what's going on..
Here in the Shipyards, we continued to work on the Sunseeker Predator 108. Lots of little parts being added to bigger parts and some decals being applied, but nothing worth shooting pics for. I did shoot one pic of the Predator interior now that it is done:
I also saw how the some of the tinted windows needed some black paint on some framework, so we masked off the parts and painted them black on the inside:
That way when they are installed the black will be gloss on the outside....
All there is left right now is to finish the instrument panel decals and then close this upper cabin up. Then we'll see what else needs to be done before this is finished.
In the next three slipways, we got to work on three Soviet Submarines from WWII. This was a kit that included all three boats:
Now one of these had been started and has been a shelf queen for at least two decades. It was the first one, the Type D. One thing I wanted to do was put these on their stands so they would stay in place while things dried. Unfortunately, they did not add an crossbar for the stand pieces so we improvised:
Later, all the missing pieces that I had not added in the past were installed on this hull and conning tower. Now this Type D is waiting for paint:
Next, a stand for the next one, a Type L:
Yes it's shorter, I was running out of that size sprue. However, the hull and conning tower were built up and all the detail parts installed. This Type L is waiting for paint:
Finally we started on the last one, a Type S. Yes, I built a stand for it, but you don't need to see another stand for this one. The hull was put together first like before:
Before too long, the conning tower was built and all the other detail parts were added. This Type S boat is waiting for paint:
Just for fun, here's all three of them together:
That completes the tour of the Shipyards for now, let's move on to the Motor Pool...
Here in the Motor Pool, there's a couple of started vehicles and more work on my monstrosity.
Let's start with the German Staff Car. This is a snap together kit, but I'm using glue here and there. The first thing we did was to shoot a metallic color over all the body panels and such:
Later, details were painted when the metallic color had dried:
Finally, some assembly got done:
That's all for that one now, in the next bay we started a Chevy wrecker for a group build on another Forums. First was the tiny engine:
Next the cab which will go over that engine:
And that is where we stopped on that one.
In this final bay, we continued to build all the bogies for the P.1000 Ratte until they were all done. Afterward when everything was dry, we installed them all on the lower hull and then snapped the upper hull on them so they would dry in the proper position to lock into the connection points on the upper hull skirts. Here is what it looked like:
Now all I need to do is figure out the rear idler wheels and why they are fitting so loosely. Then maybe we can start installing the tracks if possible.
Still trying to figure out what camouflage pattern I want to put on this; the box art pattern is just too butt-ugly!!
Maybe an ambush pattern................
And that completes this tour of Maddog Manufacturing, I hope you enjoyed it. Thank you all for taking the tour and comments are always welcome.
Similar threads
- Replies
- 23
- Views
- 2K
- Replies
- 41
- Views
- 8K
- Replies
- 0
- Views
- 288