Thanks guys, I'm seeing some fuses that may be shaped like this, just don't have the fins on it. Think I can rig some fins and take it from there. Saul what's that fuse on the front of that thing? The seam would be because it's a light casing bomb, I think...been known to be wrong before.
-
Modelers Alliance has updated the forum software on our website. We have migrated all post, content and user accounts but we could not migrate the passwords.
This requires that you manually reset your password.
Please click here, http://modelersalliance.org/forums/login to go to logon page and use the "Forgot your Password" option.
You are using an out of date browser. It may not display this or other websites correctly.
You should upgrade or use an alternative browser.
You should upgrade or use an alternative browser.
Hellcat for Hell in the Pacific
- Thread starter moon puppy
- Start date
I would guess a barometric fuse and the seam would be were the case splits so individual incendiary bomblets spray out.
This might help http://www.ammunitionpages.com/download/535/An_introduction_to_US_bombs.pdf
http://www.303rdbg.com/bombs.html
James
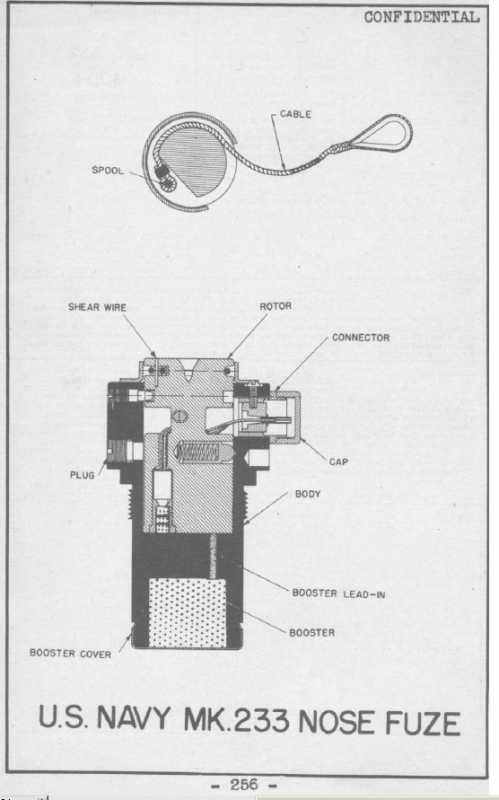
Thanks James, I found some other PDF files and I'm incline to think this is a M233 fuse. It does not have an arming vane but when released, the arming lanyard is attached to a rotor that charges up the fuze, like a pull crank lawnmower.
So, paint it metal and wire it.

the Mk 233 U.S. Navy Fuze


I know, way more info that you need but I've never seen a fuze that didn't have a vane on it. this one arms just by pulling the lanyard and rotating the rotor


I know, way more info that you need but I've never seen a fuze that didn't have a vane on it. this one arms just by pulling the lanyard and rotating the rotor
Thanks for all the positive waves man..
I broke out the Sotar to get the color demarks looking good and it really helps. I was thinking how am I going to fad and weather this thing being 3 colors, so I stopped thinking and started doing.
Here we are with your basic Tri-Color camo scheme. I'll get the Vallejo colors I used, came in a set of USAAF/USN colors.

Added Buff to the intermediate blue

I did a progressive fading job, added a little buff, squirted..little more, squirted more..little more...you get the picture. Then I started bringing it back to highlight the points that would not be faded. Like around the rivet lines.
I have not done the dark blue yet, if this looks like crap I want to go to plan B before doing the dark blue.
Question is, is it overdone?
I broke out the Sotar to get the color demarks looking good and it really helps. I was thinking how am I going to fad and weather this thing being 3 colors, so I stopped thinking and started doing.
Here we are with your basic Tri-Color camo scheme. I'll get the Vallejo colors I used, came in a set of USAAF/USN colors.

Added Buff to the intermediate blue

I did a progressive fading job, added a little buff, squirted..little more, squirted more..little more...you get the picture. Then I started bringing it back to highlight the points that would not be faded. Like around the rivet lines.
I have not done the dark blue yet, if this looks like crap I want to go to plan B before doing the dark blue.
Question is, is it overdone?
Thanks James,Just had a thought, try shooting a mist of highly thinned down original colour over it to meld it all.
I did hit it once with it, will do it again, maybe a filter? :dance
Thanks Chuck
Thanks Warren, let's see how she looks now.
I tired to blend the fading of the dark blue with the intermittent blue, to keep the level of fading consistent between the two colors. Think I was hit and miss

I'll get some more shots of the demark lines
I tired to blend the fading of the dark blue with the intermittent blue, to keep the level of fading consistent between the two colors. Think I was hit and miss

I'll get some more shots of the demark lines
I wonder if I could have done the same thing coming over the base colors with a really thin buff and build it up?
phantom II
Master at Arms
I agree with Jame's comment however I think that the dark blue surfaces need some fading as well.
Cheers, Christian B)
Cheers, Christian B)
More fading or you looking at the earlier picture?
phantom II
Master at Arms
Sorry Bob, that one must have sneaked by me while I was pecking out a message 
Cheers, Christian B)

Cheers, Christian B)
Similar threads
- Replies
- 7
- Views
- 354
- Replies
- 95
- Views
- 9K

