
-
Modelers Alliance has updated the forum software on our website. We have migrated all post, content and user accounts but we could not migrate the passwords.
This requires that you manually reset your password.
Please click here, http://modelersalliance.org/forums/login to go to logon page and use the "Forgot your Password" option.
You are using an out of date browser. It may not display this or other websites correctly.
You should upgrade or use an alternative browser.
You should upgrade or use an alternative browser.
Bf 110G-4 in-progress
- Thread starter matrixone
- Start date
 ...
... Skinny_Mike
Well-known member
Thanks for the replies!
James,
After the intense decaling session trying to piece together all those broken tiny stencil markings I tried to stand up and was hit by severe pain in my lower back...this stopped about everything for a couple days including modeling. Who would have thought you could get hurt building plastic scale models. :huh:
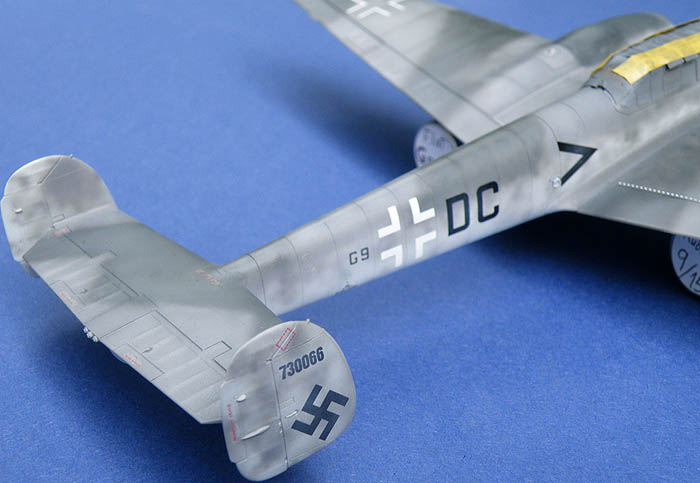
The W.Nr. on the left fin was airbrushed out and many of the stencil markings and fuselage code markings were toned down, I wanted the markings to look as tired and worn looking as the paint job.


Matrixone
James,
After the intense decaling session trying to piece together all those broken tiny stencil markings I tried to stand up and was hit by severe pain in my lower back...this stopped about everything for a couple days including modeling. Who would have thought you could get hurt building plastic scale models. :huh:
The W.Nr. on the left fin was airbrushed out and many of the stencil markings and fuselage code markings were toned down, I wanted the markings to look as tired and worn looking as the paint job.
Matrixone
Thanks guys!
Like the other models this Bf 110G-4 had oil paints used to highlight random panel lines...mostly on the undersurface and control surfaces. Its slowly starting to look like a war weary machine.")
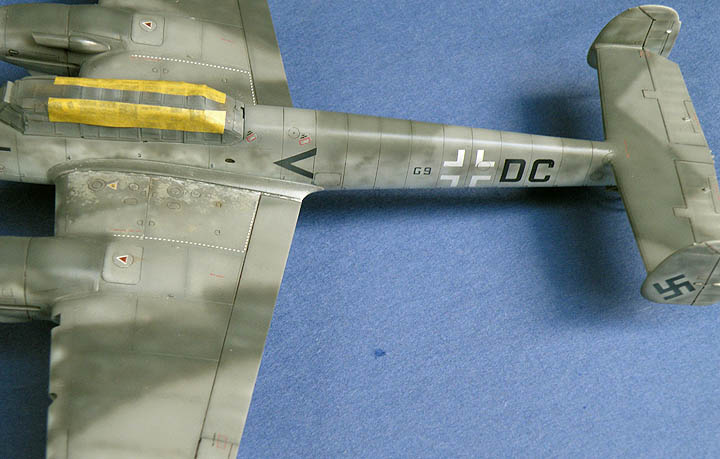
The wing roots had quite a bit of wear added but in these pictures it just looks like blobs of paint, in fact they are RLM 02 and metall and once the flat clear coat is on the work I did on the wing roots will look more like worn paint, also the final part of weathering will be using a sharpened silver artists pencil to add fresh looking paint chips.


Matrixone
Like the other models this Bf 110G-4 had oil paints used to highlight random panel lines...mostly on the undersurface and control surfaces. Its slowly starting to look like a war weary machine.
The wing roots had quite a bit of wear added but in these pictures it just looks like blobs of paint, in fact they are RLM 02 and metall and once the flat clear coat is on the work I did on the wing roots will look more like worn paint, also the final part of weathering will be using a sharpened silver artists pencil to add fresh looking paint chips.
Matrixone
Thanks for the comments!
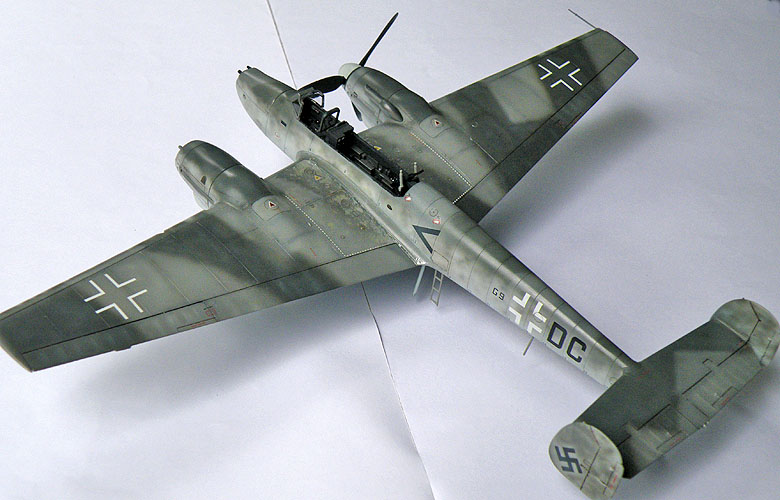
After finishing three other models I have returned to this poor old Bf 110 and am getting close to getting this completed too.
A lot of the small breakable bits have been glued on the underside and after doing so I can't help but wonder how this older aircraft design was able to even catch up to the bombers with all of its various antenna causing so much drag.
The model must now be handled with extreme care to avoid breaking anything off...and I thought it was a pain before to avoid breaking off the pitot tube during all the painting and weathering steps! I had so many close calls but never actually broke it.


The canopy was removed and all the masking was taken off so I could glue a few interior parts to the inside of the canopy and also to glue the weapons in the rear of the cockpit. After the flat clear coat is sprayed on the canopy will be the last thing attached to the model.
After all the tiny parts that were just glued on the model are dry I will tack on the flame dampeners to work out where I will need to airbrush the exhaust stains and get that done, after that the flame dampeners and drop tanks can be attached.
For all the little problems I had with this kit I am starting to like it now, its too bad the size problems with the engine cowls and spinners exist because otherwise this is a great looking representation of the Bf 110G-4. :salute
Matrixone
After finishing three other models I have returned to this poor old Bf 110 and am getting close to getting this completed too.
A lot of the small breakable bits have been glued on the underside and after doing so I can't help but wonder how this older aircraft design was able to even catch up to the bombers with all of its various antenna causing so much drag.
The model must now be handled with extreme care to avoid breaking anything off...and I thought it was a pain before to avoid breaking off the pitot tube during all the painting and weathering steps! I had so many close calls but never actually broke it.
The canopy was removed and all the masking was taken off so I could glue a few interior parts to the inside of the canopy and also to glue the weapons in the rear of the cockpit. After the flat clear coat is sprayed on the canopy will be the last thing attached to the model.
After all the tiny parts that were just glued on the model are dry I will tack on the flame dampeners to work out where I will need to airbrush the exhaust stains and get that done, after that the flame dampeners and drop tanks can be attached.
For all the little problems I had with this kit I am starting to like it now, its too bad the size problems with the engine cowls and spinners exist because otherwise this is a great looking representation of the Bf 110G-4. :salute
Matrixone
phantom II
Master at Arms
Really liking the paint on this bird Matrix. One of my favorites so far
Cheers, Christian B)
Cheers, Christian B)
Lovin' it Les. 
Sherman 18
Master at Arms
I swear you need to be running a class on how to do the Matrixone 
Thanks so much for the kind words!
This build could be done in as little as two days from now...however, a series of strong storms are now hitting where I live and the forecast is for rain for the next seven days so like the other three models I just finished it may take a while before I can get out to the airfield and get proper pictures of them.
The wind gusts are getting quite strong at the moment and my old Bf 110G-2 that has been serving as a test subject for how model paints weather outdoors took a short flight off the deck and I thought it was gone for good but I did locate it later, yes its busted up pretty good but still has one propeller.
Matrixone
Similar threads
- Replies
- 50
- Views
- 10K
- Replies
- 20
- Views
- 3K
- Replies
- 14
- Views
- 3K
- Replies
- 6
- Views
- 3K