
-
Modelers Alliance has updated the forum software on our website. We have migrated all post, content and user accounts but we could not migrate the passwords.
This requires that you manually reset your password.
Please click here, http://modelersalliance.org/forums/login to go to logon page and use the "Forgot your Password" option.
- Home
- Forums
- Current Campaigns
- Past Campaigns
- Finished Campaigns
- 2016 Campaigns
- Micro Modeler Month II
You are using an out of date browser. It may not display this or other websites correctly.
You should upgrade or use an alternative browser.
You should upgrade or use an alternative browser.
1/144 B-2 Stealth Bomber
- Thread starter Skinny_Mike
- Start date
helios
Well-known member
Thanks Adam. Will that work after a flat coat has been applied?
I used Micro-Sol (red bottle) on the SR-71 after the dull coat was applied.
Skinny_Mike
Well-known member
Thanks guys for all this help! This is honestly one of the reasons why I love this site, all the great collaboration!
Helios - I originally used the micro-set/sol system on the decals originally. The solvaset got the decals down, but they are really silvered bad. (Sorry no pictures from work) I'm going to finish assembly tonight so I can finish this stupid thing on time, and then I'll give Adam's suggestion a try. I also tried using a different gloss coat last night on the nose gear door, I'm interested to see how that decal turns out. Should know more this evening. Stay tuned! This one is coming down to the wire!
(BTW - Moon - we really need an emoticon of a dude sweating! :laugh: )
(BTW - Moon - we really need an emoticon of a dude sweating! :laugh: )
:S ? :idonno
Yeah Adam, I've seen that effect when trying to install something late in the game that might be on a decal, never thought of using it to make a decal behave. Nice!
OK Mike, all eyes on you. Before and after shots please.

Skinny_Mike
Well-known member
OK Mike, all eyes on you. Before and after shots please.
Geez - no pressure or anything!
Skinny_Mike
Well-known member
Well - I got the B-2 finished, but I'm not going to have time to get up a final WIP post tonight. So here is the photo of the completed aircraft as proof that she's built.
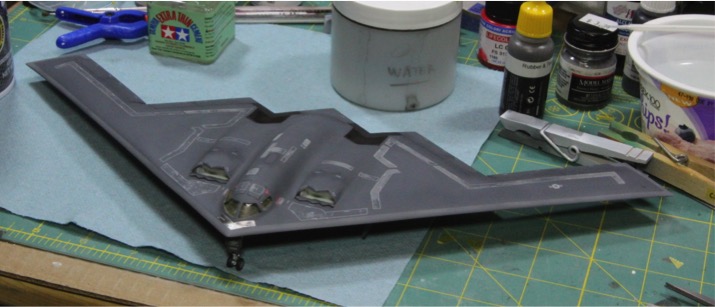
I'll put up the last steps of the build tomorrow, if that's ok with everyone.
BTW - I've taken a "before" closeup on one of the walkways, and then I brushed on some Tamiya extra thin. I'll post the results tomorrow as well.
Thanks all!
Mike
I'll put up the last steps of the build tomorrow, if that's ok with everyone.
BTW - I've taken a "before" closeup on one of the walkways, and then I brushed on some Tamiya extra thin. I'll post the results tomorrow as well.
Thanks all!
Mike
Looks great from here, nice job Mike, looking forward to those WIP shots.
Skinny_Mike
Well-known member
Well modelled, Mike !!
Ian.
Thanks Ian!
Skinny_Mike
Well-known member
Great job Mike!...Congrats
Luiz
Thanks Luiz! I appreciate it!
Skinny_Mike
Well-known member
Skinny_Mike
Well-known member
1/144 B-2 Stealth Bomber - FINISHED!
Alright folks, as promised, here’s the final WIP post for this build.
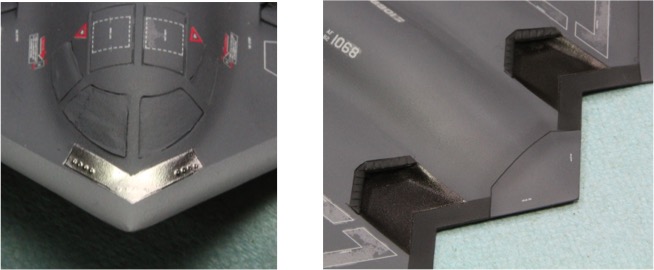
First thing that I needed to do was paint the metallic on the airframe itself. I had to carefully mask these panels so as to avoid damaging the decals or the paint. I used Tamiya tape and post-it notes for the masks. The pitot static panel on the nose was painted in Alclad Stainless Steel, over a MM Gloss Black base to represent the titanium. The area directly behind the engine exhaust was painted in Gunze Mr. Color Metallic Black. Its not a perfect match, but its good enough.
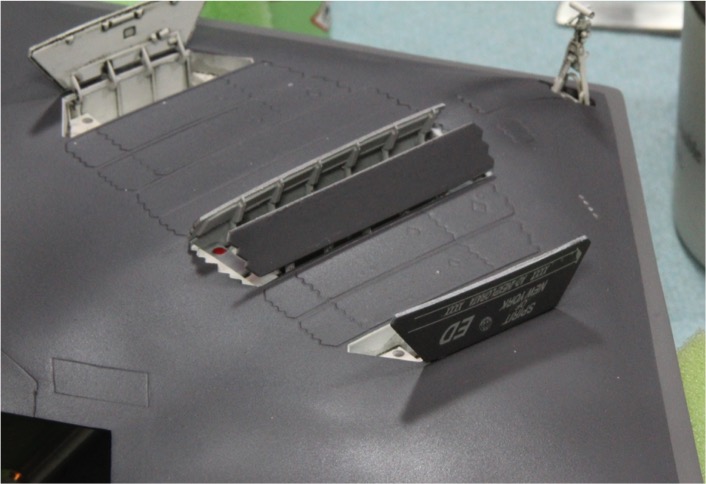
Next up the weapons bay. This is represented by a shallow rectangular cut-out molded to the bottom of the airplane. It has a couple of molded weapons as well as some molded structure to represent the equipment for carrying and releasing the weapons. There are also two weapons molded into the bay and a third that is a separate piece. I painted everything in LifeColor acrylics grays and black with the weapons being OD green. No part of this detail is accurate and will be completely invisible once the doors are attached anyway.

The weapons bay doors were painted at the same time as the gear doors and follow the same pattern, white on the inside and gray on the outside. All the doors were added next, as was the nose landing gear, which was assembled and painted white before assembly.

And a side view with the door markings.
The weapon bay doors are typically not in this configuration on the ground, but usually both sets of weapons bay doors are opened to 90 degrees when they are parked. The kit parts are molded at an angle and I really didn’t have time to fix that so we’ll live with it.
Next up, the main landing gear were assembled, painted and installed. There was no fuss here at all everything, including the tires fit perfectly. The tires were sprayed white, given a gloss coat and then a black wash followed by brush painting the wheels with Ammo by Mig Tires and Rubber. Not perfect, but pretty good. The photo in the corner shows you just how tiny these assemblies are.

And the nose gear door. I didn’t bother fixing the hinge and in the end it didn’t matter because the broken part isn’t visible anyway. It all worked out. I did use a different method for decaling this piece though. After the gray had dried, I spray Testors GlossCote from the rattle can on the part. After it dried overnight, I applied the decal and then some Solvaset to snuggle it down. After that sat all day I applied a second layer of GlossCote followed by flat coat with Testors Flat Lacquer. The result, no silvering at all. Looks perfect. Hopefully this pic shows off the finish.

After I was done with the assembly, I removed the masking from the windows and the intakes and exhausts.

And we are done!
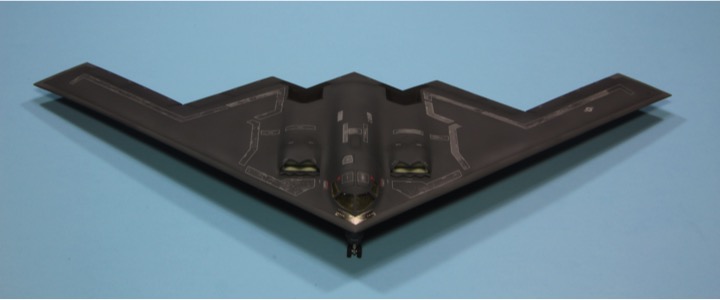
In the end this little beast fought me, but other then the decal silvering issue I have a reasonable result.
While we are on the silvering issue, I tired Adam’s suggestion of Tamiya Extra Thin Cement. I brushed it on just the end of one of the wing walkways as an experiment and here are the before (left) and after (right) results. You can actually see the difference in the spot that was treated in the picture above, which I actually took today.

Looks like it worked well. I did get a little bubbling so I poked a hole and reapplied and it settled down. I am going to apply the glue to all of the decals then spray the airframe in gloss and flat again to see how it looks. But for now I think we can say a big thanks to Adam for the tip!
Thanks for watching everyone! I appreciate all the encouraging comments and all the help. Now let’s get to the Tangle!
Mike
Alright folks, as promised, here’s the final WIP post for this build.
First thing that I needed to do was paint the metallic on the airframe itself. I had to carefully mask these panels so as to avoid damaging the decals or the paint. I used Tamiya tape and post-it notes for the masks. The pitot static panel on the nose was painted in Alclad Stainless Steel, over a MM Gloss Black base to represent the titanium. The area directly behind the engine exhaust was painted in Gunze Mr. Color Metallic Black. Its not a perfect match, but its good enough.
Next up the weapons bay. This is represented by a shallow rectangular cut-out molded to the bottom of the airplane. It has a couple of molded weapons as well as some molded structure to represent the equipment for carrying and releasing the weapons. There are also two weapons molded into the bay and a third that is a separate piece. I painted everything in LifeColor acrylics grays and black with the weapons being OD green. No part of this detail is accurate and will be completely invisible once the doors are attached anyway.
The weapons bay doors were painted at the same time as the gear doors and follow the same pattern, white on the inside and gray on the outside. All the doors were added next, as was the nose landing gear, which was assembled and painted white before assembly.
And a side view with the door markings.
The weapon bay doors are typically not in this configuration on the ground, but usually both sets of weapons bay doors are opened to 90 degrees when they are parked. The kit parts are molded at an angle and I really didn’t have time to fix that so we’ll live with it.
Next up, the main landing gear were assembled, painted and installed. There was no fuss here at all everything, including the tires fit perfectly. The tires were sprayed white, given a gloss coat and then a black wash followed by brush painting the wheels with Ammo by Mig Tires and Rubber. Not perfect, but pretty good. The photo in the corner shows you just how tiny these assemblies are.
And the nose gear door. I didn’t bother fixing the hinge and in the end it didn’t matter because the broken part isn’t visible anyway. It all worked out. I did use a different method for decaling this piece though. After the gray had dried, I spray Testors GlossCote from the rattle can on the part. After it dried overnight, I applied the decal and then some Solvaset to snuggle it down. After that sat all day I applied a second layer of GlossCote followed by flat coat with Testors Flat Lacquer. The result, no silvering at all. Looks perfect. Hopefully this pic shows off the finish.
After I was done with the assembly, I removed the masking from the windows and the intakes and exhausts.
And we are done!
In the end this little beast fought me, but other then the decal silvering issue I have a reasonable result.
While we are on the silvering issue, I tired Adam’s suggestion of Tamiya Extra Thin Cement. I brushed it on just the end of one of the wing walkways as an experiment and here are the before (left) and after (right) results. You can actually see the difference in the spot that was treated in the picture above, which I actually took today.
Looks like it worked well. I did get a little bubbling so I poked a hole and reapplied and it settled down. I am going to apply the glue to all of the decals then spray the airframe in gloss and flat again to see how it looks. But for now I think we can say a big thanks to Adam for the tip!
Thanks for watching everyone! I appreciate all the encouraging comments and all the help. Now let’s get to the Tangle!
Mike
Excellent post, great job Mike. And  to Adam for that tip, looks like it really does work. Think you hit a homer on this one Mike.
to Adam for that tip, looks like it really does work. Think you hit a homer on this one Mike. Similar threads
- Replies
- 7
- Views
- 821