
-
Modelers Alliance has updated the forum software on our website. We have migrated all post, content and user accounts but we could not migrate the passwords.
This requires that you manually reset your password.
Please click here, http://modelersalliance.org/forums/login to go to logon page and use the "Forgot your Password" option.
You are using an out of date browser. It may not display this or other websites correctly.
You should upgrade or use an alternative browser.
You should upgrade or use an alternative browser.
Amtech Ta 183 in 1/48 scale
- Thread starter matrixone
- Start date

phantom II
Master at Arms
Wow those wooden wings are very interesting :woohoo:
Cheers, Christian B)
Cheers, Christian B)
Very well done Les, what wood technique did you do?
Thanks guys!
The wood grain effect on the wings was super easy to do, here's how I did it:
After the wings were assembled I scribed some fine lines into the bare plastic where I wanted the wood grain to appear, after all the scribing was finished I washed the wings in warm water with detergent soap. After the wings were dry I mixed up some paint for the base color of the plywood and airbrushed that on and waited a few hours for the paint to dry before brushing on some Future to seal the paint in. I waited a full day for the Future to dry before using some thinned brown oil paint brushed on and I let that sit a few minutes to allow it to soak in all the scribed areas before using a hair dryer to speed up the drying time of the oil paint, afterwards with a clean paper towel I wiped off all the excess oil paint before using some brown enamel paint and a fine brush to add the last of the wood grain effect.
Next up I will add a clear coat on the wings to provide a barrier from the camouflage paint and light sanding I have planned.
The leading edge of the wings will get a tiny bit of the salt weathering technique on them to allow some of the bare wood to show through.
Matrixone
Excellent! ")
Heavens Eagle
Well-known member
Looking very good Les! 
I like the quality of the NMF and wood grain on your build! Looking forword to seeing how it ends up with the extreame weathering. :hmmm
I like the quality of the NMF and wood grain on your build! Looking forword to seeing how it ends up with the extreame weathering. :hmmm
Thanks guys!
I did not spend much effort on the NMF since about 95% of it will be covered up but I do like the looks of the Ta 183 fuselage in NMF.
There are several other of these kits in my stash and maybe I will do one of them 'naked' without any camouflage paint on the airframe at all showing the wooden wings and metal fuselage.
But before I do that one I have been thinking about building one of these and putting it in Russian markings on top of painted out Luftwaffe markings...and then taking a bunch of aged black and white pictures of it out at my airfield so I can argue that the Russians really did make the Mig 15 largely from the Ta 183 design. :gogo
No in-progress pictures today, there is a bit of a log jam of projects on my workbench at the moment. Also I had lost two decal sheets that I had been counting on for this project and have lost a full day of bench time before finding them. :vmad
Matrixone
I did not spend much effort on the NMF since about 95% of it will be covered up but I do like the looks of the Ta 183 fuselage in NMF.
There are several other of these kits in my stash and maybe I will do one of them 'naked' without any camouflage paint on the airframe at all showing the wooden wings and metal fuselage.
But before I do that one I have been thinking about building one of these and putting it in Russian markings on top of painted out Luftwaffe markings...and then taking a bunch of aged black and white pictures of it out at my airfield so I can argue that the Russians really did make the Mig 15 largely from the Ta 183 design. :gogo
No in-progress pictures today, there is a bit of a log jam of projects on my workbench at the moment.
Also I had lost two decal sheets that I had been counting on for this project and have lost a full day of bench time before finding them. :vmad Matrixone
Thanks once again Luiz!
I have painted wood grain on various other objects before so no surprises for me there...what I have not had experience doing is painting camouflage colors over painted on wooden effects (like wings) and then sanding some of it off, it should work but maybe not! If not, then I will have some re-painting to do.
Just a little while ago I airbrushed on a clear coat on the wings to act as a barrier from the sanding.
I am thinking some sanding of the decals might be attempted too.... :hmmm .
Matrixone
phantom II
Master at Arms
Thanks once again Luiz!
I have painted wood grain on various other objects before so no surprises for me there...what I have not had experience doing is painting camouflage colors over painted on wooden effects (like wings) and then sanding some of it off, it should work but maybe not! If not, then I will have some re-painting to do.
Just a little while ago I airbrushed on a clear coat on the wings to act as a barrier from the sanding.
I am thinking some sanding of the decals might be attempted too.... :hmmm .
Matrixone
Well, on Acrylics even a toothbrush can work . With enamels I would say wet sand with very fine sand paper should work

jknaus
Administrator
Thanks once again Luiz!
I have painted wood grain on various other objects before so no surprises for me there...what I have not had experience doing is painting camouflage colors over painted on wooden effects (like wings) and then sanding some of it off, it should work but maybe not! If not, then I will have some re-painting to do.
Just a little while ago I airbrushed on a clear coat on the wings to act as a barrier from the sanding.
I am thinking some sanding of the decals might be attempted too.... :hmmm .
Matrixone
Maybe do the hairspray method. I think that would work for you.
James
Thanks for the suggestions Christian and James!
Its been a little while since I have done much with this one (actually been avoiding it) while some good progress has been made on my other new builds.
In these pictures you can see the start of the extreme paint chipping process which is some jagged small bits of Tamiya tape applied in random places on the fuselage and tail while the wooden wings have some dabs of ticky-tak and rounded Tamiya tape put on them.
The wings will get some worn off paint effects instead of chipping like that on the fuselage so when I go to paint on the upper surface camouflage colors I will very lightly spray on the paint around the worn areas and after the paint is fully dry I will carefully wet sand to enhance the paint wear at the wing roots and hopefully the end result will be some realistic looking worn off paint...I have never done this before so I am making it up as I go along.
The fuselage will be getting the salt weathering technique done to it mostly near the places where the jagged Tamiya tape was placed and also some near the jet engine intake and cockpit where the pilot would enter and exit the aircraft.
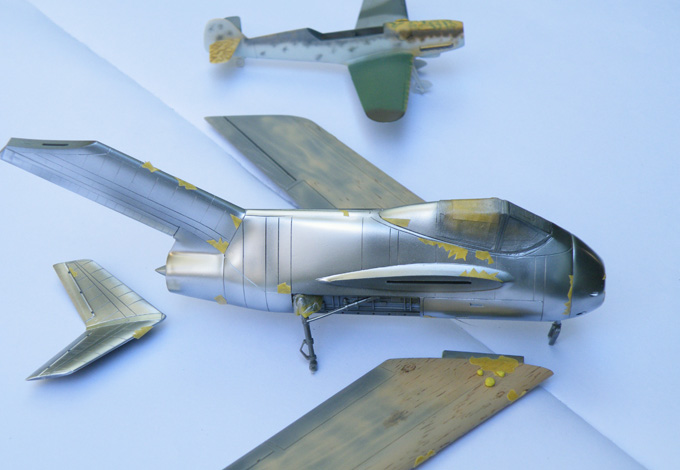
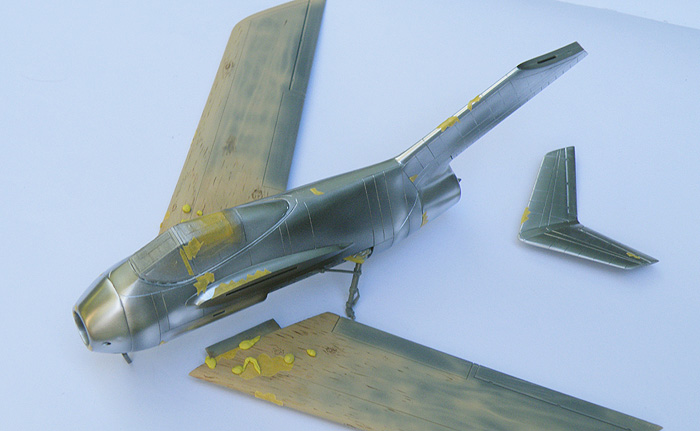
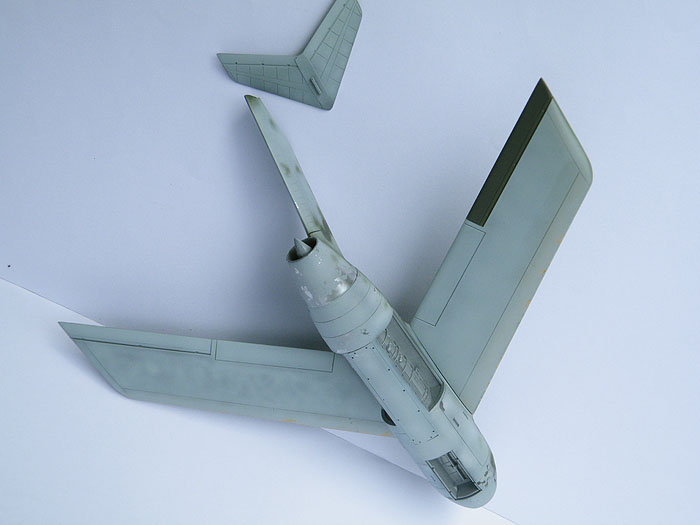
And this is the paint mule that will be used to test some of the things I mentioned above and then it will be used to test some weathering of the temporary winter finish seen on Luftwaffe aircraft during the winter on the Russian front.
Matrixone
Its been a little while since I have done much with this one (actually been avoiding it) while some good progress has been made on my other new builds.
In these pictures you can see the start of the extreme paint chipping process which is some jagged small bits of Tamiya tape applied in random places on the fuselage and tail while the wooden wings have some dabs of ticky-tak and rounded Tamiya tape put on them.
The wings will get some worn off paint effects instead of chipping like that on the fuselage so when I go to paint on the upper surface camouflage colors I will very lightly spray on the paint around the worn areas and after the paint is fully dry I will carefully wet sand to enhance the paint wear at the wing roots and hopefully the end result will be some realistic looking worn off paint...I have never done this before so I am making it up as I go along.
The fuselage will be getting the salt weathering technique done to it mostly near the places where the jagged Tamiya tape was placed and also some near the jet engine intake and cockpit where the pilot would enter and exit the aircraft.
And this is the paint mule that will be used to test some of the things I mentioned above and then it will be used to test some weathering of the temporary winter finish seen on Luftwaffe aircraft during the winter on the Russian front.
Matrixone
phantom II
Master at Arms
Thanks guys!
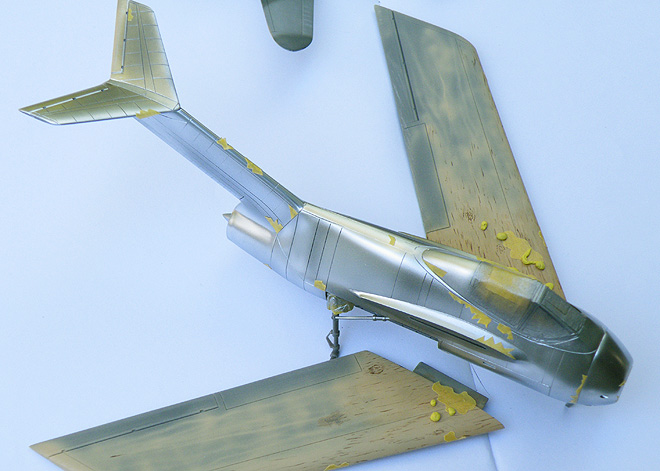
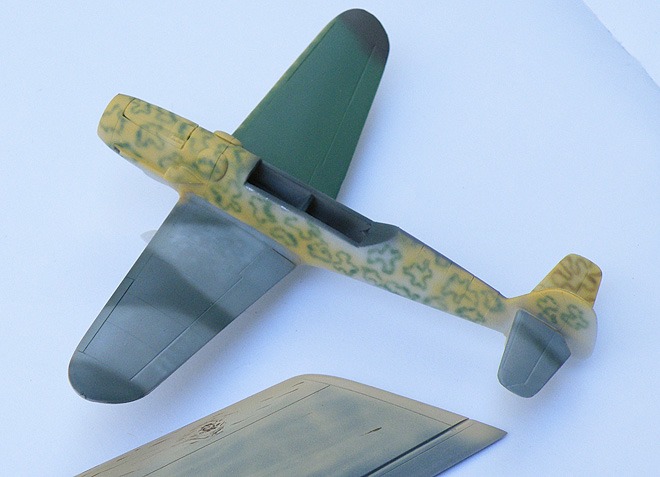
In these pictures you can see the results of the paint chipping effects I was after.
This image shows the wood grain effect showing through the worn off paint on the wing roots.
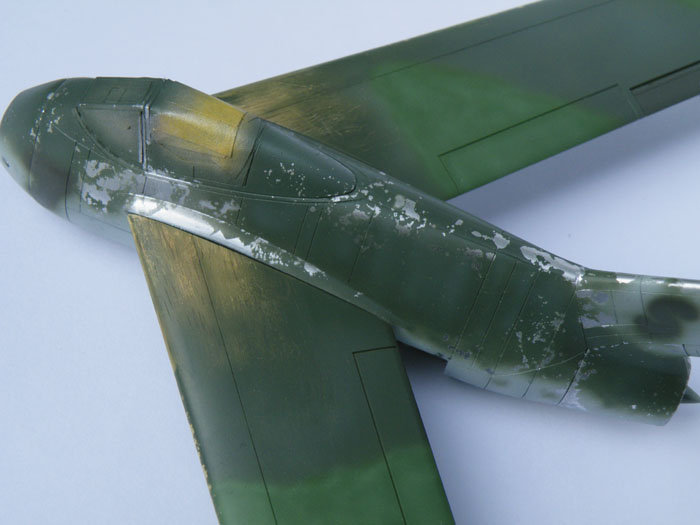
The sprayed on ''S'' on the lower part of the fin will be the place where the white S decal will go. I am finishing this as a Ta 183 that is worn out and has been retired from frontline service and being used as a trainer to help convert Me 262 pilots on how to fly the type. My inspiration for this came from looking at Me 262 photographs that had some Me 262's marked in a similar fashion and were used for training pilots.
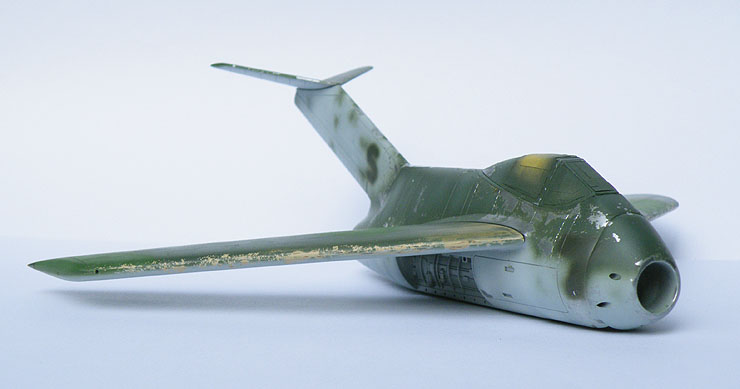
In this image of the undersurfaces one of the ailerons is painted in RLM 81, I did this to represent the aileron being a replacement part after the original was damaged in combat.
Many of the smaller bits for this model have been painted and are ready for installation so the next thing that will be done will be the spraying on the clear gloss coat and then adding the decals.
Matrixone
In these pictures you can see the results of the paint chipping effects I was after.
This image shows the wood grain effect showing through the worn off paint on the wing roots.
The sprayed on ''S'' on the lower part of the fin will be the place where the white S decal will go. I am finishing this as a Ta 183 that is worn out and has been retired from frontline service and being used as a trainer to help convert Me 262 pilots on how to fly the type. My inspiration for this came from looking at Me 262 photographs that had some Me 262's marked in a similar fashion and were used for training pilots.
In this image of the undersurfaces one of the ailerons is painted in RLM 81, I did this to represent the aileron being a replacement part after the original was damaged in combat.
Many of the smaller bits for this model have been painted and are ready for installation so the next thing that will be done will be the spraying on the clear gloss coat and then adding the decals.
Matrixone

Similar threads
- Replies
- 171
- Views
- 38K