
-
Modelers Alliance has updated the forum software on our website. We have migrated all post, content and user accounts but we could not migrate the passwords.
This requires that you manually reset your password.
Please click here, http://modelersalliance.org/forums/login to go to logon page and use the "Forgot your Password" option.
You are using an out of date browser. It may not display this or other websites correctly.
You should upgrade or use an alternative browser.
You should upgrade or use an alternative browser.
42nd Highland Infantry Regiment "Black Watch" at the Battle of Quatre Bras, June, 1815
- Thread starter Steve Ski
- Start date
JamesOLeary
Master at Arms
Looking great, Bro. You are on the home stretch now. I am sure the completed work is going to look awesome and I am also sure you will be glad when it is done as well. I couldn't imagine painting all of those plaid patterns on a flat surface much less with folds requiring shadows and highlights. The final result will be worth the effort.
Steve Ski
Well-known member
Drummer Boy
This lil feller can rattle away all he wants now, he’s done. The task of accurately depicting his sleeve details wasn’t as bad as I had expected, simply because they are not accurate, HA! I never got a reply from the Black Watch Museum in Scotland and some photos found online just weren’t clear enough for me to be sure exactly what these emblems are. I’ve had plenty of advisors tell me what they were, but I gotta see it for myself.
I did make several tempts to add fleur di lis’ to no avail, total failure. My brush work just wasn’t cutting it. The more I tried the worse they got, so I called “time out”. As I stated earlier, I hate being inaccurate if I can help it, especially on something so visible, but my brush talents had reached their limit. Ya just gotta know when to move on, so that is what I’ve done.
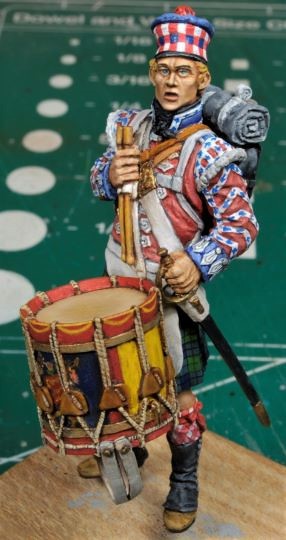
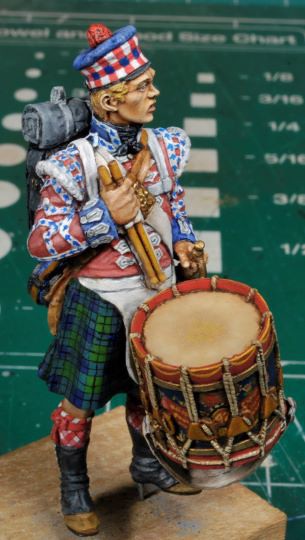
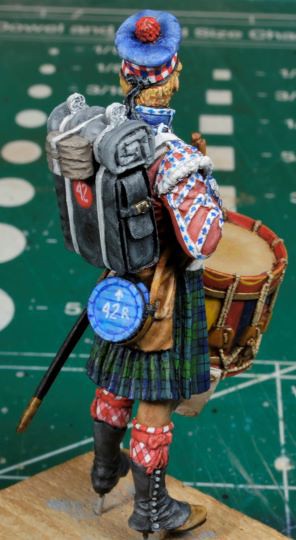
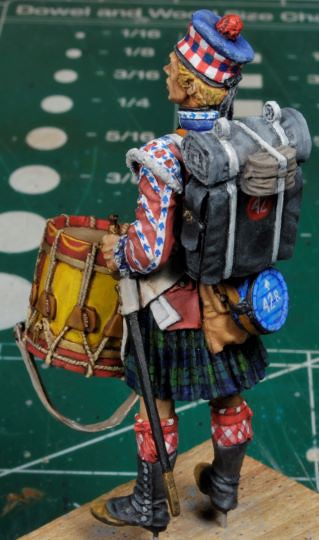
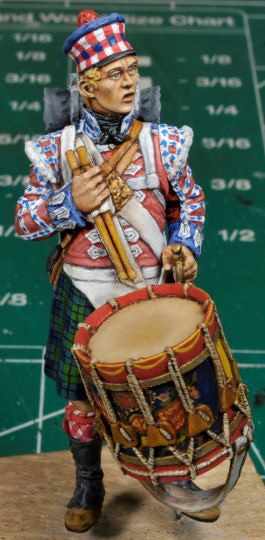
All of the techniques and processes for this lil guy are the same as all of the other Highlander figures, except one. I utilized a technique I’ve been studying lately, “stippling”, one used quite successfully by “Mike the Kiwi” in his new book “Modelling and Painting World War I Allied Figures”. It’s a new release and I just received my copy a few weeks back. I stippled the bonnet/cap on the Drummer Boy with oils. Yes, that’s right, oils. It can be done successfully with a bit of trial and error. I know this is such a minor attempt, but it gave me a good idea of just how this will work with oils, my preferred medium.
Next up, the Frenchmen, and what a relief, lol. I can’t say I won’t ever go back to the Napoleonic era; the colors are just too spectacular to pass up and the learning potential from working bright colors is astounding. I’m just not hip on the “Battle of the Tartans” enough to take on another fight like this one any time soon, HA!
Thanks for watching, all comments welcome. Cheers, Ski.
Mike Butler’s book is available here: https://www.crowood.com/products/mo...es-by-mike-butler?_pos=2&_sid=1670b538c&_ss=r
Prime example of how Mike paints using the techniques he explains in his book: https://www.planetfigure.com/attachments/mikemaoriboy-jpg.453840/
Now that is a goal to strive for, to say the least. You’d swear this figure was alive!
This lil feller can rattle away all he wants now, he’s done. The task of accurately depicting his sleeve details wasn’t as bad as I had expected, simply because they are not accurate, HA! I never got a reply from the Black Watch Museum in Scotland and some photos found online just weren’t clear enough for me to be sure exactly what these emblems are. I’ve had plenty of advisors tell me what they were, but I gotta see it for myself.
I did make several tempts to add fleur di lis’ to no avail, total failure. My brush work just wasn’t cutting it. The more I tried the worse they got, so I called “time out”. As I stated earlier, I hate being inaccurate if I can help it, especially on something so visible, but my brush talents had reached their limit. Ya just gotta know when to move on, so that is what I’ve done.
All of the techniques and processes for this lil guy are the same as all of the other Highlander figures, except one. I utilized a technique I’ve been studying lately, “stippling”, one used quite successfully by “Mike the Kiwi” in his new book “Modelling and Painting World War I Allied Figures”. It’s a new release and I just received my copy a few weeks back. I stippled the bonnet/cap on the Drummer Boy with oils. Yes, that’s right, oils. It can be done successfully with a bit of trial and error. I know this is such a minor attempt, but it gave me a good idea of just how this will work with oils, my preferred medium.
Next up, the Frenchmen, and what a relief, lol. I can’t say I won’t ever go back to the Napoleonic era; the colors are just too spectacular to pass up and the learning potential from working bright colors is astounding. I’m just not hip on the “Battle of the Tartans” enough to take on another fight like this one any time soon, HA!
Thanks for watching, all comments welcome. Cheers, Ski.
Mike Butler’s book is available here: https://www.crowood.com/products/mo...es-by-mike-butler?_pos=2&_sid=1670b538c&_ss=r
Prime example of how Mike paints using the techniques he explains in his book: https://www.planetfigure.com/attachments/mikemaoriboy-jpg.453840/
Now that is a goal to strive for, to say the least. You’d swear this figure was alive!


Steve Ski
Well-known member
Shredded! And yes, Drummer Boy done soiled his drawers, HA!Will the Froggies be mostly running away or shredded on the ground?
Tanks, MP!
Rhino
Super Moderator
Well as they should be!Shredded! And yes, Drummer Boy done soiled his drawers, HA!
Tanks, MP!

Steve Ski
Well-known member
Base Layout
We’re so close I had to forego the Frenchmen and get to work on the base. Honestly, it’s a bit of work to retool my brain right now, the bloomin tartans are still dancing in me head at night, HA! I really need to step back and study the French fellows a bit more before I move on anyways.
Being within a few miles of a huge lake it’s not hard to find drift wood, if you know where to look. I pulled a small chunk from my wife’s stash, with her approval of course, and did some trimming. I was actually a lot of fun making saw dust again, a break from the pattern grind, you could say.
These pics are not close up on purpose as they are only reference photos. I started out with a great chunk with the swirls and all, only to find they wouldn’t fit within the designated parameters of the layout. So, bandsaw to the rescue, with a little help from the joiner, and a miter saw, in business we are. Then it was all orbital sander from there on out. Some swirls are still visible under the Mahogany stain and they will show much better after about 5 coats of Tung Oil.
There’s a bit of blue construction foam under the air clay and all of it is glued massively with carpenter’s glue. I don’t expect any shifting within my lifetime. The figures will set with the clay drying overnight. All the locations have just been marked with a permanent marker so I can at least have an idea where each goes after the sanding. I’ll be using Hecky grass for the field work.
So, as you can tell by now, we are definitely seeing light at the end of the tunnel, and no, it ain’t no train.
Thanks for watching. Cheers, Ski.
P.S. Rhino, the one Frenchie will get his heads back soon, lol.
Heavens Eagle
Well-known member
Really looking good Steve!


Steve Ski
Well-known member
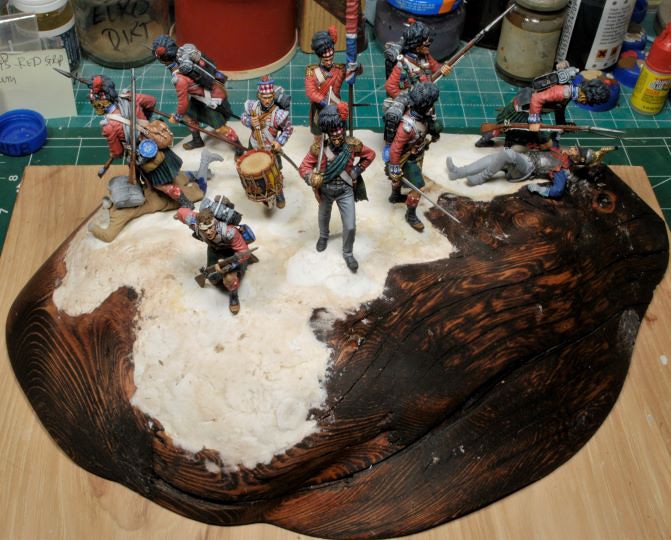
Base Redo
Several of the keen eyes reviewing this build log have come to the same conclusion as I have. The base was way too big and the figures really lost meaning when they were placed so far apart. This set is intended to be “up close and personal” and the base really had to go bye-bye. Great test run, though.
Taking another chunk from my wife’s drift wood stash pile I cut a section that had the most character. I had originally intended on using this slab, but passed it up, hmmm. I recon I needed some practice first, HA!
Spoiler alert: I’m intentionally not showing the front view. This is a placement test and it would be bad form to jump ahead and expose the intended final result before it’s time.
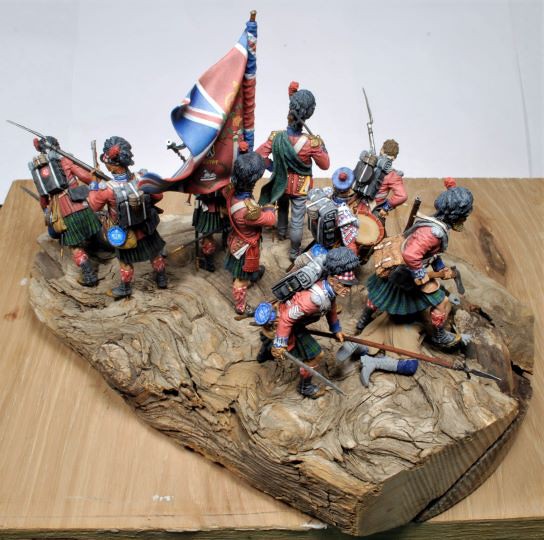
You may notice after close scrutiny that some of those delicate parts, such as a bayonet, a few bayonet scabbards, and one thumb, plus some other minor parts might be missing from the finished figs. Clumsy sausage fingers, what else can I say? This happens every time and the final punch list is standing by as usual.
There is a way to make the ground work mesh with these swirls in the drift wood and preserve its uniqueness. I’ll post SBS pics on that portion. Stand-by for the finale, it’s not far off now.
Thanks for watching and all comments are welcome. Cheers, Ski.
Several of the keen eyes reviewing this build log have come to the same conclusion as I have. The base was way too big and the figures really lost meaning when they were placed so far apart. This set is intended to be “up close and personal” and the base really had to go bye-bye. Great test run, though.
Taking another chunk from my wife’s drift wood stash pile I cut a section that had the most character. I had originally intended on using this slab, but passed it up, hmmm. I recon I needed some practice first, HA!
Spoiler alert: I’m intentionally not showing the front view. This is a placement test and it would be bad form to jump ahead and expose the intended final result before it’s time.
You may notice after close scrutiny that some of those delicate parts, such as a bayonet, a few bayonet scabbards, and one thumb, plus some other minor parts might be missing from the finished figs. Clumsy sausage fingers, what else can I say? This happens every time and the final punch list is standing by as usual.
There is a way to make the ground work mesh with these swirls in the drift wood and preserve its uniqueness. I’ll post SBS pics on that portion. Stand-by for the finale, it’s not far off now.
Thanks for watching and all comments are welcome. Cheers, Ski.

JamesOLeary
Master at Arms
Holy brightly colored patterns on the drummer boy, Batman! That is quite a colorful jacket on the drummer boy and is very well done. The smaller base looks much better on terms of the base not detracting from the story being told with the figures. I just got Mike the Kiwis book the other day. Lots of good info and techniques in there. It may even become my new go-to figure painting book.
Steve Ski
Well-known member
Ya, Buddy, made a huge difference. The base is done now, so it's Frenchmen and details to the finish.The smaller base looks much better on terms of the base not detracting from the story being told with the figures.
Mike's book is pretty impressive, an excellent tool. I'm going to be attempting his techniques with the next set of larger scale figures; start out simple, then bump it up a notch or two. I will go out on a limb to say this, Mike is "the" most realistic figure painter to date, bar none. That limb isn't very big, the proof is in the art work.
Thanks, James!
Can't remember if this is 200mm or 1/10th scale, or bigger, but it's huge. A close up:
Greg Kimsey
Well-known member
Do you have a link to Mike's book? Your figures are out of this world! I am not sure I would have the courage to tackle a project this complex LOL.
Steve Ski
Well-known member
Thanks, Greg. I felt the same way, but I decided to dive in, get all wet, and dry off later, HA!
Mike Butler’s book is available here: https://www.crowood.com/products/mo...es-by-mike-butler?_pos=2&_sid=1670b538c&_ss=r
It's also available thru: https://shop.lastcavalry.com/crowood-press-modelling-and-painting-wwi-allied-figures/
Mike Butler’s book is available here: https://www.crowood.com/products/mo...es-by-mike-butler?_pos=2&_sid=1670b538c&_ss=r
It's also available thru: https://shop.lastcavalry.com/crowood-press-modelling-and-painting-wwi-allied-figures/
Steve Ski
Well-known member
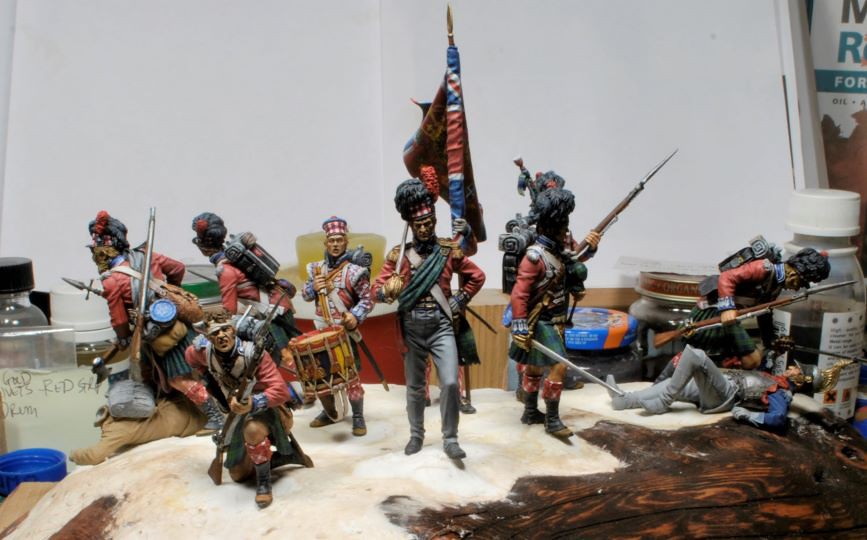
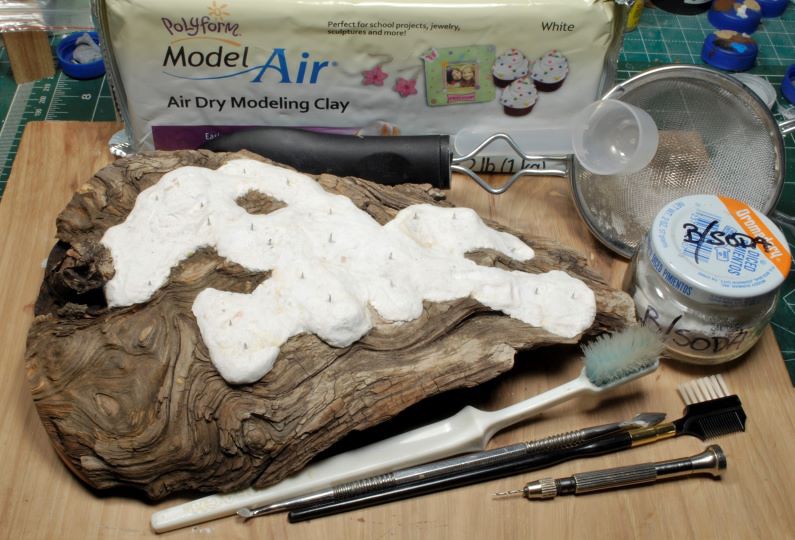
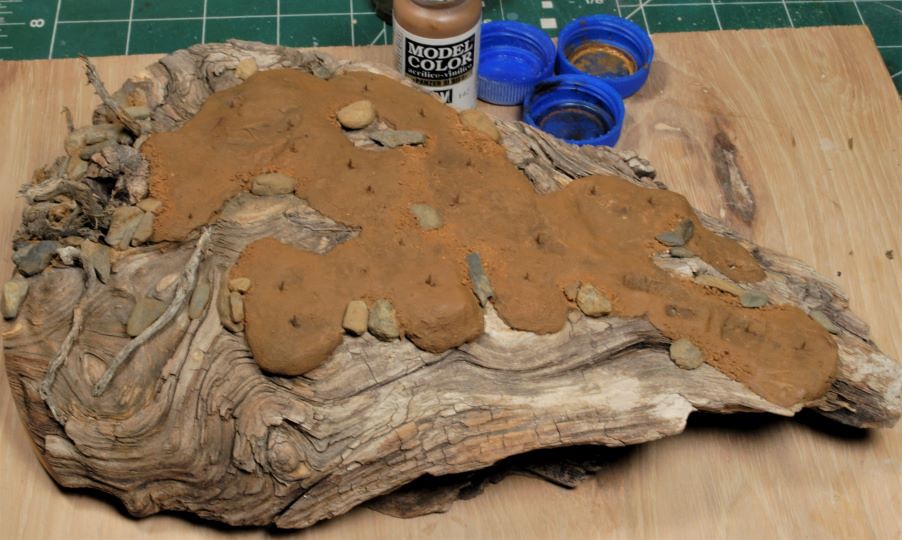
Base Work Continued
While working the last two figures I neglected the “base in progress” photos posting, so here they are. Sometimes we can get ahead of ourselves, lol. I also included a pic of the intentional layout soon to be. All the base work is standard practice, nothing new to see here.
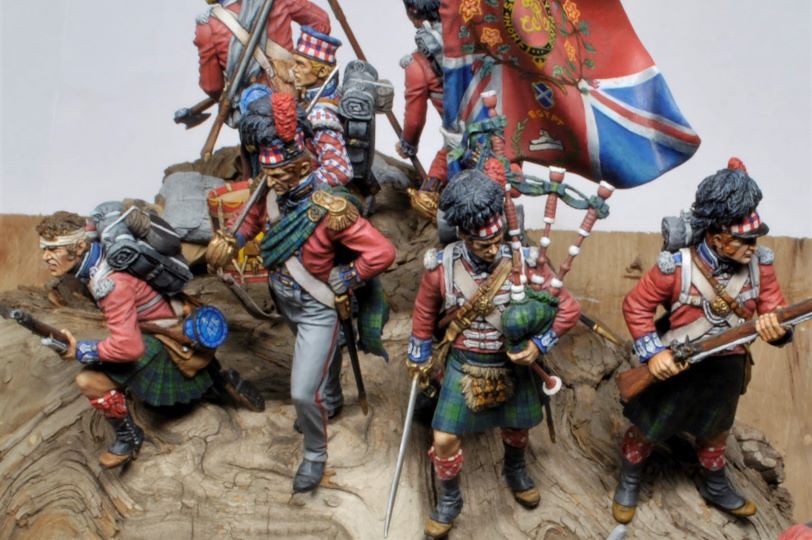
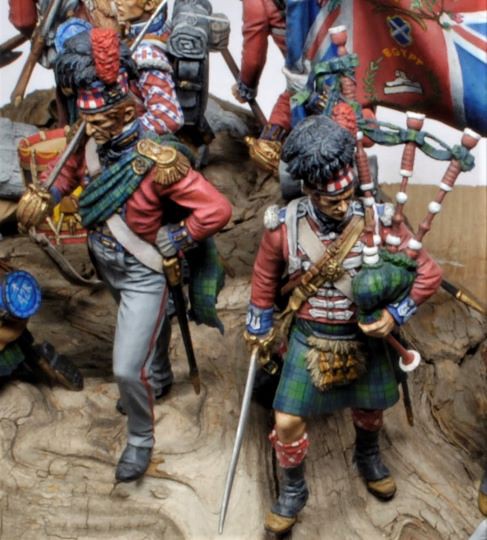
Close up of the intended Royal Regiment in action. Note, the Rifleman has had his intended orientation altered to a more correct interpretation of action since this photo was taken. I think I’m revealing too much at this stage, but I’m pretty stoked at how this is playing out so far.
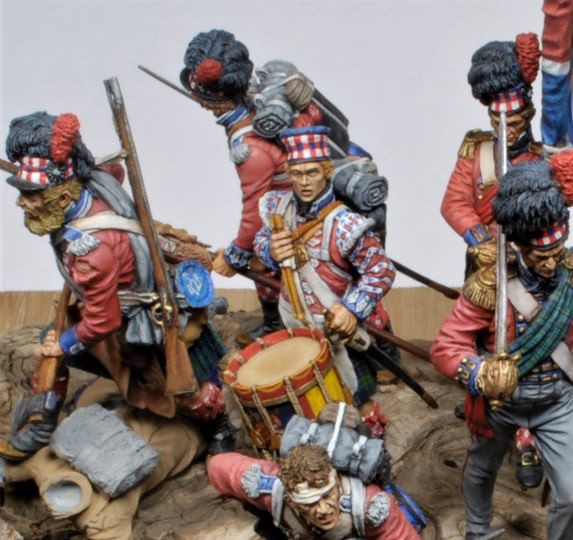
Thanks for watchin. Cheers, Ski.
While working the last two figures I neglected the “base in progress” photos posting, so here they are. Sometimes we can get ahead of ourselves, lol. I also included a pic of the intentional layout soon to be. All the base work is standard practice, nothing new to see here.
Close up of the intended Royal Regiment in action. Note, the Rifleman has had his intended orientation altered to a more correct interpretation of action since this photo was taken. I think I’m revealing too much at this stage, but I’m pretty stoked at how this is playing out so far.
Thanks for watchin. Cheers, Ski.
Similar threads
- Replies
- 106
- Views
- 15K
- Replies
- 4
- Views
- 1K
- Replies
- 104
- Views
- 22K
- Replies
- 54
- Views
- 11K