
-
Modelers Alliance has updated the forum software on our website. We have migrated all post, content and user accounts but we could not migrate the passwords.
This requires that you manually reset your password.
Please click here, http://modelersalliance.org/forums/login to go to logon page and use the "Forgot your Password" option.
You are using an out of date browser. It may not display this or other websites correctly.
You should upgrade or use an alternative browser.
You should upgrade or use an alternative browser.
101st AIRBORNE AT CARENTAN, JUNE 1944
- Thread starter Steve Ski
- Start date
Steve Ski
Well-known member
Trackin it Now!
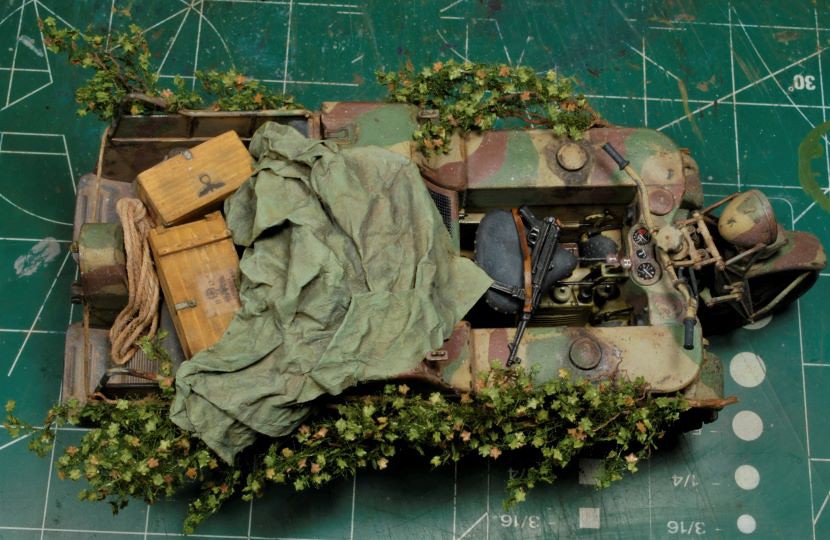
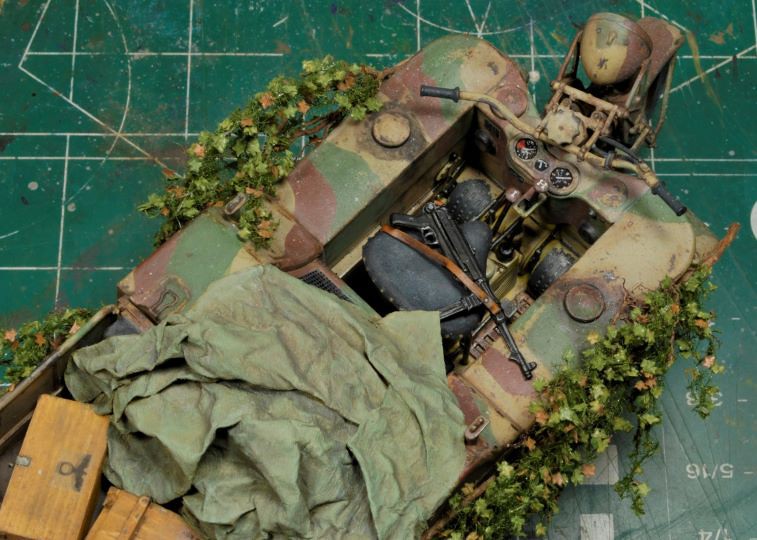
The Trak-bike has been completed, finally. Ok, for the technically inclined, it’s really a German Sd.kfz.2 Kettenkraftrad Typ HK 101. That’s a mouthful, so it shall henceforth be referred to as a “Trak-bike” for purposes of this article.
Note: As mentioned before, these tracks for this kit are pathetic and have a real tendency to break at the most inopportune time, while being installed. I painted, weathered, and left the sprockets uninstalled, so I could install the tracks over the sprockets, place the back end of the link over the rear running wheel, and carefully slip the sprocket into place. HA, ya right, they still broke. I had to “pin” each side in at least one link to keep these buggers from coming apart during installation. The design team gets a “swift kick in the pants” for that brain dead maneuver, IMHO! Ok, onward.
After using Mike Rinaldi’s “Oil Paint Rendering”, or OPR, I was decently happy with the results. This was, after all, my first attempt at weathering a vehicle using oils only,………..well almost. I did use Mig’s pigments to add a bit of mud crusty above the running gear and I also used a mix of pigments to form a Euro-earth tone and added thinner to splatter a bit on the rig lower sections. All in all, I do like the OPR method and will be using this quite a bit from here on out. Like I said before, I’m an oiler anyway, so what’s the big deal, right?
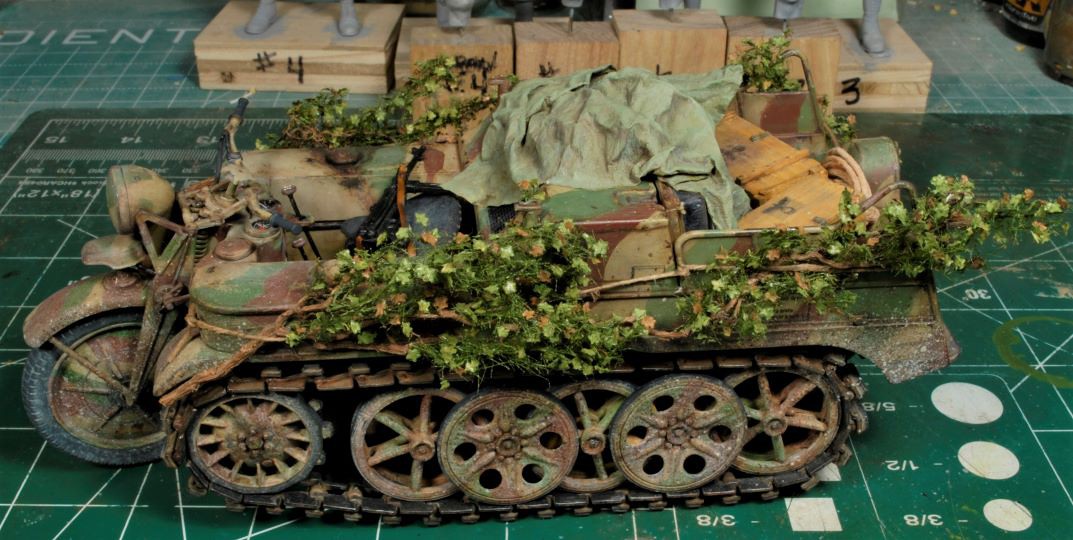
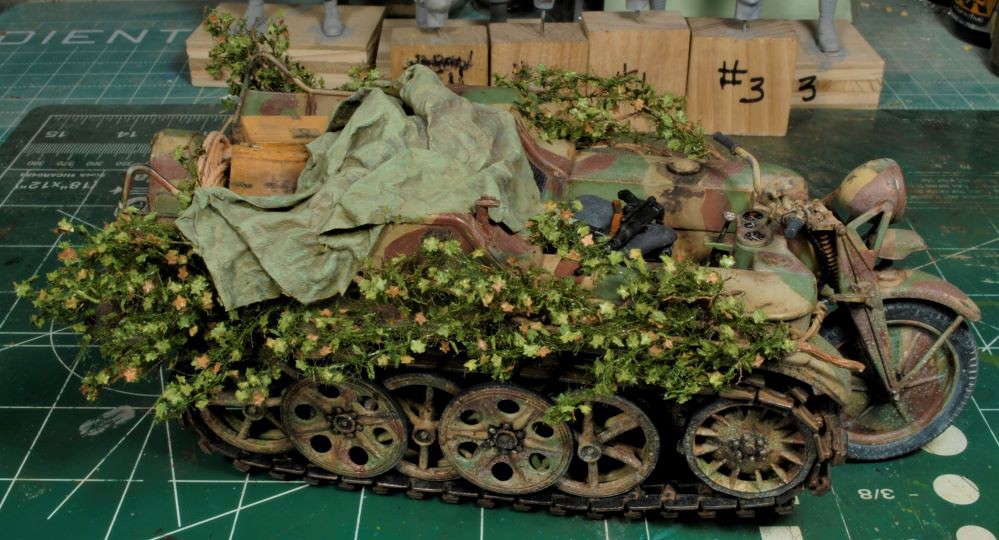
As you can see from the photos, I added some foliage using MiniNatur Plant tree foliage from Germany, to add interest and help support the story line. This stuff is great and I now need to replenish my stock, it’s very handy. I also made a few crates and some rope for the back end of the trak-bike as well as a cover tarp that has been drawn over by some of our characters. More on that later.
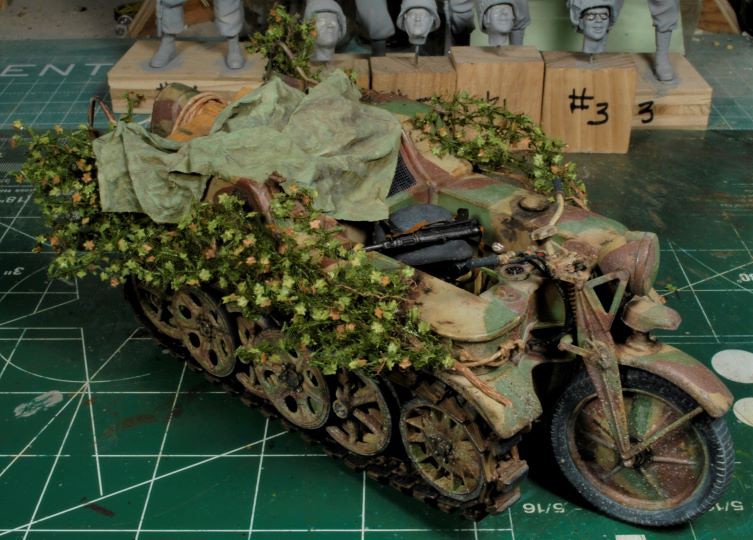
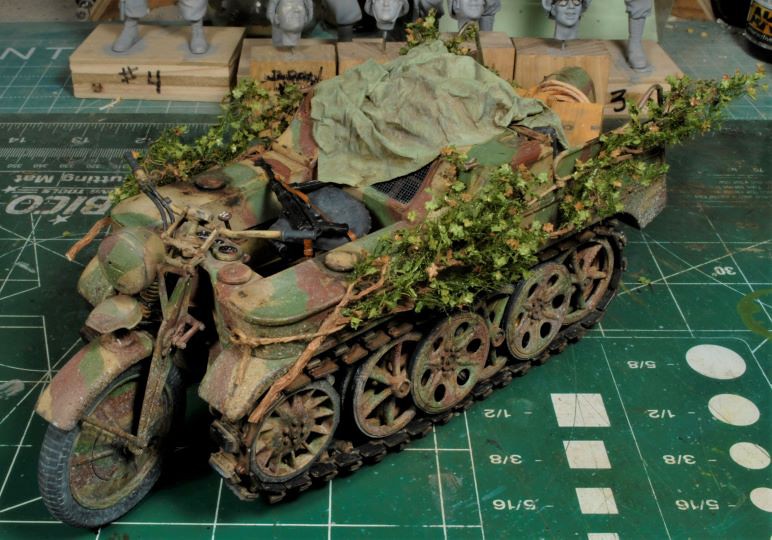
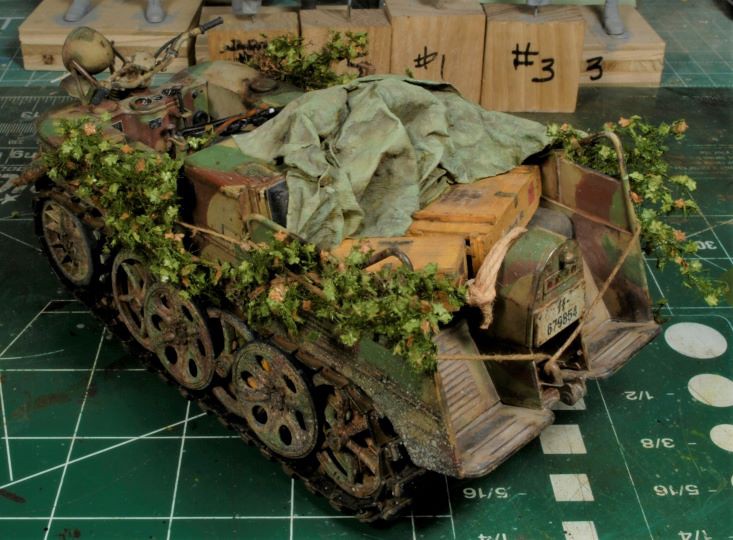
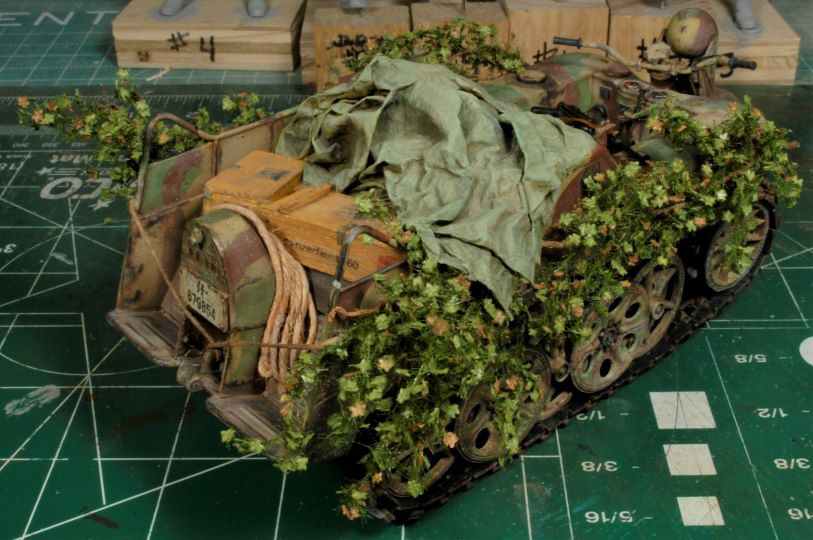
It might seem a bit odd having that MP40 sitting on the driver’s seat, but that will become obvious later, HA! I’m really not going to give up the story line just yet, but I’m sure there a few that have already figured this out.
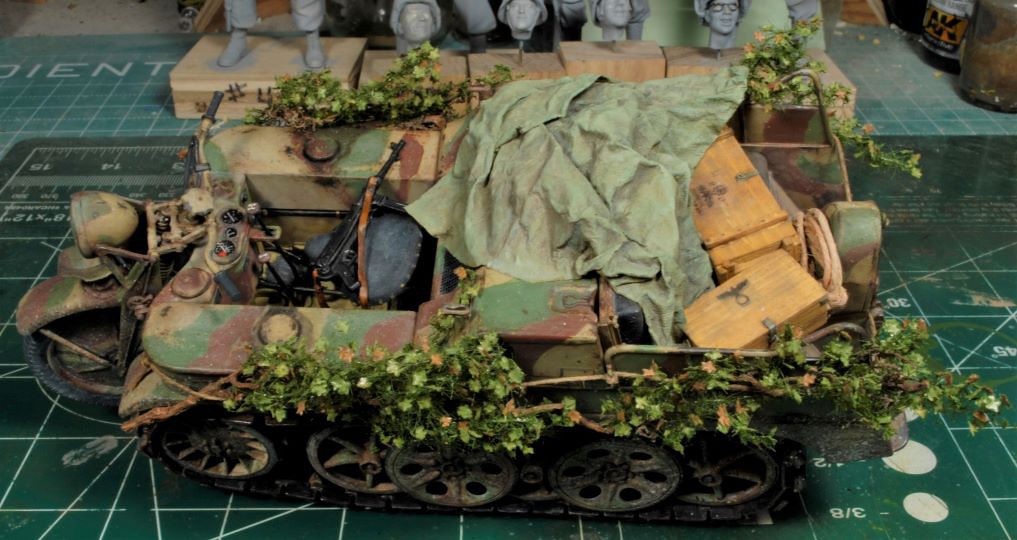
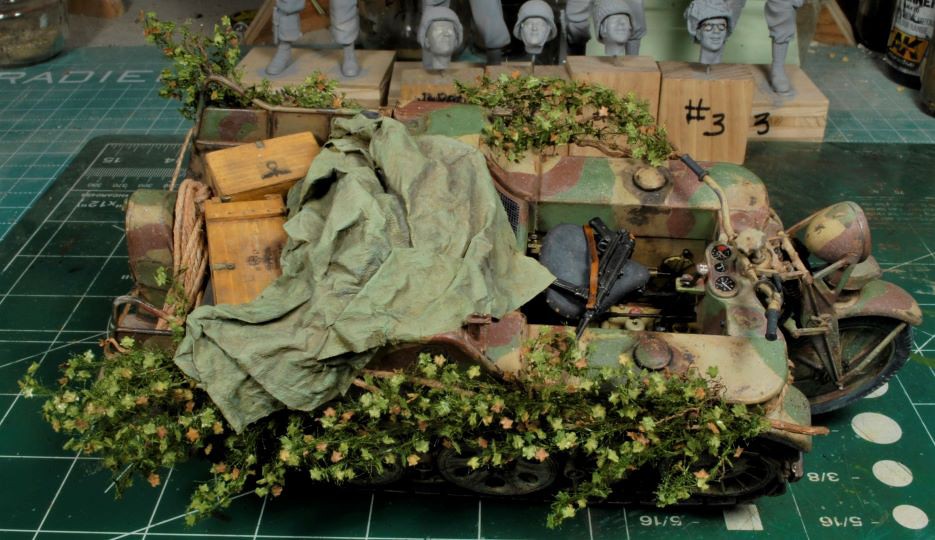
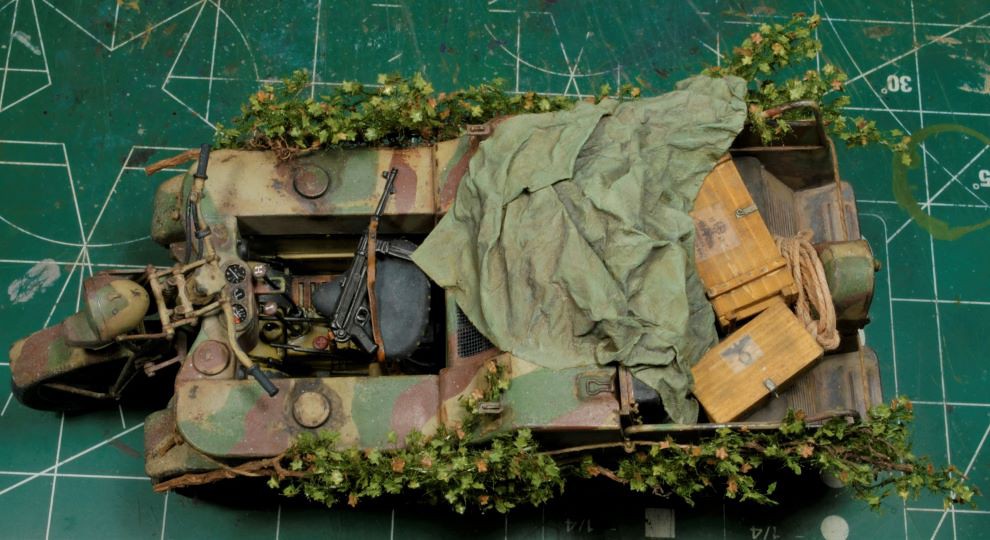
Now that this trak-bike has been finished it will sit safely in the curio cabinet until the final dio placement. Next up, changing gears and painting faces, Yehaaaa!
Thanks for watchin. Cheers, Ski.
The Trak-bike has been completed, finally. Ok, for the technically inclined, it’s really a German Sd.kfz.2 Kettenkraftrad Typ HK 101. That’s a mouthful, so it shall henceforth be referred to as a “Trak-bike” for purposes of this article.
Note: As mentioned before, these tracks for this kit are pathetic and have a real tendency to break at the most inopportune time, while being installed. I painted, weathered, and left the sprockets uninstalled, so I could install the tracks over the sprockets, place the back end of the link over the rear running wheel, and carefully slip the sprocket into place. HA, ya right, they still broke. I had to “pin” each side in at least one link to keep these buggers from coming apart during installation. The design team gets a “swift kick in the pants” for that brain dead maneuver, IMHO! Ok, onward.
After using Mike Rinaldi’s “Oil Paint Rendering”, or OPR, I was decently happy with the results. This was, after all, my first attempt at weathering a vehicle using oils only,………..well almost. I did use Mig’s pigments to add a bit of mud crusty above the running gear and I also used a mix of pigments to form a Euro-earth tone and added thinner to splatter a bit on the rig lower sections. All in all, I do like the OPR method and will be using this quite a bit from here on out. Like I said before, I’m an oiler anyway, so what’s the big deal, right?
As you can see from the photos, I added some foliage using MiniNatur Plant tree foliage from Germany, to add interest and help support the story line. This stuff is great and I now need to replenish my stock, it’s very handy. I also made a few crates and some rope for the back end of the trak-bike as well as a cover tarp that has been drawn over by some of our characters. More on that later.
It might seem a bit odd having that MP40 sitting on the driver’s seat, but that will become obvious later, HA! I’m really not going to give up the story line just yet, but I’m sure there a few that have already figured this out.
Now that this trak-bike has been finished it will sit safely in the curio cabinet until the final dio placement. Next up, changing gears and painting faces, Yehaaaa!
Thanks for watchin. Cheers, Ski.
All I see is a bush on tracks...
Last edited:
Steve Ski
Well-known member
Lol, tanks, MP!All I see is a bush on tracks...
Steve Ski
Well-known member
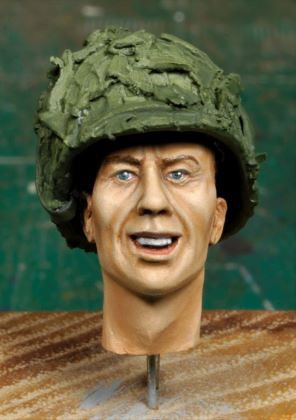
Let’s Face It, again,…….
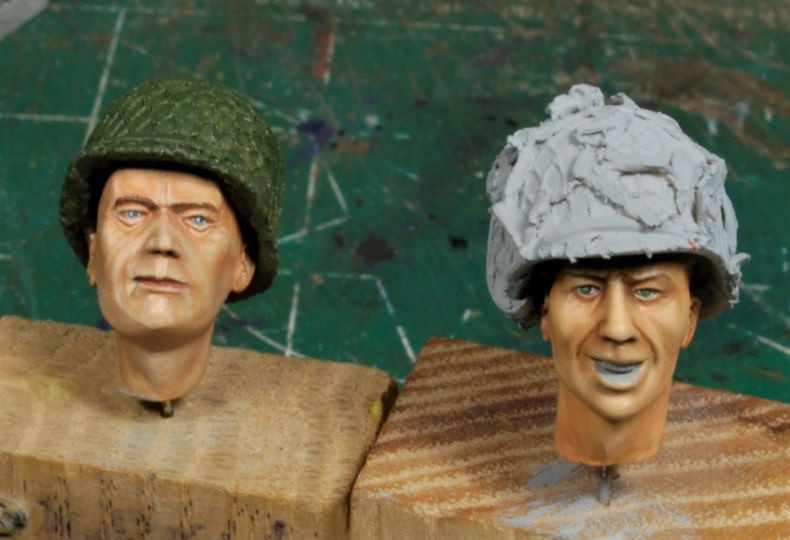
Finally, I’m back to painting the faces, my favorite part, because I have so much to learn. So much so that I’ve already given #4 a wash down at least three times. As some of you may remember, this happens pretty much every time I get back to painting faces. I recon a more analytical approach might help my process. The fact that I was rushing the process might have something to do with it, too. That was a Bozo No-no. So, I let go and let it happen, so far so good.
Here's the line-up, but as you can see the fella in the back left has some serious eye issues that will need to be addressed before he gets a brush put to him. I was not impressed with this goofy overexaggerated face, but I’ll work with it as best as I can. A little scraping and putty work should bring him in line with the rest.
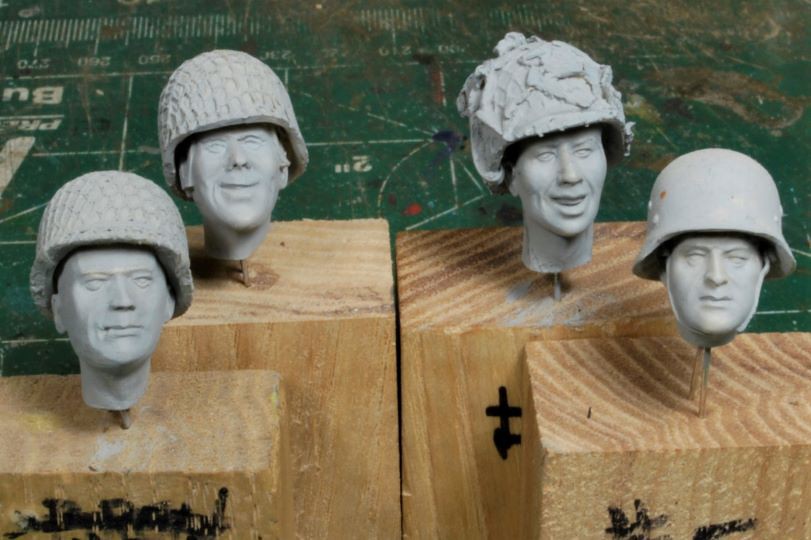
There is still quite a bit of work to be done to #4, but the basic tones are on and now some of the detail will be worked as soon as I get a hard dry on the oils. #3 has a very basic oil placement on him now, but he’s a long way behind #4.
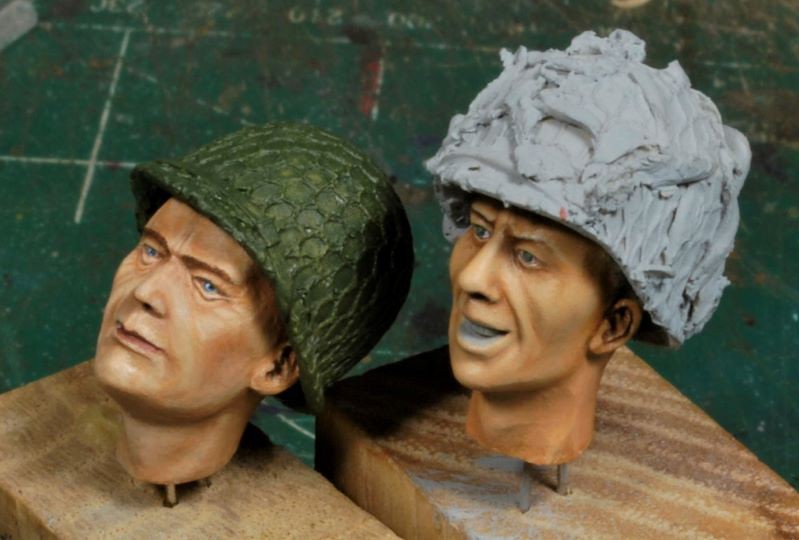
Now that I’m happy with the eyes and the basic overall color tones I will work in the more defined shadows and highlights. I like to snap a few pics and scrutinize the faces on the computer where I can see just how they will appear once posted online. I already see areas of concern and they will be addressed soon enough.
I will also be using some of Mike-the-Kiwi’s techniques from his recently released book. The facial textures are what I’d like to learn and there’s no better time than the present. Also, I recently heard an interview from Mental Dental, David Lane, so I will work on some oil feathering as well. If I jack it up, I’ll break out the oven cleaner and Ruck Onward, what else am I gonna do, right?
You may have noticed the skin tone on #4 is much lighter than #3, but that will change to a more compatible appearance. Not everybody is going to look the same anyway, but I don’t want #4 looking sickly, if ya know what I mean. I was able to knock out #3 much quicker, within an hour or so. See, once back in the groove things move much more smoothly, or kinda sorta?
Thanks for watching. Cheers, Ski.
Finally, I’m back to painting the faces, my favorite part, because I have so much to learn. So much so that I’ve already given #4 a wash down at least three times. As some of you may remember, this happens pretty much every time I get back to painting faces. I recon a more analytical approach might help my process. The fact that I was rushing the process might have something to do with it, too. That was a Bozo No-no. So, I let go and let it happen, so far so good.
Here's the line-up, but as you can see the fella in the back left has some serious eye issues that will need to be addressed before he gets a brush put to him. I was not impressed with this goofy overexaggerated face, but I’ll work with it as best as I can. A little scraping and putty work should bring him in line with the rest.
There is still quite a bit of work to be done to #4, but the basic tones are on and now some of the detail will be worked as soon as I get a hard dry on the oils. #3 has a very basic oil placement on him now, but he’s a long way behind #4.
Now that I’m happy with the eyes and the basic overall color tones I will work in the more defined shadows and highlights. I like to snap a few pics and scrutinize the faces on the computer where I can see just how they will appear once posted online. I already see areas of concern and they will be addressed soon enough.
I will also be using some of Mike-the-Kiwi’s techniques from his recently released book. The facial textures are what I’d like to learn and there’s no better time than the present. Also, I recently heard an interview from Mental Dental, David Lane, so I will work on some oil feathering as well. If I jack it up, I’ll break out the oven cleaner and Ruck Onward, what else am I gonna do, right?
You may have noticed the skin tone on #4 is much lighter than #3, but that will change to a more compatible appearance. Not everybody is going to look the same anyway, but I don’t want #4 looking sickly, if ya know what I mean. I was able to knock out #3 much quicker, within an hour or so. See, once back in the groove things move much more smoothly, or kinda sorta?
Thanks for watching. Cheers, Ski.
That last dude from the left profile kinda looks like The Duke.
 Aaah, I'm gonna take your word for it.
Brokeneagle
Master at Arms
A great looking build with a bunch of excellent figs. Your faces are looking really nice!  tens:
tens:
tens:Steve Ski
Well-known member
Tanks, Amigo!A great looking build with a bunch of excellent figs. Your faces are looking really nice!
Heavens Eagle
Well-known member
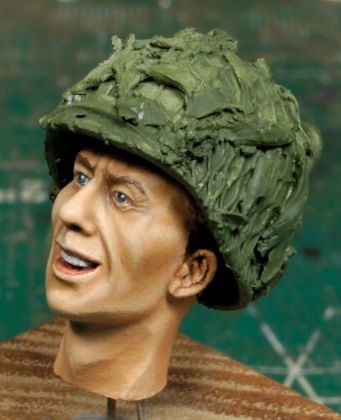
For some reason the guy with the green helmet made me think of John Wayne.
See, I'm not alone.For some reason the guy with the green helmet made me think of John Wayne.

@Steve Ski, upon seeing the kettenkraftrad, I immediately thought of the 'rabbit' from Saving Private Ryan! Nice!
That last dude from the left profile kinda looks like The Duke.
For some reason the guy with the green helmet made me think of John Wayne.
Really? I know this one does for sure! Straight outta the movie!
Steve Ski
Well-known member
Ok, John Wayne it is, Gents! I recon a cigar would work better than a cigarette, ya? Lol. He's a bit pale right now, but some more subtle work will bring him up to speed.
Ya Shark, that rak-bike is slick, but the tracks were a royal baby rump kisser.
Tanks, Gents!
P.S. I better start a "punch list", don't want to forget the 5 o'clock shadows.
Ya Shark, that rak-bike is slick, but the tracks were a royal baby rump kisser.
Tanks, Gents!
P.S. I better start a "punch list", don't want to forget the 5 o'clock shadows.
Steve Ski
Well-known member
Yep, herrrrrrrrrrrrrrrrrrrreeeeeeee's Johny! Excellent, the Duke is cool, but my wife hates him cause he's a womanizer, HA! Ok, Ruck On we shall.Looking good ,
View attachment 156695

Steve Ski
Well-known member
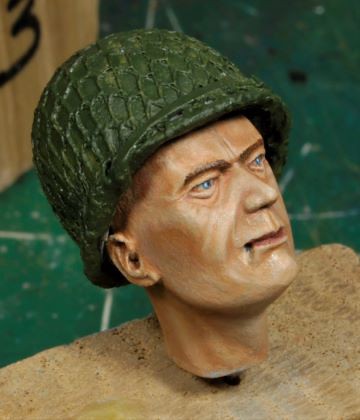
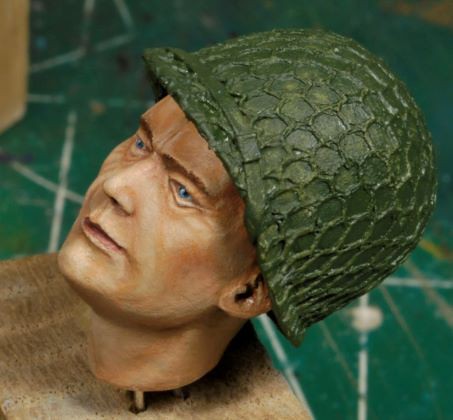
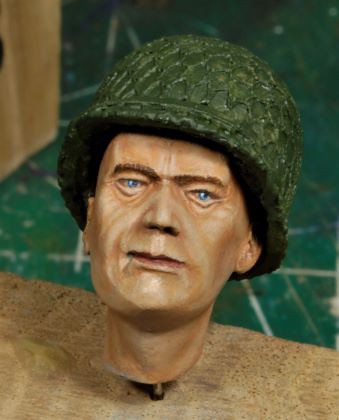
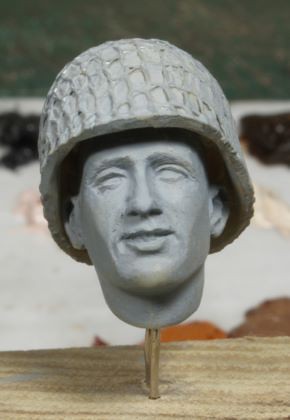
#3, Almost Acceptable
After a day of adjusting skin tones and “feathering in” the oils I am satisfied with the results so far. This one is about 80% finished. I still need a bit more work before I set it aside to dry hard before working in some facial textures.
Time to get the last two heads up to speed and work the new techniques as a set. I may give all of them a dull coat to seal in the work so far. It’s always a dice roll when working in a new technique after getting this far, but I’m willing to take that chance.
Thanks for watching. Cheers, Ski.
P.S. Let me not forget the red tones as well. Sheesh, just caught that, lol.
Steve Ski
Well-known member
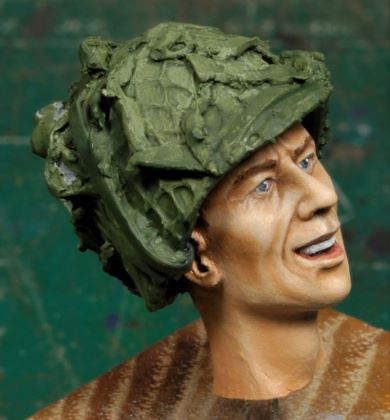
Breaking the “Glasses” Ceiling
I know some us can get carried away with detail and some of us just move on, but when the detail in literally “in your face” ya kinda gotta pay attention, IMHO. The set of glasses for the young lad on the right were a royal baby rump kisser, to say the least. Now that I’ve done this at least 7-10 times, or more, I can pretty much knock out a pair in about 15mins, sheesh! This thin copper wire takes a delicate approach or the whole thing goes to pot in a heartbeat and any prior work is caput.
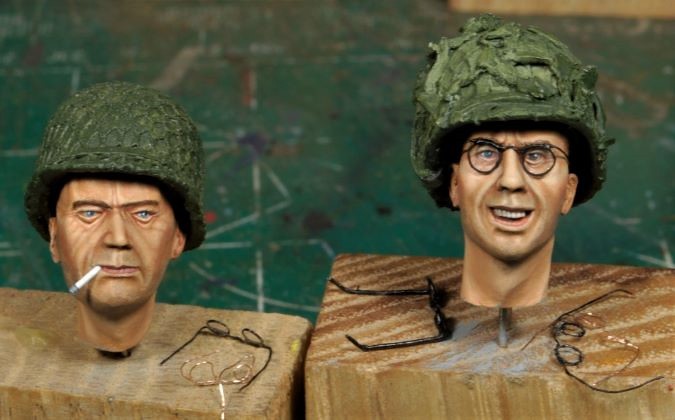
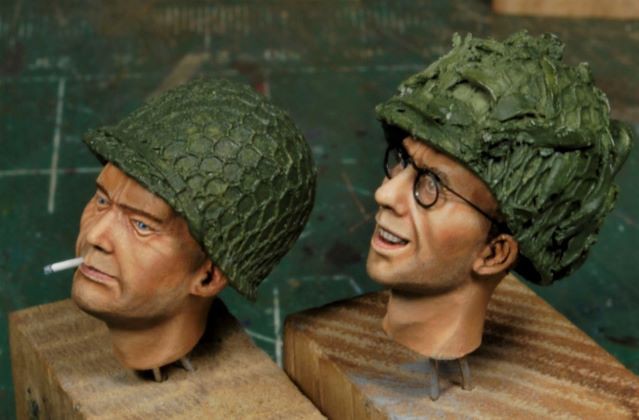
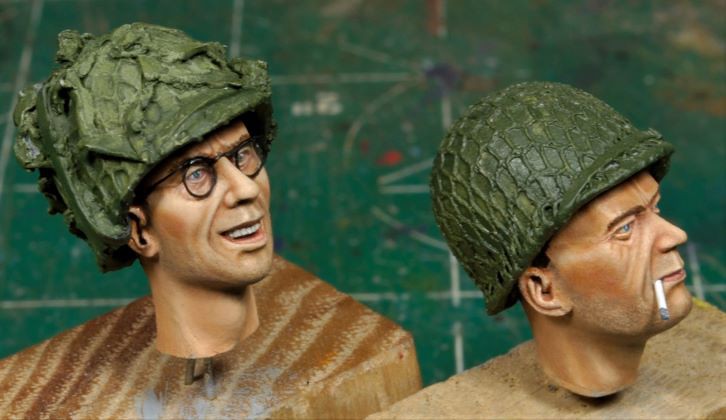
The lenses for these glasses were made from a plastic envelope that protected a set of decals in my stash. It was the only thing thin enough to work in this scale realistically. I did make an attempt at using liquid water from Vallejo, but boy howdy was he wearing coke bottle lenses then, woof!
Ok, both heads shown are completed for now with most of the minor details already added. My attempt at adding in facial textures met with utter failure, so I will move on saving that technical approach for a 1/10th bust. There comes a time when you have to realize it just ain’t happenin, and move on. I will set these aside for now and finish the last two heads before I detail the helmets and move on to the bodies.
Yes, Goofy has been replaced by one of Steve Reedee’s 1/16th scale heads. This is a far cry from that ridiculous head that came with the figure. In a conversation I had earlier today regarding well sculpted heads, they pretty much paint themselves. I agree completely, but somebody still has to control the brush, HA!
Thanks for watchin, more to follow shortly. Cheers, Ski.
I know some us can get carried away with detail and some of us just move on, but when the detail in literally “in your face” ya kinda gotta pay attention, IMHO. The set of glasses for the young lad on the right were a royal baby rump kisser, to say the least. Now that I’ve done this at least 7-10 times, or more, I can pretty much knock out a pair in about 15mins, sheesh! This thin copper wire takes a delicate approach or the whole thing goes to pot in a heartbeat and any prior work is caput.
The lenses for these glasses were made from a plastic envelope that protected a set of decals in my stash. It was the only thing thin enough to work in this scale realistically. I did make an attempt at using liquid water from Vallejo, but boy howdy was he wearing coke bottle lenses then, woof!
Ok, both heads shown are completed for now with most of the minor details already added. My attempt at adding in facial textures met with utter failure, so I will move on saving that technical approach for a 1/10th bust. There comes a time when you have to realize it just ain’t happenin, and move on. I will set these aside for now and finish the last two heads before I detail the helmets and move on to the bodies.
Yes, Goofy has been replaced by one of Steve Reedee’s 1/16th scale heads. This is a far cry from that ridiculous head that came with the figure. In a conversation I had earlier today regarding well sculpted heads, they pretty much paint themselves. I agree completely, but somebody still has to control the brush, HA!
Thanks for watchin, more to follow shortly. Cheers, Ski.
That's pretty slick Ski 
Ken Abrams
Well-known member
Oh yeah time to buckle up, I can see another masterpiece in the works! I just wish I still had a magazine to put it in.
BTW, I think you need to wrap that tire color around the sidewalls of those road wheels a little bit more, check out these pics of a real one. I know they’re already weathered and she’s in the cabinet, but maybe you can still tweak those.
.


BTW, I think you need to wrap that tire color around the sidewalls of those road wheels a little bit more, check out these pics of a real one. I know they’re already weathered and she’s in the cabinet, but maybe you can still tweak those.
.
Similar threads
- Replies
- 2
- Views
- 193
- Replies
- 54
- Views
- 12K
- Replies
- 4
- Views
- 2K