
-
Modelers Alliance has updated the forum software on our website. We have migrated all post, content and user accounts but we could not migrate the passwords.
This requires that you manually reset your password.
Please click here, http://modelersalliance.org/forums/login to go to logon page and use the "Forgot your Password" option.
You are using an out of date browser. It may not display this or other websites correctly.
You should upgrade or use an alternative browser.
You should upgrade or use an alternative browser.
1/48 scale Bf 109's x 2
- Thread starter matrixone
- Start date
phantom II
Master at Arms
Very good ") I doubt that anyone would have noticed if you had not pointed that out though :coolio
I doubt that anyone would have noticed if you had not pointed that out though :coolio
Cheers, Christian B)
I doubt that anyone would have noticed if you had not pointed that out though :coolio Cheers, Christian B)
Thanks to all for the comments! 
Christian,
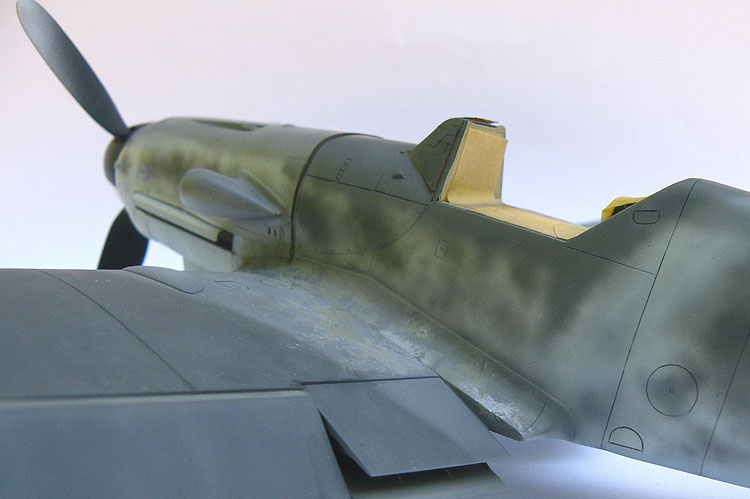
The detail painting and subtle weathering effects are just small pieces of what I hope will end up to be a realistic Bf 109 miniature. I want the weathering to look natural and the damage to the paintwork to look like it occurred over a period of time, the best way that I know how to do this is to layer the paint...besides its fun to do.
Here is a shot of the undersides after the last of the RLM 02 was sprayed in the wheel wells.
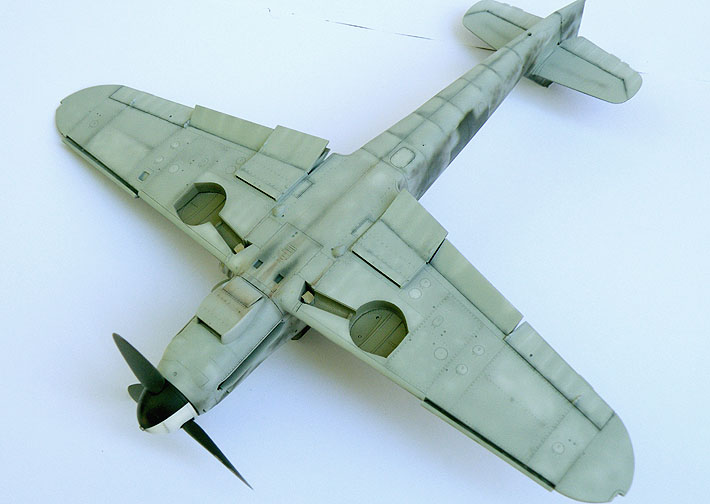
I will be trying something different to add the wear and tear on the wing roots, much more on that later. :hmmm
Matrixone
Christian,
The detail painting and subtle weathering effects are just small pieces of what I hope will end up to be a realistic Bf 109 miniature. I want the weathering to look natural and the damage to the paintwork to look like it occurred over a period of time, the best way that I know how to do this is to layer the paint...besides its fun to do.
Here is a shot of the undersides after the last of the RLM 02 was sprayed in the wheel wells.
I will be trying something different to add the wear and tear on the wing roots, much more on that later. :hmmm
Matrixone
phantom II
Master at Arms
I agree Sometimes I am just amazed at what some people can deduct from old black and whites.
For sure it helps when you can find a high quality picture verses the much reprinted variety.
Cheers, Christian B)
For sure it helps when you can find a high quality picture verses the much reprinted variety.
Cheers, Christian B)
Christian,
There is only one photograph of ''green 4'' and its not of good quality either so some of my weathering on this model is being borrowed from what I see in photographs of other Bf 109G-10's with signs of also being heavily used like ''green 4'' was.
Matrixone
There is only one photograph of ''green 4'' and its not of good quality either so some of my weathering on this model is being borrowed from what I see in photographs of other Bf 109G-10's with signs of also being heavily used like ''green 4'' was.
Matrixone
phantom II
Master at Arms
Sometimes you just got to give it your best shot
Cheers, Christian B)
Cheers, Christian B)
The only known photograph of this aircraft shows only the left hand side so the right side was painted in a similar fashion as was the left...its the best I could do in this situation. To make things worse the fuselage looks like it has had some additional painting done on it so I could not just rely on just using the factory standard camouflage pattern as a guide. These type of things are a pitfall when modeling late war Luftwaffe stuff. :idonno
Matrixone
Matrixone
phantom II
Master at Arms
So many of these airframes were salvaged and rebuilt to newer standards .
Hard to tell what they had to do with the paint jobs not knowing if they even had all the correct paints at that particular time.
Cheers, Christian B)
Hard to tell what they had to do with the paint jobs not knowing if they even had all the correct paints at that particular time.
Cheers, Christian B)
Skinny_Mike
Well-known member
great looking airplane Les. Looking really good!
Thanks for sharing!
Mike
Thanks for sharing!
Mike

My weathering experiment was successful but it would have looked better if I had not rushed things. Oh well, it is what it is.
I started by spreading some damp salt on the edges of where I wanted the worn paint look to be.
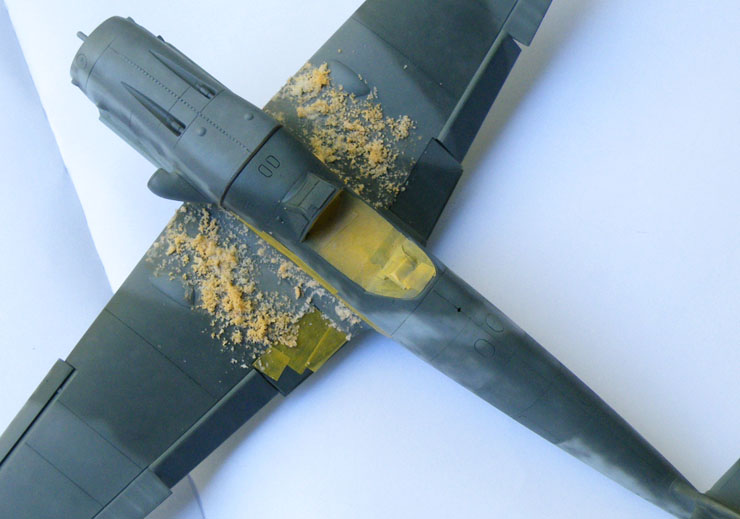
After the salt dried I sprayed on some RLM 02.
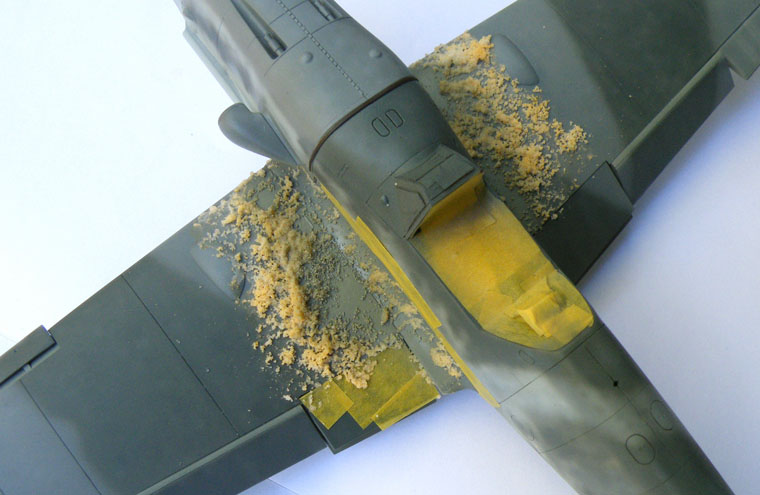
I had to wait until the paint dried a little bit before putting on more damp salt, the salt was put mostly on the edge of where the RLM 02 was sprayed trying to cover only some of it. Then metall was sprayed on followed by a few mottles of chrome silver.
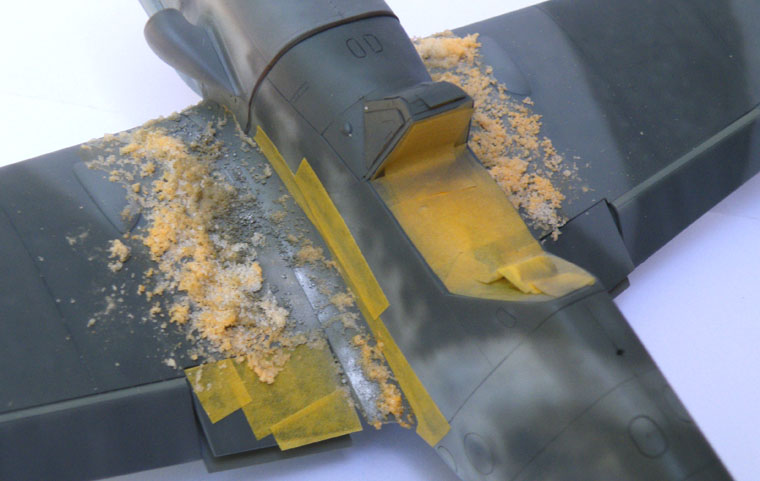
Below are the results of my experiment in weathering...with a bit more practice I think it could give some excellent results. A late war Japenese aircraft model could really look sharp with this technique. :hmmm
Matrixone
I started by spreading some damp salt on the edges of where I wanted the worn paint look to be.
After the salt dried I sprayed on some RLM 02.
I had to wait until the paint dried a little bit before putting on more damp salt, the salt was put mostly on the edge of where the RLM 02 was sprayed trying to cover only some of it. Then metall was sprayed on followed by a few mottles of chrome silver.
Below are the results of my experiment in weathering...with a bit more practice I think it could give some excellent results. A late war Japenese aircraft model could really look sharp with this technique. :hmmm
Matrixone
phantom II
Master at Arms
My weathering experiment was successful but it would have looked better if I had not rushed things. Oh well, it is what it is.
I started by spreading some damp salt on the edges of where I wanted the worn paint look to be.
After the salt dried I sprayed on some RLM 02.
I had to wait until the paint dried a little bit before putting on more damp salt, the salt was put mostly on the edge of where the RLM 02 was sprayed trying to cover only some of it. Then metall was sprayed on followed by a few mottles of chrome silver.
Below are the results of my experiment in weathering...with a bit more practice I think it could give some excellent results. A late war Japenese aircraft model could really look sharp with this technique. :hmmm
Matrixone
Never tried to do it in that order but it came out good
Cheers, Christian B)
Thanks guys!
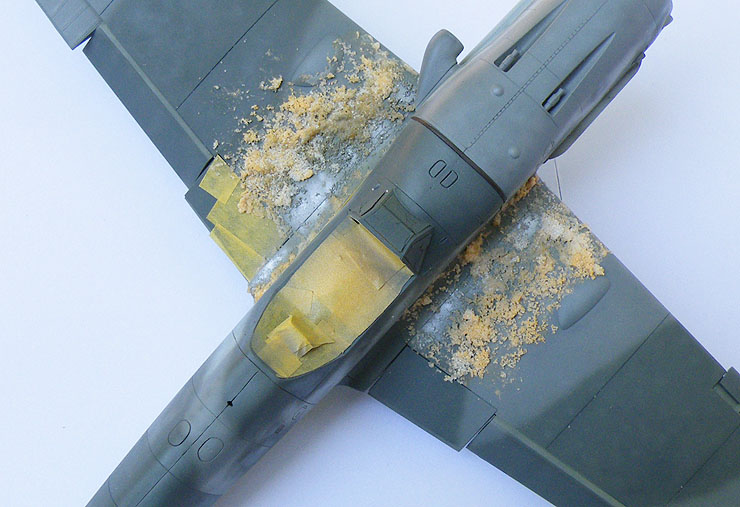
The work done on the wing roots is just the groundwork for other weathering steps to be done there, I will still use some dry brushing and a silver artists pencil to try and make things look a little more natural.
If I was to do this again on a 109 I would skip the RLM 02 step...but that's how I learn. :hmmm
Matrixone
Great job Les. 
Similar threads
- Replies
- 104
- Views
- 22K