-
Modelers Alliance has updated the forum software on our website. We have migrated all post, content and user accounts but we could not migrate the passwords.
This requires that you manually reset your password.
Please click here, http://modelersalliance.org/forums/login to go to logon page and use the "Forgot your Password" option.
You are using an out of date browser. It may not display this or other websites correctly.
You should upgrade or use an alternative browser.
You should upgrade or use an alternative browser.
Tiger 1 early - Winter Russia 1942 -completed
- Thread starter Brokeneagle
- Start date
mike walsh
Master at Arms
Wow Ian, 
The tiger looks mean
The dirty look mixed with the white and grey is sweet.
Looking forward to seeing the dio layout.
Michael
The tiger looks mean
The dirty look mixed with the white and grey is sweet.
Looking forward to seeing the dio layout.
Michael
Heavens Eagle
Well-known member
Bob while the slide show works, it is spotty and intermittent. When I first clicked it went into la-la land and the twirling dots never stopped. Later it worked but took a long time to load most of the photos. Plus many attachment photos have gone away in other threads.Sweet!
Anyone notice the slide show? Click on an image and you get a pop out that you can scroll through the rest of the images. And with Ian's images it's well worth it!!
Sorry to hijack your thread Ian, the Tiger looks awesome! You have done a wonderful job on it!

I've noticed the site is very slow right now, I suspect Ken is doing some work. I'm going to stop poking at it right now and go to the garage for a while.
centaur567
Well-known member
Very nice!! Have you ever seen the technique of winter schemes by Tony Greenland? He paints the tank white first and then dry brushed the gray over the high points to show wear. I did a 1/48th scale T-34/85 using that technique. Gary S. XXXXV XX XX

That's an interesting way to do it. Nice.
Brokeneagle
Master at Arms
No problemo. Feel free. I hope it works well for you.Awesome!!
I really...really like the way the white camo is coming out...I going to totally steal this technique.
Brokeneagle
Master at Arms
Hi Gary, yes I have tried this in the past but find adding the white layer over the top represents the effect more accurately as it is replicating the actual process.Very nice!! Have you ever seen the technique of winter schemes by Tony Greenland? He paints the tank white first and then dry brushed the gray over the high points to show wear. I did a 1/48th scale T-34/85 using that technique. Gary S. XXXXV XX XX
The method you mentioned works very well though with staining the winter cam with dirt and oil. I also use it when bringing a color back through dirt made with pigments - works especially well on seats like here..
Nice T34/85 though
Last edited:
Brokeneagle
Master at Arms
Yeah, I ended up with a number of old Russian TAMIYA T34's, so they either end up on the dio as the turret has or as a test tank for the paint , as the chassis has. Recyling - we are doing the environment a fav John.Looking great so far! Funny I too use a Russian tank as a test bed, but mine is a kv2!
Brokeneagle
Master at Arms
Thats OK, thanks Paul.Heavens Eagle said:
Brokeneagle
Master at Arms
Thank you. No problem. There seems to be a few who may give this a try.Don't know how this thread got past me...
Superb 'look' to the worn camo - may try stealing that technique for 'something Russian' I've got in mind for this winter.
Ian.
Brokeneagle
Master at Arms
Thanks Mike.Wow Ian,
The tiger looks mean
The dirty look mixed with the white and grey is sweet.
Looking forward to seeing the dio layout.
Michael
I really like working with German grey because it is neutral and with compliment any color used with it.
Dio updates coming up next!
Brokeneagle
Master at Arms
I am back with some groundwork shots. I will also add some additional early process pics that I did not include at the beginning, hoping that these will be useful to people who want to give this way a go in the future.
The snow is still in process and I will add the progress on this in my next post.
Making the base.
Texture and detail is the aim while making sure it stays random.

The sand is on the drying modelling clay base and has been pushed-in while still wet. The turret and basic damaged parts have also been added to the ground work while they can be pushed into the clay.
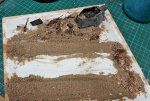

Additional rocks, kitty litter and grout have now been added using diluted white glue and water (with a touch of detergent)

Final touches of grass and further ground materials have been added and left to dry.

The Materials used to construct the base.


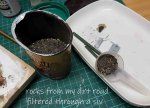
The snow is still in process and I will add the progress on this in my next post.
Making the base.
Texture and detail is the aim while making sure it stays random.
The sand is on the drying modelling clay base and has been pushed-in while still wet. The turret and basic damaged parts have also been added to the ground work while they can be pushed into the clay.


Additional rocks, kitty litter and grout have now been added using diluted white glue and water (with a touch of detergent)

Final touches of grass and further ground materials have been added and left to dry.

The Materials used to construct the base.


Last edited:
Using real rocks for rocks? Who would have thought?! 
Brokeneagle
Master at Arms
MP - well yeah, how about that.
Mike - thanks. Thats exactly what I am doing and hoping people will see.
Back with the next round.

Paint on the base.
1. the basic base with groundwork textures and no paint. If the texture looks right the paint will look good. I am aiming for lots of random details.
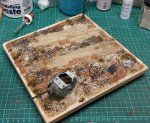
2. nice earth colors in acrylic as a base coat - the detail now starts to pop out as the base color has equalised the details into light and shadows
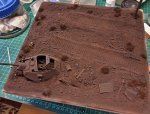
3. Grey has been added to the base as well as some earth pigments - a mix of euro dirt and African earth.
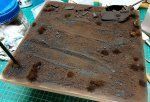
4. The turret now has dry decals and the green has been enhanced and weathered. Its good to keep old turrets.
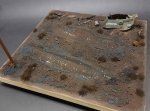
Here is the point that i would continue to enhance the detail if I was doing a non-snow scene, however because this will be getting snow I will only pick out a few rocks in some greys and browns and add some dry mud to the box and other machinery pieces.
I only need the texture to pop through the snow, as the snow will be light and the rocks will break up the white.
Mike - thanks. Thats exactly what I am doing and hoping people will see.
Back with the next round.
Paint on the base.
1. the basic base with groundwork textures and no paint. If the texture looks right the paint will look good. I am aiming for lots of random details.

2. nice earth colors in acrylic as a base coat - the detail now starts to pop out as the base color has equalised the details into light and shadows

3. Grey has been added to the base as well as some earth pigments - a mix of euro dirt and African earth.

4. The turret now has dry decals and the green has been enhanced and weathered. Its good to keep old turrets.

Here is the point that i would continue to enhance the detail if I was doing a non-snow scene, however because this will be getting snow I will only pick out a few rocks in some greys and browns and add some dry mud to the box and other machinery pieces.
I only need the texture to pop through the snow, as the snow will be light and the rocks will break up the white.
Attachments
Last edited:
Love it Ian, not only your progress but your presentation 
Brokeneagle
Master at Arms
Thanks Mike, MP and James 

The snow is finally here.......though still in process as I do it a little at a time to keep control.
I started with some Techstar snow I had kept from some years ago but that did not want to mix with any medium. I got it to mix a little with pigment fixer but found it did not deliver. I used to use Micro balloons (as can be seen on my Mk3 stalingrad repair dio) but these seem to be unavailable now. I had to find something else, so I turned to white grout mixed with pigment fixer.
Attachments
Last edited:
Similar threads
- Replies
- 1
- Views
- 261
- Replies
- 5
- Views
- 330


