• Modelers Alliance has updated the forum software on our website. We have migrated all post, content and user accounts but we could not migrate the passwords.
    This requires that you manually reset your password.
    Please click here, http://modelersalliance.org/forums/login to go to logon page and use the "Forgot your Password" option.

AMT International Scout II

Better! Built with .076mm Brass sheet, photoetch scissors, dremel, and magnifiers. The nuts are from Detail Master, set on brass pins drilled and CA'd through bracket and plastic. Hopefully paint will cover the obvious handmade'ness of it.
1000010556.jpg
 
So, since I cut the doors off there are some voids to fill. I am using strips of .04 styrene with a bevel on one side to match the curve of the body.
1000010566.jpg

There were support bars (you can see where I cut them off) so need to make new extended ones.
1000010569.jpg


I am gluing them in place and pinning while it dries.
1000010570.jpg

I looks like I am secretly building Chitty Chitty Bang Bang! (Love that movie!)
 
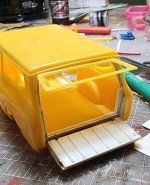
Last night I risked cutting open the tailgate! I made a .04 styrene inner skin. You can see the pivot pins.
1000010571.jpg


I used .075" styrene half round strip to make ridges to match the bed of the Scout.
1000010572.jpg

The pins for this are .02" brass rod with matching brass tube. I realize now that these are a little too lightweight, so for the doors and tail window I will use .032 rod and matching brass tube for a little extra strength. I would change these but have gone too far before thinking of it. It "works", but I would err on the side of too heavy than too light. These are only my second set of open doors to try so I am still learning.
 
Ok, a few things. I went insane and have cut the front seats apart and will hinge the seats.
1000010580.jpg


I already opened and hinged the center console...
1000010582.jpg


After I got the door hinge attachnent plates in pmace I could see how to fill the voids and have used .04" styrene strips. It was like a puzzle! After the dry completely I will finalize their shape.
1000010581.jpg
 
Oh yeah, the seat backs are both cinvmcave and convex, and the styrene kept splitting, so I decided to use thin brass to back the seat. I think I might add the map pouch to the back. Use tape maybe?
1000010583.jpg
 
I hated those seats, being the big boy I am there was never enough room to get by into the back seats. Camaros and Mustangs were the worse.
 
Little update. I remade the top to the center console to more closely match the reference. I used 3 layers of .03" styrene. The top layer got circle punched. The drink holder circles should be 6mm but the biggest I have is 5mm so it will have to do. The middle layer had a cutout where the drink holders are to make them a little deeper and the layer forms the bottom of the change troughs. The 3rd layer forms the bottom of the drink holders.
1000010605.jpg

The top was framed with 2mm quarter round styrene cut at 45° angles. The hinge is made of 1/25 scale heater hose to provide friction so the lid will stay open.
1000010620.jpg

The brass rod is glued to the underside of the lid, then encased in thin styrene.
1000010621.jpg


The seat backs have the pivot arm attached. I used .02 styrene trying to keep it in scale. It is glued with Tamiya X thin.
1000010615.jpg

I set the seat back in place and drilled a hole for the .062 brass tube. I have little metal rivets coming to put through the hole to hold the seat back in place. It folds down easily
1000010616.jpg

On the passenger side, which folds forward to allow back seat access, is hinged with brass rod and tube
1000010617.jpg
1000010618.jpg

The 2 tubes at each end are CA'd in place on the rod, and the center tube will be epoxied or CA'd to the interior base.

Speaking of hinges, I finally figured out how to hinge the rear window using a similar hinge I used on the seat. I used .04" tube, the smallest I have, and matching .02 rod to make a 3 part tube and rod hinge. I crimped the ends of the rod to keep the tubes from sliding off.
1000010612.jpg

The hinge is inset into the window edge. I should have inset into the body frame, but I misread the photo. It works though.
1000010622.jpg

1000010613.jpg

The tailgate is held closed with 2 tiny earth magnets. It stayed closed before, but now it has a very satisfying click when it closes.

The doors are hinged and work well.
1000010614.jpg

The next step for the doors is to create spacers to add the proper thickness between the skin and inner door surface.

That's about it. Thanjs for looking!
 

Attachments

  • 1000010613.jpg
    1000010613.jpg
    302.4 KB · Views: 51
Slow and steady, one detail at a time. Some I have not figured out how to do yet. The under-hood supports are done. I drew it off on the model hood, then used Tamiya tape which is transparent enough to make a template, then transfered that to .02 styrene. Slow and careful cutting with a new blade Xacto still left more flaws than I want. I may figure out how to cut steady one day. Anyway, I rounded the edges and sanded smooth, then glued in place with Model Master cement. It is close enough I guess. ... It is a little different from the real thing due to how the body is molded and I had to go around some things.
1000010633.jpg
1000010634.jpg
1000010635.jpg
 
I was questioning myself last night. Why do all this work? Why not just buy a better kit? The answer is, because there isn't one. So, it is a challenge now to see how nice I can make this with the skill set and tools that I have. I admit my skills are fair to midland so the Scout will turn out that way, but I have the highest aspirations.
Last nights episode was to open the grill and lights to bring the level up a notch.
1000010678.jpg
1000010679.jpg
1000010680.jpg
1000010681.jpg
1000010682.jpg


The little Chinese drill bits work well for grinding, but break if you breath on them; so I ran out of small enough bits despite my best effort of going slow and not forcing the issue. The pinvise bits just don't have the tight radial spiral that the cheap bits have and don't grind sideways well at all. I used tiny saw blades, the back of an Xacto blade, and a scribe to take out naterial. If anyone knows of a better tool to use please let me know.
I realized there is no fan shroud with the kit. This thing is molded with the barest minimum of details they could get away with. The radiator is molded on the outside of the body frame and would have beev completely hidden had I not opened the grill. Why did they bother with that yet put no radiator detail on the inside? Anyway, I have a lot of photo reference but don't know how much room I have to work with. I will keep plugging away. The soare Scout kit came in yesterday that I will build for Bob. This one has gone way too far to give away for nothing!
 
Back
Top