• Modelers Alliance has updated the forum software on our website. We have migrated all post, content and user accounts but we could not migrate the passwords.
    This requires that you manually reset your password.
    Please click here, http://modelersalliance.org/forums/login to go to logon page and use the "Forgot your Password" option.

All Righty ... What's on the bench today?

What is CSC?

Whoops, sorry. It's Castrol Super Clean, although it's sold everywhere under just Super Clean. I thought everyone knew about it, but it was new to me (I had a thread last week or so about it).

It was $8 a gallon at Advantage Auto. It's biodegradable (not completely non-toxic since it'll suck all the moisture out of yours hands and burn), can be used all around the house diluted, but all full strength is dissolves paint, acrylic, enamels, whatever the age and does no harm to styrene.

I've had an Aurora King Kong soaking for a week (forgot about it), whoever painted it used a lot of black enamels and seems like a tough primer. Generally just a few hours to work. I've done 4 Auroras so far with the same gallon, just reused it although KK turned it jet black I may toss it this time.

Paint comes off in sheets after a short while, sometimes just falling to the bottom of the container. It's seems to only really stick in areas where the glue has etched it.

Mike mentioned it'll strip chrome off plastic too, which will come in handy.

Thanks, not much on cleaning things... :woohoo:
 
Not really what I have on the bench today, but here is the AML-60 with markings.

DSC07034.JPG


DSC07033.JPG


DSC07035.JPG


James
 
I had to knock down some spiderwebs to get to the bench tonight, literally. It's been since before my London trip that I had been down there. Closed up the fuselage on the SBD, gotta figure out how to remove the pour slab on the Quickboost engine.

Got a bunch of stuff on the WIP shelf...I need to get :soldier
 
Don't feel bad Bob. I have been working on the jigs and fixtures for about a month now. Making a lot of progress and have a lot done, it's just that it takes a while to machine all this crap. Only reason I am doing it now is that all these little tooling things have been in the back of my head for a couple of years.
light-bulb.gif


Finally reached a point where I really wanted the tools so stopped the model and am making the tools. Have had some minor goofs and a couple of ones that required redo's. :bang head Hoping I will get all this stuff done in the next week or so then back to the Albatros.

All these tools should come in handy once I start the WNW kits and other big scale kits. As I discovered with a couple of earlier builds using more basic jigs, it is so nice to set everything up exactly how you want it to fit and align. THEN add glue, CA, solvent and walk away for a while. When I come back it is all set, dry and ready to handle. Don't have to worry about things getting out of alignment while drying. It should be a boon when building the biplanes as I will be able to set up the upper wing and tweak all the alignments with the struts between. If it needs some support while adding the rigging, just leave it in the jig and add the rigging.

I will have photos once the tooling is all done, right now all it amounts to is piles of what looks like glitter and aluminum blocks. Having to spend a lot of time sweeping and using the shop vac as the shavings act just like glitter and end up everywhere.
sweeping.gif
duh.gif
 
I had been away from my bench for several months myself due to work and other issues. I am finally back to it over the last week so now I have something to post. I hope to have it up sometime this weekend.

Stay tuned.
 
A while ago, I was given a piece of advice that I will try to stick to for the rest of my modeling "career".

One piece of work at a time. Doesn't mean I won't think of another piece while paint dries :D

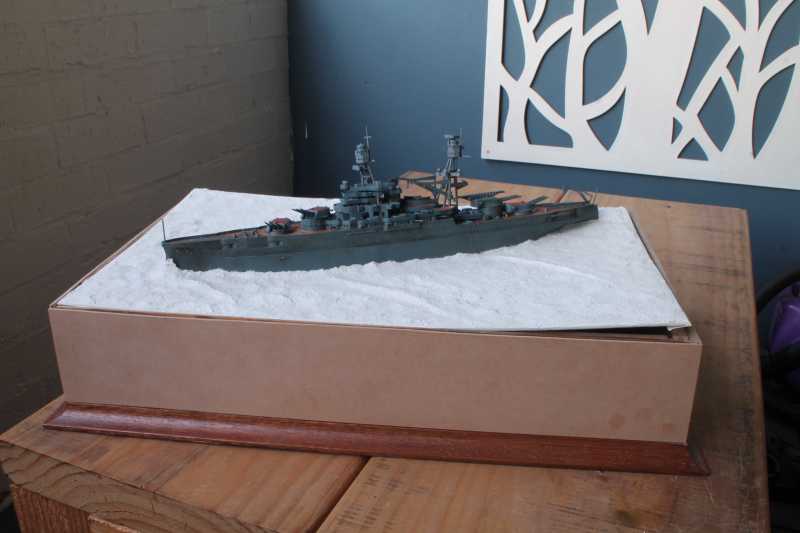
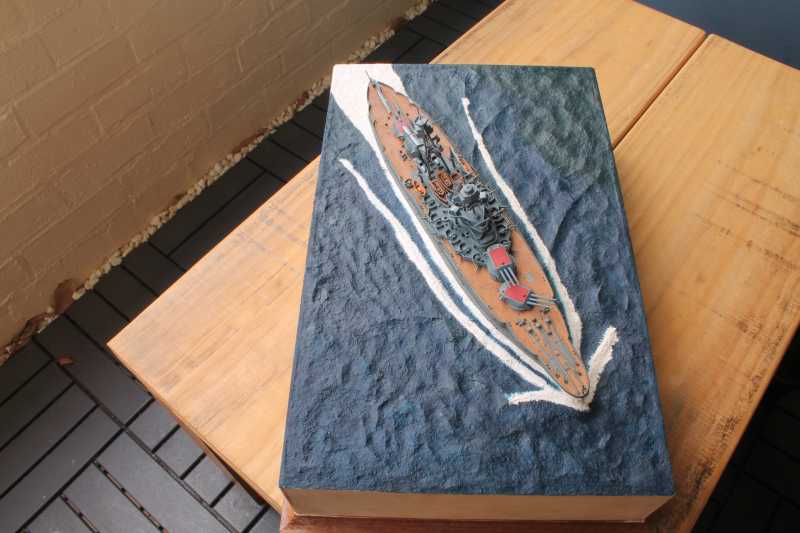
As such, there is only one thing going, my latest project, a small-ish diorama of the USS Arizona. I will call it "Two Days Till Sun Rise" - showing the battleship heading back to Pearl after some exercises.
This was on the 5th of December 1941, the last time she sailed.

The kit is Revell's 1/426th that I bought from Pearl, the museum. It was only $10 or something, but, it really is bad - nothing fits properly, the rails are totally bad - solid plastic and very thick, it has been a challenge to put it all together.

Anyway - here are a couple of shots

This was taken before the base was attached to the box, it had warped due to the Celluclay.

he545baf.JPG


First coat of paint, the ocean, that has changed now, it has more of a green tint now, barely visible in the photograph.


h6601692.JPG


I intend to have this finished as soon as I possibly can, maybe a month.

Laurence
 
Looks good Laurence!

Possibly a "Silk purse from a sow's ear" as we say?

Bob

Thanks Bob, appreciate it :notworthy :notworthy :notworthy

I know that saying, but this will never be a "silk purse". I had nothing to replace those horrible rails with, the superstructure is way out of scale, had to drill the barrels, the lifeboats are awful and the list could go on forever.

I am doing this as a memento to our honeymoon and a tribute to this famous lady Arizona.

Today I only finished applying the second coat on the ocean - first one wasn't exactly right. Hopefully it will turn out ok, I am counting on the water to make a better impression that the ship herself.

I so wanted to do the 1/200 Arizona, but it's way too expensive for me at the moment ... :S


Laurence
 
So far so good Laurence! It is looking quite good! (y)

As to the Trumpy 1/200 Arizona, don't get in a hurry on it. It seems that it is the usual completely inaccurate Trumpeter kit. It is huge but that is about the only thing really going for it. :facepalm Flaws are in the dozens on dozens including cranes, 5 inch guns, the 4 turrets, hull shape of the torpedo armor bulges. Those are only the beginning. :bang head


Good advice, thank you for that and for the kind words :notworthy

I have always had a "thing" for ships I suppose, Arizona is a famous one of course. It deserves a great diorama.

I have been looking lately, but all the big ones, Hood, Bismarck, Arizona etc they are way too expensive in Australia. Hood is around $400, and, if you want all the goodies, that's another few hundred bucks. Too steep.

On top of that, I have had huge headaches with the U-69 build - had to paint it on the balcony, carry it in and out every day - and then, of course, it's a matter of what to do with it once it's done. Donation to a museum seems the reasonable thing to do, but I would really like to keep them if I can. So, I am afraid, no huge ships on the radar, at least for the time being.


Laurence
 
Now that I had some time, I managed to get some progress done. Here's what's been done on my workbench lately.

I'll start with my aircraft. The F-102 I'm doing for the Charlie Don't Surf Campaign was first masked off on the bottom:

WIP_CDS_Meng_F-102_Dagger_XIX.jpg


Next I shot the first of the three camouflage colors on it:

WIP_CDS_Meng_F-102_Dagger_XX.jpg


This is still drying, I may get the other masking and colors on it this week.

After that, I started a couple simple models from Accurate Miniatures of a P-40 and P-51B for a Monogram Mafia Group Build on another boards. These are simple models originally from Monogram; I know because there was engraving on the inside of the wings saying Copyright Monogram and the year!

Here is the P-40 started; I had painted the interior and added the pilot (since there was no cockpit at all!) and then I closed it up and added the canopy:

WIP_Monogram_Mafia_2017_GB_II.jpg


After that I moved on to the propeller and cowl and assembled all that while the rest was drying:

WIP_Monogram_Mafia_2017_GB_III.jpg


Then I assembled the wings to have all the sub assemblies done and ready to assemble when everything was dry:

WIP_Monogram_Mafia_2017_GB_IV.jpg


Since I could go no further on this and since I'm supposed to do two Monogram models for the Group Build in order to be 'Made' in the Monogram Mafia; I also pulled out the P-51B that came in the same kit. I got the interior painted and the fuselage all closed up before I remembered to shoot a pic:

WIP_Monogram_Mafia_2017_GB_V.jpg


Later on I assembled the wings and dry-fit them to the model:

WIP_Monogram_Mafia_2017_GB_VI.jpg


Finally, I shot another dullcoat and then removed the canopy masking from my F/A-18 Hornet:

WIP_Modern_Aircraft_GB_XXIX.jpg


Now all I have to do is wait for my replacement burner cans, clean the canopy and mount the ordinance and this bird will finally be done.


Moving on, I was able to get the Sherman more fully painted:

WIP_Sherman_Mineroller_XVII.jpg


WIP_Sherman_Mineroller_XVIII.jpg


Later on I decided to shoot some white on my two Aerosans and move forward on them for once. Here's the smaller one shot first:

WIP_Game_Sleds_IV.jpg


WIP_Game_Sleds_V.jpg


The larger one was shot next. I didn't put the roof on it; I may leave it off:

WIP_Game_Sleds_VI.jpg


WIP_Game_Sleds_VII.jpg


Once these were dry, I painted a basecoat of Oily Black on the engines and painted the seats in the interiors. I also tried to paint the dials on the instrument panel of the smaller Aerosan:

WIP_Game_Sleds_VIII.jpg


There's gonna need to be some touch-up, but these are finally moving forward.


Moving on to some of my more eclectic subjects, I decided to experiment with some weathering and panel line pinwashing on the bottom of the Star Destroyer. I'm not that happy with the results under here; except in the shuttle bays:

WIP_SPAM_Star_Wars_GB_XIV.jpg


I think I'm going to do that over.

I also did the same deep wash on the face of the command module. I'm well pleased with how this looks so far:

WIP_SPAM_Star_Wars_GB_XV.jpg


I'll be dry-brushing with a lighter grey over this later on.

I did the same on the back of the module and on the neck as well. It looks well enough so far:

WIP_SPAM_Star_Wars_GB_XVI.jpg


Finally, I managed to get a lot done on my 20-mule team Borax wagon train. Here is the first wagon dusted up and weathered a bit:

WIP_Borax_Wagon_Train_XX.jpg


This pic doesn't show the dust to good effect here. I over-edited it. This second wagon shows the dusting more accurately the way it looks in person:

WIP_Borax_Wagon_Train_XXa.jpg


Then there is the water wagon all dusted up:

WIP_Borax_Wagon_Train_XXb.jpg


Just for fun I tried to get a good shot of the whole train together sans mules:

WIP_Borax_Wagon_Train_XXc.jpg


This doesn't look like what I see when I look at it so I tried it with the flash. I think this looks much better; it really shows the dirt to better effect:

WIP_Borax_Wagon_Train_XXd.jpg


Now of course, I gotta do the mules. I had already showed where I painted the first ten mules. This time I broke out the Sotar airbrush and focused on getting the noses and hocks all painted in the white-ish color that these mules have on those places:

WIP_Borax_Wagon_Train_XXIa.jpg


After this I can paint the hooves, blinders and harnesses and then move on to the final ten mules. I'm beginning to see the end of the trail for this model....


That's all I have for now for this week. I hope to get more done next week and possibly finish something else. Stay tuned everyone and thanks for looking in, comments are welcome.
 
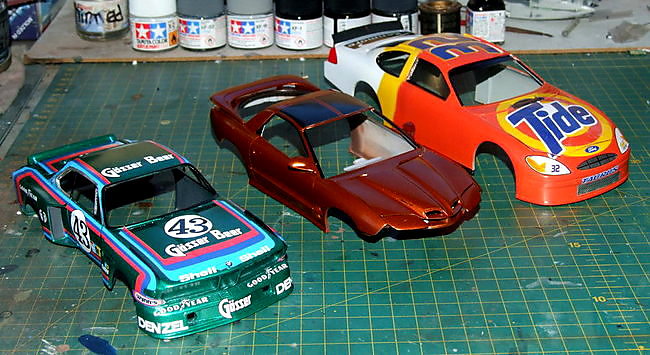
Pontiac - Three coats of Tamiya 'clear' on, so next is a session with the Turtle Wax (other car polishing compounds are available) :coolio

BMW - All the (Studio 27) decals are done, next it'll get three coats of Tamiya 'clear aswell.

Taurus - Decalling started, I'll drop a couple more pics in the thread.


hdc6dae9.jpg


Stay tuned.


Ian.
 
Back
Top