-
Modelers Alliance has updated the forum software on our website. We have migrated all post, content and user accounts but we could not migrate the passwords.
This requires that you manually reset your password.
Please click here, http://modelersalliance.org/forums/login to go to logon page and use the "Forgot your Password" option.
You are using an out of date browser. It may not display this or other websites correctly.
You should upgrade or use an alternative browser.
You should upgrade or use an alternative browser.
All Righty ... What's on the bench today?
- Thread starter panzerace007
- Start date
Sherman 18
Master at Arms
:woohoo:
Duke Maddog
Well-known member
Sweet Kenny! I'm looking forward to seeing that on the boat!
Duke Maddog
Well-known member
Well, today my condo was being worked on all day so I stayed home to attend to the workers whenever needed. I didn't need to do much for them so I was able to stay out of their way in my Hobby Room. I was able to get quite a bit done while I was in there, but not as much as I had hoped to. Enough banter, here's the latest progress I've made...
To start with, I got the interior of the cab on the JGSDF three-ton truck painted up:

Later I installed all the windows onto the outer cab and let them dry before I masked them up for painting later. Here is the truck all dry-fit together; she's now ready for paint:

I decided to put the benches in the back in the stowed position; my other 3-tonner with the kitchen trailer and water trailer has the benches deployed for all the relief workers that would be inside. This one is going to be a cargo truck.
While I was doing cab interiors, I also painted up the cab interiors on the JGSDF radar and missile trucks, as well as added the clear windows to these as well:

Later on I masked these windows as well.
Gee, while I was painting all these truck interiors, why not get the interior done on the Type 60 "Nippon Ontos"? So, I pulled out additional colors and went to work. The interior overall was white, so that went in first. Then I painted the engine, transmission, and other related parts in Oiled Steel first. The seats were done in olive drab and the other parts done in flat black. I also painted the pedals in steel as well and then dry-brushed white on the face of the radio for the knobs, and added a red knob or two in there too. After the paint had dried, I applied a wash of Oily Black to the engine and transmission parts and the rest of the interior was done with a raw umber wash. Unfortunately that doesn't show up well in these pics. I apologize for this; I tried to adjust the white balance to show this better, but I guess I'm not experienced enough with that. Anyway, here's a couple of pics of the interior:


While that was drying, I also masked off the vision blocks on this as well as the other clear parts that are not supposed to be painted. Now my baby Ontos is ready for paint as well.
After all that, I went ahead and finished up the radar truck to get it ready for paint:

After that, I continued to work on the the missile truck to get it all ready for paint as well. I assembled all the missile arms and two box assemblies that I think are supposed to hold reloads, but I'm not sure:

Then it came time to glue the missile launcher arms to the launcher. However, I didn't want to glue them in some arbitrary position; I figured if I'm making this in firing mode, I should make the arms moveable. So, I cut off the mounting pins, drilled some holes and then glued a brass rod inside one of them:

Next I put the rod through the existing holes in the launcher body and super-glued the other rocker arm in place. I had taped it into place to hold it so I could line them both up perfectly:

Afterward, I added the platforms that the re-load(?) boxes go on and added them to the truck. These actually move up and down: up for travel mode and down for firing mode. I glued mine in the lowered position for firing mode. Here is what the whole thing looked like when I dry-fit this truck together:

I didn't add the boxes to these yet as there were some bad seams on top that I covered with Mr. Surfacer. I'm going to sand them first to make the top smooth before I add them to the truck.
Now I have three trucks and a Type 60 "Nippon Ontos" all ready for paint!
I wasn't ready to pull out the airbrush and fire up the compressor, so I figured it was a good time to pull out Anni and get some more work done on her. The first thing I did was finish up the forward tractor that I'd started at Hobby Day:

Then I went to work on the secondary Tractor and got that completed as well:

I did have a few issues with these as they went together; particularly in lining up suspension and other support parts underneath, but nothing real difficult to fix. Here are both tractors sitting together waiting for the rest of the gun to be built:

After this, I painted the interiors of the cabs on these and then masked off the windows again in preparation for paint. It looks like my airbrush is going to get quite a workout tomorrow!
That is all I got done today. I'm hoping tomorrow will be at least as productive. If not, I'm hoping to at least get some paint shot on all these. Meanwhile, thanks for looking in, comments are welcome.
To start with, I got the interior of the cab on the JGSDF three-ton truck painted up:

Later I installed all the windows onto the outer cab and let them dry before I masked them up for painting later. Here is the truck all dry-fit together; she's now ready for paint:

I decided to put the benches in the back in the stowed position; my other 3-tonner with the kitchen trailer and water trailer has the benches deployed for all the relief workers that would be inside. This one is going to be a cargo truck.
While I was doing cab interiors, I also painted up the cab interiors on the JGSDF radar and missile trucks, as well as added the clear windows to these as well:

Later on I masked these windows as well.
Gee, while I was painting all these truck interiors, why not get the interior done on the Type 60 "Nippon Ontos"? So, I pulled out additional colors and went to work. The interior overall was white, so that went in first. Then I painted the engine, transmission, and other related parts in Oiled Steel first. The seats were done in olive drab and the other parts done in flat black. I also painted the pedals in steel as well and then dry-brushed white on the face of the radio for the knobs, and added a red knob or two in there too. After the paint had dried, I applied a wash of Oily Black to the engine and transmission parts and the rest of the interior was done with a raw umber wash. Unfortunately that doesn't show up well in these pics. I apologize for this; I tried to adjust the white balance to show this better, but I guess I'm not experienced enough with that. Anyway, here's a couple of pics of the interior:


While that was drying, I also masked off the vision blocks on this as well as the other clear parts that are not supposed to be painted. Now my baby Ontos is ready for paint as well.
After all that, I went ahead and finished up the radar truck to get it ready for paint:

After that, I continued to work on the the missile truck to get it all ready for paint as well. I assembled all the missile arms and two box assemblies that I think are supposed to hold reloads, but I'm not sure:

Then it came time to glue the missile launcher arms to the launcher. However, I didn't want to glue them in some arbitrary position; I figured if I'm making this in firing mode, I should make the arms moveable. So, I cut off the mounting pins, drilled some holes and then glued a brass rod inside one of them:

Next I put the rod through the existing holes in the launcher body and super-glued the other rocker arm in place. I had taped it into place to hold it so I could line them both up perfectly:

Afterward, I added the platforms that the re-load(?) boxes go on and added them to the truck. These actually move up and down: up for travel mode and down for firing mode. I glued mine in the lowered position for firing mode. Here is what the whole thing looked like when I dry-fit this truck together:

I didn't add the boxes to these yet as there were some bad seams on top that I covered with Mr. Surfacer. I'm going to sand them first to make the top smooth before I add them to the truck.
Now I have three trucks and a Type 60 "Nippon Ontos" all ready for paint!
I wasn't ready to pull out the airbrush and fire up the compressor, so I figured it was a good time to pull out Anni and get some more work done on her. The first thing I did was finish up the forward tractor that I'd started at Hobby Day:

Then I went to work on the secondary Tractor and got that completed as well:

I did have a few issues with these as they went together; particularly in lining up suspension and other support parts underneath, but nothing real difficult to fix. Here are both tractors sitting together waiting for the rest of the gun to be built:

After this, I painted the interiors of the cabs on these and then masked off the windows again in preparation for paint. It looks like my airbrush is going to get quite a workout tomorrow!
That is all I got done today. I'm hoping tomorrow will be at least as productive. If not, I'm hoping to at least get some paint shot on all these. Meanwhile, thanks for looking in, comments are welcome.
Here's what's on the bench today.

Something I started back in 2012 and didn't finish.
Terry
Look at the size of them Blasters!!!
 Could do some serious damage with them!! Looks good Terry!!
 Jeeves
Well-known member
As per my normal Friday afternoon after school-- I had a couple hours in the shop. I re glued the chimney on the Quonset Hut for a third time...
Worked on weathering the halftrack...

Roughed up a tow truck I am building in a down and dirty type build...


And did some slight preshading on the Snowspeeder...

Guess that's it for now!
Worked on weathering the halftrack...

Roughed up a tow truck I am building in a down and dirty type build...


And did some slight preshading on the Snowspeeder...

Guess that's it for now!
Adam Baker
Active member
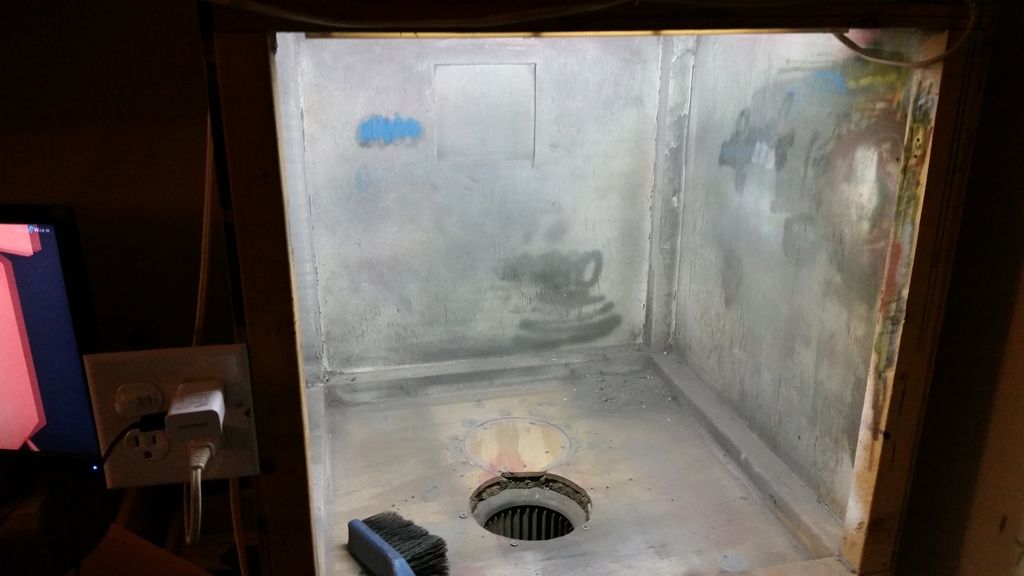
Not much modeling lately, but one thing I have worked on is trying to clean up my paint booth some. I built this thing several years ago, but never did anything to the inside other than put silicone around all the joints.
Over time, the inside has gotten really dirty and pretty dark, and a few weeks ago I decided I wanted to paint the inside of it in an attempt to clean it up but also help make the lighting better.
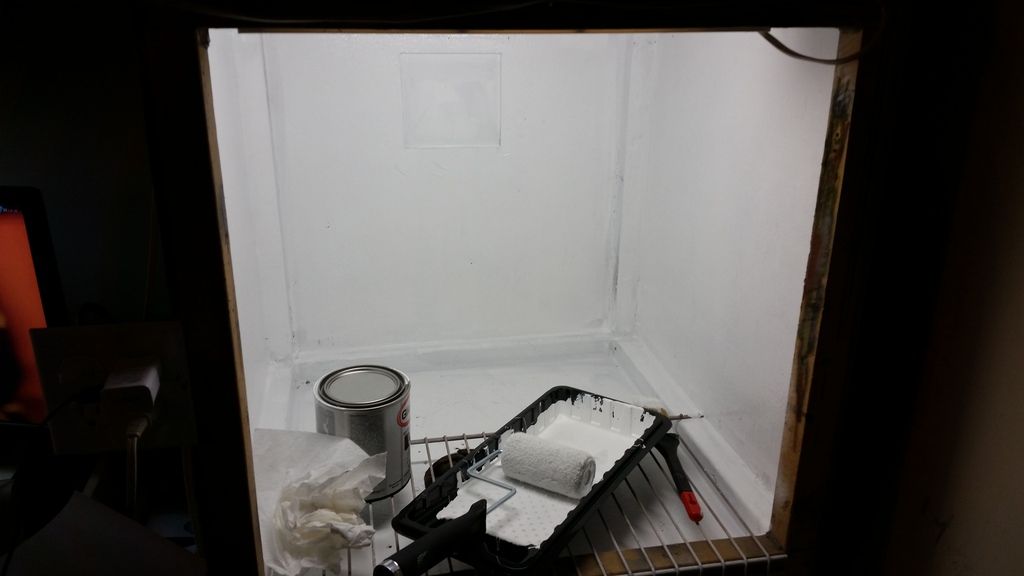
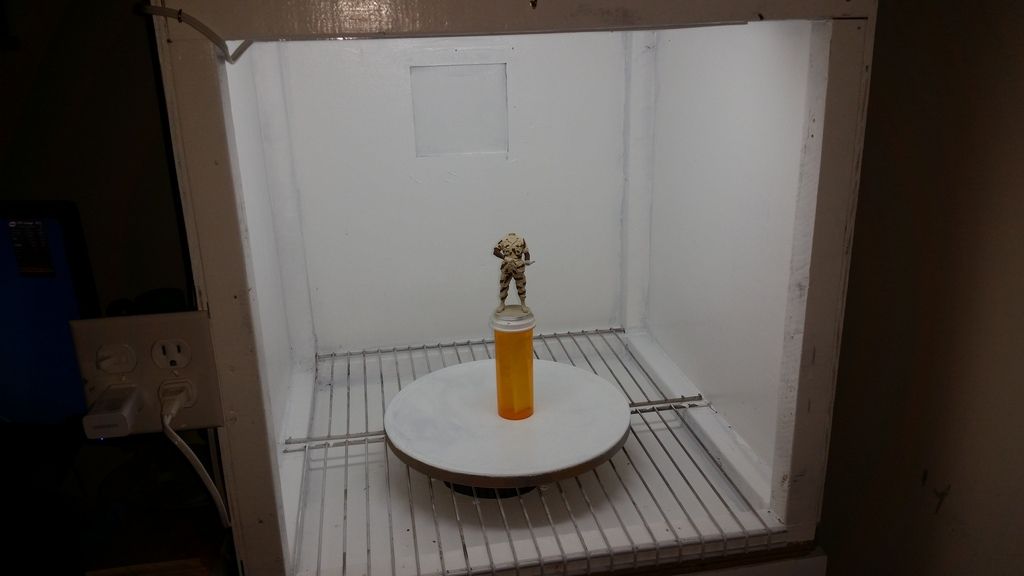
So I chose to get some Glidden High Gloss White exterior enamel paint and put down a couple of coats on it. Overall I'm very happy w/ the results. Along w/ the paint, I also replaced the light fixture I had in it, and put in a brighter bulb. Before it had a Kitchen/Bathroom bulb, and now it has an Outdoor/Sunlight bulb, so instead of a slightly yellow tint to the light, its more blue/white, and with the white paint, its even brighter.
Here's the before.
And after
Over time, the inside has gotten really dirty and pretty dark, and a few weeks ago I decided I wanted to paint the inside of it in an attempt to clean it up but also help make the lighting better.
So I chose to get some Glidden High Gloss White exterior enamel paint and put down a couple of coats on it. Overall I'm very happy w/ the results. Along w/ the paint, I also replaced the light fixture I had in it, and put in a brighter bulb. Before it had a Kitchen/Bathroom bulb, and now it has an Outdoor/Sunlight bulb, so instead of a slightly yellow tint to the light, its more blue/white, and with the white paint, its even brighter.
Here's the before.

And after


Not much modeling lately, but one thing I have worked on is trying to clean up my paint booth some. I built this thing several years ago, but never did anything to the inside other than put silicone around all the joints.
Over time, the inside has gotten really dirty and pretty dark, and a few weeks ago I decided I wanted to paint the inside of it in an attempt to clean it up but also help make the lighting better.
So I chose to get some Glidden High Gloss White exterior enamel paint and put down a couple of coats on it. Overall I'm very happy w/ the results. Along w/ the paint, I also replaced the light fixture I had in it, and put in a brighter bulb. Before it had a Kitchen/Bathroom bulb, and now it has an Outdoor/Sunlight bulb, so instead of a slightly yellow tint to the light, its more blue/white, and with the white paint, its even brighter.
Here's the before.

And after


Nice
Same thing on my bench as it was a week ago, might try to do something about that.
Adam that's a nice paint box, what are you going to do to clean up the over spray and not strip that paint job?
Adam that's a nice paint box, what are you going to do to clean up the over spray and not strip that paint job?
Similar threads
- Replies
- 39
- Views
- 10K
- Replies
- 60
- Views
- 19K



 :drinks

