• Modelers Alliance has updated the forum software on our website. We have migrated all post, content and user accounts but we could not migrate the passwords.
    This requires that you manually reset your password.
    Please click here, http://modelersalliance.org/forums/login to go to logon page and use the "Forgot your Password" option.

Advance to Arnhem 1/16 scale

Sorry for the delays Gents. Thank you so much John, Martin, and Gary! Thanks for the kind words.

Heya James, hope all is well on your end.

I was on a roll last Sunday painting figure #3 when I received an urgent request for a build, a wood podium. Strange I know, built quite a few of them, but this was a rush order, going overseas (African Continent) in a suit case, lol. You might first think "smuggling", lol, but in a suit case is cheaper than shipping, especially with nowadays freight prices. In the shop at a balmy 38* on average is a bit much, but it's being tung oiled now, so won't be long and out the door.

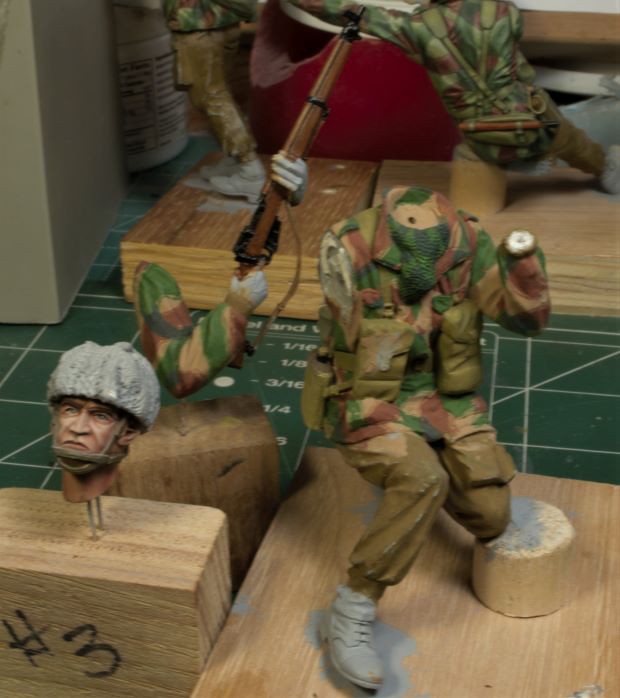
I'll be back at it in the bunker in a few days, hopeful get these guys done so I can get to the base. Spring is fast approaching and the outdoor list is growing. My bunker time always seems too short, HA!

Thanks again Gents, Ski.
 
Back in the bunker!

It's been raining and the firewood is almost done, so I kept the bunker fully operational after the H34. I loaded a new palette of oils and I always keep the prior for tonal references. Not much to look at right now, but the light tones on the Para smock are being worked right now. The right arm is done, working the left arm today, then the chest portion. Once the smock is done, I'll go back and add the brush marks and work the web gear. Point being, it's good to be back to "sniffin paint and gluin my fingers together"!

Cheers, Ski.

_DSC0195b-vi.jpg

_DSC0189b1-vi.jpg

_DSC0190b-vi.jpg

_DSC0194b-vi.jpg
 
Isn't this hobby great!! You can step away for month on end and then come back and pick up right where you left off!
...And Awesome work to boot!
:victory:
 
Isn't this hobby great!! You can step away for month on end and then come back and pick up right where you left off!
...And Awesome work to boot!
:victory:
Man I hope so!

Looks great Steve, I showed this to a non-modeling buddy and he was astounded that you painted the seams. :vgood:
 
Sir Duke, thanks Bro, working it betwixt the clear and rainy days. Snow fly is coming soon, yehaaaaaa!

Thank you Bob!

Eric, you have a great point, Amigo, but if I were to start off with the faces at the beginning of my season it would be one heck of a learning curve all over again. Strangely enough I go through that every time, but this camo pattern was a nice re-entry point.

MP, thanks Brother! Make sure your buddy knows this is 1/16th, not 1/35th. Them lil seems can be brutal in 1/35th, lol.

Thanks, Piet!
 
Smock Light Tones Complete

I just finished the lighter smock tones on the arms and chest. I will now go back across the entire smock to ensure the brush strokes are correctly placed according to color, etc. Like I said before, this particular pattern has evaded me, but it’s way too late to go back and change it, so we carry on, artistic license I say. As you can see, the shadows and highlights should carry through all three-color tones and painting them one color tone at a time completely before moving on to the next was not really that difficult. After doing this for a while you get use to it, seems to have worked out ok so far.

The last step for this figure will be the web gear and helmet. As mentioned earlier, all the brass and metal work will be done on all the figures as a last step before the dull coat.

Thanks for watchin. Cheers, Ski.

_DSC0198c-vi.jpg


_DSC0201b-vi.jpg
 
Last edited:
Web Gear, Helmet, and Rifle

I finally got the brush wet this past week. The web gear and helmet have been completed for this stage of the process. I went ahead and painted the rifle with an initial tone just to get that portion initiated. The hands will need to be done as well, but I will do all the figures’ hands at once to keep the flesh tones in check.

_DSC0206b-vi.jpg


_DSC0207b-vi.jpg


_DSC0208b-vi.jpg


_DSC0209b-vi.jpg


_DSC0210b-vi.jpg


And finally, the last figure will be tackled this week. I’m thinking at least a week and a half to get this camo pattern done on this figure. I removed the right arm due to the tight quarters in the chest area. It’s just too tight to get an accurate paint job with it attached. More to follow soon on #3.

Once I finish the smock on #3 the real fun begins, the trousers and details, and I’m looking forward to that! This last pic is rather blurry, but yall get the idea, it’s on the bench 😉

_DSC0212b-vi.jpg


Thanks for watchin, Ski.
 
Coming along quite nicely, Ski! The only thing I see is that the way the left arm looks near where the hand is holding the rifle looks kind of odd. Not sure how that would be fixed, though. It is in the sculpting of the original figure, not something you did. Other than that, I think you are doing awesome work, Brother.
 
Thank you, MP, once again, you are too kind, lol. Thanks buddy!

Hey James, thanks for stoppin by. Ya, can't fix that issue, but once it's on the base it will look acceptable. Someone else had pointed that wrist out, too. Looking at it closely on the base it disappears from sight, mostly.
 
Trouser Works

In keeping with the drive and motivation in challenging times, we press on. Work the easy challenges first, then finish up the loose ends, hence the last figure’s smock will take a back seat,…for now, lol. He’s not going anywhere; he’ll be back soon.

Back at it, Corp Reynolds is getting a leg workout. After making an initial attempt at this color tone and realizing it was way too dark, I initiated an Oven Cleaner bath. This was certainly not the first, nor the last bath I’ve done, but it had to be done in a bit more delicate manner since the upper torso was already complete. There was no room for error, none at all!

_DSC0213b-vi.jpg

_DSC0214b-vi.jpg


Staying with Mig’s original trouser color tone I did a light shading and feathering with darker tan oil tones into the appropriate areas. Windsor Newton did me a favor by producing Golden Ochre, what a hoot. This is pretty close to a usable match if ever there was a color in a tube. Minor adjustments with Titanium white, a bit of Burnt Umber, and tones in betwixt, it all fell together nicely.

_DSC0215b-vi.jpg

_DSC0216b-vi.jpg

_DSC0217b-vi.jpg

_DSC0218b-vi.jpg


Now, some may say there should be a slight olive tone within this mix, which I actually did include, but nailing down this exact color tone was a bit of a challenge. Re-enactment pics are good, some original article pics are even better, but we are really close, and neither us were there, so it’s a go.

I do like the results, so I’m sticking with this process throughout. I treated this like any white or grey color tone, light application of shadows and let the highlights bring out the intended final color tones.

The legging had a much greater olive tone in some of the reference pics and in others it was more of a tannish tone. I personally liked the olive tone for contrast. I’m still not completely sure about the straps, leather or canvas, but I’m thinking leather for even more contrast and definition in this area. The boots will get a better work over when all the figures get a bit of weathering.


More to follow real soon and thanks for your patience. Cheers, Ski.
 
Back
Top