
-
Modelers Alliance has updated the forum software on our website. We have migrated all post, content and user accounts but we could not migrate the passwords.
This requires that you manually reset your password.
Please click here, http://modelersalliance.org/forums/login to go to logon page and use the "Forgot your Password" option.
You are using an out of date browser. It may not display this or other websites correctly.
You should upgrade or use an alternative browser.
You should upgrade or use an alternative browser.
Advance to Arnhem 1/16 scale
- Thread starter Steve Ski
- Start date
5'clock shadow on that one would totally be Mel. But we know the British would never allow themselves to go to battle unshaven... 

Steve Ski
Well-known member
Team Member #2
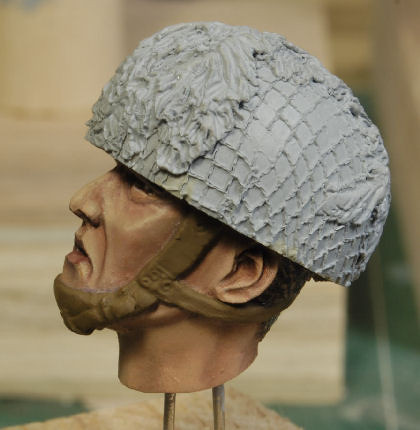
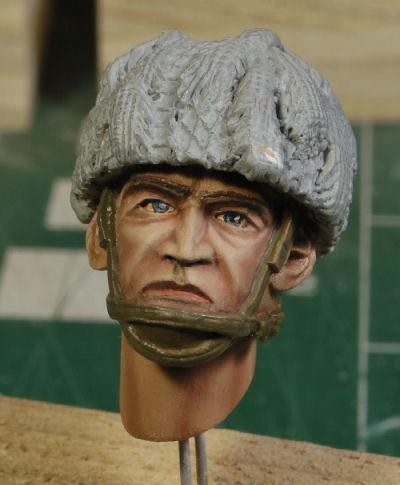
Back at it again, finally. Unfortunately there were a few winter chores that kept me from the bench, snow being just one of them, so taking off from my last stop did mess with my momentum. I had to wash this mate's face twice already. Ain't nothin but a thang, right?
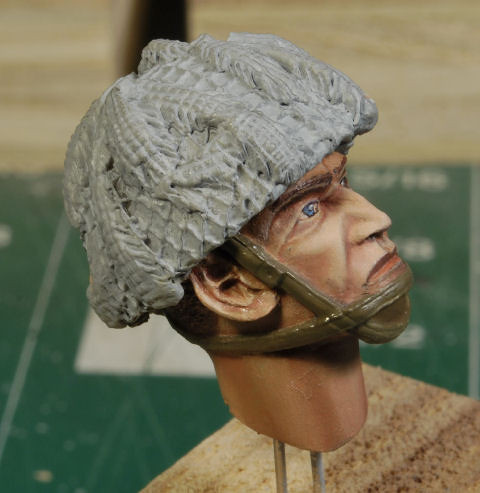
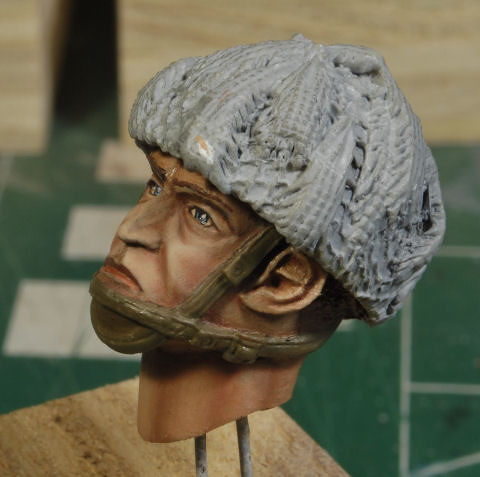
Working with the same method as the other two I was able to get the main facial features taken care of. The punch list will be the same for this face, just like the last two, and will be done when it is fully dried. I went ahead and gave the chin strap a base leather tone for facial clarity. There's still plenty to do here, but we have the major work completed.
So far so good, I'm liking it ok. I'll be going over this face closely to see if any more details are needed before closing him out.


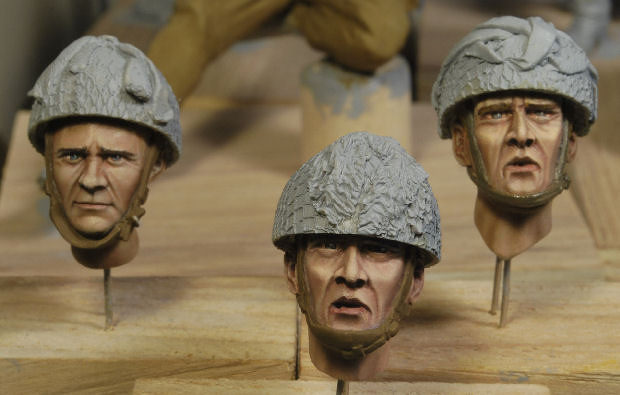
Here's a few shot of the trio. I'm going to leave these guys alone until the last face is done. We're making progress.
I might add that I am enjoying working with this painting technique. What I'm finding is that after a period of time I'm not having to revert back to my notes or videos. If I feel I'm starting to lose focus I quickly look up at my photo references and examples and they bring me right back in line. I'm still not out of the woods yet, but I do see the clearing up ahead, HA!
Ok, off to finish team Mate number 4, so more to follow soon.
Lastly, if you see any obvious discrepancies or areas requiring attention, please holler, I appreciate the constructive criticism.
Thanks for watchin. Cheers, Ski.
Back at it again, finally. Unfortunately there were a few winter chores that kept me from the bench, snow being just one of them, so taking off from my last stop did mess with my momentum. I had to wash this mate's face twice already. Ain't nothin but a thang, right?
Working with the same method as the other two I was able to get the main facial features taken care of. The punch list will be the same for this face, just like the last two, and will be done when it is fully dried. I went ahead and gave the chin strap a base leather tone for facial clarity. There's still plenty to do here, but we have the major work completed.
So far so good, I'm liking it ok. I'll be going over this face closely to see if any more details are needed before closing him out.
Here's a few shot of the trio. I'm going to leave these guys alone until the last face is done. We're making progress.
I might add that I am enjoying working with this painting technique. What I'm finding is that after a period of time I'm not having to revert back to my notes or videos. If I feel I'm starting to lose focus I quickly look up at my photo references and examples and they bring me right back in line. I'm still not out of the woods yet, but I do see the clearing up ahead, HA!
Ok, off to finish team Mate number 4, so more to follow soon.
Lastly, if you see any obvious discrepancies or areas requiring attention, please holler, I appreciate the constructive criticism.
Thanks for watchin. Cheers, Ski.
They look incredible Ski, press on! 
Brokeneagle
Master at Arms
They look great! The sculpting on the figures is amazing to be able to match the photo so closely.
Fantastic all round.
Fantastic all round.

Steve Ski
Well-known member
Team Member #3
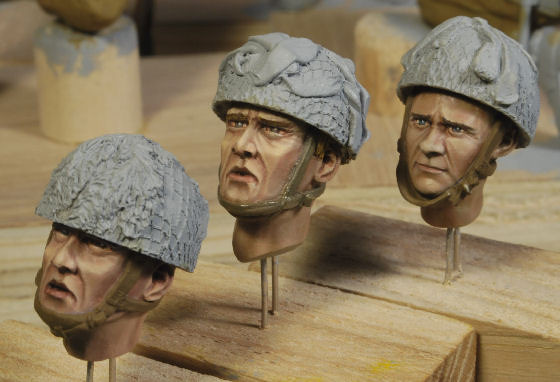
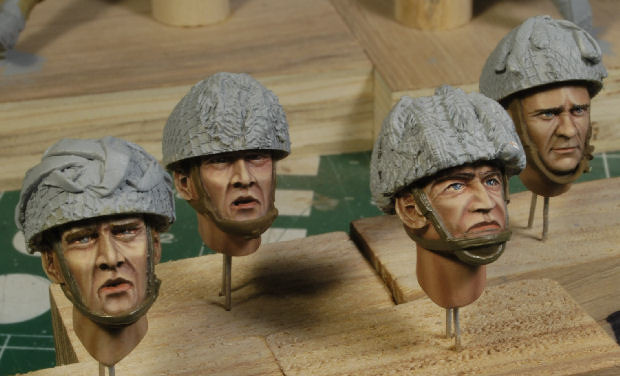
A bit late on this update, but finally all the faces are complete. They say we are our own worst critique, this is no exception. I've scrubbed every one of these heads at least twice and some four times. So, time to move on and get to the figures and that camo pattern. Of course I'll go back later before I attach the heads and do any final touch ups. Ruck On from here.
I will add that using #6 readers has helped out quit a lot when doing the eyes, my weakest point. I'm pretty happy with the results so far, but obviously I've still got a bit more to learn.
Ah, it's just practice, practice, and more practice,...................and more practice, lol.
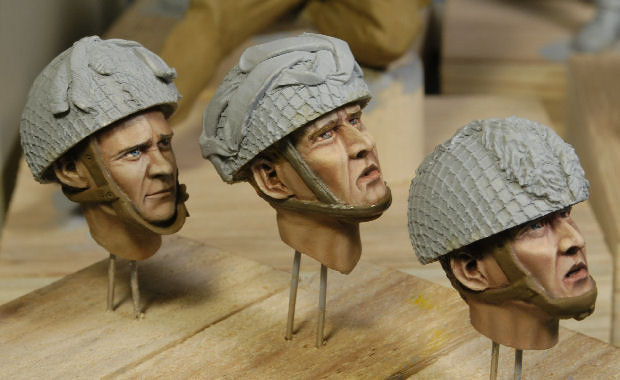
The team is finally together and on stand-by until all the figures are completed.
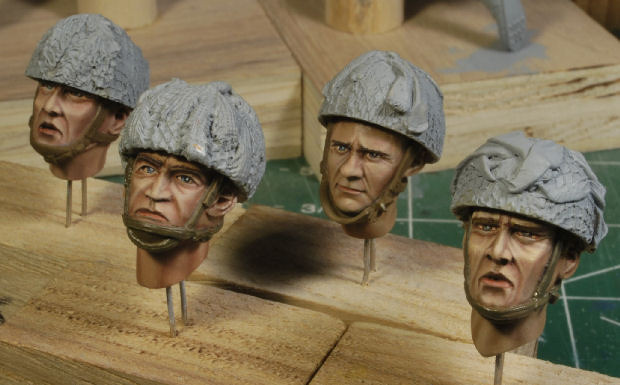
Thanks for watchin, more to follow soon. Cheers, Ski.
A bit late on this update, but finally all the faces are complete. They say we are our own worst critique, this is no exception. I've scrubbed every one of these heads at least twice and some four times. So, time to move on and get to the figures and that camo pattern. Of course I'll go back later before I attach the heads and do any final touch ups. Ruck On from here.
I will add that using #6 readers has helped out quit a lot when doing the eyes, my weakest point. I'm pretty happy with the results so far, but obviously I've still got a bit more to learn.
Ah, it's just practice, practice, and more practice,...................and more practice, lol.
The team is finally together and on stand-by until all the figures are completed.
Thanks for watchin, more to follow soon. Cheers, Ski.
JamesOLeary
Master at Arms
The heads are looking good, Ski!
Can't wait to see the rest of the figure painted up on all of them.
Can't wait to see the rest of the figure painted up on all of them.
Steve Ski
Well-known member
Camo Pattern, Para Smock and Web Gear
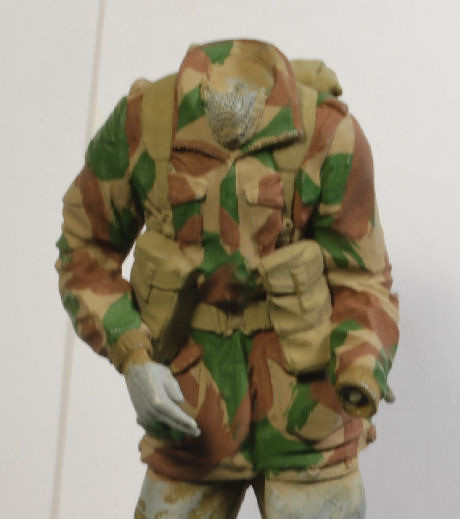
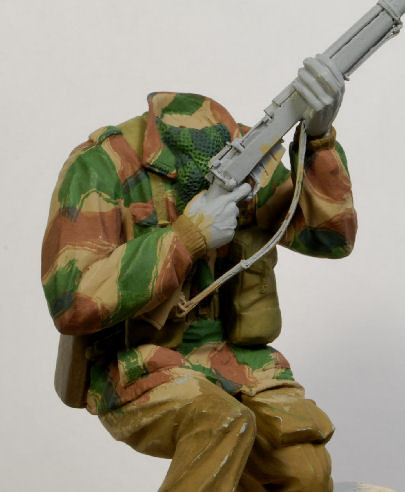
Finally it's time to get to work on the smocks and web gear. This particular camo pattern was not as difficult as some I've done in the past, but it has unique brush marks on all the examples I've seen. I was able to duplicate this by doing just as they did, swipe the brush across the area.
Now, I did give this figure a bath after my first attempt, but now the pattern is more in line with the examples. I had the pattern a too bit tight for the actual pattern, it was not going to work. Like I said, don't be afraid to wash it all and go for it again.
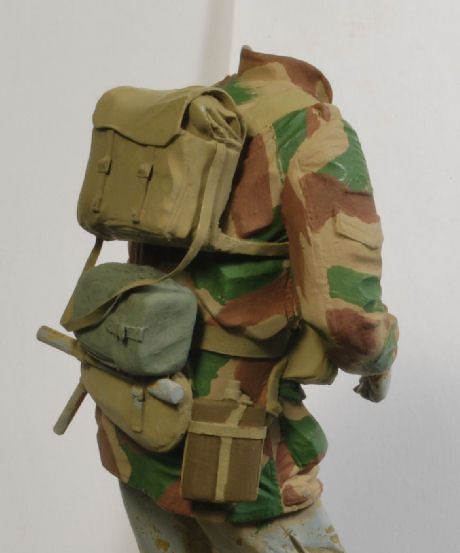
The first pic is a bit blurry, but you get the idea. The web gear and pack were given an acrylic base tone using Tamiya FX-49, Khaki. The mid pouch on the back was blend of a Khaki and light greenish tan.
Time to work the camo pattern on the other three figures and slightly alter the tones of the web gear for each one. My Official Advisor has reminded me that the veteran's uniforms will be slightly faded, whereas the green horns will have a more crisp appearance to them. I will work to make that happen as best I can.
Once these smocks are patterned it will be time for oils, the fun part. More to follow soon.
Thanks for watchin. Cheers, Ski.
Finally it's time to get to work on the smocks and web gear. This particular camo pattern was not as difficult as some I've done in the past, but it has unique brush marks on all the examples I've seen. I was able to duplicate this by doing just as they did, swipe the brush across the area.
Now, I did give this figure a bath after my first attempt, but now the pattern is more in line with the examples. I had the pattern a too bit tight for the actual pattern, it was not going to work. Like I said, don't be afraid to wash it all and go for it again.
The first pic is a bit blurry, but you get the idea. The web gear and pack were given an acrylic base tone using Tamiya FX-49, Khaki. The mid pouch on the back was blend of a Khaki and light greenish tan.
Time to work the camo pattern on the other three figures and slightly alter the tones of the web gear for each one. My Official Advisor has reminded me that the veteran's uniforms will be slightly faded, whereas the green horns will have a more crisp appearance to them. I will work to make that happen as best I can.
Once these smocks are patterned it will be time for oils, the fun part. More to follow soon.
Thanks for watchin. Cheers, Ski.
Steve Ski
Well-known member
Adding Camo Pattern Details
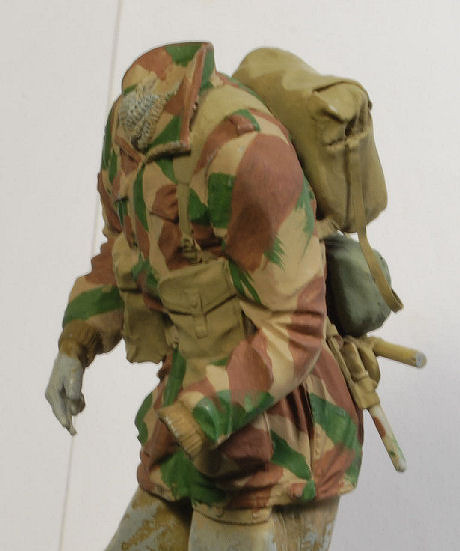
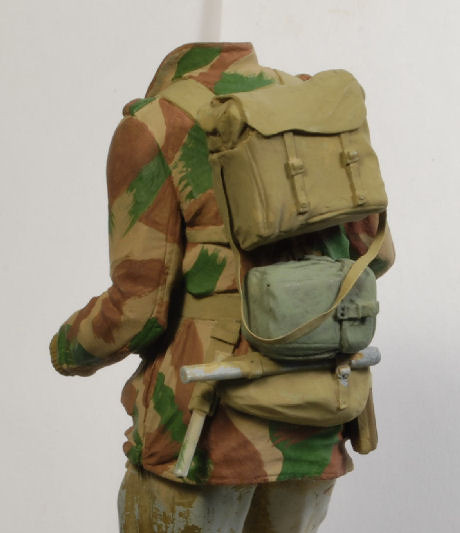
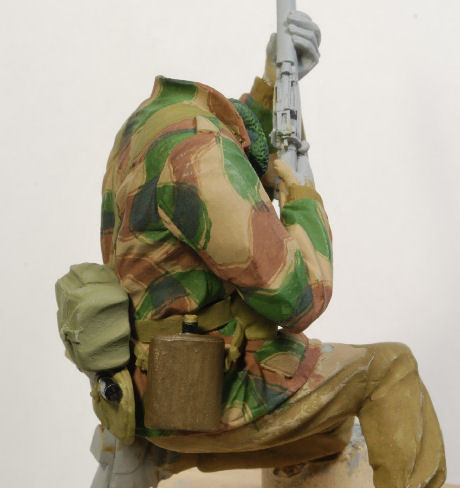
Looking closely at many smock examples there is actually four colors visible. In places where the red tones were brushed across the green tones there is actually a darker green tone that appears. Trying to duplicate this with a simple swipe of the red tone over the green won't get it done. I'm using acrylics for this portion, not oils. So, I added a darker green tone in those areas, including the brush marks that are visible in some examples.
The real trick here is to make sure no area is left undone, so combing over these areas slowly and carefully is a must. Looking at these pics I see a few areas that I missed during my last inspection, oops. I'll focus on those areas mue pronto!
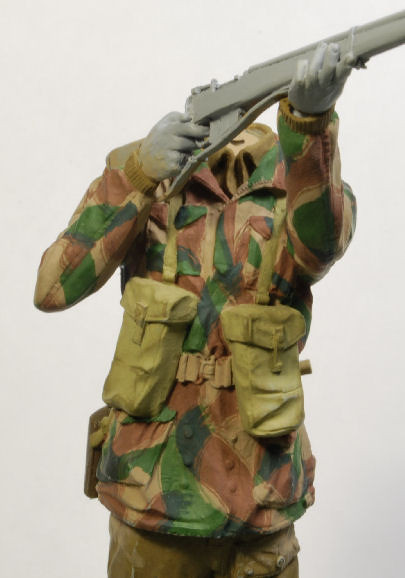
Here's the first three pretty much done, but they will have another go-over before the oils flow. Also, light Olive Drab has been used on the web gear. It's a decent tone that is not too tan or too green.


The Bren gunner is in the first stage of the camo pattern and will be completed soon.

More to follow and thanks for watchin. Cheers, Ski.
Looking closely at many smock examples there is actually four colors visible. In places where the red tones were brushed across the green tones there is actually a darker green tone that appears. Trying to duplicate this with a simple swipe of the red tone over the green won't get it done. I'm using acrylics for this portion, not oils. So, I added a darker green tone in those areas, including the brush marks that are visible in some examples.
The real trick here is to make sure no area is left undone, so combing over these areas slowly and carefully is a must. Looking at these pics I see a few areas that I missed during my last inspection, oops. I'll focus on those areas mue pronto!
Here's the first three pretty much done, but they will have another go-over before the oils flow. Also, light Olive Drab has been used on the web gear. It's a decent tone that is not too tan or too green.
The Bren gunner is in the first stage of the camo pattern and will be completed soon.
More to follow and thanks for watchin. Cheers, Ski.
Similar threads
- Replies
- 106
- Views
- 15K
- Replies
- 3
- Views
- 1K