Might want to thin the paint a bit more, looks like some spatter going on. Looks good though, easy clean up. You could always mix some black with yellow ochre, it's a fun technique several of us have played with here.

-
Modelers Alliance has updated the forum software on our website. We have migrated all post, content and user accounts but we could not migrate the passwords.
This requires that you manually reset your password.
Please click here, http://modelersalliance.org/forums/login to go to logon page and use the "Forgot your Password" option.
You are using an out of date browser. It may not display this or other websites correctly.
You should upgrade or use an alternative browser.
You should upgrade or use an alternative browser.
Accurate Miniature RAF Mustang Mk-1A
- Thread starter Greg Kimsey
- Start date
Greg Kimsey
Well-known member
Black with yellow ochre! I use black mixed with yellow to make an olive green in my paintings all the time. Yellow ochre should do the trick. Good idea. Thanks!Might want to thin the paint a bit more, looks like some spatter going on. Looks good though, easy clean up. You could always mix some black with yellow ochre, it's a fun technique several of us have played with here.
paddy
Well-known member
You need to either use a smaller nozzle or turn the paint flow down and spray close to the item. Your feathered edges seems to be large so possibly too far away. Basically i would say you need to be able to draw a line about 1mm -1.5mm wide with the brush so adjust your flow and distance ?
Camo was basically the same on British fighters as they used large mats laid on the wing to mask off and give the shape.
Camo was basically the same on British fighters as they used large mats laid on the wing to mask off and give the shape.
Greg Kimsey
Well-known member
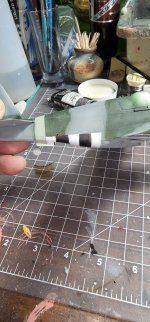
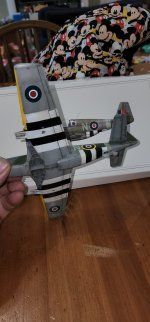
Worked on the airbrush trying to ultra clean and fine tune. I thinned the paint so thin that it was pretty transparent so it took several layers, but I painted over the olive with grey to redo the camo. I took my time and tried to accurately match the camo. That is as good as my skill level is gonna get it. It is dang frustrating to know what you want and can't make it happen. After that dried I opted to paint the stripes rather than use the decals, so I masked off the stripes and airbrushed them white then black. Using Sky I painted the tail stripe. I wanted to see what weathering would look like and as I was doing the right wing I realized I had forgotten the yellow on the wing front. Anyway, I will let this dry and paint the yellow, then continue.
Attachments


paddy
Well-known member
You are actually setting yourself quite a goal to spray an edge to the camo in this scale Its worth playing with pressure and flow as well as nozzle distance, with your iwata you should almost be able to sign your name like a pen and ink but it is a skill and like all skills practice makes perfect
If you are using Tamiya paint, thin it about 50%, it should just form a drip and drop off your stirrer so almost as thin as the thinners with just enough colour to cover in maybe 2 coats.
Mean while get your self some Blu tac, roll out some sausages and use them to mask.
Put a base colour down like your Grey and mask off the underside if its already painted

Add your sausages of Blu tac and use some cheap masking take to fill in the gaps

the spray your camo colour

then peel off all the blutac and masking and you should have a feathered edge that uniform and more to scale


Hope this helps")
If you are using Tamiya paint, thin it about 50%, it should just form a drip and drop off your stirrer so almost as thin as the thinners with just enough colour to cover in maybe 2 coats.
Mean while get your self some Blu tac, roll out some sausages and use them to mask.
Put a base colour down like your Grey and mask off the underside if its already painted
Add your sausages of Blu tac and use some cheap masking take to fill in the gaps
the spray your camo colour
then peel off all the blutac and masking and you should have a feathered edge that uniform and more to scale
Hope this helps
I like it myself. Press on! 
Greg Kimsey
Well-known member
Paddy, dang, I would have totally done the sausage trick. My airbrush will intermittently spray the tiny line, then stop, then spray, then stop. I have looked at the needle under magnification and it "looks" OK. This is a a frustrating problem. I have two Iwata's and they both do it. I don't know that I can clean them any better than I have, and I am almost certain the paint consistency is thin enough, maybe too thin. I am going to practice some more on the abandoned model. I truly appreciate the excellent suggestions!
paddy
Well-known member
a couple of points, the smaller you roll your sausage, the sharper the edge will be.
Always spray down on to the wing and not under the curve of the sausage because its the gap between the edge of the sausage and the wing thats giving the feathered edge, thats why the smaller the sausage the sharper the line.
what pressure are you spraying at ?
Here is another
Grey with blu-tac

Green sprayed all over except where the blu-tac is covering the Grey

Blu tac removed

Always spray down on to the wing and not under the curve of the sausage because its the gap between the edge of the sausage and the wing thats giving the feathered edge, thats why the smaller the sausage the sharper the line.
what pressure are you spraying at ?
Here is another
Grey with blu-tac
Green sprayed all over except where the blu-tac is covering the Grey
Blu tac removed
Last edited:
helios
Well-known member
Paddy hit on air pressure which I was about to ask. 
I usually spray my flat Tamiya around 15-18psi. 50/50 mix w/ Tamiya thinner (usually use their yellow cap lacquer thinner, though standard X20 works fine as well), and about 5% retarder (though I've sprayed w/ no issues before I started using the retarder). If pressure is too high it might be drying on the tip of the airbrush. Gloss paints I'll go to 10% retarder and thin out a little bit more.
Your thread reminded me I actually did some cleanup on the paint of mine last week...I'll have to grab some updated pictures this weekend.
Greg Kimsey
Well-known member
I will check the pressure I have set when I get home (at the store now working on a commission painting). I try to use low pressure normally, around 15. I wish I could use lacquer thinner, but the wifey won't have it LOL. Not in the house anyway. I have been using Tamiya thinner, but will try the alcohol. Like you said, much cheaper. According to my rep, the Tamiya works best with lacquer thinner, alcohol second, water last resort. You guys really are extremely helpful! Thank you.
Greg Kimsey
Well-known member
Thanks for checking in Helios! Your thread gave me the confidence to start this kit. I haven't built a plane in at least 5 years, maybe longer. A helldiver, for my dad. I am better at tanks and carsPaddy hit on air pressure which I was about to ask.
I usually spray my flat Tamiya around 15-18psi. 50/50 mix w/ Tamiya thinner (usually use their yellow cap lacquer thinner, though standard X20 works fine as well), and about 5% retarder (though I've sprayed w/ no issues before I started using the retarder). If pressure is too high it might be drying on the tip of the airbrush. Gloss paints I'll go to 10% retarder and thin out a little bit more.
Your thread reminded me I actually did some cleanup on the paint of mine last week...I'll have to grab some updated pictures this weekend.
Greg Kimsey
Well-known member
The compressor is set at 16psi. I mixed the Tamiya paint 50/50 and it worked great. Go figure. Thanks for that!
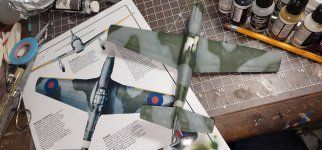
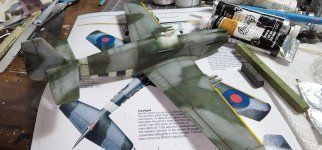
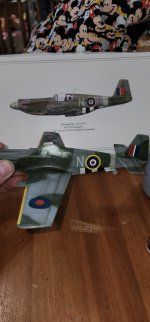
I painted the front edges of the wings yellow. I used raw umber and black oil paint to weather the darks, then white oil paint to highlight the gray panels on top. I have probably over-weathered but I kinda like it. To tone down the blotchiness of the greens I tried to use pastel to dust over and help smooth that out. I will let it rest overnight then gloss coat and decal tomorrow.
I painted the front edges of the wings yellow. I used raw umber and black oil paint to weather the darks, then white oil paint to highlight the gray panels on top. I have probably over-weathered but I kinda like it. To tone down the blotchiness of the greens I tried to use pastel to dust over and help smooth that out. I will let it rest overnight then gloss coat and decal tomorrow.
Greg Kimsey
Well-known member
RichB
Well-known member
Late to the party as usual. Mustangs were "officially" painted in the Day Fighter colours and pattern of Ocean Grey/ Dark Green over Medium Sea Grey (or the US equivalents from the production line) as shown in the Technical Orders ("T.O. Scheme") from mid-1941.
There were 2 other camouflage patterns in addition to the NMF/painted scheme adopted when the USAAC stopped applying camouflage on their aircraft. The second pattern, known as the "Firewall Scheme", showed up on some late Mustang III's and continued onto the Mustang IV's from US production lines. The upper nose surface forward of the firewall panel line was solid grey. The wings and horizontal tail surfaces were also significantly different. The third pattern, sometimes known as the "Loop Scheme", appears to have been a repaint in the RAF Standard colours in the UK before the aircraft were sent to the squadrons. This pattern had a unique left to right diagonal flow on the wings. While not common, it was seen on Mustang I's thru to the Mustang IV's.
Cheers,
Rich
Fast progress! Weathering looks spot on. 
Greg Kimsey
Well-known member
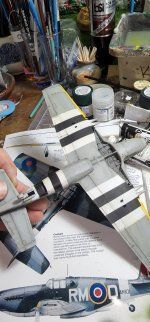
I have never been good with decals. I watched Vallejo's video on using their decal products so I feel pretty good about these. The upper wing emblems (roundel's?) were printed off center so that white showed on one edge. My effort to correct that with my exacto knife slipped on one of them so it is a littke buggered. Hopefully I can sand or weather that to look like wear or something. On my tanks, I sand away a good portion so it looks faded and worn. I assume planes don't get such treatment normally? I do need to tone the color down though, they are very bright!
Attachments
Have you got any decal solution to get them to melt into the panel lines a little? Looks good so far Greg.
You really making fast progress!
You really making fast progress!
Greg Kimsey
Well-known member
Yessir! I applied decal set to the model and ket it sit for a few minutes then applied the decal. After drying them off with a paper towel I then applied the decal solvent.Have you got any decal solution to get them to melt into the panel lines a little? Looks good so far Greg.
You really making fast progress!
My next trick is the mask off the canopy and paint the edges. I have never done that before. A video I watched showed to use a toothpick to delineate the edges, but the relief is so feint that I am having an extremely hard time finding the edge. I tried shining a flashlight through but still cannot see them. I am using blue tape and may have to try something else.
Similar threads
- Replies
- 104
- Views
- 22K
- Replies
- 50
- Views
- 10K