
-
Modelers Alliance has updated the forum software on our website. We have migrated all post, content and user accounts but we could not migrate the passwords.
This requires that you manually reset your password.
Please click here, http://modelersalliance.org/forums/login to go to logon page and use the "Forgot your Password" option.
You are using an out of date browser. It may not display this or other websites correctly.
You should upgrade or use an alternative browser.
You should upgrade or use an alternative browser.
Wingnuts Gotha
- Thread starter Big10
- Start date
Big10
Well-known member
So I am messing around in my head about the rigging that is coming up. I am going have to do some pre-rigging before the top wing goes on. There is one part where 1 line meets 2 and turns into a Y.
What I want to do is join 3 of Bob's Buckles together for the connection. I would rather solder the 3 together than super glue. Here is a pic I took of an apperatus I used to try and hold the 3 end to end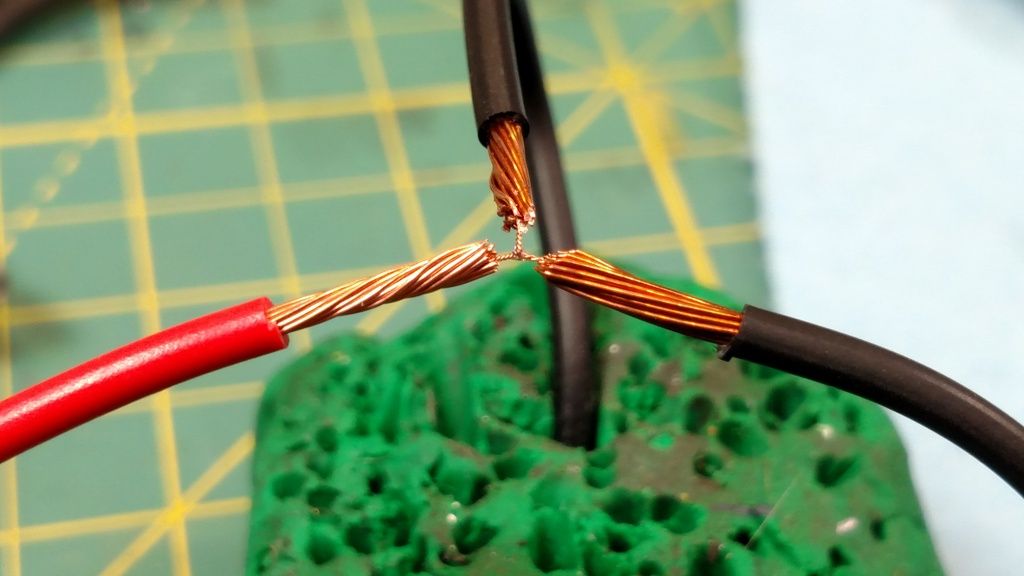
The problem is that it does not hold securely enough. Also, I have notice that the solder seems to chase up one of the Buckles only. How can I get solder to stick all 3 at the same time.
If any has a suggestion to use for attaching 3 lines together, I am all ears. Gonna try this a few more times, but I am not going to get my frustration up much more than it already is. I need to keep moving forward and not backwards. I have wasted alot of time on this little part.
EDIT:
I have also thought about buying this after my failed attempt at a holder.
http://www.amazon.com/QuadHands-Armed-Helping-Soldering-Station/dp/B00GIKVP5K
What I want to do is join 3 of Bob's Buckles together for the connection. I would rather solder the 3 together than super glue. Here is a pic I took of an apperatus I used to try and hold the 3 end to end

The problem is that it does not hold securely enough. Also, I have notice that the solder seems to chase up one of the Buckles only. How can I get solder to stick all 3 at the same time.
If any has a suggestion to use for attaching 3 lines together, I am all ears. Gonna try this a few more times, but I am not going to get my frustration up much more than it already is. I need to keep moving forward and not backwards. I have wasted alot of time on this little part.
EDIT:
I have also thought about buying this after my failed attempt at a holder.
http://www.amazon.com/QuadHands-Armed-Helping-Soldering-Station/dp/B00GIKVP5K
Hey Big
That heavy copper wire is sucking up your heat.
Are you soldering just the center section or the smaller wire as well?
That high dollar holder is not necessary, make one. You need three or four alligator clips,some copper
wire that will fit the crimp clips on the end and a block of wood with some drilled holes that will fit the wire.
Get some Heat Paste to keep the heat from transferring to the clips and solder away bud.
If just soldering the very center heat paste the small wire and that might do it as well.
I'm no expert I just stayed at a Holiday end last night.(tv Commercial)
Tony lee
Big10
Well-known member
Hey Big
That heavy copper wire is sucking up your heat.
Are you soldering just the center section or the smaller wire as well?
That high dollar holder is not necessary, make one. You need three or four alligator clips,some copper
wire that will fit the crimp clips on the end and a block of wood with some drilled holes that will fit the wire.
Get some Heat Paste to keep the heat from transferring to the clips and solder away bud.
If just soldering the very center heat paste the small wire and that might do it as well.
I'm no expert I just stayed at a Holiday end last night.(tv Commercial)
Tony lee
Tony,
Thanks so much for taking the time for your post. It is much appreciated.
I have done some more goggle searches and came across some Micro size, smooth flat bill alligator clips. I am gonna get a few of these and use you tips with the wire and wood.
I want to try and get the solder only at the join where the 3 meet. Will I need a flux or whatever that is to make the solder stick or flow better. It seemed to ball up on the tip of my iron.
I have one of those iron where you can adjust the heat, goes up to 500 degrees I believe, is that hot enough. Or do I need to turn the heat down.
I will definitely get me some of that paste as well.
Thanks again Tony!!!!!
Yep you need Flux and cleaner if you can get it. I don't like the combo cleaner/flux myself.
I use the small gauge solder for model work. NON ACID CORE
Apply cleaner to the area you're soldering.
Sand or file the gun tip clean of old solder. Flux the tip and recoat with solder it's called tinning the tip.
DON'T get carried away with the solder just a little bit goes a long way.
Apply heat from the underside,heat will travel up, touch the solder to the top side and as soon as the solder flows remove heat.
AGAIN a little bit of solder will go a long way so don't gob it on its not needed for a good joint.
You might twist some small copper wire with a loop on the end and stack them to practice with. Better than
wasting those neat AM jobs.
If you have any other questions just ask. I think I did some kind of soldering info here,it might be in the school section?????
Tony lee
Heavens Eagle
Well-known member
Twenty years in electronics building prototypes here. If the three little parts are eyelets that your are trying to assemble, pre-tin them.
Take a touch of flux, get your soldering iron clean and tinned and get just a small drop of solder on it. Touch it to the end you want to solder and pre-tin it. You don't need it to be anything but silver colored. Not much solder at all.
Once the parts are all pre-tinned, set them up in a jig to hold them and touch a little flux to them (just to help) and then with the tiny drop of solder on your iron touch it to the tinned parts. They should join quickly and soldily. If you need more solder on the join add it to the soldering iron and touch the "wet" solder to the join and it should flow.
The biggest mistake most folks make is they try and assemble the parts, then add flux and solder. When you do that there is no control of where the solder will go. In some cases it will ball up and go exactly where you DON'T want it to go.
Another mistake that people make is that they take a "dry" soldering iron and hold it against the part trying to heat it so the solder will then melt when they touch the solder to the part. That never works. The iron has to be "wet" with a small amount of liquid solder on it. When you touch the drop of "wet" solder to something that has flux on it, the solder will carry the heat to the part. The flux is a wetting agent and cleaner for the liquid solder. Once the liquid solder connects with the part you want to tin, it carries the heat and then flows.
By pre-tinning, you have predetermined where you want the solder to go. Once you have it all set up pre-tinned and ready a small drop of clean solder on the iron will bond all 3 parts evenly and at the same time.
Hope that helps. Once you get the basic idea, it becomes fairly easy. Even complex assemblies can be assembled with just a 35 watt soldering iron. It isn't so much how much heat as how the heat is applied.
Any questions, feel free to PM me I will be glad to help.
ausf
Master at Arms
I concur wholeheartedly on the pre tinning and touch assembly.
After ruining/losing/inhaling countless SMD LEDs, the second best way to solder PE or any small delicate items is the least amount of heat for the least amount of time. Pre tinning gives you the most control.
The best way is a resistance solderer, but unless you plan on doing a ton of PE, it's hard to justify the $400 price tag. I had one for a while and it lived up to the hype, but it the end, I didn't use it as much as I thought I would.
Another point is the thinnest solder you can find and this decision is up to you, lead is best too since it melts lower. I was using high lead solder (had to get it from the UK) with the resistance solderer and it really works well if you are careful regarding the very real health consequences. I keep a Hakko iron that I use with only lead free for most stuff, but a cheapo soldering station that I use with leaded. You can find non-toxic liquid flux online that works great for small stuff, but you should always have ventilation.
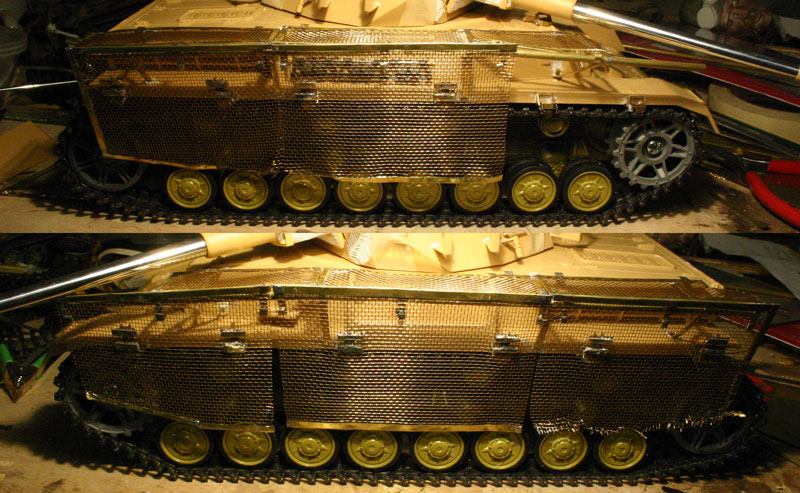
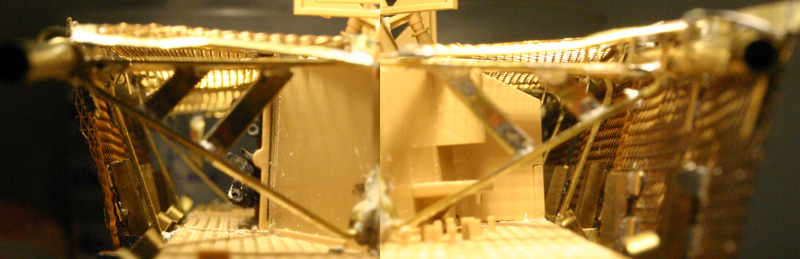
These schurzen on the pz IV were assembled by soldering only, using 60/40 and paste flux, lots of paste flux.

After ruining/losing/inhaling countless SMD LEDs, the second best way to solder PE or any small delicate items is the least amount of heat for the least amount of time. Pre tinning gives you the most control.
The best way is a resistance solderer, but unless you plan on doing a ton of PE, it's hard to justify the $400 price tag. I had one for a while and it lived up to the hype, but it the end, I didn't use it as much as I thought I would.
Another point is the thinnest solder you can find and this decision is up to you, lead is best too since it melts lower. I was using high lead solder (had to get it from the UK) with the resistance solderer and it really works well if you are careful regarding the very real health consequences. I keep a Hakko iron that I use with only lead free for most stuff, but a cheapo soldering station that I use with leaded. You can find non-toxic liquid flux online that works great for small stuff, but you should always have ventilation.
These schurzen on the pz IV were assembled by soldering only, using 60/40 and paste flux, lots of paste flux.
So I am messing around in my head about the rigging that is coming up. I am going have to do some pre-rigging before the top wing goes on. There is one part where 1 line meets 2 and turns into a Y.
What I want to do is join 3 of Bob's Buckles together for the connection. I would rather solder the 3 together than super glue. Here is a pic I took of an apperatus I used to try and hold the 3 end to end
The problem is that it does not hold securely enough. Also, I have notice that the solder seems to chase up one of the Buckles only. How can I get solder to stick all 3 at the same time.
If any has a suggestion to use for attaching 3 lines together, I am all ears. Gonna try this a few more times, but I am not going to get my frustration up much more than it already is. I need to keep moving forward and not backwards. I have wasted alot of time on this little part.
EDIT:
I have also thought about buying this after my failed attempt at a holder.
http://www.amazon.com/QuadHands-Armed-Helping-Soldering-Station/dp/B00GIKVP5K
Can you post a picture of what you're trying to replicate?
Big10
Well-known member
Thanks everyone for the vast amount of information. WOW, some damn good information that I will most definitely use.
Time to get some test pieces and practice.
Moon puppy, I have no pictures of what I am trying to replicate.
Its just something I wanted to try.
It's probably not an accurate representation, but I have never been an accurate modeler.
Time to get some test pieces and practice.
Moon puppy, I have no pictures of what I am trying to replicate.
Its just something I wanted to try.
It's probably not an accurate representation, but I have never been an accurate modeler.
Swordsman
Active member
All this info sounds good ... Just remember to clean your Iron on a damp sponge ( Not Bob ) ... ... then tin the tip of the Iron ... ( touch solder to it ) Just a bit ... then touch Iron to wire allow it to heat a bit ... Touch solder to the wire not the tip of the Iron ... You always solder this way it allows where you want solder to go ... the more cooper or metal you have the more heat it takes to solder ...  :dude
:dude
... then tin the tip of the Iron ... ( touch solder to it ) Just a bit ... then touch Iron to wire allow it to heat a bit ... Touch solder to the wire not the tip of the Iron ... You always solder this way it allows where you want solder to go ... the more cooper or metal you have the more heat it takes to solder ... :dudeHeavens Eagle
Well-known member
Gerry beat me to the sponge thing. 
One other thing I saw mentioned, DON'T use a file on the tip! Most solder iron tips are a thick iron coating over copper. The copper carries the heat, the iron coating keeps the solder from dissolving the copper. Once the copper starts eroding it is time for a new tip. At most use some fine grit sandpaper to knock through any oxide buildup. On mine it is usually wipe-wipe on the damp sponge and tin immediately.
Be sure to clean the soldered part off then. Get all the flux off. Laquer thinner should work. If yu want you can immerse brass, copper and soldered parts in white vinegar for a few minutes and it will clean the oxides off the surfaces. Vinegar shouldn't hurt the copper and tin/lead alloys at all. It will eat iron away in short order.
jknaus
Administrator
I think everyone has covered the subject pretty well. I'm not sure that the Y junction had turnbuckles though. The best way I have seen the Y handled is to loop some ez thread over another strand of ez thread. Glue the single strand to its rigging point and then pull the looped threads tight. That way you cant see they are 2 pieces and then glue them to their single mounting point. Dont know if that makes sense. From pics though there is no turn buckles there.
James
James
Big10
Well-known member
I think everyone has covered the subject pretty well. I'm not sure that the Y junction had turnbuckles though. The best way I have seen the Y handled is to loop some ez thread over another strand of ez thread. Glue the single strand to its rigging point and then pull the looped threads tight. That way you cant see they are 2 pieces and then glue them to their single mounting point. Dont know if that makes sense. From pics though there is no turn buckles there.
James
I have no intent for it to use turnbuckles. I just wanted something that would secure a 3 line junction. I will be using mono for all of the wing rigging.
I am going to toy around with my idea a little more, mock it up and if is does not look good, I will go the route that you have suggested. This will be my second plane to rig, so I am just shooting from the hip at this point.
Thanks aging all. In the end, I hope the model reflects on every ones great input. :drinks
Big10
Well-known member
Such a great model so far we just wanna see you hit it outa the park
Thanks Dave, I'm trying to get up a hill here at the moment and its getting the best of me.
I hate when a model stalls on me and then I loose all interest.

