• Modelers Alliance has updated the forum software on our website. We have migrated all post, content and user accounts but we could not migrate the passwords.
    This requires that you manually reset your password.
    Please click here, http://modelersalliance.org/forums/login to go to logon page and use the "Forgot your Password" option.

Maddog Manufacturing 2014 Aircraft Production Line

Okay, here's a small update on all the work I managed to get done on Friday and Saturday at Hobby Day. Hopefully I'll be able to improve on this during the week.

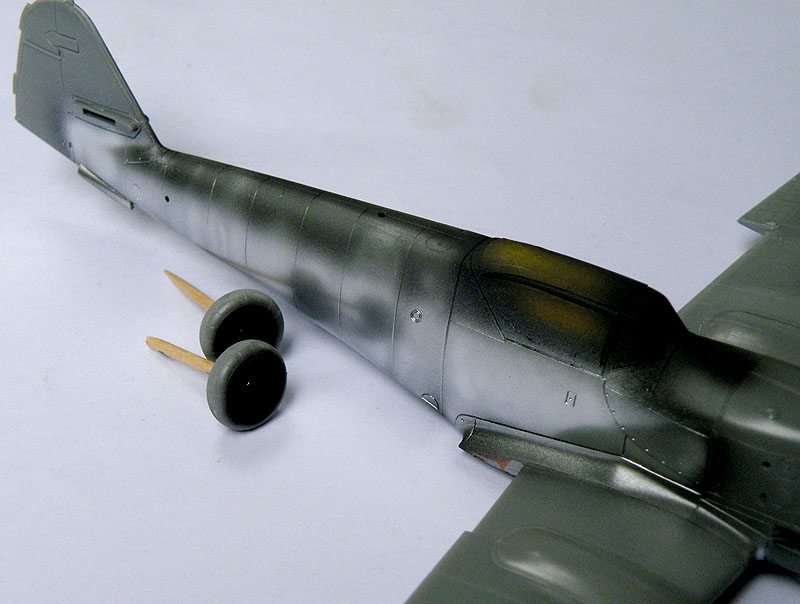
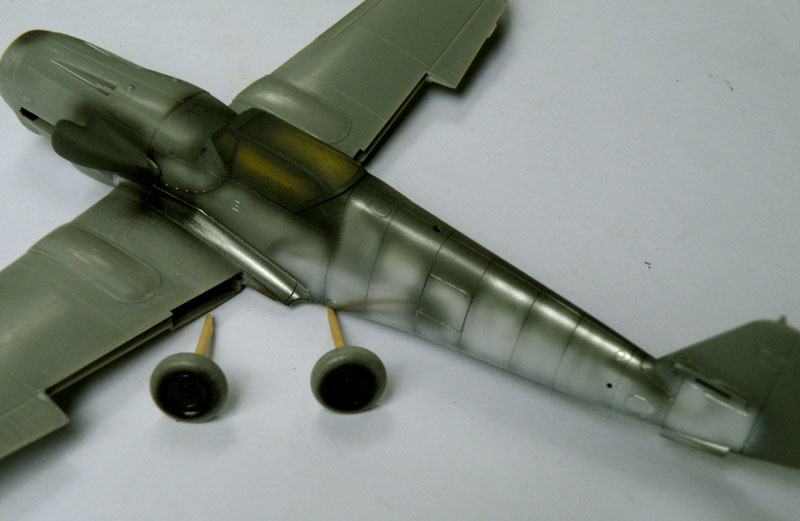
I have been trying to get back to working on some of my models that have sat for too long. One was my DC-6. I finally took some time to mix up some paint to match the orange decals on my aircraft. It took awhile, but I think I finally have something close enough:

WIP_DC_6_Super_Cloudmaster_XV.JPG


WIP_DC_6_Super_Cloudmaster_XVI.JPG


Hopefully now I'll be able to move on with this thing.

Next I decided to work on something new. This is the 1/72 scale F-35; another model for another Group Build. I started with the usual suspects: cockpit, then engine, then I closed everything up inside the fuselage. Later I realized that, again; I'd forgotten to take some additional pics. Here is where it was after all that:

WIP_BernieMemorialGB_I.jpg


You'll note that it is sitting on it's nose. That is because they require you to assemble the main landing gear in the main landing gear bays first; then install the bays inside the fuselage. Otherwise; adding the landing gear later would be considerably more difficult. You'll also note that the cockpit isn't painted yet. That is because it is so open that I can easily do that later.

I did go ahead and add the nose gear to the front to let it sit straight:

WIP_BernieMemorialGB_II.jpg


This actually went together quite well, except for the internal parts for the air intakes. One side didn't want to cooperate no matter how much I tried to get it right, so I had to resort to Mr. Surfacer 500:

WIP_BernieMemorialGB_III.jpg


I started my 1/72 scale Saturn V by (naturally) building the bottom part of the first stage first. When I saw all these gaps; I thought, 'How can this be from Dragon? They usually have far better fit than this!'

WIP_Saturn_V_Rocket_I.jpg


Wow, I pulled out my trusty roll of painters tape and pulled everything together as much as I could until the glue dried:

WIP_Saturn_V_Rocket_II.jpg


It worked for the most part...... I didn't get a pic of that yet. Maybe just before I add some Mr. Surfacer 500 to what remains I'll take another shot.

I then glued the two haves of the next part of this stage together. For some reason; the ends of one side liked to flare out on one end. I had to clamp them to get them to cement fairly flush:

WIP_Saturn_V_Rocket_V.jpg


Then I added the partition part at the top of the next part of the first stage, after gluing the two halves together. I thought once again, "Gee Dragon, is there really supposed to be that much gap all around this thing?'

WIP_Saturn_V_Rocket_III.jpg


Apparently so, since the same gap is found all around every other partition part except those holding that stage's engine nozzles.... Anyway, I don't expect them to be seen once this is fully built.

Here's a shot looking down into the first stage:

WIP_Saturn_V_Rocket_IV.jpg


I honestly don't know why I took that pic; it doesn't really add to the story here....

I assembled the second stage the same way as well as part of the third stage. I didn't get any other pics of that because it would have been the same pics of looking at big tubes. Once I did finish all those other assemblies I did take this pic of the first, second and half of the third stages all dry-fit together:

WIP_Saturn_V_Rocket_VI.jpg


Sitting there like that, it is around four feet tall now. I still have to add all the detail parts after sanding some seams. Then there is the remaining parts of the third stage; as well as the command and service module and the lunar module. I'm considering using some of the clear parts that they include to show the lunar module stashed inside for the trip. I'll cross that bridge when I come to it.


Okay, that's all I have for now. I hope you enjoyed this trip. Meanwhile, thanks for looking in; comments are welcome!
 
My apologies Sherman, no progress yet on the Phantom or the Saturn V. Instead, I continued to go through all the models I had been neglecting lately. Most were armor, but I did manage to get some progress done on one aircraft, my 2009 New Year Challenge model: the 1/32 scale Tigershark that I failed to meet the challenge with. Well, I had to replace a few broken parts first, then I refined the sanding I had done earlier. Finally, I masked certain areas off and shot a light, duck-egg blue to the underside:

WIP_Tigershark_X.jpg


Now all I have to do is flip it over and shoot the camouflage pattern on it. I hope to do that sometime this week. While I'm at it, I also hope top get some more painting done to one other large aircraft I've been neglecting too.

Stay tuned for more.
 
Thanks James!

Thanks Sherman! Yes it did feel interesting to be shooting so much paint on the Tigershark. It was even more interesting shooting paint on the top if it! See below...

Okay, here's another small update. I managed to get a little more done yesterday and today. Here is my latest...


I decided to try and get some more paint in the Tigershark. Here it is with the upper basecoat done:

WIP_Tigershark_XI.jpg


Next step is to mask it off and apply the camo pattern.

Speaking of camo pattern, I masked off the rest of the Valiant with tape and Silly Putty. I didn't have enough silly putty to cover all the areas I wanted to cover, so I added tape and then placed the silly putty around the edges of the tape to round things off:

WIP_Valiant_XV.JPG


Next came shooting the color:

WIP_Valiant_XVI.JPG


I didn't have my instruction sheet to show me just where the grey and green were supposed to be so I just 'winged' this..... so to speak....

While I had the airbrush out and ready to go, I decided to try out the Alclad on the gloss black on the F-86 just to see if I finally got it smooth enough. Well, it seems that once again I am foiled in trying to get a smooth bare metal finish! Apparently Alclad is very particular about what Gloss Black you apply to your model first:

WIP_HobbyBoss_F86_IV.jpg


WIP_HobbyBoss_F86_V.jpg


Time to strip this again.... for the seventh time!


After that disaster, I set myself up for another one...

I went back when all the paint was dry on the Valiant and removed all the masking tape and Silly Putty. Apparently I suck at masking because I had a load of bleed through and one mysterious brown swipe that wasn't there when I taped this bird up!

WIP_Valiant_XVII.JPG


WIP_Valiant_XVIII.JPG


So, can someone tell me why I seem to be the only one who follows everyone's advice to the letter and I STILL have this kind of crap happen? I see all these other fantastic modelers who show a taped-up/masked aircraft and when they show the next pic, it's a PERFECT PAINT JOB!


Man it's enough to make one just want to give up...

Tomorrow I hope to add the camo pattern to the Tigershark before going to a friend's house to help escort his kids while they trick-or-treat. We'll see if I am successful then.

I also got some work done on some of my armor. Feel free to check it out in the Armored Fury Forum.

Meanwhile, thanks for looking in, comments are welcome.
 
I think the problem is to much to wet to fast, just a thought :D Two things you might try if they haven't been suggested already is to follow around the edges of the masking with a couple of light coats before you open up the airbrush and walk on it painting, the other thing might be to give a clear coat around the masking first. either way it's to seal off the edge of the masking with a layer of dry paint before you before you layer on the the main coat.

:popcorn :drinks
 
Sorry you had trouble with the crinkling of the Alclad finish on the F-86. The Alclad is really nice to work with and I think what has happened to your model there was a reaction between the base coat and the Alclad.
Usually when this happens the base coat was not 100% cured before the application of the Alclad.

What I have found that works quite well when using Alclad is to first spray gloss black on the model with a thin but even coat, I thin the gloss black a bit more than usual and spray wet on wet, by doing this you can avoid a lot of orange peel that will adversely effect the look of the Alclad after its sprayed on. The thing that's important about only spraying on a thin coat of gloss black is the fact it will take a lot less time to fully dry and there will be less chance of the Alclad crinkling.

Another metallic paint that should not be overlooked is good old Testors Chrome Silver, you would be surprised how good this paint works for BMF, be sure to give the model a coat of gloss black first and you will get a nice finish...the plus side to the Testors paint is you will not run the risk of the paint crinkling on you later.

Matrixone
 
Thank you very much for the reply. Interestingly enough; I did everything that you suggested completely to the letter. I misted on the Gloss Black, I had this thing sitting for seven weeks or more before applying the Alclad and I misted on the Alclad. I still have no idea why this messed up since I followed your directions exactly as you said. The only thing I can think of is the Gloss Black itself doesn't go wiht the Alclad.

Chrome Silver... now that is an idea. I think I'll try that on my Gloster Meteor since that is also ready for a metallic basecoat. Between the two, we'll see which one works the best.

Thanks again for the excellent advice and suggestions. This is why I post these "disasters" so I can learn better how to avoid them.
 
I think the problem is to much to wet to fast, just a thought :D Two things you might try if they haven't been suggested already is to follow around the edges of the masking with a couple of light coats before you open up the airbrush and walk on it painting, the other thing might be to give a clear coat around the masking first. either way it's to seal off the edge of the masking with a layer of dry paint before you before you layer on the the main coat.

:popcorn :drinks

Clear coat or the base color you're masking. So if it leaks it either leaks clear or the same color you're masking.


AlcladII...Mark what AlcladII were you using on this? That doesn't look like one of the High Shine colors. It also looks way to thick. What medium was the Gloss Black, Acrylic, Enamel?

Bob, the Alclad Aircraft Aluminum was sprayed over the gloss black coat on the F-86. I don't know why it looks way too thick; I was misting it on in a very fine mist. I hadn't even added a second coat since it had crinkled up like that! The gloss black was Testor's Model Master enamel that was airbrushed on.

Anyway, I'm going to try again later on that aircraft. Meanwhile, here is a small update showing the things I got done at my Hobby Day weekend.

I changed my tack a bit by starting a new aircraft. This is a Williams Bros. 1/72 scale C-46 that I'd gotten for four bucks at a model show. I started, as usual; with the cockpit/interior (such as it is):

WIP_C_46_I.jpg


The posts are where the seats are supposed to go, but this was a "distressed" kit when I bought it. That means the box was crushed and there were some holes in the bags so one seat disappeared. It may be somewhere in my Hobby Room at home, but I don't know. I have a friend who took the remainder and is casting me a replacement.

Next I assembled the wings and horizontal stabilizers. Not bad, but there are some fit issues. Besides, the instructions weren't very clear about the landing gear bays so I had to take apart the main wings three times before I could finally close them up permanently:

WIP_C_46_II.jpg


Next the instructions told me to add the two canopy halves to the front of the fuselage halves. What a pain that was! I had to tape the fuselage sides flat and glue the canopy pieces on as best I could. They still don't fit very well:

WIP_C_46_III.jpg


WIP_C_46_IV.jpg


What a mess!


Finally it was time to have a little fun...

I pulled out some of the parts to the Saturn V and assembled the upper part of the LEM:

WIP_Saturn_V_Rocket_VIII.jpg


I left off a lot of the small detail parts that would get broken during further assembly.

Next I built the lower part of the LEM. It only consisted of two parts:

WIP_Saturn_V_Rocket_VII.jpg


Here is the two parts sitting dry-fit together:

WIP_Saturn_V_Rocket_IX.jpg


I won't go much further on this until I get it gold-leafed. But, I did get the command and service module finished up:

WIP_Saturn_V_Rocket_X.jpg


That was a tougher build than I though it would be. I actually had to pull it apart once in order to glue a part on in the right position. The instructions weren't clear on how certain parts were supposed to fit together!

Now for fun, I put all the main assemblies together to get an idea of how big this monster is gonna look when done. The Command and Service Module is not floating in mid-air; they are sitting on the clear parts that Dragon included so that the LEM could be seen inside the rocket when done:

WIP_Saturn_V_Rocket_XI.jpg


You can see the standard-sized cola can sitting next to this to give you some idea of the size of it.

That is all I have for now. It ain't much, but I appreciate any and all comments. Thanks for looking in.
 
Duke,
If you let the gloss black on your F-86 dry for seven weeks there should not have been a reaction that would cause the Alclad II to crinkle up like it did so something else may be going wrong with it.

I mentioned the use of Testor's Chrome Silver enamel paint as an alternative to Alclad and here are some snaps of my Bf 109K that had the lower half of the fuselage painted with the Testor's paint to show how it looks after being sprayed on.
Keep in mind I was not trying to get a smooth finish and painted on the Chrome Silver in streaks to give it the illusion of some weathering but even when I tried to screw it up on purpose it gave a nice looking metal finish anyway.

hd81935e.jpg


h5891c10.jpg


In this last snap the bottom of the fuselage with the Chrome Silver was sprayed on without any streaking weathering effects and as you can see its very metallic looking.

h802b392.jpg


If you wanted to have various panels on your F-86 to look a little different from one another its easy enough to do, you can either mask off random panels and spray them with a flat paint before spraying on the Chrome Silver or you can add a tiny amount of flat gray to the Chrome Silver and spray that on some masked off panels, this way the panels will have a different sheen to them.

Matrixone
 
Bob, the Alclad Aircraft Aluminum was sprayed over the gloss black coat on the F-86. I don't know why it looks way too thick; I was misting it on in a very fine mist. I hadn't even added a second coat since it had crinkled up like that! The gloss black was Testor's Model Master enamel that was airbrushed on.

Aircraft Aluminum is not one of the High Shine colors. AirFRAME Aluminum is, check the label.

http://alclad2.com/finishes/high-shine/

Yeah, I was going for the more dull look on this model. Still, I do plan on picking up some AirFRAME Aluminum later on for another project. This other color is good practice... I hope.


Meanwhile, I finally got a day to spend in the Hobby Room, so I went to work on some of the models that had been sitting around for far too long.

I'll start with this beast. I decided to fix the issues I had with the Valiant. I masked off the top and all the rest of the camouflaged areas:

WIP_Valiant_XIX.JPG


WIP_Valiant_XX.JPG


I then shot a clearcoat on the bottom. After it dried, I shot a new coat of white to the bottom. When it was dry, I removed all the masking to see how well it worked.

It worked:

WIP_Valiant_XXII.JPG


But the top had more issues to deal with:

WIP_Valiant_XXI.JPG


I just hand painted on the patches to cover these issues and then clearcoated the model with Aqua Clear in preparation for decals. It is sitting now and drying, waiting for the decals later on.

Next I masked off the 1/32 scale Tigershark with Silly Putty:

WIP_Tigershark_XII.jpg


Next, I shot on the second color, Neutral Grey over the model:

WIP_Tigershark_XIII.jpg


The next color is going to be Intermediate Blue, but I have to go pick up some more Silly Putty since I'm out!

Once I get the last color on, I'll be able to clearcoat and decal this monster after I finish repairing the wingtip missile rail....again.


That's all for now. Thanks for looking in, comments are welcome.
 
Thanks Bob!

Matrix, I apologize, I hadn't seen your reply with the pics before this for some reason. Thank you for those steps, I will be using that color quite often now. Your information was highly helpful. You might be interested to know that I did use Testor's Chrome Silver on the body of a bus I'm doing; you can check it out in my Thread in the Armored Fury Forum.

Okay, on to today's latest progress....

Okay, yesterday and today I was able to find some time for the workbench so I got some more progress to show.

On Monday I messed around a little, doing some simple work on some of my models. For starters, I shot another coat of Alclad on my F-86 Sabre jet. I can now claim victory over this thing after five attempts:

WIP_HobbyBoss_F86_VI.jpg


WIP_HobbyBoss_F86_VII.jpg


Well, that is about all for now on my aircraft. I got a lot more progress done on my armor models this time; you can check out that progress on my Thread in the Armored Forums. Meanwhile, I have at least four other models that are now ready for decals so I may take the next bench time to apply them and move four more projects closer to the finish. Until then, thanks for looking in, comments are welcome.
 
Back
Top