• Modelers Alliance has updated the forum software on our website. We have migrated all post, content and user accounts but we could not migrate the passwords.
    This requires that you manually reset your password.
    Please click here, http://modelersalliance.org/forums/login to go to logon page and use the "Forgot your Password" option.

Large Custom Millennium Falcon (new pics )

Large Custom Millennium Falcon (New Extreme pics)

I am watching out for the new tools!

Regards,
 
Large Custom Millennium Falcon (New Extreme pics)

Great stuff Paul carry on ... Your doing great ... My Dad was a tool designer ... if I need a tool for a tight spot He'd make it for Me .... Looking Good my Friend ... :popcorn :popcorn :popcorn
 
Large Custom Millennium Falcon (New Extreme pics)

Oh, that's lovely.
As I haven't started on the back half of my cockpit yet, this is going to be extremely helpful.
My plan is the use EL tape to light the back areas with a nice even glow, and that will remove any LED hot spots. It's not like there are a lot of blinking lights back there anyway.
 
Large Custom Millennium Falcon (New Extreme pics)

Thanks for all your kind comments everyone! :notworthy

Dan, this is a huge experiment for the lighting. I am going to attach the LEDs directly to the back side of the bulkhead. There are going to be some fine fiber optics used for the ton of little round lights.

In doing the plannng layout I found most everything changed size and position wise, so it all will get made from scratch even if I don't end up lighting it.

I think the way I am going to light it though will work. The only thing I have not really figured out yet is how to paint the little grey and white lines on the panels. :bang head
 
Large Custom Millennium Falcon (New Extreme pics)

Very cool! Love the size of the ship. I'll be watching the rest of this build! :popcorn

Tim
 
Large Custom Millennium Falcon (New Extreme pics)

We have a new tool folks! Got home last night and fiddled around for a little bit and then ended up in the hobby room. Four hours later the tool was finished and I was a happy camper.

Here you are:

TT-032.jpg~original


TT-033.jpg~original


TT-034.jpg~original


TT-035.jpg~original


TT-036.jpg~original


TT-037.jpg~original


TT-038.jpg~original


TT-039.jpg~original


TT-040.jpg~original


Falcon-EX-071.jpg~original


I will probably try it out tomorrow. Been busy today and am a bit on the tired side. The seasons changing is wiping out my sinuses. Not too worried about if it will work as I have done similar stuff before and it has worked quite well.

It's nice to have nice tools. :smack (OK Bob, I know) :D
 
Large Custom Millennium Falcon (New Tool pics)

:blink :notworthy :drool

Wow... Just, wow. Um, if you make yourself a better one for yourself later, let me know. I could so use one of those.
And what did you use to make all the teeny square buttons? I figured on getting strip styrene and trying to cut out buttons by hand. This is amazing.

Oh, here's a link that I've been using for my cockpit. This guy is using all the attention to detail you are, and modeled the whole cockpit in the computer. It helped me a lot with the front console shapes.
 
Large Custom Millennium Falcon (New Tool pics)

Hey Dan, thanks for the link, I appreciate it. The biggest problem with using another persons construct is that it is their impression of what things look like. He also is doing the ANH version as he said. Basic shapes of their work though can help clarify what you are trying to do however.

I always use actual photos for detail reference, but other constructs can sure give some enlightenment to what I am looking at.

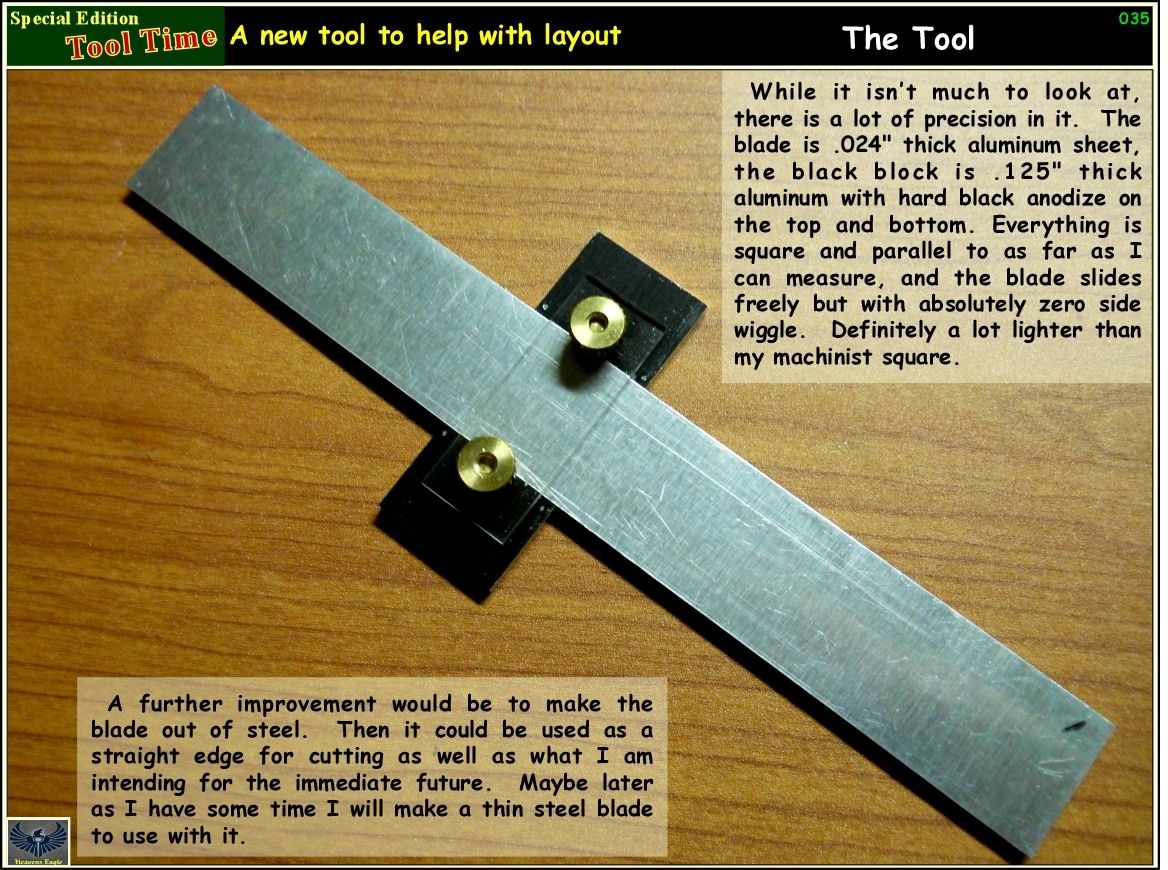
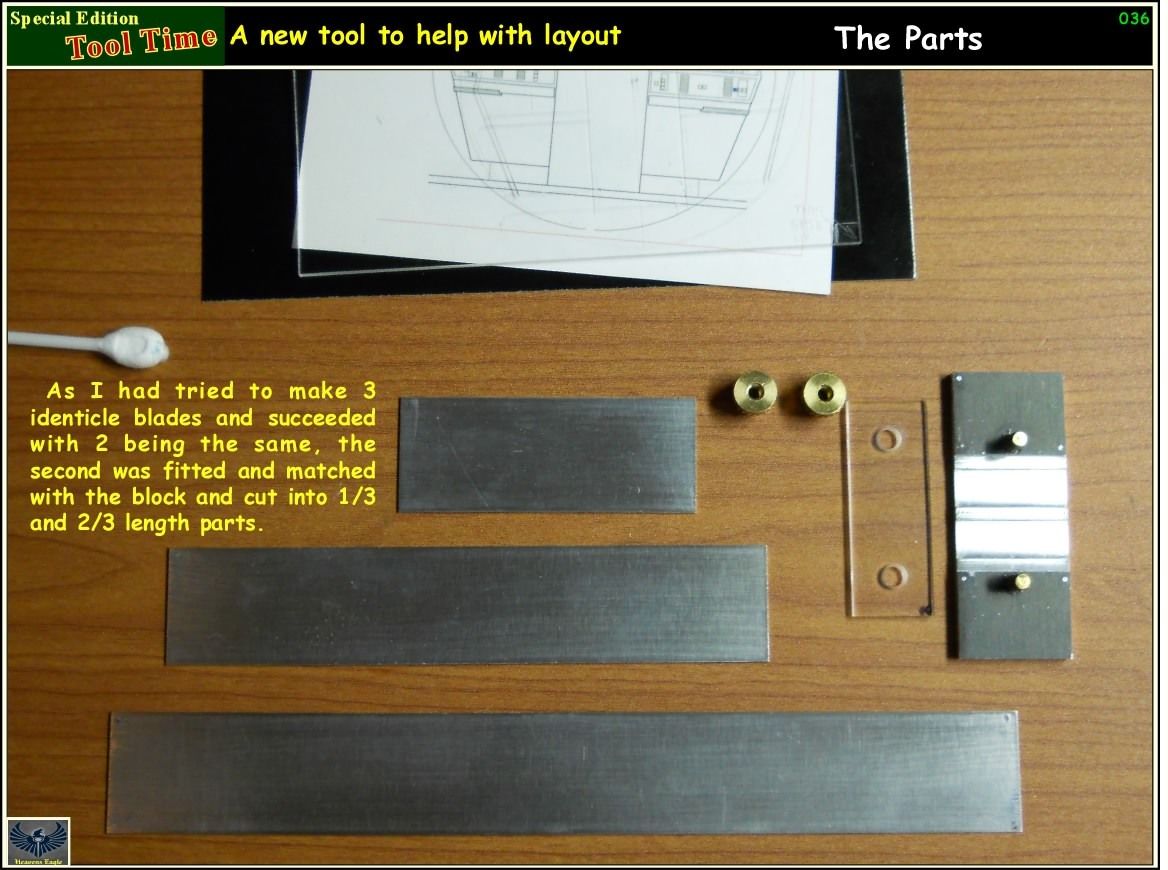
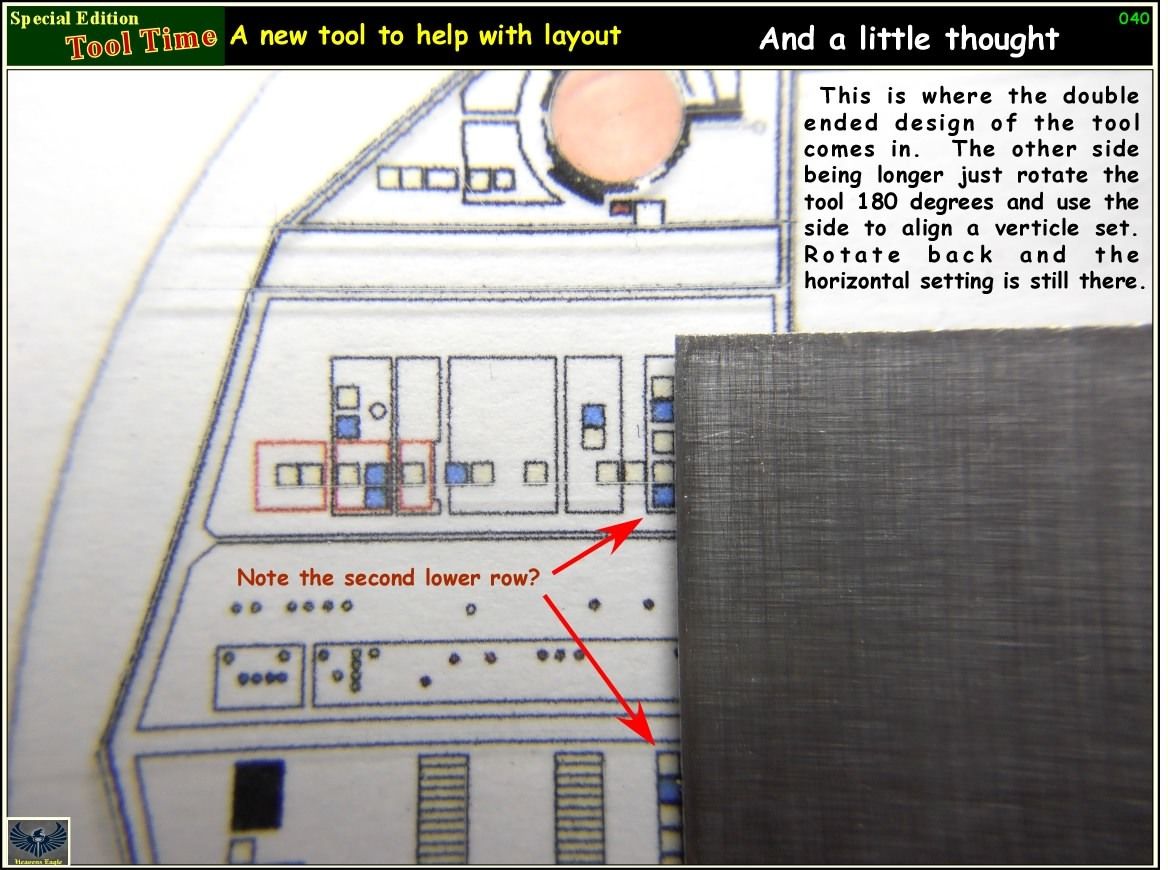
As to the tool, I won't make a new one, just a new steel blade for it. The aluminum sheet part will work fine for what I am doing right now.

The little cut squares are fairly easy. I would suggest you try and find several 6 inch by 3/8 thin steel rulers to your tool stash. I use them all the time. I bought mine from Wholesale Tool in Tulsa. They also do mail order.

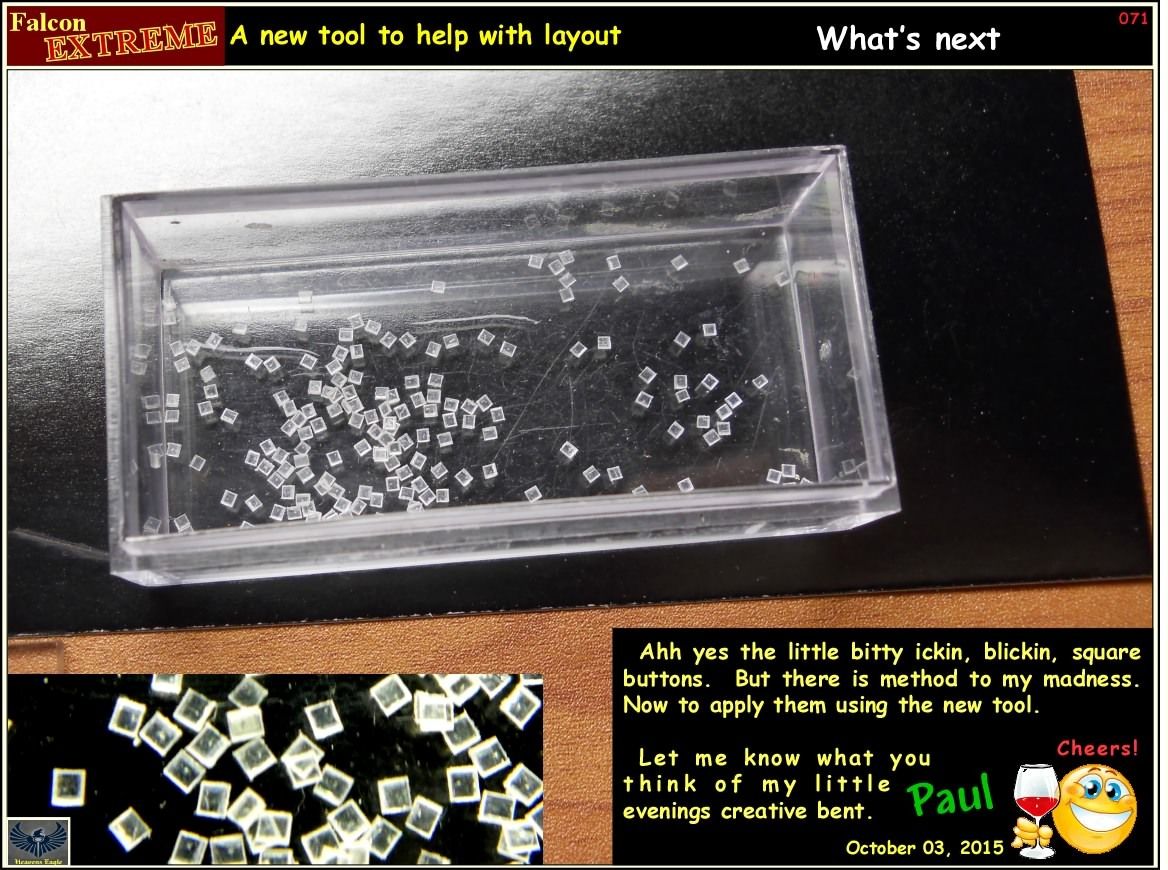
How I cut the buttons: Using a sheet of .010 thick clear, I marked and cut a .030 wide strip. I do that with a sharp knife and make several "light" cuts. I then set the strip part in my PE bender lined up with the cut and break it the rest of the way.

To cut the strip into like sized square bits, I used some double sticky Scotch photo tape. (about as sticky as a post it with blue on the label) Used the tape to stick my steel rulers down to some glass. With the setup I was then able to slide the strip along and use the ruler to guide the cuts to keep them even.

I will make a photo set for you after while if you would like me to show the how. I am thinking I need to remake the buttons out of some .005 thick clear. They are seeming a little too thick to me.

A lot of what I do is done planning and visualizing about 10 steps ahead. I already know how I am going to do all the little round lights, but there are the buttons first and a couple of things I have to do before attaching the buttons yet.

You know I am pickin on ya Bob! Sometimes I wish I had bought a little bigger mill. I didn't know when I got it how much I would use it. Somewhere about 10 to 20 times more than the lathe. I thought the lathe would be used more. DUH!
 
Large Custom Millennium Falcon (New Tool pics)

Marvelous work, Paul- cheers! I love that new square- really well done. All dem lil' buttons! :dude
 
Large Custom Millennium Falcon (New Tool pics)

A perfect example of learning techniques in a zone which isn't one's own (I rarely build Sci-Fi).

Regards,
 
Large Custom Millennium Falcon (New Tool pics)

Very very cool. I especially like that square you have. Watching with interest :popcorn
James
 
Large Custom Millennium Falcon (New Tool pics)

Thanks everyone! Your comments are very much appreciated! :notworthy

The square is something that came from using the expensive machinest one and I needed something much thinner and lighter. I am sure there would be some better ways to make it for production, but with what I had, I did it more simply as I could "fit" the blades to the block with real light careful use of a file. Eventually if it turns into a "go to" tool I will try and make a steel blade for it.

One thing I have thought about doing is with little tools like this, submit them to "The Small Shop" to add to their tool inventory. The quality of their stuff is right up there! The Hold-&-Fold 5.5 inch tool I bought from them is one of the few that I have never felt needed tweaking. Most everything else needs to be adjusted or reworked to work correctly. If that happens and they go for it, a more improved version could be available to all of you for a resonable price.

I'm going to ponder that for a bit. :hmmm
 
Large Custom Millennium Falcon (New Extreme pics)

Hey Eagle, WOW! What a great build...You are taking this model to a new level.

Been following your build since back when you started posting on the 'other' forum, then moved here.

I am also building this kit, although mine is being kept in boxes until I have most of it delivered, in the mean time I have been planning my 'attack'.

I love what you are doing with the cockpit back wall and can't wait to see how it turns out with the lighting.

Thanks for posting so much of your research and 'how to' it has been very informative and helpful, I will be taking many notes from your work.


imurme


BTW...You mentioned trying to figure out how you were going to put the panel lines on the back wall and I thought I would mention a couple of extra fine oil paint markers I seen on eBay that I thought you could use to draw on the panel lines after you have painted the back wall (perhaps using your awesome new strait edge tool). They come in many different colors but here are links to the Red, White and Silver ones...

$_12.JPG

eBay Link: Sharpie Paint Marker Pen Oil Based Extra Fine Red

$_12.JPG

eBay Link: Sharpie Paint Marker Pen Oil Based Extra Fine White

$_12.JPG

eBay Link: Sharpie Paint Marker Pen Oil Based Extra Fine Silver
 
Large Custom Millennium Falcon (New Tool pics)

Hey Imurme! Thanks for following it over, I think Dan followed as well and is finding all kinds of fun stuff over here.

I much appreciate the links to the pens, I don't think they will be quite fine enough though. Probably going to have to do it "The Hard Way" with a nice quality paint brush on a day that I have passed on the caffine. Vallejo paints really seem to work well for that and I can do it, but it has been quite a while. Nothing like some challenge eh?

That is one of the nicest things about the group on this forum, everyone is almost always positive and complementary. Everyone that I know also tries to give assistance when we are having problems. While I probably won't go for the pens, there is a good use for them I am sure and it might be just the ticket for another member. (y)

well I am getting ready to do some machine work on the backside of the bulkhead now. The door area needs some thinning from behind to make adding the new door a little easier.

I also decided that the doorway needs to be open. (so guess what that means) :blink
 
Large Custom Millennium Falcon (New Tool pics)

Just a couple of things to give everyone a heads up, SprueBros has the new Revell snappy kits from the new movie. They appear to have some sound electronics in them and lights on the Falcon. Might have to order an X-wing and Falcon for grins-n-giggles.

Looking at the box art pics I did notice that the new X-wings are quite a bit different from the originals! Have seen the teaser clips for the new movie, but didn't notice the differences. Definitely nicely upgraded! Might actually have to go to the movie theater and see it on the big screen.
 
Large Custom Millennium Falcon (New Tool pics)

Yeah, the new x-wings are significantly different from the OT version. They take a lot of design reference from the original Ralph Mcquery concept art. The Falcon looks mostly the same except for the rectangular dish, though the cockpit controls have been simplified. There are fewer levers and the controls look less cluttered on the dash.
 
Back
Top