• Modelers Alliance has updated the forum software on our website. We have migrated all post, content and user accounts but we could not migrate the passwords.
    This requires that you manually reset your password.
    Please click here, http://modelersalliance.org/forums/login to go to logon page and use the "Forgot your Password" option.

IAR 81C

Thanks, you flatterers! ;)

Moon, I am still chopping off tiny bits of solder- if anybody has a line on good soldering paste please let me know!

Eagle, this dang thing is tiny indeed. i thought I could get it done in a reasonable amount of time, but, well, I've chukked it all up, haven't I? :P ;)

I did rebuild the front of the air intake but forgot to post the pics. That will be in the next update. The big dust filter will be attached to the lower cowl, and I'll make 8 latch brackets from pie-pan foil.

My last request will be for a spiral pattern for the spinner- neither set of decals has one, and the spiral is very tight on a smallish, FW109-like spinner. Nothing comes easy, do it?

Cheers-
chuk
 
Chuck,
With each your topic is always same problem - they are extremely awesome (y) . Not only from modeling point of view but also in way how you present it.

Great work!!!
 
Thanks, guys!

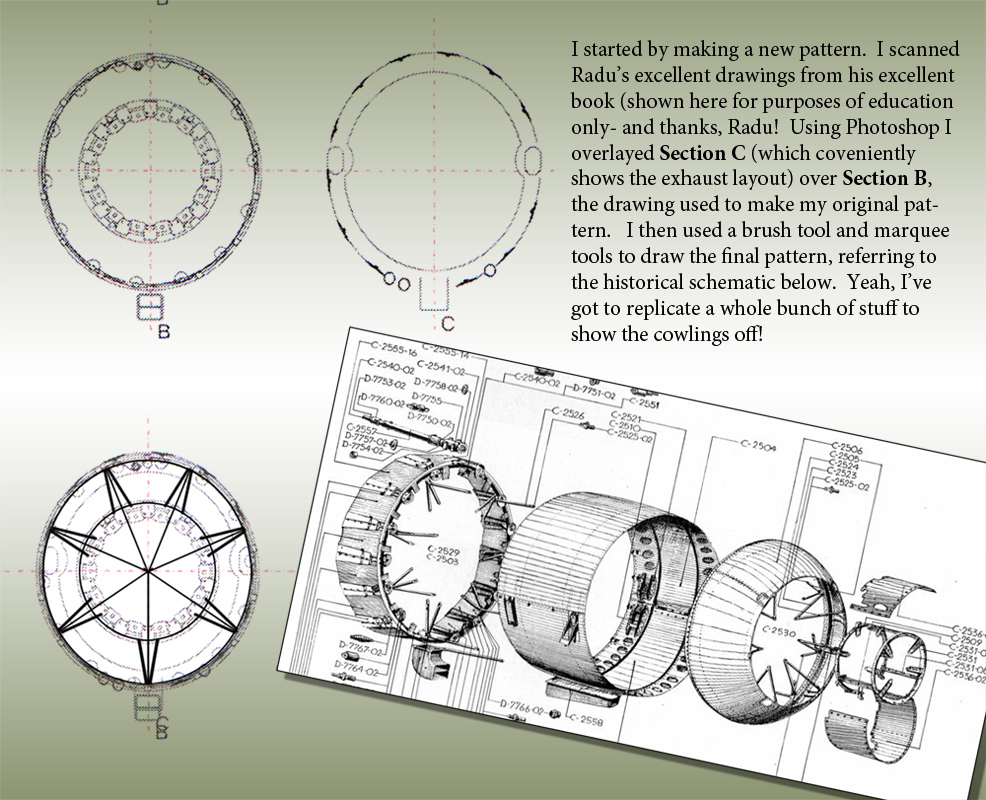
I have been considering making a brass wire frame to simulate the "gearbox case" as seen in the pic reposted here. That way I can keep the front cowl on, not behead the model and still show that glorious resin engine in it's fullest. The sheet metal parts can be easily made from heat-bent styrene and displayed along with the main cowls on the base. It might be fun....

IAR_085.jpg
 
The computer (with the right software) does become a quite handy tool for doing the layouts doesn't it Chuck! That and the kind of reference you showed us makes a huge amout of difference.

It's not what we plan to do with the tools, it is what all the little tools allow us to plan.

Keep up the great work my friend! It inspires me to go the extra steps myself!
 
chuck there are many folks that i watch with great interest and deep admiration. you are one of the top. this is unbelievable detailing. absolutely impressed with the level of work my friend.


joe
 
Thanks, friends! A bit of progress- I've bent the fore and aft rings for that housing framework- and drilled and pegged the tailfeathers. Once ComicCon is over I can get back to modeling business and post new pics.

Cheers!
chuk
 
Hey Chuck
As to the flux beading up on the nickel plating, I have found that a lot of the Eduard PE is nickel plated. (probably mostothers as well) In addition, it seems that the plated PE also has an oily/ waxy coating as well. I have had CA bead up and had PE parts peal loose from CA bonds if I didn't clean the parts.

I have found that 409 sprayed on the fret and then rinsed and BLOTTED dry with paper towel seems to work OK. Usually I have forgotten to do that, so I take the parts and dip them in a clean bottle of Xylene solvent and then blot the solvent off on a clean paper towel. I use Xylene as it has similar properties to acetone/lacquer thinner, but it doesn't evaporate much faster than alcohol (maybe a touch slower). The good thing is that it does get that residue off and then the parts bond solid. (y)

Hope that helps.
 
A teaser. :evil:

Flux_05.jpg

Dang Chuck, missed your question about a source for the soldering paste. James posted a link and I got some now if I can find the link again.

Ah yeah, here it is

http://www.digikey.com/product-search/en?vendor=0&keywords=SMD291SNL10-ND

This is the stuff I got. Works fine for what I've tested with lately, nothiing major. Maybe some of the solder experts could direct us to something more suited for our needs.
 
Chuck - amazing as usual. I can't wait for the rest of the update!

Does any one know of a good tutorial on soldering? Especially for modelling? I have tried to do it a few times with bad results every time. (Sorry to hijack your thread Chuck. :blush: )

Mike
 
As a matter of fact....yes.

Easy as 1 2 3
https://www.modelersalliance.com/component/content/article?id=64

https://www.modelersalliance.com/component/content/article?id=67

https://www.modelersalliance.com/component/content/article?id=68

Watanabe-san created these for us years ago. If you have any questions don't hesitate asking, lot of us have some experience in it.
 
Thanks, guys! The rest of that review should be up on Aeroscale soon. I'll add an addendum about washing the nickel-plated brass as soon as I can test it out. Big thanks to you, Paul! You've just saved a lot of us from a boatload of frustration.

Moon, I'll get me some of that, thanks! I've gotten used to "chipping" solder, but apste will be very useful as well. Think of slat armor cages... ;)

Mike, those articles were what launched me into doing proper soldering for the very first time. I can't claim to be an expert in the least, but I've gained to confidence to experiment- and it's really fun! As long as you don't grab the wrong end of the iron. Ow....
 
BTW, I meant to say how nice those small solder joints were. Got interrupted and missed doing that Chuck :S .

As to solder paste where the flux has small micro beads of solder suspended in it, I do have a little experience from my years working in electronics prototyping. All solder paste has a shelf life, which means that it will still work for us hobbyists quite well way beyond that shelf life. It won't matter what you use though if the brass, copper, nickel, or whatever it is you are trying to solder isn't reasonably clean to start with.

A bright surface will give the best results. This can be obtained by filing, sanding, using a knife blade to scrape the surface, or any other similar method. The purpose of the flux is to keep the surface clean while heating and to help remove minor oxidization that has formed while the part set.

If the parts are quite small, pretinning the joint areas can make the build process go quick and easy. It only has to have enough solder to silver the surface. Then align the parts and add a little heat and they will join quick and easy.
 
Back
Top