• Modelers Alliance has updated the forum software on our website. We have migrated all post, content and user accounts but we could not migrate the passwords.
    This requires that you manually reset your password.
    Please click here, http://modelersalliance.org/forums/login to go to logon page and use the "Forgot your Password" option.

1/72 Revell Me 262 A-1a

razordws

Well-known member
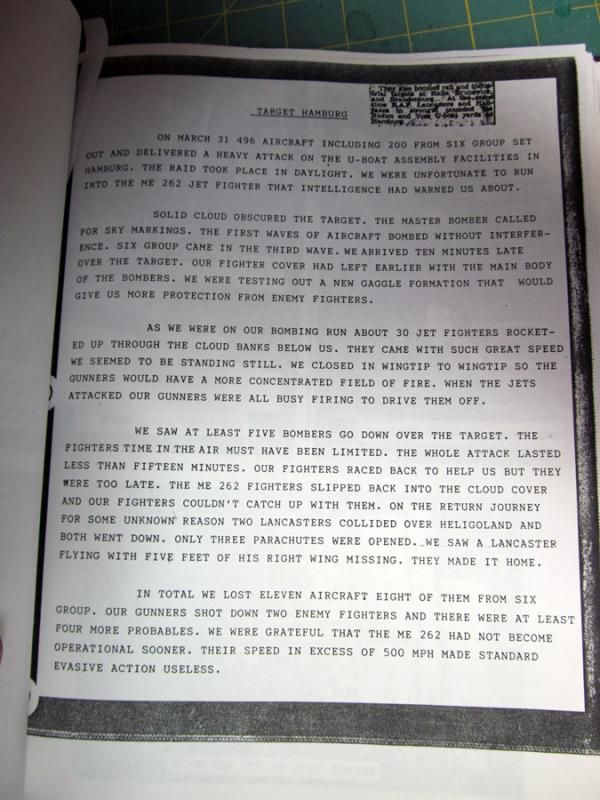
So after the Airfix P-61 (Pacific campaign) I decided on something a little more simple. This one has a bit of a personal note for me as well. My Uncle was a WAG in a Halifax towards the end of the war and I managed to get a copy of his memoirs of his experiences. Here is the page of note.

03Me262ARG2_zps879295af.jpg


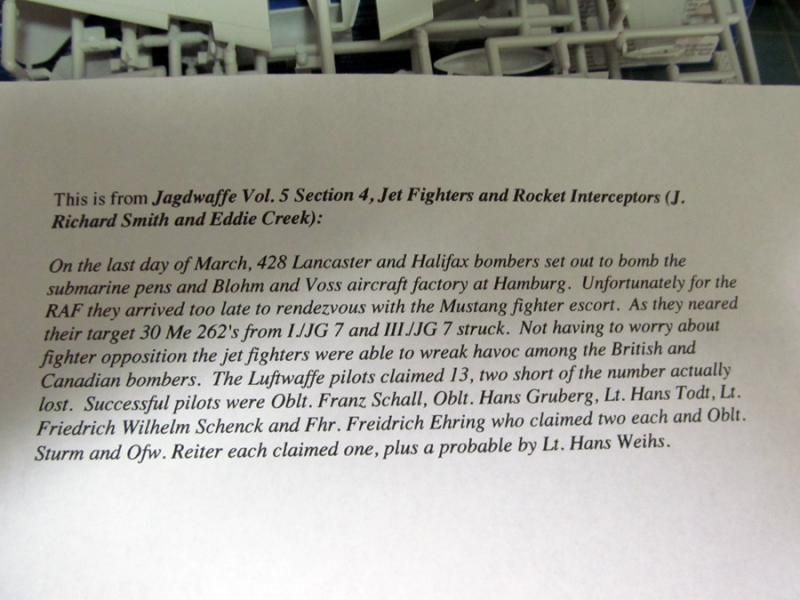
Someone on another forum years ago was kind enough to do some digging for me and identified the units involved in this attack for me.

04Me262ARG2_zps27bb3fe7.jpg


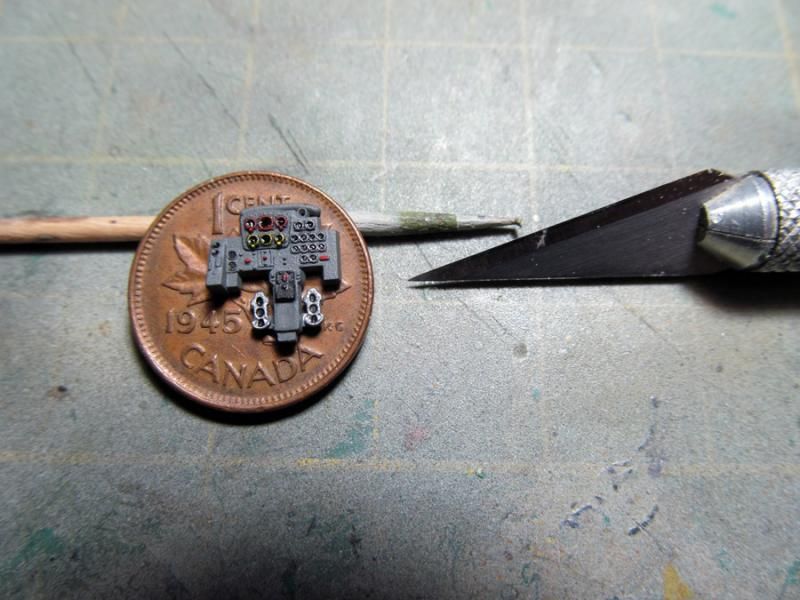
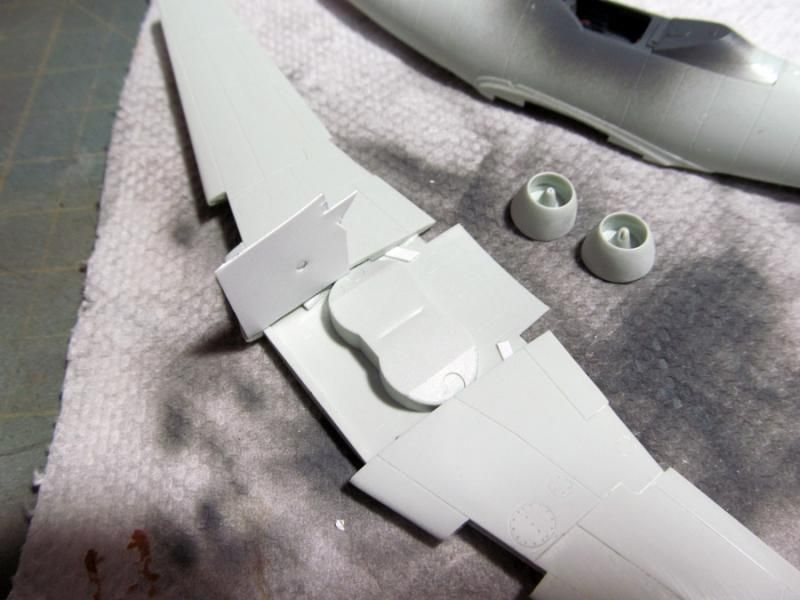
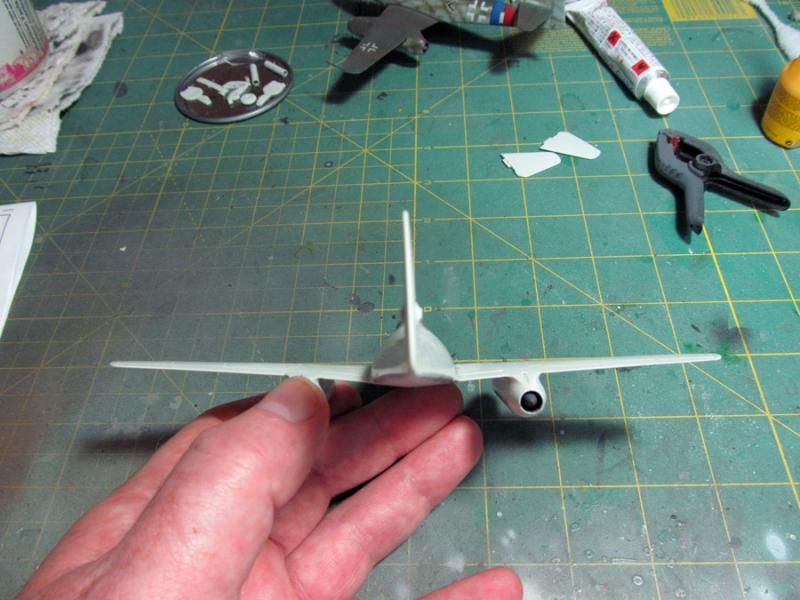
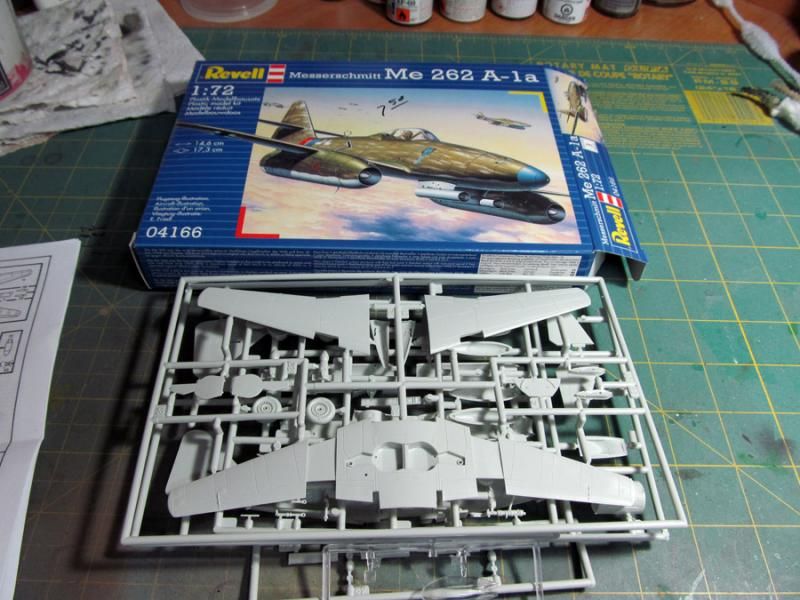
So my plan is to do this kit. I've built this particular kit once already and used the kit markings for the JG7 aircraft. This time I plan to do yellow 5 using a sheet from Eagle Cal.

01Me262ARG2_zpsfa88d3ba.jpg


02Me262ARG2_zps1451325a.jpg


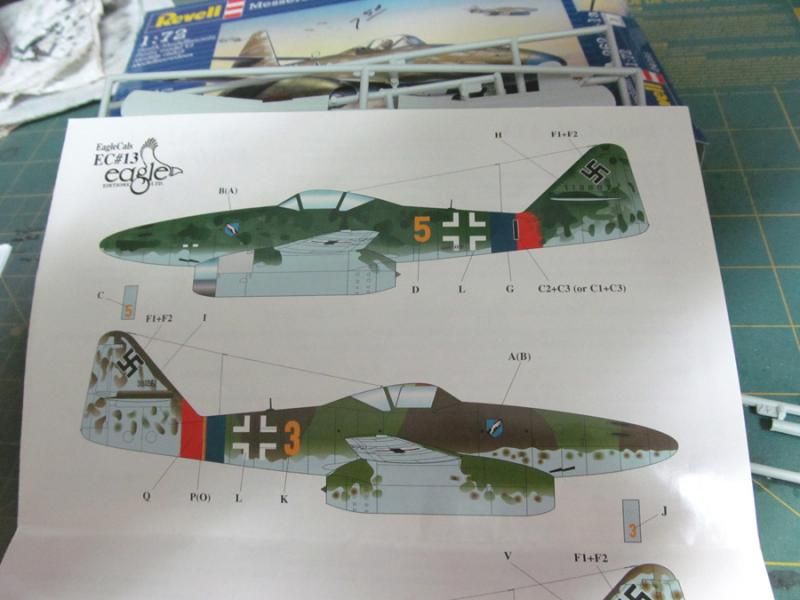
The instructions call for a heavy mottle of RLM 81/82 but I have a question for you experts out there. The instructions are unclear (to me anyways) as to the top side scheme. Would this have had the standard splinter camo as well and mottled only on the sides (does not look like it in the profile) or would the whole top side be mottled? Need your input.

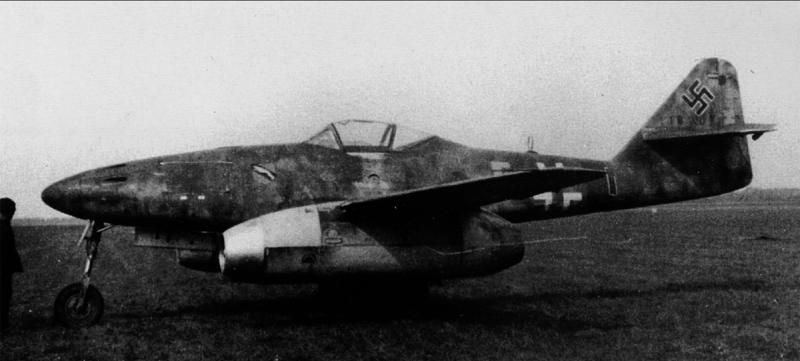
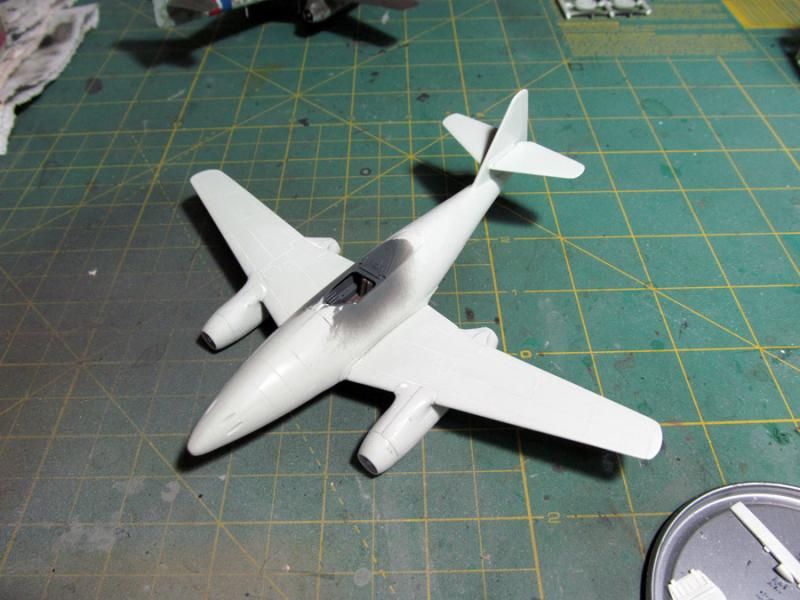
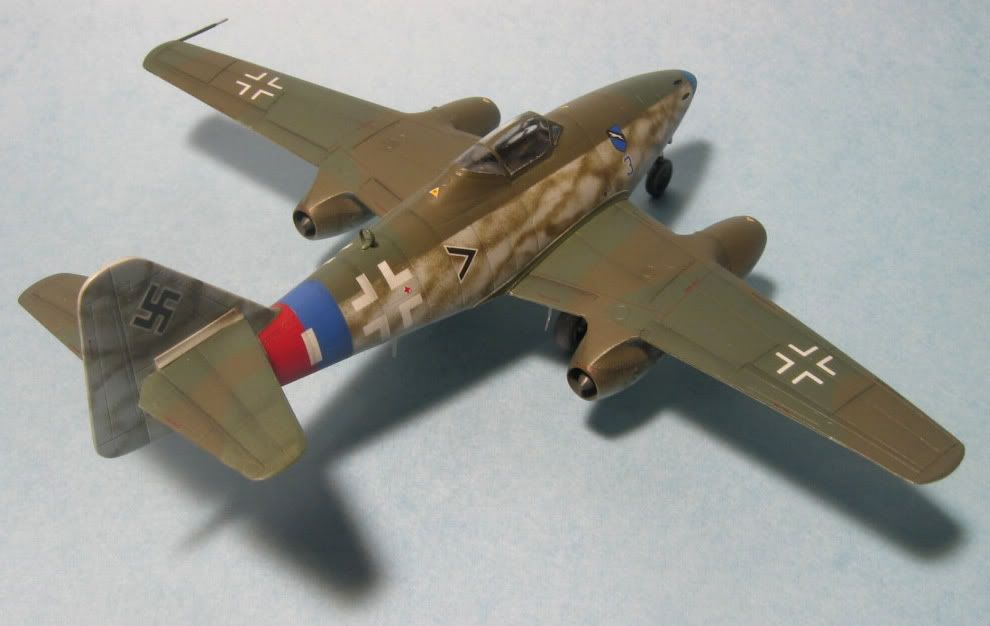
Here's a shot of the last one I built. Hope to do better this time.

09Me262.jpg
 
Dave,
I might be able to help answer your question but I would need the W.Nr. of ''yellow 5''.

EagleCals are usually accurate in their color callouts so if you can't find out anymore information about the wing upper surface painting pattern go with the EagleCal instructions.

There are a number of these Revell Me 262's in my stash and was thinking about building one at the end of the year, I will be watching this build closely. :)


Matrixone
 
I was hoping you would pop in Les. The worker number is 110007. My problem is that the Eagle Cal instructions are vague because there are two yellow 5 's on this sheet and while it is stated that the splinter pattern goes on yellow 3,5 & 7 it does not specifically state that the splinter pattern goes on both yellow 5's. Judging by the colour profile it is impossible to say. Maybe they just don't know for sure because there are no photos of the actual aircraft to verify? Any help you can provide Les would be greatly appreciated.
 
Dave,
I could not locate a ''yellow 5'' of JG 7 with that W.Nr., but I did find W.Nr.111007 marked with a yellow 5 that was used by JG 7 and had a small yellow 5 on the nose gear door and that might be the Me 262 you are interested in modeling.

There are some other books I need to check for photograph's of ''yellow 5'' so I will get back to you later.


Matrixone
 
Thanks James. I think you are right. Even though there is not a top view it looks like the top of the fuselage does have some hard lines.

Les, I found another build here where they mentioned the same issue (I assume from the same book). I had some more time to search the web and this appears to be the best photo of this aircraft. You can see the splotch where the third one should be that Ian was talking about. Now to see if I have some extra "1"s to correct the kit decals. Thanks for your help! :ro:

1-Me-262A1a-Schwalbe-9JG7-Y5I-Uffz-Schoppler-WNr-110007-Fassberg-May-8-1945-01_zps5d9afc0b.jpg
 
Dave,
Thanks for posting the link to the other Me 262 build, I have not seen it before.

By looking at the photograph of ''yellow 5'' its easy to see how a mistake could be made in trying to read the W.Nr.

After looking at photograph's of other Me 262's in that W.Nr. block built at Leipheim they had a standard Me 262 camouflage pattern with mottling on the fuselage sides and there is little doubt they had the splinter pattern on the upper surface of the wings as per the EagleCal painting instructions.
One thing that I notice in the few available photograph's of other wartime Me 262's the wings camo pattern is sprayed on and has a soft edge between the two colors.

I believe the heavily over sprayed fuselage on ''yellow 5'' is an attempt at additional camouflage for better concealment while on the ground or possibly some repainting after repairs were made from battle damage...no matter what the reason is it looks like a good challenge to try and copy on a model. (y)


Matrixone
 
Well, now that we have the camo issue sorted it is full steam ahead on this build. At the rate I'm going I should have the major assembly done tomorrow. The IP was well molded so even in this tiny scale it was possible to pick out some nice details.

05Me262ARG2_zps2fa7853c.jpg


Had to clamp the fuselage to help make the bottom nose piece fit better but even still there is a pretty good step on the one side. That should sand off nicely though.

06Me262ARG2_zpsda1ce4fd.jpg


The front of the lower wing fits nicely but the back has too much curve to it so I glued some tabs to the fuselage and with some shimming I should be able to get it to sit properly.

07Me262ARG2_zps942863c8.jpg


That's all for now! :drinks
 
Thanks guys. Well, this is definitely not the Tamigawa build that I was hoping for after the Airfix P-61 but it is still going together quickly enough. I had a couple of issues to deal with but they are almost sorted out now. I had to shim the wing to make it thicker so there would not be a step where it joins the fuselage and I added some thin card to fill in a gap too. That was cut and sanded down before it was joined to the fuse. You will also notice in the first photo that one of the engine intakes was not properly formed. Turns out that all three of my Revell Me 262 kits have this same deformity so it is not just a short shot. I glued some plastic to fill the hole and carefully filed it back down to shape. I will drill out the center later.

08Me262ARG2_zps88f841ef.jpg


09Me262ARG2_zps72eb7ab8.jpg


Something seemed amiss with the tail when I tried to glue the stabilizers on. Starting to feel more and more like an Airfix kit here! A quick dip in some hot water got that straightened out.

10Me262ARG2_zps5db6cda8.jpg


Airframe now complete. Just needs a little more PSR and then we will have to get the canopy sorted. Looks like I'll have to put my handy dandy home made vac box to work again. Sigh!

11Me262ARG2_zpsc66f1076.jpg
 
Looking good Dave . This kit looks way better than their 60's version that still sits on my self :rotf

Cheers, Christian B)
 
Thanks Dave, MP. :drinks

Looking good Dave . This kit looks way better than their 60's version that still sits on my self :rotf

Cheers, Christian B)

It is a great kit, especially when you consider that it is less than a third of the cost of the Hasegawa or Academy kits. I've built the Hasegawa kit before and though the fit is better it lacks the interior detail that the Revell kit has. I also have the Academy kit in the stash so it will be interesting to see how it compares.
 
Back
Top