
-
Modelers Alliance has updated the forum software on our website. We have migrated all post, content and user accounts but we could not migrate the passwords.
This requires that you manually reset your password.
Please click here, http://modelersalliance.org/forums/login to go to logon page and use the "Forgot your Password" option.
You are using an out of date browser. It may not display this or other websites correctly.
You should upgrade or use an alternative browser.
You should upgrade or use an alternative browser.
1/48 Scale Bf-109G-6
- Thread starter Skinny_Mike
- Start date
Skinny_Mike
Well-known member
Hello everyone! Thank you all for the kind words! I’m trying my best on this one.
MP – I don’t know if I’m really sold on the UMM prop tool. It had originally set the prop blades at a very strange/extreme pitch angle that I ended up relaxing a little bit before gluing the prop blades in place. But they are all even, which I probably would never have got on my own. Maybe I’m not using it right. Don’t know… :hmmm
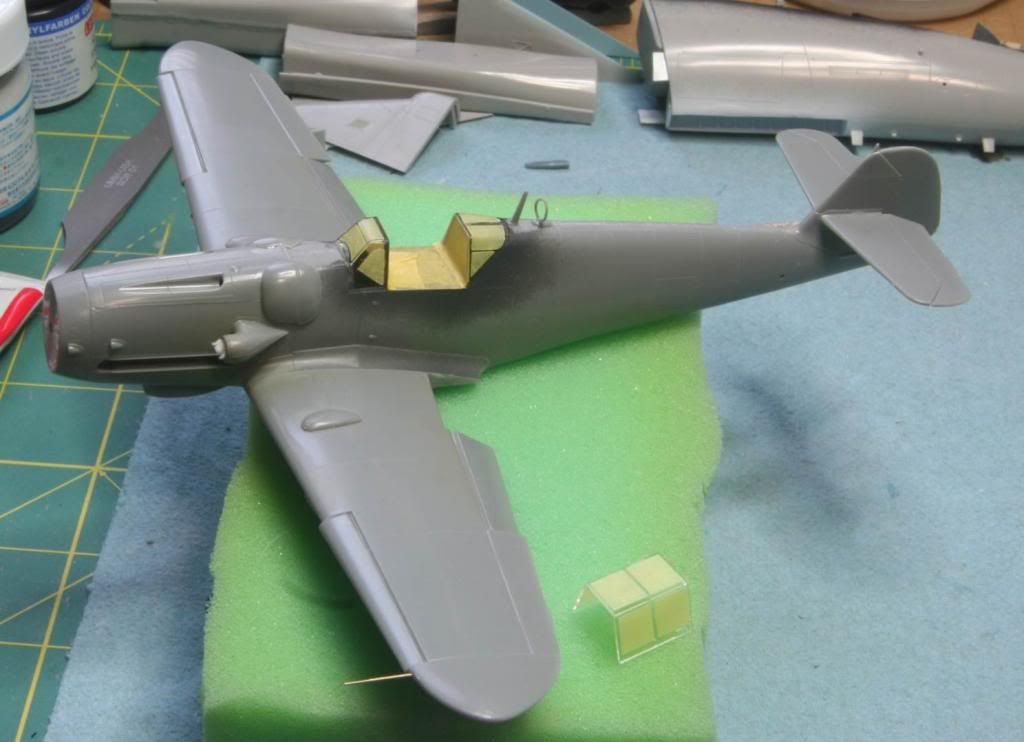
I have a small update here today. I was out of town all week so didn’t get much bench time until today. All the remaining pieces have been added to the fuselage. The gun sight was painted flat black and then the glass elements were added, using future to secure them. Then it was attached to the instrument panel and the windshield was added. The photoetch grab handles were attached inside of the windshield before I attached it to the fuselage. Also the rear of the canopy was attached and the cockpit masked off. I also used a Master turned brass pitot tube. A must for me as I always break off the plastic ones!
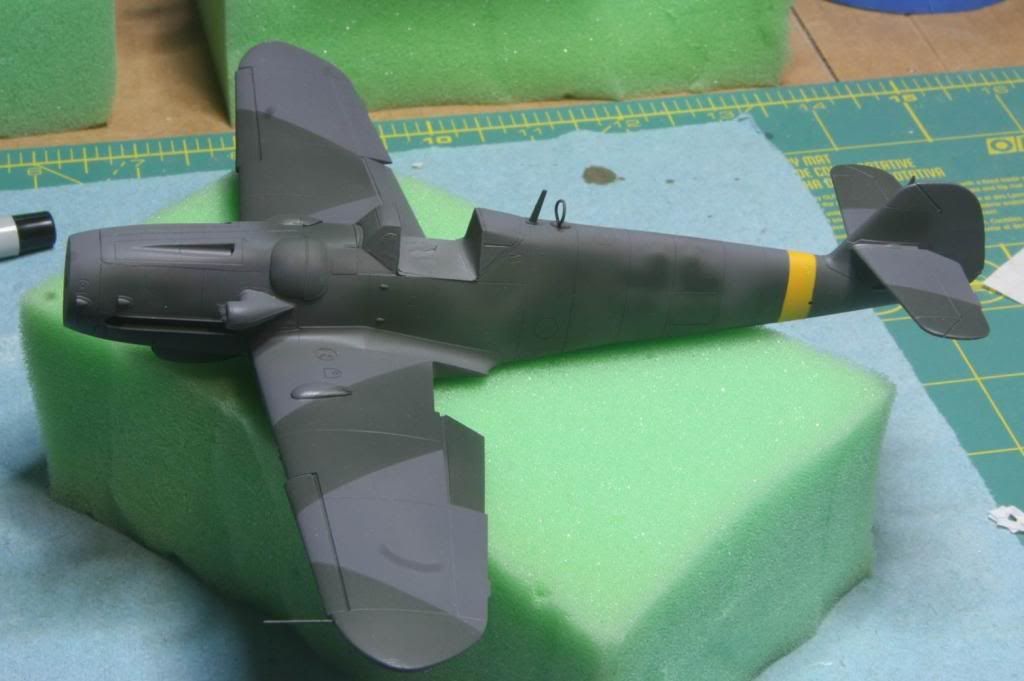
We are now ready for some paint! I first painted all the clear parts with Tamiya XF63 and once that had dried I primed the airframe with Alclad gray primer. After about an hour I started looking for any problems with seems or blemishes. Sure enough I found a few and cleaned them all up.
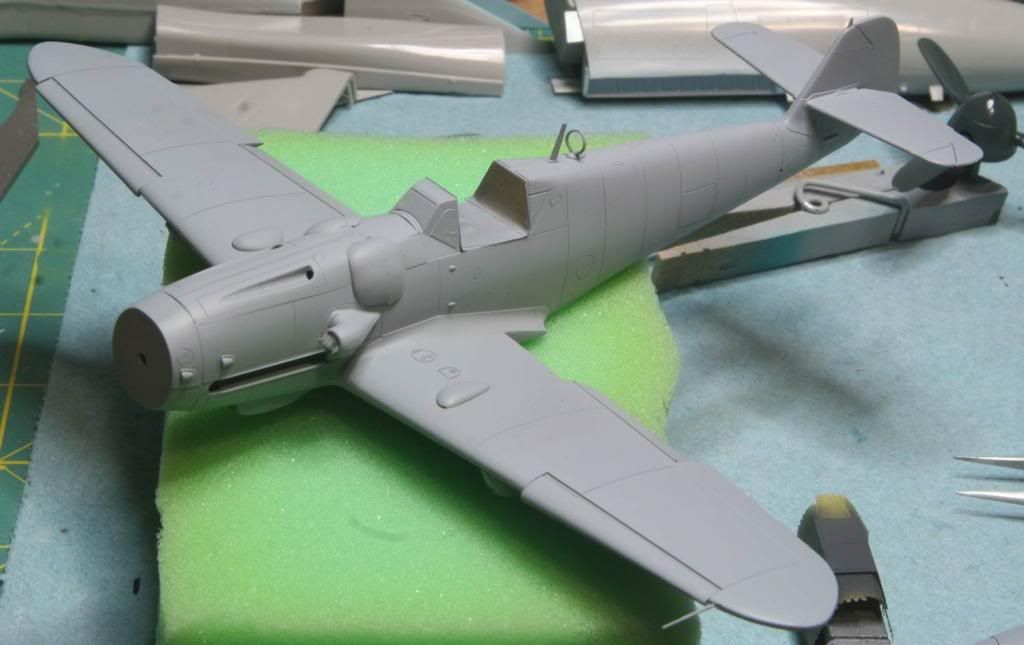
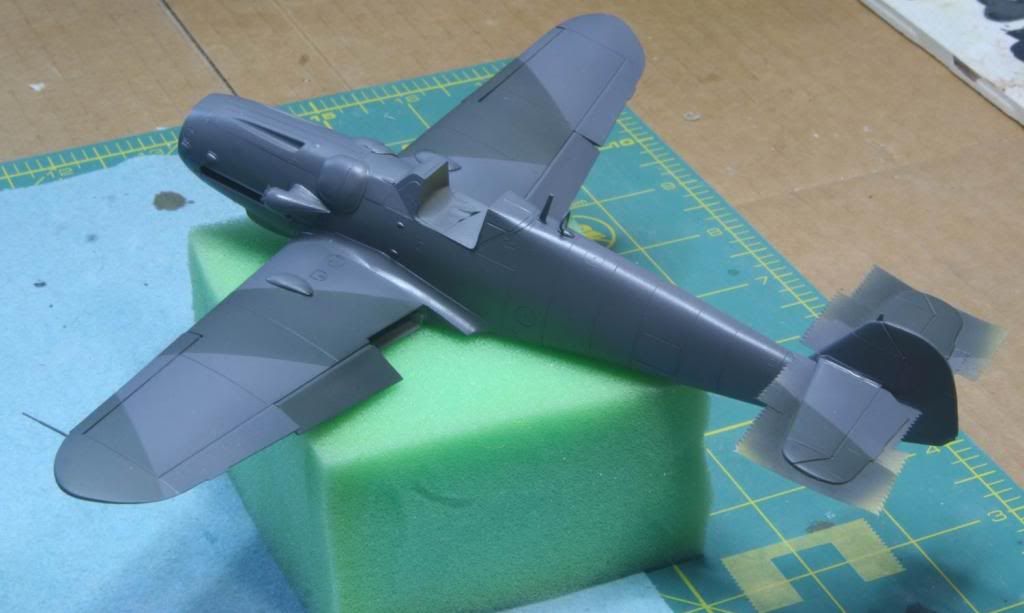
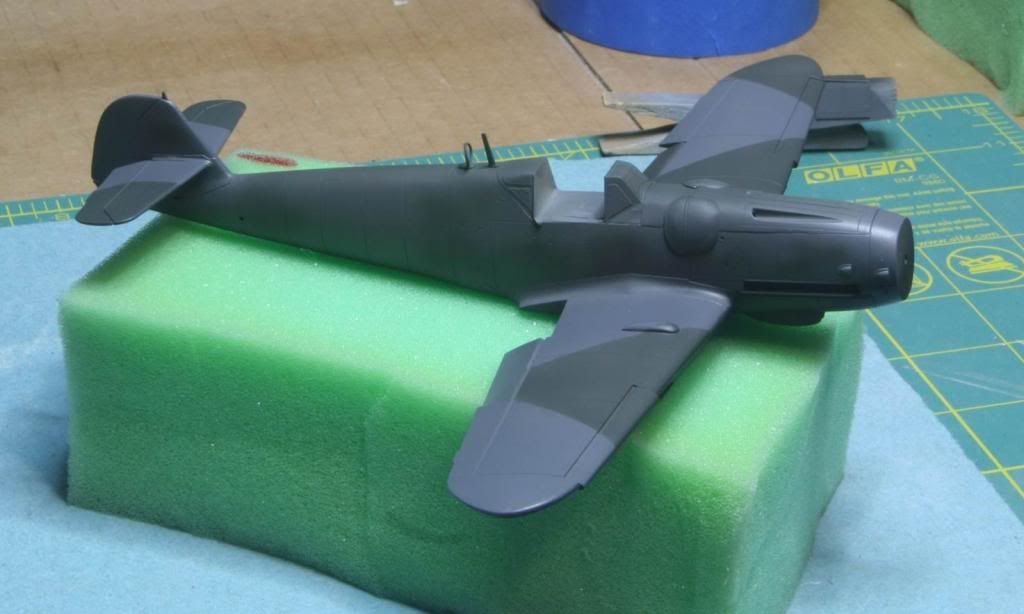
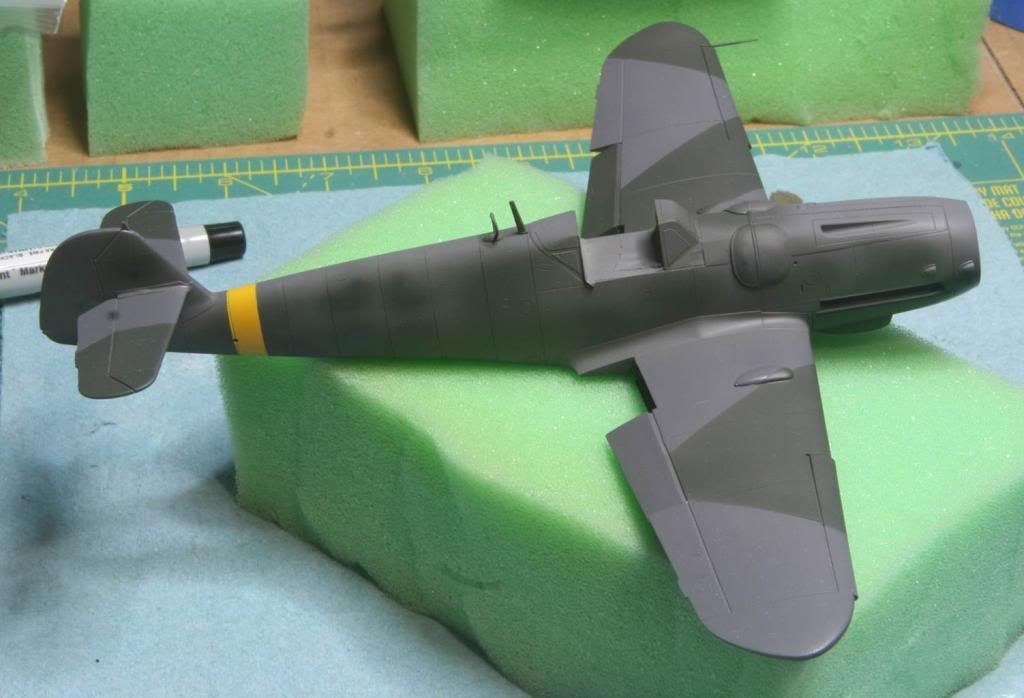
After priming I sprayed the underside of the horizontal tail in Tamiya gloss black, figuring it would be easier to mask those off then try to mask all around them to spray the black. Next step was the RLM 75. I planned to use the Xtracolor RLM 74/75 for this build, but unfortunately my RLM 74 had turned into tar, in color and consistency! It was pretty unusable so I used my White Ensign Colorcoats RLM 75 instead. I sprayed the entire upper surface and a good bit under the tail.
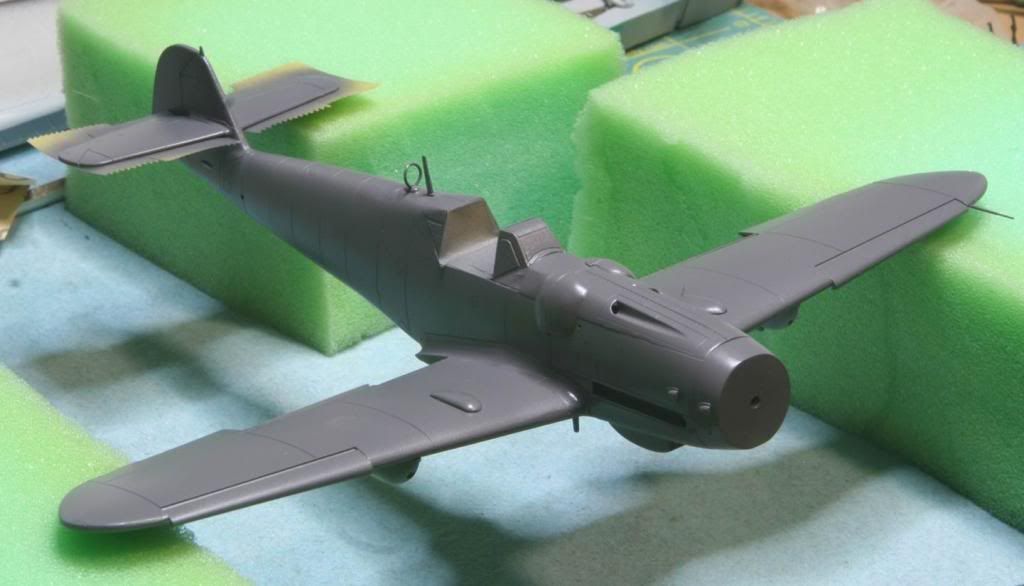
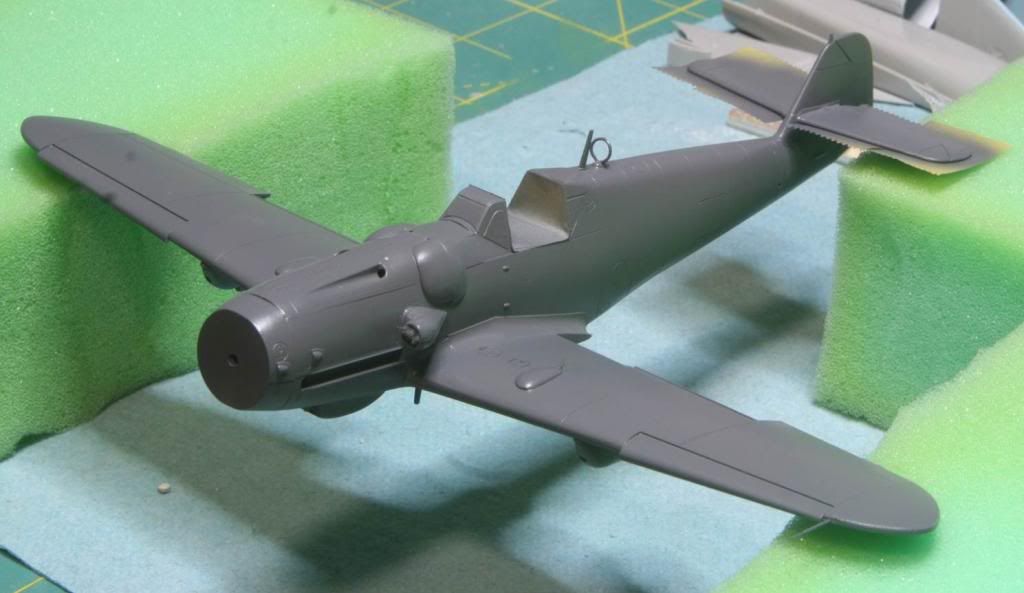
Next step will be the RLM 74. I’ll probably do this in stages, the camo on the wings first, then the mottling on the fuselage. But I’m going to let this sit as is for a day or so to let the paint cure, as the wing pattern is the hard edged geometric shapes, don’t want to ruin my nice smooth finish with the masking!
Thanks to everyone for the encouragement, thanks for looking, and as always comments are always welcome!
See you in a few days!
Mike
MP – I don’t know if I’m really sold on the UMM prop tool. It had originally set the prop blades at a very strange/extreme pitch angle that I ended up relaxing a little bit before gluing the prop blades in place. But they are all even, which I probably would never have got on my own. Maybe I’m not using it right. Don’t know… :hmmm
I have a small update here today. I was out of town all week so didn’t get much bench time until today. All the remaining pieces have been added to the fuselage. The gun sight was painted flat black and then the glass elements were added, using future to secure them. Then it was attached to the instrument panel and the windshield was added. The photoetch grab handles were attached inside of the windshield before I attached it to the fuselage. Also the rear of the canopy was attached and the cockpit masked off. I also used a Master turned brass pitot tube. A must for me as I always break off the plastic ones!
We are now ready for some paint! I first painted all the clear parts with Tamiya XF63 and once that had dried I primed the airframe with Alclad gray primer. After about an hour I started looking for any problems with seems or blemishes. Sure enough I found a few and cleaned them all up.
After priming I sprayed the underside of the horizontal tail in Tamiya gloss black, figuring it would be easier to mask those off then try to mask all around them to spray the black. Next step was the RLM 75. I planned to use the Xtracolor RLM 74/75 for this build, but unfortunately my RLM 74 had turned into tar, in color and consistency! It was pretty unusable so I used my White Ensign Colorcoats RLM 75 instead. I sprayed the entire upper surface and a good bit under the tail.
Next step will be the RLM 74. I’ll probably do this in stages, the camo on the wings first, then the mottling on the fuselage. But I’m going to let this sit as is for a day or so to let the paint cure, as the wing pattern is the hard edged geometric shapes, don’t want to ruin my nice smooth finish with the masking!
Thanks to everyone for the encouragement, thanks for looking, and as always comments are always welcome!
See you in a few days!
Mike
Skinny_Mike
Well-known member
Hi everyone! Its been a little while since my last update. I have done a little work and made some progress. I let the RLM 75 sit for a few days, then I masked off the camouflage pattern on the wings and tail surface. I then sprayed the RLM 74, also using the White Ensign RLM 74. These paints are fantastic.
I have often tried to freehand the camouflage patterns and met with complete failure, especially the mottle on German aircraft. But I have been practicing and have spent a little money on some better equipment so I wanted to try to free hand the soft demarcation lines on this aircraft.
After the RLM 74 was allowed to fully dry for a couple of days I started by painted the bottom using Tamiya Semi-Gloss Black. I free handed the demarcation along the belly and up at the exhausts on the nose.

The “spine” came out perfectly and there was just a hint of overspray on the nose and under the turbo charger intake, which I touched up with a quick shot of the RLM 75. Once the black had a few days to fully dry I moved onto the RLM 74 on the upper fuselage. I thinned the paint a little more than 1:1 and set the pressure to 40psi. Then I sprayed the top of the aircraft followed by the mottle on the sides.
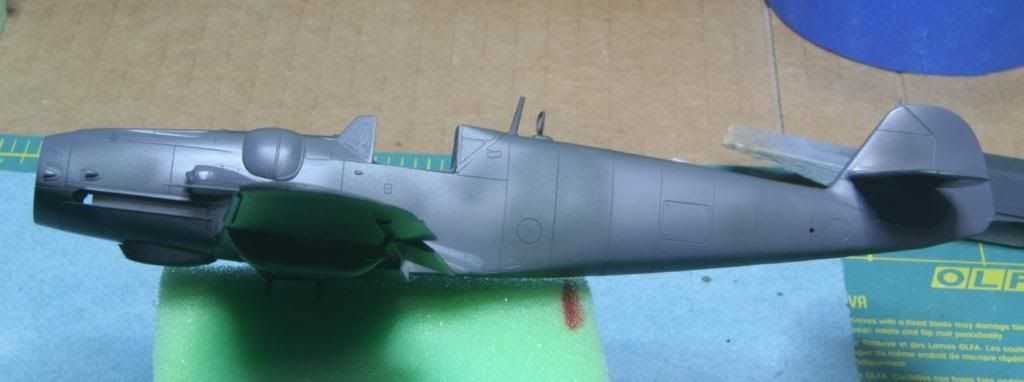
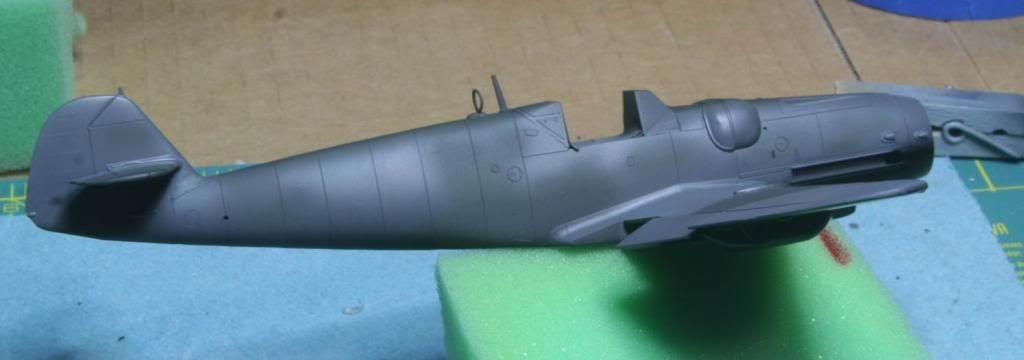
The key here is I had really good control of the paint, but I think it’s a little light in the end. What do you guys think? Your thoughts/advice on the mottle would be most appreciated.
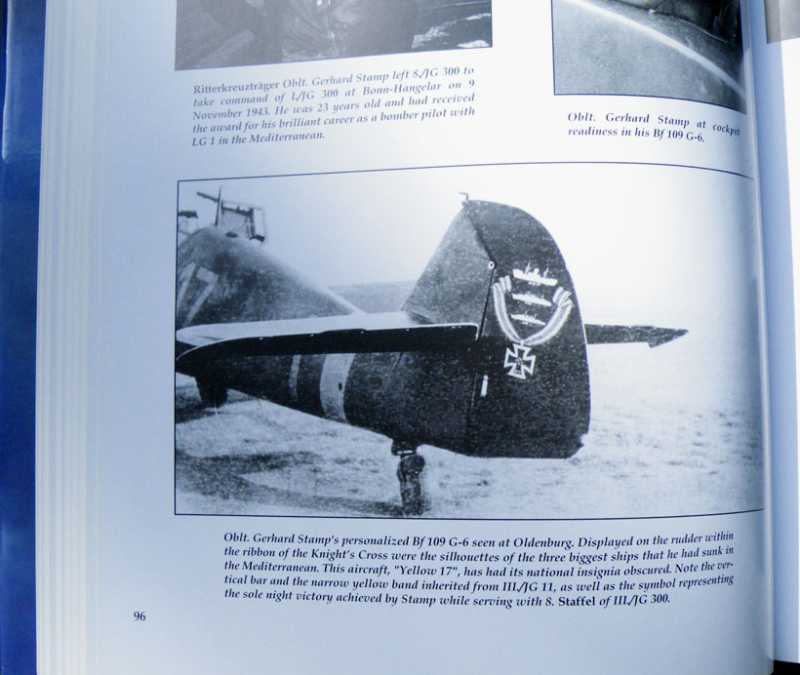
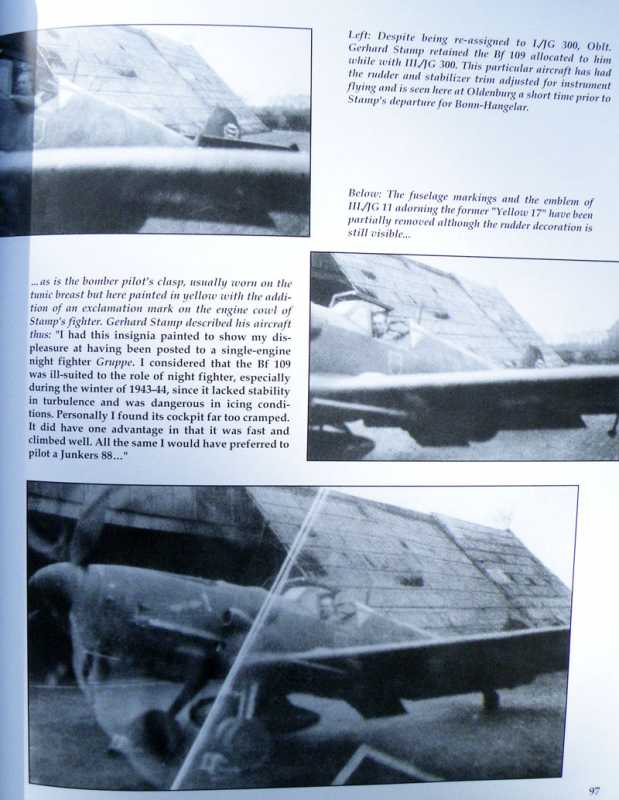
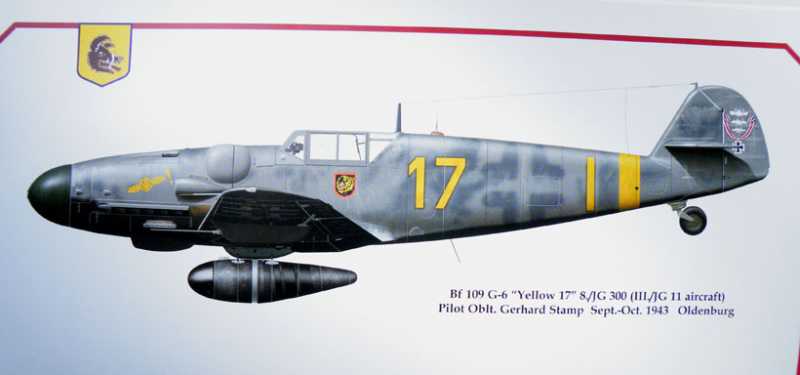
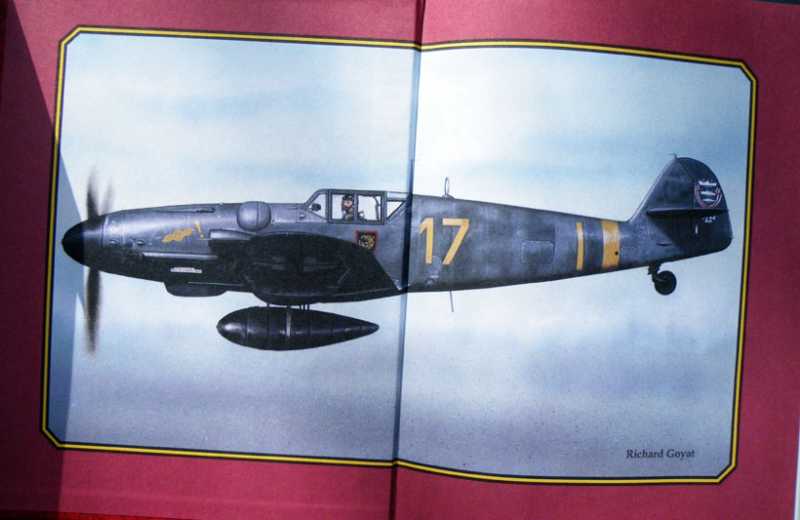
Well that’s where I am. I have a quick request, I am building the aircraft Yellow 17 from JG 300. I have been searching the internet and been unable to find a photo of this aircraft. If anyone has a photo or a link to a photo of this aircraft that they could share with me, I would appreciate it. I just want to get a look at this bird in real life.
Thanks for watching and as always thanks for all the encouragement and help along the way!
Talk to you all soon!
Mike
I have often tried to freehand the camouflage patterns and met with complete failure, especially the mottle on German aircraft. But I have been practicing and have spent a little money on some better equipment so I wanted to try to free hand the soft demarcation lines on this aircraft.
After the RLM 74 was allowed to fully dry for a couple of days I started by painted the bottom using Tamiya Semi-Gloss Black. I free handed the demarcation along the belly and up at the exhausts on the nose.
The “spine” came out perfectly and there was just a hint of overspray on the nose and under the turbo charger intake, which I touched up with a quick shot of the RLM 75. Once the black had a few days to fully dry I moved onto the RLM 74 on the upper fuselage. I thinned the paint a little more than 1:1 and set the pressure to 40psi. Then I sprayed the top of the aircraft followed by the mottle on the sides.
The key here is I had really good control of the paint, but I think it’s a little light in the end. What do you guys think? Your thoughts/advice on the mottle would be most appreciated.
Well that’s where I am. I have a quick request, I am building the aircraft Yellow 17 from JG 300. I have been searching the internet and been unable to find a photo of this aircraft. If anyone has a photo or a link to a photo of this aircraft that they could share with me, I would appreciate it. I just want to get a look at this bird in real life.
Thanks for watching and as always thanks for all the encouragement and help along the way!
Talk to you all soon!
Mike
Looks good to me Mike. I'm sure Les will chime in with some good constructive comments shortly. 
Looking good so far Mike! 
I will check my Jagdgeschwader 300 books from Eagle Editions for photographs of 'yellow 17' and let you know if I find any.
The internet is nice but for reference photographs of specific Luftwaffe aircraft nothing beats good reference books.
Matrixone
I will check my Jagdgeschwader 300 books from Eagle Editions for photographs of 'yellow 17' and let you know if I find any.
The internet is nice but for reference photographs of specific Luftwaffe aircraft nothing beats good reference books.
Matrixone
Now that's an interesting scheme. ") Les
Les
LesSkinny_Mike
Well-known member
Thanks MP and Luiz!
Thanks for the photos Matrixone - that is really helpful. I think I'm going to repaint the spine in 75 then darken up the 74 a little more. Then it should be close enough for me.
:snoopy
Thanks for the photos Matrixone - that is really helpful. I think I'm going to repaint the spine in 75 then darken up the 74 a little more. Then it should be close enough for me.
:snoopy
You can say that again.Now that's an interesting scheme.
Les I would love to see your library one day :woohoo:
Skinny_Mike
Well-known member
Hi guys! Made some progress on the G-6.
First thing I did was to darken up the mottle and to add the grayed out cross on the fuselage. I used a mask and then over sprayed it free hand to get the look of the original being sprayed out. It wasn’t perfect, but it should even out after the coats of future/weathering/flat coat! I also masked and added the yellow fuselage band. After I masked it, I sprayed a white primer first and then the yellow, which helped to cover the black and the grays. I also masked the aft radiator bays and the wheel wells and
Next step was two coats of future. Then I added the decals, starting with the crosses on the bottom of the wings. After these were installed I let them cure overnight. I had a problem getting the EagleCals decals to settle down with Micro Sol and had to eventually use some Solveset. Does anyone know if this is normal with Eagle Cal Decals? This is my first time using them. After the bottom of the wings dried, I decaled the left half of the fuselage and the left wing. The EagleCal sheet provides no stencils for the airframe. On the fuselage this is ok because the stencils were all over painted, but I wasn’t sure about the wings. I decided that since the wings weren’t repainted then the stencils probably remained. I used the kit decals for the tops of the wings, and again used Solveset for these decal as well. I let the left side dry overnight and repeated the process for the right side. Overall it turned out pretty good. No silvering that I can see.
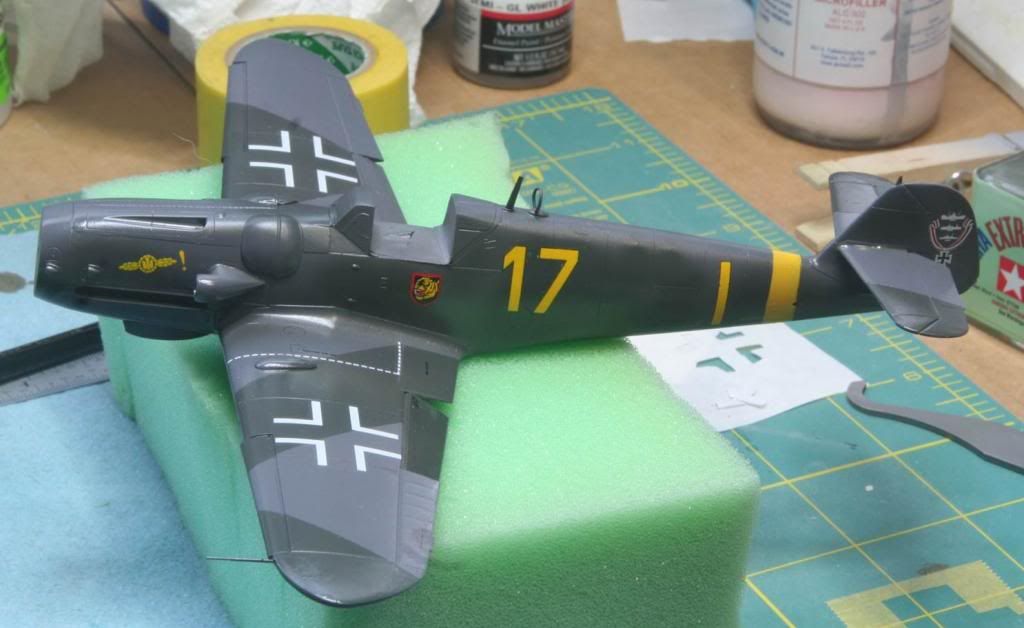

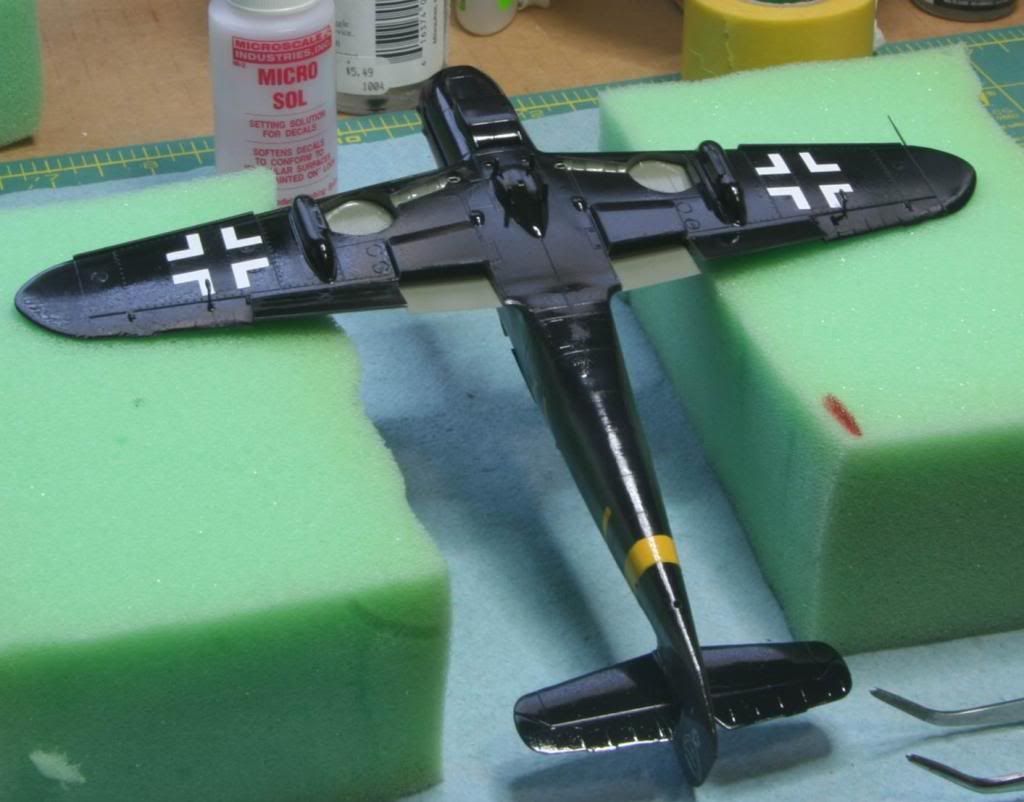
I had to fix up a couple of places I messed up the finish of the future on the bottom of the airplane. Apparently this round of future took longer to dry then normal and I left a few marks. So I sanded out the fingerprints re-sprayed a little semi-gloss black and then applied a future coat to the bottom, sealing in the new paint and the decals. You can’t even tell.
That’s where we are as of now. I can see the end of the tunnel on this one.
Thanks for watching
Mike
First thing I did was to darken up the mottle and to add the grayed out cross on the fuselage. I used a mask and then over sprayed it free hand to get the look of the original being sprayed out. It wasn’t perfect, but it should even out after the coats of future/weathering/flat coat! I also masked and added the yellow fuselage band. After I masked it, I sprayed a white primer first and then the yellow, which helped to cover the black and the grays. I also masked the aft radiator bays and the wheel wells and
Next step was two coats of future. Then I added the decals, starting with the crosses on the bottom of the wings. After these were installed I let them cure overnight. I had a problem getting the EagleCals decals to settle down with Micro Sol and had to eventually use some Solveset. Does anyone know if this is normal with Eagle Cal Decals? This is my first time using them. After the bottom of the wings dried, I decaled the left half of the fuselage and the left wing. The EagleCal sheet provides no stencils for the airframe. On the fuselage this is ok because the stencils were all over painted, but I wasn’t sure about the wings. I decided that since the wings weren’t repainted then the stencils probably remained. I used the kit decals for the tops of the wings, and again used Solveset for these decal as well. I let the left side dry overnight and repeated the process for the right side. Overall it turned out pretty good. No silvering that I can see.
I had to fix up a couple of places I messed up the finish of the future on the bottom of the airplane. Apparently this round of future took longer to dry then normal and I left a few marks. So I sanded out the fingerprints re-sprayed a little semi-gloss black and then applied a future coat to the bottom, sealing in the new paint and the decals. You can’t even tell.
That’s where we are as of now. I can see the end of the tunnel on this one.
Thanks for watching
Mike
Plastik Smurff
Well-known member
Really nice job Mike and a great cammo, it's gunna look good on the shelf.
ij001
Well-known member
I had a problem getting the EagleCals decals to settle down with Micro Sol and had to eventually use some Solveset. Does anyone know if this is normal with Eagle Cal Decals? This is my first time using them.
Mike
Never, not ever !! - In my experience, Eagle Cals have only needed a tiny amount of MicroSol and they settle down incredibly well with no silvering whatsoever. I'd go so far as to say that along with Pyn-Up, Tally Ho and HaHen (and I've only just discovered these), Eagle Cals are IMO the best decals you can buy.
Ian
Similar threads
- Replies
- 104
- Views
- 22K