• Modelers Alliance has updated the forum software on our website. We have migrated all post, content and user accounts but we could not migrate the passwords.
    This requires that you manually reset your password.
    Please click here, http://modelersalliance.org/forums/login to go to logon page and use the "Forgot your Password" option.

Scammell Pioneer FINISHED

paddy

Well-known member
Scammell Pioneer TRMU30 Tractor and Trailer

DSC_3252.JPG


Background

This kit is 1/35 scale produced by Thunder models. with colour profiles from Ammo/Mig. As far as i can make out it started life in 1997 as an Accurate Miniatures subject and became an IBG and Thunder models subject from 2017 with various configurations from heavy recovery to Artillery tractor with various new tooling's along the way..
This version is actually two kits in one box as the tractor and trailer are both available separately.
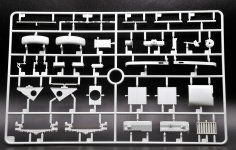

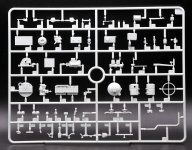
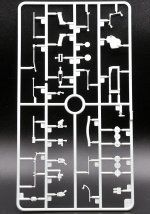
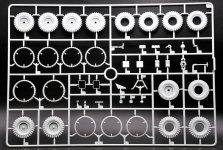
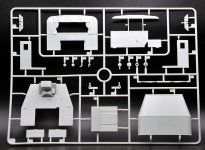
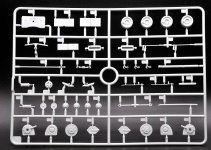
Spru A.JPG Spru B.JPG Spru C.JPG Spru D.JPG
Spru E X2.JPG Spru F.JPG Spru G.JPG Spru H X2.JPG
Spru J X2.JPG Spru K.JPG Spru L.JPG Extras.JPG

Here we have 17 Sprue's + a clear sprue, 3 PE sheets and assorted cables and wires and Decals.
Initially i thought one sprue was missing however it seems sprue H has parts for both the tractor and trailer.

watch this space..........​
 
Last edited:
Its going to be big. the trailer section is 11" long and the tractor about 4" and with a Grant tank on the back it will be 6-7" tall.
already wondering where i will find space to build let alone display :)
 
The engine seems as good a place to start as any so here it is.
This is a Gardner 7.5 ltr (460 cubic inch) ,110hp Diesel 6 cylinder.. 110hp doesnt seem much but with a top seed of 25mph i would imagine its geared for pulling power. these engines seem to have been painted blue and the instructions say Messerschmitt underside blue/grey which is handy because i had some of that .

DSC_3423.JPG


Its a nice model in itself made up of 35 parts. Plenty of room to super detail although i will not be doing that on this build but having seen how it goes i may if i go on to build another variation of the model like the artillery tractor.

DSC_3430.JPG


An all over coat of blue as a base

DSC_3446.JPG


Followed by some weathering with washes and pigments etc , all MIG. I am trying to guess what desert weathering looks like but cant imagine its a lot different to a European situation, just without the mud and a bit more dust.
 
Three guys arrived today to help load the Grant on to the Scammell :) one appears to be drinking a mug of tea so no doubt about his Britishness :)t
DSC_3463.JPG
DSC_3465.JPG


My local traveling Fair when i was a kid had Scammell pioneers for pulling the fairground equip so i looked them up this morning and they still have three. One ex Tank transporter tractor and two heavy recovery tractors, all bought at the end of the War.
It was found that these were not suitable for the roads here as tank transporters because with a Sherman on the trailer they wouldn't fit under std railway bridges here so they were sold off or scrapped in 1946 onwards by the British army.

Back in the day the 3 axels are transporter tractors

IMG_2950.jpg


Today a 2 axel converted recovery tractor, these have massive generators in the back for powering the fairground rides and still going strong.
7e195720200cb660934dd52aa0b05086.jpg
 
It seems that your research states the kit started with Accurate Miniatures but was released by both IBG and Thunder Model? If so, let me correct that. The subject was only available in 1/35th as resin from Accurate Armour of England. The IBG and Thunder Model kits decided to release their own tooled polystyrene kits. You chose wisely as the IBG kit is crude compared to Thunder Models. ;)

Regards,
 
Thanks Saul
I was just going by the time line on Scalemates. Need to double check my research in future :)
EDIT
Looking again at scalemates it seems i have totally misunderstood how the time lines work, i thought hat these showed the reboxing history of a kit but now i see its actually completely different moulds. Thanks for the heads up .
 
Last edited:
I like models that tell stories best! Perhaps I'm not that hard to please, since almost every model tells a story. :blink
You don't see this kit built everyday! :vgood:
 
Excellent @paddy, you found one of the links I was going to post! :D

I know you will do great. PLEASE, concentrate on parts cleanup and orientation. The fit is tight but good.
As for which kit production you have, the first release had an error which Thunder Models corrected. See if your kit box includes the corrected radiator seen here:
1646006175330.png


1646006433171.png


Terry Ashley has some tips and details for this kit, worth looking at:

Articulating Front Suspension
Improved Stowage Box

A simple, and affordable, improvement (in the middle):
1646005706993.png


Regards,
 
Thanks Saul
It does look like i have the early radiator rather than the mod. That said i wonder f this is rivet counting as its hardly going to be seen and when i enhance the pictures of the restoration project it does in fact have the early model rad fitted in real life.

036.jpg.9b2da01764f82e988dba0bf27c2062be.jpg036.jpg.9b2da01764f82e988dba0bf27c2062be_01.JPG


For others watching, this is an example of some parts that need cleaning up. this is a front leaf spring :) terrible pictures :)

DSC_3467.JPG DSC_3469.JPG

what i have found is, rather like the MiniArt Grant, the parts are a good fit but location pins and lips are very very small such that a drop of glue on a pin will melt it before you can use it to locate so you need to dry fit, glue and position very quickly. One other point is a lot of the structural parts of chassis etc are very thin. This means that as you assemble the glue will weaken/soften parts till it goes hard so you need to assemble and support parts either on a flat plate or with support to stop the whole thing warping out of shape.
Its not a problem if you are aware before hand.

Having now followed Saul excellent links i am now ungluing the steering on my model with a view to making it "working" :) should have thought of that before...
 
Last edited:
I have looked at articulating the steering and it would be quite simple to do had i already not assembled 75% or it. Of course the question remains if that would be overcomplicating things ? as this is not a toy so it would only enable you to change the pose of the front wheels and my guess is in a Diorama or on the shelf thats not going to happen. I looked at replacing the steering rod with brass because as a bearing thats going to last longer than the std kit part of a 1.2mm dia plastic ring with a 0.5mm hole in it :)
DSC_3471.JPG

This works practically but its too far away form correct detail wise.

So i reverted to the steel pin and collar method using the kit parts like this

DSC_3475.JPG
DSC_3479.JPG


One other thing i did as the front chassis can pivot from side to side was beef up the pivot point with a steel pin you can just see here

DSC_3478.JPG


As i mentioned i am too far down the road to fully articulate this now but for anyone else thinking of building this then Saul's link above is worth looking at and considering as its not hard to do..
 
Why make it articulate? Because you can. :coolio2: or could have...It's that little victory you can get when building even if you end up glueing it in place once its done.

Looks good :popcorn
 
Why make it articulate?
Visual interest which doesn't depend on artistic license. ;)

Not needed at all but it helps to see other people's completed work as orientation is key with this kit. Obviously following with interest.

Regards,
 
!0 steps backwards today
I have started to de construct the Chassis, something is not right but not sure what, nothing lines up and with the engine sitting on its mounts it crooked in the chassis and it pushes the gearbox nearly 2mm to far back and also means the radiator is not square to its mounting crossmember.

DSC_3483.JPG


the damage is not good, i will need to rebuild quite a bit of this but first i need to find out what's wrong so out with the digital Vernier's and a square. It would only take a crossmember to be even .003" out in position to throw the whole lot out and the fixing points are very vague to say the least.
Bottom line is if you dont get the foundations right the rest will get further and further out till it looks like it ran over land mine..

:wow:
 
Ouch! you can tell I wasn't lying about parts orientation! Sending good vibes, this is all in the lesser seen areas.

Regards,
 
Back
Top