• Modelers Alliance has updated the forum software on our website. We have migrated all post, content and user accounts but we could not migrate the passwords.
    This requires that you manually reset your password.
    Please click here, http://modelersalliance.org/forums/login to go to logon page and use the "Forgot your Password" option.

RAF 112 Sqn Kittyhawk

paddy

Well-known member
Jumping the gun a bit here but i started my research tonight into the 112 sqn Kittyhawk Mk1a used by the RAF 239 Desert wing 1940-41.
Kittyhawks were essentially P40E's converted to British spec inc. armour, radios's, self sealing fuel tanks and armoured glass wind screens. Originally ordered for use on the home front it was quickly found that the single stage superchargers ran out of puff above 15,000ft where as the Spitfires of the time were intercepting German raiders from Norway at up to 30,000ft. A good home was found for these fighters in the Western Deserts of Egypt and Tunisia where high altitude flying was not common place and the Kittyhawks became well known for their army co-operation sortie's (or ground attack).
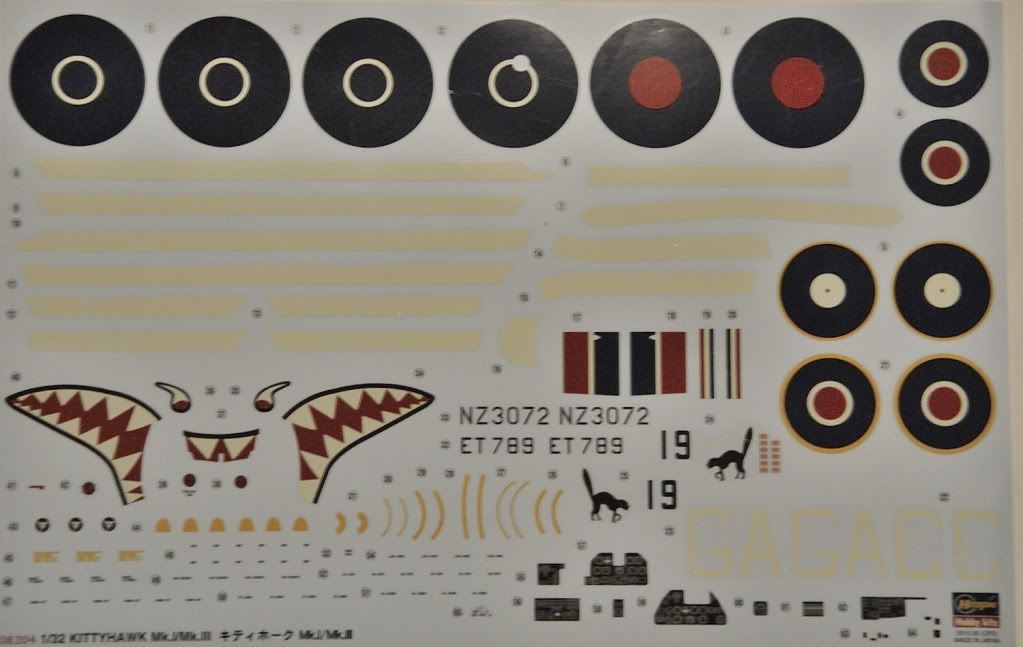
the most famous of their keepers was 112 sqn based in Egypt from 1941-42 they were famous for carrying the sharks teeth on the nose ( an idea borrowed from the cowling's of Luftwaffe ME110's in the Battle of Britain the year before. 112 Sqn was formed in 1917 and had always been know as the Sharks so it was quite fitting despite the sqn badge depicting a black cat .... Well thats what i found out so far and now i need to look into aircraft detail but in the mean time a few pictures. I am using the Haseagawa 1/32 model for this build so it can sit along side my Hellcat and spitfire of the same scale.


_DSC4881.jpg


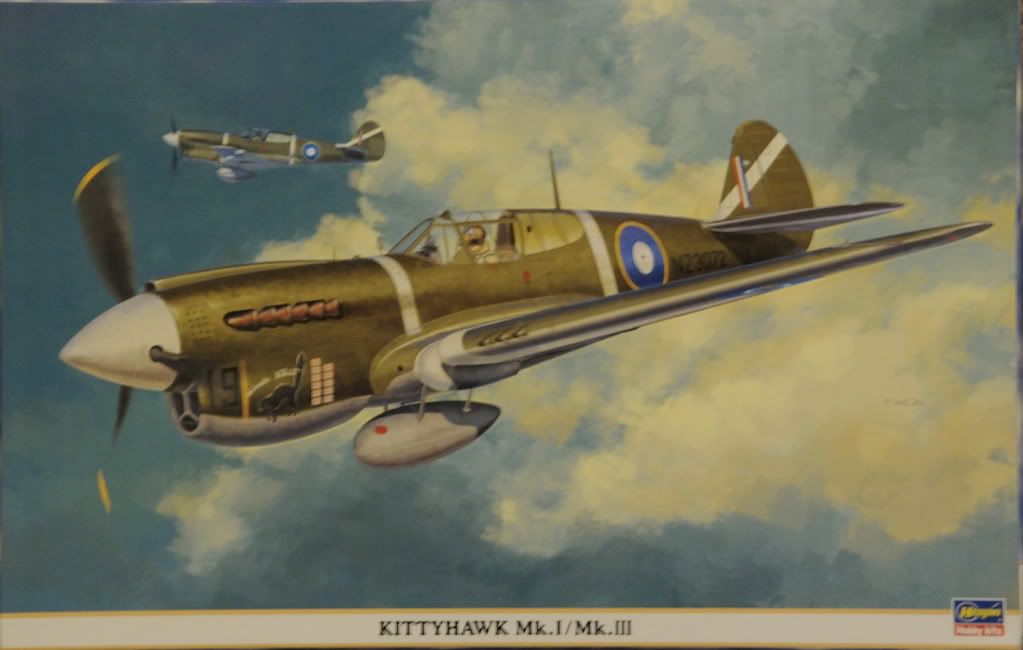
And this is what i would like to end up with :)

TR_000978_kittyhawk.jpg


raf112_warmup.jpg


profile_112sqn_09.gif
 
hehe, in my stash I have 2 P-40B, 3 P-40E, 2 P-40F, 1 P-40K, 2 P-40M, 4 P-40N... I think that is enough even though none are in a larger scale than 1/48th.

Regards,
 
blast !!!!! i gave in and ordered some PE :) That will teach me not to look at chuk's builds for ideas and inspiration ! anyway not much to report, just some green spray on some bits of spru...I have gone with RAF interior Green instead of the darker US Green and chromate as its a bit lighter and will show detail a bit better in a confined space.. Lets call it artistic licence :) I'm pretty well decided what I am going to do with this kit and i am looking forward to trying out some new ideas....watch this space. Those of you who have followed my WIPs before will know i like to try something new on a build to keep it exciting (for me anyway) :) I will update as soon as i get the PE.
 
PE showed up today so off we go...I have gone for the basic stuff without landing flaps and added gun bays. Just interior and exterior basics.

_DSC4911.jpg


This is something new i wanted to try, well new to me anyway :)....I hate PE seatbelts, i just cant get them to sit right or look right. this is a set of micro fibre belts i found on the Hannants sight. they are very fine cloth and need to be cut out, they come with pe buckles etc. Two sets for £5. Not cheap but fun to try.

_DSC4913.jpg
 
I'm really keen to hear your thoughts on the seat belts. I've been looking at some of their stuff, but havent taken the plunge. They also have a store in Ebay

I dont know if you've tried Radu Brînzan seat belts before but they are my current favorites and can be found here
James
 
thanks for that James. I'm not sure about these belts i have. The advantage is they are cloth so stronger than paper like the ones in your link. Against that is the fact you have to cut them out and the instructions about how they are put together are useless being just a finished photo. anyway this is the end result with a light wash of brown.

_DSC4922_01.jpg


The thing about trying new things is sometimes they dont work :) this was an attempt to put a metal slider in the undercarriage leg. I cut out the plastic section, cut a piece of alloy tube to fit in its place and a pin to join the whole lot together. It means drilling up the middle of the leg. I don't honestly think its worth it but it was worth a try. you dont learn unless you try. :)

_DSC4921.jpg


_DSC4924.jpg
 
Don't know what you're talking about, well worth the effort if at least for added strength. The seatbelts look great!!

:popcorn
 
Paddy, you really must be commended for trying out new ideas to improve your skills and the models appearance. Especially as it shares good ideas with others.

The harnesses look great. With a little seam line work, the gear will also look fantastic.
 
I dont know why i started with the wheels ? just impatient to try out my metal legs thing i suppose, anyway here they are minus wheel trims which i will spray when i do the underside of the aircraft.
I have given them a liberal coating of desert sand staining as these things were based in the Sahara in Tunisia. As well as the metal sections I made up a couple of brake hose clips and added the hoses and some decals otherwise its pretty much OTB

khwheels1.jpg
 
God its hot......and this sand gets everywhere !!
This is the basis for my interior. I have seen other people do this sort of shading but never tried it myself. A good coat of interior green then varnish, a wash with Yellow Ochre water colour then varnish , a wash with Burnt umber then varnish....I needed to keep varnishing between coats to stop each colour being re-activated by the next. Its quite fast as the water colour dries in 5 mins and so does the varnish ( Tamiya clear matt)Looks like plenty of sand got in the cockpit :)
I'm sure other people must have found easier ways to do this but this worked for me :)
Now down to the detail.
I cant help thinking when i look at the PE stuff from Eduard this is cheating ;) I think next time i will have to work it out myself. The instrument panel looks good but i cant really say any of its down to me... :(

_DSC4941.jpg


Does anyone know what that map case was made of ? i spent ages making one for a P47 to look like leather and it turned out they were bare aluminium !!
 
Back
Top