
• Modelers Alliance has updated the forum software on our website. We have migrated all post, content and user accounts but we could not migrate the passwords.
    This requires that you manually reset your password.
    Please click here, http://modelersalliance.org/forums/login to go to logon page and use the "Forgot your Password" option.

Protar AJS 7R 350cc (1/9)

@Sharkmouth @paddy
I made a small bead blast booth to use my Paasche Air Eraser on R0L3X Yacht Master Bezels when I refinish them. There are several types of media. I found that the abrasive media I had gave a frosted effect on the metal and then any oil touch would make it darken in weird patches. I then got some glass beads which gave a slightly softer effect as it wasn't abrasive but peened the surface. It also didn't do the darkening bit with oily finger touches. Only problem was I had to buy an 8 pound package of 220/240 grit glass beads which for the air eraser is enough to last decades. I did find a nice heavy plastic box to make into a booth for it that works perfectly.
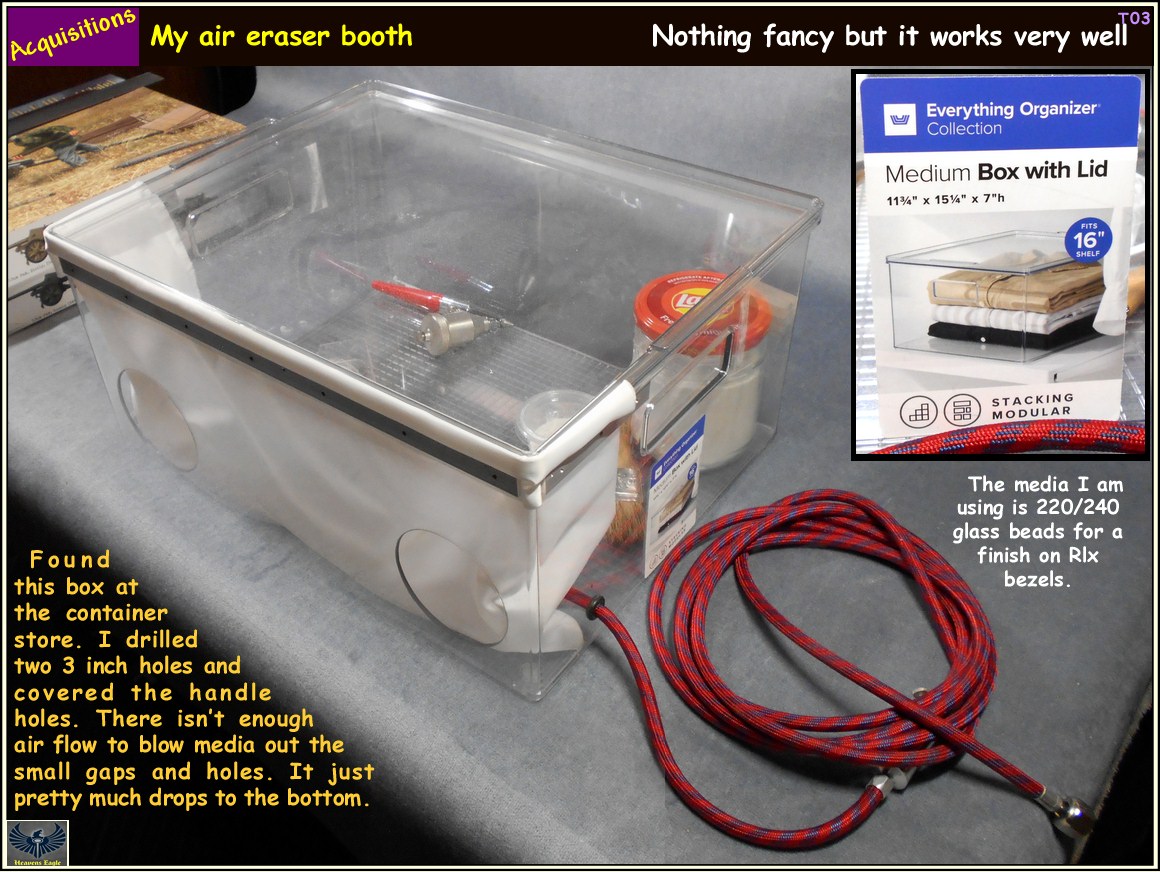
T03.jpg


If I ever needed a larger box, there is a MUCH larger box like this that would work well too.
The 3 inch holes I drilled are "just" big enough for me to pass my hands through. The white fabric is a satin piece I got at Hobby Lobby and placed some fishing weights on the bottom edge to hold it down and make it drape. Next time I will just make some sleeves around the holes to put my hands through. As to the grit coming out. There is so little actual air movement that it just drops to the bottom and sets there. No air pressure, no dust.
 
An often found problem with old kits and poorly packed kits

This is a 1mm rod and unfortunately the levers each end are also 1mm wide so cant be drilled.
DSC_0662.JPG


The answer is to drill the levers 0.35 and insert a hard steel pin and cut a piece of 1mm alloy tube the same length of the original rod

DSC_0663.JPG


Drop of CA each end.....Job done

DSC_0665.JPG
 
AJS 7R engines were often gold, but some were black. Basically, they were painted to protect the magnesium castings which would corrode very quickly if left open to the air. Its very much like the zinc chromate the US used on their interior alloy panels on Aircraft during he war . It also helped seal the casting that tended to be porous. Magnesium casting are about 35% lighter than alloy so has a great weight saving on engines

DSC_0676.JPG
 
Looks sharp Paddy. I thought Magnesium had a slow corrosion rate, I remember someone talking about that on the German tank tracks.
 
Magnesium corrodes while you look at it. Its banned in the states for things like wheels. It has a shelf life of about 10 years but is structurally compromised by 5 years. Ducati owners used to ring me up and ask about there wheels but i always recommended throwing them away and switching to alloy as the first sign that they were on the way out was cracks which on a bike would mean they would shatter

Speedlinecompressed.jpg
 
A couple of problems

the primary drive chain is of the rubber band type not unlike early tamiya tank tracks. There is no way to attach this to the primary drive sprocket ?

DSC_0686.JPG


the only way around this i can see is to remove the teeth from the sprocket where the chain sits on it. 1/9 scale chains are rare. MFH do one but the pitch is quite different so i would still need to remove the teeth.


The carb on this bike had a remote float bowl, you can see above the carb has no integral float bowl. The reason is race bikes drink fuel . The fuel level in the carb is regulated by a float and valve like a lavatory system. that fuel level dictates the fuel level in the carb body above the main jet. If the fuel level varies so does the mixture in the carb body. For this reason the race carbs had a much larger remote float chamber that didn't tend to drain as the throttle was snapped open of held wide open. The kit does have a remote float bowl but nowhere to mount it. they just leave it dangling on the fuel line so this needs to be sorted. This the kit carb

DSC_0668.JPG


I am doing my best above to get this into shape.


DSC_0687.JPG


As i happen to have a suitable carb here on my shelf , you can see the huge float bowl attached to the carb , actually bigger than the carb itself.
 
You might want to put your fingers in your ears for this one :doh:

I have decided to give one of these MFH chains a go....again. I don't take this lightly, they are £35 each and my success rate is about 1 in 4 with these so a very expensive option. Not a lot of choice in this scale and the rubber band chain supplied is not up to the job.

The idea is the PE side plates snap on to the white metal pins to form a chain

DSC_0693.JPG


The reality is the pins are badly deformed and have no pretense of being domed with a tight fit to the PE links as above

DSC_0691.JPG


under magnification you can see the problem. The pins are badly cast but its not the fact that the ends of the pins should be spherical and of a dia a few thou of an inch larger than the hole in the PE side plate...... its that the pins are usually so under size there is not anough metal to squash and expand to stop the PE side plate falling off

WIN_20260903_11_34_27_Pro.jpg


WIN_20250602_11_30_31_Pro.jpg


this side plate should be a press fit :=)
Yea i know i said it all before but i want too post this on another forum so i have copied it out again and stuck it here as well.
 
I think another medium for the pins would work better for "snap on". White metal doesn't really play well for snapping back in shape.

Now if you could flare the end of the pins once the link is in place...maybe that'll work.

Good luck!
 
Today's special word is SMUG which is how i feel :) Can you have super Smug ? sounds better.
DSC_0696.JPG

This about 4" laid out straight so about 1.5 inch down its longest length plus curves/sprockets

The secret is parallel pliers whos jaws open parallel surprisingly :) so force is directly down the center line of the chain link pin. I had thought that my long nose pliers were sufficiently long that the closing angle probably wouldn't be a problem but it turns out they were 95% of my problem.

DSC_0698.JPG

Here is the kit rubber chain. It has no holes for the sprocket teeth so all yo can do is sit it next to the sprocket

DSC_0694.JPG
DSC_0695.JPG


And here is thew MFH chain. its pitch is wrong for the kit sprockets so you will have to cut them off where the chain sits but its a lot better than the rubber effort so worth doing

DSC_0700.JPG


its only sitting on the engine at the moment and will look better when it glued down and the chain guard is fitted. I had to temporarily mount the whole lot in the frame as the gearbox/rear sprocket are hold in position by screws so you need to mock it up to get the chain length. there is no adjustment so you need to get right to the link, not a problem with the rubber band chain. it will eventually get a black wash

If i did this again which i will as i have the Protar Matchless i would use a 1/12 chain for this primary drive as stock 1/9 is a bit large. Fine for final drive but large for primary. 1/12 is a lot more common and there is a good choice of way of doing it
 
Last edited:
Back
Top