• Modelers Alliance has updated the forum software on our website. We have migrated all post, content and user accounts but we could not migrate the passwords.
    This requires that you manually reset your password.
    Please click here, http://modelersalliance.org/forums/login to go to logon page and use the "Forgot your Password" option.

Maddog Manufacturing 2025 Grand Re-Opening

Well, it's May and I have a short tour to offer everyone. All aboard the trams everyone!


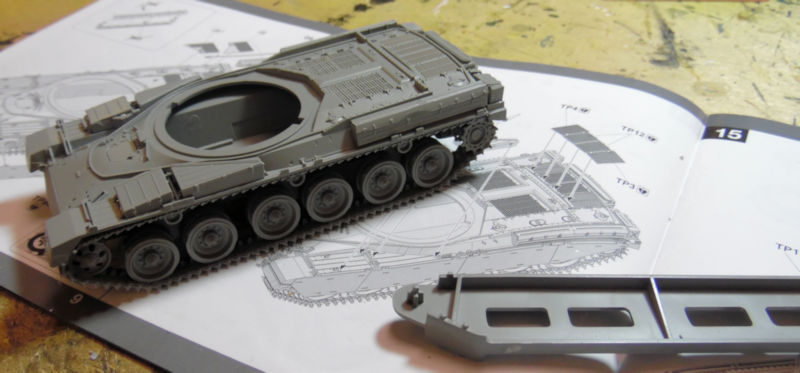
Starting in the Motor Pool, we have some small progress done on the Iranian Chieftain. Using the pictured jig, we got the tracks assembled and installed:

full


In this next bay, we got the German Landwasserschlepper marked up with the decals:

full


Next to that is another German project, the SdKfz 9 Early version with the crane. This one got the engine and transmission installed:

full


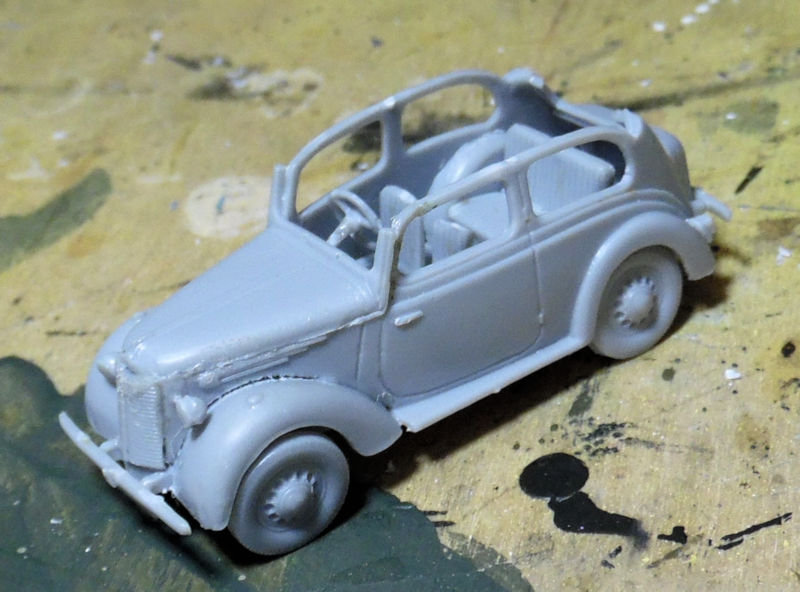
In this next bay is an ACE kit of the British Forlite staff car. However, when I looked inside it had a paint scheme for a civilian car so that is what I decided to do. I got it all assembled to this point so far:

full


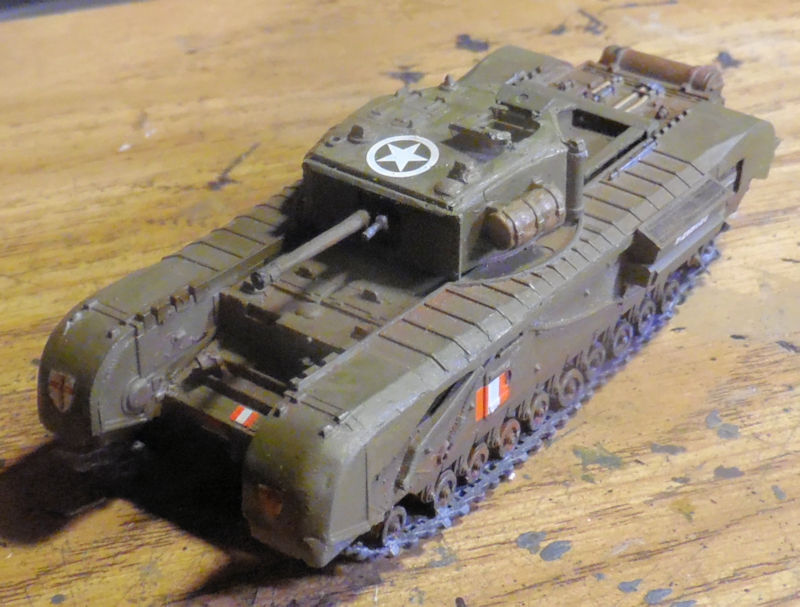
In this next bay is the Canadian Churchill. I didn't have the decals to make a specific tank so I winged it using the standard format for decals on Canadian Churchills to make this one look like a Canadian Churchill. It's done and incorrect, but this is how it's gonna stay:

full


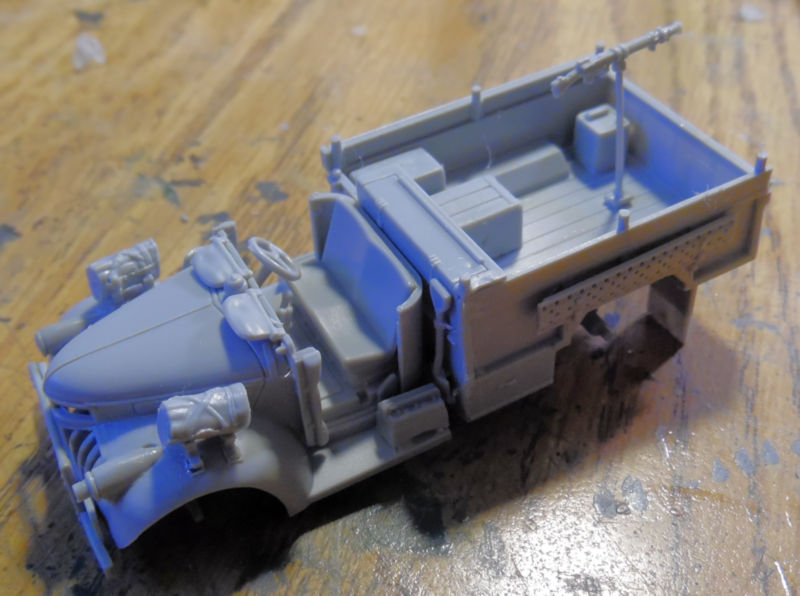
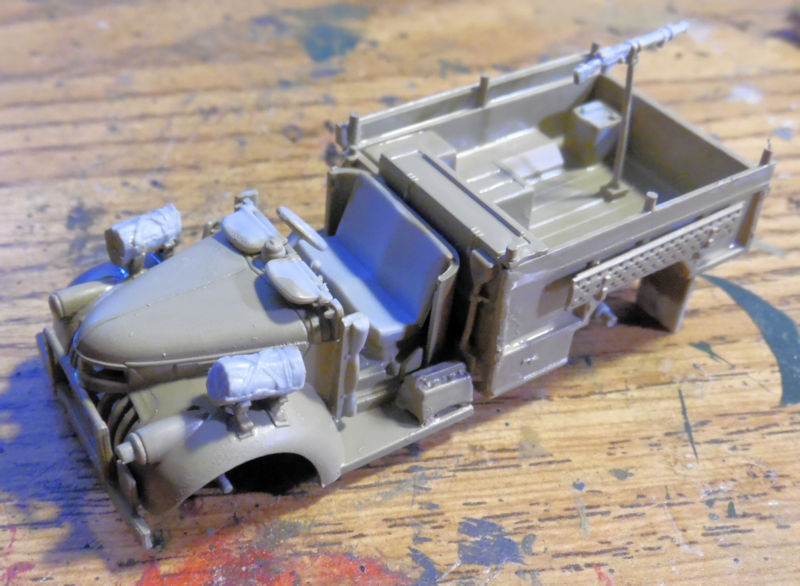
Moving on to the next bay, we have the almost final assembly of the LRDG truck ready for paint:

full


Later we got the base paint down on the British LRDG truck:

full


More details were then painted. Note the machine gun in place of the 20mm cannon; I had lost the parts tree for the cannon, so I improvised:

full


In this next bay, I did some additional work on my Russian P-15 radar truck. A good friend told me that mesh was needed to be added to the radar dishes, so I found some that looked about right and went to work, adding it to the framework with Gator's Grip glue::

full


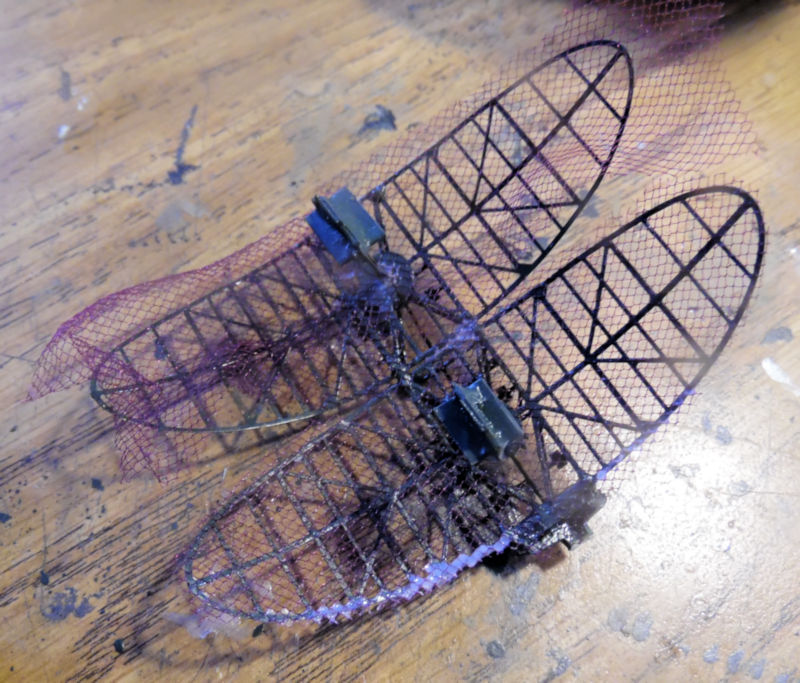
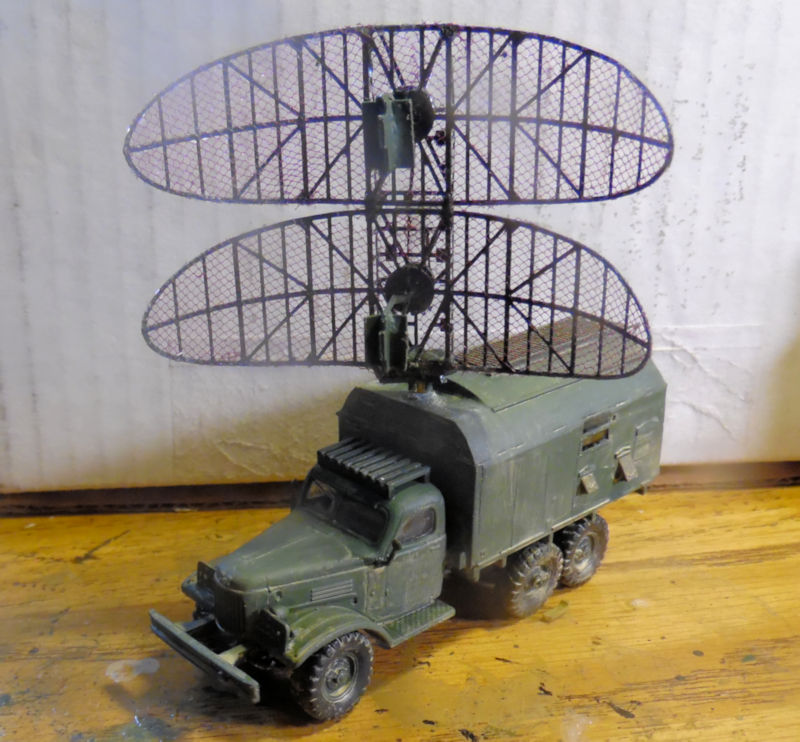
Here it is some hours later, all glued down and dried. This is how it's gonna look. I also had broken off the radar base from the truck and made it so the whole radar turns since that is how it's supposed to be:

full


Lastly in this next bay is the radar system for the P-18 radar truck. It took some doing and isn't lined up properly at all, but it is done:

full


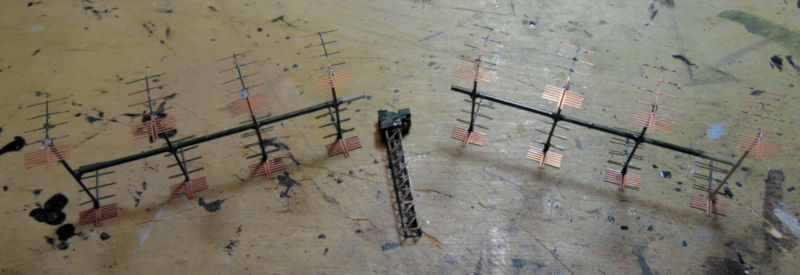
Next will be some final additions and then assembly onto the truck. This radar will turn as well.


That's all for the Motor Pool, let's do a quick swing through the Shipyards....

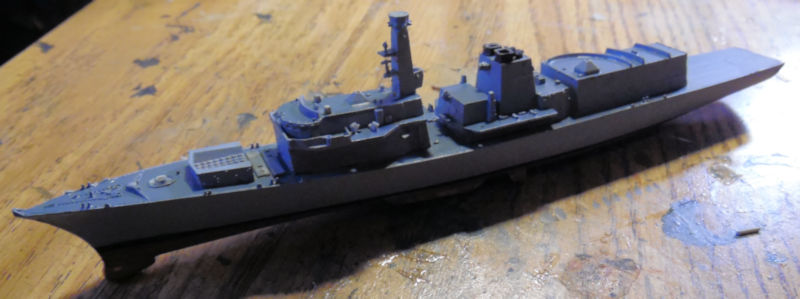
In this first slip is the HMS Westminster, her hull is completely painted and now the photo etch details can be added:

full


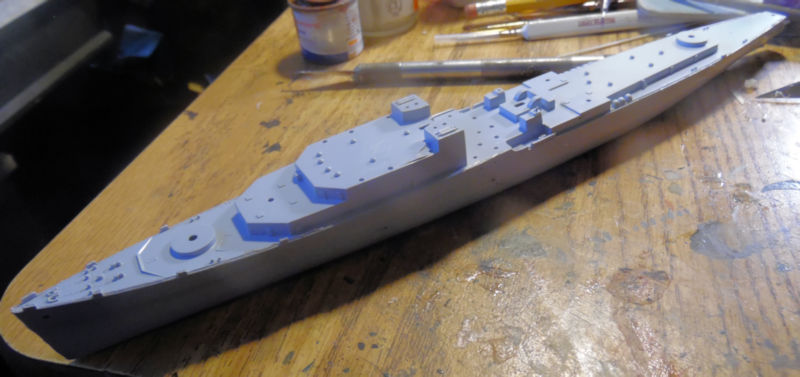
In the next slip, the keel has been laid down for another British ship, the HMS Tiger:

full


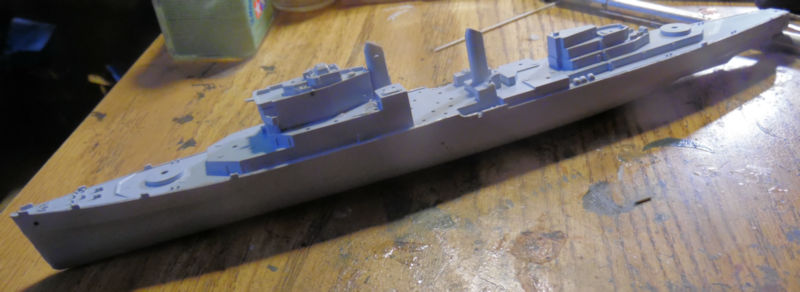
Later the superstructure was added:

full


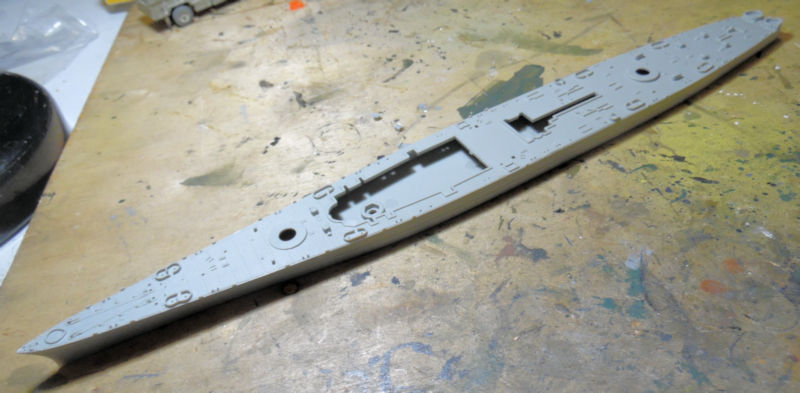
Finally in this last slip, the keel was laid for another ship. This one is the USS Alaska CB-1:

full


That's as far as I got on this. Thank you all for taking my tour and don't forget, comments are always welcome; thanks for looking in.
 
It's been awhile since I posted last due to a very brutal month of May for me, causing me to lose mojo and my drive to do anything. June has been slightly better which has allowed me to get a lot more done on my workbench again. I know many don't take my tours because of the length and slow load speeds; but today I have a long tour to try and catch everyone up who decides to join this tour.

Trams are waiting, all aboard for those who wish to join.....


Our first stop is in the Motor Pool where my continued efforts to achieve my next milestone have been the focus of my work.

This first bay is a German Krupp Protze truck that I started from ICM. It was extremely delicate and required some finesse. First, the chassis and suspension parts were done:

full


The interior was added and attached to the chassis:

full


While that was drying, the bed was assembled:

full


Later everything was put together. This was starting to look like a truck:

full


Wheels and final details went on next:

full


Paint was applied next:

full


Afterward, decals were applied, bringing this truck very close to completion:

full


In the next bay I started a Hobby Boss armored train car, the panzertraegerwagen. Mostly all I did was build up the main car:

full


In the next bay over, I went back to another project, the SdKfz 9 with crane. The chassis had been mostly assembled, so the main body was started:

full


Once it was mostly completed, the body was installed on the chassis:

full


More details were added, and the engine closed in by the hood (or bonnet if you prefer):

full


Paint was applied next:

full


After adding the tracks, I built the crane and installed it. I then started the rigging:

full


Once that part of the rigging was done, more paint was added to bring this closer to the finish:

full


Moving, on; in this next bay we have the Iranian Chieftain that got additional details added:

full


Next is photo etch application....

In the next bay we have the final painting and detailing on the Russian P-18 Spoon Rest radar system:

full


I also made it so it will turn just like the real one:

full


In the next bay, I decided to start the PST ZIS-10 tractor Trailer since it's such a cool kit and rare in my scale. Firs was the chassis and suspension. PST is notorious for having the axle rods molded too short, so I pulled out some polystyrene rod to make the axles so the wheels were properly positioned and that the linkage connecting the transmission and differential would be the proper length:

full


full


It's almost a given that every PST truck needs this treatment...

Once that was done, the trailer was built up:

full


This truck was starting to look good:

full


I then started some painting on the tractor, and then added windows using the Micro Krystal Klear window cement since this did now come with clear acetate or parts:

full


After all that dried, the while thing got a coat of paint:

full


Moving on to the next bay, I had also started this Modelcollect tractor trailer towing a Tomahawk cruise missile launcher. Chassis and engine were first:

full


The rear parts of the tractor were added next:

full


While that was drying, I assembled the launch tubes:

full


Later I added all the panels for this and then built up the resat of the trailer to put it on:

full


As you can see it also lowers so I can position it in either launch or stowed position:

full


This is another long truck:

full


Next I added the windows and doors to the cab; and installed the cab interior to the chassis:

full


You can see I left the cab off to paint the interior and also to paint it separate to keep dullcoat from fogging the windows when I shot the rest of this.

And then paint was applied. Due to delicate parts; I opted to freehand the camouflage with a brush:

full


Wheels were added, and the cab closed up, this one is close to being finished:

full


And the launcher still raises to the launch point:

full


And that concludes our tour of the Motor Pool; since no other work was done in the Hangar or Shipyards, we'll move on to the Spaceport...


Here in the Spaceport, a good amount of work got done. First though; I found this fun little kit in my stash and figured it had to be built:

full


It just needs paint now and some details and it'll be finished.

Speaking of Flying Saucers; in this next bay we got a lot of interior painting done. It still needs some touch ups, but overall it's close to done. Here's the four views of the interior:

full


full


full


full


Moving on to the next bay, we got the crew together, (sans Chewie who was out scrounging parts) for the Falcon, along with a few interested Stormtroopers:

full


Meanwhile the Falcon herself got the top and bottom hulls mated together:

full


Afterward, all the side detail was added all around:

full


full


Some of the crew decided to try out the cockpit seats:

full


All the final details are on this and she is now fully ready for paint:

full


full


And that concludes our latest tour of Maddog Manufacturing for this month. Thank you to all who took the tour, comments are welcome.
 
Thanks to this past Hobby Day weekend, I have more progress to show, enough to bring out the trams again and load them up for another tour. All aboard as we take another tour of the Motor Pool this week.


The first model we worked on in this first bay is the Iranian Chieftain. We got the photo etch on it to prepare for painting:

full


full

'
Later it got a basecoat of the sandy color it will be sporting:

full


Finally, it got the skirts and a replacement barrel. I lost the original somehow, so I found one that looks close enough. I refuse to sideline a kit to wait forever for one lousy part to reappear! Other detail parts were added too:

full


Here it is glossed up and ready for decals:

full


Moving on to the next bay, we had the German panzerjaegerwagen languishing for a bit so it was pulled out and the turret built:

full


A base coat and camouflage pattern were then painted on:

full


Followed by Gloss and decals:

full


Since so many of these were so close to finishing, I pulled out more to start. This first one is the ancient Morris Quad and 25lb gun with limber which will be added to my Canadian Army in honor of a fellow Braille Scale modeler from Canada who passed away recently. I started with the Quad, even adding the driver to it:

full


Later I continued to work on this; enjoying the nostalgia of the build and before too long; I had this:

full


Yeah that will be ready for paint soon. In the next bay, I started the ACE kit of the Salamander Crash tender I bought in San Diego. I started with the interior as always:

full


That must have been interesting to drive from the center of the cab. Next the rear sections were built up and added:

full


Those were tough to line up but I got them looking fairly close. Next I painted the interior so I could close it up:

full


Roof, sides and front went on next, along with some filler in certain places:

full


After some sanding and prep, this got a coat of Krylon glossy apple red spray can:

full


I then decanted some and hand painted the frames on the windows, which I refined later:

full


Next this got almost all the last detail parts before decaling:

full


In the next bay; we started an ancient ESCI kit of the Leopard 1A2, which had markings for an Italian tank. So, we started on the hull of my new Italian tank:

full


While that was drying, the basic turret was built:

full


Later on the bogies, drive wheel and idlers were added and the tracks installed. The extra parts for the upper hull were added and then the whole thing cemented together:

full


Sometime later the remaining detail parts for the turret were added so now this one is ready for paint:

full


Finally in this last bay; we managed to get started on one of my raffle prizes from San Diego; the Dragon Hummel. This one is going to be Syrian, thus completing the entire inventory of German vehicles in Syrian service:

full


And that completes this tour of the latest Motor Pool progress for this week. Thank you for stopping in, comments are welcome.
 
Thank you Bob! This is what I do since I have no patience! LOL!

Thank you Saul! I have heard they are stepping up production so I guess I'd better pick it up to stay on top! LOL!


And now for another short tour of the Motor Pool, showing some of the latest production we got done before the Fourth of July holiday....

All aboard!


In this first bay, we have the German SdKfz halftrack with the finished rigging on the crane. I tried so hard to make it all straight and conformed, but no such luck. At least I got it rigged and now I can finally add all the final detail parts to finish this off:

full


full


In the next bay we have the Italian Leopard now sporting it's "spots" or camouflage pattern:

full


Later the decals went on and this moved closer to the finish line:

full


Moving on to the next bay, we have the Iranian Chieftain now glossed for decals:

full


The decals were added, bringing this closer to the finish line:

full


Speaking of Iranian tanks, in this next bay I started another Iranian tank, this time an M60 Patton, since someone who won it in the Distressed Kit Auction gave it to me after the meeting. The hull and turret were started first of course:

full


Later, after adding grooves to the center of the wheels to make them look like paired wheels, (it is an ancient ESCI kit after all) I added them to the hull and started the tracks:

full


Later it got the base coat of paint:

full


Afterward, decals were added and detail painting happened:

full


That brings that one close to the finish line.

Moving on to the next bay we have another ancient ESCI kit, this one is the LKW 3-ton truck that has been sitting for awhile in the stash. Time to fix that. The cab was built first and painted inside:

full


The chassis was built fast and the the cab and bed were added to it:

full


Then came the final build up of the bed and the addition of detail parts:

full


The last of the painting was done; this one is looking like it will get finished soon too:

full


In this last bay, we have a new project barely started. It's an OT-62 APC. I realized I have one for my Egyptian Army, but I don't have a Russian one so now I'm plugging that hole in my collection. Chassis was started first:

full


And that is as far as we got on that one so far.


That completes our tour of the Motor Pool for today. Have a happy Fourth of July and remember comments are always welcome.


Thanks all for coming in!
 
It's the middle of July and time for another tour of Maddog Manufacturing. This time we'll be making a brief foray into the shipyards to see one of my ships getting outfitted for launch. So, all aboard the trams for our next tour.


As mentioned, we'll start in the shipyards where the HMS Westminster has been sitting in drydock waiting for the photo-etch parts to be installed. Finally, we got them all on this ship:

full


Later they were all painted up, and additional detail parts were installed:

full


full


Finally, the decals were added, bringing this closer to launch and shakedown cruise:

full


Now on to the Motor Pool where we have a lot that has happened lately...


In this first bay, we have a German M113 APC that was started this past week. The running gear were installed first, sans drive sprockets as those were mounted with track links before being installed on the hull. The sharp-eyed among you will recognize this as an ancient ESCI kit too:

full


Later the top was built up:

full


The tracks went on nice and easy and the upper hull was added to the lower hull. I also base painted this a dark green:

full


The second camouflage color was then painted on:

full


Followed by the third color:

full


During this time, I was also working on a second ESCI M113 APC. This one is going to be added to my Canadian Army. Since everything except the camouflage was identical; I only took this pic of the Canadian APC in it's base coat:

full


Moving on to the next bay, I started another quick kit, this time it's the Airfix WWI-era Mk. I tank. Basic assembly was fats and easy:

full


After adding additional detail parts and building the 'steering wheels', this got a base coat of green:

full


Later I added the tracks and then took some time to paint the camouflage pattern on this tank. It's not easy to see, but there are four colors on that tank:

full


In this next bay, I worked on the upper hull for the previously-misnamed BTR-50PK APC:

full


This was later installed on the lower hull:

full


In this bay beside it, I started a second BTR-50PK, this time from PST. Wheels were done first:

full


The upper hull was then built; which was tougher to do than the previous one which is a Revell kit:

full


As before, the lower and upper hulls were then built up:

full


That one is going to take some work.

In this last bay is another German model. This is the German FAUN SLT-56 tank transporter. This is the Takom kit that came with a Leopard 2A7 as a load. The tank had been built already some time back so now it was time to build this transporter. First was the suspension ans axle system:

full


This was later added to the chassis frame:

full


Some of the upper works on the body were then added, including the crew seats in the cab:

full


Once the cab interior was completed and painted; the cab was added to the main body:

full


Later the rear superstructure was added once it was fully assembled:

full


Later a preliminary basecoat was added:

full


Followed by a more solid base coat and some additional detail panting:

full


While all that was drying, I built the trailer up almost completely, leaving off the wheels:

full


When all that was dry, I painted the other two camouflage colors on and afterward added all the wheels:

full


full


And that completes this tour of Maddog Manufacturing, I hope you all enjoyed it. Thanks all for looking in, comments are welcome.
 
It's been awhile, so it's time for another tour. This time we've opened up the Hangar to work on some aircraft, the Spaceport is still slowly plugging along and the Motor Pool is still in full production mode. So, all aboard the Trams and get ready for a fun tour!


First stop is in the Hangar, here we have three projects going. In this first bay is the A-model Russian Yak-28R reconnaissance plane. It goes together very roughly as you can see. The wings are not attached at this time:

full


Later, additional parts were added and a copious amount of putty was applied to help streamline and refine this. Again, wings still not attached:

full


Interestingly enough, this box also included a Hobby Boss quick-build F-86 so I figured I'd start that too. I got this far before stopping. I'm still not sure what markings I'll be applying to this since I already have a couple US jets and maybe a Canadian one already:

full


In between all that, I continued to try and sand and fill and sand my two B-2 bombers. For some reason, I keep finding tiny divots and holes that refuse to stay filled when I sand these planes! I keep trying to experiment with different putties and fillers:

full


In that pic above, you can see where I applied some plastic that I'd melted in a jar of Acetone. The wings kept snapping open so I pressed a bunch of this inside the seams; added a quantity of Tamiya Extra Thin to smooth it out and make it hold better, and then took to sanding it later.


That concludes the tour of the Hangar, now on to the Motor Pool.....

In this first bay, we continued to work on the FAUN SLT-56 tractor, adding the decals to it:

full


The Trailer then got decals, but also the folding loading ramps which would be painted later:

full


In the next bay we have another German truck, the Armory model of the Tatra T-111 cargo truck. First the cab was built up:

full


I then followed up with the chassis and cargo bed:

full


Later, the cab was added, wheels installed. The the cab roof was dry fit in this picture. You can see why with the step in the cab at the rear:

full


Later the tilt was added and everything painted including the cab interior. The roof was then added. I lined it up with the front of the cab:

full


I couldn't let that step at the rear stand, so I took some styrene strip and cemented it to the back of the roof until it was flush with the rear wall of the cab:

full


When it was dry, I trimmed it down flush with the roof top and sanded it smooth:

full


Later paint made it look like no step was ever there:

full


This truck was then very close to finishing. By the way, I might not have mentioned yet, but this Tatra T-111 kit came with no instructions at all; and none were available on Scalemates or any other site. This kit was built entirely blind and I think it turned out quite nicely. I guess maybe I am a modeler now instead of just an 'assembler' LOL!

Moving on to the next bay, I continued to work on my two BTR-50PK's. The Egyptian one went together okay (it's an ancient PST kit) and the tracks were certainly easier to install, but that seam on the side needed to go:

full


I added some extra detail parts first before filling and sanding:

full


Next came the Tamiya white putty:

full


You can see that I started to paint the base coat on it too. Later when it was sanded smooth, I finished painting the base coat and added the camouflage:

full


Once that dried, the decals went on. They are most likely fictitious, but the scream "Egyptian" so that is what I used:

full


The Russian BTR also went together a bit better, until I got to the tracks, which I somehow managed to wrestle into place despite constantly breaking roadwheels:

full


Base paint was then applied

full


Then I found the photo-etch fret inside the box, so I pulled it out and added it to the model, followed by the last detail parts:

full


A full coat of paint came later:

full


...followed by decals. Yes, they silvered, but I was able to save the numbers. The Guards symbol was later removed and replaced by better ones that stayed flat:

full


That's as far as I got on those. They are close to being finished.

Over in the next bay I decided to start another Egyptian subject, this time it is the Trumpeter SA-6 Gainful. Tracks and lower hull were done first:

full


The upper hull had the detail parts added next:

full


Then I built up the launcher cradle:

full


Put them all together and we have this:

full


Base paint went on next:

full


Later on it got camouflaged and the final detail painting was completed.

Moving on to the next bay, I decided to make my Riich Models M109A2 into an Italian gun. assembly was fast and furious:

full


Paint went on next. Later more detailed work went on:

full


Moving to the next bay, I started another ancient PST kit, this one was a combo kit of a halftrack with a 38mm anti-aircraft towed gun . I started with the gun itself:

full


...followed by the transport cradle:

full


Once I put them together, I started painting it:

full


Naturally, if I built the gun, I needed to build the halftrack for it. This is the Zis-42M halftrack, which built up fairly fast:

full


Parts of it had been painted, the rest of the paint went on later:

full


That's what got done on these, on to the next bay where I started another large kit in order to clear the large box from the shelf. This is the Modelcollect MAN KAT tractor trailer used by the US Army. The chassis was done first; you gotta love the detail on these models:

full


The cab was then worked on, assembling all but the windows:

full


I then moved on to build the trailer:

full


More was added to the chassis, including the photo-etch:

full


The cab was then painted inside and out, and the photo-etch was applied to that as well:

And that's how that has progressed so far.

In this last bay is another US Army truck, this time the Heller Red Ball Express deuce-and-a-half truck. Again, the chassis was started first:

full


full


Next came the cab, hood, and cargo bed:

full


Paint went on next after all that had dried sufficiently:

full


And that concludes the tour of the Motor Pool, now we can check out the progress in the Spaceport...


Here in the Space Port, I did more work on the Millennium Falcon. All the top decals went on first:

full


The I added all the underside decals when the top ones were dry:

full


After that, I started to experiment with weathering and distressing this beast. I don't want it to look decrepit, but certainly well used; or rather "rode hard and put away wet" I started with some black wash in the deepest recesses:

full


full


That's as far as I got while I try to determine the best way to weather the flat areas.

And now that completes this latest tour of Maddog Manufacturing, thank you all for looking in and comments are always welcome.
 
Back
Top