
-
Modelers Alliance has updated the forum software on our website. We have migrated all post, content and user accounts but we could not migrate the passwords.
This requires that you manually reset your password.
Please click here, http://modelersalliance.org/forums/login to go to logon page and use the "Forgot your Password" option.
You are using an out of date browser. It may not display this or other websites correctly.
You should upgrade or use an alternative browser.
You should upgrade or use an alternative browser.
Logistics, The Rolling Stock Completed April 18th, 2020
- Thread starter bob letterman
- Start date
White_Wolf
Master at Arms
Loving this ") , fantastic stuff Bob - a very good lesson too, coming at the perfect time, since I have a yellow thingy to weather :p
, fantastic stuff Bob - a very good lesson too, coming at the perfect time, since I have a yellow thingy to weather :p
Laurence
, fantastic stuff Bob - a very good lesson too, coming at the perfect time, since I have a yellow thingy to weather :pLaurence
Duke Maddog
Well-known member
I'll have to look into gettign some of these too. They are perfect for my 1/72 scale models.
The micro pens are not new, I bought a couple back when I was still living in Iowa. I wanted to use them for panel lines on my car builds, but they tended to bead up on glossy paints. I hadn't considered using them on flat paints.
Are they that old Mike? The Micro brand? I just discovered them a couple of years ago! I assumed they were a new brand. There were several other brands as well. No, they would bead up on gloss paint. They work great on military flats!
Bob
Loving this
Laurence
Thanks Laurence,
That's right, You do have a yellow thingy coming up!!
Bob
I'll have to look into gettign some of these too. They are perfect for my 1/72 scale models.
I never thought of that but you're right Mark, they would work in that scale!
Bob
Would I pull your leg? Pretty sure they came from The Art Store, near downtown.
I believe you!!!!! I even believe they were from an art store! I even believe it was near downtown! But.... yeah, I also believe you're not beyond pulling my leg Mike!
LOL!!!!
Bob
Last edited:
I had to look a little, but I found them and they still work!View attachment 816
Actually, that's great news! I have maybe 50 of them and they'll last another 10 years!
Bob
I just told MP I think I bought those in the late 90's.
Damn, that's 20 years!!! And they still work! I'll be a hundred years old then! Wonder what I'll be working on in 2040?
Iron Mike
Master At Arms And Resident Curmudgeon
You can bet it will something good. Just found the 02 pen, now I need to try them out on something.Damn, that's 20 years!!! And they still work! I'll be a hundred years old then! Wonder what I'll be working on in 2040?
You can bet it will something good. Just found the 02 pen, now I need to try them out on something.
You have more faith in my longevity than I do!
Show us what you did with the pen!
Bob
OK, this is a very monumental post on this thread! For me that is!
To begin, I had to use two simultaneous posts to include everything as the new site only allows ten photos for each post.
When I began posting this build back in 2007, I broke it up into five threads. Base & Buildings, Armor, Figures, Trucks & Jeeps and this one, the Rolling Stock! Finally, this will be the last build post on this thread! All the rolling stock models are now officially completed after this. I have quite a few photos to wrap this one up with.
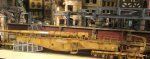
Some of the photos of the rail gun were taken where it will eventually go on the diorama. Just so you know, the entire train shed is built and base coated but as yet, not weathered, and it will be heavily weathered when complete. That will be my next project and will be posted on the Base & Buildings thread.
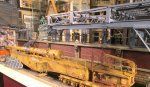
Now, for the finished K5 E Rail Gun. Here is the generator unit at the rear of the rear truck. The top has the crane and shell loading trolley plus various controls in the side panels for the generator.

A view from the front of the generator.
As this diorama depicts a fictitious city in central Germany, I didn't want to use the names of the at least five K5s with names of the 27 in total that were built. Germans have always given their large machines names from the ancient German mythology, Siegfried, Thor, etc. I researched the mythology. One of the names that struck me as appropriate was Nibelungen. That translates to the citizens of Nibelung, a mythical city of dwarves who were especially effective warriors despite their diminutive size. In view of the monster rail guns Dora and Gustav, the K5s were relatively small, but, could still level a city. So, I called this one Nibelungen. The next obstacle was the Gothic lettering. As far as I could find, there was no Gothic lettering in the size font I needed, so, I printed out the name in gothic, laid them beside the gun carriage and hand painted them. That was lots of fun! I used white paint and a black surround to make them stand out.

This is where the Rail Gun will be vis a vis the Train station. It would have been pulled under the shed by the locomotive after the shed had received some, but not all the bomb damage. Note the paint removed from the gun barrel from the recoil from firing. That was the case with all the K5s I found photos of during the war!

From another angle. Note the schedules above the boarding gates. Bahnsteig 1 is Gate 1 in English.

A closer view of the enormous gun barrel. In 1/35th scale it is nearly two feet long!
View attachment
From the top. The platform was lowered to access controls of the gun itself which was normally covered with a metal lid. Of course, curious G.I.s would have to see what was there.

A side view!

The barrel goes beyond the emergency stops almost into the station itself.

This new site only allows 10 images per post, so, I'll continue on the next post immediately following this one!
To begin, I had to use two simultaneous posts to include everything as the new site only allows ten photos for each post.
When I began posting this build back in 2007, I broke it up into five threads. Base & Buildings, Armor, Figures, Trucks & Jeeps and this one, the Rolling Stock! Finally, this will be the last build post on this thread! All the rolling stock models are now officially completed after this. I have quite a few photos to wrap this one up with.
Some of the photos of the rail gun were taken where it will eventually go on the diorama. Just so you know, the entire train shed is built and base coated but as yet, not weathered, and it will be heavily weathered when complete. That will be my next project and will be posted on the Base & Buildings thread.
Now, for the finished K5 E Rail Gun. Here is the generator unit at the rear of the rear truck. The top has the crane and shell loading trolley plus various controls in the side panels for the generator.
A view from the front of the generator.
As this diorama depicts a fictitious city in central Germany, I didn't want to use the names of the at least five K5s with names of the 27 in total that were built. Germans have always given their large machines names from the ancient German mythology, Siegfried, Thor, etc. I researched the mythology. One of the names that struck me as appropriate was Nibelungen. That translates to the citizens of Nibelung, a mythical city of dwarves who were especially effective warriors despite their diminutive size. In view of the monster rail guns Dora and Gustav, the K5s were relatively small, but, could still level a city. So, I called this one Nibelungen. The next obstacle was the Gothic lettering. As far as I could find, there was no Gothic lettering in the size font I needed, so, I printed out the name in gothic, laid them beside the gun carriage and hand painted them. That was lots of fun!
I used white paint and a black surround to make them stand out.This is where the Rail Gun will be vis a vis the Train station. It would have been pulled under the shed by the locomotive after the shed had received some, but not all the bomb damage. Note the paint removed from the gun barrel from the recoil from firing. That was the case with all the K5s I found photos of during the war!
From another angle. Note the schedules above the boarding gates. Bahnsteig 1 is Gate 1 in English.
A closer view of the enormous gun barrel. In 1/35th scale it is nearly two feet long!
View attachment
From the top. The platform was lowered to access controls of the gun itself which was normally covered with a metal lid. Of course, curious G.I.s would have to see what was there.
A side view!
The barrel goes beyond the emergency stops almost into the station itself.
This new site only allows 10 images per post, so, I'll continue on the next post immediately following this one!
Attachments
Last edited:
A continuation of the Rail gun post.
A side view of the front of the diorama.

A worm's eye view.

Overhead view.

The full eight feet across the front.

View from the ground.

Difficult to get a full photo of the rail gun because of it's length and still make out details.

Close up of the fire control panel.

Obviously, the shed has yet to be weathered!

Another angle.

The gun from the rear!

So, this closes out this thread as far as build posts are concerned. Next up, the weathered shed on Base and Buildings. Then, there are a couple of trucks and four trailers to finish on Trucks and Jeeps, that will close out that thread. Then to armor which still has four Shermans to weather and detail.Then that will be closed out. Then, finish up the figures, that will take awhile, then the final touches on the buildings and then, Guess what?
Thanks for looking in,
Bob
A side view of the front of the diorama.
A worm's eye view.
Overhead view.
The full eight feet across the front.
View from the ground.
Difficult to get a full photo of the rail gun because of it's length and still make out details.
Close up of the fire control panel.
Obviously, the shed has yet to be weathered!
Another angle.
The gun from the rear!
So, this closes out this thread as far as build posts are concerned. Next up, the weathered shed on Base and Buildings. Then, there are a couple of trucks and four trailers to finish on Trucks and Jeeps, that will close out that thread. Then to armor which still has four Shermans to weather and detail.Then that will be closed out. Then, finish up the figures, that will take awhile, then the final touches on the buildings and then, Guess what?
Thanks for looking in,
Bob
Finish line?! 
Iron Mike
Master At Arms And Resident Curmudgeon
I did, see the photos of the pens? I wrote the captions with them.You have more faith in my longevity than I do!
Show us what you did with the pen!
Bob

Similar threads
- Replies
- 4
- Views
- 2K