
-
Modelers Alliance has updated the forum software on our website. We have migrated all post, content and user accounts but we could not migrate the passwords.
This requires that you manually reset your password.
Please click here, http://modelersalliance.org/forums/login to go to logon page and use the "Forgot your Password" option.
You are using an out of date browser. It may not display this or other websites correctly.
You should upgrade or use an alternative browser.
You should upgrade or use an alternative browser.
Fw 190D-9 and Ta 152C in-progress
- Thread starter matrixone
- Start date
Thanks again guys!
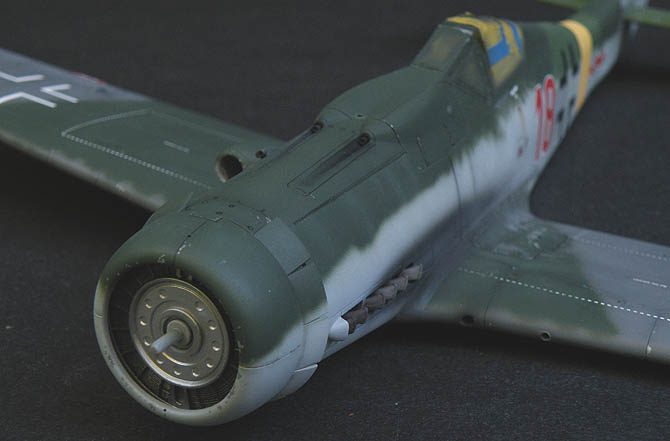
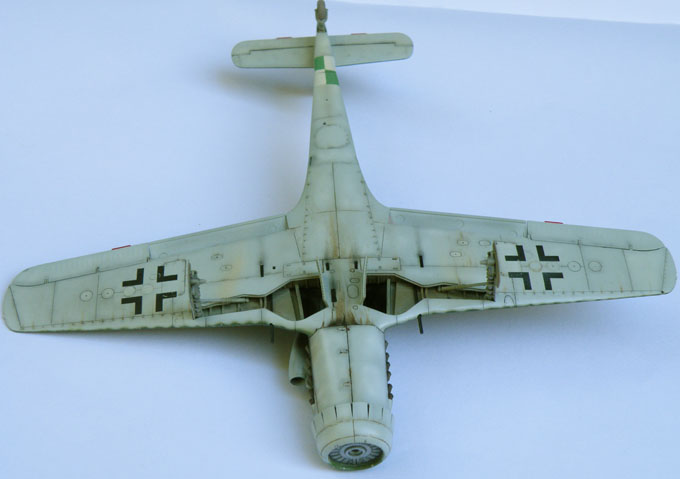
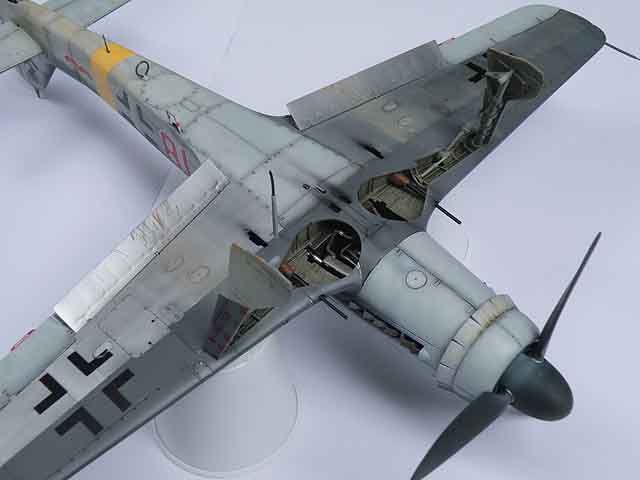
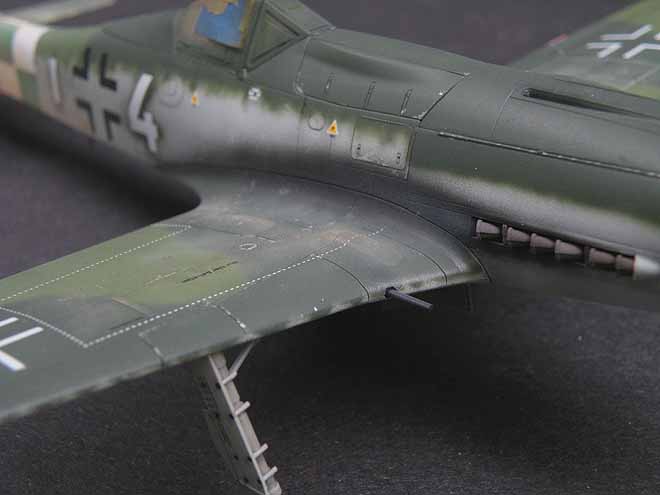
More weathering done on these models, the exhaust stubs have been added and a tiny amount of airbrushing has been done to blend them in.
Also more paint chipping has been done on both the upper and lower surfaces. The rear of the canopy on both models show some extreme paint chipping, this was done because both of these aircraft did not have the pully system for the antenna wire and when the canopy was open the wire went slack and would tend to cause some wear and chipping to the paint work on windy days which caused the wire to flap about and strike the rear of the canopy.
The paint chipping as it looks now is too bright and fresh looking but after the rest of the weathering is done and after the flat coat is sprayed on the paint chipping will look more natural, the final step in weathering will be done with a sharpened silver artists pencil to add just few fresh scuff marks over the paint chips on the wing roots.
The Fw 190D-9

The Ta 152C:
Matrixone
More weathering done on these models, the exhaust stubs have been added and a tiny amount of airbrushing has been done to blend them in.
Also more paint chipping has been done on both the upper and lower surfaces. The rear of the canopy on both models show some extreme paint chipping, this was done because both of these aircraft did not have the pully system for the antenna wire and when the canopy was open the wire went slack and would tend to cause some wear and chipping to the paint work on windy days which caused the wire to flap about and strike the rear of the canopy.
The paint chipping as it looks now is too bright and fresh looking but after the rest of the weathering is done and after the flat coat is sprayed on the paint chipping will look more natural, the final step in weathering will be done with a sharpened silver artists pencil to add just few fresh scuff marks over the paint chips on the wing roots.
The Fw 190D-9
The Ta 152C:
Matrixone
Don't know what to say Les, outstanding! Especially love how you've done the chipping, enough for the effect but not over done. 
Heavens Eagle
Well-known member
Those planes are really coming along nicely there Les!! ")
I definitely like how the weathering is soewhat subdued and subtile. While there was a fair amount of wear and tear, many of these planes didn't last long enough to get really worn. They did get beat up quite a bit, and scratched and dirty, but the everyday wear on the paint wasn't over a long enough tiime at the end of the war to get really worn.
Have several of the late war Fw and TA kits and it is so helpful to see some nice builds!

Wow man you are really going to town! I'm loving it.
I just acquired the D9 profipack from Eduard, from Old Dog. That guy is awesome. Anyway it has red 18 mustache in it like we were talking about earlier this year when I built that Italeri offering. It's got the little circle 17 in it that you were talking about and "probably?" the right color call outs.
I just acquired the D9 profipack from Eduard, from Old Dog. That guy is awesome. Anyway it has red 18 mustache in it like we were talking about earlier this year when I built that Italeri offering. It's got the little circle 17 in it that you were talking about and "probably?" the right color call outs.
Thanks Paul, Luiz, and Adam!
Adam,
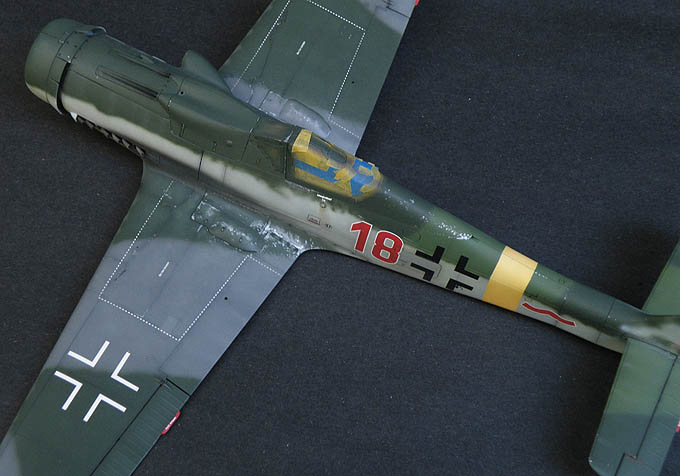
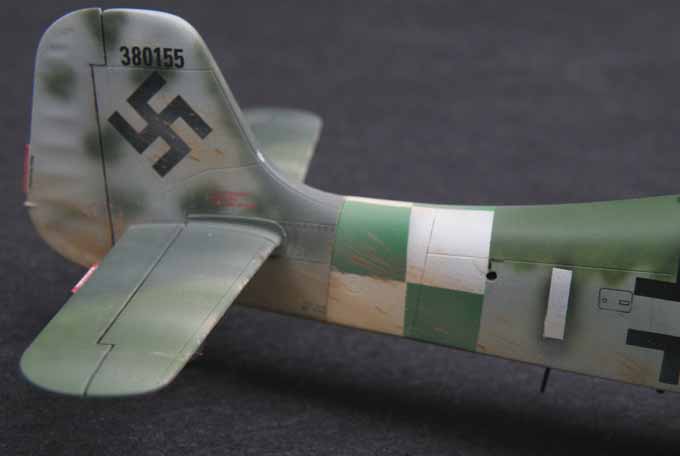
Since I don't have that kit I can't comment on what colors Eduard suggests for it but I do have the Eduard D-11/D-13 double kit and noticed the color call outs in the instructions follow the JaPo Fw 190D-9 books closely, the JaPo books are excellent but I can't agree with their conclusion on the paint colors used on the lower surface of Dora wings with the front half painted and the rear half NMF, JaPo suggests the painted portion of the wings were painted in RLM 81. From all the evidence I have seen of wings painted in this fashion they had the front half painted RLM 75 and not RLM 81, RLM 81 was not a common color to be seen on the Fw 190D-9 series and was seen mostly on the fuselage spine aft of the cockpit of Mimetall machines and was not very often used on D-9 wings by any D-9 producer.
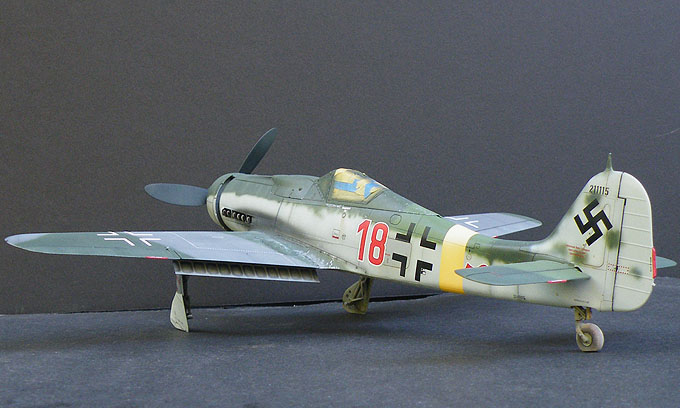
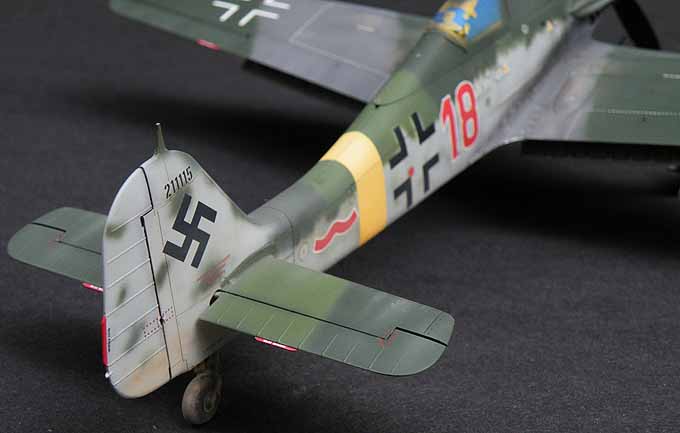
The Focke-Wulf factory at Marienburg built the D-9 in the 211 W.Nr. block series and these aircraft were known to have the undersides of the wings half painted, half unpainted, with the front half painted with RLM 75, ''red 18'' W.Nr.211115 was one of these aircraft.
That's cool that Eduard includes the black 17 in the circle decal, this issue is not so easy to overcome unless one has the ability to make their own decals.
Below are two images of a group of former Luftwaffe aircraft photographed at Stendal in the summer of 1945, these type of photographs are always a treat to see as they usually show a wide variety of aircraft types and camouflage schemes.
The nearest Fw 190 in the image shows some older markings starting to appear underneath the newer markings.
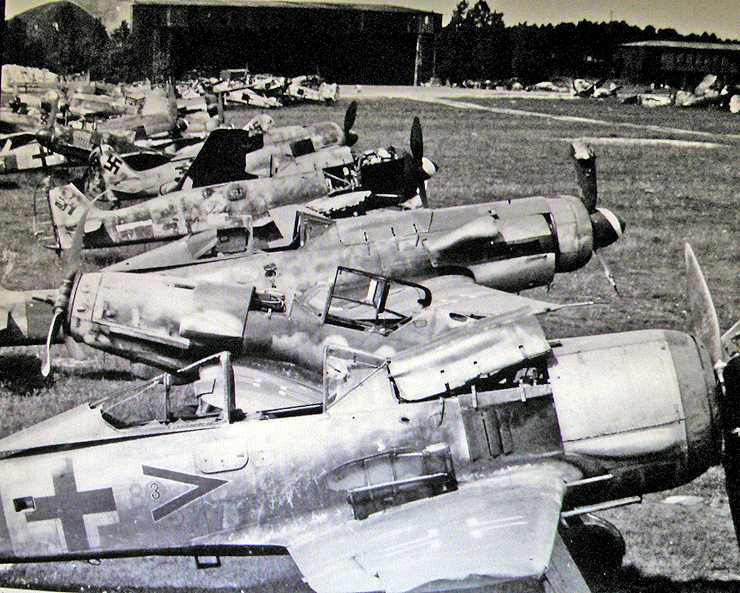
This second picture is a close-up of the above photograph and shows an ultra rare Ta 152H in operational markings, and just in front of it is a Bf 109K-4!
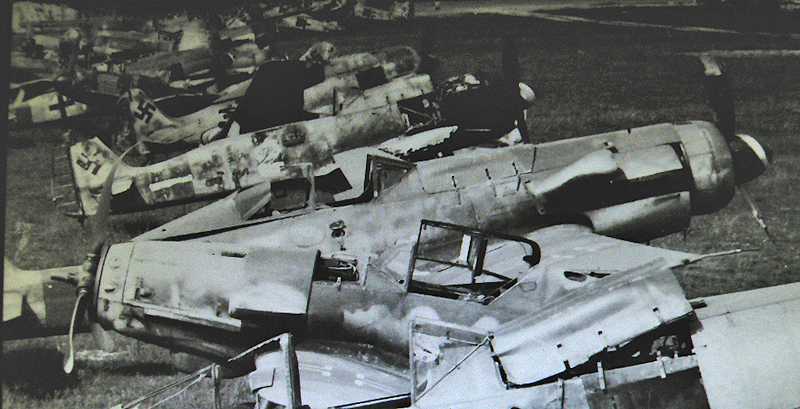
I hope more photographs of this airfield show up.
Matrixone
Adam,
Since I don't have that kit I can't comment on what colors Eduard suggests for it but I do have the Eduard D-11/D-13 double kit and noticed the color call outs in the instructions follow the JaPo Fw 190D-9 books closely, the JaPo books are excellent but I can't agree with their conclusion on the paint colors used on the lower surface of Dora wings with the front half painted and the rear half NMF, JaPo suggests the painted portion of the wings were painted in RLM 81. From all the evidence I have seen of wings painted in this fashion they had the front half painted RLM 75 and not RLM 81, RLM 81 was not a common color to be seen on the Fw 190D-9 series and was seen mostly on the fuselage spine aft of the cockpit of Mimetall machines and was not very often used on D-9 wings by any D-9 producer.
The Focke-Wulf factory at Marienburg built the D-9 in the 211 W.Nr. block series and these aircraft were known to have the undersides of the wings half painted, half unpainted, with the front half painted with RLM 75, ''red 18'' W.Nr.211115 was one of these aircraft.
That's cool that Eduard includes the black 17 in the circle decal, this issue is not so easy to overcome unless one has the ability to make their own decals.
Below are two images of a group of former Luftwaffe aircraft photographed at Stendal in the summer of 1945, these type of photographs are always a treat to see as they usually show a wide variety of aircraft types and camouflage schemes.
The nearest Fw 190 in the image shows some older markings starting to appear underneath the newer markings.
This second picture is a close-up of the above photograph and shows an ultra rare Ta 152H in operational markings, and just in front of it is a Bf 109K-4!
I hope more photographs of this airfield show up.
Matrixone
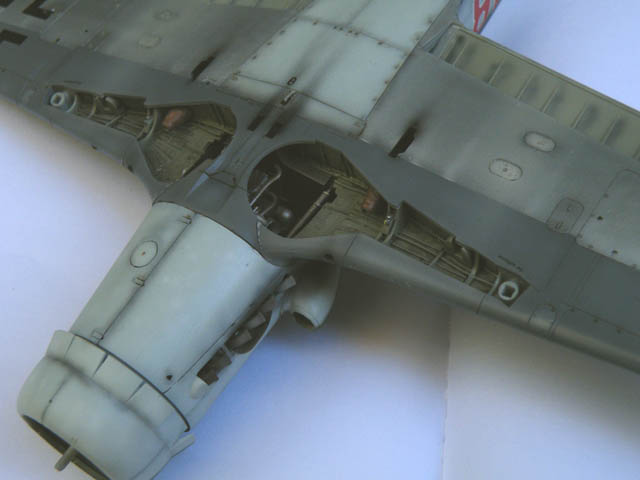
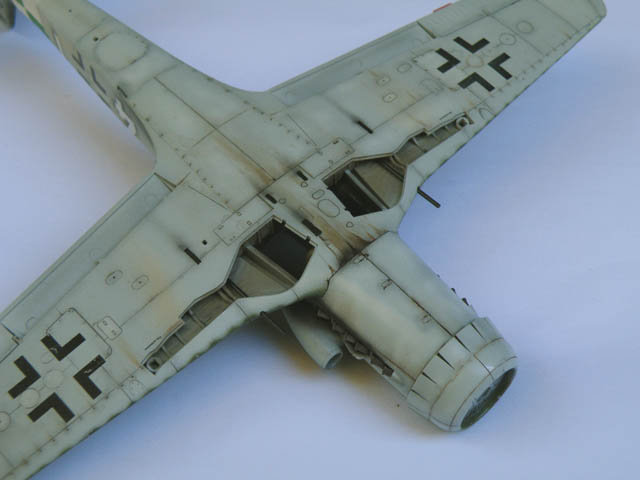
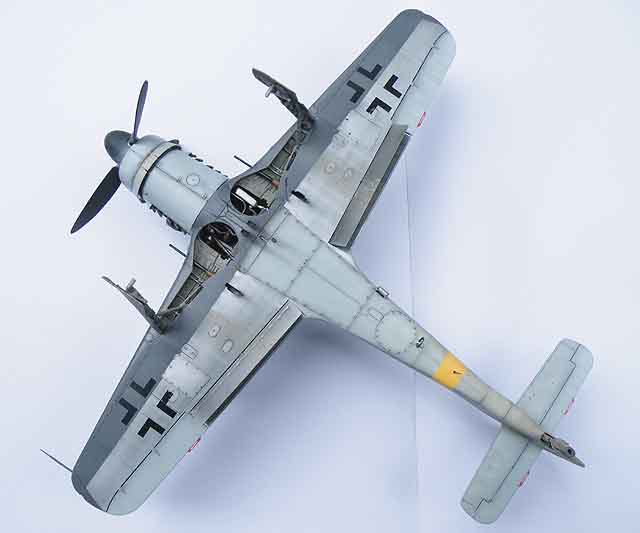
These models are getting close to the finish line, the landing gear legs and other smaller parts are being put on now. The Ta 152C will be getting a bit more weathering put on it in the form of dirt and mud splatters on the undersurface and rear fuselage.
The Fw 190D-9
The Ta 152C
Matrixone
The Fw 190D-9
The Ta 152C
Matrixone
Delicious...
Heavens Eagle
Well-known member
They are really coming along and looking nice Les!
Thanks again guys!
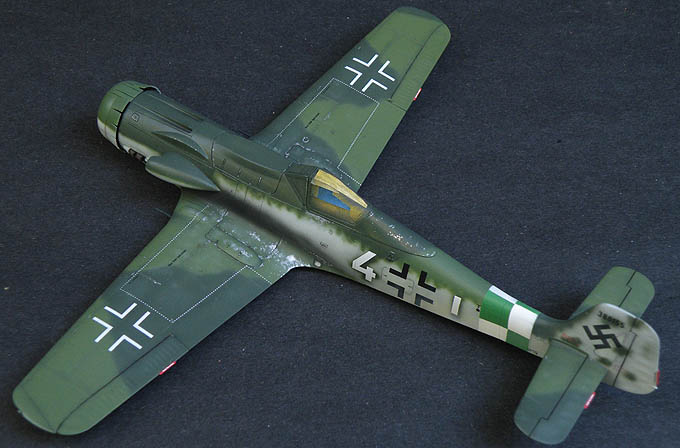
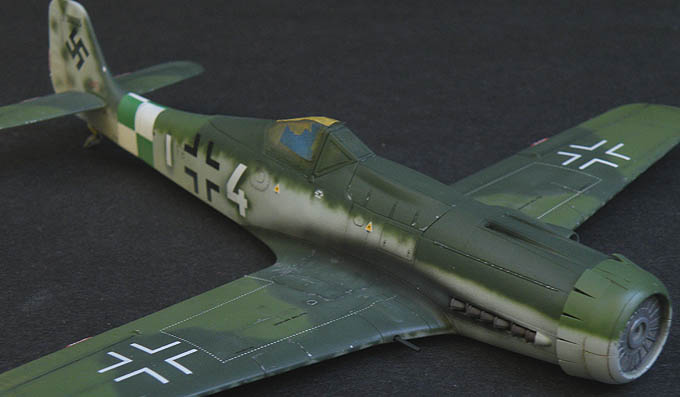
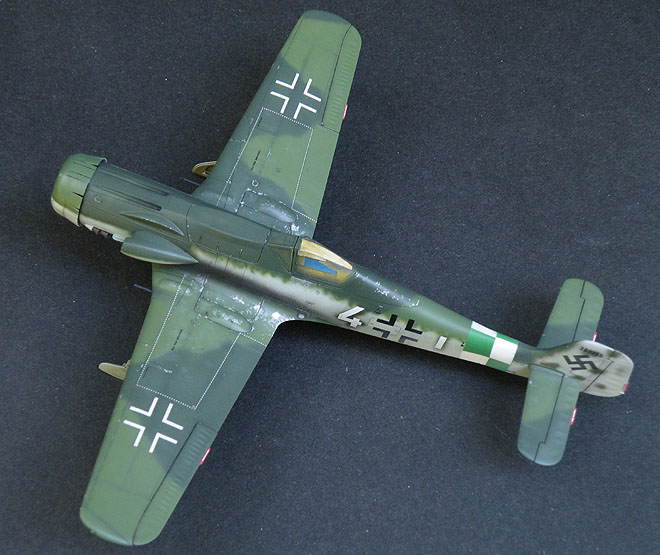
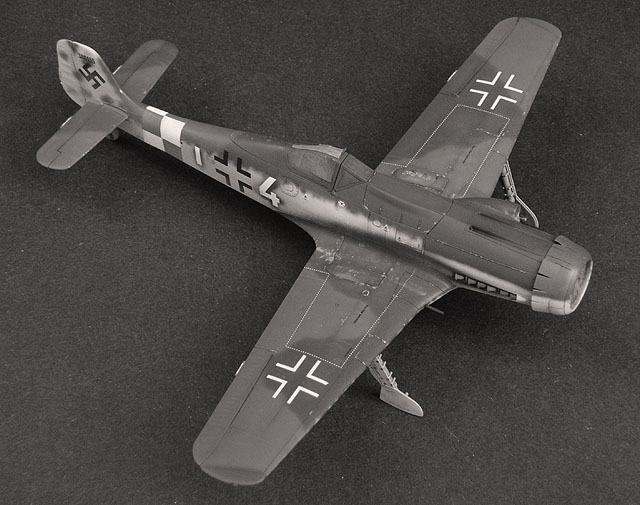
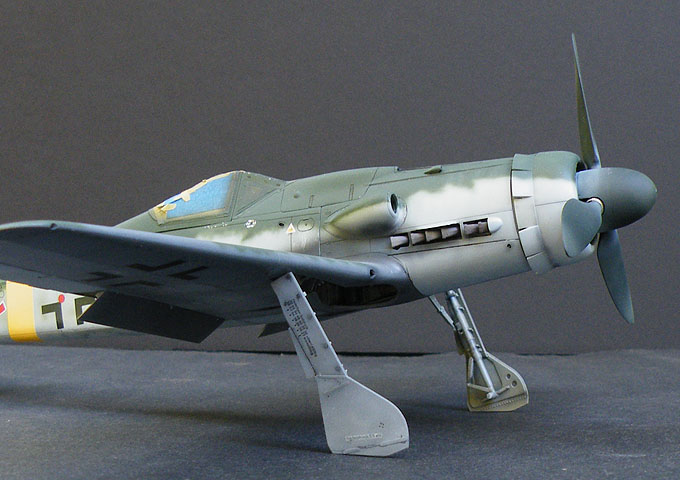
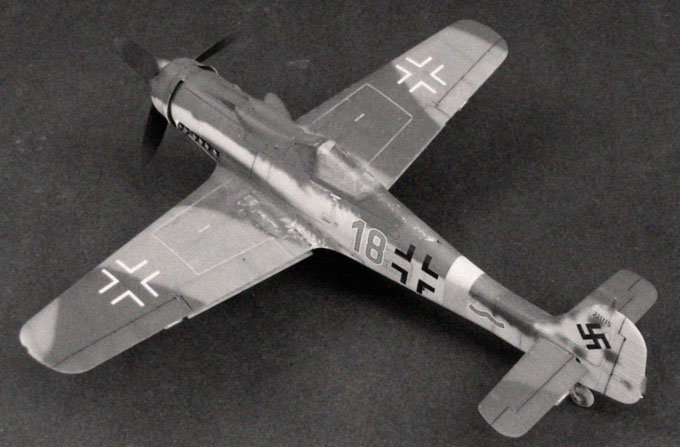
This may very well be the last of the in-progress pictures of these models, as you can see below they are getting properly dirtied up as part of the weathering process...up till now IMHO I thought they looked lifeless and hideous.
All that's left to do is spray on the flat clear coat, do some final detail brush painting and add the wheels.
Fw 190D-9
Ta 152C
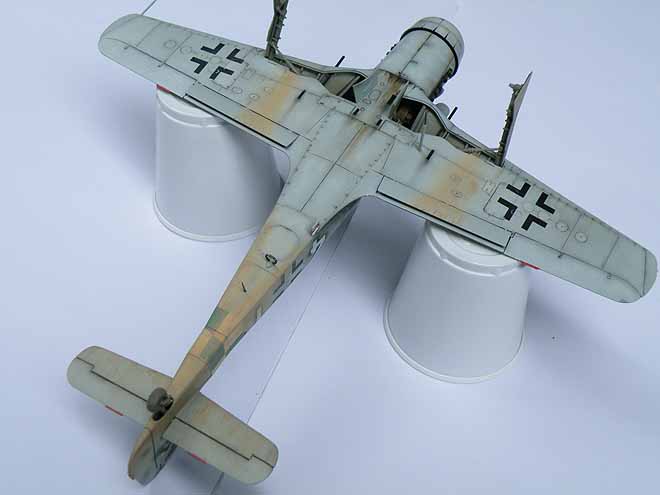
Matrixone
This may very well be the last of the in-progress pictures of these models, as you can see below they are getting properly dirtied up as part of the weathering process...up till now IMHO I thought they looked lifeless and hideous.
All that's left to do is spray on the flat clear coat, do some final detail brush painting and add the wheels.
Fw 190D-9
Ta 152C
Matrixone
Super! love how you get the mud slingin' all over the place.
Thank you Bob,
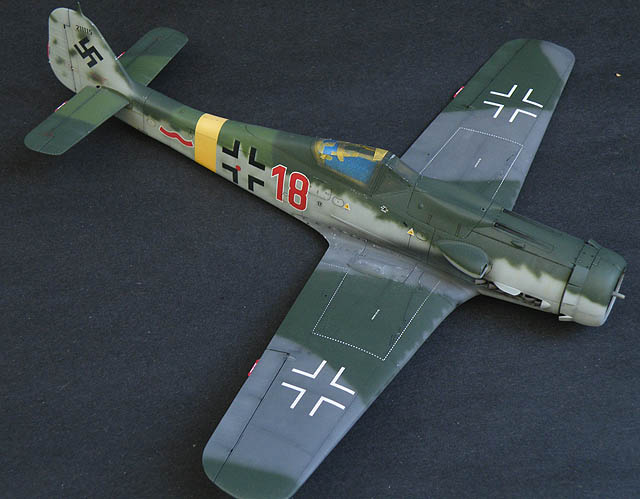
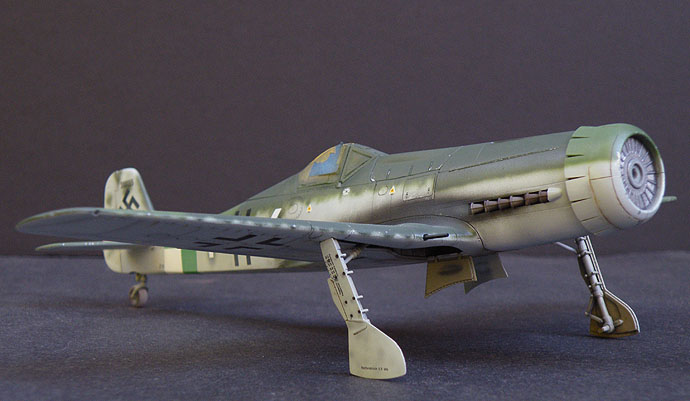
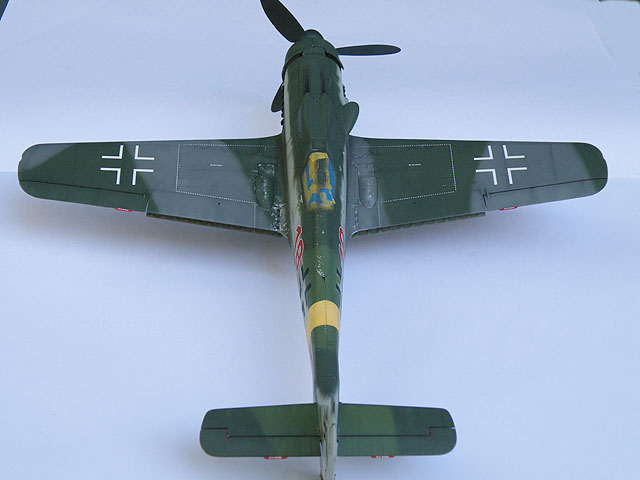
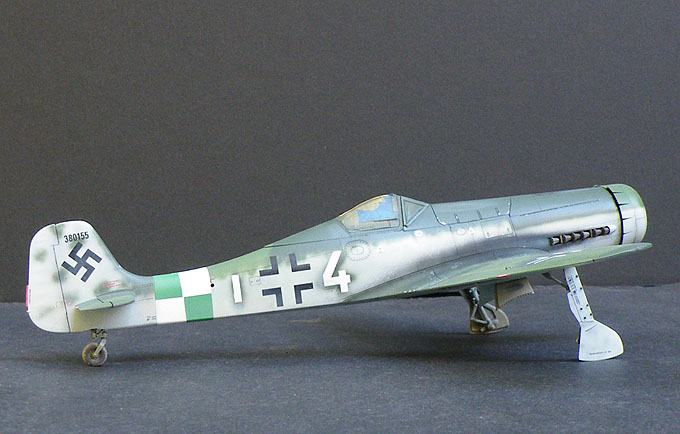
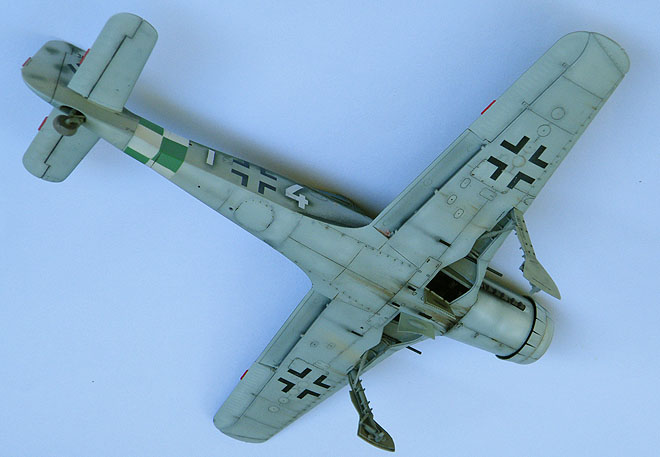
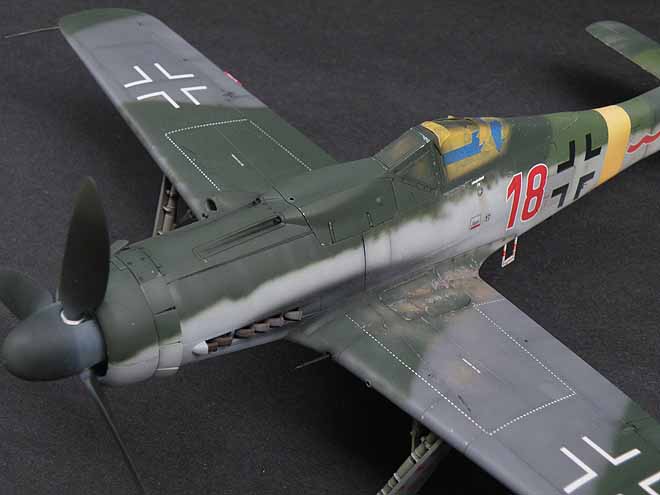
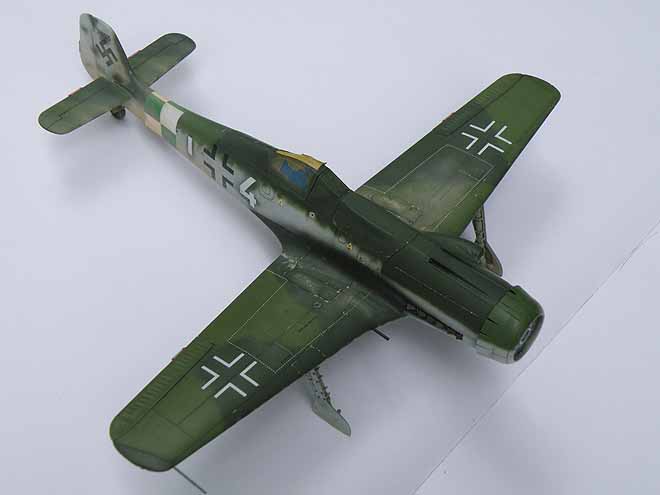
The Ta 152C of KG(j)27 is very heavily coated with dirt stains, from all the photographs I have seen of other aircraft in that unit they looked to have been well used and flown from dirt airstrips judging from the amount of dirt and mud flung over the airframes.
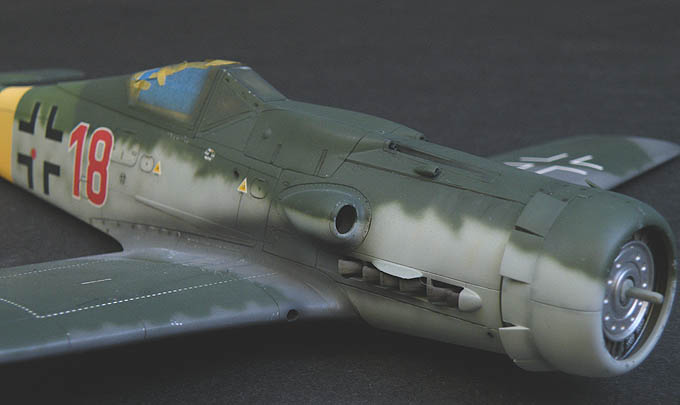
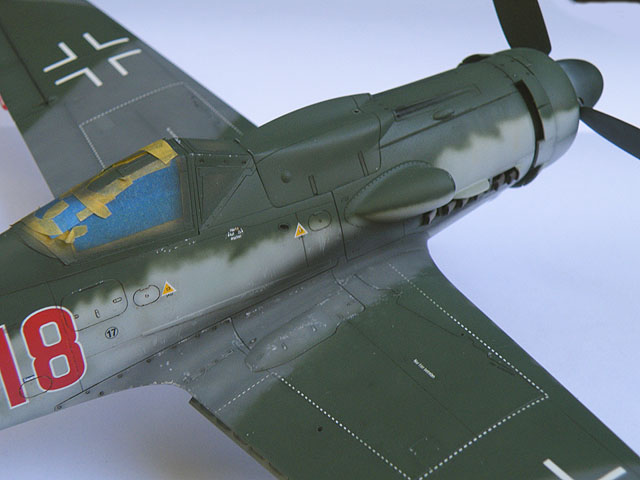
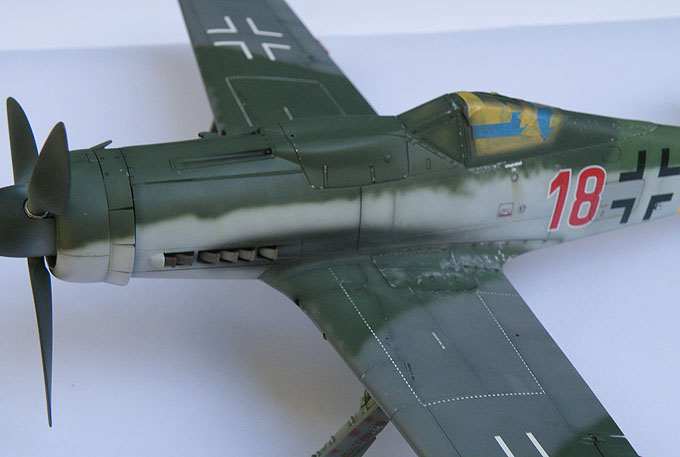
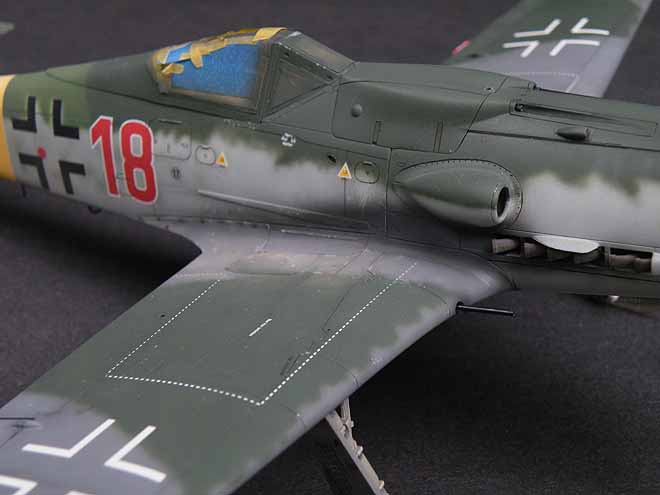
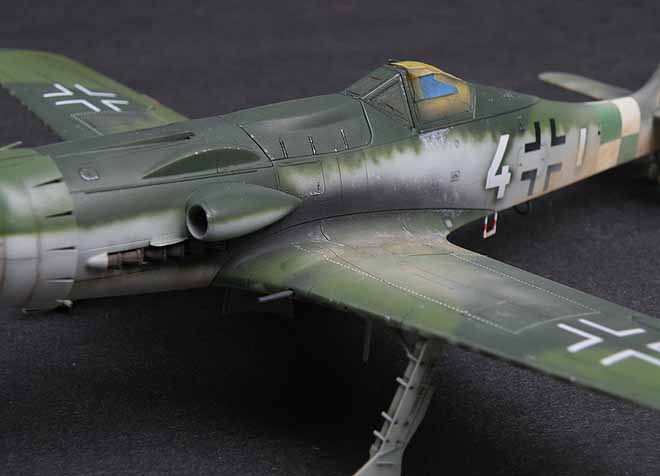
The Fw 190D-9 ''red 18'' of I./EKG(j) also looked like it had seen a lot of use but without much of the mud splatters on the rear fuselage, the left wing root looked like it had extensive paint wear on it or perhaps was dirty from boots from the pilot or ground crew...since all photographs of this machine were taken after it was captured its impossible to know exactly how weathered the wing roots were when it was still in active service so on the model I added paint chipping AND some dirt stains to cover all bases.
Both models have just had their flat clear coats sprayed on so I just have to wait until this dries before I can add the finishing touches, I find its difficult to leave them alone because I can't wait to see what they will look like after the last bits of weathering are on. :frantic
Matrixone
The Ta 152C of KG(j)27 is very heavily coated with dirt stains, from all the photographs I have seen of other aircraft in that unit they looked to have been well used and flown from dirt airstrips judging from the amount of dirt and mud flung over the airframes.
The Fw 190D-9 ''red 18'' of I./EKG(j) also looked like it had seen a lot of use but without much of the mud splatters on the rear fuselage, the left wing root looked like it had extensive paint wear on it or perhaps was dirty from boots from the pilot or ground crew...since all photographs of this machine were taken after it was captured its impossible to know exactly how weathered the wing roots were when it was still in active service so on the model I added paint chipping AND some dirt stains to cover all bases.
Both models have just had their flat clear coats sprayed on so I just have to wait until this dries before I can add the finishing touches, I find its difficult to leave them alone because I can't wait to see what they will look like after the last bits of weathering are on. :frantic
Matrixone
Similar threads
- Replies
- 7
- Views
- 787
- Replies
- 23
- Views
- 2K
- Replies
- 104
- Views
- 22K