• Modelers Alliance has updated the forum software on our website. We have migrated all post, content and user accounts but we could not migrate the passwords.
    This requires that you manually reset your password.
    Please click here, http://modelersalliance.org/forums/login to go to logon page and use the "Forgot your Password" option.

"Easy Pickins"

Good question James, they depict a long ago damage series over time, hence the mold on the bricks. The veggies will fill up a lot of the wall with these areas kinda in the background, etc. The veggies will be the trick for me.

Thx for watchin Bro.

Thx Mr. Iron Mike, James and moon puppy, more to follow soon. We got snow coming already which means bunker time, yehaaaaaa!
 
Restart “Easy Pickins” 200mm Dio

Resurrecting this older 200mm dio has been a long time in coming. I literally had to stop the build, because there was nowhere to put this huge base once it was finished, and that’s not cool. It only took a few years, 10 plus to be honest, to get another cabinet built so I could reacquire my original cabinet. Common, yall know how much a happy wife is worth right, everything!

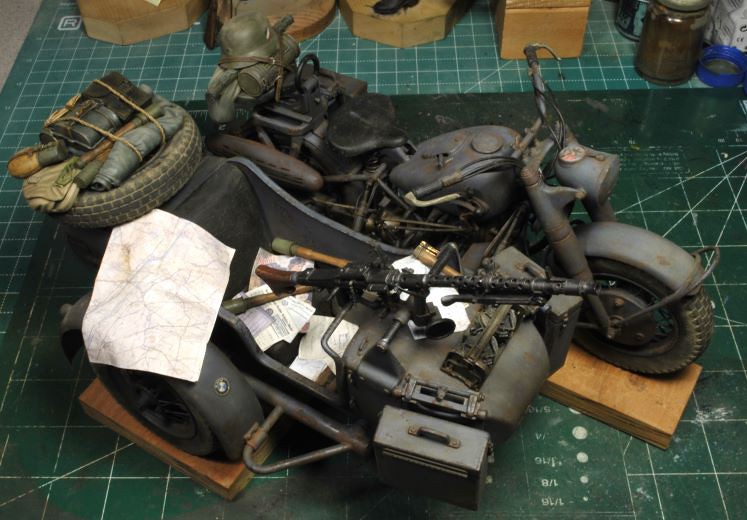
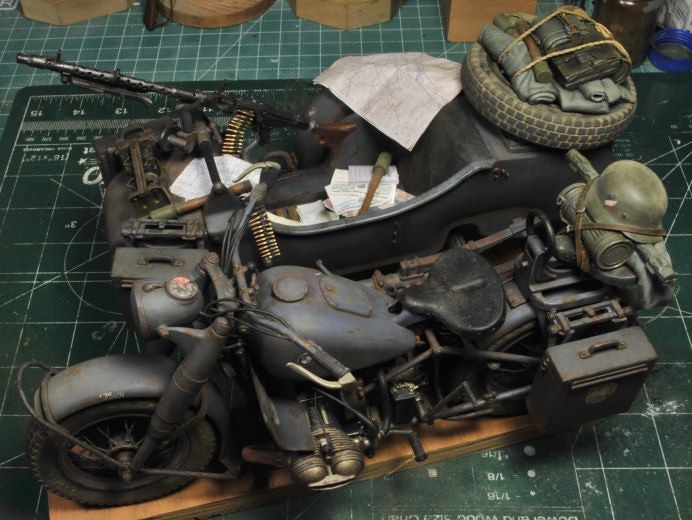
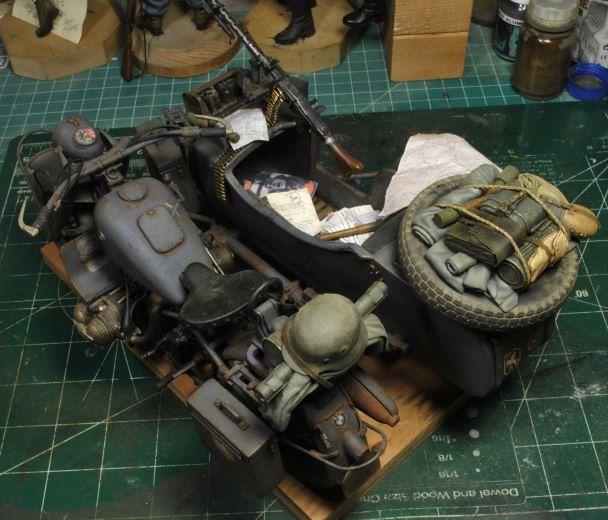
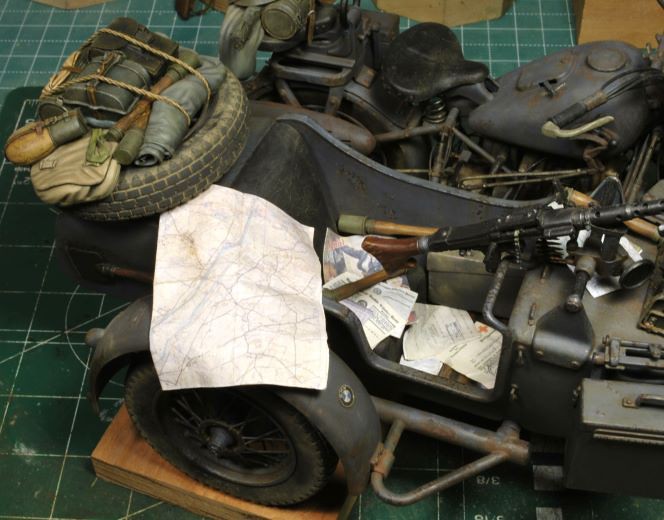
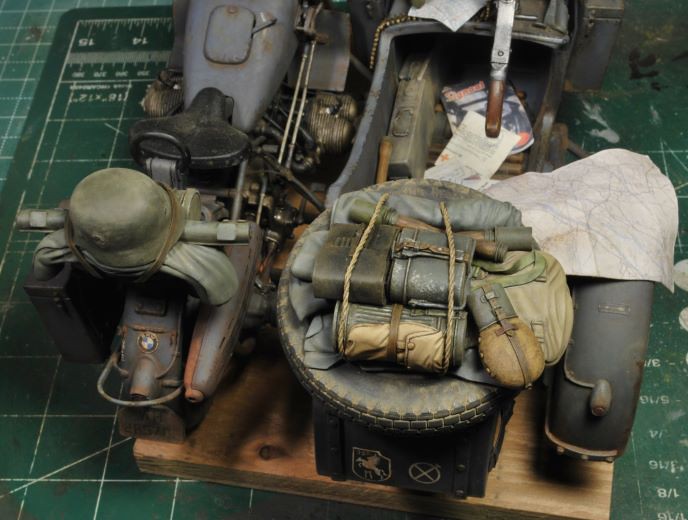
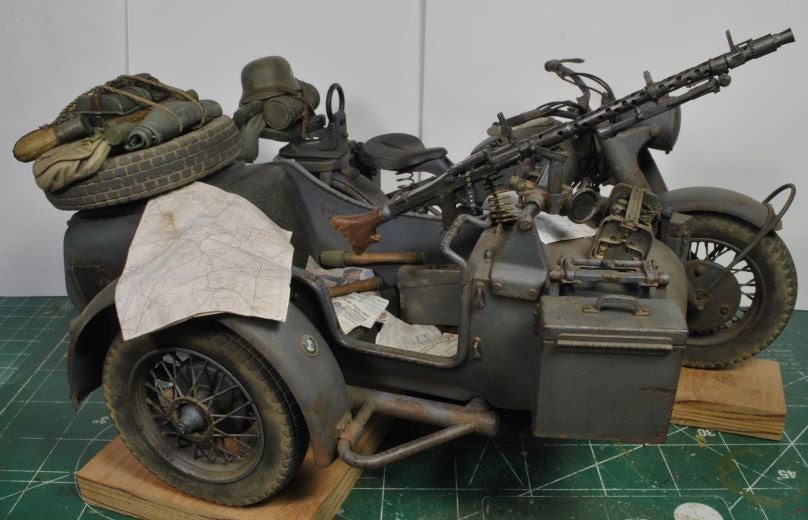
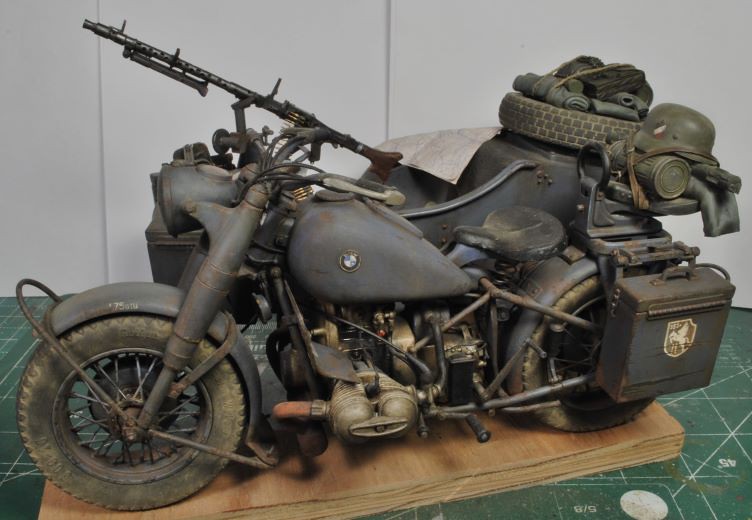
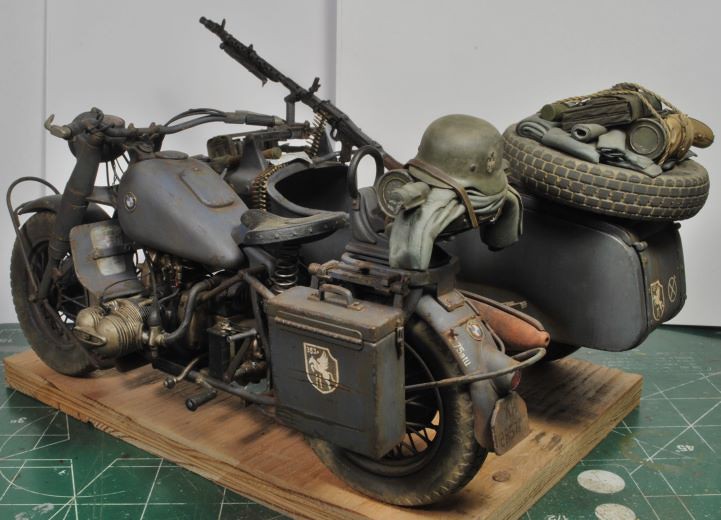
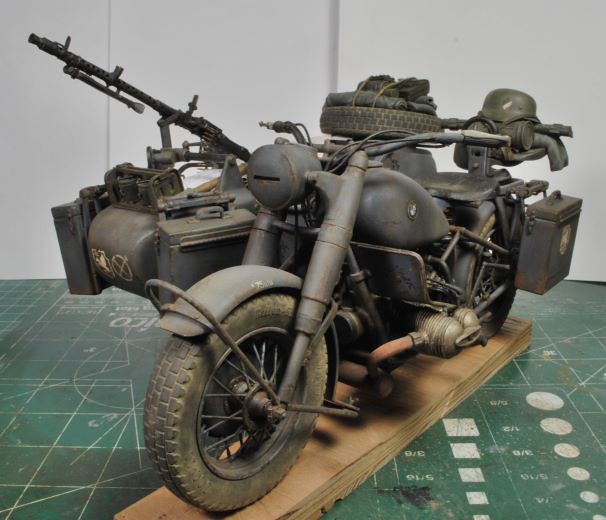
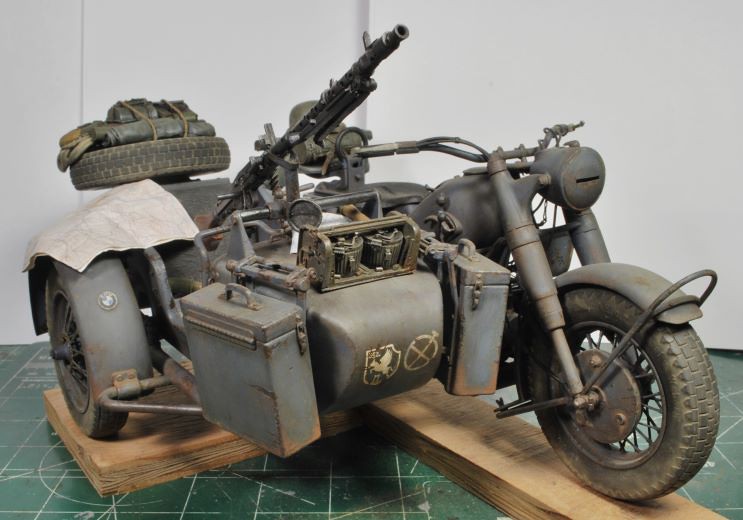
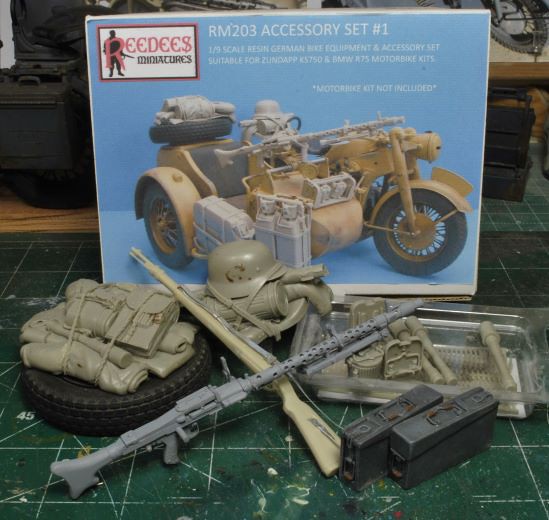
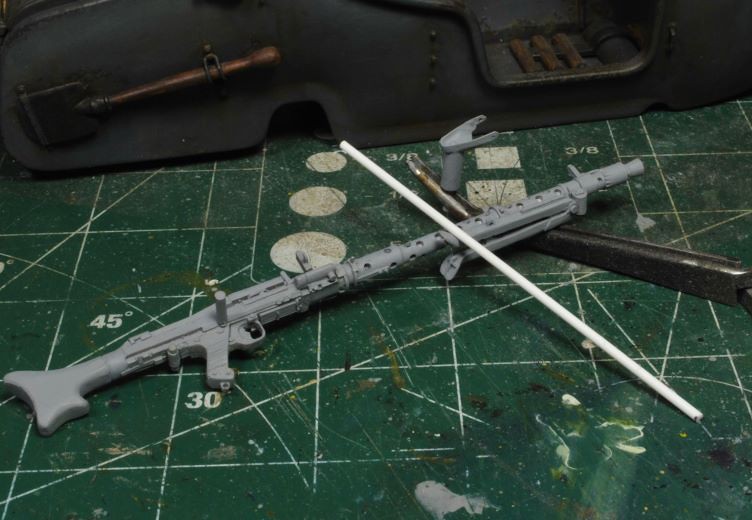
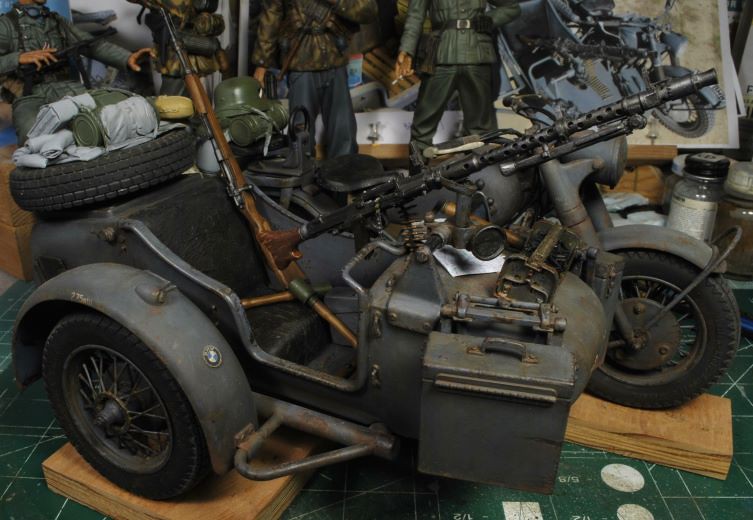
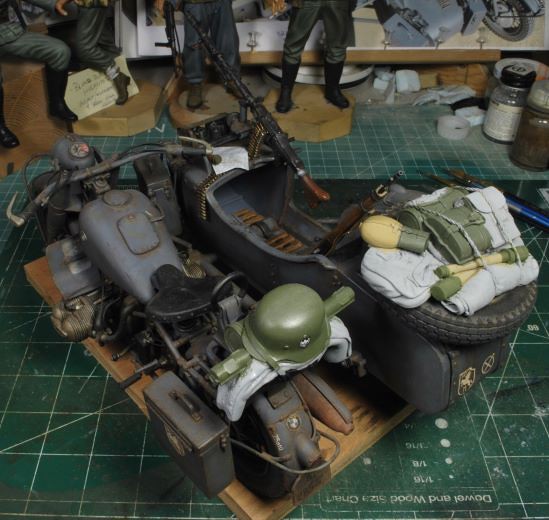
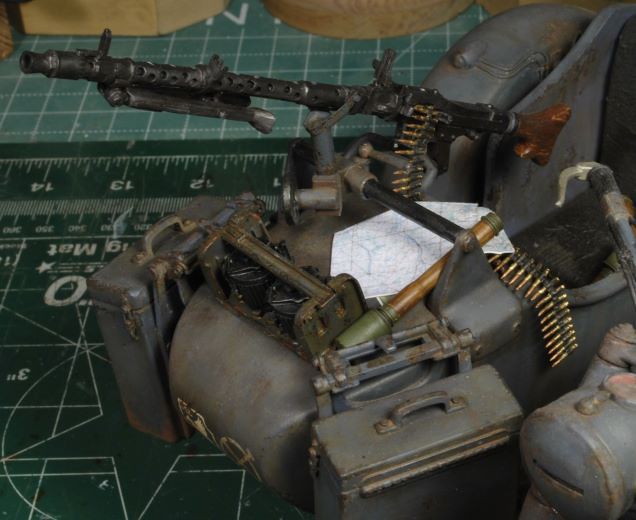
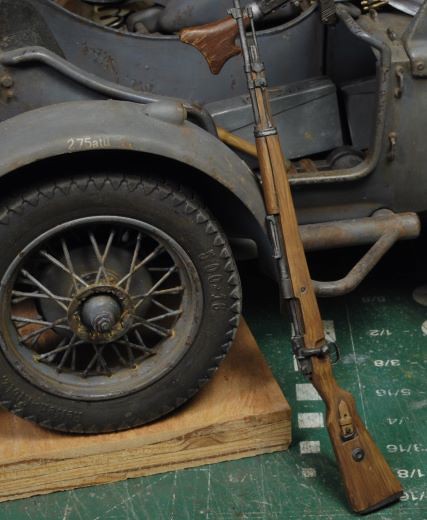
This may sound crazy, but my oil painting style has changed somewhat and I can see some of the figures will need some minor attention to get them up to speed. The bikes are looking ok, but the R75 will need to be properly weathered since I did not do that before I stopped this build.

A lot has changed in those few years, yes few, cause time does fly. Even my SBS build log organization has changed; the way I personally file my write-ups on my PC, etc. No worries, we got this. And lastly, after the PBucket sham I had to find a reliable photo storage site for all my builds. Fotki has filled the bill perfectly. They aren’t like some of the others, as in, “If it ain’t broke, bloody well don’t fix it!” Yall know what I mean.

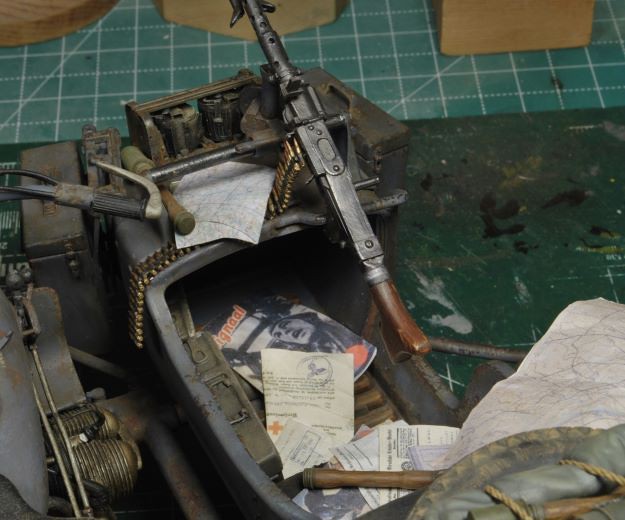
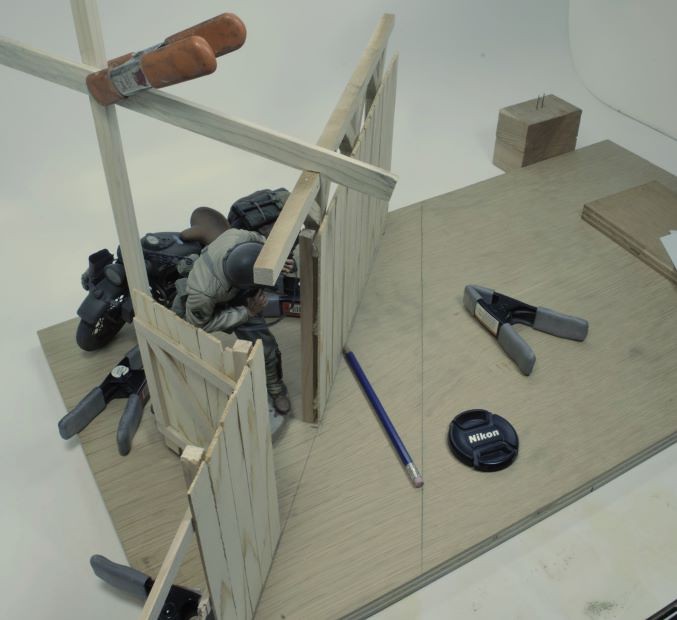
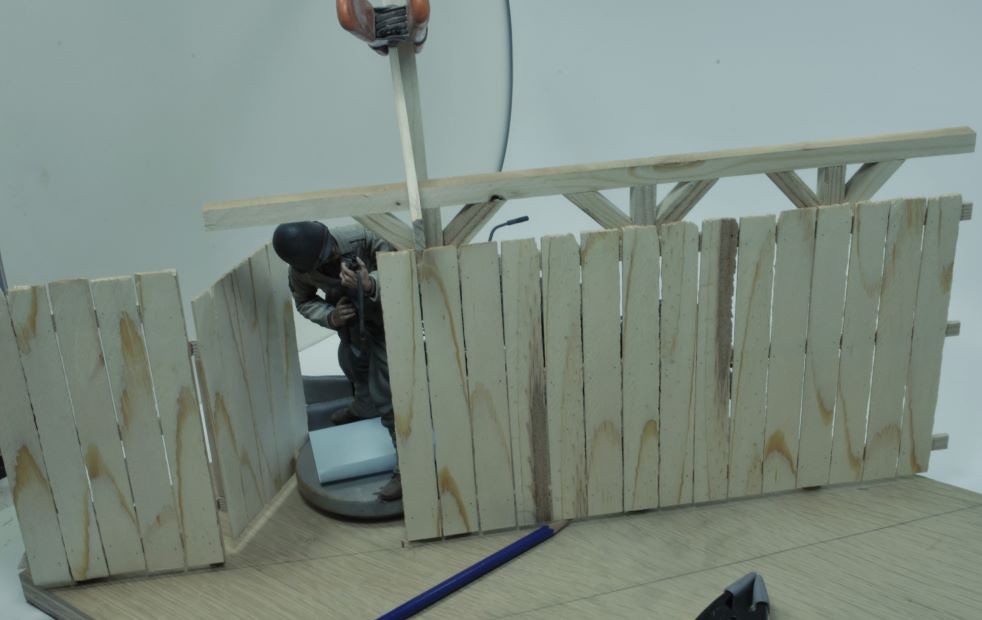
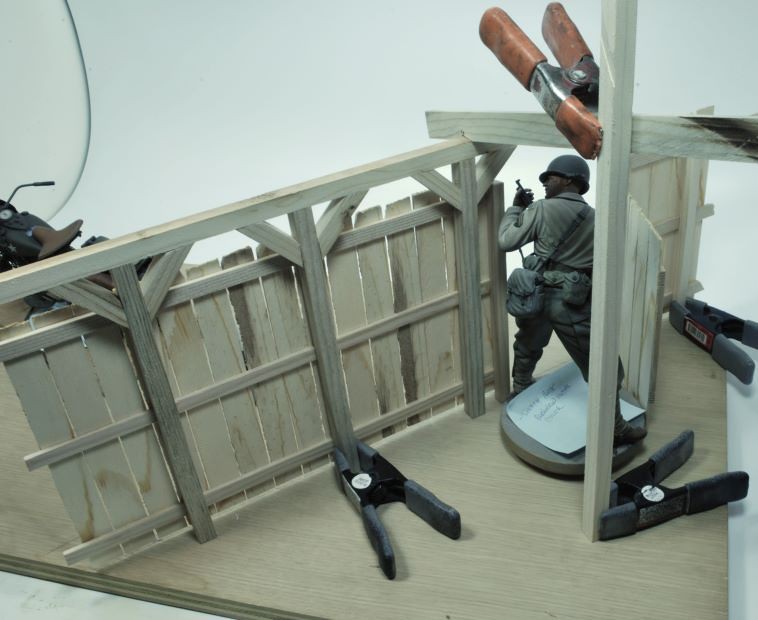
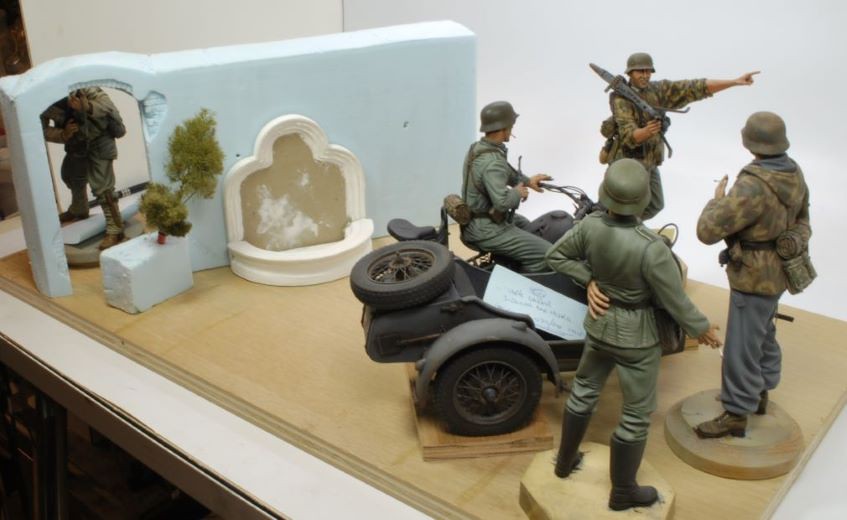
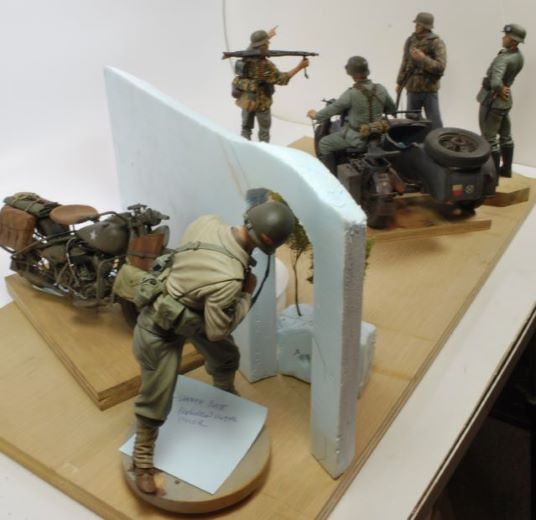
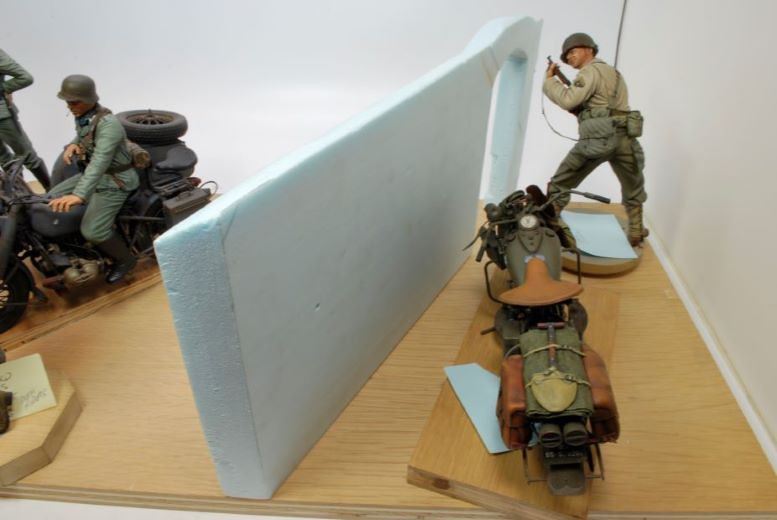
Ok, so once the figures had been finished, minus dirt and grime, I built the Harley Hog followed by the R75 with sidecar. I then began working the basic layout to fit the story line. This scenario is of a Ranger relaxing and taking a break behind a cemetery wall when all the sudden Jerry and his cohorts show up out front without a clue as to his presence, hence, “Easy Pickins.”

_DSC2128c-vi.jpg
_DSC2130c-vi.jpg
_DSC2127c-vi.jpg
_DSC2126c-vi.jpg
_DSC2158c-vi.jpg


Looking over this layout 10 plus years later it’s obvious the Ranger is not the same scale as the German figures. I have always known this from the beginning, so having him placed at a distance away from the others, as far as possible, should mitigate this issue. At least that was my intention. However, that gate is just a little too short for our Ranger, so I am rethinking this structure.

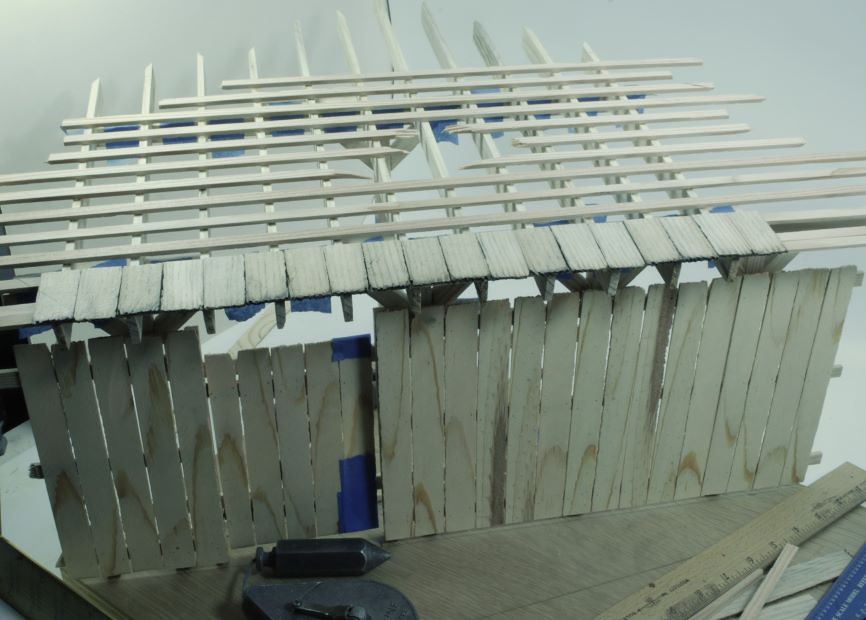
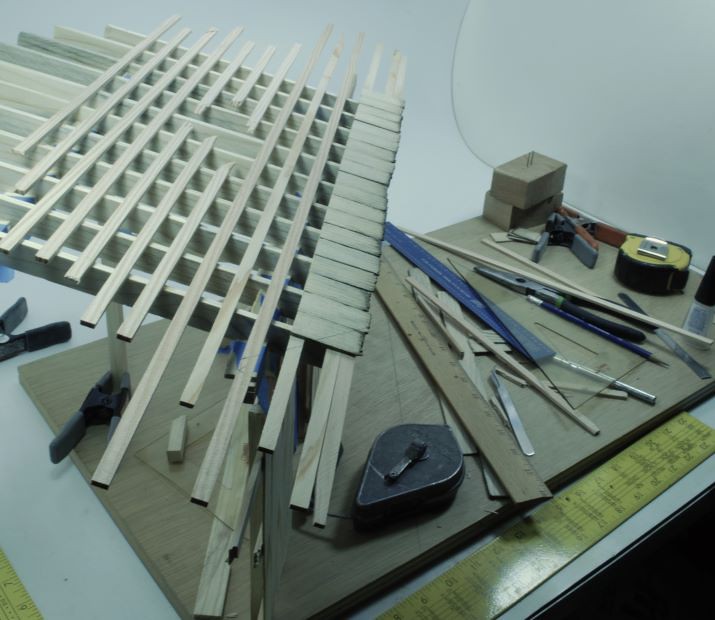
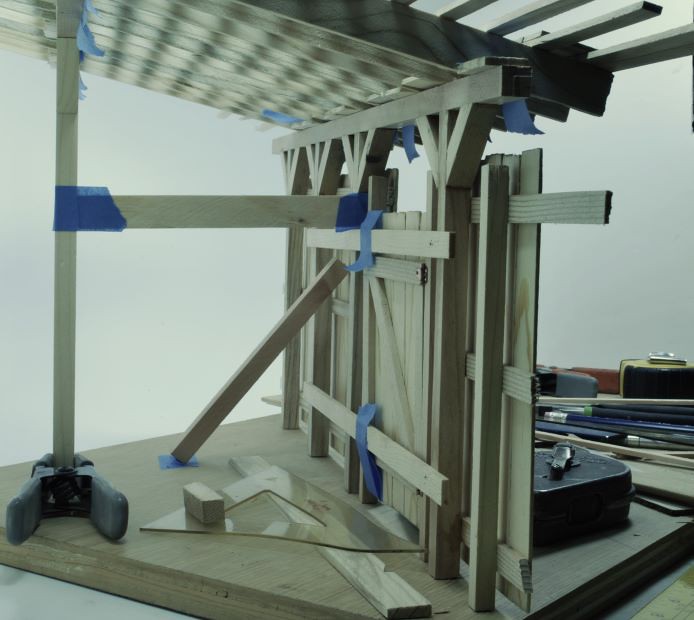
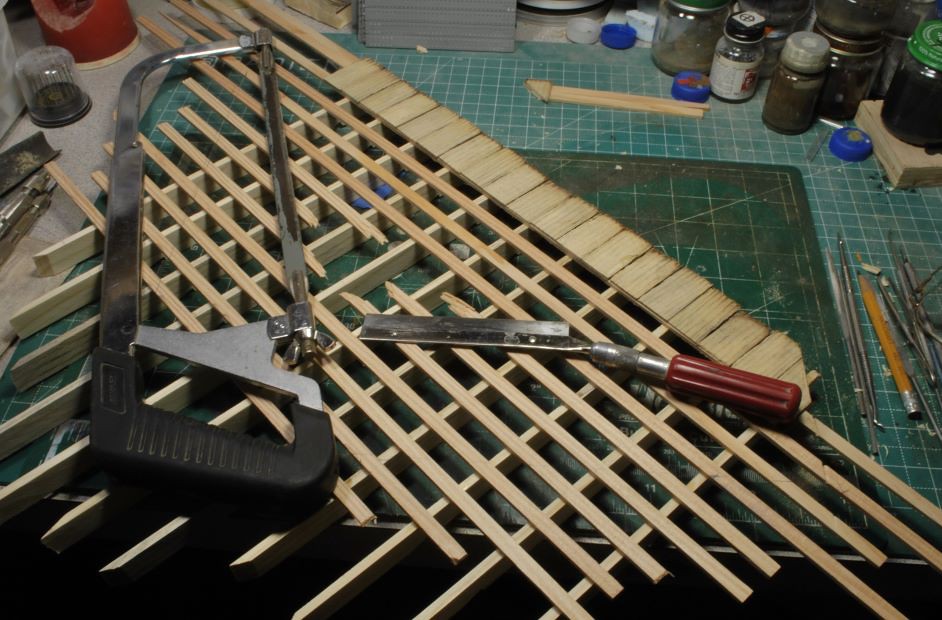
My initial intent was to build a corner section of an old barn, shed, or whatever, with plenty of foliage and overgrowth to make the Ranger’s hidey hole much more realistic. I am still mulling this over as I prep the R75 for completion. I can always use this wall section for my 1/16th Airborne figures too, so not all is lost on that cemetery wall. I will certainly redo the wall tiles, they are way, way, too big, especially looking at them right now, woof!

So, more updates to follow soon. It sure feels good to get these massive figures back on the bench and finish this beast of a dio.

Thanks for watchin. Cheers, Ski.
 
Yup! I remember this one! Glad you have dug it out to try and push it to the finish line Steve! Have a few of those myself and have been beating up on a real beast the last few months. Looks like it will sit a little while longer as MMM starts tomorrow.
 
I was about to say I've seen this setup somewhere before, it was right here!!

:soldier
Yep, I was not going to forget this set-up, not by a long shot. I've got too much time invested in these bikes, let alone these huge figures, lol.
Yup! I remember this one! Glad you have dug it out to try and push it to the finish line Steve! Have a few of those myself and have been beating up on a real beast the last few months. Looks like it will sit a little while longer as MMM starts tomorrow.
Thanks, Bro. I've never been one to leave a project unfinished unless there is a really good reason. If you've noticed the last three to five builds have all had a very minimal footprints. That cabinet space was getting scary and trying to shove a huge footprint like this one in there would have met with disaster, lol.

I froze my hinny off this last January just to be able to get this beast up and running, so now that I'm working it, I couldn't be happier to see these figs and bikes on the bench again.

More to follow soon, Gents!
 
Nice , back from the dead , project BroSki !!!
I remember this and yes it was a long time ago , always love your bike builds !!!
Aaaaaaaaaand your figure painting is bar none ...........
 
I see all your original photos are gone, you still have them?
Yes, MP, but reposting all of them will take forever, hence the "never use again" for PB.
Nice , back from the dead , project BroSki !!!
I remember this and yes it was a long time ago , always love your bike builds !!!
Aaaaaaaaaand your figure painting is bar none ...........
Thanks, Glenn, good to get it going again.
 
MG34 and Mount

The MG34 that comes with this kit is rather crude compared to the MG34 that is produced by Reedees Miniatures. There really is no comparison. Before I had received Steve’s kit, I had already drilled out the barrel and was having no fun with the kit gun mount, it was very weak.

As you can see from the box photo there’s quite a bit of gear that Steve has included in this accessory kit and I will be using much of it. Since this R75 crew is very close to home I won’t be using the gas can or chow jugs, but I will use the rest of it. Steve also provided the ammo cans and potato mashers. Inside that plastic box are several belts of MG ammo. They are very well molded, but even so, it’s a very delicate operation to clean up. Resin is not as tough as styrene, so I’m really taking my time with these belts.

_DSC0603b-vi.jpg


Below you can see how I drilled out the barrel of the MG and inserted plastic rod. The details on this MG34 are very accurate as is all of Steve’s gun parts and kits. I don’t know how he does it, but I’m likin it.

_DSC0599b-vi.jpg
_DSC0601b-vi.jpg


I had to refabricate another gun mount using brass which was cut, bent, and attached to the base of the kit mount. With some careful and delicate filing and shaping I was able to get this mount into shape to take the MG without too much difficulty and still be very close to accurate. I’ll give this MG and mount some paint and set it aside while I clean and paint the rest of the gear.

Momentum is rolling along nicely, so we’ll keep at it until the base work. Hopefully I will have figured out my plans for the Ranger’s hidey-hole. Whatever I come up with I want a lot of veggies, vines, and grass.


More to follow soon and thanks for watchin. Cheers, Ski.
 
Time for the Details

When getting back into working this R75 I realized just how much I had to do to get it in shape for the finish. I had to redo the unit decals, because I never paid attention to which unit was portrayed in the kit set. I needed to mount the MG34 gun plus the ammo belt, add the ammo drum rack, and pin and mount the storage boxes. The ammo belt took a bit of careful work, but Steve has made working the belts easier by how they were cast. They are still very delicate, and you will break them. I think everyone does break a few, but with a little care you can make them work as needed.

_DSC0606b-vi.jpg
_DSC0608b-vi.jpg
_DSC0610b-vi.jpg


In between working the R75 I also prepped the 98K rifle. For that I added a light wood grain pattern and used Raw Umber oils for the stock color tone. For the metal I did and experiment that seems to be working well so far. With a layer of Tamiya Flat Black in place I used standard carpenter’s pencil lead applied with a mascara applicator to all the high points. I then gave the metal a wash mix of Ivory Black and Brunt Umber oils to set in all the recesses. Once this was completely dry, I then used the applicator again but this time I used tube graphite that had been crushed fine. This last step seems to give a more silver tone to the barrel on the top high points. It may not look like much yet, but the MG34 is a better example of how well this worked.

_DSC0613b-vi.jpg


I’m now in the process of painting the stowage gear, and I still need to fling on some dirt and mud splatter onto the R75, plus get the tires in order. Once the R75 is up to speed I will finish any punch list items for each figure, there are quite a few, and get ready for the base.

Just a quick note; the difference in my figure painting quality from ten plus years ago to today is glaring me in the face. I’m almost embarrassed to put some of these guys into this dio, but I’m going to let it ride and get this beast of a project finished. No, I am not going to redo any of the older figures, other than add a glint to the eyes and adjust some minor issues. Wow, I never really gave that “glint” a thought way back then, HA! What a trip, lol. Ahhh, we’ll call this dio a time capsule, Ya?

More to follow soon and thanks for watching. Cheers, Ski.
 
R75 Almost Complete

The R75 and sidecar are nearly completed. I just have a few more items to deal with such as toning down the rusty tail pipe, clean up some overzealous scratches and rust marks, splatter some euro dirt, and dust up a few locations up from the underside.

All the gear has been painted and installed including some paperwork and maps, a few stick grenades, ammo cans, and the aftermarket accessory set from Reedees Miniatures. I wanted the sidecar to look somewhat messy with papers and gear in disarray. I understand many of the motorcycle units pretty much lived in their rigs, but these guys are local to the Normandy area, so I couldn’t get too carried away. I just love the passenger’s smirk on his face indicating he’s not really sure where he is, lol. He doesn’t appear to be the most organized fellow anyway. More on him later as we get closer to the figure placement.

_DSC0615b-vi.jpg
_DSC0617b-vi.jpg

_DSC0619b-vi.jpg
_DSC0621b-vi.jpg

_DSC0624b-vi.jpg
_DSC0626b-vi.jpg


Here’s a few full rig shots. The tires have been dusted as well as the spare on the rack. I used an odd mixture of pine sap and bees wax to clean off the Mig Pigments dusting on the tire treads. I know this is a very odd thing to use, but the wet sponge just wasn’t “cuttin the mustard” and the pine salve just happened to be handy, lol. It actually worked very well and without a sheen, excellent!

_DSC0627b-vi.jpg
_DSC0630b-vi.jpg

_DSC0632b-vi.jpg
_DSC0635b-vi.jpg


Now you can see the unit decal on the front of the sidecar. I had to play with the patch in “MS Paint” before printing on clear decal paper. There was a learning curve. Then, not being satisfied with the results, I hand painted each decal over the printed pattern. It wasn't too difficult, I used a very tiny brush and painted over the yellow printed color. I may need to touch up the decal on the R75 saddle box, it’s looking a bit odd from these photos.

_DSC0637b-vi.jpg

_DSC0639b-vi.jpg


The R75 is in the cabinet until the figures have been addressed. Once the figures are set, I will figure out how the layout will work best and begin the base work. The final stages are in motion and the veggies will follow very soon.

Thanks for watchin. Cheers, Ski.
 
I agree, MP. Butchya know, that pax sure has a knucklehead smirk that just can't be ignored, therefore he will be the brunt of this scenario, HA!
 
Building the Woodshed/Out-Building

After serious consideration on how to lay out this scenario I’ve decided to build a woodshed/out-building. Since most of the barns in Normandy back in WWII were made mostly of stone with wood roofs and trusses, and I wanted to make an out-building, no stone work will be done. The lumber material has a rough sawn texture and would be typical of what would have been used for such a secondary structure.

_DSC0640b-vi.jpg
_DSC0641b-vi.jpg
_DSC0642b-vi.jpg


The scenario will work the same and I’ll be able to keep the scene open enough for the action to be visible without losing sight of the Ranger, he won’t be hidden. And of course there will be plenty of climbing ivy and bushes to cover and climb the old wooden structure. I will be using several shades fo dark brown and black to give the old wood appearance, so this should work just fine.

I cut all the material on the table saw using weathered 1”x10” pine board scraps. I left an area open for some weather damage as well. The shake shingles were cut from a board that had not been planed, so the width would wider and be close to scale. I’m going to be busy for some time placing all those shingles, but the effect will be worth it.

_DSC0643b-vi.jpg
_DSC0644b-vi.jpg


The posts all have heavy metal pins and the base has been drilled for each location making for a stable set up. Right now, I’m debating what kind of equipment might need to be built to fill in some spaces as well as a few oil drums and maybe some tractor equipment as well. If I could find some 1/9th scale aftermarket equipment that would be great, but I’m thinking I will have to build all of it from scratch. No worries, that’s another fun [part of this Sport, the imagination and creation, right?

_DSC0645b-vi.jpg
_DSC0646b-vi.jpg


More to follow soon, but right now I’ve got my work cut out for the next few days. Thanks for watchin.

Cheers, Ski.
 
Back
Top