• Modelers Alliance has updated the forum software on our website. We have migrated all post, content and user accounts but we could not migrate the passwords.
    This requires that you manually reset your password.
    Please click here, http://modelersalliance.org/forums/login to go to logon page and use the "Forgot your Password" option.

"Easy Pickins"

I dunnaknow but this looks like round irons .

Du43Mbx.jpg
 
You nailed it Cheyenne, just watch Mark Dice on utube, they wouldn't take the gold either, HA!

Ya, I didn't have any Evergreen rod or square tubing, so soldering plenty of copper and brass was the next fix.

Thx for the kind words gents, Ski.
 
Damn, Ski! How did I miss this one?

That gate looks awesome and you did a really great job with it's construction and the finish. That patena would be something the guys from American Pickers would pay some bucks for. :)

Cheers, Bro!
James
 
Hey James, I get your updates . Ya, the gate is still in progress, probably do another hair spray on it today, the flaking is what is a bit tough to get just right. Seems I end up doing it more than once every time I go back to doing chipped paint, don't do it every day, lol.

Thx for the compliment Ma Brotha! Cheers, Ski.
 
What's the Marine Corp mato? "Improvise, adapt and overcome, ooraaaaaaaaaah!"

A serious oversight was committed, but corrected, and it had to do with the fact that 200mm figs are just a slight bit smaller in all aspects compared to a 1/9th scale figs. Seeins how the figs will be far apart from each other, 200mm vs 1/9th, it wouldn't be a big deal, but constructing the cemetery wall according to the 200mm specs would be a problem for that 1/9th scale Ranger fig.

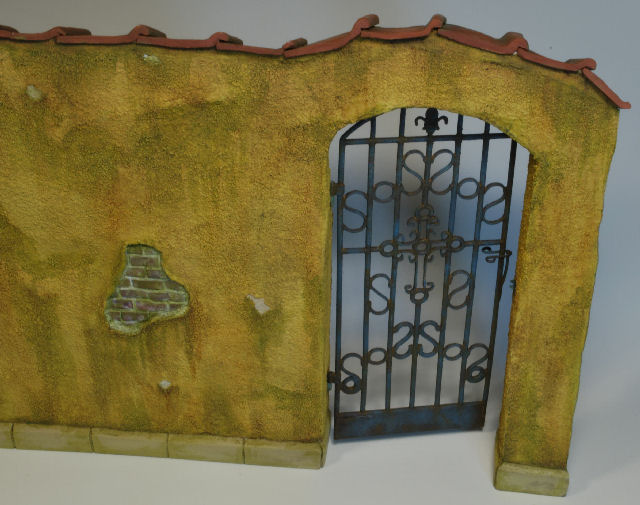
So, as mentioned above, I did some slight modifications and added 3/4" foam to the bottom of the wall structure and plasticard to the gate. I think it came out rather nicely and now we prep for paint and weathering, plus careful planning of our veggie arrangement. The veggies, just as with any good meal, can spoil a good plate, so steady ar she goes................lol.

_DSC2154b-vi.jpg


_DSC2155b-vi.jpg


_DSC2157b-vi.jpg


___________________________________________________________________________________________________________

FLASHBACK:

Now, a quick pictorial rehash of where we are in the final stages. Since nearly all the prior pics of this SBS have been wiped by the PB debacle I will just add a few pics to get everyone up to speed. To repost the entire build would be futile, but one could go back and read the details if they wished.

At any rate, we are getting close to closing out this dio, veggies and ground work are front and center at this time.

May I introduce to you the crew of this delicate dance of resin and paint......

_DSC1853b-vi.jpg


_DSC1883b-vi.jpg


_DSC2102b-vi.jpg


_DSC1970b-vi.jpg


_DSC2028b-vi.jpg


Yes, the glint in the eyes of the 4 Germans will be added, minor oversight, lol..

Thx for watchin and more to follow soon. Cheers, Ski.
 
Thanks for getting a new post start on this Ski! It all looks great and am looking forward to seeing the finish line. (y) (y)

:popcorn
 
Thx Guys, working it more tomorrow after I help my grandson put together a snap tight P51, yehaaaaaaaaaa!


Cheers, Ski.
 
200mm would be what in standard scale? If I think 1/16 would I be close? Anyway those figgies look awesome.
 
Thx Luiz, Mike, working the wall more today, :soldier

Hi Paul, thx for the compliment Amigo.

As the scales go, 200mm is really close to 1/9th scale, but a tad smaller. 1/16th is closer to 120mm, but a tad smaller as well. It can get confusing, but both are compatible if situated within the scene where the differences wouldn't be so noticeable. Remember, no GI or Grunt is ever the same size in real life, so why should every fig be exactly the same, minus the equipment and arms, IMHO, right?

I certainly have noticed that even though a fig may say 1/16th or 120mm, every sculptor may have proportional differences, which means the equipment may close that gap for you. Hope that wasn't tooooo long winded, lol.

Thx again Gents. Cheers, Ski.
 
A little bit of wall action lately and more to follow. I'm just getting around to posting these pics, still busy outside for a little while longer.

Some weathering on the cemetery wall has taken place;

_DSC2158B-vi.jpg


_DSC2160b-vi.jpg


More to follow soon. Thx for watchin, Ski.
 
The colors of the wall look good. The weathering looks good, too. A question about the portions where the brick is showing through - are they places that have been exposed to the elements for a long time or are they the result of recent combat? If from recent combat I would think there would be a more noticeable jaggedness around the edges whereas erosion could soften the edges over time. Other than that the wall looks great. I hope the structures I use for my current projects look half as good.

Cheers,
James
 
Back
Top