
-
Modelers Alliance has updated the forum software on our website. We have migrated all post, content and user accounts but we could not migrate the passwords.
This requires that you manually reset your password.
Please click here, http://modelersalliance.org/forums/login to go to logon page and use the "Forgot your Password" option.
You are using an out of date browser. It may not display this or other websites correctly.
You should upgrade or use an alternative browser.
You should upgrade or use an alternative browser.
"Easy Pickins"
- Thread starter Steve Ski
- Start date
Steve Ski
Well-known member
Thx Mike, just got three different punches in yesterday, perfect for 1/35 but too small for 200mm, bummer. I saw a boobtube vid talking about using aquarium plants, so I ordered a few sets that closely resemble ivy leaves, we'll see.
Spring is here, so I'll scour the yard for small plants and see what I come up with.
Thx again, Ski.
P.S. BTW, it was still cheaper, even after shipping, to buy from overseas, go figure........... :huh:
http://www.greenstuffworld.com/index.php?id_category=101&controller=category&id_lang=3
Spring is here, so I'll scour the yard for small plants and see what I come up with.
Thx again, Ski.
P.S. BTW, it was still cheaper, even after shipping, to buy from overseas, go figure........... :huh:
http://www.greenstuffworld.com/index.php?id_category=101&controller=category&id_lang=3
Steve Ski
Well-known member
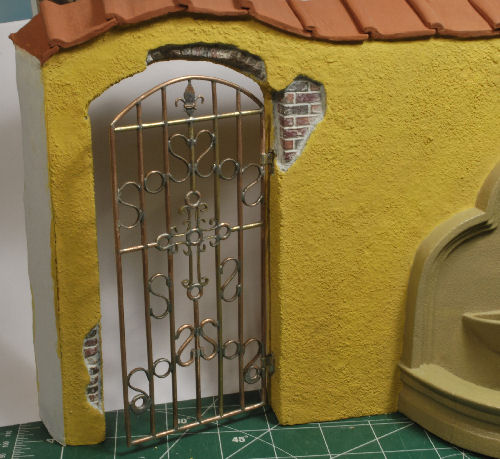
It's been raining and more for the rest of the week, so I got a little bit more done. The water fountain is done for now and the wall roof tiles have been started as well as the Terra Cota tiles for around the fountain. More to follow soon.

Thx for watchin. Cheers, Ski.

Thx for watchin. Cheers, Ski.

Skinny_Mike
Well-known member
Steve Ski
Well-known member
Been getting a little work done on the wall section for the cemetery using Laszlo Adoba's "Building Dioramas 1,2 &3". These are great book and well worth the investment. They are not expensive by any means. Kuddos to Laszlo!
Here's a quick pictorial of how I got to where I am now with the stucco wall. I am using 1" thick construction foam board commonly used to insulate the exterior of your average basement wall. It's an easy process and the example took me less than an hour, so here goes......
All the materials needed which can be acquired from your local hardware store.

Using thinned drywall patching compound and a basic brush I applied a semi-thick layer directly onto the foam.

Next I used Spackle in a common kitchen sifter and coated the entire work area making sure to cover all the "blue" that might show through.

Here's a photo of the sample section after I used a hair dryer to speed up the drying process. Some of the Spackle will fall off, but not much. After the Spackle had been dried I misted the work area with a water bottle mister to cement the top layer (sifted) to the work piece. Then use the hair dryer once again to dry completely.

Priming the surface is a tricky process so you need to take a few precautions to avoid "burning or melting" the foam sheet. Lacquer based primers will melt or burn the foam really quick, so a light coat is recommended, then build up a second layer if you feel it's necessary. If you rush this process the primer will leach through the Spackle and come in contact with the foam and destroy all you have done up to this point. I taped off any areas that were not treated to avoid a major mess.

And finally we have a finished section ready for painting. I would suggest using an air brush for your first coat and then brush on subsequent coats. The Spackle will suck up most of the first coat, so be prepared to make a few passes before the color is satisfactory.

As you can see from this example it's not a difficult process, so why spend money buying kits of plastic buildings when you can make you own. The possibilities are endless and only depending on your imagination, and of course, realism is a factor, too.
Thx for watchin and more to follow soon. Cheers, Ski.
Nice job Ski! Simple and to the point. ")
Skinny_Mike
Well-known member
The wall looks great!
Steve Ski
Well-known member
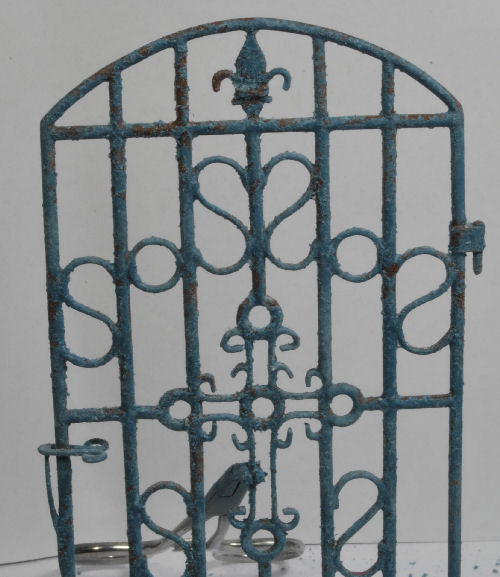
I got past the gate guard to work on the gate, really guys, go figure, but there you have it! Actually, the smoke has been so bad in our area, worse than the smog alerts in Los Angeles back in the 60's, that I now have the excuse to avoid splitting fire wood and get ta sniffin some paint, lol.
After going back to review early period pics of iron gates it was then I realized round rod wasn't, if ever, used. Oh well, a square head I ain't so it stays as is, lol.
A bit of primer after the latching mechanism was installed. Note the decorative feature appropriate for a cemetery gate, ya???

The standard salt and hairspray method for heavy chipping, gotta love this technique!
Note: The Gate Guard, i.e., my wife, and I agreed a blue tone would break up the color scheme just right for this scenario.

As you can see, there's plenty more work to be done, especially on the salt chunks and then some really intense rust work with pigments and oils, etc.
I will post "up to speed" pics to counter the PB debacle so there won't be such a gap in the photo sequence, when I get time.
Thx for watching and let's hope this winter will be a heavy snow season with plenty of bunker time, HA! Let is snow, let is snow, let it snow................................
Cheers, Ski.
After going back to review early period pics of iron gates it was then I realized round rod wasn't, if ever, used. Oh well, a square head I ain't so it stays as is, lol.
A bit of primer after the latching mechanism was installed. Note the decorative feature appropriate for a cemetery gate, ya???
The standard salt and hairspray method for heavy chipping, gotta love this technique!
Note: The Gate Guard, i.e., my wife, and I agreed a blue tone would break up the color scheme just right for this scenario.
As you can see, there's plenty more work to be done, especially on the salt chunks and then some really intense rust work with pigments and oils, etc.
I will post "up to speed" pics to counter the PB debacle so there won't be such a gap in the photo sequence, when I get time.
Thx for watching and let's hope this winter will be a heavy snow season with plenty of bunker time, HA! Let is snow, let is snow, let it snow................................
Cheers, Ski.
Wooo....NICE!!! 
Iron Mike
Master At Arms And Resident Curmudgeon

Similar threads
- Replies
- 5
- Views
- 2K
- Replies
- 106
- Views
- 15K