
-
Modelers Alliance has updated the forum software on our website. We have migrated all post, content and user accounts but we could not migrate the passwords.
This requires that you manually reset your password.
Please click here, http://modelersalliance.org/forums/login to go to logon page and use the "Forgot your Password" option.
You are using an out of date browser. It may not display this or other websites correctly.
You should upgrade or use an alternative browser.
You should upgrade or use an alternative browser.
Carlo Faggioni's SM.79bis ANR (2nd plane)
- Thread starter Flyingbabydoc
- Start date

Flyingbabydoc
Well-known member
Carlo Faggioni's SM.79 (281-4)
Thanks a lot. I appreciate the input.
This thing with thinning the paint is driving me insane.
I used mostly enamels before, then I just recently switched to the acrylic range. I used for the Japanese aircraft mostly mr color from Gunze; however the Italian colors are not well represented in that range, so I got Italeri acrylics. These seem fine at first but they simply do not stick to the plastic. I tried a prime coat before and it got so thick the airplane looked like a panzer. I assumed it was because in airbrushing it would settle better (never could try)... Not sure though how to solve this. It is frustrating.
But I'm sure this is the place to get the help and solve that one too")
Thanks again
Alex
Thanks a lot. I appreciate the input.
This thing with thinning the paint is driving me insane.
I used mostly enamels before, then I just recently switched to the acrylic range. I used for the Japanese aircraft mostly mr color from Gunze; however the Italian colors are not well represented in that range, so I got Italeri acrylics. These seem fine at first but they simply do not stick to the plastic. I tried a prime coat before and it got so thick the airplane looked like a panzer. I assumed it was because in airbrushing it would settle better (never could try)... Not sure though how to solve this. It is frustrating.
But I'm sure this is the place to get the help and solve that one too
Thanks again
Alex
Carlo Faggioni's SM.79 (281-4)
Have you tried spraying with a mask?
Have you tried spraying with a mask?
phantom II
Master at Arms
Carlo Faggioni's SM.79 (281-4)
Hi Alex . My best recomendations for primer is Tamiya gray primmer ( spray can ) . Maybe you could spray it outside.
Dries really quick and lays down like magic.
Cheers, Christian B)
Thanks a lot. I appreciate the input.
This thing with thinning the paint is driving me insane.
I used mostly enamels before, then I just recently switched to the acrylic range. I used for the Japanese aircraft mostly mr color from Gunze; however the Italian colors are not well represented in that range, so I got Italeri acrylics. These seem fine at first but they simply do not stick to the plastic. I tried a prime coat before and it got so thick the airplane looked like a panzer. I assumed it was because in airbrushing it would settle better (never could try)... Not sure though how to solve this. It is frustrating.
But I'm sure this is the place to get the help and solve that one too
Thanks again
Alex
Hi Alex . My best recomendations for primer is Tamiya gray primmer ( spray can ) . Maybe you could spray it outside.
Dries really quick and lays down like magic.
Cheers, Christian B)
Flyingbabydoc
Well-known member
Carlo Faggioni's SM.79bis (2nd attempt)
Hi again,
Thanks for all the input. Dealing with these acrylics is another challenge in a seemingly endless sucession of challenges and problems I have to deal with.. Nonetheless, little by little I learn how to solve each new challenge.
This thickness problem may have also another reason, which I just checked today. I diluted the grigio azzuro chiaro with thinner when it was supposed to be water. Oh the stupidity...
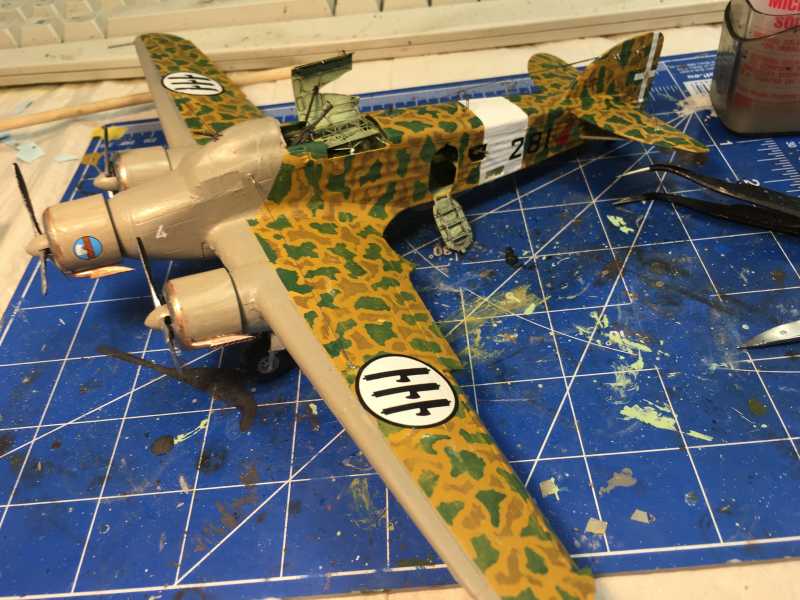
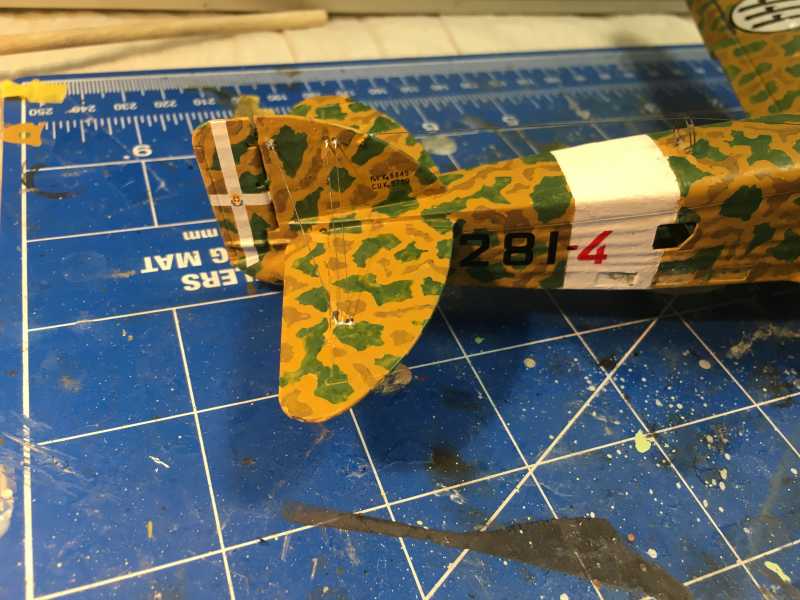
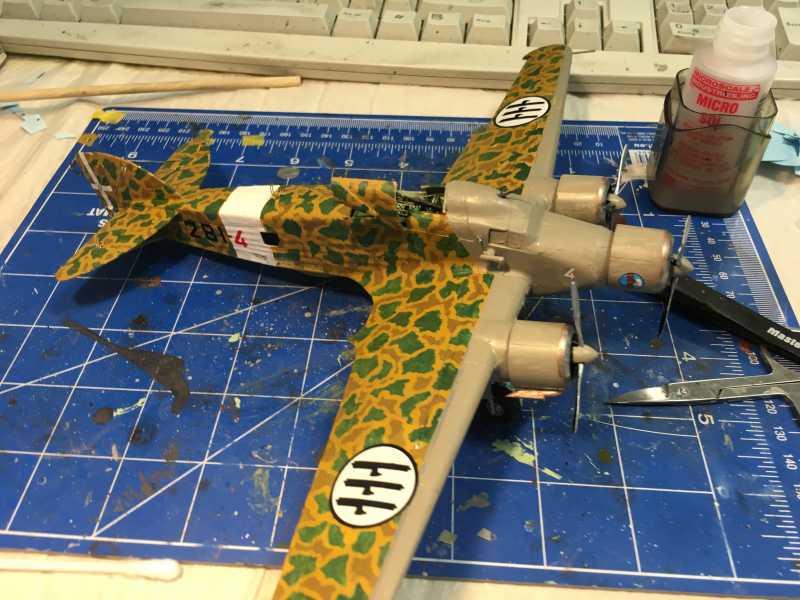
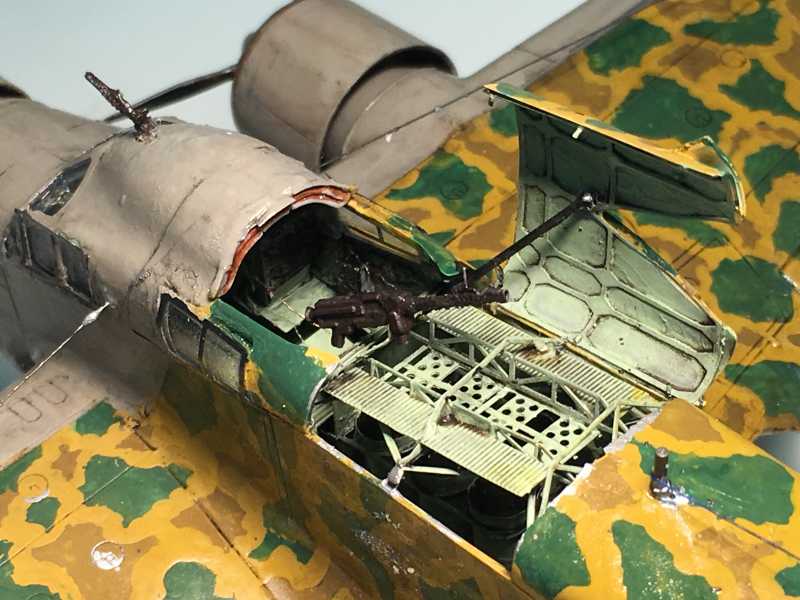
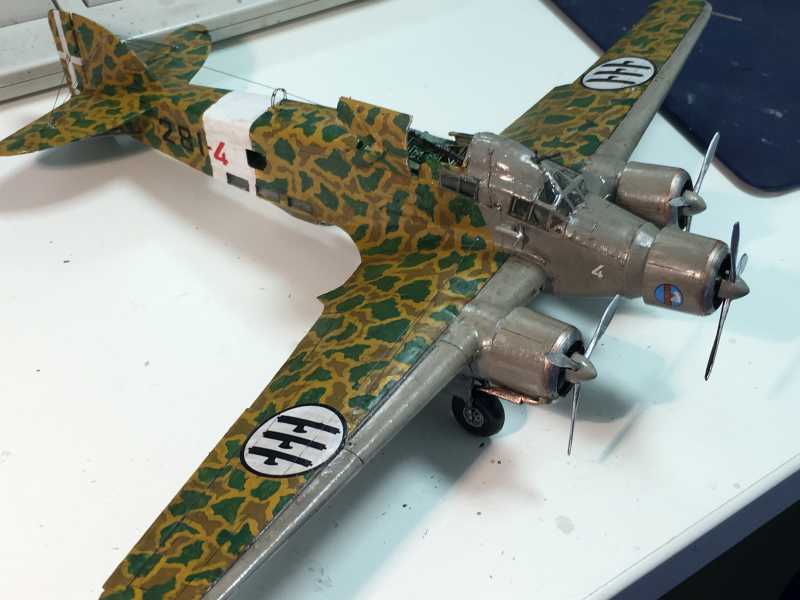
At least the decals are in and even "thick" I like the result, it really turned out a great camo IMHO. Check it out:

Now will let it rest for a while and then the final detailing.
Cheers
Alex
Hi again,
Thanks for all the input. Dealing with these acrylics is another challenge in a seemingly endless sucession of challenges and problems I have to deal with.. Nonetheless, little by little I learn how to solve each new challenge.
This thickness problem may have also another reason, which I just checked today. I diluted the grigio azzuro chiaro with thinner when it was supposed to be water. Oh the stupidity...
At least the decals are in and even "thick" I like the result, it really turned out a great camo IMHO. Check it out:
Now will let it rest for a while and then the final detailing.
Cheers
Alex
Flyingbabydoc
Well-known member
Carlo Faggioni's SM.79 (281-4)
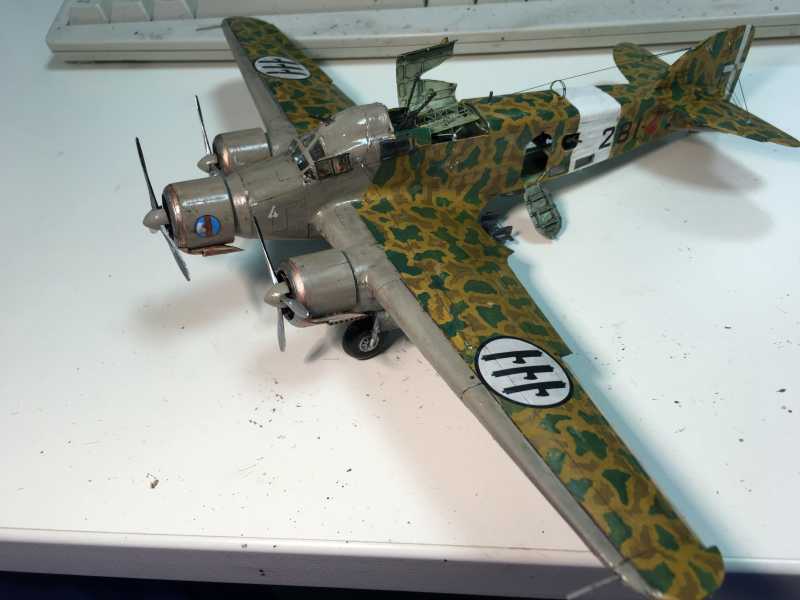
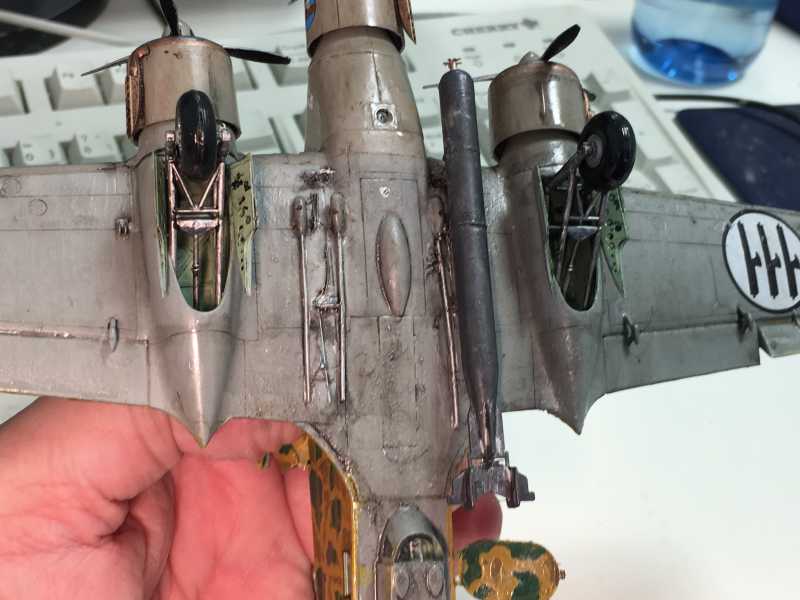
Well, I guess I am done.
In this model there were a few positives (the PE turned out great, the wiring was a fun new experience and future does avoid smears in the transparent parts) and many negatives (the damn Italeri acrylics, my stupidity in diluting with the wrong solvent, the horrid thickness of the painting and many others which you will point out).
I was almost thinking that maybe I should give up, I am eons away from an acceptable end-result. But, as they say, don't get frustrated - just lower your expectations.
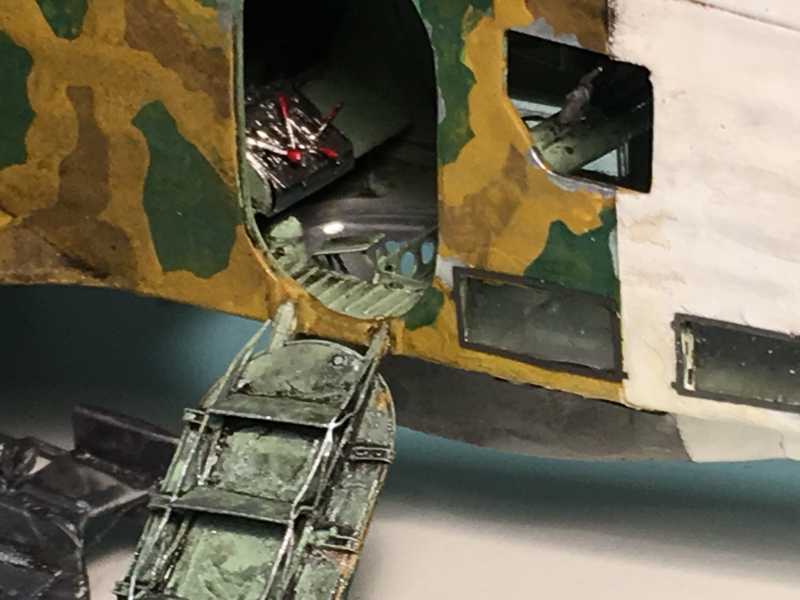
Anyways, this picture shows that the real thing was really dirty.

This is how it turned out. The lighting was somehow horrible today (rain).

In any case, I am working on a display (diorama) of the Gadurra Air Base in Rhodes in 1941 to make the final pictures.
Please fire away your comments. Thanks a lot for your support and patience.
Alex
Well, I guess I am done.
In this model there were a few positives (the PE turned out great, the wiring was a fun new experience and future does avoid smears in the transparent parts) and many negatives (the damn Italeri acrylics, my stupidity in diluting with the wrong solvent, the horrid thickness of the painting and many others which you will point out).
I was almost thinking that maybe I should give up, I am eons away from an acceptable end-result. But, as they say, don't get frustrated - just lower your expectations.
Anyways, this picture shows that the real thing was really dirty.
This is how it turned out. The lighting was somehow horrible today (rain).
In any case, I am working on a display (diorama) of the Gadurra Air Base in Rhodes in 1941 to make the final pictures.
Please fire away your comments. Thanks a lot for your support and patience.
Alex
phantom II
Master at Arms
Carlo Faggioni's SM.79 (281-4)
Hi Alex. I see some of the problems you speak of but I continue to see improvements .
Modeling is an ever learning process . It can only get better every time you find and apply a solution.
I love that torpedo and the old picture is fabulous . I have never seen one that looked that beat up.
Cheers, Christian B)
Carlo Faggioni's SM.79 (281-4)
Never give up, Never Surrender!
You're learning and having fun, what more matters?
Never give up, Never Surrender!
You're learning and having fun, what more matters?
Carlo Faggioni's SM.79 (281-4)
Anyone who brush painted that camo and made it look that good should be proud of themselves.
Couple of things I notice. I am not sold on the bone wax as filler. It looks like it makes an awful mess. Have you tried regular white putty and sanding?
Paint in thin coats even with a brush. If you need a second and third coat fine but try not to glob the paint on.
You are making leaps and bounds in improvements. Don't ever give up. We all get discouraged. Just like this guy:
https://www.facebook.com/ross.a.lewis.7/videos/10206284745025005/
Flyingbabydoc
Well-known member
Carlo Faggioni's SM.79 (281-4)
Hey guys
Thanks a lot for your messages. Now it's time to stop acting like a whining wuss and get ready for the next challenges...
You are quite right. I have an enormous amount of fun and I am learning so much. Couldn't get better.
In any case, do you remember that zero which looked like Scheiße (German for S**t) in the end? I started another one which was better. So I will do the same thing here. After the armistice Faggioni joined the Aeronautica Nazionale Repubblicana piloting the last version of the SM.79, the SM.79bis. In this airplane he was killed in 1944. That said beginning tomorrow I will start this plane as my entry for the torpedo campaign. The one now was a "dry run"
as for the next projects, I have a few ambitious things in mind:
1. An Italian Ju-87B for the Junkers campaign
2. A Fokker E-I for the WWI campaign
3. A Savoia-Marchetti SM.75 for the cargo campaign.
The SM.75 will be assembled using the Italian Kits adaptation into the italeri SM.82 marsupiale, and will be a military version. I am very psyched about this one.
Thanks again folks and stay tuned for scenes from our next chapter!
Cheers
Alex
Flyingbabydoc
Well-known member
Carlo Faggioni's SM.79 (281-4)
Thanks Adam that is very kind and reassuring of you
The secret of bone wax is to heat it up until it becomes almost liquid. Then apply. However, I agree with you that sanding and trimming it afterwards is a PITA. I tried the liquid putty from Gunze and it is indeed much better
Cheers
Alex
Anyone who brush painted that camo and made it look that good should be proud of themselves.
Couple of things I notice. I am not sold on the bone wax as filler. It looks like it makes an awful mess. Have you tried regular white putty and sanding?
Paint in thin coats even with a brush. If you need a second and third coat fine but try not to glob the paint on.
You are making leaps and bounds in improvements. Don't ever give up. We all get discouraged. Just like this guy:
https://www.facebook.com/ross.a.lewis.7/videos/10206284745025005/
Thanks Adam that is very kind and reassuring of you
The secret of bone wax is to heat it up until it becomes almost liquid. Then apply. However, I agree with you that sanding and trimming it afterwards is a PITA. I tried the liquid putty from Gunze and it is indeed much better
Cheers
Alex
Carlo Faggioni's SM.79 (281-4)
Alex, your skills are improving with each build!
I think this looks great! You worked hard to add the extra detail, that camo scheme is a tough one and even though the paint may be a little thick, you nailed it!
Keep it up! If I ever build my SM.79 I'll have to use your interior details for a reference!
:salute
Carlo Faggioni's SM.79 (281-4)
Are these guys wearing stockings????
Why the dark legs???
Are these guys wearing stockings????
Why the dark legs???