• Modelers Alliance has updated the forum software on our website. We have migrated all post, content and user accounts but we could not migrate the passwords.
    This requires that you manually reset your password.
    Please click here, http://modelersalliance.org/forums/login to go to logon page and use the "Forgot your Password" option.

All Righty ... What's on the bench today?

I know exactly what you mean Paul and that was my original plan and it would have worked if the spokes left the rim at a much shallower angle

I may be able to fill the gaps between the alloy tube and the rim with some thick CA and then paint the rims but its not ideal. I still think if i do the other wheel i will leave the tube off as the spoke angle is even steeper on that one.
Really my whole method is wrong. Instead of using a jig i just glued the two halves of the wheel together then cut the spokes out of one side using the other half as the jig to hold the other half of the rim and hub in place. You have to drill the spokes from the outside and they are not marked and they would also break in to the rim join if you drilled them to take a the 1mm tube. incidentally i dont know what the plastic is they use for this chrome plate but normal glues dont melt it so you have to use CA
Bit despondent with this TBH.
 
Looks like your angles are a bit off but it's surely passible representation. I like it Paddy, is it worth your time? Well it's your time so you tell us. Would love to see more. :popcorn
 
OK i am getting on top of this.

DSC_2959.JPG


this the rear wheel, basically i am doing one spoke at a time so the wheel retains its shape and the hub stays in the middle so basically cut one off and fit a steel one.

on the back i am slotting the rim to take the spoke and this means i can leave the bump on the rim where the spoke enters

The wheel is obviously in two halves and the spokes are slightly off set from the centre line, this is actually correct to the real thing.

DSC_2961.JPG


It looks a bit messy but i have hopes for this method.

i will probably transfer this lot to a build thread if there is interest, I know this is mostly an armour and aircraft place ?
 
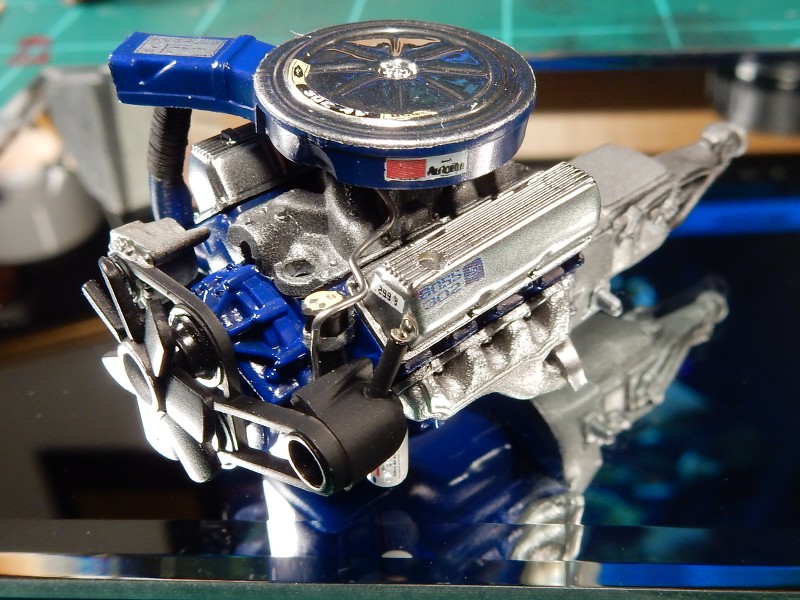
Have had a side project going on along side of the 67 Fastback build. It's part of a joint effort between me and 2 other fellas on another forum. One guy got the body & chassis and another fella got the interior. Me.....I get my favorite part every time....the engine.

A Boss 302 for a Revell 1970 Boss 302 Mustang. I've been working on this now solid for the last month and a half and have everything done except the engine wire harness and spark plug wires now.
Spark plug wires came in and are now cut and prepped for install. Just have to form them to present a natural "lay" appearance and get 'em on there. Engine wire harness is also in the prepping stages. After that I think she'll be all done.

To achieve the corrugated aluminum sleeve on the passengers side manifold on the heat duct I just wound fine copper wire around the piping and painted a dull black.

QmfhO5.jpg
 
Both y'all are nailin' it. Joe that motor looks like it should be on a test stand ready to turn over.
Paddy you got the spokes down, the effort is going to be well worth it!
:notworthy
 
Much happier with this.

DSC_2963.JPG


Metal v plastic spokes. The difference doesnt look much but the metal are 0.5mm which in 1:8 is a 4mm spoke which is correct.
The plastic spokes are 1mm and that would be an 8mm spoke. way too big


DSC_2964.JPG


Doing it this way i have retained the correct rim bulge where the spoke enters, Just wish i had thought of this before i did the front wheel but even that is looking better without the alloy spoke nipples.
just got to do the other half of this back wheel and join the two halves and we are off.
 
Paddy, Joe, those auto assemblies are magnificent! Way to go!

Brooks, that is so cool! I'm currently building one of those in 1/72 scale too.
 
Much happier with this.

View attachment 143387

Metal v plastic spokes. The difference doesnt look much but the metal are 0.5mm which in 1:8 is a 4mm spoke which is correct.
The plastic spokes are 1mm and that would be an 8mm spoke. way too big


View attachment 143388

Doing it this way i have retained the correct rim bulge where the spoke enters, Just wish i had thought of this before i did the front wheel but even that is looking better without the alloy spoke nipples.
just got to do the other half of this back wheel and join the two halves and we are off.
:notworthy
 
After a little research it looks like the original issue of the Heller Laverda in 1973 had the right size tyre for the wheel however the kit was reissued in 2012 and its these kits that have the wrong tyre. Oh well, I'm sure i will find a solution
I have been able to finish the rear wheel at least and whatever happens now i am happy i have sorted the way to do spoked wheels :)

DSC_2966.JPG
 
The F-4 & F-100 are still sitting on the bench. I think the F-100 is almost at the point of calling done.

In other news, all kinds of crazy flooding going on around here. But never fear, the stash is safely stored on top of a hill away from harm. Now whether or not I can make it home from work today remains to be seen. :blink
 
Back
Top