-
Modelers Alliance has updated the forum software on our website. We have migrated all post, content and user accounts but we could not migrate the passwords.
This requires that you manually reset your password.
Please click here, http://modelersalliance.org/forums/login to go to logon page and use the "Forgot your Password" option.
You are using an out of date browser. It may not display this or other websites correctly.
You should upgrade or use an alternative browser.
You should upgrade or use an alternative browser.
All Righty ... What's on the bench today?
- Thread starter panzerace007
- Start date
Duke Maddog
Well-known member
Ed, Gerry, lots going on there. Glad to see you guys keeping it going. Nice work too!
Thanks Luiz! Now if only I can finish a few of these!
Eagle, I have not had any issues with any tweezers yet! Thanks for that awesome Tool Time! I vote that to be the best Thread ever started to date!
Here's my latest progress I got done so far. I've not had very much time to get to the workbench the last few days, but during the short times I have had; I've managed to get the following done.
First off, I shot some Primer Grey on the bottom of my C-46. It looks spot on to Model Master Neutral Grey, so this will be the underside coat. It did reveal a few areas where some additional attention was needed so I added some more Mr. Surfacer to the areas. I'll be sanding these later:

You can see where the Mr. Surfacer is added...
While that was drying, I sanded and polished a couple other models: the F-51 and the Jet Commando. Since they still look the same, I didn't take pics of them.
Next I took a look at the little Russian gun I had painted and I noticed an obvious seam on the top of the breach block. That ain't supposed to be there, so out came the Mr. Surfacer again and I got it all filled and smoothed out. I also adjusted the wheels so they all sit right, and I painted the details on the wheels, breach, gun slide, and targeting sight:

Now to re-coat this in clear for the wash, then dullcoat and drybrush/weathering and this will be done.
Speaking of guns; I found this little Italian gun that I'd started some time back. It's a cheap little snap-together wargame gun with crew that I got for my Italian Army. It is in soft plastic and has some fairly soft detail, but this isn't expected to go to any contests or anything. Anyway, it was primered white when I found it so I applied some paint to this to move it along:

After all that, I felt it was time to get back to the Shipyards.
I pulled down this RAF rescue launch that had been sitting for awhile and decided it was time to get it moving again. I finished adding a few more deck detail parts and then masked the windows for this. It is now ready for painting:

Next I sanded the sides of the Spru-can I'm doing. Now I have to repaint some as I sanded down to the base plastic. I went ahead and masked and painted the lower hull anyway. Now it's got the red hull underneath and is that much closer to decals:

Yes, some of the masts and antenna bits broke off again. I'm leaving them off until the end so that I don't have to keep re-gluing them into place.
Finally, I was having so much fun in the Shipyards, I decided to open another slip and start a model that a friend on another Forums had just started. Now the two of us are doing a mini-group build over there building this model. It's the Dragon 1/700 scale USS New York and I started with the Rolling Airframe missile launchers:

They each had four parts each and they were tiny! That's why I left the bases on the sprue until I need them.
Moving along, I added the small parts to the main octagonal tower:

Next, the instructions told me to add all the small parts on the foredeck before gluing the whole assembly to the main hull. I figured that these small parts would be difficult enough putting on the deck part, and then might break off when I attach it to the main hull. I decided to reverse the process; I added the fordeck part to the main hull first:

Then I added all the tiny parts. It made this step so much easier:

By this time I'd run out of time again so just for fun I quickly dry-fit the upper superstructure and forward tower to the main hull to get an overall shot of what this will look like:

That's gonna be one impressive ship! I just hope I can do it justice.
That's all I have for now. Stay tuned, I hope to have more done soon.
Thanks for looking in, comments are welcome.
Thanks Luiz! Now if only I can finish a few of these!
Eagle, I have not had any issues with any tweezers yet! Thanks for that awesome Tool Time! I vote that to be the best Thread ever started to date!
Here's my latest progress I got done so far. I've not had very much time to get to the workbench the last few days, but during the short times I have had; I've managed to get the following done.
First off, I shot some Primer Grey on the bottom of my C-46. It looks spot on to Model Master Neutral Grey, so this will be the underside coat. It did reveal a few areas where some additional attention was needed so I added some more Mr. Surfacer to the areas. I'll be sanding these later:

You can see where the Mr. Surfacer is added...
While that was drying, I sanded and polished a couple other models: the F-51 and the Jet Commando. Since they still look the same, I didn't take pics of them.
Next I took a look at the little Russian gun I had painted and I noticed an obvious seam on the top of the breach block. That ain't supposed to be there, so out came the Mr. Surfacer again and I got it all filled and smoothed out. I also adjusted the wheels so they all sit right, and I painted the details on the wheels, breach, gun slide, and targeting sight:

Now to re-coat this in clear for the wash, then dullcoat and drybrush/weathering and this will be done.
Speaking of guns; I found this little Italian gun that I'd started some time back. It's a cheap little snap-together wargame gun with crew that I got for my Italian Army. It is in soft plastic and has some fairly soft detail, but this isn't expected to go to any contests or anything. Anyway, it was primered white when I found it so I applied some paint to this to move it along:

After all that, I felt it was time to get back to the Shipyards.
I pulled down this RAF rescue launch that had been sitting for awhile and decided it was time to get it moving again. I finished adding a few more deck detail parts and then masked the windows for this. It is now ready for painting:

Next I sanded the sides of the Spru-can I'm doing. Now I have to repaint some as I sanded down to the base plastic. I went ahead and masked and painted the lower hull anyway. Now it's got the red hull underneath and is that much closer to decals:

Yes, some of the masts and antenna bits broke off again. I'm leaving them off until the end so that I don't have to keep re-gluing them into place.
Finally, I was having so much fun in the Shipyards, I decided to open another slip and start a model that a friend on another Forums had just started. Now the two of us are doing a mini-group build over there building this model. It's the Dragon 1/700 scale USS New York and I started with the Rolling Airframe missile launchers:

They each had four parts each and they were tiny! That's why I left the bases on the sprue until I need them.
Moving along, I added the small parts to the main octagonal tower:

Next, the instructions told me to add all the small parts on the foredeck before gluing the whole assembly to the main hull. I figured that these small parts would be difficult enough putting on the deck part, and then might break off when I attach it to the main hull. I decided to reverse the process; I added the fordeck part to the main hull first:

Then I added all the tiny parts. It made this step so much easier:

By this time I'd run out of time again so just for fun I quickly dry-fit the upper superstructure and forward tower to the main hull to get an overall shot of what this will look like:

That's gonna be one impressive ship! I just hope I can do it justice.
That's all I have for now. Stay tuned, I hope to have more done soon.
Thanks for looking in, comments are welcome.
The last thing on my bench was a sign that read, "FREE!" Somebody picked it up off the curb yesterday. I'm waiting on the the car transporter to show up the take the Roadster on it's journey north, and a guy from the movers to come and measure up my neon, the u-boat and some big balsa model for custom crates. Then we get re-appraised at 1, seeing as the first appraisal was totally bogus. It's the last day with any semblance of "normalcy"- tomorrow the packers come and we go into chaos!
I'm reminded of the line in Blazing Saddles...

Good luck Chuck.
Good luck Chuck.
I'm reminded of the line in Blazing Saddles...
Good luck Chuck.
Yeah buddy!!
Prop Duster
Member
Chuck Good luck on the move and all. :v 
SoCals
 loss is the North Wests gain
 OH Wait! I mean, have a good trip

re; the bench I guess I missed that golden opportunity to have a gen-u-ine chuckw original. I are so
slow

SoCals


re; the bench I guess I missed that golden opportunity to have a gen-u-ine chuckw original. I are so
slow
Duke Maddog
Well-known member
Man, Chuck I'm gonna miss you something fierce! I wanted to spend some more time with you at Orangecon but so much kept getting in the way. Have a great trip Chuck!
Have faith Ed! They may work yet.
Well, I got a lot of things to post! I spent the day trying to get several projects moved ahead so I can get them off my workbench sooner and make up for lost time again. I am pleased that I got a bit more done than I had expected or hoped for.
Okay, let's get on with this since I have a lot to show here.
First off, I clearcoated a few things in preparation for decals. I re-shot the USS Virginia, and Annie; then shot a clear on the Spru-can. I've decided that she'll be christened the USS Caron, even though she's not quite in the proper configuration according to the instructions. Oh well; this was before her refit. I also shot a coat of clear over the Mustang in preparation for the Alclad. I didn't shoot any pics of them as they look the same as before. Once the decals go one and some other weathering is done, I'll have something to shoot.
Now on to the things that I can show progress on....
First off, the Monkeemobile I've had on the Shelf of Shame has been there too long. I took the body down and shot another coat of red on it. Still not very smooth.... again:

While that sat drying, I went ahead and painted the bottom chassis black:

I then checked the instructions and saw that the interior should be done in white, along with the roof. I'm thinking for simplicity's sake, I'm going to shoot it Radome Tan instead. Or maybe a camouflage grey, which is really really light grey, almost white. I'll see which one I have more of.
Moving on, I went to work on a couple of my aircraft. First I masked and painted a white stripe on the fuselage of the little Czech plane. I planned on getting that stripe painted yellow today but didn't get around to it:

Next I did what I could with the C-46 since I feel like it never gets anywhere no matter how much I work on it! I sanded the seams smooth that I'd filled with Mr. Surfacer the other day:

Then I shot a coat of Primer Grey on it again. Looks a lot better now:

After that, I shot Primer Grey over the top of it too:

You can see how big that monster is on my workbench. Now you know why I'm so eager to get it off my bench!
Finally, I masked off the bottom and shot Olive Drab paint on the top. Hopefully everything looks well enough for me to continue on with this plane:

After that, since I had the OD out, I shot some on the exterior of my helicopter I had started some time ago:

Moving on to my armor now, I had to fix a ding on the barrel of my Russian BS-3 gun. I didn't get any pics of that since it went so fast after the Mr. Surfacer dried. I did get pics of the fix I did to the rotating platform on Annie. First I scraped and sanded the top to remove the crinkled paint; then I took my Exacto blade and scraped out the messed up paint in between the ridges along the side:

Then I shot the OD over it. I did that when I was shooting the helicopter and C-46:

Wow, looks like I still need to do a little cleanup on that thing.
The next thing I did work on though was my IBG Diamond T Cargo truck.
I had finished up the chassis first, complete with engine:

Then I got the front of the cab built along with the cargo bed:

They are just sitting on that chassis to get a better pic. The next thing I did was paint the chassis Oily Black:


Paint was a little wet still I think...
After I painted the chassis, I shot another pic with the cab and cargo bed to see how it looked:

While I still had the OD out, I shot a coat over the Diamond T's fenders on the chassis; and then the cab and cargo bed:


Next I should be able to paint the interior details in the cab and then get it assembled. Hopefully tomorrow.
Now it was time to get some serious work done....
I started out with the little LAV I was finishing. I pulled out my Silly Putty and placed the masking on it for the second color:

Next I pulled out my brown and shot it over the little vehicle:

While that was drying, I pulled out my T-90 and started masking off the green with the Silly Putty as well in preparation for the second color:

This one got a dark earth color; more tan than brown:


The holes in the turret Silly Putty happened because I'd forgotten to take the pic of the tan color first before I started removing the Silly Putty where the black was supposed to go.
Once these two were dry; I removed the Silly Putty in the places where the black was supposed to go and then masked off the rest of the tan:


I also masked off the brown on the LAV in preparation for shooting the black:

I mixed up a little "light black" using some light grey in a jar of flat black and proceeded to shoot it on these two armor models. First the T-90:

Then the LAV:

Once they both dried, I was able to remove the masking to see how well these came out. First the LAV:


Black came out a bit pebbly because for some reason my compressor had turned off and the tank had run down. I hate when that happens! I turned it back on to shoot the T-90.
Here's the T-90:


Not bad if I do say so myself! The black turned out a little better.
Finally, after they had both dried sufficiently, I shot clearcoats on them in preparation for washes and decals:


The last thing I did before I ran out of time was to shoot the remaining black paint on the side of the Rescue Launch's hull:

Well, that's all for today. I'm hoping tomorrow to get decals on at least three models, if not more; shoot some Alclad on the Mustang, make more progress on the New York, and shoot the interior and roof of the Monkeemobile. If all goes well tomorrow, I might be able to get all that done. So, stay tuned everyone, and remember, comments are welcome. Thanks for looking in on this overly long post.
Have faith Ed! They may work yet.
Well, I got a lot of things to post! I spent the day trying to get several projects moved ahead so I can get them off my workbench sooner and make up for lost time again. I am pleased that I got a bit more done than I had expected or hoped for.
Okay, let's get on with this since I have a lot to show here.
First off, I clearcoated a few things in preparation for decals. I re-shot the USS Virginia, and Annie; then shot a clear on the Spru-can. I've decided that she'll be christened the USS Caron, even though she's not quite in the proper configuration according to the instructions. Oh well; this was before her refit. I also shot a coat of clear over the Mustang in preparation for the Alclad. I didn't shoot any pics of them as they look the same as before. Once the decals go one and some other weathering is done, I'll have something to shoot.
Now on to the things that I can show progress on....
First off, the Monkeemobile I've had on the Shelf of Shame has been there too long. I took the body down and shot another coat of red on it. Still not very smooth.... again:
While that sat drying, I went ahead and painted the bottom chassis black:
I then checked the instructions and saw that the interior should be done in white, along with the roof. I'm thinking for simplicity's sake, I'm going to shoot it Radome Tan instead. Or maybe a camouflage grey, which is really really light grey, almost white. I'll see which one I have more of.
Moving on, I went to work on a couple of my aircraft. First I masked and painted a white stripe on the fuselage of the little Czech plane. I planned on getting that stripe painted yellow today but didn't get around to it:

Next I did what I could with the C-46 since I feel like it never gets anywhere no matter how much I work on it! I sanded the seams smooth that I'd filled with Mr. Surfacer the other day:

Then I shot a coat of Primer Grey on it again. Looks a lot better now:

After that, I shot Primer Grey over the top of it too:

You can see how big that monster is on my workbench. Now you know why I'm so eager to get it off my bench!
Finally, I masked off the bottom and shot Olive Drab paint on the top. Hopefully everything looks well enough for me to continue on with this plane:

After that, since I had the OD out, I shot some on the exterior of my helicopter I had started some time ago:

Moving on to my armor now, I had to fix a ding on the barrel of my Russian BS-3 gun. I didn't get any pics of that since it went so fast after the Mr. Surfacer dried. I did get pics of the fix I did to the rotating platform on Annie. First I scraped and sanded the top to remove the crinkled paint; then I took my Exacto blade and scraped out the messed up paint in between the ridges along the side:

Then I shot the OD over it. I did that when I was shooting the helicopter and C-46:

Wow, looks like I still need to do a little cleanup on that thing.
The next thing I did work on though was my IBG Diamond T Cargo truck.
I had finished up the chassis first, complete with engine:

Then I got the front of the cab built along with the cargo bed:

They are just sitting on that chassis to get a better pic. The next thing I did was paint the chassis Oily Black:


Paint was a little wet still I think...
After I painted the chassis, I shot another pic with the cab and cargo bed to see how it looked:

While I still had the OD out, I shot a coat over the Diamond T's fenders on the chassis; and then the cab and cargo bed:


Next I should be able to paint the interior details in the cab and then get it assembled. Hopefully tomorrow.
Now it was time to get some serious work done....
I started out with the little LAV I was finishing. I pulled out my Silly Putty and placed the masking on it for the second color:

Next I pulled out my brown and shot it over the little vehicle:

While that was drying, I pulled out my T-90 and started masking off the green with the Silly Putty as well in preparation for the second color:

This one got a dark earth color; more tan than brown:


The holes in the turret Silly Putty happened because I'd forgotten to take the pic of the tan color first before I started removing the Silly Putty where the black was supposed to go.
Once these two were dry; I removed the Silly Putty in the places where the black was supposed to go and then masked off the rest of the tan:


I also masked off the brown on the LAV in preparation for shooting the black:

I mixed up a little "light black" using some light grey in a jar of flat black and proceeded to shoot it on these two armor models. First the T-90:

Then the LAV:

Once they both dried, I was able to remove the masking to see how well these came out. First the LAV:


Black came out a bit pebbly because for some reason my compressor had turned off and the tank had run down. I hate when that happens! I turned it back on to shoot the T-90.
Here's the T-90:


Not bad if I do say so myself! The black turned out a little better.
Finally, after they had both dried sufficiently, I shot clearcoats on them in preparation for washes and decals:


The last thing I did before I ran out of time was to shoot the remaining black paint on the side of the Rescue Launch's hull:

Well, that's all for today. I'm hoping tomorrow to get decals on at least three models, if not more; shoot some Alclad on the Mustang, make more progress on the New York, and shoot the interior and roof of the Monkeemobile. If all goes well tomorrow, I might be able to get all that done. So, stay tuned everyone, and remember, comments are welcome. Thanks for looking in on this overly long post.
You really know your silly putty, Mark- those look great!
Well, we're deep in boxes now- it's pretty crazy wit a houseful of guys pulling tape and wrapping it all up. They'll finish tomorrow, loading is next. Drive and drabs of paperwork as well- that's the nerve- wracking bit!
Well, we're deep in boxes now- it's pretty crazy wit a houseful of guys pulling tape and wrapping it all up. They'll finish tomorrow, loading is next. Drive and drabs of paperwork as well- that's the nerve- wracking bit!
You really know your silly putty, Mark- those look great!
Well, we're deep in boxes now- it's pretty crazy wit a houseful of guys pulling tape and wrapping it all up. They'll finish tomorrow, loading is next. Drive and drabs of paperwork as well- that's the nerve- wracking bit!
:drinks :frantic Wish ya the best with the move & Yeah I feel for ya! :frantic :frantic
ij001
Well-known member
It's the 'Armistice Show' up in Cambridge in a couple of weeks, so with the 'Dinah' now completed I can get on with repairing my entries for the display tables. This year a couple of guys who normally bring a good number of models aren't going to be there, so instead of the normal half-dozen that I usually take, I'm going to take at least double that.
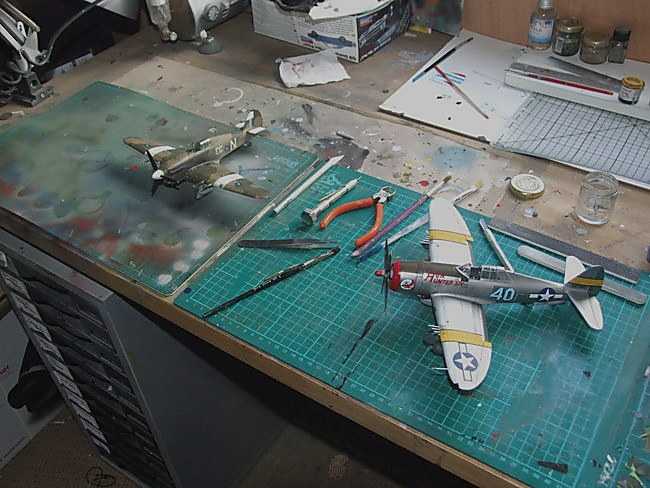
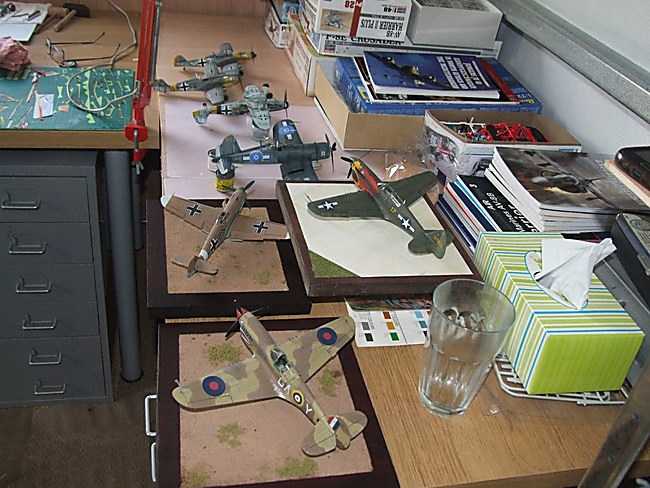
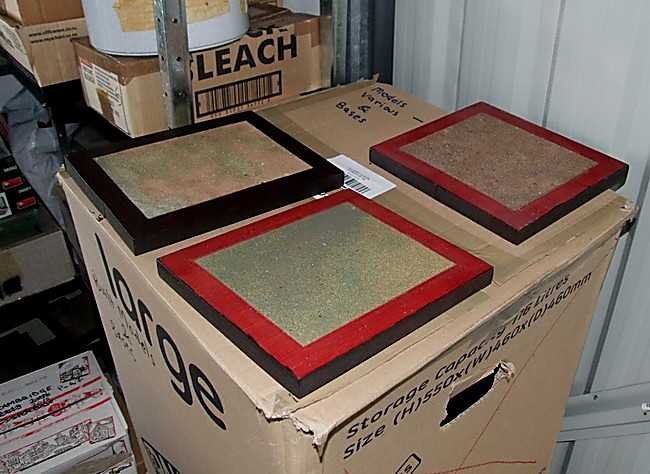
To be honest I'm enjoying this, it's very therapeutic, I'm even re-staining some of the old bases that I brought over from the 'Old Country'.
Should still get my Hawk finished for the 'Learning Curve' Campaign despite all of this repair work. It's mainly aerials & undercarriages so no big problem.
Ian.


To be honest I'm enjoying this, it's very therapeutic, I'm even re-staining some of the old bases that I brought over from the 'Old Country'.

Should still get my Hawk finished for the 'Learning Curve' Campaign despite all of this repair work. It's mainly aerials & undercarriages so no big problem.
Ian.
Duke Maddog
Well-known member
Thanks Chuck! I have found that my camouflage painting has improved tremendously after using that stuff.
Looking good Ian! Yeah, spending time getting repairs done is quite therapeutic indeed. Have fun at the show and well done on bringing extras.
Looking good Ian! Yeah, spending time getting repairs done is quite therapeutic indeed. Have fun at the show and well done on bringing extras.
Similar threads
- Replies
- 39
- Views
- 10K
- Replies
- 60
- Views
- 19K

