Looks great Laura!

-
Modelers Alliance has updated the forum software on our website. We have migrated all post, content and user accounts but we could not migrate the passwords.
This requires that you manually reset your password.
Please click here, http://modelersalliance.org/forums/login to go to logon page and use the "Forgot your Password" option.
- Home
- Forums
- Current Campaigns
- Past Campaigns
- Finished Campaigns
- 2011 Campaigns
- MrT's Bomber Command!
You are using an out of date browser. It may not display this or other websites correctly.
You should upgrade or use an alternative browser.
You should upgrade or use an alternative browser.
Adlertag!
- Thread starter Kreighshoer
- Start date
AndyFettes
Master at Arms
Laura that looks fantastico !!!!!
Kreighshoer
Active member
desaster stroke!
on top the ju88 looks like i left her but when i turned her around to do the underside details i noticed the worst case - somehow the clear gloss let the black preshading sip everywhere and major areas of the belly look like a dried out river bed in summer!

i don't see any chance to repair this and to be frank i'm growingly losing patience and interest!
i have not the slightest clue why this happened - the basepaint had time enough to dry out, the two coats of clear gloss to seal it up had enough time to dry out and now the final sealing led to this epic %*&§#~/+$*
most of all i ask myself why this happened to the underside only and the top side still looks like i left it ... maybe it's a sign of the modelling gods that i shouldn't leave armor paths ...
i'll stay away from the bench today to evaluate if i will finish birdie or give birdie a flying lesson out of the second floor living room window!
how it should look, how i left birdie last time and how it still looks in some areas:

the desaster:


i'm really, really pissed and i really have enough of plane building at the moment! i'll glue the spinners on and store birdie away ... if i ever return to that build is quite uncertain! don't waste your time to try to cheer me up or to give me repair suggestions - right now i'm looking at a hammer laying around here and a smile comes to my face when thinking of what i can do with that hammer!


on top the ju88 looks like i left her but when i turned her around to do the underside details i noticed the worst case - somehow the clear gloss let the black preshading sip everywhere and major areas of the belly look like a dried out river bed in summer!
i don't see any chance to repair this and to be frank i'm growingly losing patience and interest!
i have not the slightest clue why this happened - the basepaint had time enough to dry out, the two coats of clear gloss to seal it up had enough time to dry out and now the final sealing led to this epic %*&§#~/+$*
most of all i ask myself why this happened to the underside only and the top side still looks like i left it ... maybe it's a sign of the modelling gods that i shouldn't leave armor paths ...
i'll stay away from the bench today to evaluate if i will finish birdie or give birdie a flying lesson out of the second floor living room window!
how it should look, how i left birdie last time and how it still looks in some areas:
the desaster:
i'm really, really pissed and i really have enough of plane building at the moment! i'll glue the spinners on and store birdie away ... if i ever return to that build is quite uncertain! don't waste your time to try to cheer me up or to give me repair suggestions - right now i'm looking at a hammer laying around here and a smile comes to my face when thinking of what i can do with that hammer!
Kreighshoer
Active member
Was the clear a lacquer?
acrylic based lacquer! ... maybe the word based was the devil ... i'm extremely pissed nontheless and placed my panther g on the workbench already to give a washing, fading and weathering ...
That is understandable but PLEASE lift an edge on the masking to be able to remove it later. Depending on how long the Ju-88 is a shelf queen, the adhesive on the canopies may dry out causing more trouble. Personally, I would remove the masking. Strip off the paint gently (don't do this in your state of mind) to remove the top layer coat. The other layers are damaged and need repainting.
Don't worry about the decals, they can be replaced (someone wants me to review a set anyway and I don't intend on getting a kit).
Work your big cat. This happens to all of us, really!
Regards,
Don't worry about the decals, they can be replaced (someone wants me to review a set anyway and I don't intend on getting a kit).
Work your big cat. This happens to all of us, really!
Regards,
Take the masking off and put it on the shelf. There WILL be a shelf queen GB and you now have your subject.
Well, that's pretty pissy, but it's just on the bottom, right? Leave those masks on, strip those areas and repaint. You done so much good to this bird- a little accident like this can't possibly set you back. I suggest taking the weekend to do other things- walk the doggy, have a drink or two and look at it with refreshed eyes later.
Was the base colors Gunze? They are notorious for this kind of riverbed cracking. Future ( or "Erdal Rex Glänzer" or "Aldi Stodil") usually work perfectly on Tamiya acrylics or enamels, but Gunze- forget it!
I am at your service for any help I get give- don't hesitate to ask. After all, I'm going to need your help with armor projects, so fair is fair.
Old Dog
Well-known member
Man what a bummer ! That's one reason why I really hate the normal drill of gloss, decals, gloss, washes and flat to seal. The way I see it that's three opportunities for things to go Hades. In my last few builds I buffed the areas for decals and applied them without gloss coat with good success then did my washes with only a light flat coat to finish up. Most German aircraft had a slight sheen to them anyway unless severely weathered so no need to make them dead flat.
I hope at some point down the road a fix will be found to save all that terrific work you put into it but I agree that setting it aside for now is probably best.
I hope at some point down the road a fix will be found to save all that terrific work you put into it but I agree that setting it aside for now is probably best.
Kreighshoer
Active member
thanks for motivating me to return to save what can be saved and not to fetch the hammer ...
i bit the bullet and sanded all areas i could reach as good as possible and applied some light blue over any offending spot ... some overspray wasn't avoidable but you may guess it already - i don't care anymore, i'm by far too annoyed to see all my efforts destroyed!
brmlgrmpf!
after that treatment i gave the mess a black washing and now everything looks even worse than before ... the wash couldn't be wiped away from the gloss coat like i hoped ...
->
but whatever ... i still could do a belly landed wreck (that's indeed a very tempting thought!)
pics will follow after a coat of flat and fading! will be the last update in this thread!
I hope you mean the last update for a while. Belly landed is a good idea though... as a last resort.
Regards,
Regards,
Laura, I think you've done a fine job, these mishaps happen, let's see some pictures when you have the chance.
Laura as a last resort and knowing its not accurate for your bird, paint the undersides black. There is some ref but I cant find a picture.
Laura, James really has a great answer! I am sure I will find a photo and send you the scan. Best of all, AirDoc has a set of decals with an A-1 with black lower surfaces! See the second one down on the right column.
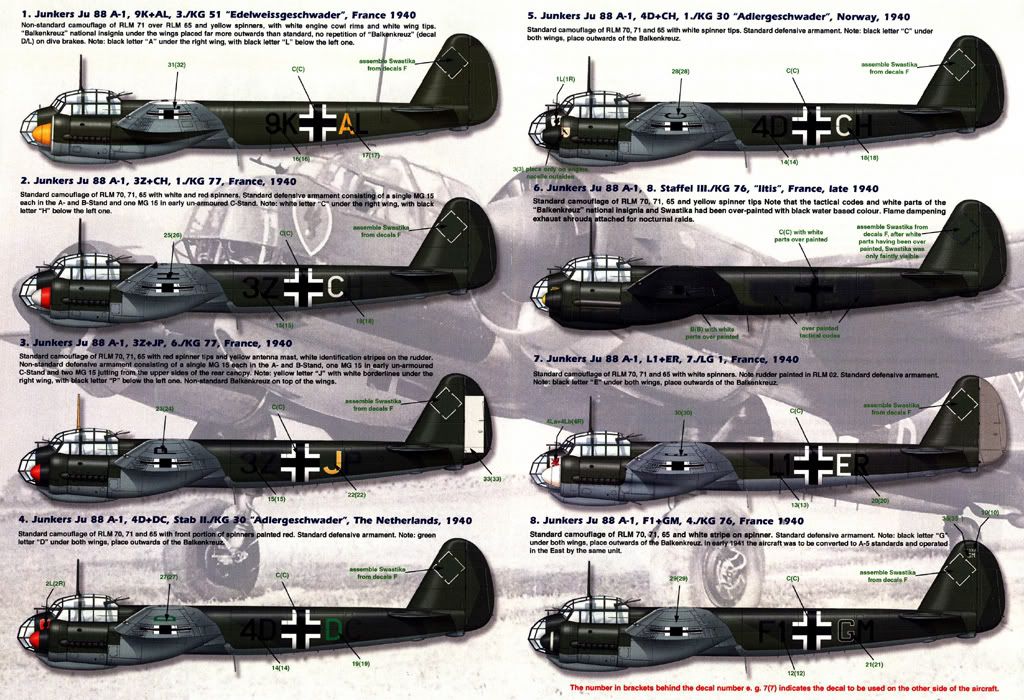
Note that most of the white is painted over crudely. Since almost all the markings are over painted, no need to buy the decals!
Regards,
Kreighshoer
Active member
timeout!
james's suggestion is a really good one and IF i follow it, all i would do was to mask the balkenkreuze and then give the black a go! no new decals, no nothing else!
i want to move on and leave frustwaffle stuff behind!
ok?
james's suggestion is a really good one and IF i follow it, all i would do was to mask the balkenkreuze and then give the black a go! no new decals, no nothing else!
i want to move on and leave frustwaffle stuff behind!
ok?
I like it! Just light and almost random overcoat of black and call it a field mod.
Funny this should come up today, as yesterday I was talkin' with another MA member about painting my Ju-88's underside black, as I was reckoning that a night bomber (and many Ju-88s were used as such) would have to look dark from the ground. But my friend wasn't able to find any reference pics on that either."Laura as a last resort and knowing its not accurate for your bird, paint the undersides black. There is some ref but I cant finda pic. ..."
I wish you luck on this last stage of your build. :dude
Cheers! B)
Fernao
Similar threads
- Replies
- 39
- Views
- 12K