• Modelers Alliance has updated the forum software on our website. We have migrated all post, content and user accounts but we could not migrate the passwords.
    This requires that you manually reset your password.
    Please click here, http://modelersalliance.org/forums/login to go to logon page and use the "Forgot your Password" option.

1/32 Tamiya P-51K/D

Paulw

Well-known member
Since I plan on doing this as a K model and possibly a replication of one of two Mustangs based out of Tulsa here I am going to post this as my NMF campaign also, if agreeable. I do have a couple of ideas where I want to go with it but for right now Ill stick to just the builds.


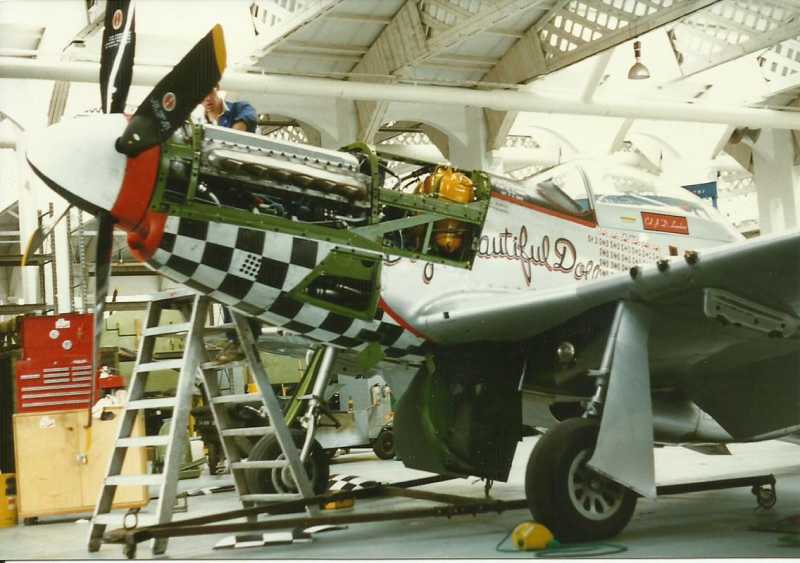
This has to be the fifth or sixth Merlin I have built but so far I like the Tamiya one best.


I will be like my hero, Dave the Chef, and also do the P-40, P-47, vigilante at the same time also.
 
I will be like my hero, Dave the Chef, and also do the P-40, P-47, vigilante at the same time also.


:S Please , you just made my head spin ! :sick:


Darn if the upper end of the engine have a bunch of bolts in it ! (y) (y)

Cheers, Christian B)
 
Since I plan on doing this as a K model and possibly a replication of one of two Mustangs based out of Tulsa here I am going to post this as my NMF campaign also, if agreeable.

Not sure I follow you Paul but I think you're asking if this can be your NMF build also? If so, sorry, has to be one or the other, either way really looking forward to this! :coolio
 
So now I have some paint on the engine and let me tell you that even though its a Merlin it doesn't assemble exactly like the on in the Spitfires do. All I can say is really look at the sprue numbers carefully.


the intake plenum on the Spit has its mounting brackets lower than the Mustang and it had two holes for the locator pins. Its best to look first instead of just jumping the gun and using the wrong plenum. This is because the header tank and fire wall mount to it and the ip mounts directly to that sub assembly.


I did, however, get the ip just about right. its a decal that fits reverse to the back od the3 clear part which makes up the instrument lenses.

I really like the reliefs in the molding, nice and high but not too high as to make it look like a toy.


The reason why the top gauges look as if they are fogged its because there is nothing behind them to block the light until its installed in the fuselage.
 
Paul...P51, Paul...P51...DANG! I was suppose to send you that tail section. :bang head :bang head :bang head :bang head :bang head I'll go back to the garage and grab it to send it out ASAP tomorrow Paul. Sorry.

IP is looking great. :pilot
 
facepalm.gif
 
More excellent progress, Paul..... Does this help at all ??


h91848c8.jpg


Or does it just make it more complicated ?? :gogo

Ian
 
Since I have the Jug done I am going to concentrate on this and the old Spit, I spent most of the morning and half of the afternoon just finishing up the office and the dash. I stippled the seat a bit to show some texture and it came out pretty good. All I did was put some poor mans Mr Surfacer, which I have pretty thick like liquid styrene (which it is), and I just dabbed some on the seat cushion and shot some yellow on it. Today I even went and did some pe origami and got those belts on also.


I feel relaxed now because the hectic Jug build is out of the way. I hope this comes out better than that did.
 
This is a way better kit than the ZM P-51. I am thoroughly enjoying this build. So far I have the pit done, the side walls done, engine done and the inter cooler/radiator done and then test fit. I monged out and tried to close up a gap behind the pit but after about 30 minutes of squeezing things together and them not fitting did I come to the realization that maybe it was supposed to be like that. Really?

I really like this oil wash technique. I am glad I finally decided to work it.


this pic is quite a bit over exposed and grainy


Here you maybe able to see that I wrinkled the cushion.


thanks for watching.
 
This is a way better kit than the ZM P-51.

I thought you'd like it! :pilot

That slot is for the canopy rail guide. When you get to that point you'll slide the canopy in that slot and then install the missing top of the fuselage to lock it in place.

:good:
 
Love watching these Tamiya P-51's coming together. Every time I watch one 'in progress', I go look at mine and begin daydreaming... and the I look at my 'to do' pile and get real again !! - Paul, did you decide on which scheme you're doing yet ??

Ian
 
Back
Top