
-
Modelers Alliance has updated the forum software on our website. We have migrated all post, content and user accounts but we could not migrate the passwords.
This requires that you manually reset your password.
Please click here, http://modelersalliance.org/forums/login to go to logon page and use the "Forgot your Password" option.
You are using an out of date browser. It may not display this or other websites correctly.
You should upgrade or use an alternative browser.
You should upgrade or use an alternative browser.
DAK with Doc - Next installment
- Thread starter JSteinman
- Start date
DML Panzer 1 ausf. B ( DAK with Doc)
At least you got your grass mowed right?
First, let give my 2 cents to JSteinman. You have captured the desert bleached panzer grey perfectly. Stopping right there and weathering would look great.
Second, Thank you for link Iron Mike. That looks like a great way of doing it. Right now I taped a stir stick (the big gallon ones) a track length back to another stir stick so there is a step. The step stops the track from moving while I insert the pin. I will give your method a try on the other side.
IMPORTANT UPDATE. The owners of the sheep have been found and will coming to get them shortly. They are in the front of the house. My two dogs (Yorkie and Schnauzer) believe they are the top of the food change because everything runs from them: Deer, Woodchuck, etc. Will they chase the sheep? Yes. Will the sheep dog put some serious hurt on them for chasing the sheep? Yes. What am having to do is put leashes on my dogs and take them out back to potty.
At least you got your grass mowed right?
JSteinman
Master at Arms
DML Panzer 1 ausf. B ( DAK with Doc)

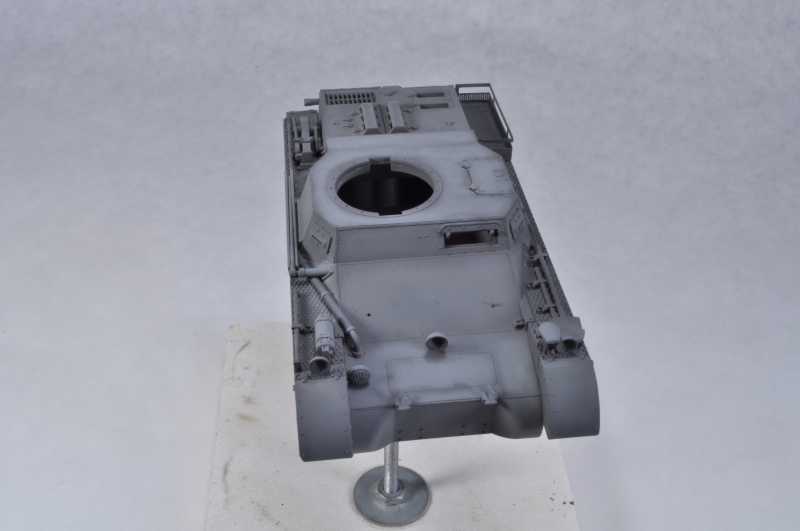
Any decals you want to have a grey background, apply now.
I have gloss coateded, left to dry overnight, applied the decals with the

potions in the photo, then applied a satin coat, and when suitable dry, applied masking with Mr. Tamiya’s fabulous tape.
Any decals you want to have a grey background, apply now.
I have gloss coateded, left to dry overnight, applied the decals with the
potions in the photo, then applied a satin coat, and when suitable dry, applied masking with Mr. Tamiya’s fabulous tape.
DML Panzer 1 ausf. B ( DAK with Doc)

JamesOLeary
Master at Arms
DML Panzer 1 ausf. B ( DAK with Doc)
I like how this is turning out.
Cheers,
James
I like how this is turning out.
Cheers,
James
DML Panzer 1 ausf. B ( DAK with Doc)
There is a contrast in tone in post 123. Which represents the actual color? Thank you so much for the track method. Between you an Iron Mike, tracks now are simply tedious. Yes Iron Mike, I gave up my jig and went your route. It is the way to go.
At least you got your grass mowed right?
Everything. It was like a Buffet for sheep. They tried a grape vine and chewed the leaves off it. The did not like it and went back to everything else (which was fine by me).
JSteinman
Master at Arms
DML Panzer 1 ausf. B ( DAK with Doc)
The darkest. The lighter greys are the post shade. I use the airbrush to fade the finish and begin the weathering process. Review Post #108.
There is a contrast in tone in post 123. Which represents the actual color?
The darkest. The lighter greys are the post shade. I use the airbrush to fade the finish and begin the weathering process. Review Post #108.
Skinny_Mike
Well-known member
DML Panzer 1 ausf. B ( DAK with Doc)
Taking notes sir!
Taking notes sir!
Jeeves
Well-known member
DML Panzer 1 ausf. B ( DAK with Doc)
Ok...I'm two weeks behind the mark but school this time of year is extremely sucky. How much of the diluted deck tan (and later stage of diluted white) is to be added to the German Grey mix?
It’s June 1 so...
Everyone should be in primer at this stage. Next step is to apply a base coat of German grey. I am using Tamiya XF-63 diluted with 50% X-20A and a few drops of Tamiya retarder. Take the time to make sure this coat covers well. Generally, I have the psi set to 15 for this type of work.

This can be followed immediately with a post shade layer of the XF-63 mixed with XF-55 Deck tan. Generally, I turn the psi on the line down to 10 for this stage. Good airbrush control is important in this stage. Make sure you stay away from panel lines! Also, hit flat surfaces more than vertical ones. You want to apply color slowly, building up the effect and feathering the edges. A test line sprayed on a piece of paper should be at most 1.5mm wide.
This step is immediatly followed by a final post shade by adding XF-2 white to the mix. Psi stays at 10, and maximum spray with is 1mm. Again hit flat surfaces more and feather inside previous post shading.


As a note I predilute all my Tamiya paints with X-20A 50% when I first open them, by mixing well and then decanting 50% of the volume into a spare bottle, then adding X-20A to restore full volume. So when I say to add XF-55 and XF-2 it is assumed they have already been diluted.
Good luck!
Ok...I'm two weeks behind the mark but school this time of year is extremely sucky. How much of the diluted deck tan (and later stage of diluted white) is to be added to the German Grey mix?
JSteinman
Master at Arms
DML Panzer 1 ausf. B ( DAK with Doc)
I hope all of you who are fathers are having a great day!
Next up is the application of a separating medium. I am using hairspray, decanted from the spray can and applied with the airbrush. When dry I apply the first coat of RAL 8020. This is not like the base coat of Dark Grey, you want to let some of the Grey show through in certain areas, like panel edges and such. Below is a video of the process, enjoy!
Last edited:
Sherman 18
Master at Arms
DML Panzer 1 ausf. B ( DAK with Doc)
Not much a Fathers day for me - One kid in college, the other off playing ball and me at work :salute
But it's nice to see a master at work B)
Not much a Fathers day for me - One kid in college, the other off playing ball and me at work :salute
But it's nice to see a master at work B)
Sherman 18
Master at Arms
DML Panzer 1 ausf. B ( DAK with Doc)
:yipee
I hope all of you who are fathers are having a great day!
Next up is the application of a separating medium. I am using hairspray, decanted from the spray can and applied with the airbrush. When dry I apply the first coat of RAL 8020. This is not like the base coat of Dark Grey, you want to let some of the Grey show through in certain areas, like panel edges and such. Below is a video of the process, enjoy!
https://youtu.be/gIUhFMUK0P8
:yipee
DML Panzer 1 ausf. B ( DAK with Doc)
Thanks Doc!
Interesting to see your spray technique. i'm always spraying over the entire thing like i'm putting a primer down no matter what coat it is.
Thanks Doc!
Interesting to see your spray technique. i'm always spraying over the entire thing like i'm putting a primer down no matter what coat it is.
JSteinman
Master at Arms
DML Panzer 1 ausf. B ( DAK with Doc)
That works if you building model cars. But to get the tonal variation and mottled effect you have to tighten things up. It’s not a race to see how fast you can get color down, to do a whole model can take 1-2 hours depending on size.
Thanks Doc!
Interesting to see your spray technique. i'm always spraying over the entire thing like i'm putting a primer down no matter what coat it is.
That works if you building model cars. But to get the tonal variation and mottled effect you have to tighten things up. It’s not a race to see how fast you can get color down, to do a whole model can take 1-2 hours depending on size.
JSteinman
Master at Arms
DML Panzer 1 ausf. B ( DAK with Doc)
10-12 psi
Okay guys let’s step back a sec. To do this style of paint work requires an immaculately clean and tuned airbrush. If you have a bent needle tip, or old paint dried in the nozzle, you will not be able to paint in this style. You need a clean dry air source and quality paints and thinners.
When you are applying layers pretend you are a 1/35 scale dude with a spray gun. Your spray width should be in scale! Painting armor is different than cars, a uniform finish is not what we want. The weathering process starts with the first layer of paint, it is not something you do to the model after it is painted. So as you apply paint your MAX spray with should be 1-1.5mm. It will probably take an hour per coat depending on the size of the kit. Not a race to get this step done, it is a process and journey if you will. You are telling a story about what your model went through with the painting and weathering, spend some time doing this, it’s what created the wow.
Cool!What air pressure are you using? I did a different type of paint yesterday, porch railing with Sherwin Williams, :gogo Thankfully, that's behind me and I can get my Kubel on.

10-12 psi
Okay guys let’s step back a sec. To do this style of paint work requires an immaculately clean and tuned airbrush. If you have a bent needle tip, or old paint dried in the nozzle, you will not be able to paint in this style. You need a clean dry air source and quality paints and thinners.
When you are applying layers pretend you are a 1/35 scale dude with a spray gun. Your spray width should be in scale! Painting armor is different than cars, a uniform finish is not what we want. The weathering process starts with the first layer of paint, it is not something you do to the model after it is painted. So as you apply paint your MAX spray with should be 1-1.5mm. It will probably take an hour per coat depending on the size of the kit. Not a race to get this step done, it is a process and journey if you will. You are telling a story about what your model went through with the painting and weathering, spend some time doing this, it’s what created the wow.
Plastik Smurff
Well-known member
DML Panzer 1 ausf. B ( DAK with Doc)
This is really good info an a perfect explanation as to why,makes perfect sense so why have I been layering it on like no tomorrow ?
So a .2 AB with correctly prepped paint should be ideal for this.
Thank you for showing this")
This is really good info an a perfect explanation as to why,makes perfect sense so why have I been layering it on like no tomorrow ?
So a .2 AB with correctly prepped paint should be ideal for this.
Thank you for showing this
Similar threads
- Replies
- 18
- Views
- 2K
- Replies
- 19
- Views
- 806