
-
Modelers Alliance has updated the forum software on our website. We have migrated all post, content and user accounts but we could not migrate the passwords.
This requires that you manually reset your password.
Please click here, http://modelersalliance.org/forums/login to go to logon page and use the "Forgot your Password" option.
- Home
- Forums
- Current Campaigns
- Past Campaigns
- Finished Campaigns
- 2017 Campaigns
- Micro Model Month III
You are using an out of date browser. It may not display this or other websites correctly.
You should upgrade or use an alternative browser.
You should upgrade or use an alternative browser.
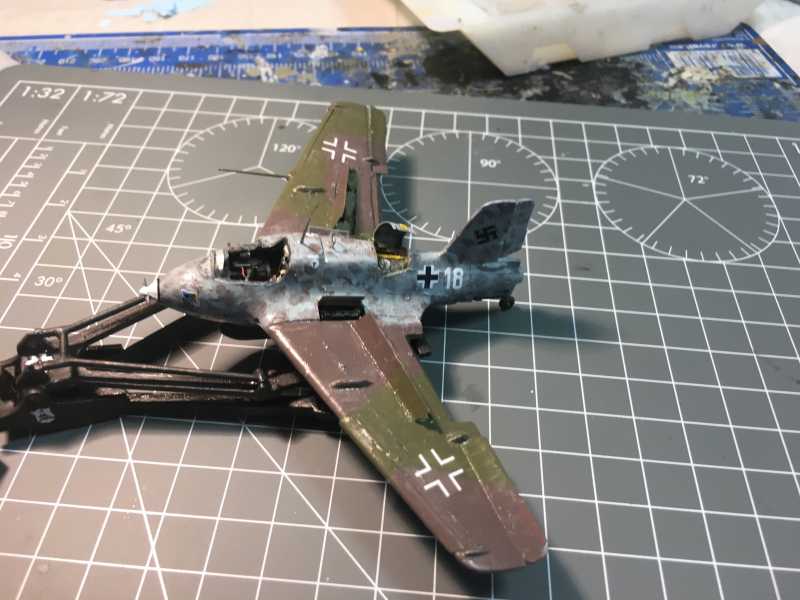
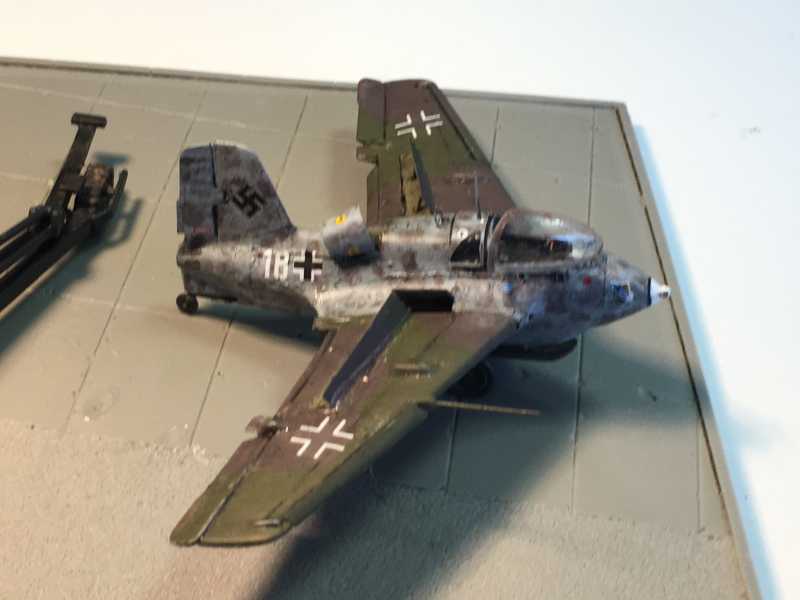
1/72 Messerschmitt Me 163 B-1a
- Thread starter Flyingbabydoc
- Start date

Flyingbabydoc
Well-known member
Hello everyone
Horribly busy week, I wanted to comment on so many magnificent builds I have been following but no luck. Maybe this Weekend.
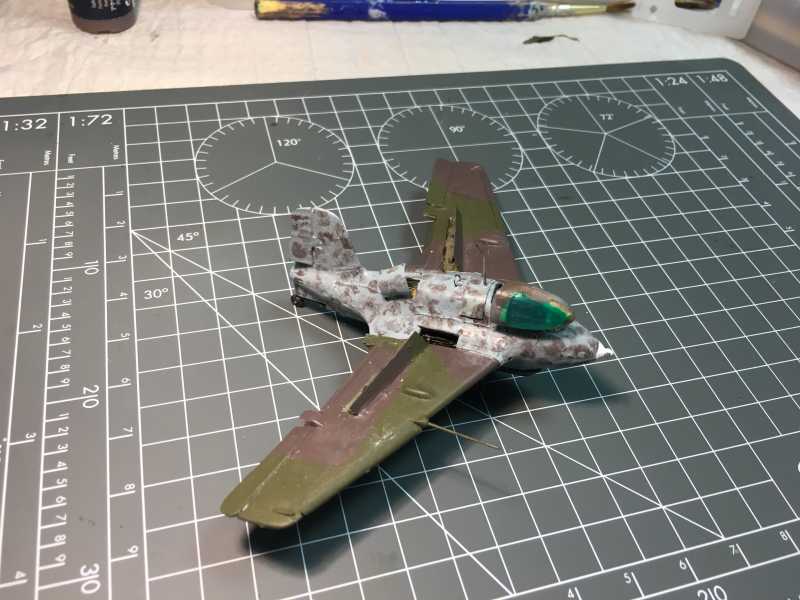
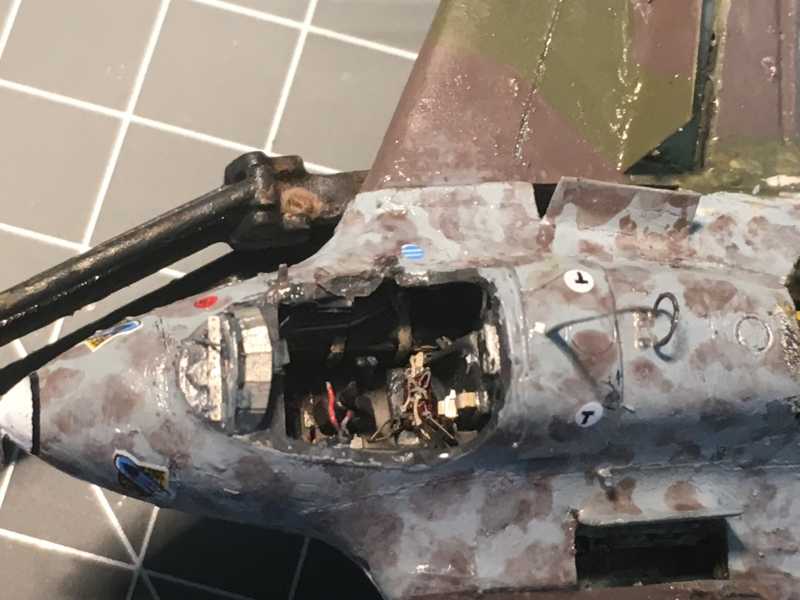
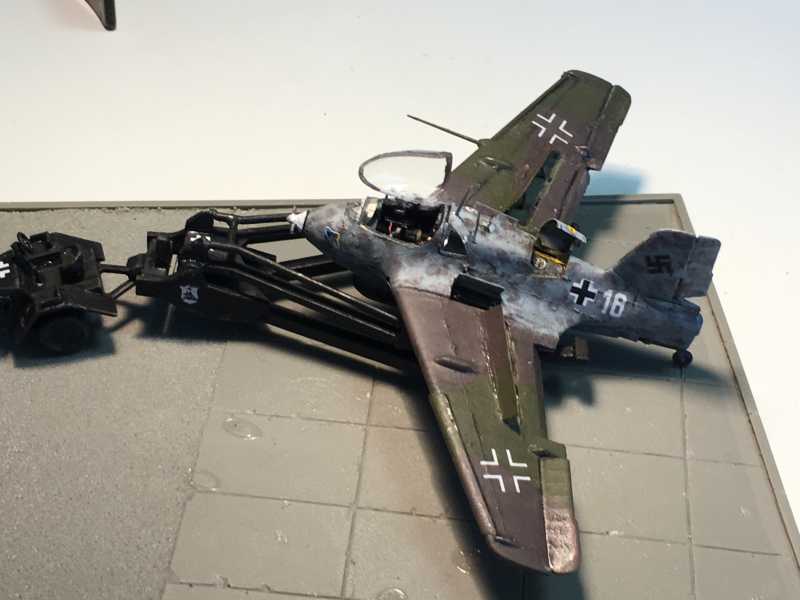
Got some free time and painted the Little egg. I tried some new sponge technique for the mottling, I think it Looks better than before. Still cannot get the smooth finish I wanted this is very frustrating.
In any case, I am happy and I see some Progress.
Thanks for looking and for your comments!
Cheers
Alex


Horribly busy week, I wanted to comment on so many magnificent builds I have been following but no luck. Maybe this Weekend.
Got some free time and painted the Little egg. I tried some new sponge technique for the mottling, I think it Looks better than before. Still cannot get the smooth finish I wanted this is very frustrating.
In any case, I am happy and I see some Progress.
Thanks for looking and for your comments!
Cheers
Alex
phantom II
Master at Arms
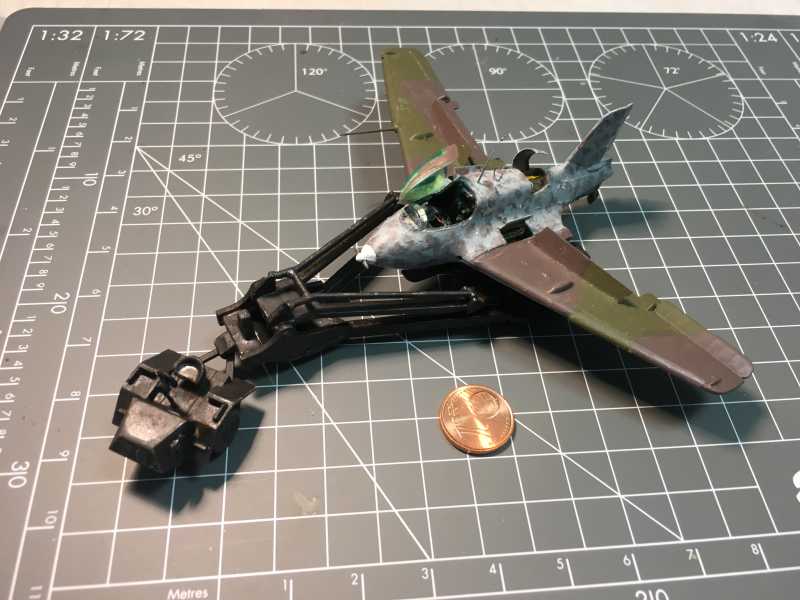
The tractor and the upper wings look very good Alex .
The lower wings would look very good as well , if not for the stuff mixed in with the paint, keeping it from being smooth in appearance .
I like the mottled paint . Good approach . I think that similar things were done in real life.
You just keep on getting better with each build")
Cheers, Christian B)
The lower wings would look very good as well , if not for the stuff mixed in with the paint, keeping it from being smooth in appearance .
I like the mottled paint . Good approach . I think that similar things were done in real life.
You just keep on getting better with each build
Cheers, Christian B)
Duke Maddog
Well-known member
I agree with Christian. You are definitely improving. You constant practice of the basics is showing great results. The sponge technique for the mottling is a time-honored technique and your efforts with this technique show why. Keep going Alex; you are truly moving along in many ways.
Flyingbabydoc
Well-known member
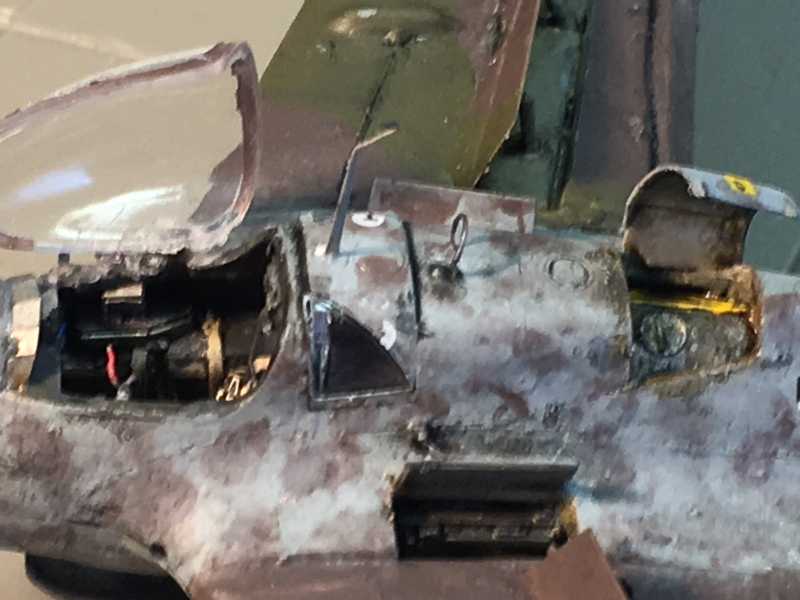
Thank you Christian, Chris and Mark. I really appreciate it. It is hard. I start full of hope, the PE works out wonderfully, then Comes the time to paint and all goes down the drain. I manage to assemble These tiny Little resin pieces and all is well, but a simple Camouflage turns out horribly wrong.
Well, now the disaster 2017 has decals. Looks not so bad given that it is a cute plane. Actually from far away it almost Looks good.
Oh well, I will soldier on.
Nice Weekend everyone
Cheers
Alex
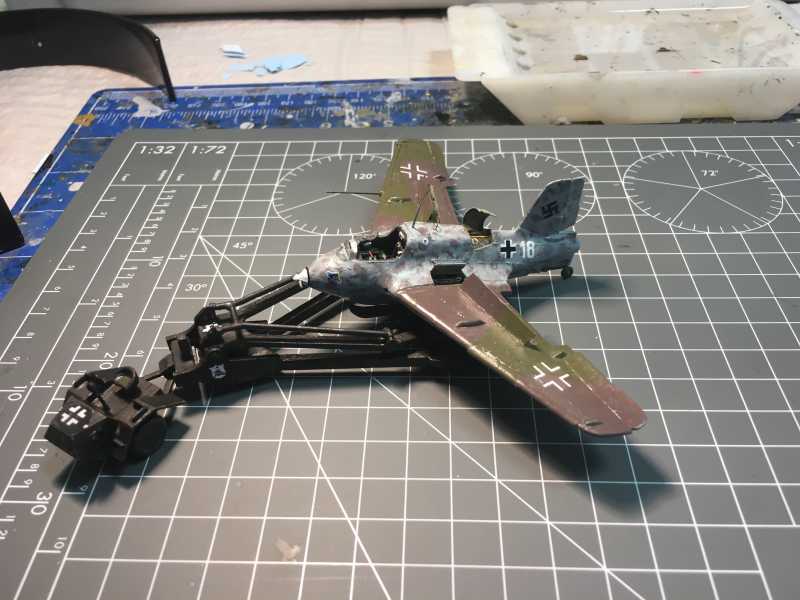

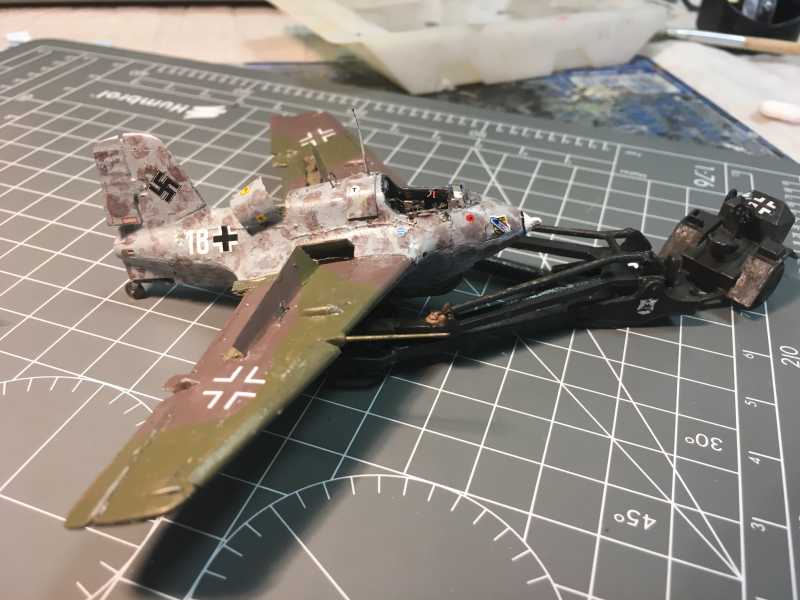

Well, now the disaster 2017 has decals. Looks not so bad given that it is a cute plane. Actually from far away it almost Looks good.
Oh well, I will soldier on.
Nice Weekend everyone
Cheers
Alex
helios
Well-known member
How many coats of paint are you using? If it's going down in 1 coat, the paint is too thick and could be contributing to why you are getting the uneven finish. Try thinning the paints out some and shoot for 3-4 thin coats. You should be seeing "uneven" coverage after the first couple coats. But the wetter, thinner coats should help settle down and smooth out. Also what are you using for brushes? I've found real hair (camel/sable) tend to provide a more consistent coverage. I've found while the small synthetics work ok for detail work...I haven't had much luck with area coverage.
It's a cool paint scheme though. I really like it.
It's a cool paint scheme though. I really like it.
Flyingbabydoc
Well-known member
Hey Chris
Many thanks for taking the time and trying to help me!
I used two coats, which is possibly one of the reasons. Another one is that I am simply confused as to what exactly use as primer, if any.
Right now I am using a black acrylic polymer primer than on top of it a coat of aluminum (which actually is to be used with an airbrush).
After that I use the "scratches effect" from ammo of mig.
Then I start painting.
I think this is all too much. But how to get scratches without using an aluminum base before? And then how to get that to stick without a primer?
Seems like a catch 22 to me. Very frustrating.
Also I think that I'm not waiting enough between coats. Usually 12 hours. Maybe should let it cure more. It is just that I have so little time for the hobby that I try to pack as much in as possible.
Sorry for this heart pour and many thanks for helping.
Cheers
Alex
 ... have a nice weekend :drinks
 phantom II
Master at Arms
Hey Chris
Many thanks for taking the time and trying to help me!
I used two coats, which is possibly one of the reasons. Another one is that I am simply confused as to what exactly use as primer, if any.
Right now I am using a black acrylic polymer primer than on top of it a coat of aluminum (which actually is to be used with an airbrush).
After that I use the "scratches effect" from ammo of mig.
Then I start painting.
I think this is all too much. But how to get scratches without using an aluminum base before? And then how to get that to stick without a primer?
Seems like a catch 22 to me. Very frustrating.
Also I think that I'm not waiting enough between coats. Usually 12 hours. Maybe should let it cure more. It is just that I have so little time for the hobby that I try to pack as much in as possible.
Sorry for this heart pour and many thanks for helping.
Cheers
Alex
How to get scratches without the silver scratches without the silver coat :
Prismacolor metallic silver pencil ( after dull coat paint 0
Or Rub'nBuff siver leaf and a sharp tootpick
Best primmer is Tamiya is Tamiya surfacer primer rattle can (gray) You'll absolutely have to spray it outside .
Brush coating Acrylics like Tamiya and Gunze must be cured before applying a second coat with a brush.
It is best to not go back over your last brush stroke.
Cheers, Christian B)
helios
Well-known member
If the aluminum was just for weathering, perhaps try using some dry brushing as a post-effect. That would enable you to forgo a couple coats and keep the paint a bit thinner. By doing that you may even be able to forgo the primer. Some people swear by primer, others don't. I think it's a matter of experimentation to see what works best with your equipment and paints. I don't always use primer. Most of the time I do, it's because I want to get a better visualization of filler & scribing work.
No worries Alex. I'd hate to see you give up in a fit of frustration. I know it can happen...I was almost there when I almost got in over my head w/ my F-8 on re-entry into this hobby.
Keep in mind, I'm still learning myself, so take any suggestions I make with a grain of salt. I'm looking at it as if it were my result, and some things I might try to see what kind of effect they might change.
Another thing to possibly try...hit it with a little wet sand in between coats if you notice it getting a little uneven. During this additional prep time between coats you could also clean up any scribing that gets filled in before you get to the final coat.
Heavens Eagle
Well-known member
For what you are doing I would reccommend doing scratches and wear by dry brushing over the other colors. The biggest problem with brush painting is usually the thickness of the paint. Some paints will go on fine and level out. Most flat grey paints can do this. Others like white require several coats. As Ckukw showed us a while back, instead of showing all scratches and wear with silver, light grey can be used to better effect as aluminum like that becomes greyish and not silvery. Only brand new scratches might be a silver color.
Also, depending on the type of paint you use, you might not need a primer coat. Since I use enamels which bond quite well to the plastic, I don't tend to use a primer. The enamel itself works like a primer for the acrylics I use over it. Those are usually Vallejo brand these days and I thin and mix them on a wet pallet. Out of the bottle they are way too thick.
Tamiya paints, I believe, can also be painted without primer coats. The whole point of a primer coat is to help paint to stick to the model. Washing the parts in dish soap to remove oils can help as well.
Your color schemes are quite nice and well done Alex. Models can be hand painted with brushes. The best examples of this (that I know of) are some exquisite gaming pieces found on a site called Dakka Dakka.
Lastly, don't forget that the more time spent on getting the surface and seams right, will also make the paint job work better.
Keep at it my friend your work is getting better! I really like the looks of the Komet!
You've got the right idea Alex and the pattern looks great.
I just think you need to thin out your paint a little more and and give it a few coats like the others mentioned.
I had a nice electronic file that described brush painting when I first got back into the hobby before I bought an airbrush. Should see if I can dig it up!
I just think you need to thin out your paint a little more and and give it a few coats like the others mentioned.
I had a nice electronic file that described brush painting when I first got back into the hobby before I bought an airbrush. Should see if I can dig it up!
Flyingbabydoc
Well-known member
Hello dear friends
Many, many thanks for taking the time and providing such valuable insight. I greatly appreciate it.
I guess that it boils down to one word: patience. That is mostly what I am lacking when I read your comments. I guess that is inherent to the way i work - I can't stop a surgery to wait for the blood to cure and continue a few hours later.
I am also in agreement with the primer and aluminum base not being necessary. In the many articles I read about it all were used in 1:48 or bigger planes. It just doesn't make sense to use it in 1:72. Besides making everything thicker the scratches must be so minimal that a pen or a fine pencil would to better.
I have already ordered another ME 163 and will try again. I will keep posting the results of these new attempts, if you can bare with me.
Also, I will try the He 177 again.
Thanks once again dear friends
Cheers
Alex
Alex, does the smell of thinner (say Tamiya thinner) affect you as well?
I assume you are using all acrylic paint. You could try thinning it a bit with a small amount of water (maybe even distilled water)? I wouldn't use too much as you don't want it to be too thin.
Just a suggestion! B)
I assume you are using all acrylic paint. You could try thinning it a bit with a small amount of water (maybe even distilled water)? I wouldn't use too much as you don't want it to be too thin.
Just a suggestion! B)
Heavens Eagle
Well-known member
I think you hit some of the nails right on the head there Alex. Model building isn't about getting it all done at once, it is about the process and the journey.
Bob Letterman has been working on Logistics for many years. What is done so far is fabulous! No way can it be done quickly.
Chukw also builds amazing models and dioramas. His posts are always enlightening and entertaining. The finished builds are as good as you can get. He takes sometimes a long whie to finish a build.
When I was quite young, the point of the build was to finish it FAST so I could play with it. These dys it is to build it as clean and accurate as possible. It took several evenings to build the PE flaps on my Dornier. Part of that process was to figure out and visualize the process in my head. I guess you could say it was getting the muscle memory prepped. The hands can do it no problem, the brain just has to have the plan in place to make the assembly clean and smooth. Sometimes I work on only one or 2 parts in an evening getting them just right. For me these days it isn't about speed it is about the process and how good I can make the finished model.
It still is taking me a bit longer than I would like at times as I am still discovering some of the processes and what works and what doesn't. Slow going sometimes, but getting better. My Tie Fighter builds are moving along quite quickly. Have a couple of small challenges ahead on the Striker but have been doing the mods in my head while busy with other stuff. The biggie will be the front window on the Striker. It needs some work. Still might not finish it in time, but am not building it for the time frame, Learning experience and pushing my comfort zone.
Looking forward to watching your next attempts Alex! Any problems you encounter, please feel free to ask as many questions as you want. We are all here to help you in your endeavors!
phantom II
Master at Arms
I have heard that water works for brush painting but I have not tried it myself
Cheers, B)
Cheers, B)
Flyingbabydoc
Well-known member
Thanks again guys
Warren, the smell is not the Problem. The Aerosol particles are. Everything that is sprayed, airbrushed or vaporized kills me.
I will try diluting the paints as you all mentioned. That is why I am not calling this Project done. I will start working on another one.
This Little catastrophe is finished now. That is the base I will be using for a small Diorama, just Need to work on that.
Cheers
Alex
Very nice Alex
Similar threads
- Replies
- 22
- Views
- 5K
- Replies
- 51
- Views
- 10K
- Replies
- 8
- Views
- 2K
- Replies
- 4
- Views
- 2K