• Modelers Alliance has updated the forum software on our website. We have migrated all post, content and user accounts but we could not migrate the passwords.
    This requires that you manually reset your password.
    Please click here, http://modelersalliance.org/forums/login to go to logon page and use the "Forgot your Password" option.

Tornado ASSTA 3.1, Revell 1:48

Greg Kimsey

Well-known member
20221026_195955.jpg
20221026_200005.jpg

Ok, Tornado, take 2. I am taking what I learned from Paddy and the rest of you awesome guys on the British Tornado and see if I can do it better on this Gernan version. As usual I start in the cockpit, specifically the seats. I wanted to see if I could come closer to my reference photos.
First, the real thing...
5b1059962bfb400b5730522452771fa6.jpg
64a194c5a3a4f5adad8866b031d752c3.jpg

Now the model...
20221026_213917.jpg
20221026_213510.jpg
20221026_213249.jpg


Under this extreme magnification I can see some things I want to fix, but in real life they look passable. I still have decals to apply. For the harness backing and the fabric cover on top (the green parts) I used Amaco embossing metal sheet. For the actual belts I used flat lead wire .2x1mm. For the hardware I also used the embossing sheet as it is even thinner than the lead. For the (what I think is the) black and yellow striped ejection handle I used .5mm styrene rod.
It is not 100% accurate, but it looks ...cool. Maybe I will get there one day. Anyway, for this model I am taking Paddy,s lesson to heart and will attempt a clean showroom model (that I assume this model depicts with the amazing tail art) with all of the inspection areas open
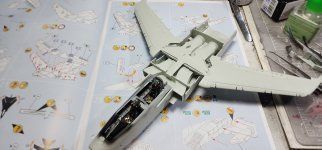
 
The seats look good in their new home. I am trying to keep this cockpit fairly "clean" so have only done a light wash and let some dark grey wick into the edges. For anyo e interested, I found this super cool video on the Tornado 3.1 training simulator which provided me a lot of info and reference:
Below are my progress shots so far.

20221030_122810.jpg
20221030_121318.jpg
20221030_121307.jpg
 
Y'all, this plane is going together like a dream. Everybody please knock on wood somewhere! The secret may be the extra thin Tamiya cement. That stuff is a game changer! I have minimal work on the seams, and some I have no work to do but paint. I worked about 12 hours on it today and am ready for bed. Oh! The wings actually work like they are supposed to. The armament pivots actually turn correctly. That may change if the connector bar slips off ot its pin. If it does...meh, wasnt meant to be. But hey, I did it right this time!
20221030_212057.jpg
20221030_212122.jpg

Gonna knock off here for tonight. Thanks for watching!
20221030_224333.jpg
 

Attachments

  • 20221030_212057.jpg
    20221030_212057.jpg
    1.4 MB · Views: 11
The pylons move? That's awesome. Neat engineering there.
Press on Greg!
Yeah, as the wings swing back the pylons rotate to keep the armament pointing forward. Pretty cool really.
However, I am going to model this plane with the flaps down so I am not sure the wings will be able to swing back with them down. BUT! I did it right this time. It took a LOT of time and fiddling and figuring out how to keep the parts in place while putting the wings together. I ended up using low tack tape to hold the bar down then covered it with the upper wing. The tape released with I activated the mechanism just as I had hoped. So, there is a random piece of tape floating around between the wing halves LOL.
 
I have most of the bodywork done and am ready to paint I think. For this version I am adding as many bells and whistles as the kit allows. This is an "air show" plane with all inspection options open. I will try to make the paint job "clean" as well!

20221108_205002.jpg
20221108_205106.jpg
20221108_210316.jpg
20221108_210326.jpg
20221108_204947.jpg
 
Last edited by a moderator:
I got the matte black Tamiya XF-1 sprayed on rather thinly. I want to experiment with the next step by using different metallic colors to do the marbling in some of the panels. Hopefully that will give the panels various hues when I overspray with the main color, plus some pop from the metallic properties.
20221111_170251.jpg

I have all of the little tidbit parts primed as well.
20221111_170259.jpg
 
Back
Top