• Modelers Alliance has updated the forum software on our website. We have migrated all post, content and user accounts but we could not migrate the passwords.
    This requires that you manually reset your password.
    Please click here, http://modelersalliance.org/forums/login to go to logon page and use the "Forgot your Password" option.

Revell A-10 Warthog

Greg Kimsey

Well-known member
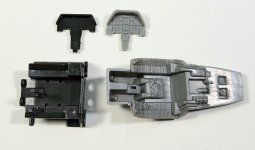
So after FUBARing the Tamiya Thunderbolt kit I decided I would compare it to the Revell Warthog, kit which coincidentally came yesterday while I was off work. I usually equate Tamiya with "quality", however, after opening the Revell kit and comparing it to the Tamiya, I must say that I am disappointed in Tamiya and grateful that I screwed it up so badly. Look at the difference in detail in these two photos. Tamiya on left and Revell on the right.
20221216_141139.jpg
20221216_143520.jpg
Are you kidding me? Anyway, I am glad to be starting over. This is where I am also grateful for getting things at wholesale, even though I still got the very serious evil eye from Gail when I opened the Revell box! She'll get over it. So, take two, camera, ACTION!
Things I have learned:
1-This plane is kept fairly clean, so no chipping.
2-This plane has RAISED panel lines, so don't screw them up.
3-Repairing inset panel lines is hard to keep straight, so don't screw them up either.
 

Attachments

  • 20221216_141139.jpg
    20221216_141139.jpg
    206.3 KB · Views: 12
This is a rebox of the old Monogram kit. Some people still argue it's a better kit than the HobbyBoss.....if you can get past the raised panel lines. I've got both (well, soon anyways), so I don't have a particular bias. But I'm also not one to get too hung up on minute "inaccuracies". Probably going to need a bit more care assembling, as it's still fairly old tooling (1988)...but not nearly as ancient as the Tamiya (1977). I think I read somewhere that the Tamiya may have been based off the prototype, hence some of the differences...but I don't recall where I saw that...so take it with a grain of salt.
 
But I'm also not one to get too hung up on minute "inaccuracies".
@helios, samesies. I don't count rivets

The only thing I am not crazy about is that the seat is molded to the cockpit floor. That "might" make putting on the harness difficult. I will paint the chair sides and make a decision after that.
 
Their F-4 is the same way (at least the 72nd one). It's annoying if you want to replace the seat...but fortunately they aren't bad as far as kit seats go. A little tarting up and they'll look well enough.
 
I finally conquered the harness. I got so frustrated last night that I knocked off early and went to bed, hoping for a new vision in the morning. It was a good call. I thought of the way I wanted to do it and it worked!
20221217_052746.jpg


I used tape instead of the lead strips I was trying to use. The lead wire buckles finally cooperated and I ended up happy 😊
 
Finally got on track with the cockpit. I think whoever designed this plane said, "Let's see how many switches can I put in this baby...challenge accepted!"
20221217_090346.jpg
20221217_090357.jpg
I am pretty happy with the results. I need to weather just a little, but otherwise, I'll take it.
 

Attachments

  • 20221217_090248.jpg
    20221217_090248.jpg
    97.2 KB · Views: 12
Let's see, where was I? I got the cockpit done. I started working on the front wheel well. Starboard side is weathered. I didn't add any wiring to this side.
20221217_155806.jpg
I glued the fuselage together with the cockpit in place. The fit wasn't all that great and I ended up using epoxy add a clamp to force it to stay in place.
20221217_180014.jpg
20221217_175707.jpg


For the port half of the wheel well I did add some hydraulic lines.
20221217_184003.jpg
I trimmed the "wires" off of the landing gear and used lead wire to make better ones. I used embossing metal to cut very thin clamps.
20221217_212507.jpg

I got that half glued in place and will let it dry before adding the gun cover because it is a poor fit and I need to trim it.
20221217_232604.jpg
The only other thing accomplished was to address the gun. I trimmed off the barrels (not sure of the right word) and replaced them with brass tubing. Then I drilled out the holes (cooling ports? Not sure what they are called either)
20221217_225844.jpg
I will sand them even tomorrow. That's it for today.
 
I have gotten some done on the plane despite helpful grandchildren, a Christmas party, and some bad luck. The bad luck part is that my airbrush holder, which has a built in clamp, decided to unclamp itself and fall to the floor, right on the tip
20221218_183951.jpg
bending all to h e double hockeysticks. I had the guard off because I had been doing some close up spraying. FUBAR. There's that word again. Anyway, I fixed the falling off problem with screws.
20221218_183633.jpg
I got one of my other brushes out and cleaned it so I am good 'til the new nozzle comes in.
Another issue has been this part:
20221218_182949.jpg
the turbine is just a disc that you put in the bottom then put the top on. The trouble is, there was nothing to hold it in place, and it basically "floats" on the rim
20221218_185509.jpg
and you have to center it and hope it stays there, but it kept falling sideways, or sliding back, etc etc. I finally used epoxy to fill around the edges. I held the parts over my head so that gravity might assist, got as centered as I could and slowly lowered it to the table, hoping the pieces would stay centered while I wasn't looking. They didn't. So I used my knife to trim the off centered edges and used Tamiya putty to fill in.

While the putty was setting I built the wings and tail
20221218_183059.jpg
No issues AT ALL...FINALLY! Went together easily and won't even need sanding. Jiminy Crickets! Stike up the band!
I almost forgot about re-creating the raised panel lines. I could not see a way to even the center seam without losing some. I used masking tape and Vallejo plastic putty to create new seams...It was relatively simple to do.
20221218_131856.jpg
However, the raised rivets were another story. Nothing to do but make "innies" where the others are "outies". Honestly, after a dusting of paint it looks just fine.
20221218_191146.jpg
That's all folks. I have been at the bench since 10am and I have about had it. (The Christmas party was at our house but I wasn't invited LOL. It was my daughter's friend's party so I was relatively undisturbed for 3 hours!) More on another day. G'night mates.
 
It does look a challenge, you're whippin' it though, Go man go!
It is funny how you figure out what you should have done after you have done it wrong. I should have used epoxy PUTTY, not epoxy glue. Hopefully that can be a lesson learned and not forgotten like normal. It would have been so easy to have designed it so you put the halves together, put in the blades, then put on the cover. Doesn't take a genius to figure that out. I am living proof!
 
This build is cursed! OMG. I would give up and put it away if it were for me. But, for Ray, I must persevere.
I cut the crap out of my thumb making the bombs.
20221221_093449.jpg
I bled like no tomorrow but superglue finally stopped it. It's part of the game, I know.

I was going to work on the canopy, so I studied the diagram...
20221221_093934.jpg
trying to figure out how part #78 goes in. Trying to test fit (now realizing I was doing it completely wrong) I forced a little too much and it flew into the fuselage. Yes, seriously. So, ...what to do? I tried making a scratch built one, but you've seen my scratch build skills, so I went with plan B. I cut a hole in the bottom with what looks like a hatchet.
20221221_093309.jpg
and got the piece out. Of course, it was broken.
20221221_093239.jpg
So, this is where I am
20221221_093222.jpg


On a happier note, the wheel...struts(?) look decent enough.
20221220_144843.jpg
20221220_163730.jpg
Yes, I realize the tiny rods are not right and are supposed to be even, but I didn't see any way of making that happen with the cover completely in the way, which means I put it on wrong, but could see no other way, so they stay the way they are.

Anyway, you are caught up on this complete clusterf%$# of a %$@&ing %#×=damn airplane build. Can't wait for it to end. I have taken extra Prozac and plenty of Crown Royal trying to not kill anyone who speaks to me right now.
 
for the canopy rail glue the pieces to the canopy itself and get it aligned. It probably nestles inside the canopy if I had to guess. Have you looked at any other build blogs to see how others have done it?
 
Back
Top