• Modelers Alliance has updated the forum software on our website. We have migrated all post, content and user accounts but we could not migrate the passwords.
    This requires that you manually reset your password.
    Please click here, http://modelersalliance.org/forums/login to go to logon page and use the "Forgot your Password" option.

Logistics, The Rolling Stock Completed April 18th, 2020

Logistics, The Rolling Stock Update Mar. 19, 2018

Stunning work Bob! I am overwhelmed!

Thanks Duke,

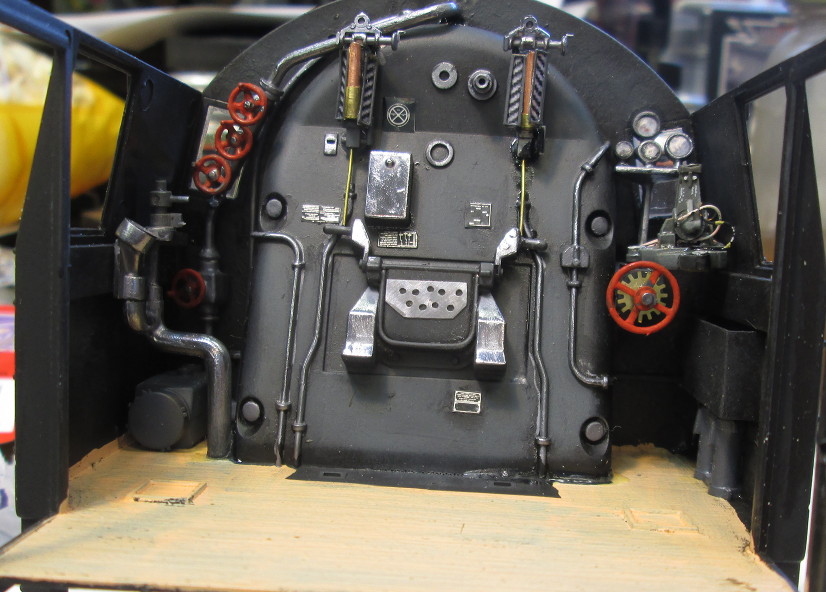
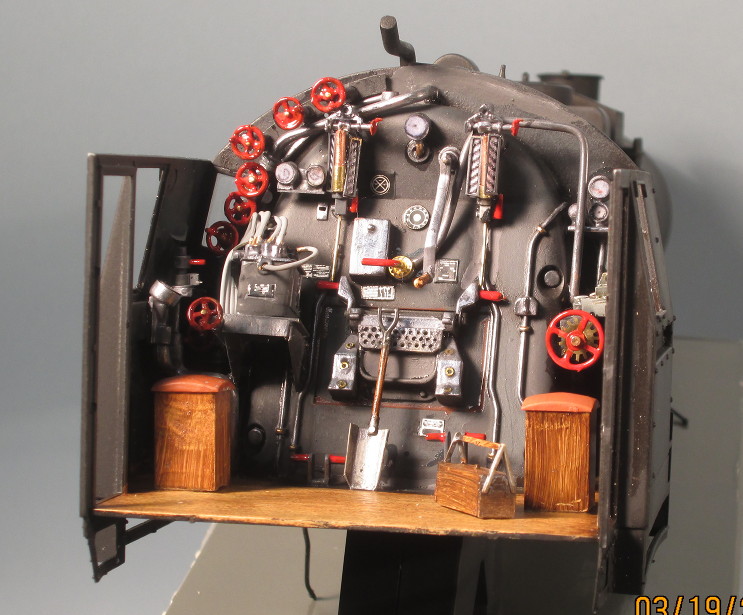
Now that I posted the locomotive cabin, here is a problem I encountered. I wonder if anybody can relate?

Has anybody ever had a brilliant idea? I mean a real epiphany! Then you get everything you need to pull it off and the results suck?

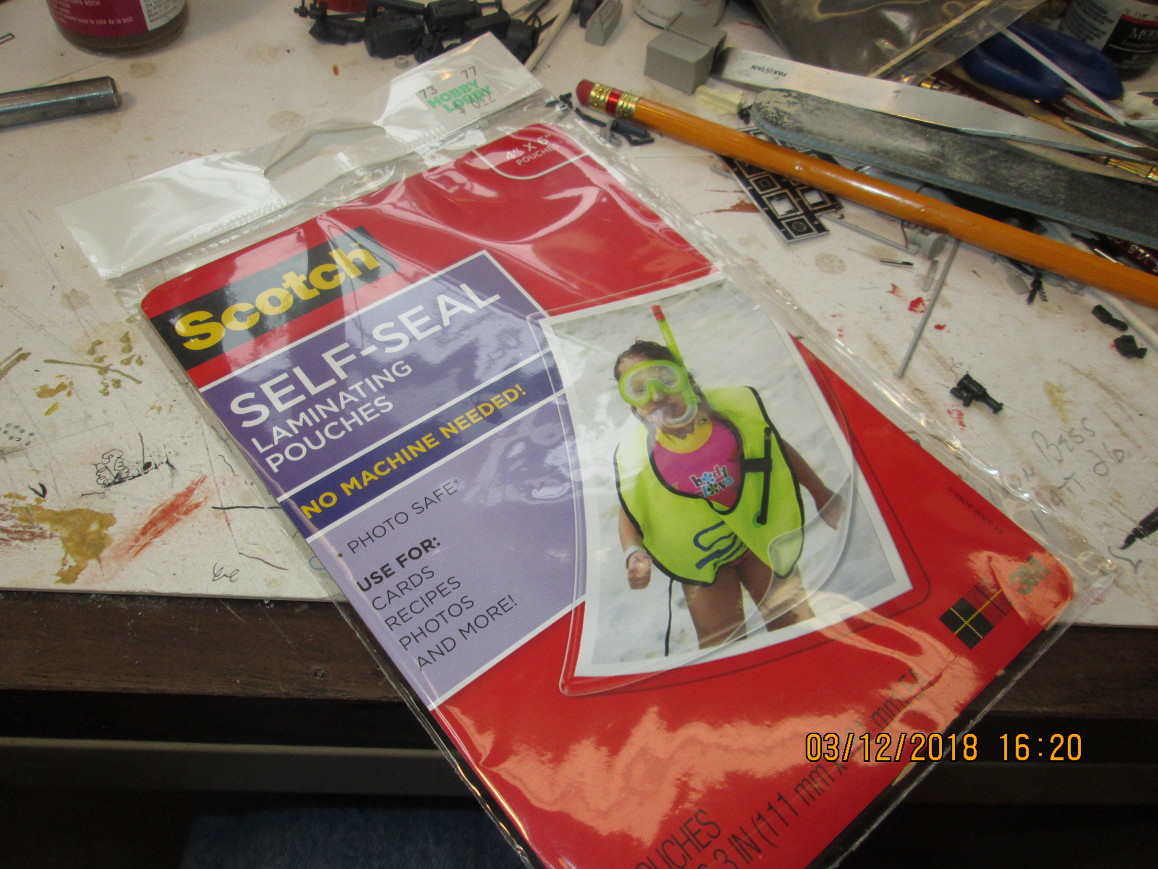
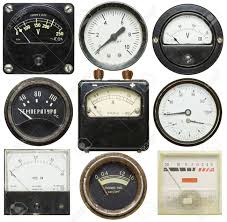
Well, I had one in the building of the locomotive cabin. There are all these gauges, right? They all have white dials. So, I went on the Internet and found tons of white faced gauges. Perfect! Then I bought some laminating sheets. The kind you laminate your Social Security card, etc.

g0~5.JPG


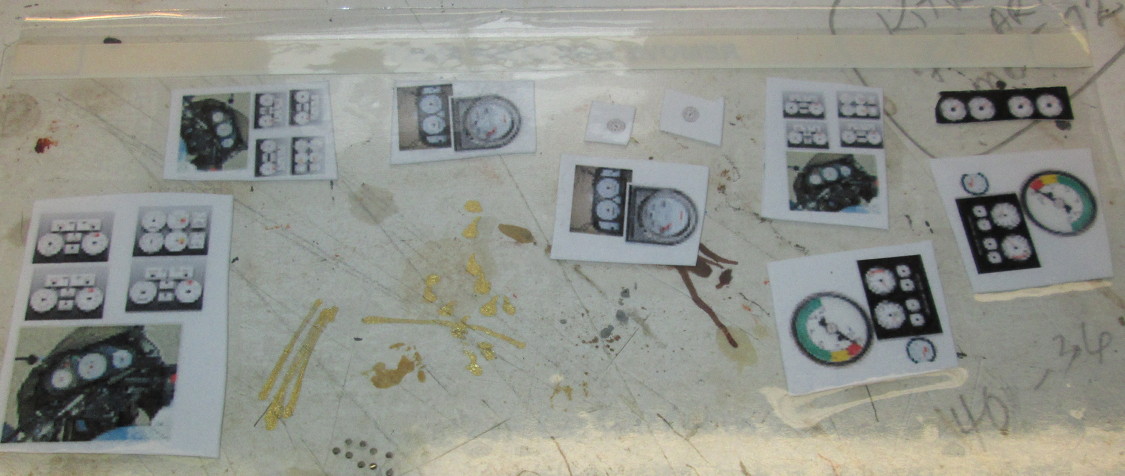
Then I use my computer program to reduce the gauges to the right size, (Very tiny). Then i cut them into small sheets with several gauges each. Then I laminate them to, 1), make them stronger and invulnerable to liquids. 2) To give them a gloss finish that will approximate clear lenses. So far, wonderful! I'm on a roll now! I get out my punch and die and start punching them out.

g00~5.JPG


g000~5.JPG


And they look great! Maybe a bit pixilated but, installed, nobody will notice! Right? These are really blown up compared to their real size.

g00000~2.JPG


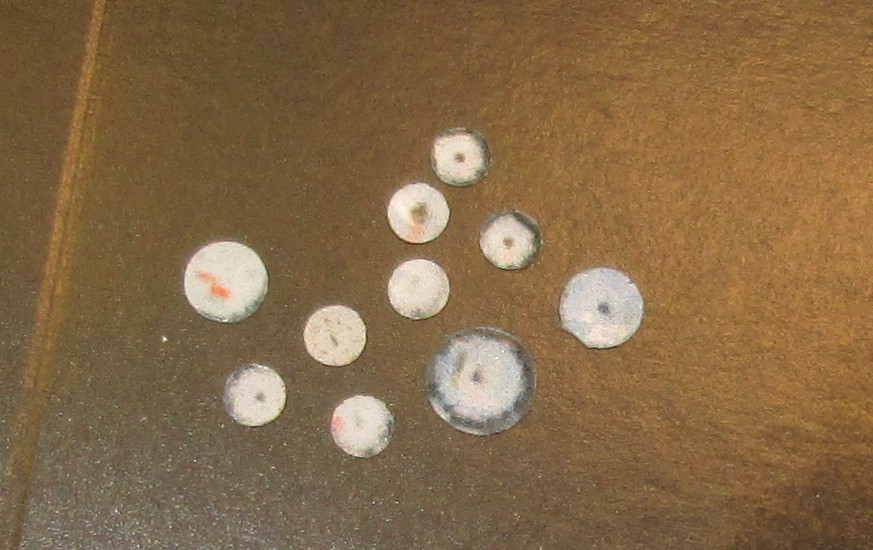
Then, I put them in the gauges and the glue gets inside. I forgot that when you punch them out, the entire edge on the gauge becomes suseptable to liquids. Now they are not only pixelated, they are blurry as well! I will never be able to live with these damned things, even though you will barely be able to see them after the locomotive is built, so, I'll put them on the back burner until I can find something to replace them with. Most aircraft gauges and dials have a black face. There are white faced model car gauges out there, but they're 1/25th, many are not round, and I could run into the same pixilation problems again.

You can see them clearly in this photo on the right side.

00~16.JPG


0000~12.JPG


I'm open to ideas you guys! Help!!!!

Bob
 
Logistics, The Rolling Stock Update Mar. 19, 2018

I have used Micro Kristal Clear to cover small gauges on the vehicles that I had done before. The dials were mostly not white, they were black, but, the small drop of MKC made it look realistic. A clear "lens" was produced, protecting the dial.


Laurence
 
Logistics, The Rolling Stock Update Mar. 19, 2018

Not sure what you printed them on or what kind of printer you used but normally when you print your own decals on decal film with an inkjet printer you need to use a fixative to seal the ink before wetting them for use. I am sure there are products made specifically for that but I used to use light coats of testors clear gloss to good effect. If you spray it on too heavy the ink will run so just a light coat or two will do.

If you need a white dial could you do a decal with a clear background over some white styrene sheet and punch that out?

Great work on the cabin!
 
Logistics, The Rolling Stock Update Mar. 19, 2018

you wouldn't think they would be so pixelated scaling down. Send me what you scanned and let me see what happens. Might be the printer that did it?

They look good to me.
 
Logistics, The Rolling Stock Update Mar. 19, 2018

I have used Micro Kristal Clear to cover small gauges on the vehicles that I had done before. The dials were mostly not white, they were black, but, the small drop of MKC made it look realistic. A clear "lens" was produced, protecting the dial.


Laurence

Thanks Laurence,

I have used Krystal Clear for years that way as well. The problem, at least for me, is that Trumpeter chose to emboss the dials with raised tic marks and needle about 2mm thick inside the dial. To me, that looks so amateurish and frankly, bad. It would take a ton of Krystal Clear to fill the dial faces sufficiently to cover the embossing and create a flat lens.

Now, the only way to correct is to find gauge faces that are white, not pixilated and printed.

Bob
 
Logistics, The Rolling Stock Update Mar. 19, 2018

Not sure what you printed them on or what kind of printer you used but normally when you print your own decals on decal film with an inkjet printer you need to use a fixative to seal the ink before wetting them for use. I am sure there are products made specifically for that but I used to use light coats of testors clear gloss to good effect. If you spray it on too heavy the ink will run so just a light coat or two will do.

If you need a white dial could you do a decal with a clear background over some white styrene sheet and punch that out?

Great work on the cabin!

Thanks Dave,

Good ideas! the laminate does a great job serving as a gauge lens. The reason mine look like hell is because they were pixilated to begin with and then the liquid glue blurred them further. I should have used something better than regular printing paper. I think you nailed it. I should have used decal paper! Then made very thin plastic discs with the punch and die, put the decals on that and then glued the discs over the embossed numbers.

I appreciate the help!

Bob
 
Logistics, The Rolling Stock Update Mar. 19, 2018

you wouldn't think they would be so pixelated scaling down. Send me what you scanned and let me see what happens. Might be the printer that did it?

They look good to me.

Thanks MP, you'd know better than me about that! I pulled them off the web. They looked great, but had to reduce them to about a quarter of their original size in Gimp.

I'll email them to you.

They may look good to you, and, nobody has mentioned them, so, I could probably leave them as is, especially because when on the diorama, you will barely see them. My problem is, when I began this project, I swore to myself, I would do everything to the best of my ability, as this is almost certainly the last super diorama I will ever build!

Dad
 
Logistics, The Rolling Stock Update Mar. 19, 2018

Has anybody ever had a brilliant idea? I mean a real epiphany! Then you get everything you need to pull it off and the results suck?

That's the story of my life. Almost every model does that to me.


One other idea: Reduce them slightly smaller than you did, then try laminating them so the edges seal. Then glue the entire laminated piece in the gauge faces. That way the whole printed image is protected.

Then again, given the size of these, this probably isn't the best or easiest idea. Still, it is something to consider.

Thanks Duke,

It is something to consider!!

There is no place like MA to get good advice when you need it!

Bob
 
Logistics, The Rolling Stock Update Mar. 19, 2018

:( Wow Bob after such a nice job on the physical details of the engine room.
I am half way through one of these so this is all very interesting. What I can't understand is why they pixelated when you went smaller as 'pixelation' is a problem when you try to make a small low quality file fit a larger resolution.
But you went the opposite way. It should have got sharper.
I would reprint them on a higher quality gloss paper at about 200 gsm and glue them onto the disc with some Krystal clear.
Also , I would love to know your method of making the round wheel handles....I am facing the same detail problem as you and was thinking how I would do this?

Ian.
 
Logistics, The Rolling Stock Update Mar. 19, 2018

The problem is your printer works in dots per inch and converts it all to those dots (Pixels per Inch or PPI sometimes also called DPI or Dots Per Inch) You might ask your local print stores about printing the pages for you. You can even ask the local place that does photo printing as they use much higher resolution printers than the norm and the inks they use are much more color fast.

Hope that helps
 
Logistics, The Rolling Stock Update Mar. 19, 2018

:( Wow Bob after such a nice job on the physical details of the engine room.
I am half way through one of these so this is all very interesting. What I can't understand is why they pixelated when you went smaller as 'pixelation' is a problem when you try to make a small low quality file fit a larger resolution.
But you went the opposite way. It should have got sharper.
I would reprint them on a higher quality gloss paper at about 200 gsm and glue them onto the disc with some Krystal clear.
Also , I would love to know your method of making the round wheel handles....I am facing the same detail problem as you and was thinking how I would do this?

Ian.

Ian, Dad sent me what he had, they were actual images of the of the dials, photos so I can understand (I think) it going bad.

Dave's right about the printer, sometimes you can up the printer settings to take advantage of higher resolution they can output. Depends on the printer of course.
 
Logistics, The Rolling Stock Update Mar. 19, 2018

:( Wow Bob after such a nice job on the physical details of the engine room.
I am half way through one of these so this is all very interesting. What I can't understand is why they pixelated when you went smaller as 'pixelation' is a problem when you try to make a small low quality file fit a larger resolution.
But you went the opposite way. It should have got sharper.
I would reprint them on a higher quality gloss paper at about 200 gsm and glue them onto the disc with some Krystal clear.
Also , I would love to know your method of making the round wheel handles....I am facing the same detail problem as you and was thinking how I would do this?

Ian.

Bad news Ian, my intention was to cast the round wheel handles as I could think of no other way! Then I was looking through my vast boxes of parts for something else, and lo and behold, a half dozen of those wheels, plus a couple of larger ones! It worked out perfectly. I have no idea where I got them, there are parts in those boxes from the 1970s.

Also, see below! I think I figured out the pixilation problem, with you guy's help!

Bob
 
Logistics, The Rolling Stock Update Mar. 19, 2018

The problem is your printer works in dots per inch and converts it all to those dots (Pixels per Inch or PPI sometimes also called DPI or Dots Per Inch) You might ask your local print stores about printing the pages for you. You can even ask the local place that does photo printing as they use much higher resolution printers than the norm and the inks they use are much more color fast.

Hope that helps

It did help, a lot! See below!

Thanks Dave!

Bob
 
Logistics, The Rolling Stock Update Mar. 19, 2018

:( Wow Bob after such a nice job on the physical details of the engine room.
I am half way through one of these so this is all very interesting. What I can't understand is why they pixelated when you went smaller as 'pixelation' is a problem when you try to make a small low quality file fit a larger resolution.
But you went the opposite way. It should have got sharper.
I would reprint them on a higher quality gloss paper at about 200 gsm and glue them onto the disc with some Krystal clear.
Also , I would love to know your method of making the round wheel handles....I am facing the same detail problem as you and was thinking how I would do this?

Ian.

Ian, Dad sent me what he had, they were actual images of the of the dials, photos so I can understand (I think) it going bad.

Dave's right about the printer, sometimes you can up the printer settings to take advantage of higher resolution they can output. Depends on the printer of course.

Ian, Dave and MP!

You were all right! I went into the gauges file after the reduction and looked at them closely! The images were beautiful. It was when I printed them out when they became, what I thought, pixilated. Here Is first, the original, then the first reduction and finally the last reduction!

I opened the original in Gimp, then reduced it via Scale image, then exported the reductions to my desktop.

images-1.jpeg


g.jpeg


gg.jpeg


OK, now, how do I do this? Put them on a memory stick and take them to a print shop?

Absolutely perfect reductions! The last time I did something like this I was using a Mac laserwriter.

My printer is a Canon MP 620. Obviously the problem!

Thanks so much you guys!

Where else can you have a problem, then have it answered by two Dave's, one from South Africa, two Australians, Ian and Laurence, and another Bob from South Carolina! Is this a great website or what?

:yipee

Bob
 
Logistics, The Rolling Stock Update Mar. 19, 2018

Where else can you have a problem, then have it answered by two Dave's, one from South Africa, two Australians, Ian and Laurence, and another Bob from South Carolina! Is this a great website or what?

:yipee

Bob

:rotf :rotf Getting useful info from someone in SC is the shocker right! :rotf :rotf :rotf :D
 
Logistics, The Rolling Stock Update Mar. 19, 2018

United Nations of Modeling - where the sun never sets and friends lend a helping hand.

Not running for office, just sayin' :D


Laurence
 
Back
Top