
-
Modelers Alliance has updated the forum software on our website. We have migrated all post, content and user accounts but we could not migrate the passwords.
This requires that you manually reset your password.
Please click here, http://modelersalliance.org/forums/login to go to logon page and use the "Forgot your Password" option.
- Home
- Forums
- Current Campaigns
- Past Campaigns
- Finished Campaigns
- 2013 Campaigns
- From Russia With Love
You are using an out of date browser. It may not display this or other websites correctly.
You should upgrade or use an alternative browser.
You should upgrade or use an alternative browser.
Eduard 1/48 IL-2M Shturmovik * Completed *
- Thread starter Phil
- Start date
nsmekanik
Member
Eduard 1/48 IL-2M Shturmovik
Here, let me help you decide Personally I like the rust(ic) look

Buthmy: what colour is the instrument panel :huh:
'could it be some offish grey greeny colour instead of grey? Maybe

Or not! :evil:

And the interior........well....how about a nice light grey :woohoo:


Look at the fun you could have with the colour pallet in thier :geek
even some green if you like

Have fun, and above all else have a nice day :drinks
Here, let me help you decide
Personally I like the rust(ic) look
But
hmy: what colour is the instrument panel :huh: 'could it be some offish grey greeny colour instead of grey? Maybe
Or not! :evil:
And the interior........well....how about a nice light grey :woohoo:
Look at the fun you could have with the colour pallet in thier :geek
even some green if you like
Have fun, and above all else have a nice day :drinks
nsmekanik
Member
Eduard 1/48 IL-2M Shturmovik
It doesn't match any known use or any known colour in the soviet line up in that era :vmad
What's wrong with the interior color?? I think it's looking great so far
It doesn't match any known use or any known colour in the soviet line up in that era :vmad
Eduard 1/48 IL-2M Shturmovik
Well the first two and last pics are not really much help, now we have yet another diff ip colour-black, grey sidewalls? looks predominately blue to me..........
which just about seals this deal - IL-2's were painted - whatever.
and another colour
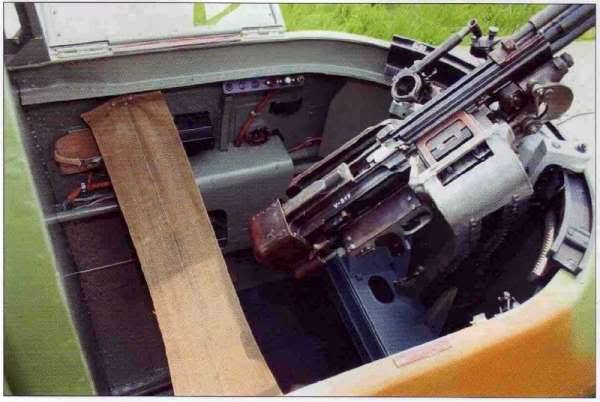
and another - which looks like Humbrol 145 which will do me just fine.

Well the first two and last pics are not really much help, now we have yet another diff ip colour-black, grey sidewalls? looks predominately blue to me..........
which just about seals this deal - IL-2's were painted - whatever.
and another colour
and another - which looks like Humbrol 145 which will do me just fine.
AndyFettes
Master at Arms
Eduard 1/48 IL-2M Shturmovik
Excellent start,...
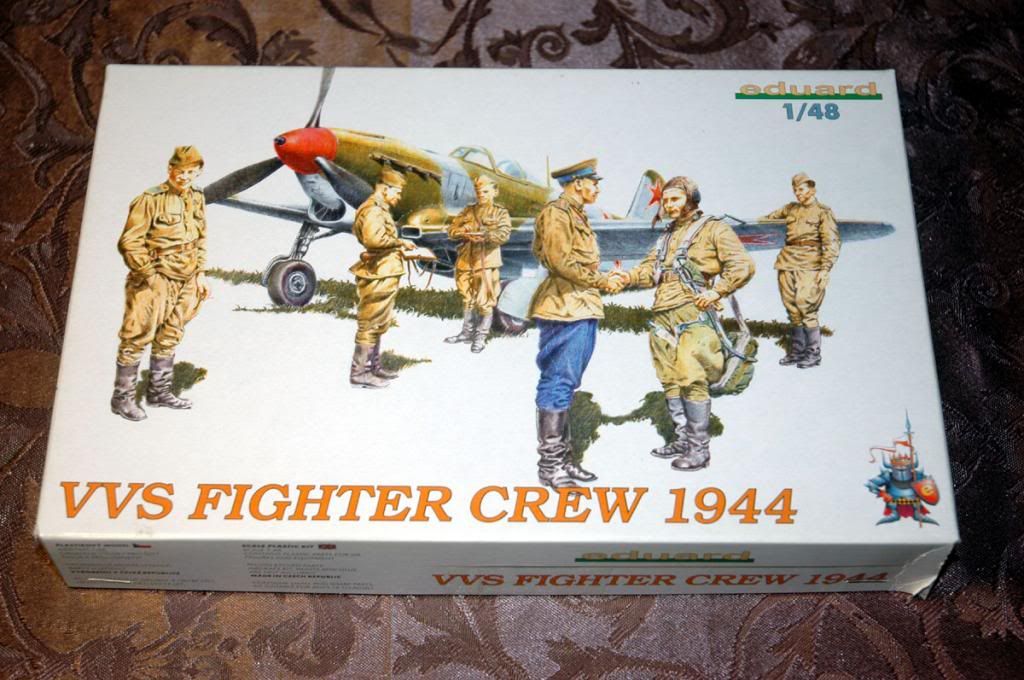
Never seen those Eduard figures before,...........
open the box open the box open the box
Excellent start,...
Never seen those Eduard figures before,...........
open the box open the box open the box
nsmekanik
Member
Eduard 1/48 IL-2M Shturmovik
Oh and Phil..............NEVER NEVER NEVER EVER USE A COLOUR PICTURE TO DECIDE WHAT COLOUR, AND ESPECIALLY WHAT SHADE OF COLOUR, AN OBJECT IS/WAS :smack
It's more likely that all those different coloured cockpits are actually the same shade of grey then not, and only look different due to the differences involved in the photography.
:drinks
open the box open the box open the box
Oh and Phil..............NEVER NEVER NEVER EVER USE A COLOUR PICTURE TO DECIDE WHAT COLOUR, AND ESPECIALLY WHAT SHADE OF COLOUR, AN OBJECT IS/WAS :smack
It's more likely that all those different coloured cockpits are actually the same shade of grey then not, and only look different due to the differences involved in the photography.
:drinks
nsmekanik
Member
Eduard 1/48 IL-2M Shturmovik
K Phil, so I was rolling around trying to sleep :gogo then it hit me, what I had forgot about since this whole VVS colour thing has finally settled itself out a while back. Eduard based the colour of it's instrument panel on the very same misinformation that WEM (White Ensign Models) Based their enamel VVS paints on. So if you want an exact match for your Panel you need to get your grubby little mitts on a tin of WEMCC ACS05 WW2 Soviet VVS WUP GREY INTERIOR PRIMER
In Erik Pilawskii's Since been discredited book Soviet Airforce Fighter Colours (of which I have a copy and long before this whole VVS thing blew up I was already having some questions as certain things did not add up in it) WUP stands for Wood Use Primer.

If you can't see it the paint and the panel are an exact match, The interior of my IL-2 is based on Mr. Pilawskii's "ALG 5" , I mixed the colour up from Vallejo's paint line using the Pantone information provided In the book as this is the colour he would have you believe the interior of you IL-2 was painted. If you scroll down to the very bottom of the page Here you will see what ALG 5 actually looked close to, and if you look very very carefully at those rusty relics you will see the remnants of. The options you have for your instrument panels are ALG 5 and Black.
VVS colours are not complicated really, but trying to mix Western Ideology with the philosophies of a Brutal Dictorial regime and then stir in some misinformation does tend to muddy the waters a bit. There were only so many colours made in so many factories to certain specifications designed specifically for certain applications monitored by individuals lookin to avoid getting shot or just for an excuse to shoot somebody.
:drinks
K Phil, so I was rolling around trying to sleep :gogo then it hit me, what I had forgot about since this whole VVS colour thing has finally settled itself out a while back. Eduard based the colour of it's instrument panel on the very same misinformation that WEM (White Ensign Models) Based their enamel VVS paints on. So if you want an exact match for your Panel you need to get your grubby little mitts on a tin of WEMCC ACS05 WW2 Soviet VVS WUP GREY INTERIOR PRIMER
In Erik Pilawskii's Since been discredited book Soviet Airforce Fighter Colours (of which I have a copy and long before this whole VVS thing blew up I was already having some questions as certain things did not add up in it) WUP stands for Wood Use Primer.
If you can't see it the paint and the panel are an exact match, The interior of my IL-2 is based on Mr. Pilawskii's "ALG 5" , I mixed the colour up from Vallejo's paint line using the Pantone information provided In the book as this is the colour he would have you believe the interior of you IL-2 was painted. If you scroll down to the very bottom of the page Here you will see what ALG 5 actually looked close to, and if you look very very carefully at those rusty relics you will see the remnants of. The options you have for your instrument panels are ALG 5 and Black.
VVS colours are not complicated really, but trying to mix Western Ideology with the philosophies of a Brutal Dictorial regime and then stir in some misinformation does tend to muddy the waters a bit. There were only so many colours made in so many factories to certain specifications designed specifically for certain applications monitored by individuals lookin to avoid getting shot or just for an excuse to shoot somebody.
:drinks
Eduard 1/48 IL-2M Shturmovik
Not true Tim. Remember I was a professional color corrector for 5 years. Depending on who took those pictures and who color corected them (or not) and to what standard they did it. Looking at those pictures most do apear to be quite white point color corected. I would prefer a nice neutral grey But that you can only get if the Photographer used color control strips when he took the photo. In my opinion the variance of color on most of those pictures (Including the ones you put up) are quite massive.
Not true Tim. Remember I was a professional color corrector for 5 years. Depending on who took those pictures and who color corected them (or not) and to what standard they did it. Looking at those pictures most do apear to be quite white point color corected. I would prefer a nice neutral grey But that you can only get if the Photographer used color control strips when he took the photo. In my opinion the variance of color on most of those pictures (Including the ones you put up) are quite massive.
Eduard 1/48 IL-2M Shturmovik
Well pass the
Well pass the
Eduard 1/48 IL-2M Shturmovik
You may need plenty!!! and don't forget the :drinks !!!
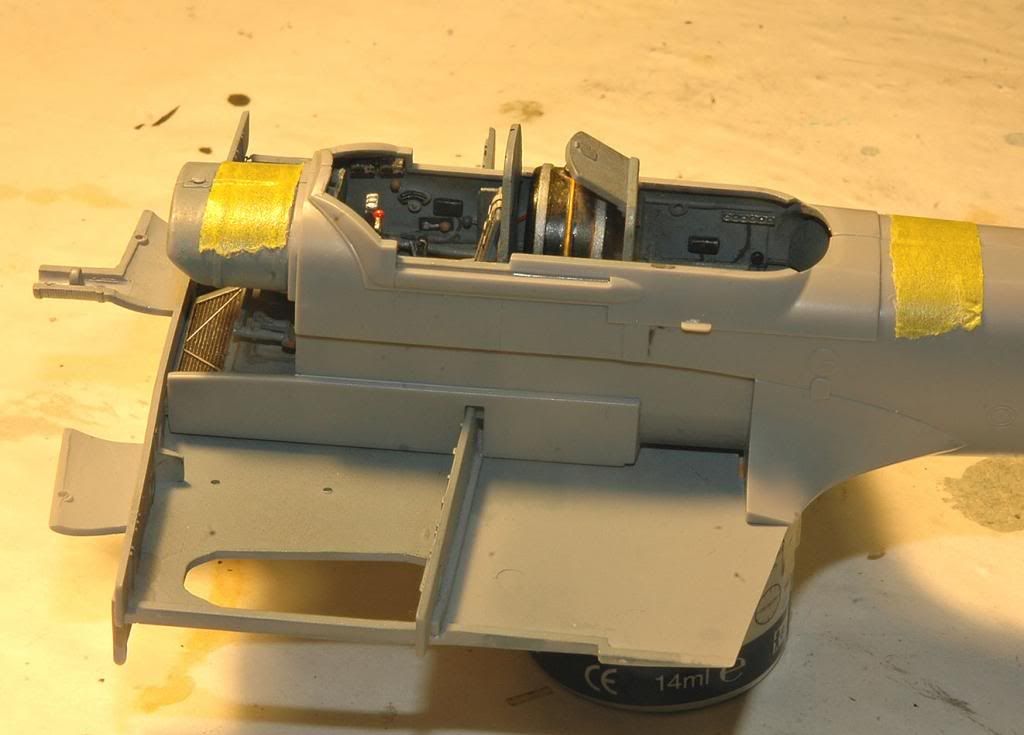
slow progress so far........
\Well pass the
You may need plenty!!! and don't forget the :drinks !!!
slow progress so far........
Eduard 1/48 IL-2M Shturmovik
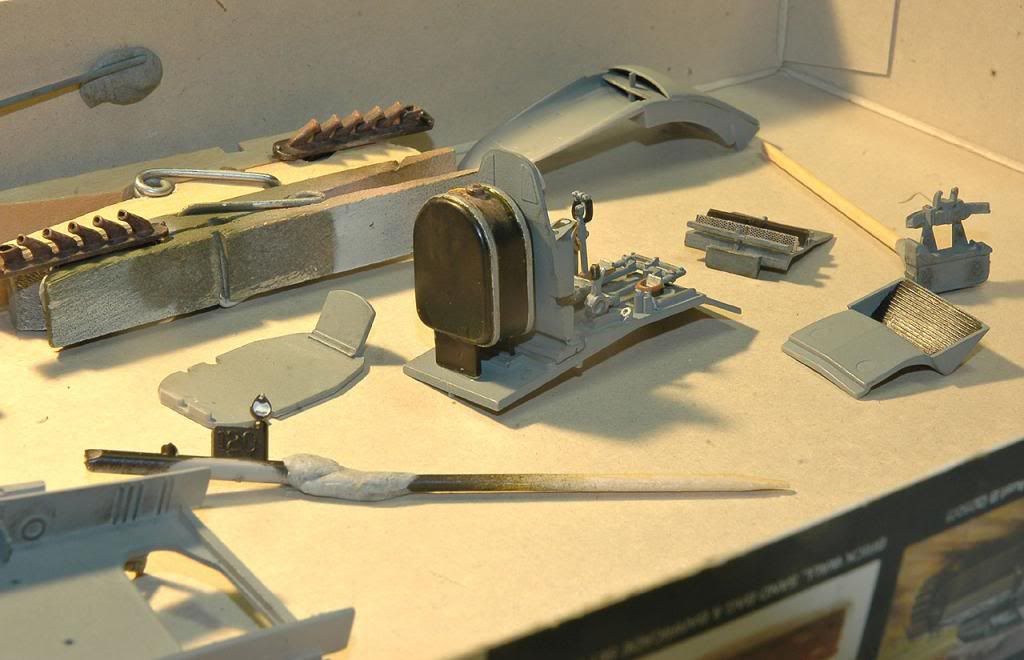
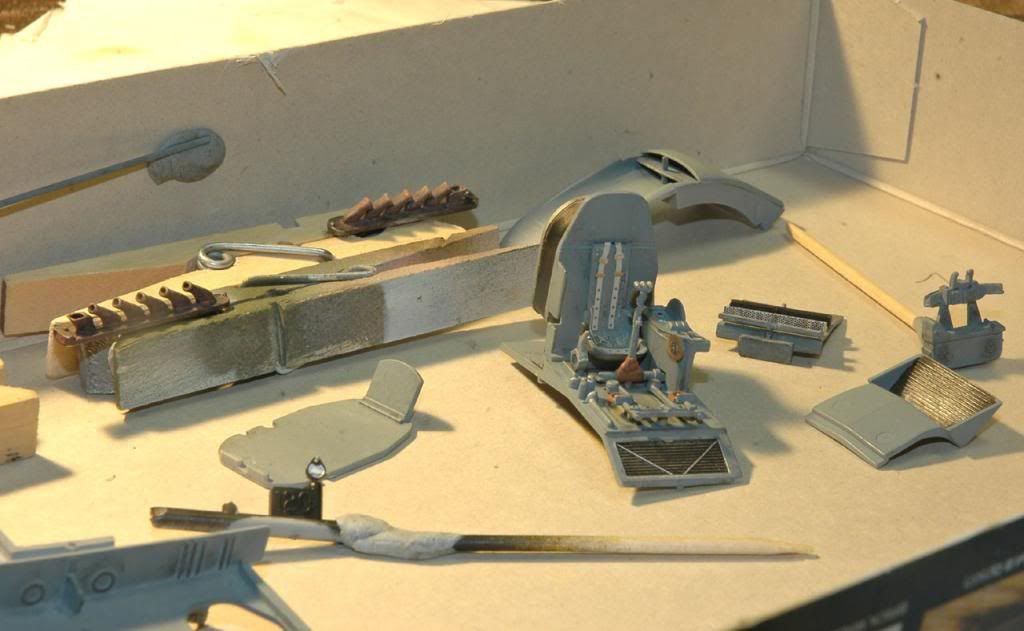
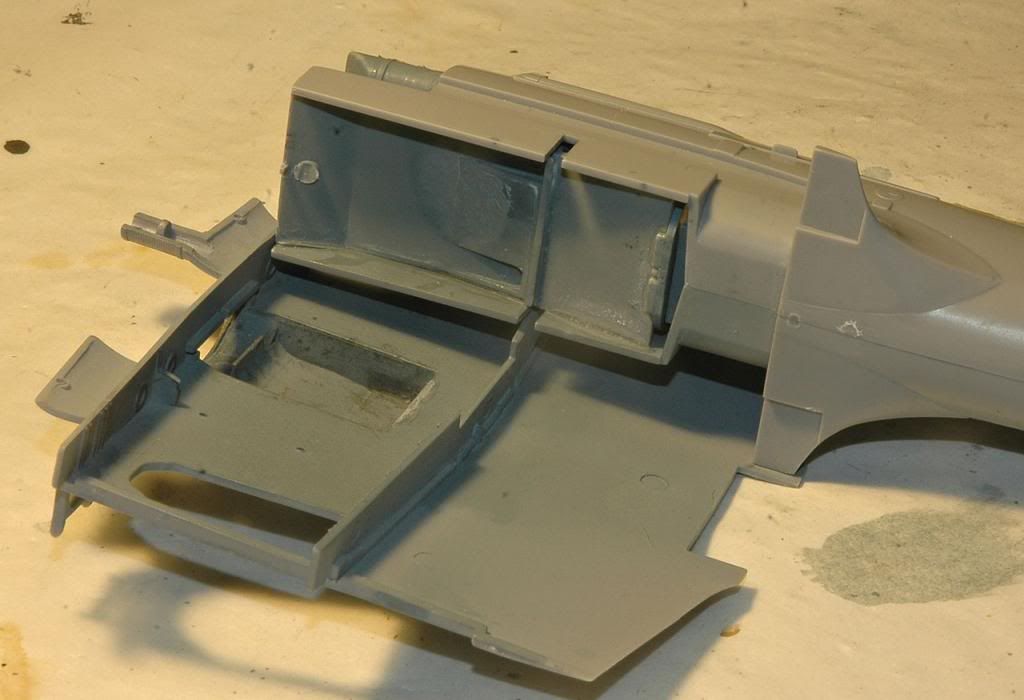
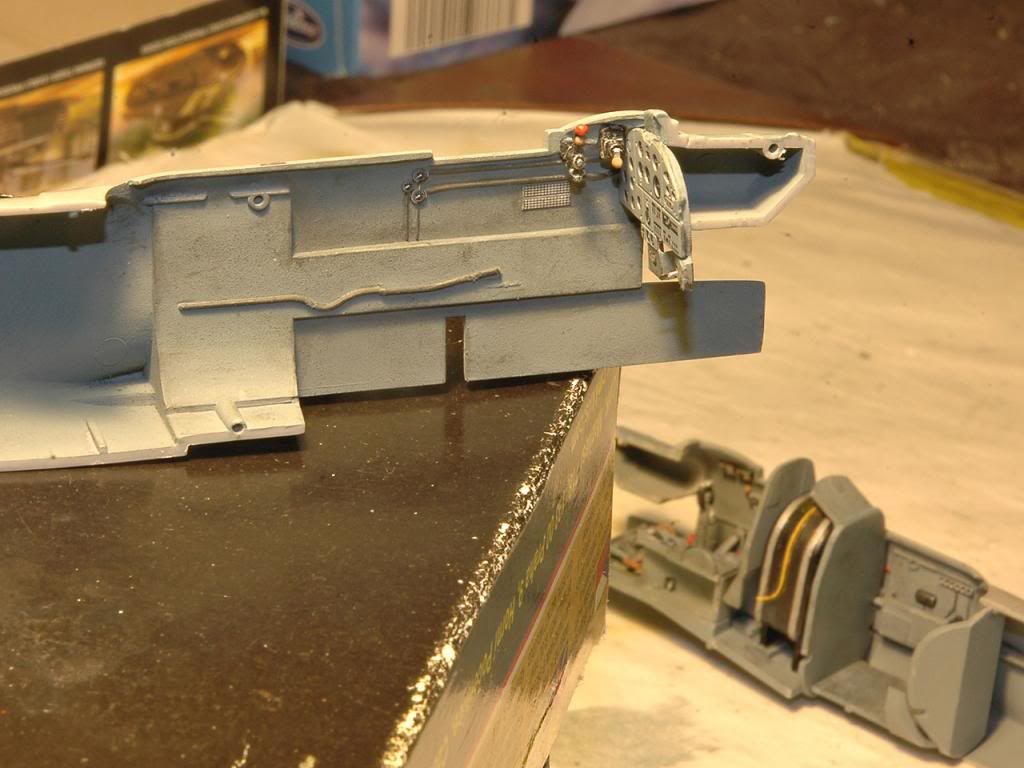
Box open for you Andy
As with the kit cannons - the Mg's were the same = pathetic !!
Brass tube to the rescue

Now we have gun barrels that look like gun barrels
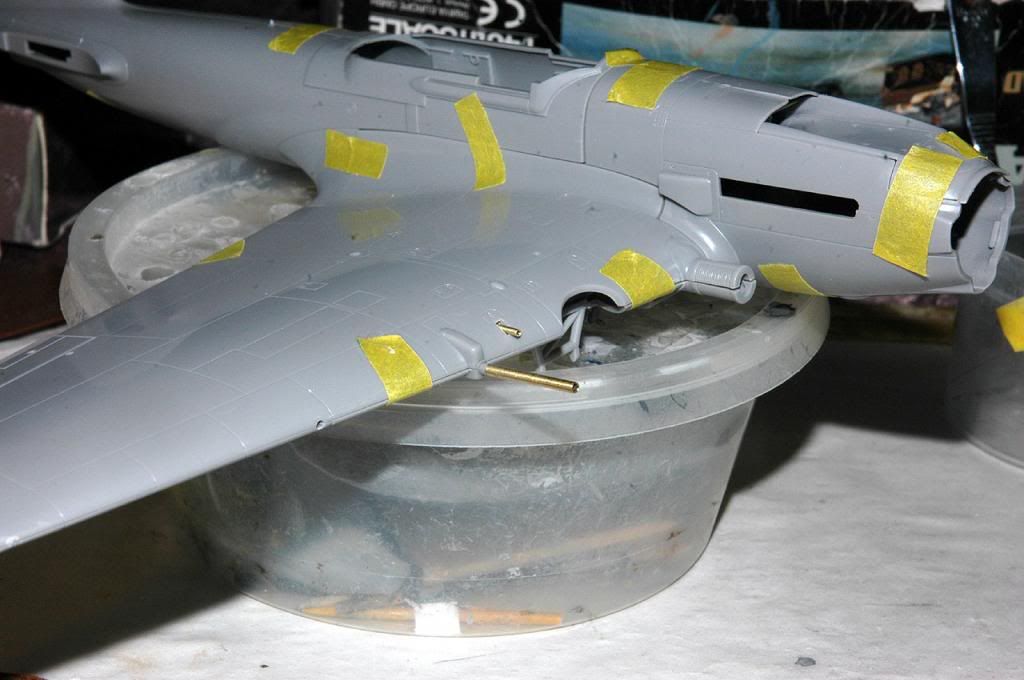
So I can fit these after painting, I made a fairly crude guide for inserting the barrels at the right depth
this won't be seen when the wings are closed up

And a dry fit to check the fit - it will be a tricky process but the fit is ok, all parts close up when pushed into place
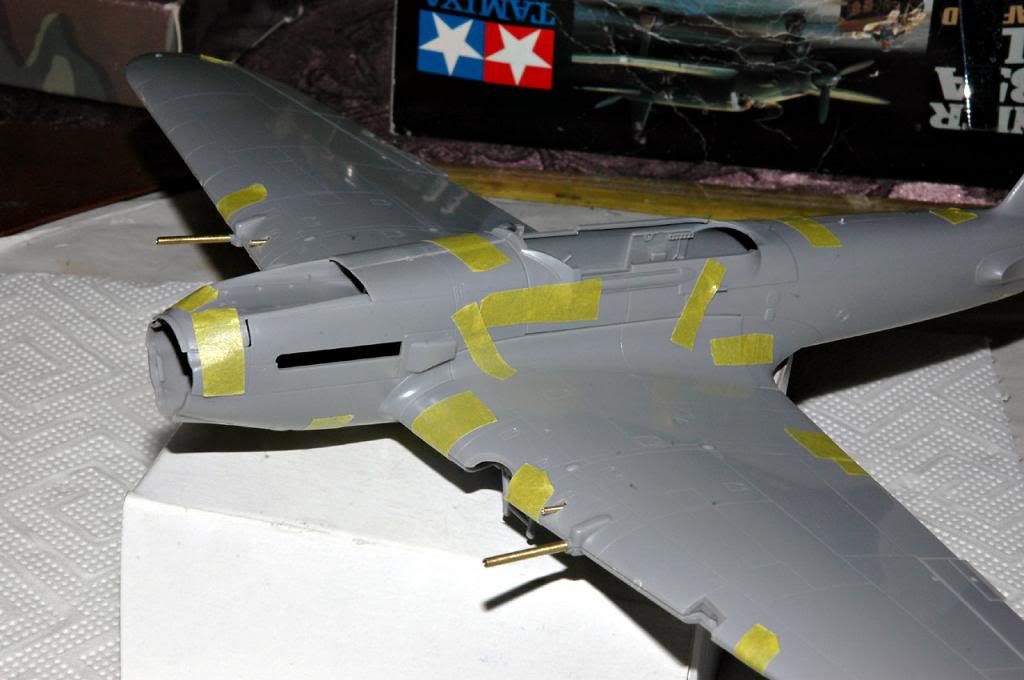

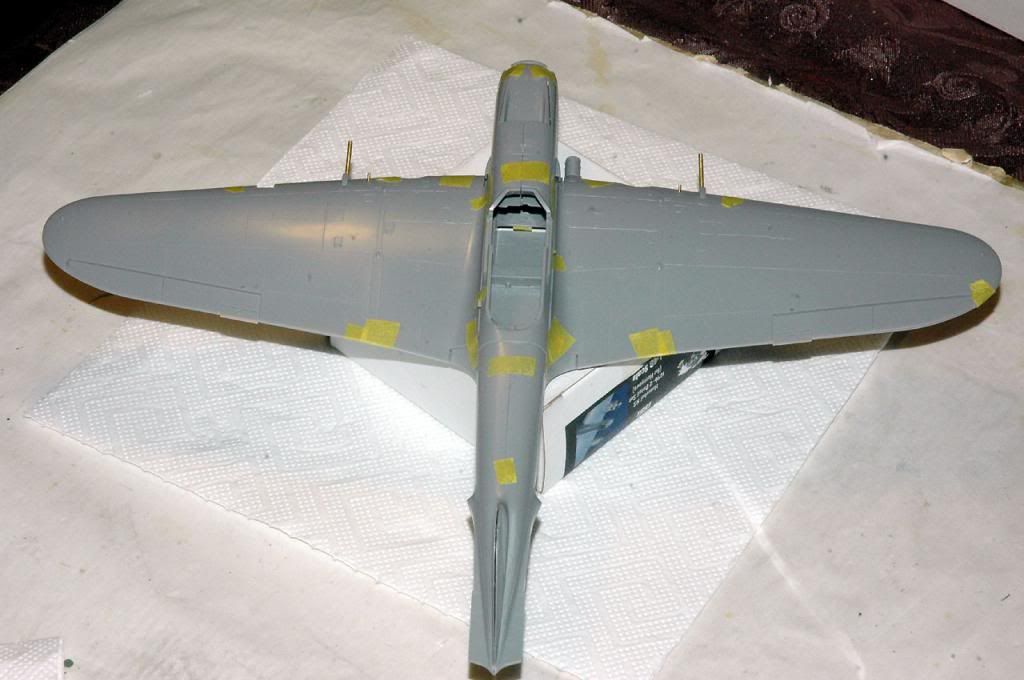
Did the tailplanes tonight - fit is damned perfect. ( not shown!)
This plastic is a dream to work with as well.
Box open for you Andy
As with the kit cannons - the Mg's were the same = pathetic !!
Brass tube to the rescue
Now we have gun barrels that look like gun barrels
So I can fit these after painting, I made a fairly crude guide for inserting the barrels at the right depth
this won't be seen when the wings are closed up
And a dry fit to check the fit - it will be a tricky process but the fit is ok, all parts close up when pushed into place
Did the tailplanes tonight - fit is damned perfect. ( not shown!)
This plastic is a dream to work with as well.
Eduard 1/48 IL-2M Shturmovik
Bit the bullet today and Sprayed the interior in the color that I thought looked the best, after freakin hours of searching and looking at build after build on these damned Ruski birds - every one has an opinion and everyone has the "" right correct"" colors pffffffft = and finding out about this - if you are not a Russian citizen living there it's very hard to go though dusty pages of info on colors used in this periods.
Plus seeing color photos of these birds that have been immersed in mud and water for 60 odd years! gives what conclusions!!!!!!!!
best guess - whatever looks ok will do!!!
build after builds no matter if IL-2 or Il2m or Il2m3 all diff colors.
So if you decide to build one of these birds - good freaking luck with your color choices!!!!!!!!!!!!!!!!!!
:zen :zen :zen :zen :zen :zen
pics soon!!!!!!
Where's the Vodka!!!!!!!!!! :woohoo:
Eduard 1/48 IL-2M Shturmovik
Bingo. That color would not be like a modern automotive assembly line paint color, it would change ever so slightly even on the assembly line cause they were just getting the product out the door. I suspect the color could have change depending on who mixed the thinner.
Let's take US Olive Drab, we've seen it everywhere from green to brown in shade. I got a picture my Dad took in Korea that sums it up.

Both of those are standard OD color...
the Brass barrels look great
so...
best guess - whatever looks ok will do!!!
Bingo. That color would not be like a modern automotive assembly line paint color, it would change ever so slightly even on the assembly line cause they were just getting the product out the door. I suspect the color could have change depending on who mixed the thinner.
Let's take US Olive Drab, we've seen it everywhere from green to brown in shade. I got a picture my Dad took in Korea that sums it up.
Both of those are standard OD color...
the Brass barrels look great
so...
phantom II
Master at Arms
Eduard 1/48 IL-2M Shturmovik
Hi Phil, I see you have discovered the quagmire that is the VVS paints :fencing
I remember pouring through all that a couple/three years back
Matter of fact the IL-2 story is no better. Not in the make up of the airframe or the paint schemes.
I have to admit that Massimo guy mentioned above was very helpful to my build.
Just a tidbit of useless info to add : There were only the IL-2's in the Russian inventory. The M suffixes and -3 ext, is something the West added to the designation.
Good luck in your build whatever you decide. :drinks
Glad the kit goes together well.
Cheers, Christian B)
Eduard 1/48 IL-2M Shturmovik
Cheers guys, interesting shades of OD there MP!
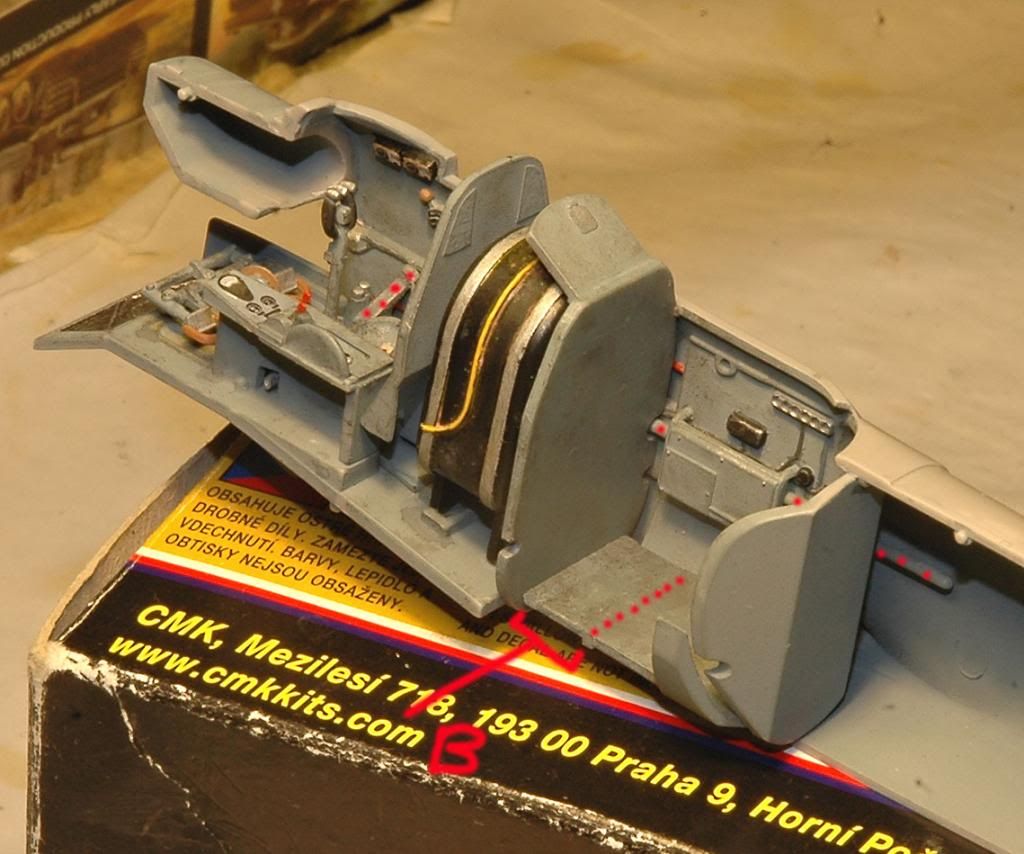
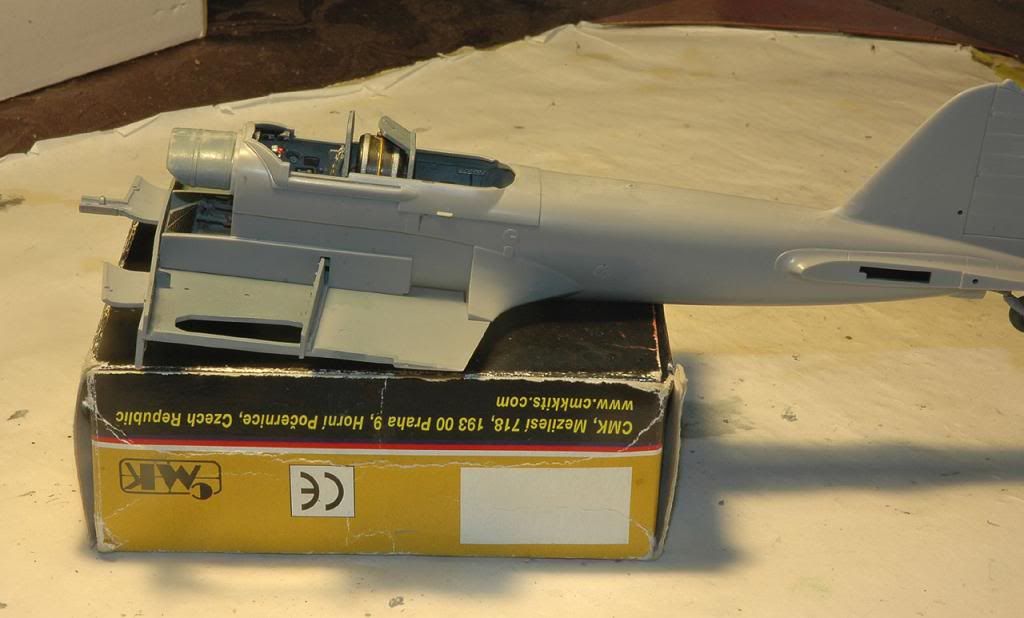
So here we are at this point, as you know Eduard gave a bluish grey pit color for the Pe parts and I decided to try to match that rather having green or grey for every thing else which I think would of looked just plain dumb.
Note to self - always flatcoat the colored IP face before gluing to the instrument cluster......
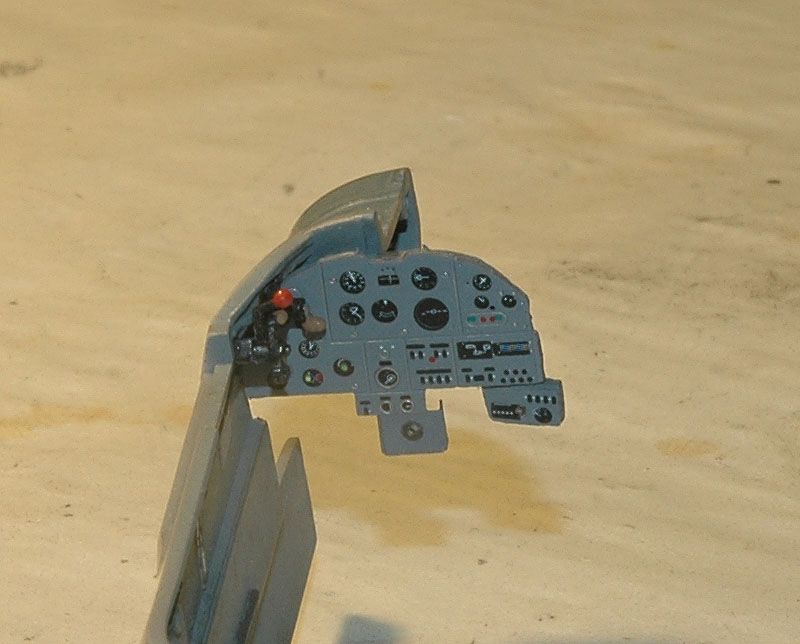

still a wip - but at least some forward movement!

Would anyone know what part #120 is or where it goes, it states 'not used' , I suspect it id from the single seat version?
Cheers guys, interesting shades of OD there MP!
So here we are at this point, as you know Eduard gave a bluish grey pit color for the Pe parts and I decided to try to match that rather having green or grey for every thing else which I think would of looked just plain dumb.
Note to self - always flatcoat the colored IP face before gluing to the instrument cluster......
still a wip - but at least some forward movement!
Would anyone know what part #120 is or where it goes, it states 'not used' , I suspect it id from the single seat version?
Eduard 1/48 IL-2M Shturmovik
Don't have the kit Phil, can't help but think you're looking good here.
Don't have the kit Phil, can't help but think you're looking good here.
Eduard 1/48 IL-2M Shturmovik
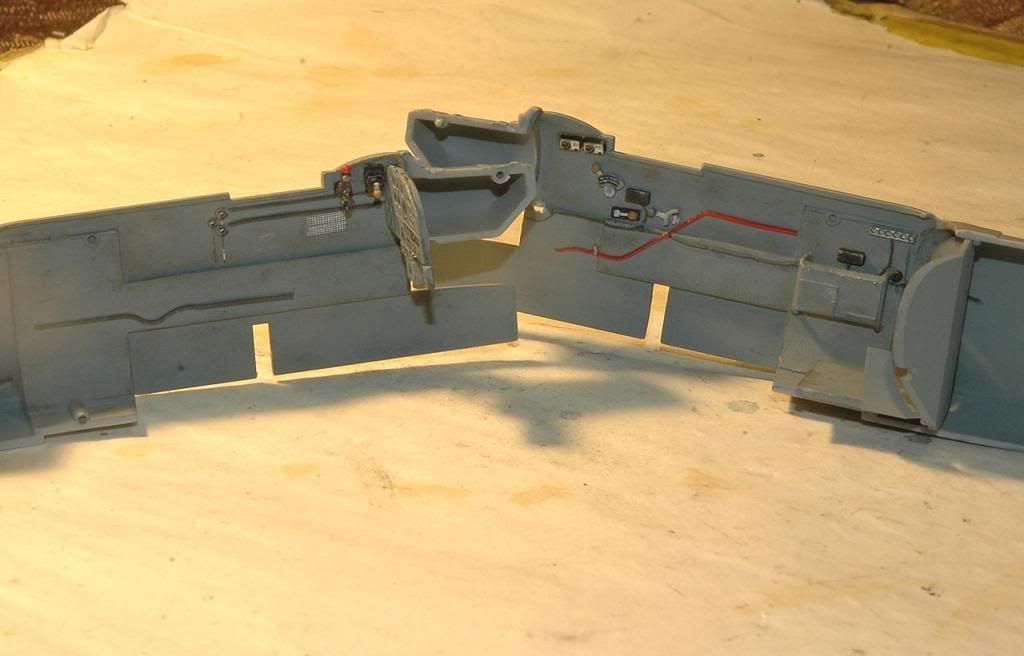
Changed the energy saver globe in my lamp - which again gave me yet another variation in colors!!! now too light :facepalm
anyways here's where I am after today
Instructions want you to glue the pit floor directly to the centre fuse/wing piece first, join the two fuse halves, then attach this to the floor and fuse/wing piece - at the same time threading the elevator rod (marked with red dots)thru various cutouts in the side panels - DUH!!!
You will need to add some extra flooring in the rear gunners department also - it's short leaving a large gap that can be easily seen
better fix - thread the elevator rod first thru the STB side panels and let hang there, dry fit the floor to the fuse/wing part, then with the fuse halves joined together with mask tape fit over the floor - you will get a horrible feeling as this crunches into place !!- hold the fuse halves firmly and remove - the floor stays inbetween - Ca glue the STB side only - let dry.
Then glue position the elevator rod to its locating hole the floor, it also attaches to the control column cross rod, let dry.
Then join the fuse halves together - this fits perfect to the fuse/wing piece without the worry of glue on both sides of the fuse halves getting all over the pit details, plus the hassle of threading that rod thru the various traps!.
Final pics of the pit area before closing up, I weathered it with thinned dry brushed Humbrol 32 dark grey and Humbrol 56 Aluminum, some thinned, some straight until I was happy with the result.

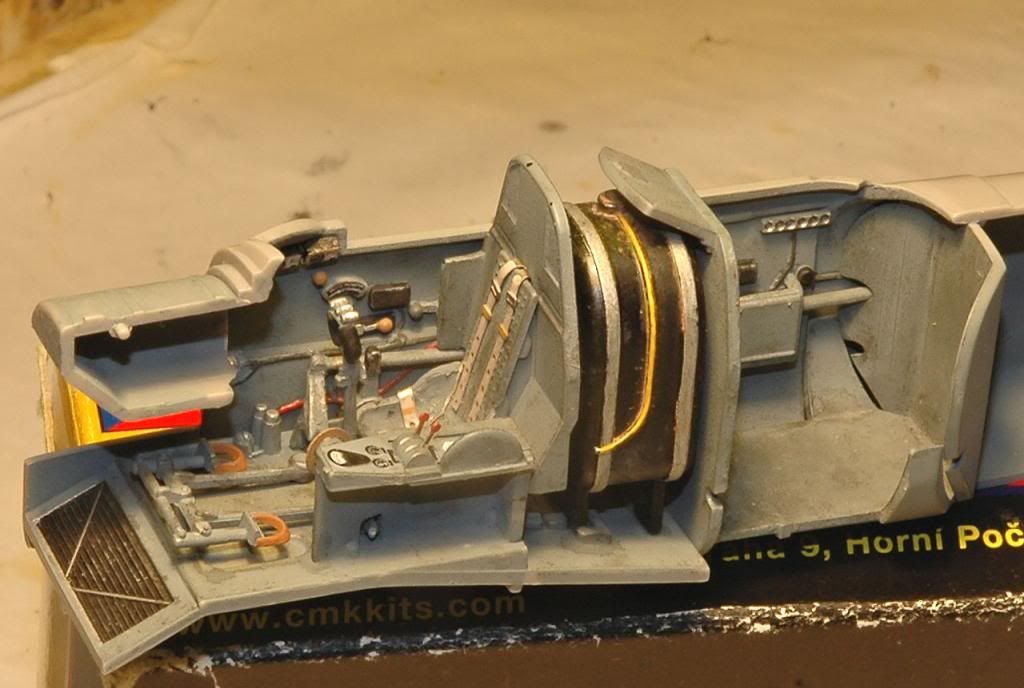
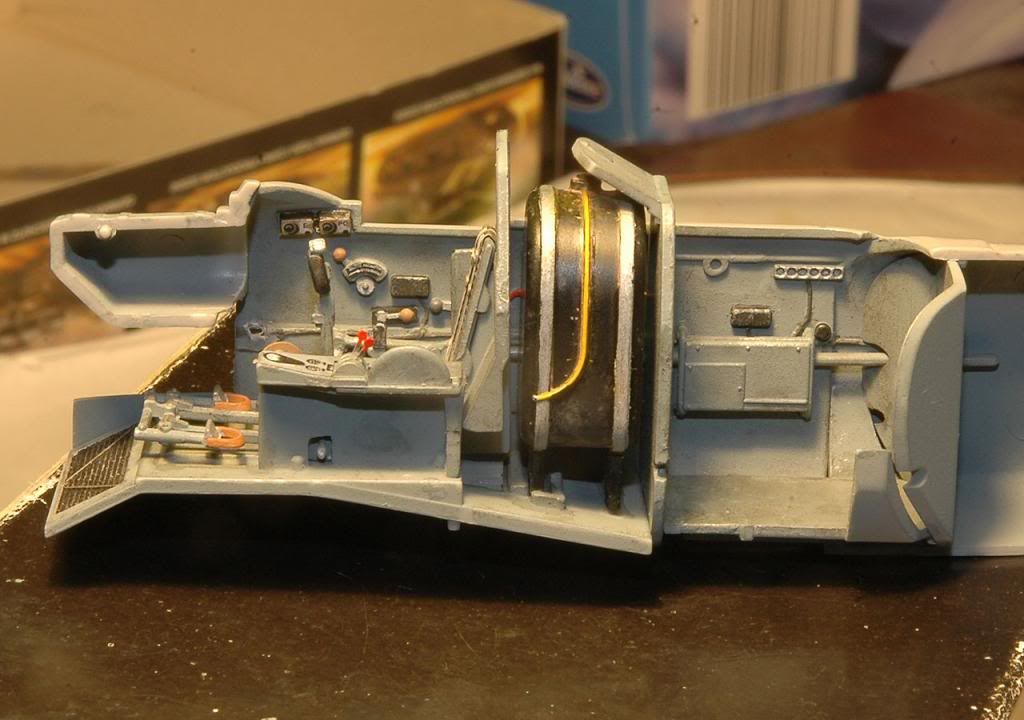
masks are still on the pilots bulkhead, and drilled the exhausts out and painted the up as they have to go in the nose parts before joining those up

will glue the fuse to the lower wing part tomorrow....... :yahoo:
Changed the energy saver globe in my lamp - which again gave me yet another variation in colors!!! now too light :facepalm
anyways here's where I am after today
Instructions want you to glue the pit floor directly to the centre fuse/wing piece first, join the two fuse halves, then attach this to the floor and fuse/wing piece - at the same time threading the elevator rod (marked with red dots)thru various cutouts in the side panels - DUH!!!
You will need to add some extra flooring in the rear gunners department also - it's short leaving a large gap that can be easily seen
better fix - thread the elevator rod first thru the STB side panels and let hang there, dry fit the floor to the fuse/wing part, then with the fuse halves joined together with mask tape fit over the floor - you will get a horrible feeling as this crunches into place !!- hold the fuse halves firmly and remove - the floor stays inbetween - Ca glue the STB side only - let dry.
Then glue position the elevator rod to its locating hole the floor, it also attaches to the control column cross rod, let dry.
Then join the fuse halves together - this fits perfect to the fuse/wing piece without the worry of glue on both sides of the fuse halves getting all over the pit details, plus the hassle of threading that rod thru the various traps!.
Final pics of the pit area before closing up, I weathered it with thinned dry brushed Humbrol 32 dark grey and Humbrol 56 Aluminum, some thinned, some straight until I was happy with the result.
masks are still on the pilots bulkhead, and drilled the exhausts out and painted the up as they have to go in the nose parts before joining those up
will glue the fuse to the lower wing part tomorrow....... :yahoo:
Eduard 1/48 IL-2M Shturmovik
Similar threads
- Replies
- 12
- Views
- 4K